
Basic 4ply Socks pattern and tutorial – easy beginner sock knitting!
This free basic sock pattern and tutorial shows you how to knit socks using 4ply yarn, with step-by-step instructions suitable for beginners. If you’ve always wanted to learn to knit socks, this is a great place to start.
Is this sock pattern right for you?
It’s written for:
- Beginner sock knitters
- Knitters who want a simple 4ply sock pattern
- Anyone looking for a reliable, well-tested beginner sock knitting method
Hello! Do you want to learn how to knit socks? You’re in the right place!
I’ve been teaching people all over the world how to knit socks for many years through my patterns and tutorials here at Winwick Mum, and thousands of knitters have used this pattern to make their first pair. I’d love to help you join them!
I originally wrote this post back in 2014 and after hearing from so many people who thought sock knitting was too difficult, I created the Winwick Mum Sockalong tutorials. These take you step by step through everything you need to know if you’ve never knitted socks before—from choosing yarn and needles, understanding sock anatomy, and getting the perfect fit, right through to knitting your first pair.
If you’re brand new to socks, I’d recommend starting with the Sockalong tutorials and downloading the free pattern by clicking the image below—you’ll be knitting with your choice of DPNs (double-pointed needles) or circular needles before you know it.
If you’re just looking for the
Winwick Mum Sockalong Basic 4ply Sock pattern,
click here to go straight to it
Or, if you’re not a beginner and just need a refresher, keep reading. This tutorial includes step-by-step photos using a short circular needle (my preference), and you’ll also find instructions for DPNs and magic loop in the full Sockalong tutorials, along with additional videos and help on the Winwick Mum Sockalong help page.
* * *
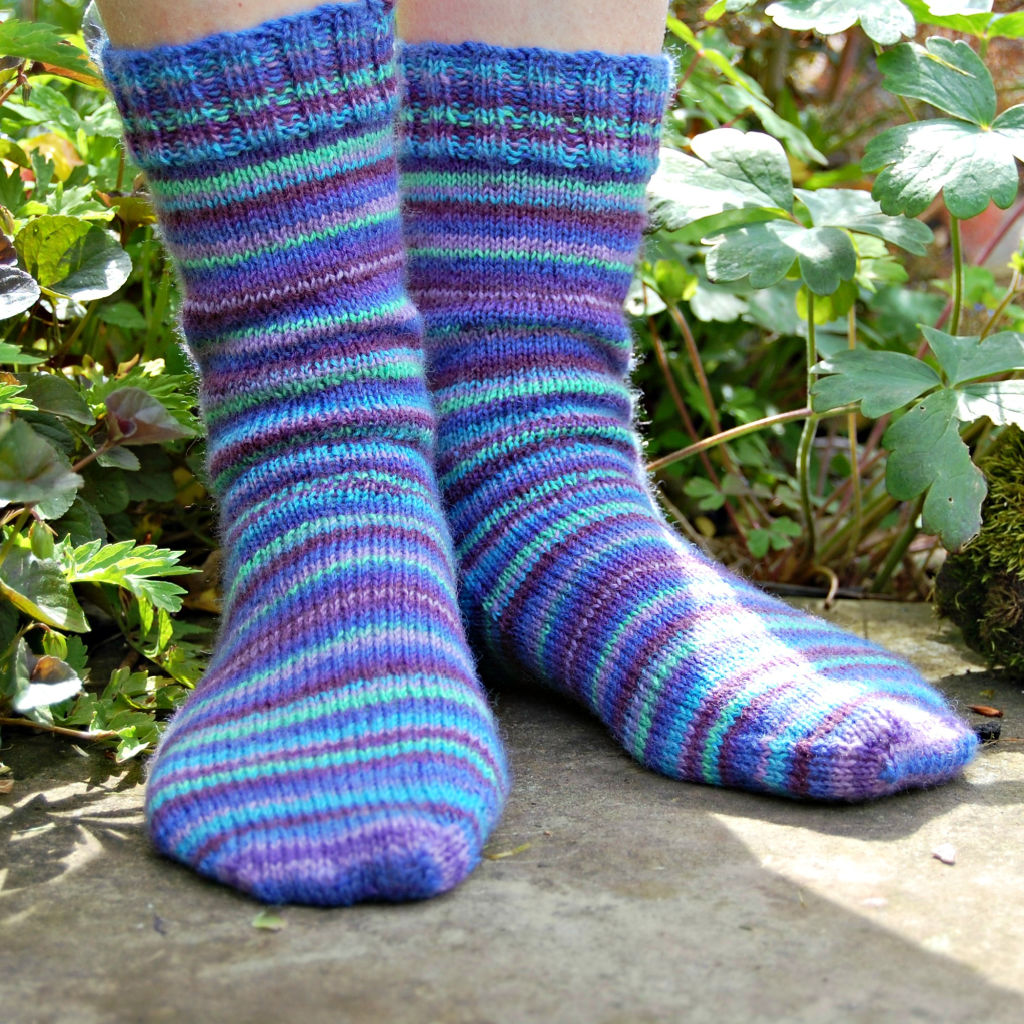
The idea of knitting socks can be quite daunting if you’ve not done it before. The whole thought of turning heels and grafting toes can be quite enough to put you off before you even pick up your needles – and I know this because that’s how I felt too! Now, of course, you know all about my love affair with socks … here’s my latest pair. I just love the colours in this yarn, definitely my favourite combination!
I knitted my first pair of socks for my beloved Uncle Harry when I was about 16 years old. My Aunt Ella had always knitted his socks for him and when she died, he asked whether I’d be able to make some for him as he didn’t want to have to buy any. What a performance! The pattern was quite awkward, involving sewing gussets and side seams, and I wasn’t sure they were anything like up to my Aunt Ella’s standard. I decided I would not be making any more socks.
Fast forward to when small daughter was a baby. I was in a local yarn store buying wool for yet another baby cardigan when I spotted balls of multi-coloured yarn on the counter, along with leaflets showing knitted socks.
“They’re new in,” said the lady, noticing my interest. “They make lovely socks.”
“Oh, I made a pair of socks a long time ago,” I told her, shuddering at the memory. “I’m not sure I could face another pair.”
“This is a good pattern,” she said, “and you get it free with the yarn.”
Ker-ching! I left the shop with baby yarn and multi-coloured yarn to make my husband a pair of socks. And this time round, the pattern was much more straight-forward. No sewing up and a heel that magically created itself thanks to some nifty decreasing. I was hooked!
A couple of pairs later, I just happened to search for sock yarn on the internet. WOW!! I had no idea there was so much sock yarn available, that so many people knitted socks, there were so many fabulous patterns out there – or that there would be so much help. I joined a knitting forum, discovered Ravelry and the couple of pairs of socks turned into something of an obsession. Now, it seems incredible to think that I ever thought there was anything difficult about knitting socks, but anything new takes some thinking about and certainly anything new that involves four or five double-pointed needles and 4ply yarn!
I know there are many sock patterns and tutorials on the internet aimed at beginners, but sometimes you just need one basic pattern that you can use to get started, increase your confidence and then adapt to suit your own feet. I’d like to share mine with you – not the free one I originally got but an amalgamation of a few versions, altered over many pairs to get it just the way that I like to wear my socks, and still being adapted to suit other members of the family.
This pattern is now the basis of the Winwick Mum Sockalong tutorials and you can find detailed instructions with lots of pictures here.

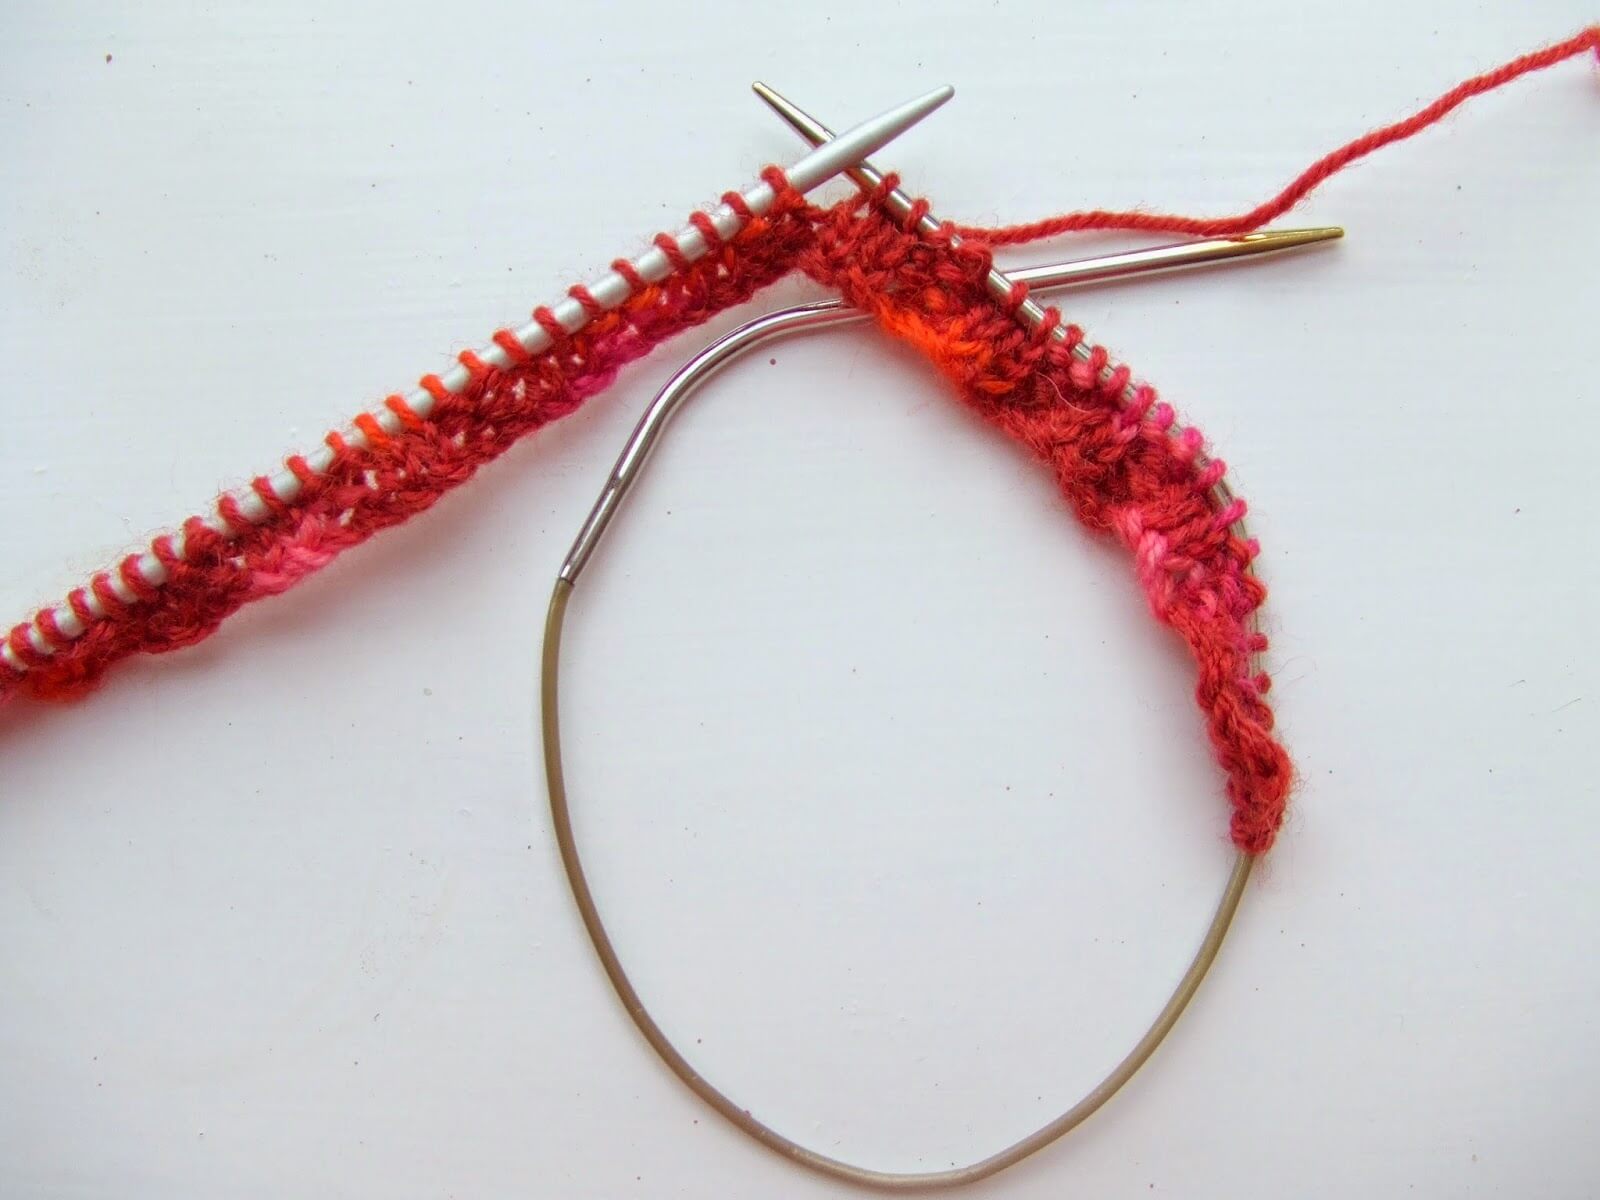
Now, before we get started, a quick word about needles. I use both double-pointed needles (DPNs) and a small circular. Mine’s a 30cm Addi but Hiya Hiya also make them although in a 23cm length and you can find smaller lengths and other brands too. It’s simply a matter of preference as to which one you’d choose. (More info here and here) I always cast on using my DPNs as trying to cast on with a tiny circular is a disaster – it just doesn’t work for me with the cast on that I use.
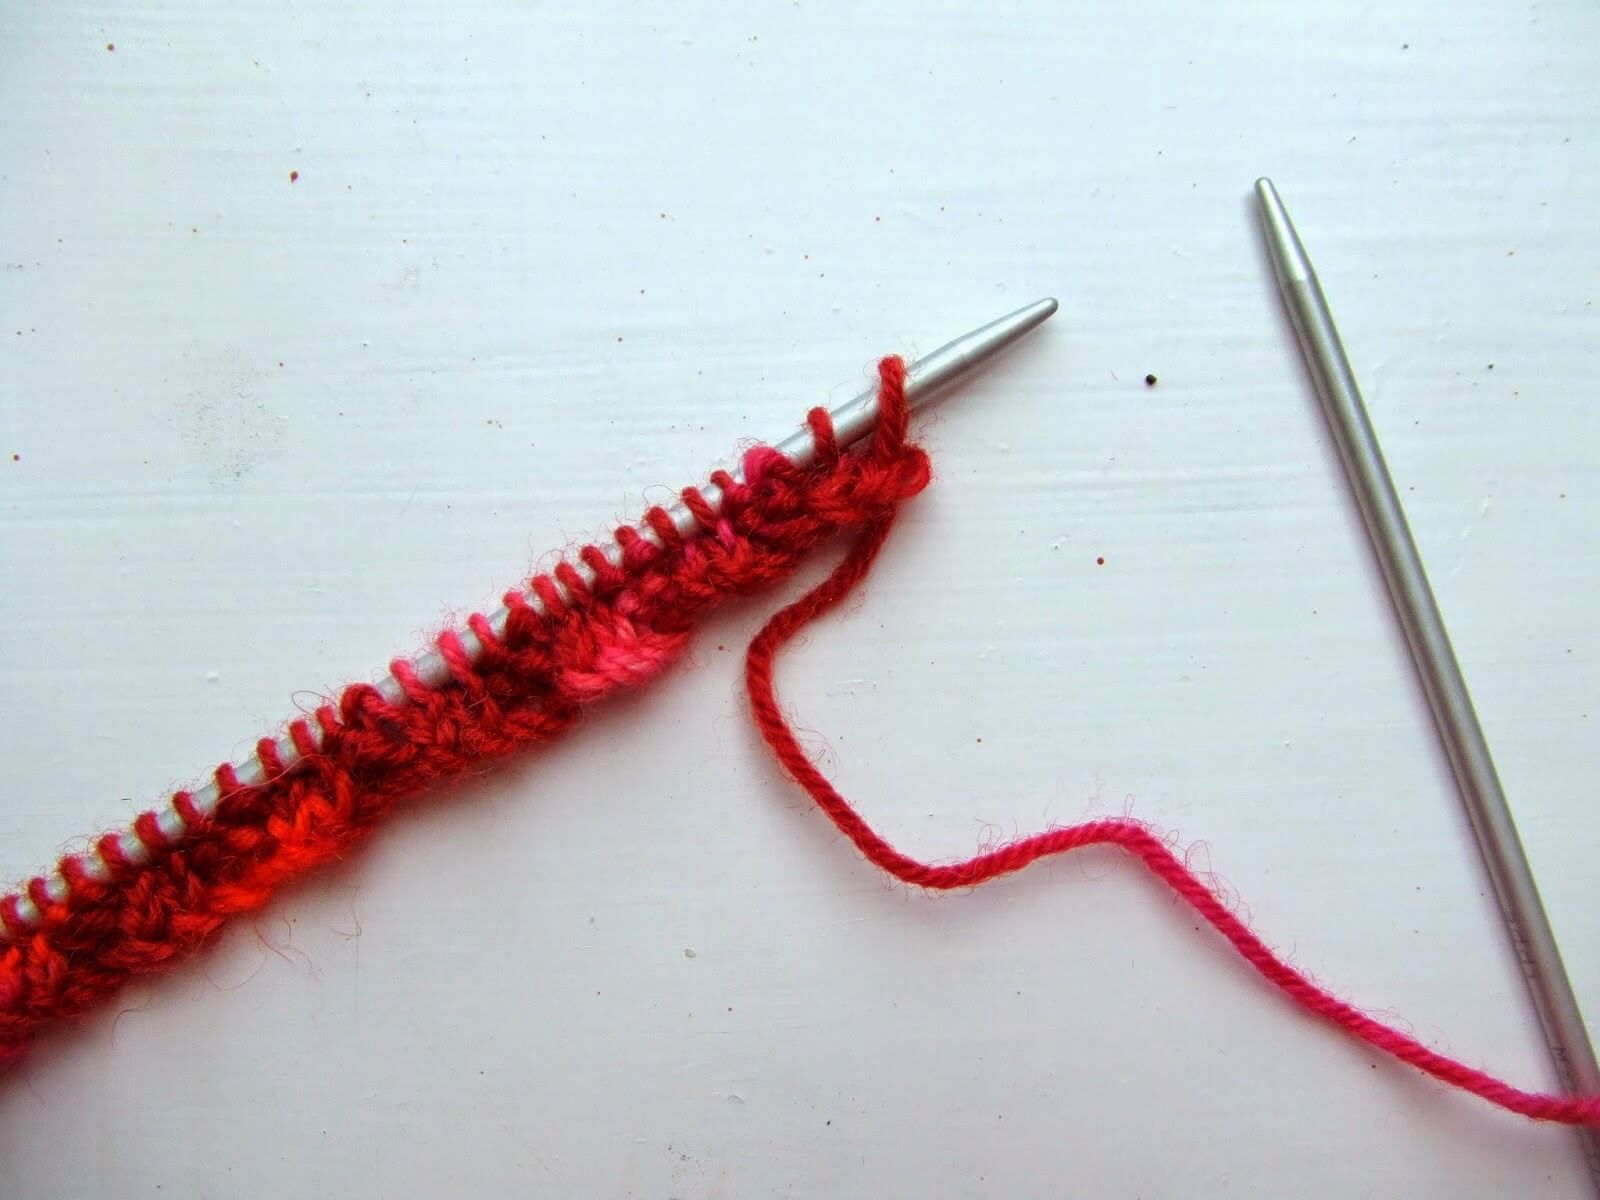
Then, after a couple of rows of rib, I transfer my stitches to my circular and off I go. I find it so much easier than knitting a whole sock on 5 needles and you don’t get join lines down the socks either. Some people like the magic loop method using a longer circular and I have used that, particularly for knitting two socks at a time, but it’s not my favourite method.
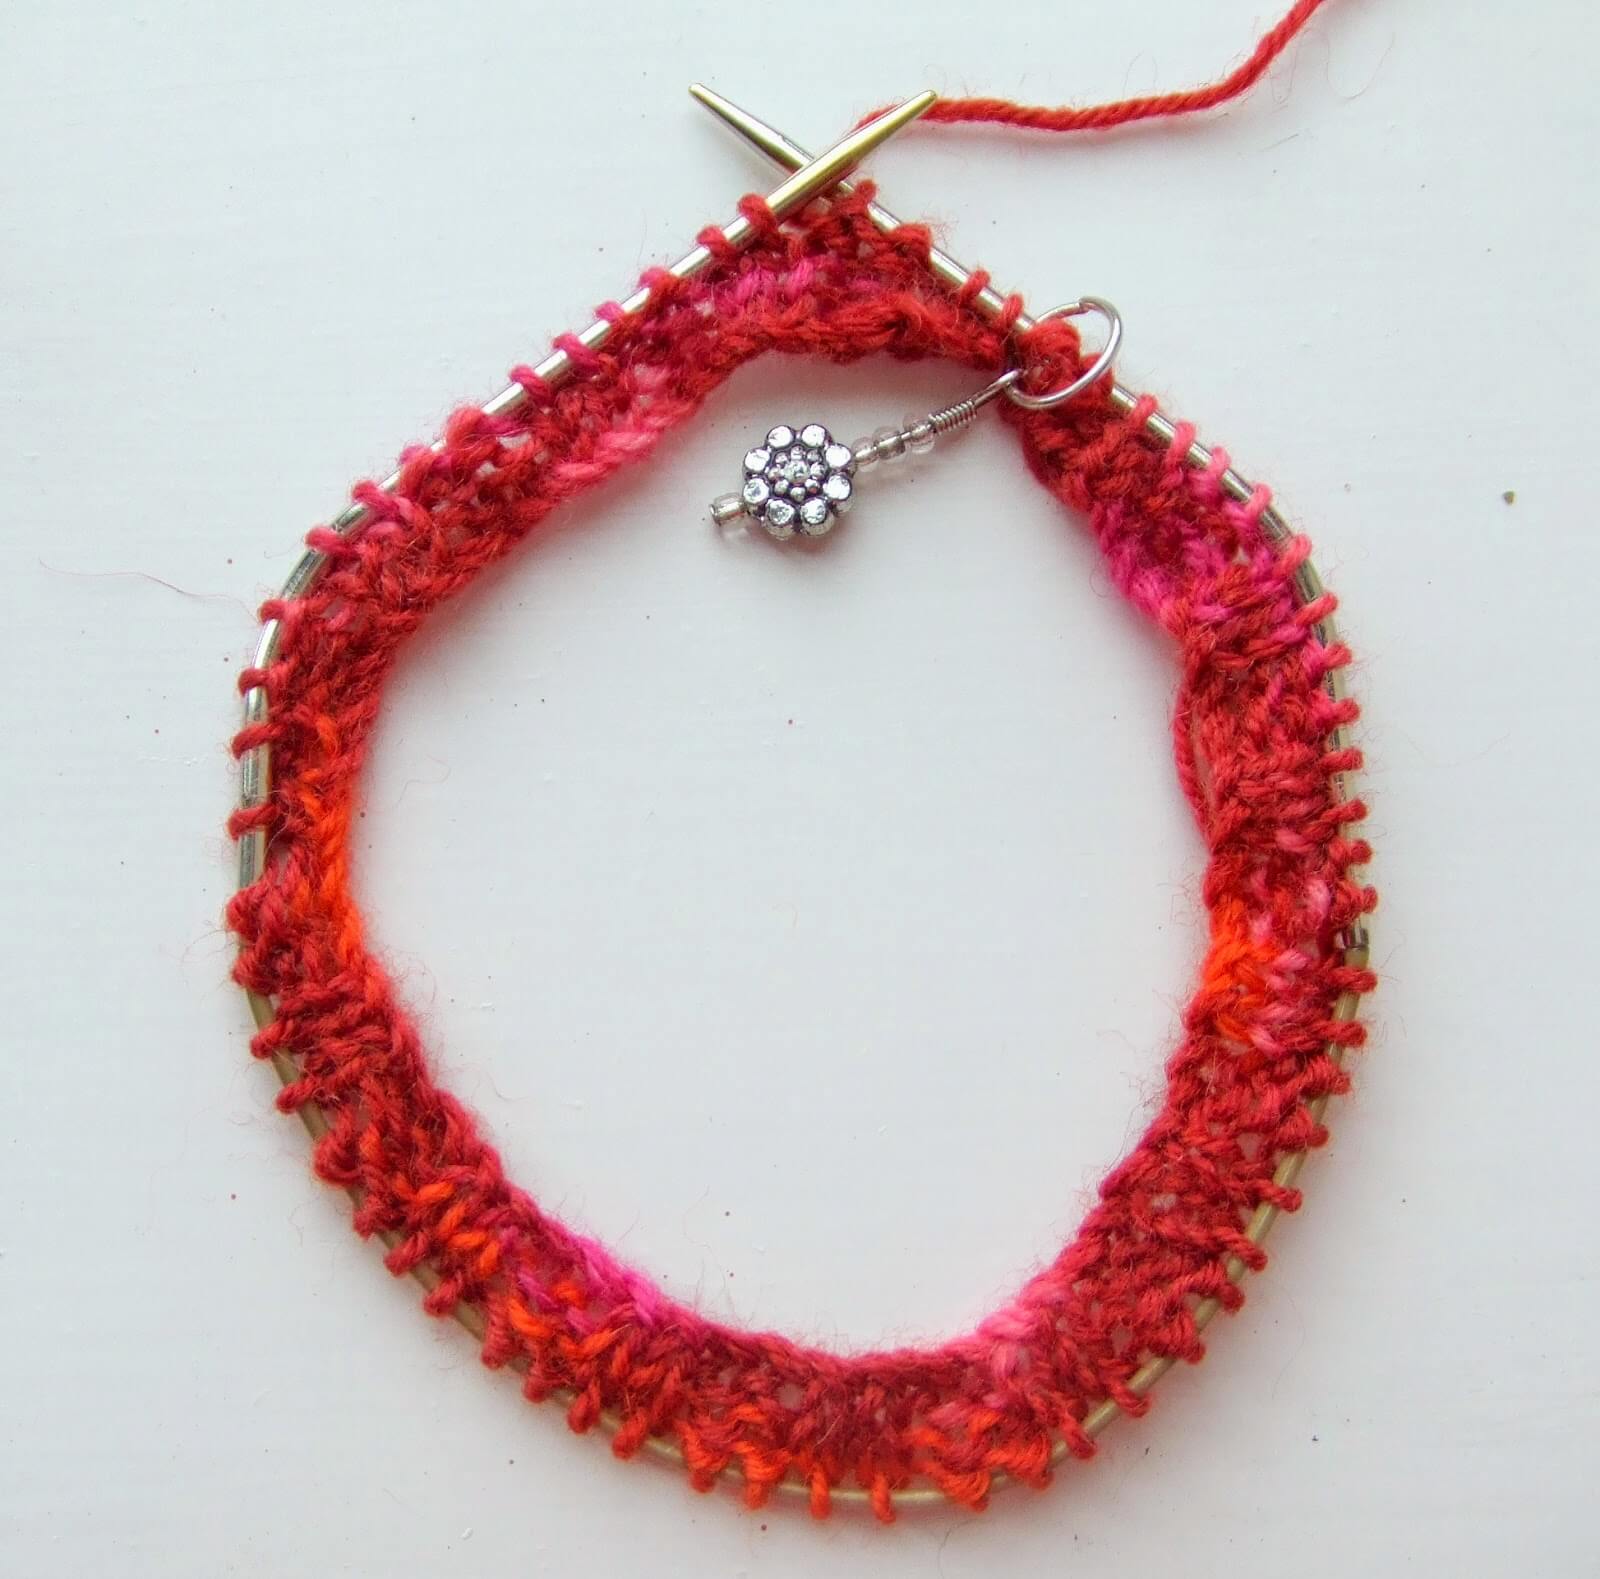
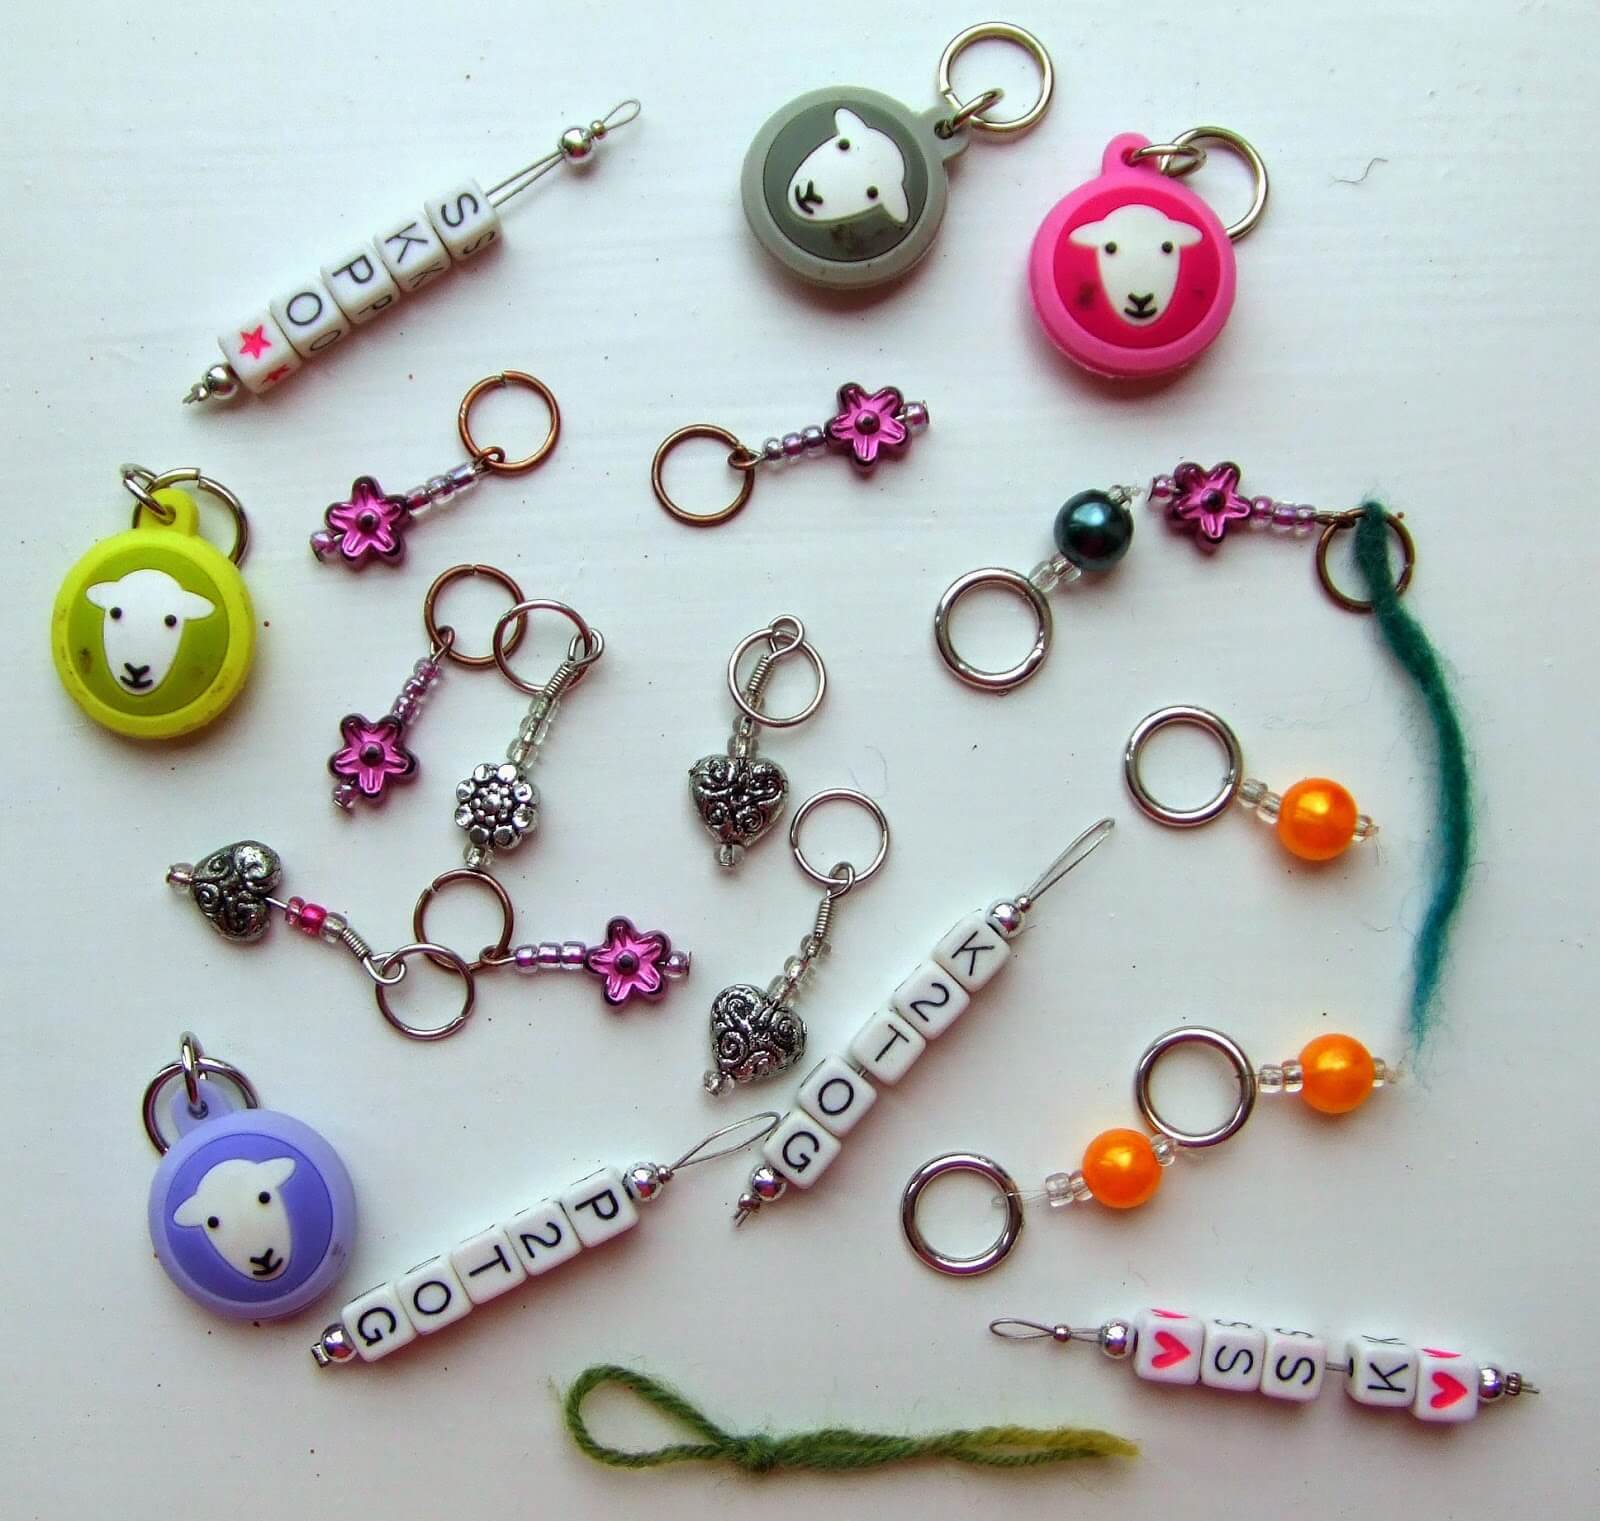
Another thing that you’ll need for knitting socks is stitch markers. Apart from my lovely Herdyones, mine were all free gifts from magazines but you can buy them from yarn stores, online or you can simply make your own from a knotted piece of yarn. All a stitch marker needs to do is show you where your round starts and finishes, and the start and finish of any pattern section you may have so they can be as fancy or plain as you like. (More info on accessories here)
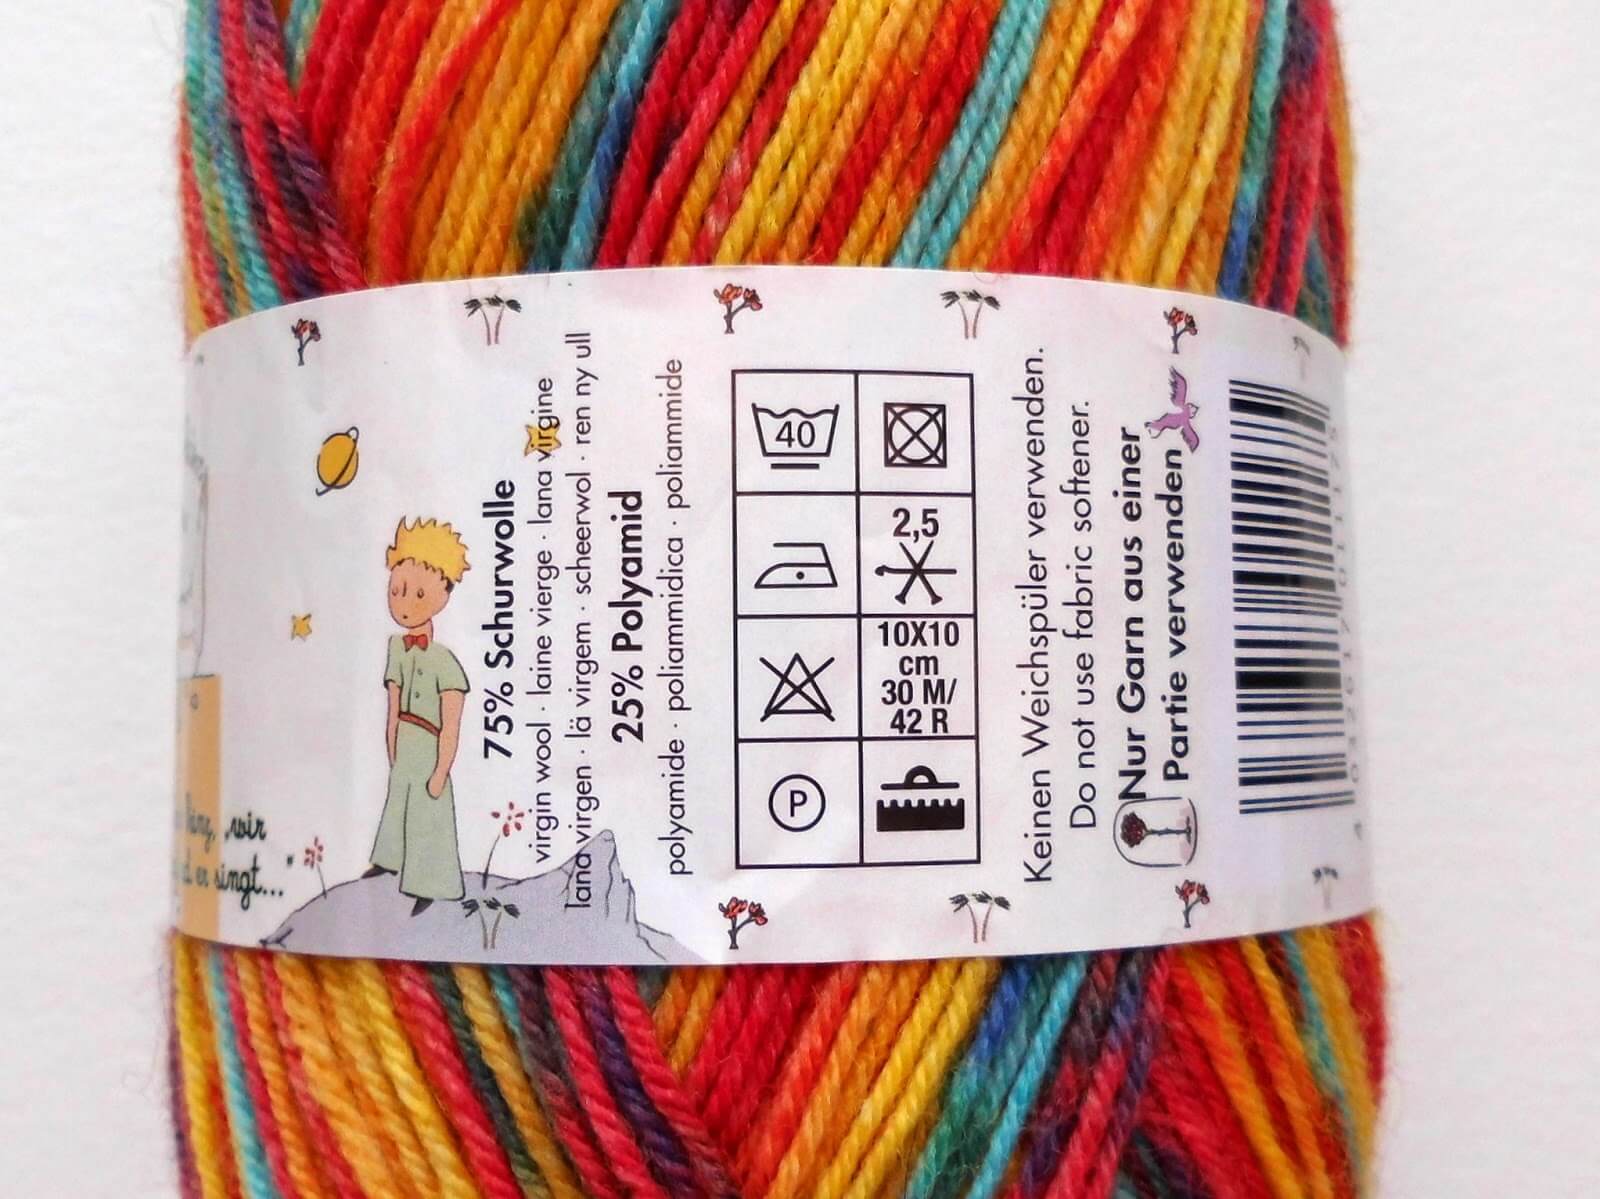
What else? Oh yes, yarn! It’s best to use yarn that’s specifically for knitting socks because it will usually have a proportion of nylon in the yarn which helps to hold the socks’ shape and make them more hard-wearing. Some of the gorgeous hand-dyed skeins that you can buy don’t have any nylon in their content but that doesn’t mean you can’t use it, just that your socks might wear out a bit sooner, especially if they get a lot of use. Most sock yarn is 4ply but you can also buy 6ply, 8ply (and thicker) which is great for boot socks. (You can find out more about suitable yarns here)
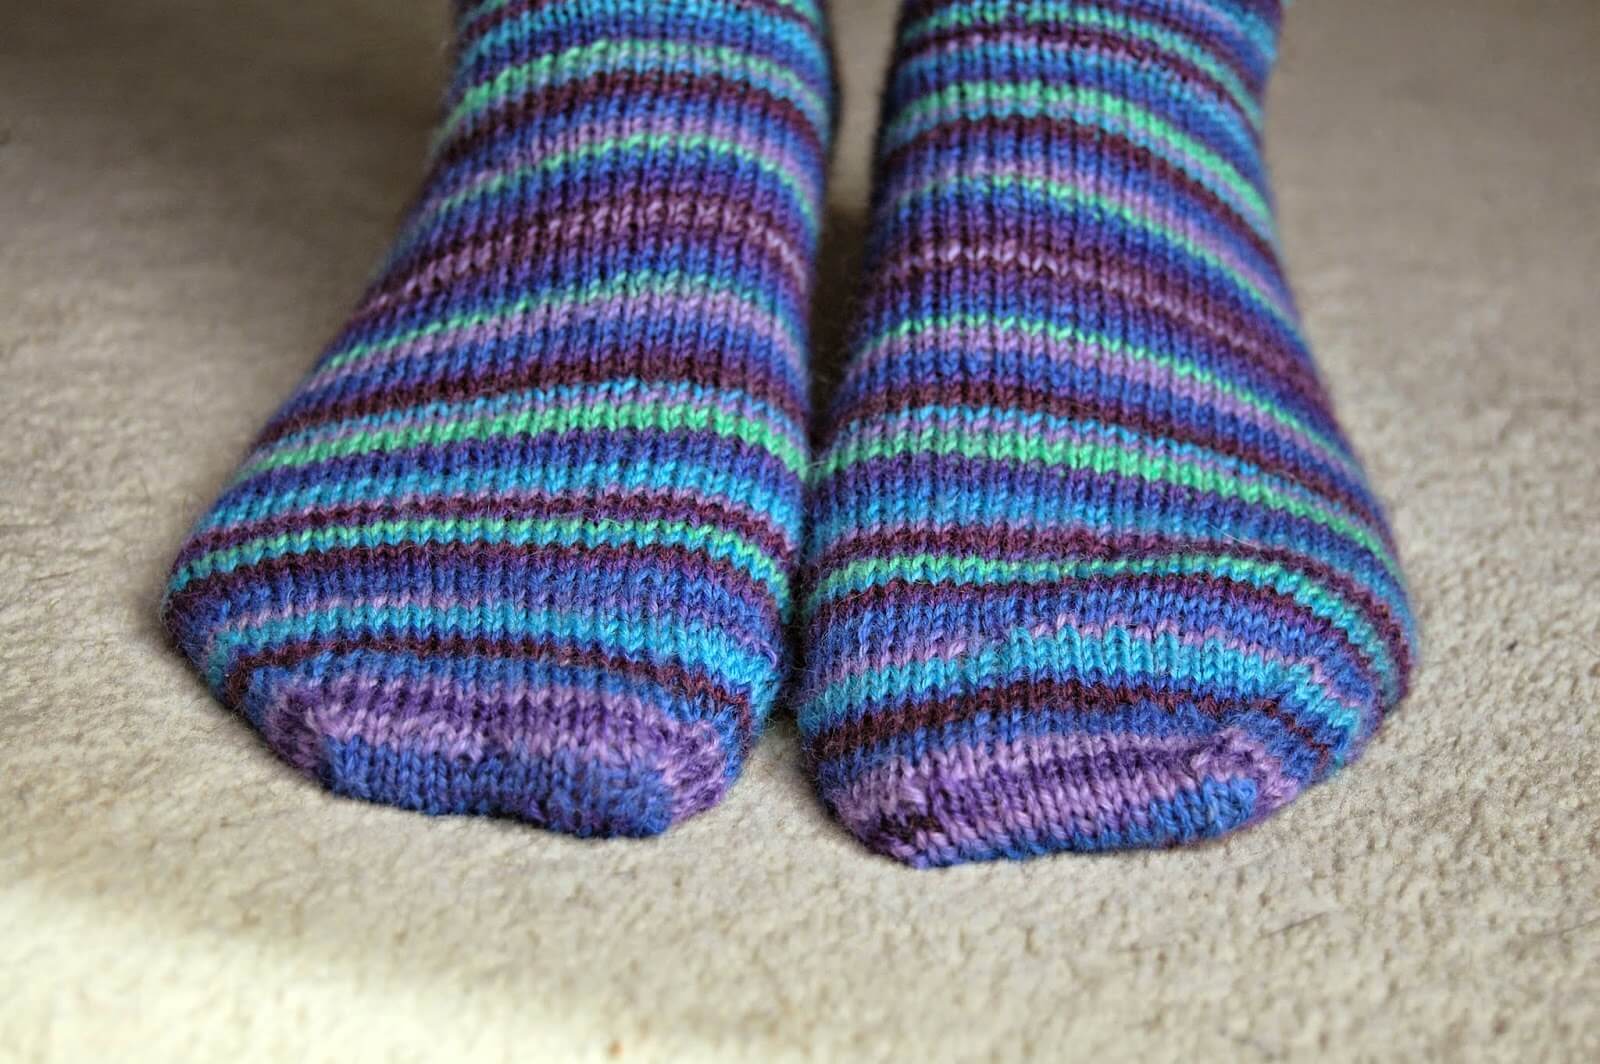
Just in case you’re interested, my new stripy socks are knitted in Regia Design Line “Random Stripe” shade 02904 Delphinium and the red socks for illustrating this tutorial are knitted in Regia Galaxy shade 1559 Jupiter Red (2021 edit – both now discontinued).
Basic 4ply Socks pattern
– you can download a free PDF copy of the sock pattern here
This is the pattern that’s being used for the Winwick Mum Sockalong. You can find more detailed step-by-step tutorials for knitting this sock here and you can join the accompanying Facebook group for help, support and showing off socks here and our knit n natter group here.
A quick word about gauge before you get started – most people prefer to skip quickly across the recommendations for gauge and tension but in the case of socks, knowing your gauge is really helpful – not least because it can help you to re-size your socks for any foot. The standard gauge for 4ply yarn is 30 sts per 4 inch (10cm) on whatever needles gives you that gauge – for most people, that is 2.5mm needles but it’s always worth checking just in case you knit tighter or looser than that.
How to adjust the size for this pattern
There is only one size given for this pattern but you can use this as a guide for any other size. Hand knitted socks are measured by width and not length, which is easily adjusted, so to get the perfect fit for the person you are knitting for, it is best to measure their feet first and use the Sock Stitch Calculation to find out the right number to cast on. It’s very easy to do, and once you have the numbers, you can use them for any pair of socks in the same weight of yarn.
For help checking your gauge in the round (different to gauge worked flat) and how to re-size the pattern for any foot, click here. There’s a useful video to help here.
Materials
2.5mm needles – Short circular, DPNs or magic loop
1 x 100g ball of 4ply sock yarn (or 2 x 50g depending on brand)
1 pair DPNs size 3.0mm
1pair DPNs size 2.5mm
stitch markers
tapestry needle
Note: I cast on using DPNs then change to my circular needle – it’s not easy to cast on using the circular as it’s too small. If you want to use magic loop you will be able to cast on with the larger circular needle. If you use DPNs, you might find it easiest to cast on and work 2 rows before dividing the stitches across the needles.
To adjust the size for this sock, just add or remove stitches in blocks of 4 from the cast on total. For example, if knitting a man’s sock I would cast on 64 or 68 stitches. Remember that you will need to make adjustments when turning the heel if you use extra stitches. There’s a calculation for working out the number of stitches you need as mentioned above in the tension section here.
Pattern
Cast on 60 stitches using 3.0mm needle. Need help with casting on? Click here!
Row 1: K2, P2, repeat to end, turn
Row 2: K2, P2, repeat to end, turn
Change to 2.5mm needles. At this point, change to a short circular, magic loop or divide the stitches across DPNs and join into a circle, place marker.
Continue in K2, P2 rib for 14 more rounds or until desired length of rib (I knit 16 rounds of rib).
Continue to knit each round until desired length before start of heel (for me, this is about 75 rounds in total including the rib).
Heel flap
Change to 2.5mm DPNs. You are going to create the heel flap from half the number of stitches that you cast on, so if you have cast on more or less than 60 stitches, remember to adjust the number of stitches when you start the heel flap. Need help with the heel flap? Click here!
Row 1: K2, (Sl1, K1) until you have 30 stitches on your needle, turn.
Row 2: Sl1, P to end, turn.
Row 3: Sl1, (K1, Sl1) to end, turn.
At this point, I usually tuck the ends of my circular needle down inside my sock so that it doesn’t get in the way. If you are using DPNs for the entire sock, you may prefer to put the spare stitches onto a stitch holder whilst you work the heel.

Repeat rows 2 and 3 until heel measures approximately 2 inches, finishing on row 3 (approx 35 rows) . If you want to make the heel flap longer, continuing knitting rows 2 and 3 until you reach the desired length, but remember that you will need to pick up more stitches to create the gusset.
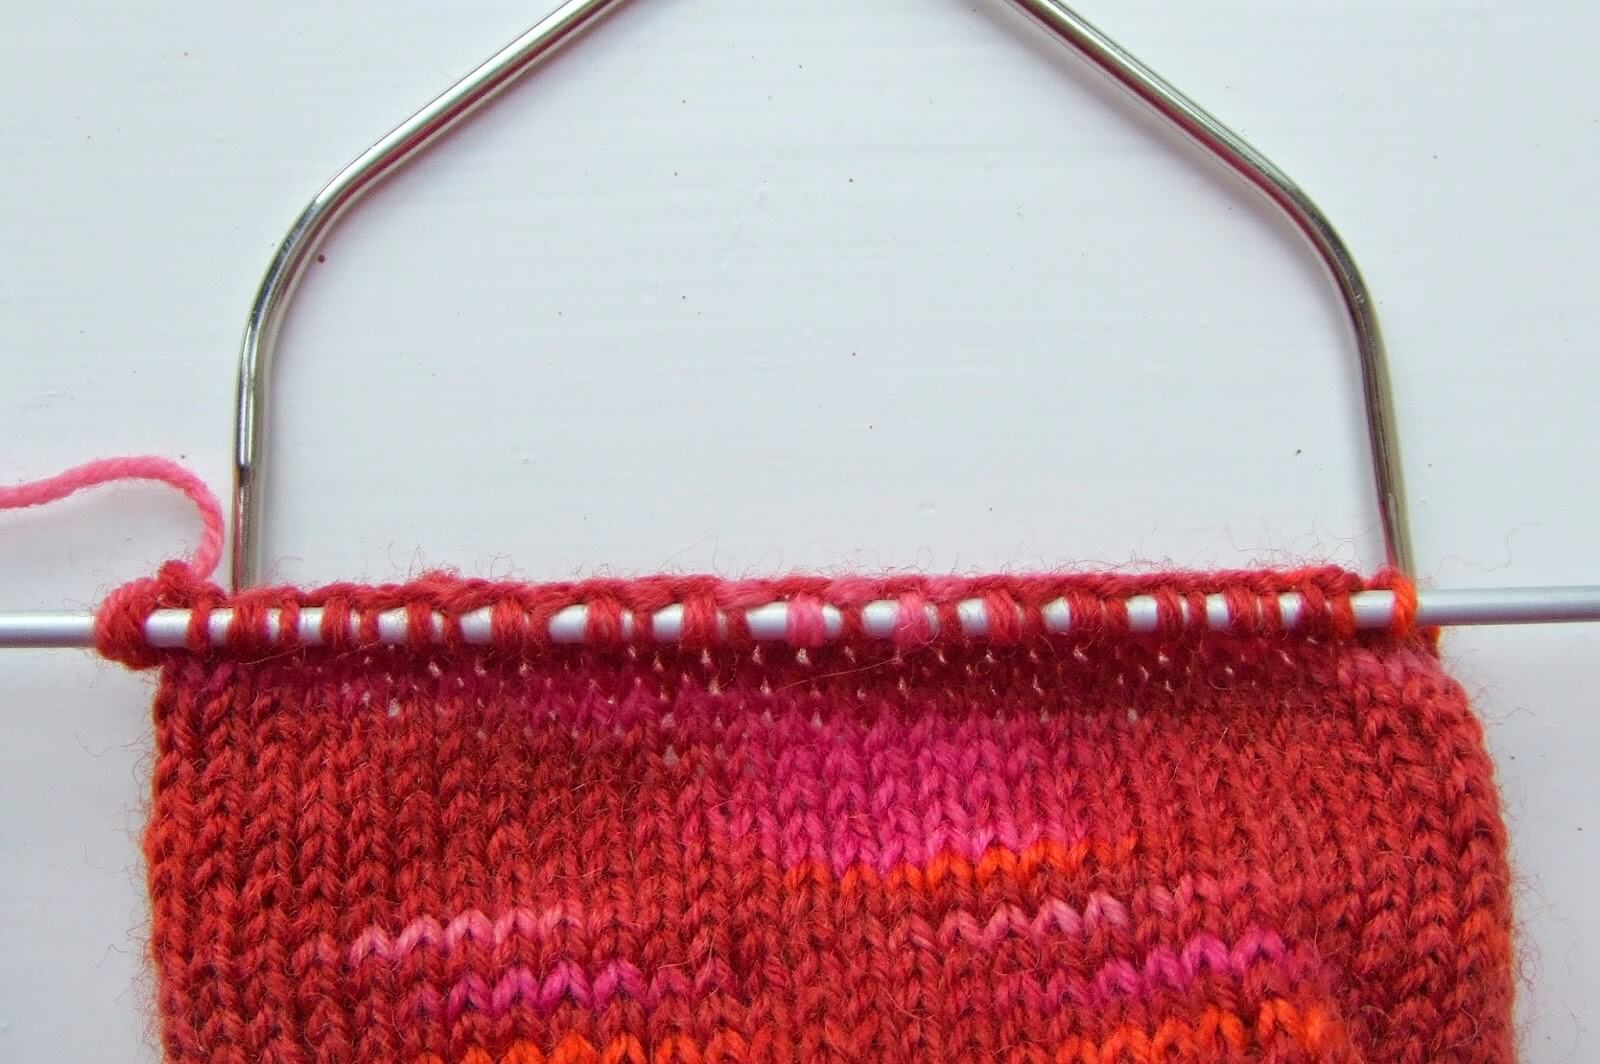
This is what the heel flap looks like when it’s finished. Slipping every other stitch gives a raised texture that is thicker than just knit and purl which is ideal for a sock heel.
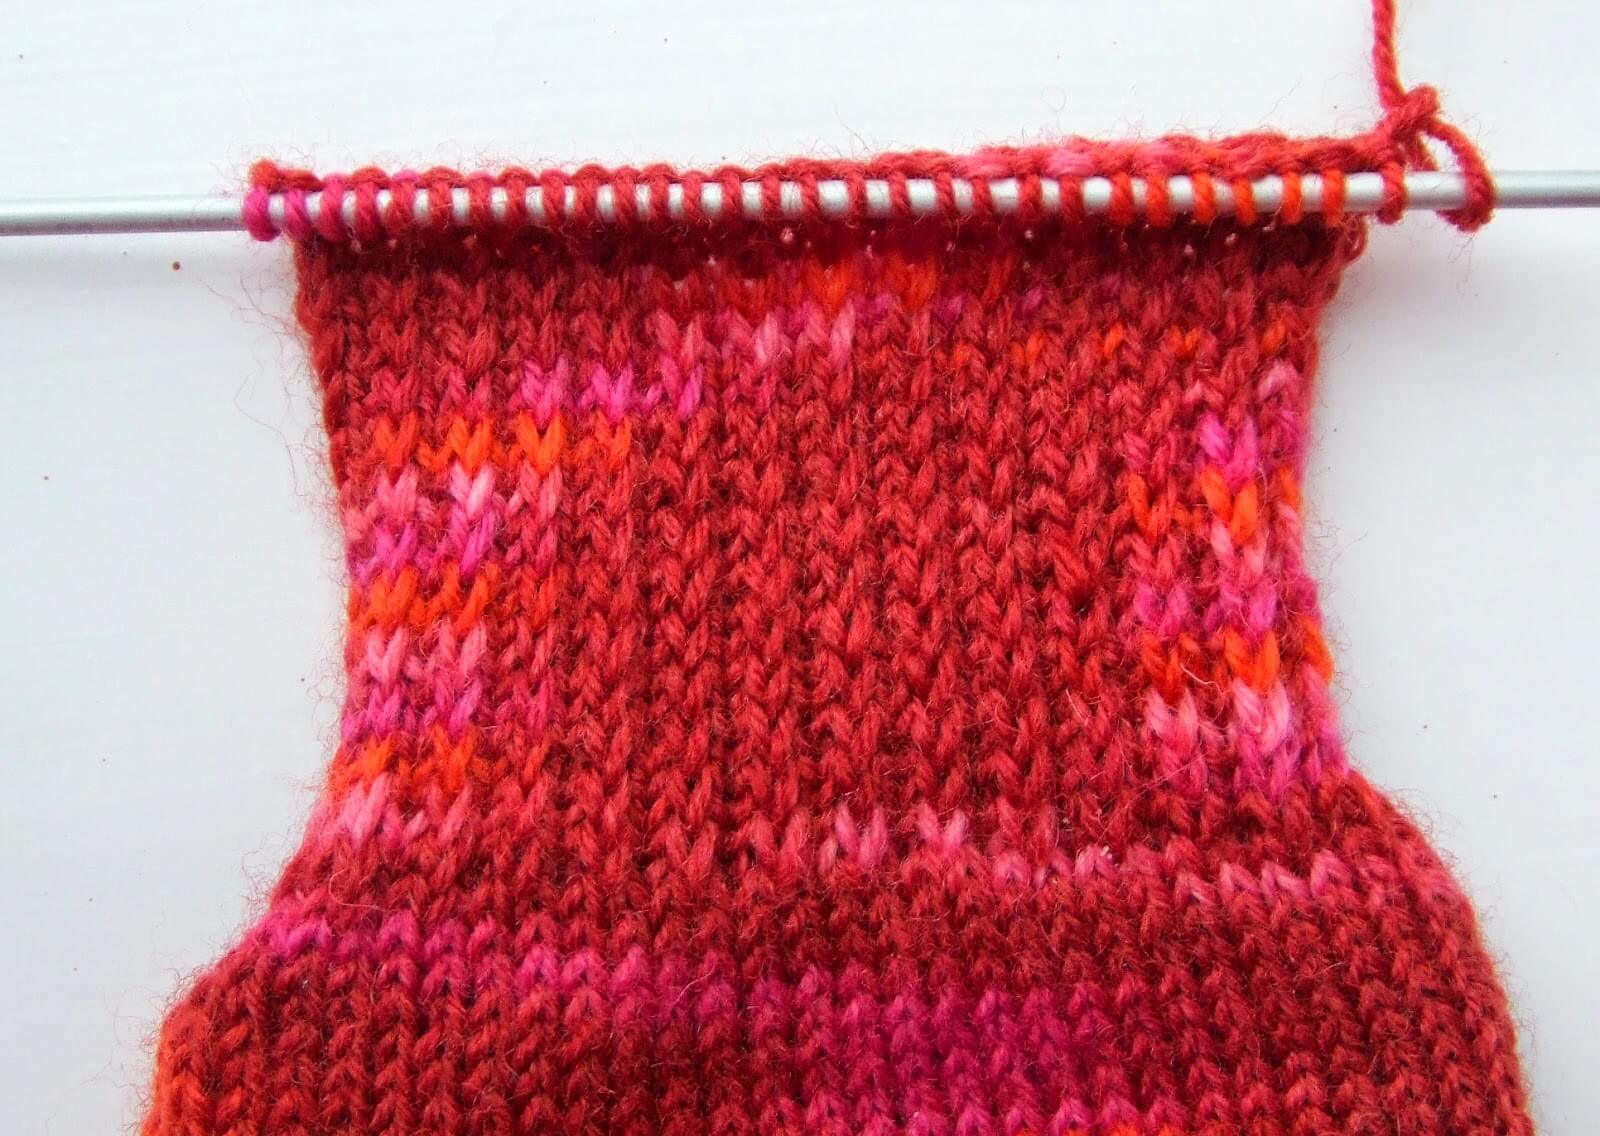
This is what it looks like on the purl (wrong) side.
Turn heel
Now, this is the fun part and the one that puts a lot of people off, but it’s quite easy as long as you take it slowly. Need help turning the heel? Click here!
*For a larger or smaller sock, you will need to alter the number of purl stitches in the first row of the heel (marked in bold below), increasing by 1 stitch for each block of 4 stitches extra that you cast on, or decreasing by 1 stitch for each block of 4 stitches less than 60 stitches. For example, if you cast on 64 stitches, your first row would be Sl1, P17, P2tog, P1, turn*
Row 1: Sl1, P16, P2tog, P1, turn
Row 2: Sl1, K5, SSK, K1, turn
Row 3: Sl1, P6, P2tog, P1, turn
Row 4: Sl1, K7, SSK, K1, turn
Continue in this way, adding one stitch between slip stitch and SSK or P2tog on each row until all of the heel stitches are used (ie, Row 5: Sl1, P8, P2tog, P1; Row 6: Sl1, K9, SSK, K1, etc) until all of the heel stitches are used. Depending on how many stitches are in your heel flap, you may find that the K1 and P1 stitch is not required at the end of the last two rows.
As you work these rows, you’ll notice that there’s a gap between the end of your knit or purl stitches in the middle and the remaining stitches to be worked into the heel. This will help you to work out where you’re up to.
When you work the SSK or P2tog stitches at the end of each row, you take one stitch from each side of the gap and that’s what pulls the heel round into the right shape.
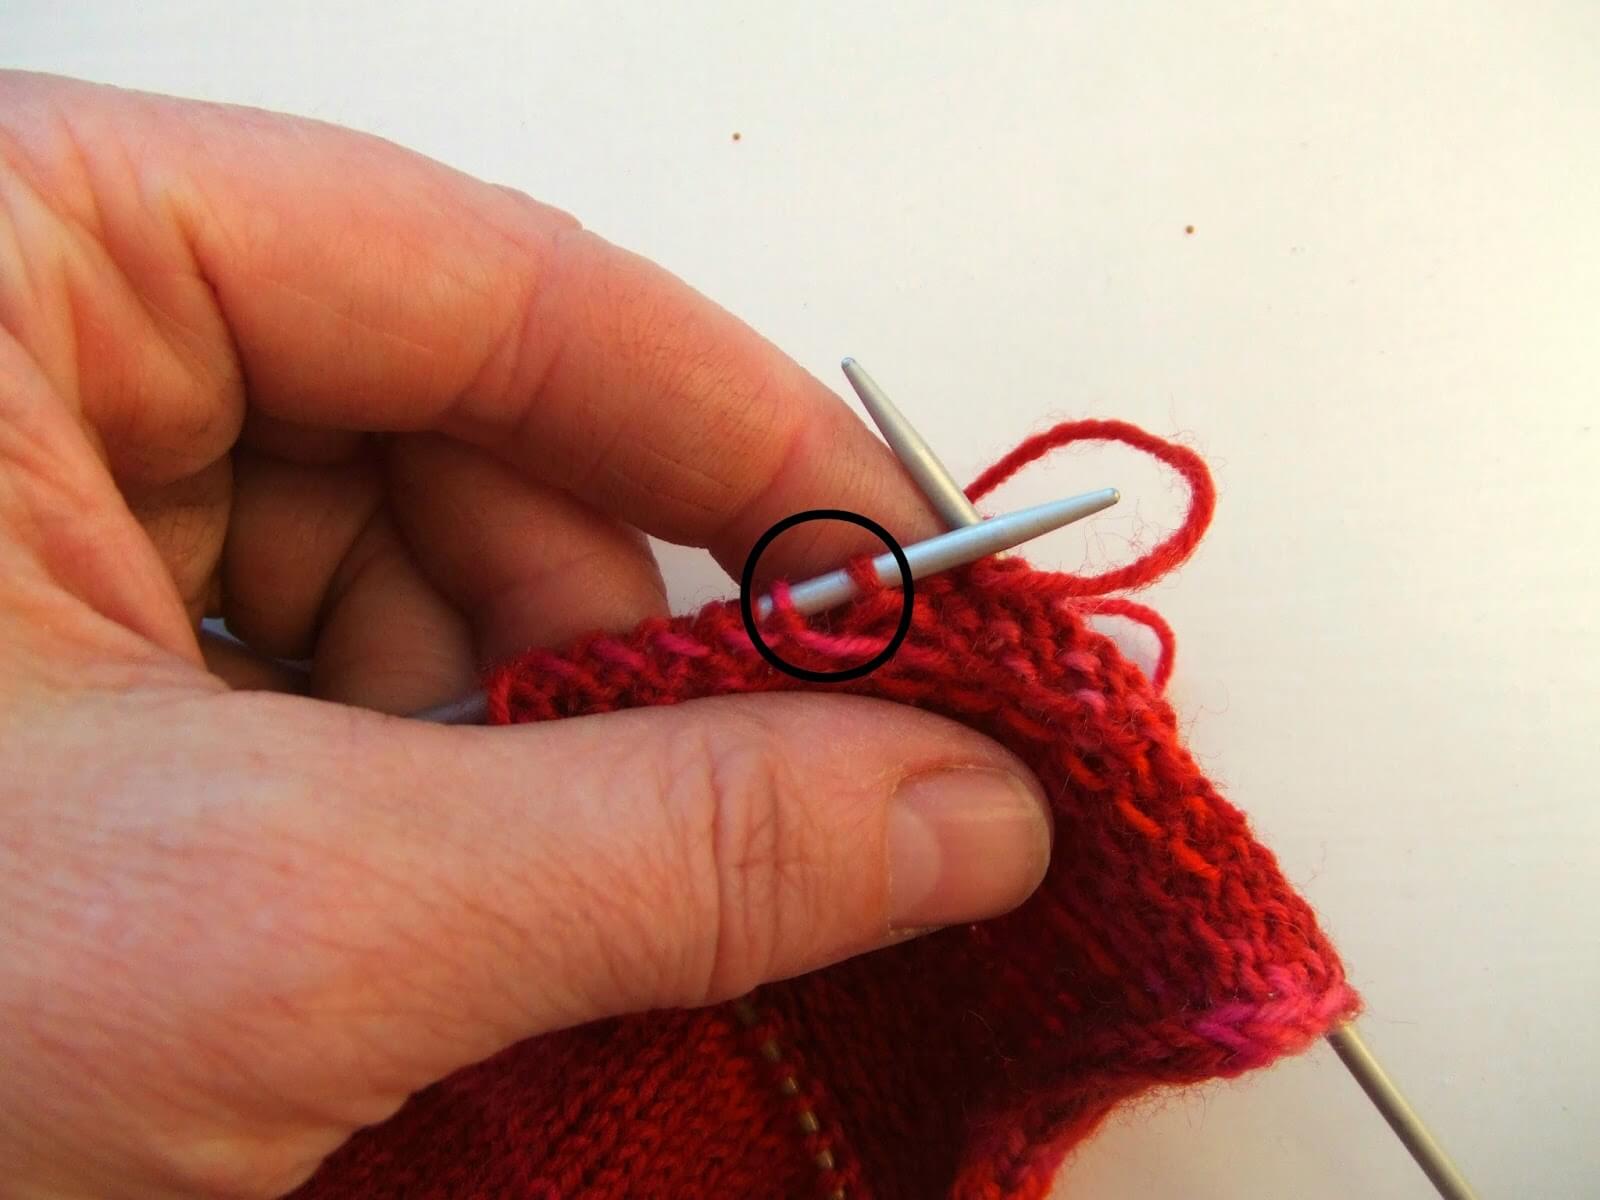
This picture illustrates the SSK stitch – slip the first stitch as if to knit, the second stitch as if to purl, slip them both back onto the left hand needle and knit through the back of the stitches. This gives you a much neater decrease stitch than K2tog.
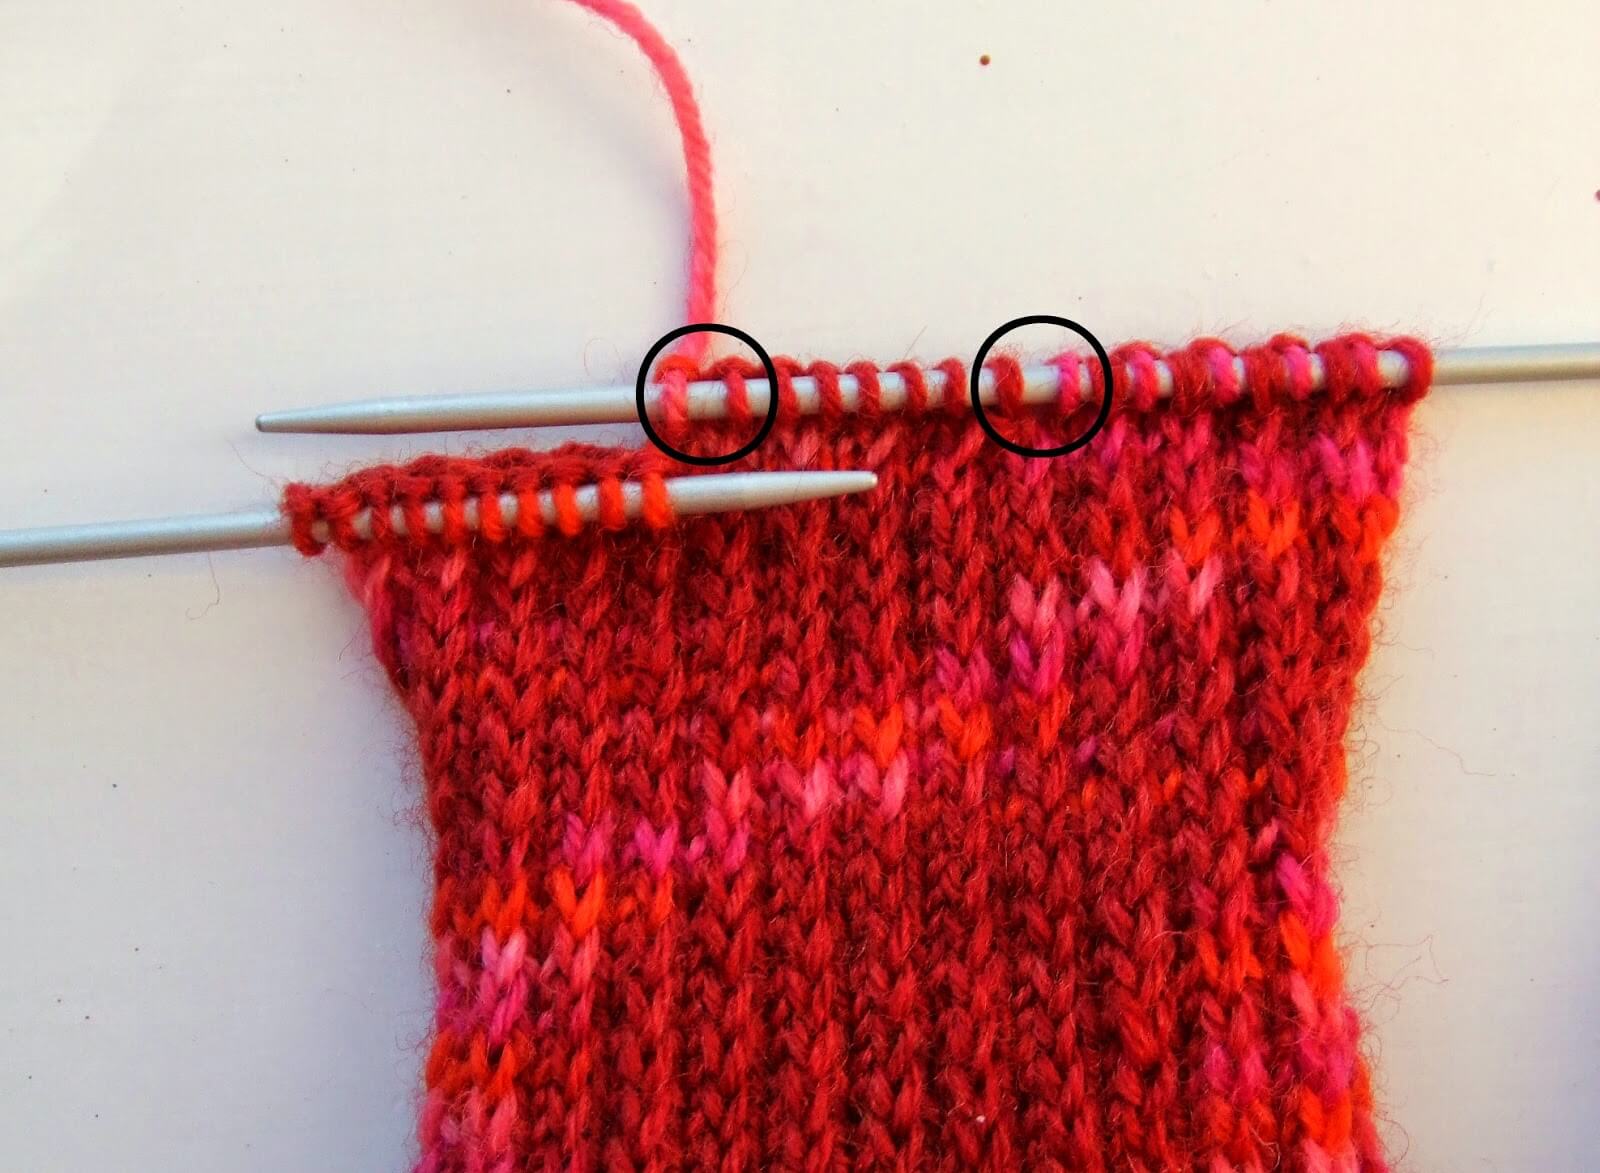
This is what the SSK looks like on the right side of the sock …
and this is what the P2tog looks like. It gives a nice neat finish to your heel with no gappy holes.
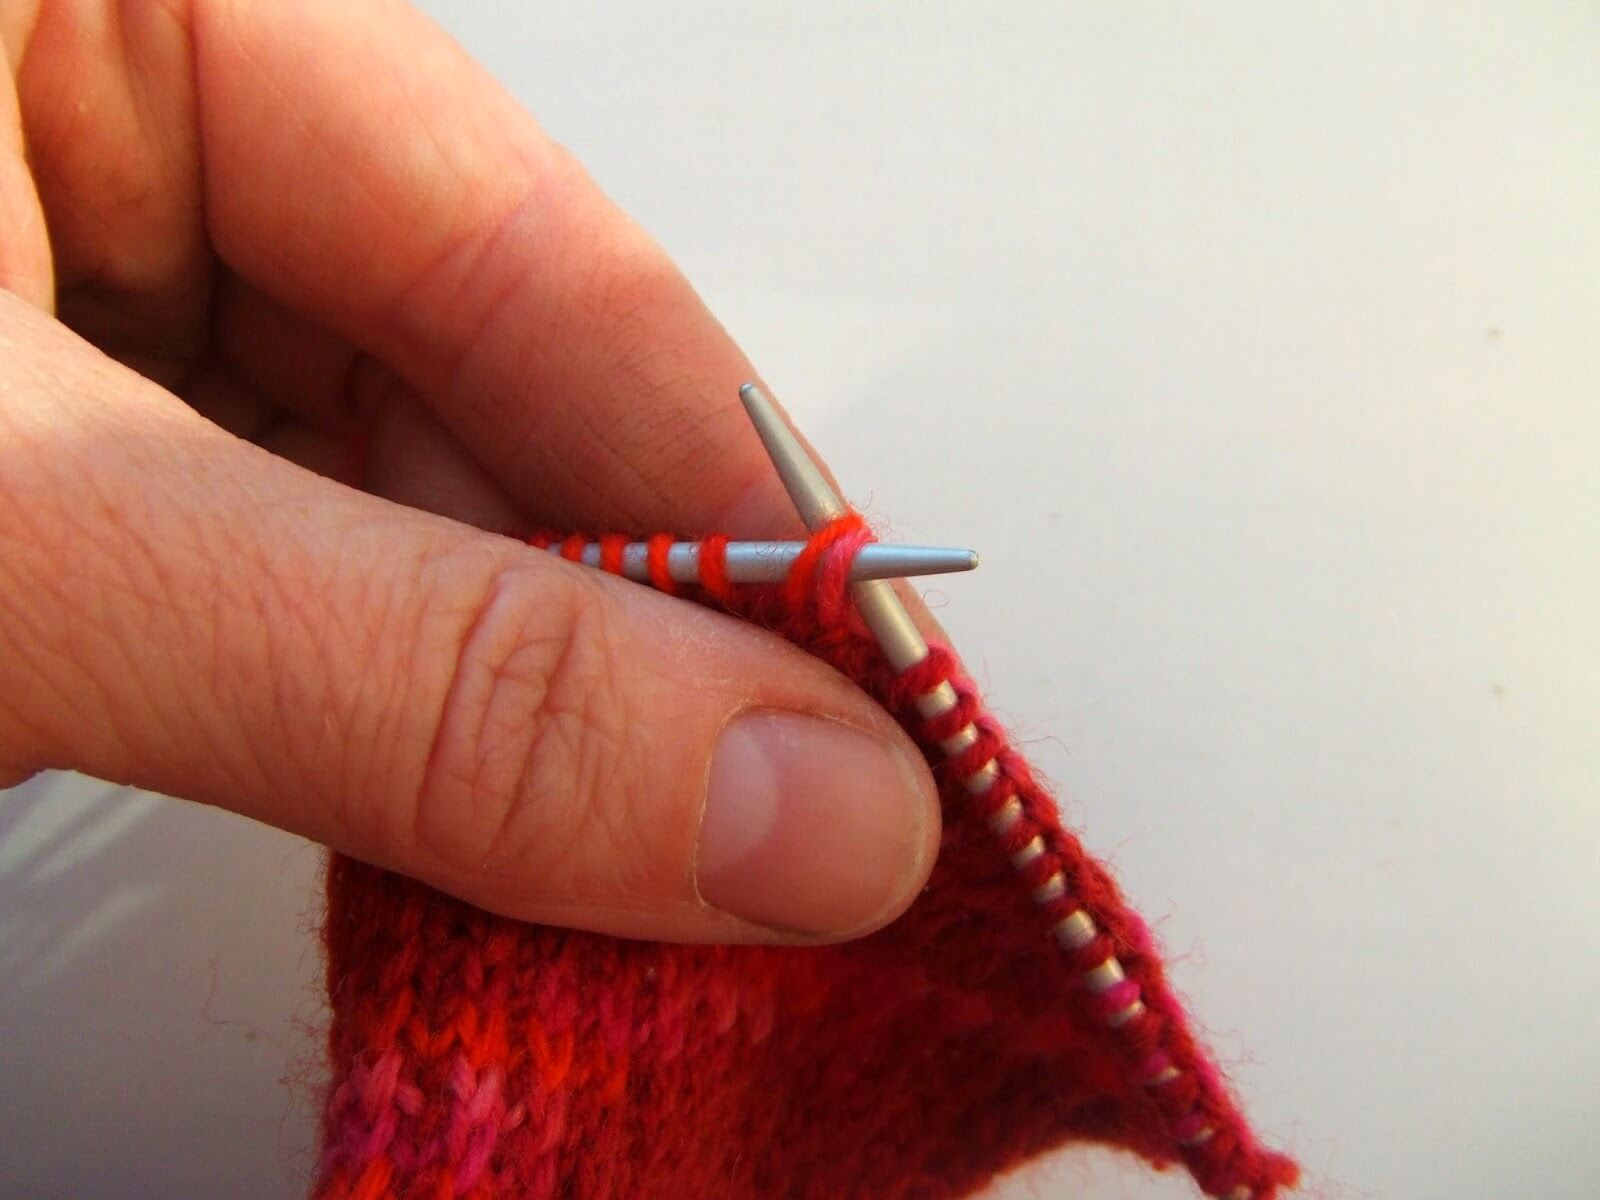
Knit across the heel stitches if required to bring you to the left hand side of the heel ready to pick up 19 stitches. It works out as 1 st per every 2 rows of heel flap knitted so remember that if you made the heel flap bigger, you will need to pick up more stitches.
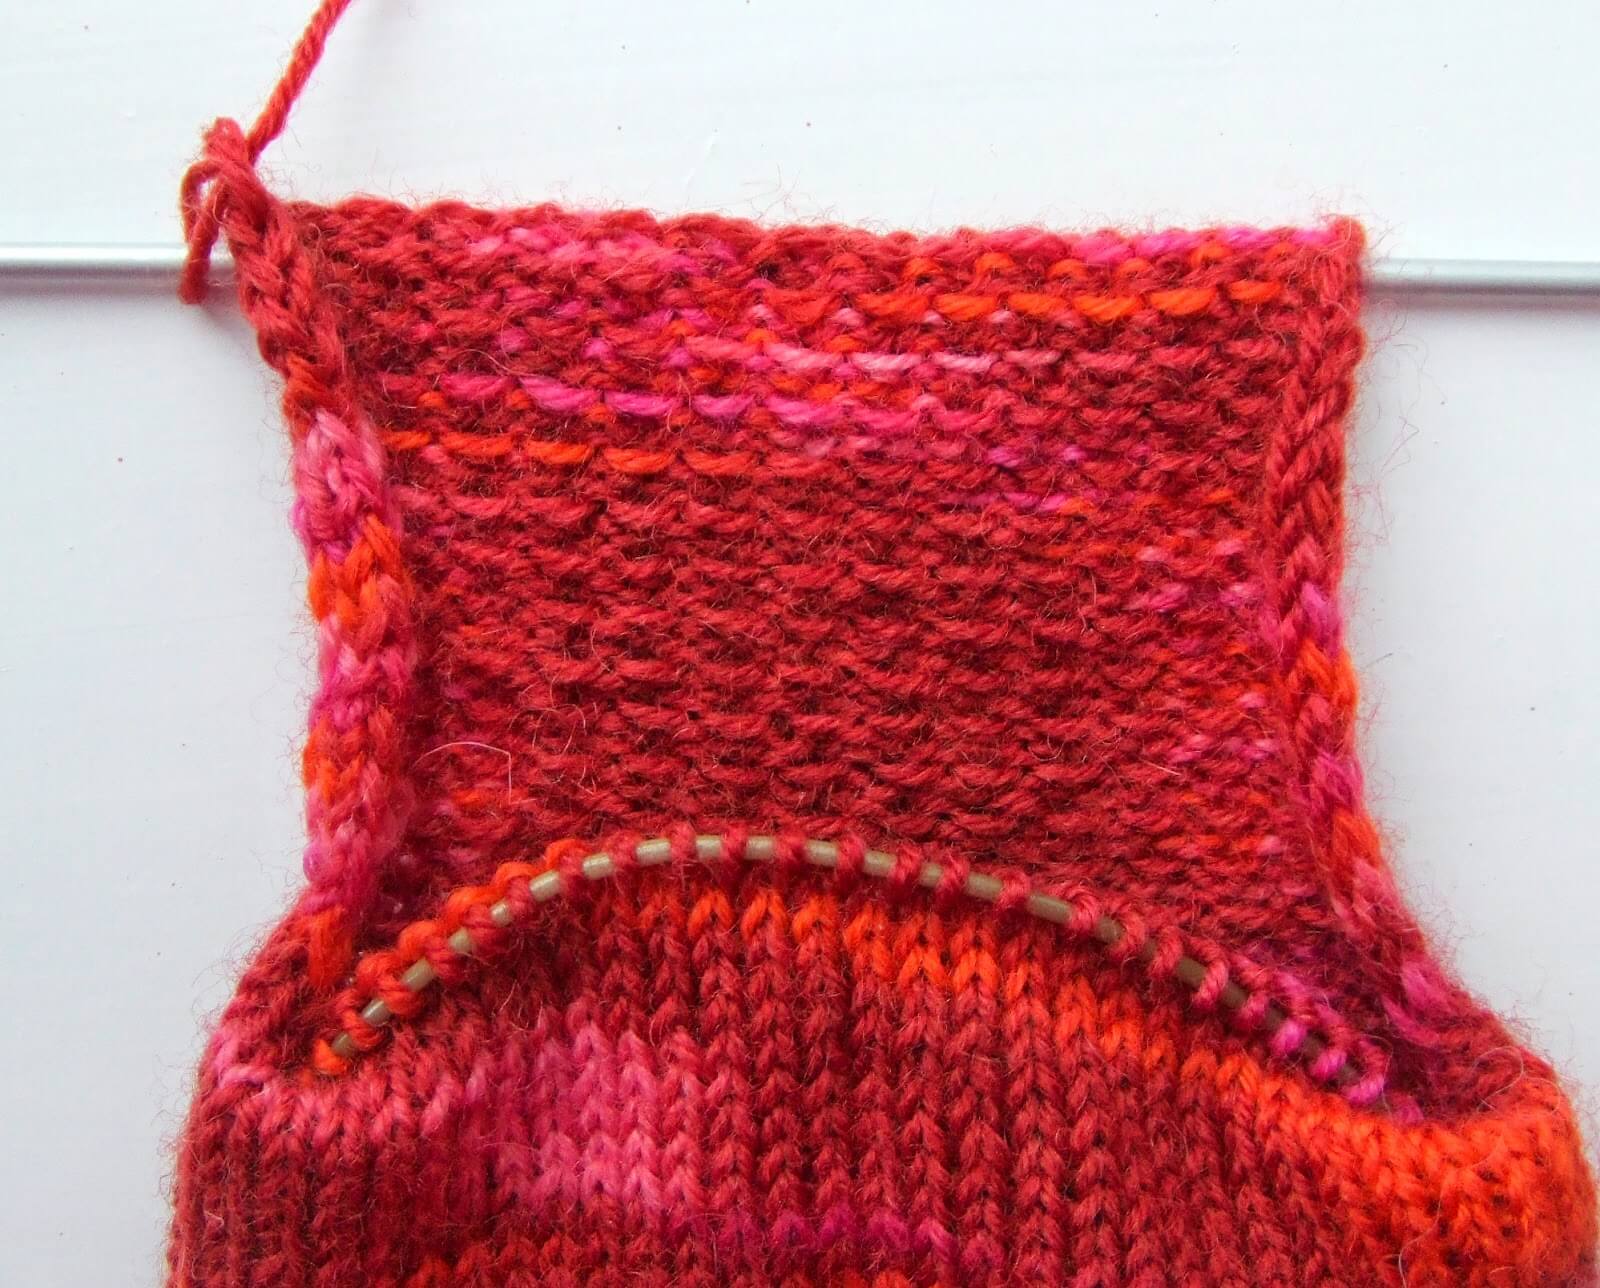
The reason that you used a slip stitch in the heel flap is to make it easier to pick up the gusset stitches. You can see in this picture the slipped stitches are the row of larger stitches lying flat against the flap. I pick up the inside loop to create my new stitch.
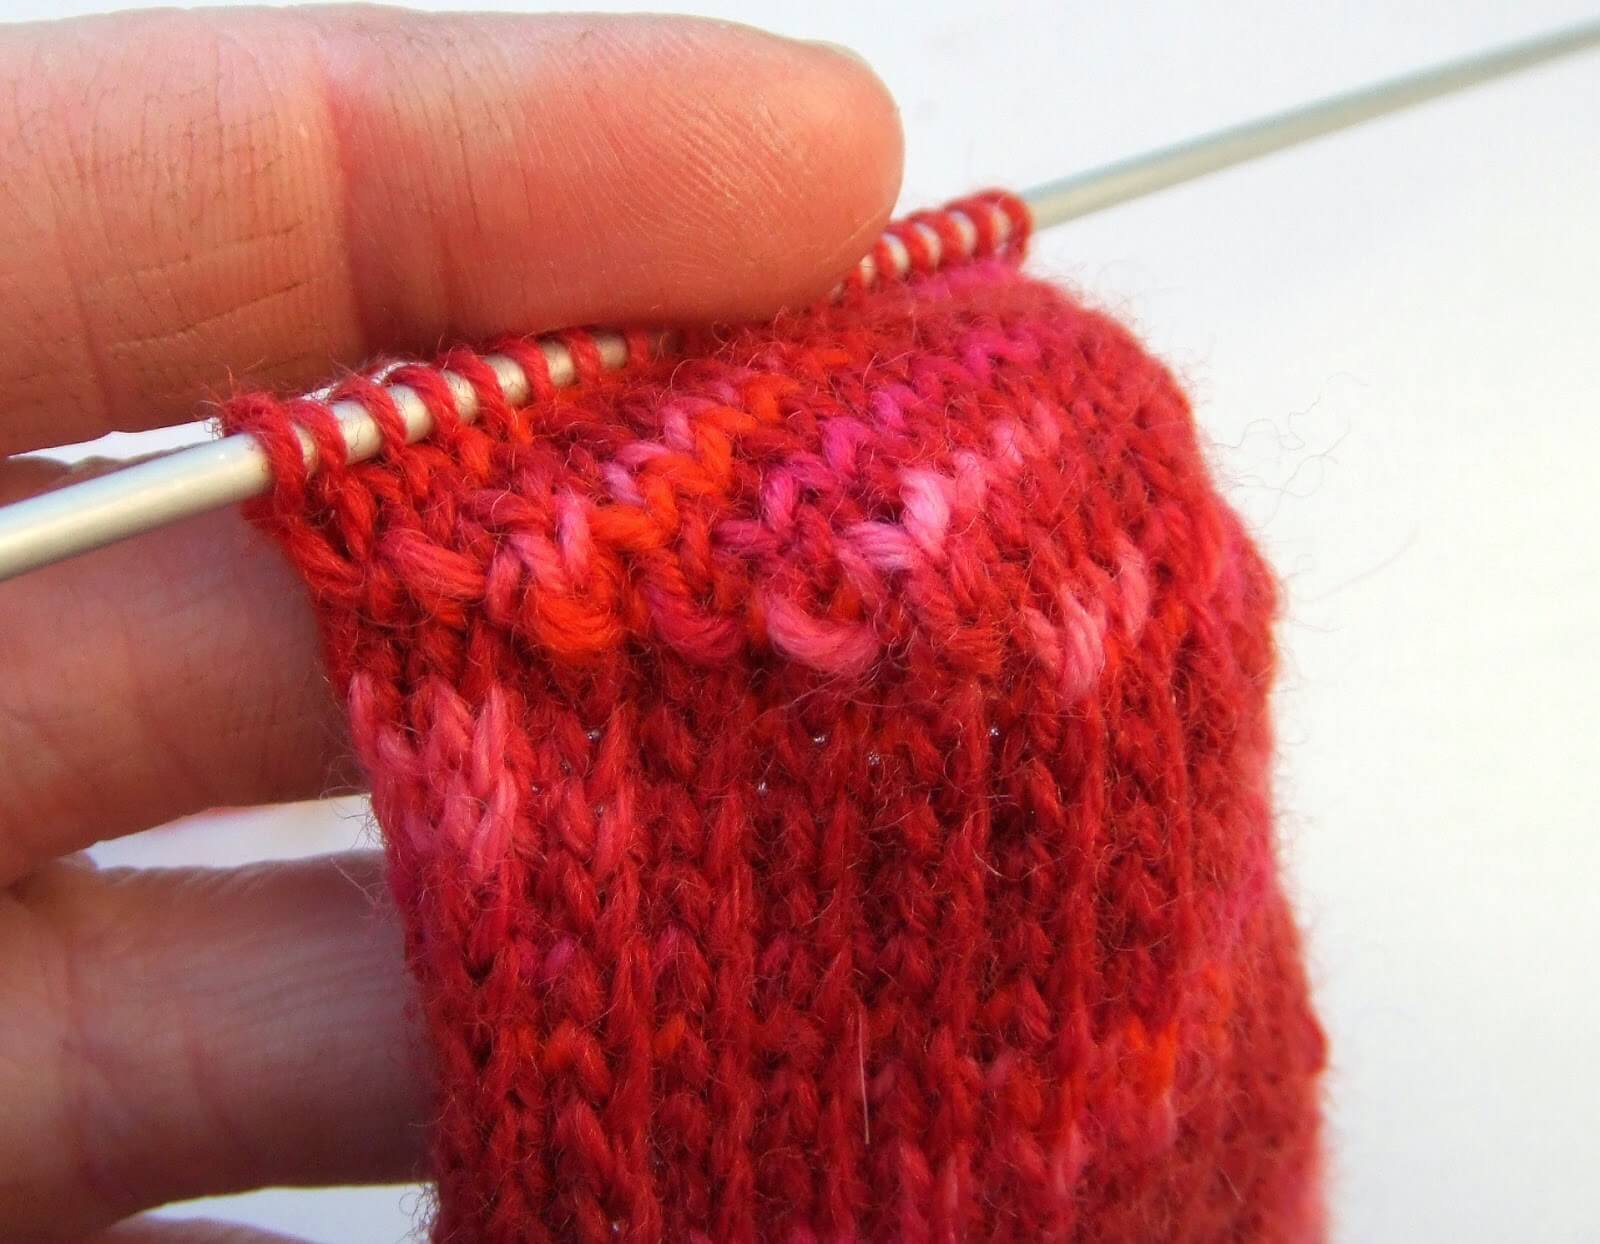
This picture shows how the row of slip stitches looks once you’ve picked up all the gusset stitches.
Once you have picked up the stitches, place marker to indicate the new beginning of the round. Knit across the top of the foot (I usually knit back onto my circular needle at this point), place marker, then pick up 19 stitches (or more if required) up the other side of the heel. It works out at 1st per every 2 rows knitted in your heel flap so you may have more or less. Knit across the top of the heel and then shape gusset as below.
Note: If you are using DPNs and/or have placed your stitches on a stitch holder, you can arrange the needles as follows: Needle 1 for stitches across heel, Needle 2 for picked-up stitches down side of foot, Needle 3 for stitches across top of foot (knit stitches off stitch holder if required), Needle 4 for picked-up stitches on other side of foot. You may find that stitch markers are not required at first.
Shape gusset
Round 1: K to 3 sts before the marker, K2tog, K1, slip marker, knit to next marker, slip marker, K1, SSK, K to marker.
Round 2: Slip marker, knit to next next marker, slip marker, knit to 3 sts before marker.
Round 3: K2tog, K1, slip marker, knit to next marker, slip marker, K1, SSK, K to marker.
Repeat rounds 2 and 3 to shape the gusset and continue in this way, decreasing by two stitches at the gusset on every other row until there are 60 stitches on the needle. If you want to take out the SSK marker you can do that now, but leave the other one on to indicate the beginning/end of your round. Need help with the gusset? Click here!
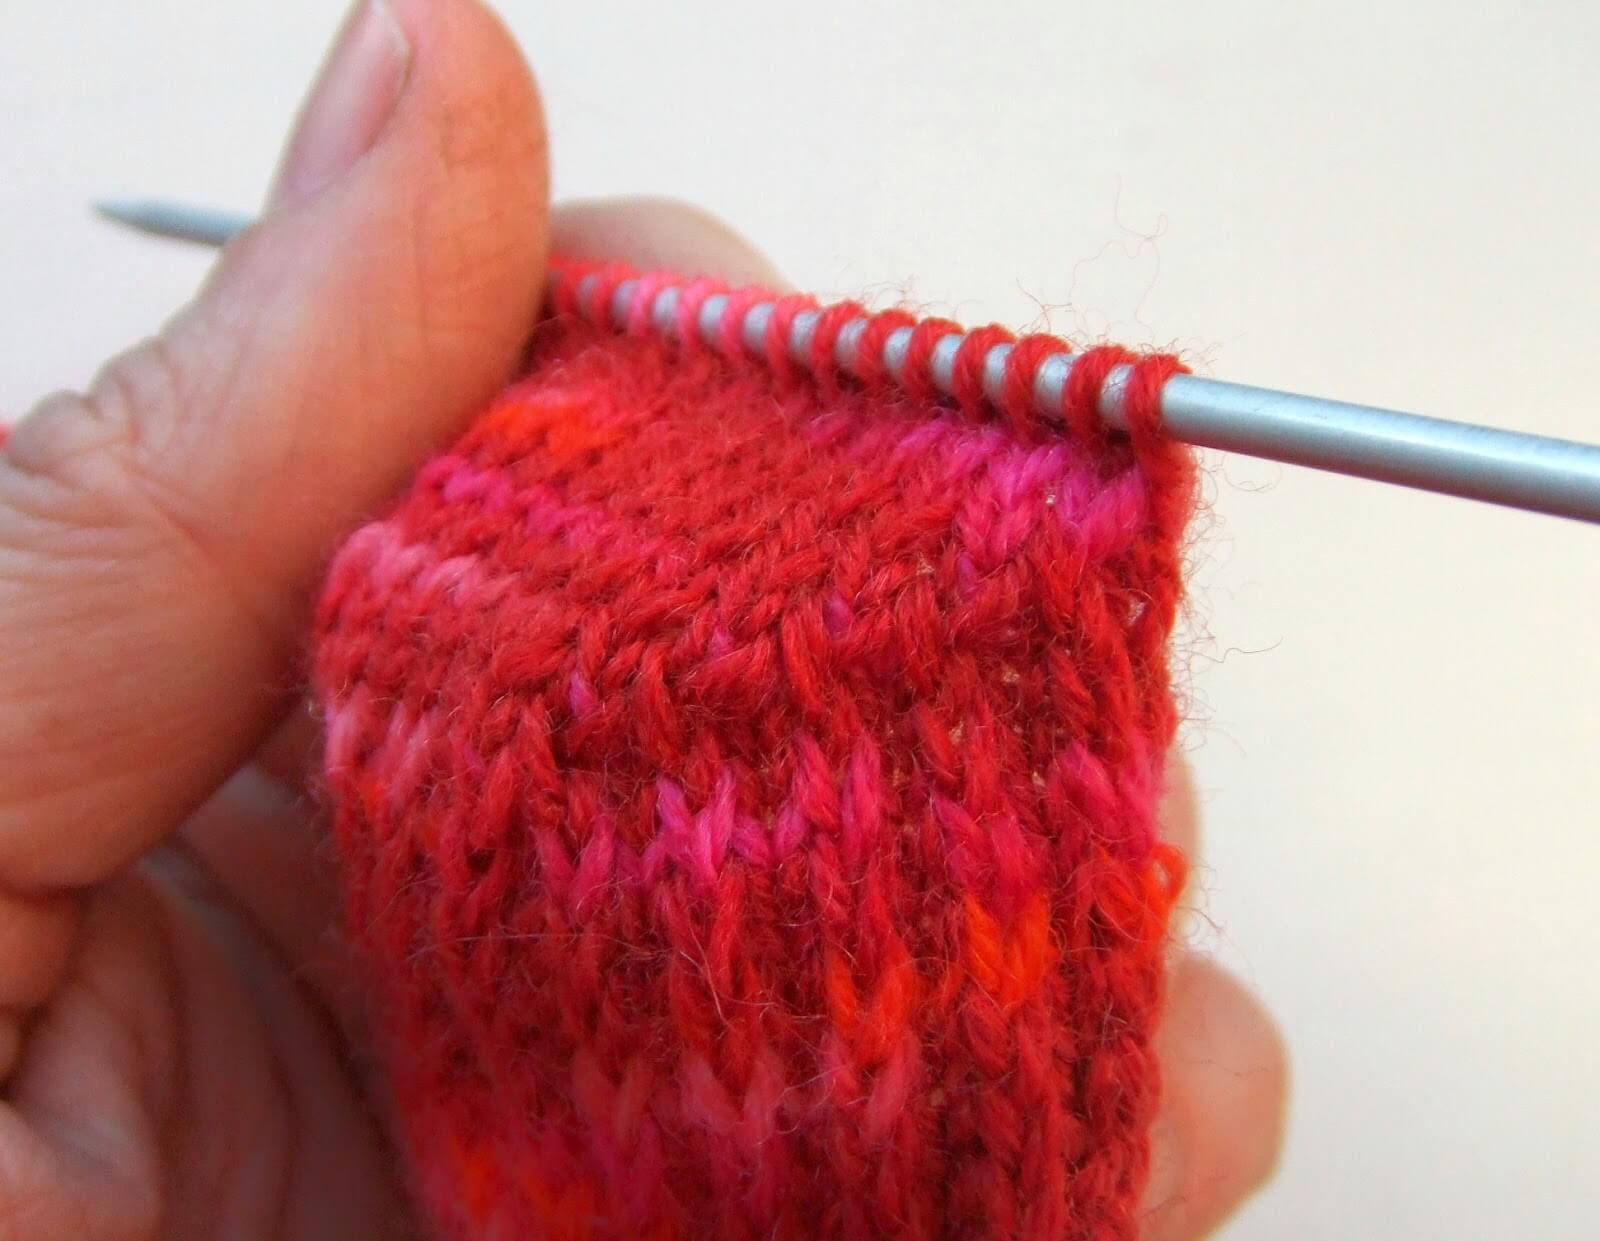
You can see the line where the decreases create the gusset quite clearly in this picture.
Once you have 60 stitches again, continue to knit each round until you reach approximately 2.5in;5cm before the desired length ready to start the toes. For my UK size 5 feet, this is about 47 rounds. Don’t be afraid to try your sock on before decreasing for the toes!
Toes
At some point whilst decreasing for the toes, if you are using a small circular you will need to change back to DPNs as the number of stitches becomes too small for the circular. It’s up to you when you choose to do that, and how you distribute the stitches across the needles; just keep following the pattern as set below. Need help with the toe decreases? Click here!
Create the toes as follows:
Round 1: K1, SSK, K24 sts, K2tog, K1, place marker (if required), K1, SSK, K24 sts, K2tog, K1.
Round 2: Knit one round, slipping markers as you come to them.
Round 3: K1, SSK, K to 3 sts before marker, K2tog, K1, slip marker, K1, SSK, K to 3 sts before marker, K2tog, K1.
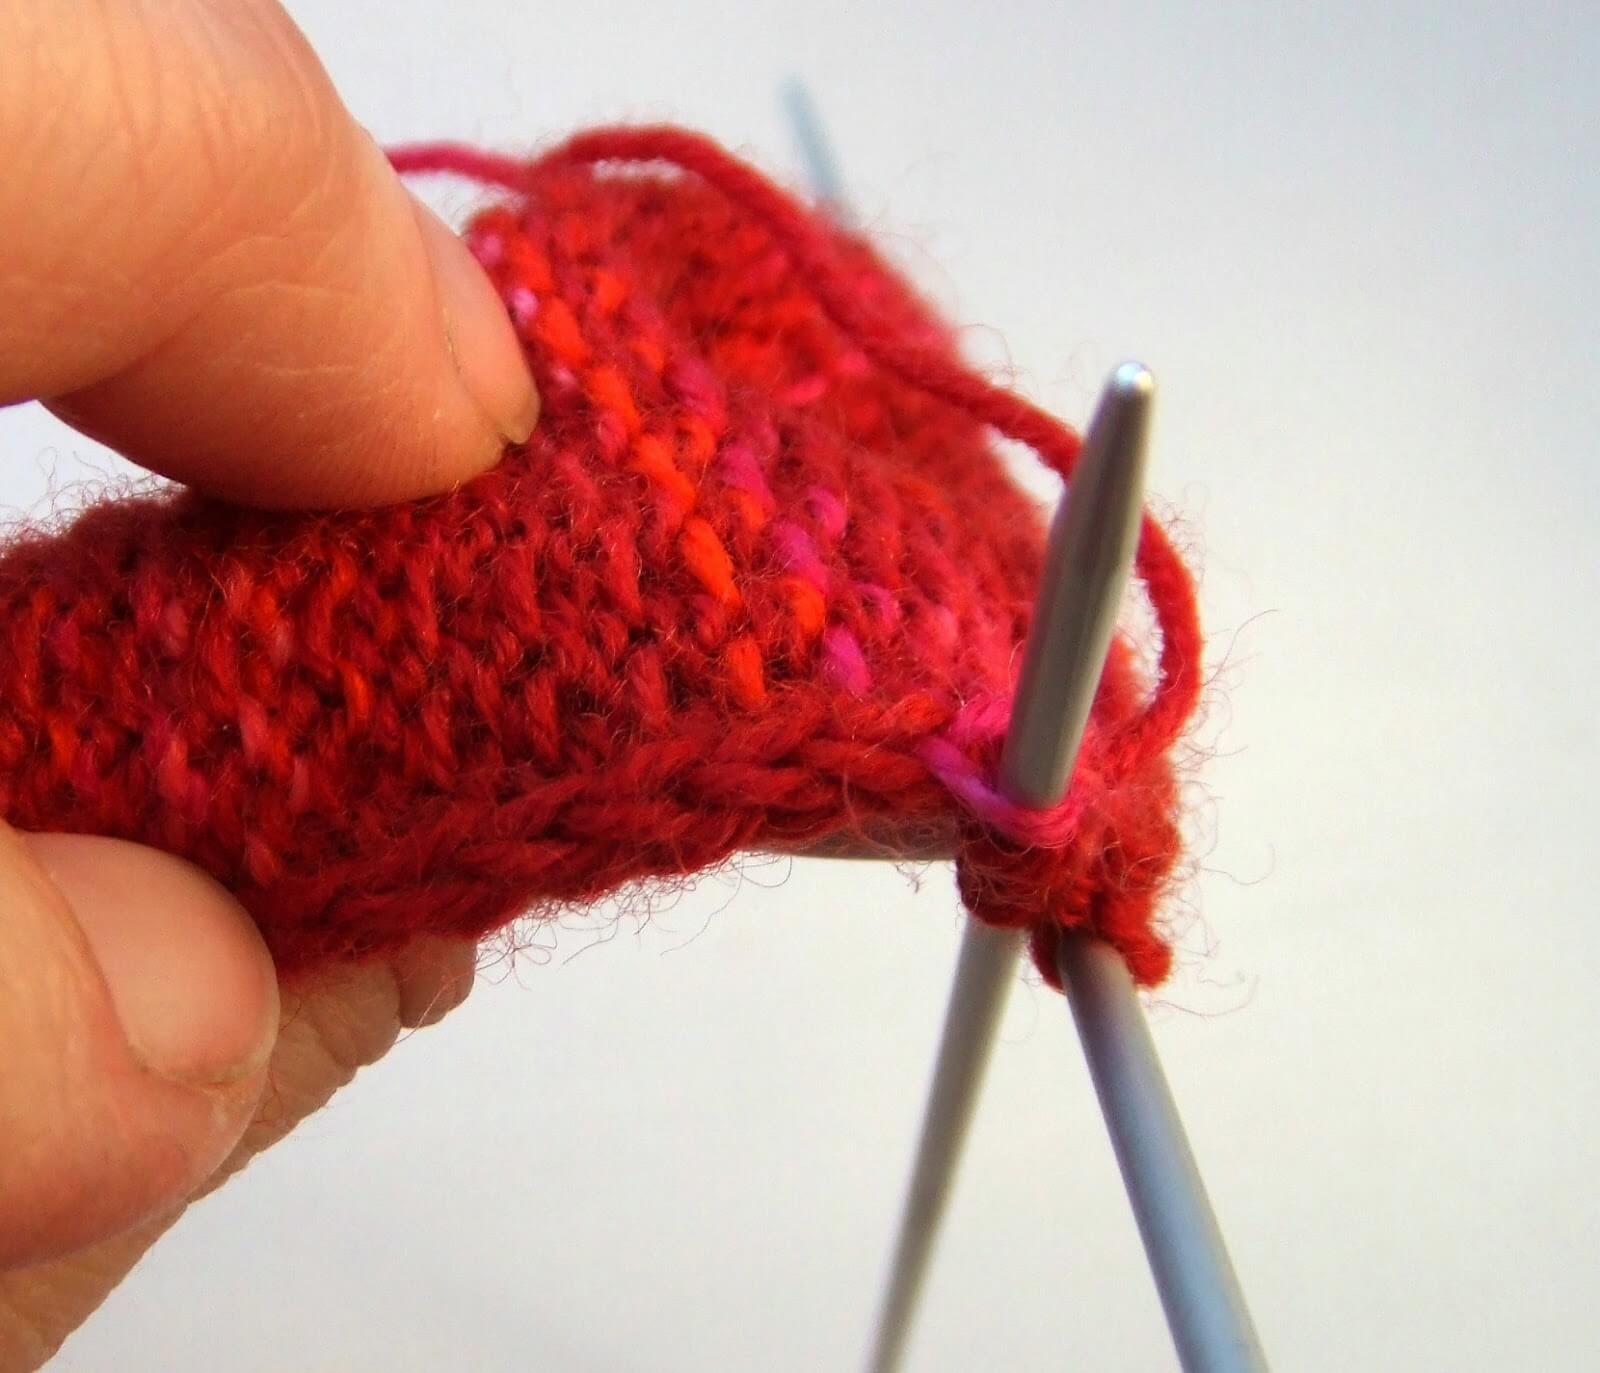
Repeat rounds 2 and 3 until you have 28 stitches left and divide these between two needles so that front and back of socks match (14 stitches on each needle).

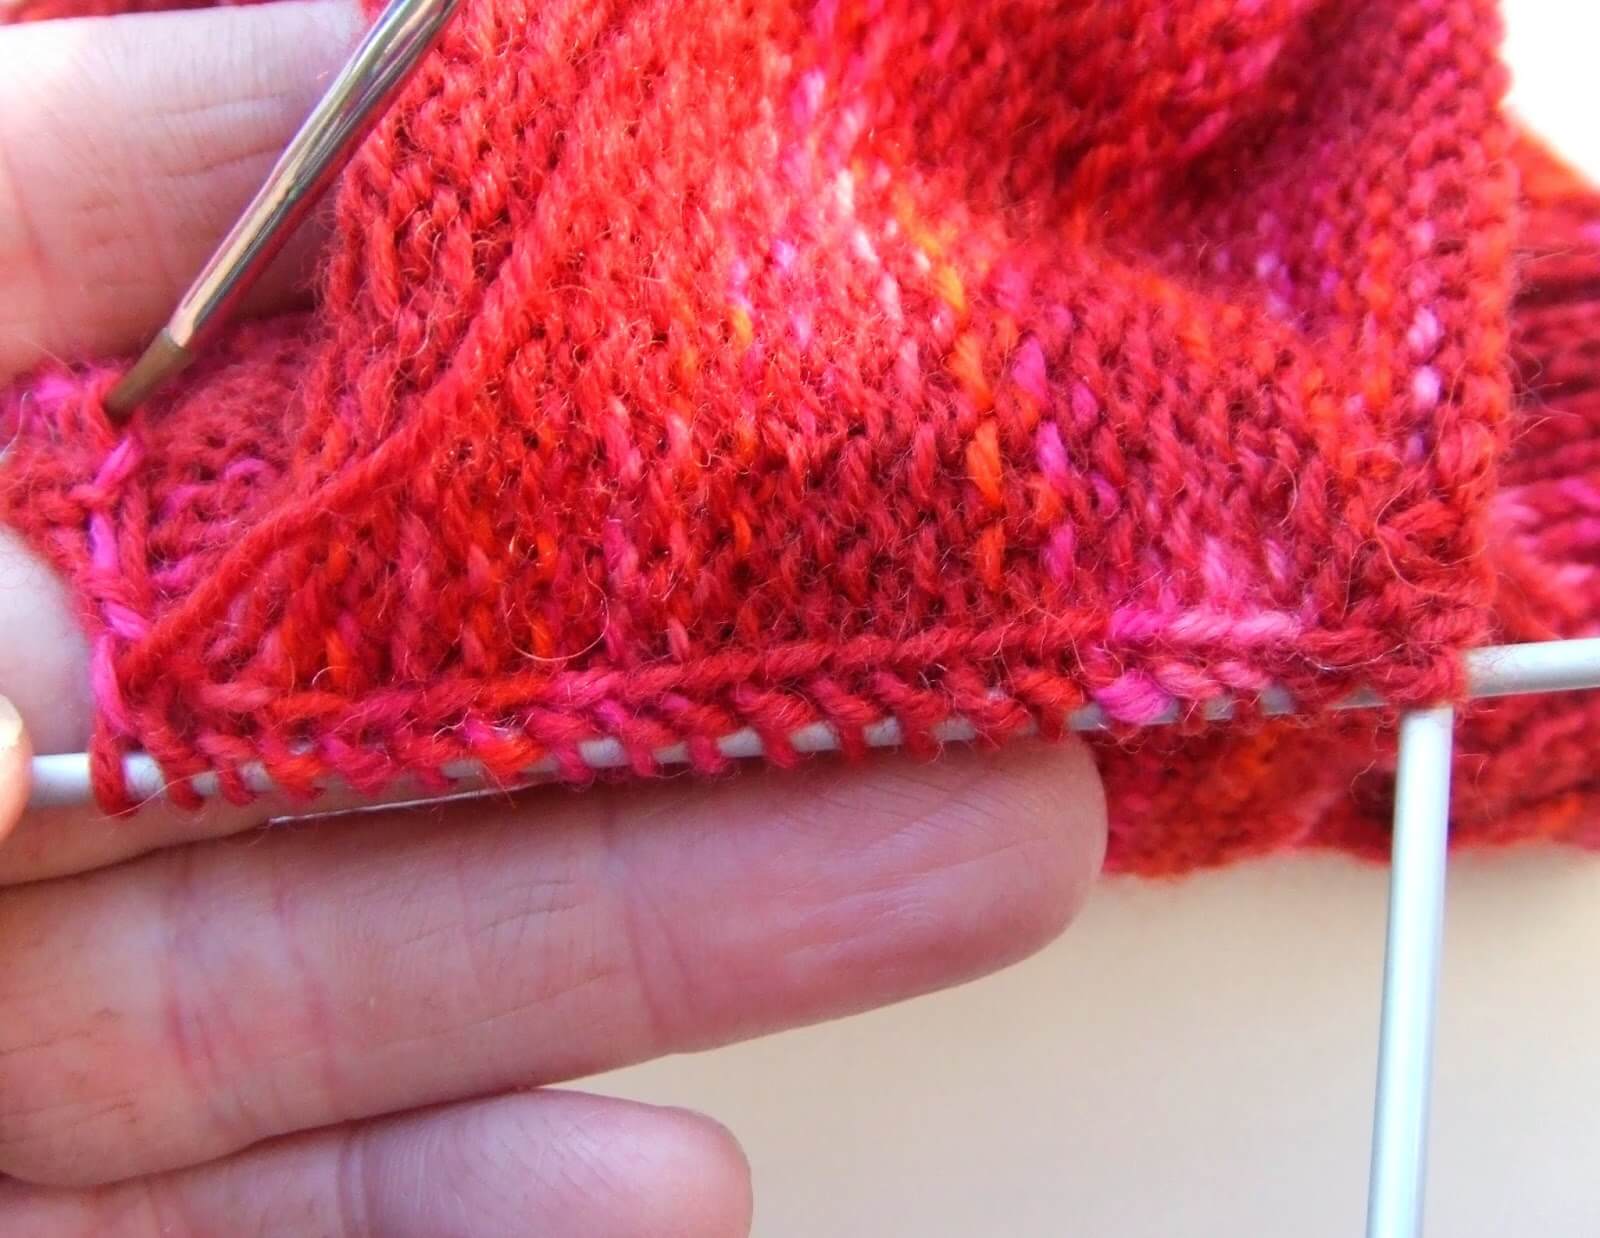
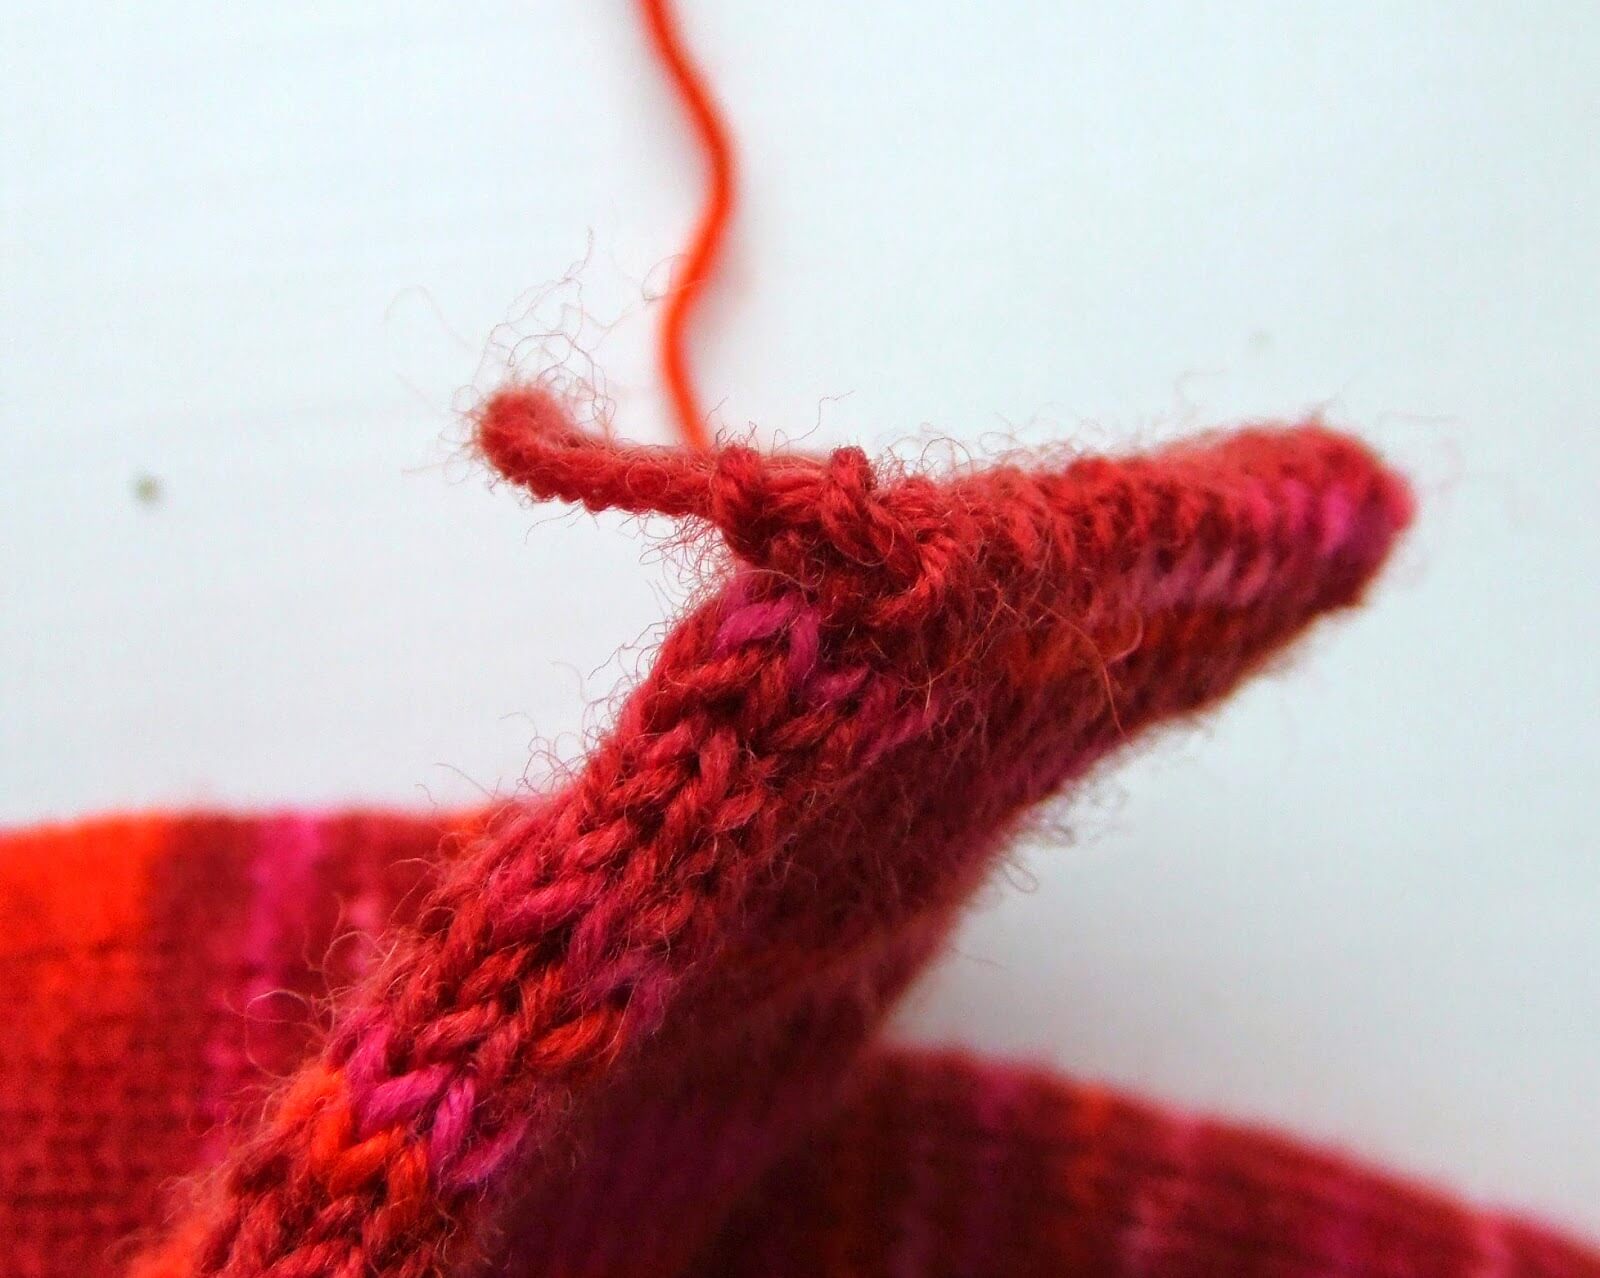
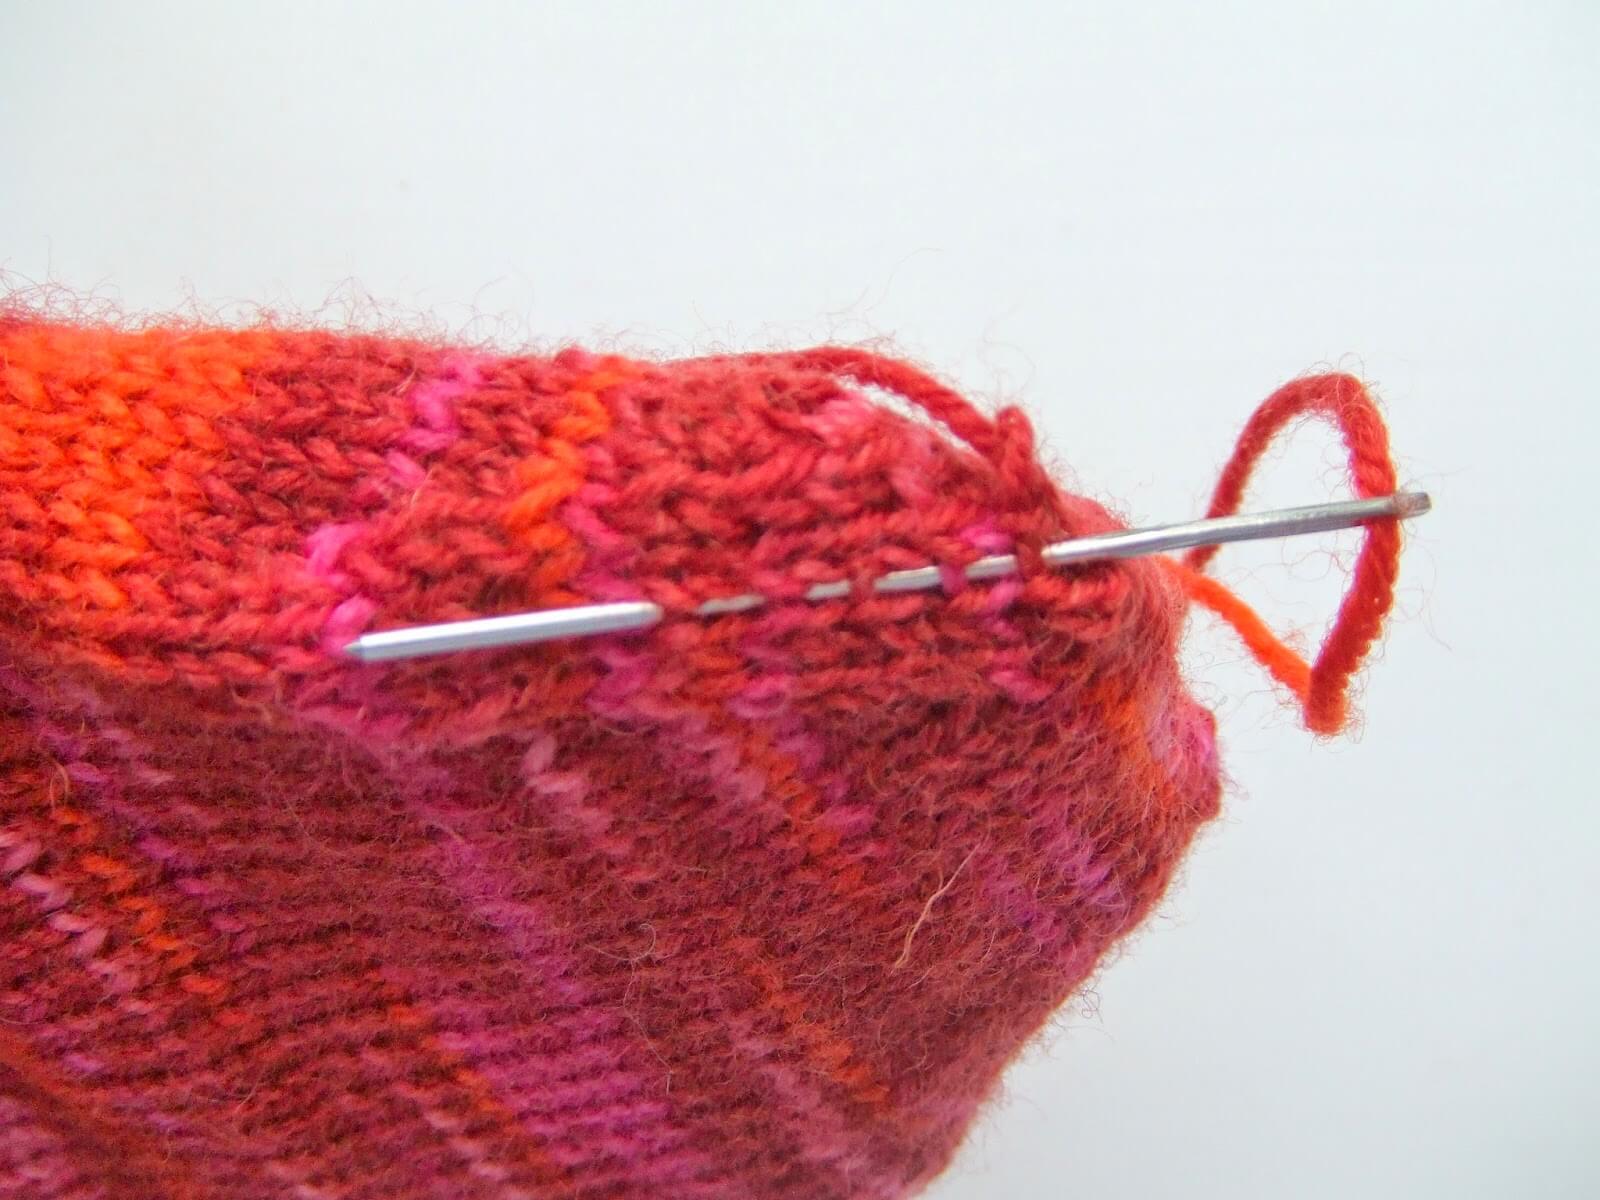
Graft toes using Kitchener stitch. This is another part of the sock-creation that some people aren’t so keen on, but again it’s not too bad if you take it slowly. Cut a long length of yarn and thread it onto a wool needle. I’m giving you right-handed instructions here. Need help with the Kitchener Stitch? Click here! You can also see how I do this in a video here (it’s a different pattern but the process is the same!
Note: the following instructions show the Kitchener stitch with set up stitches – some people find this gives them an “ear” at the end of their sock so if you prefer, you can miss out steps 1 and 2 and start at step 3.
1 Hold the two DPNs with your left hand. Insert the wool needle purl-wise into the first stitch on the front DPN and pull the yarn through. Don’t take the stitch off the DPN.

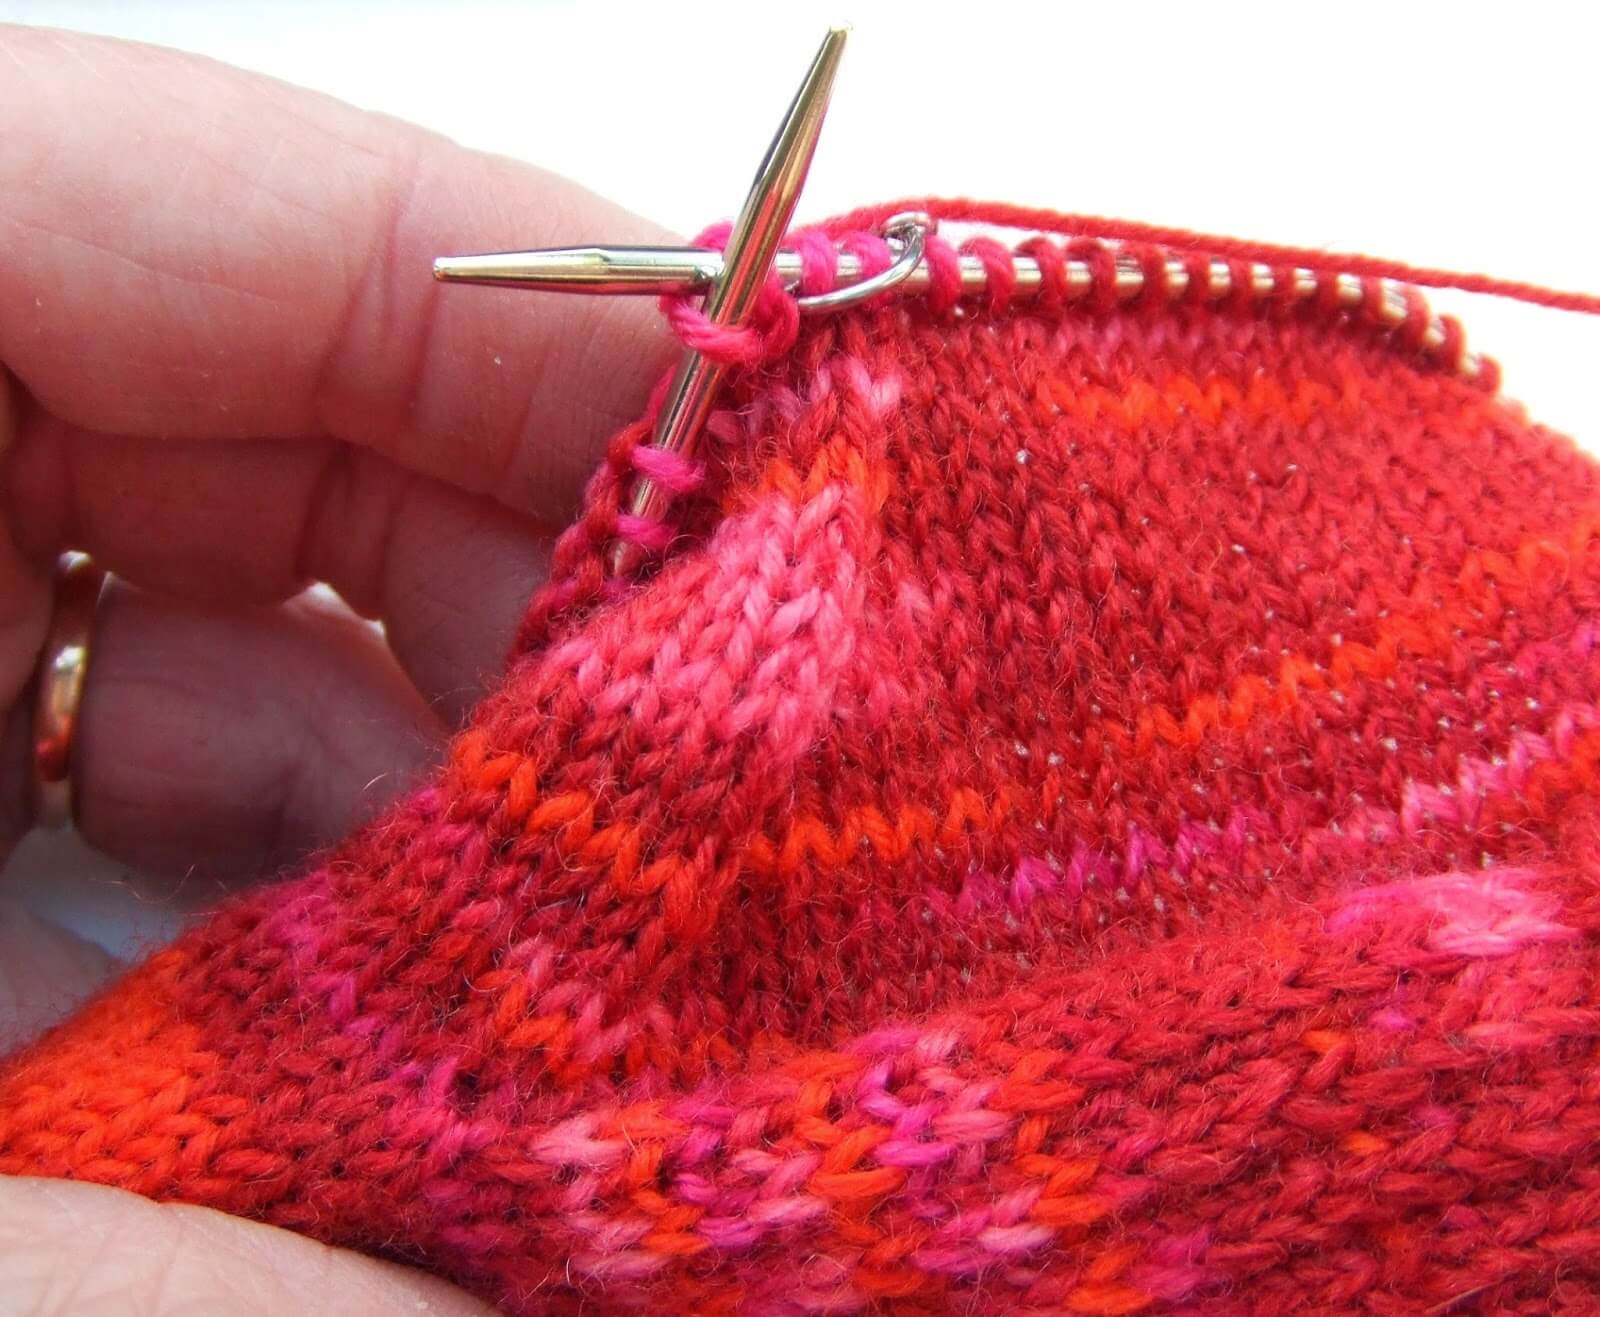
2 Next, insert the wool needle knit-wise into the first stitch on the back DPN. Don’t take the stitch off.
3 Insert the wool needle knit-wise into the first stitch on the front DPN and slip it off.
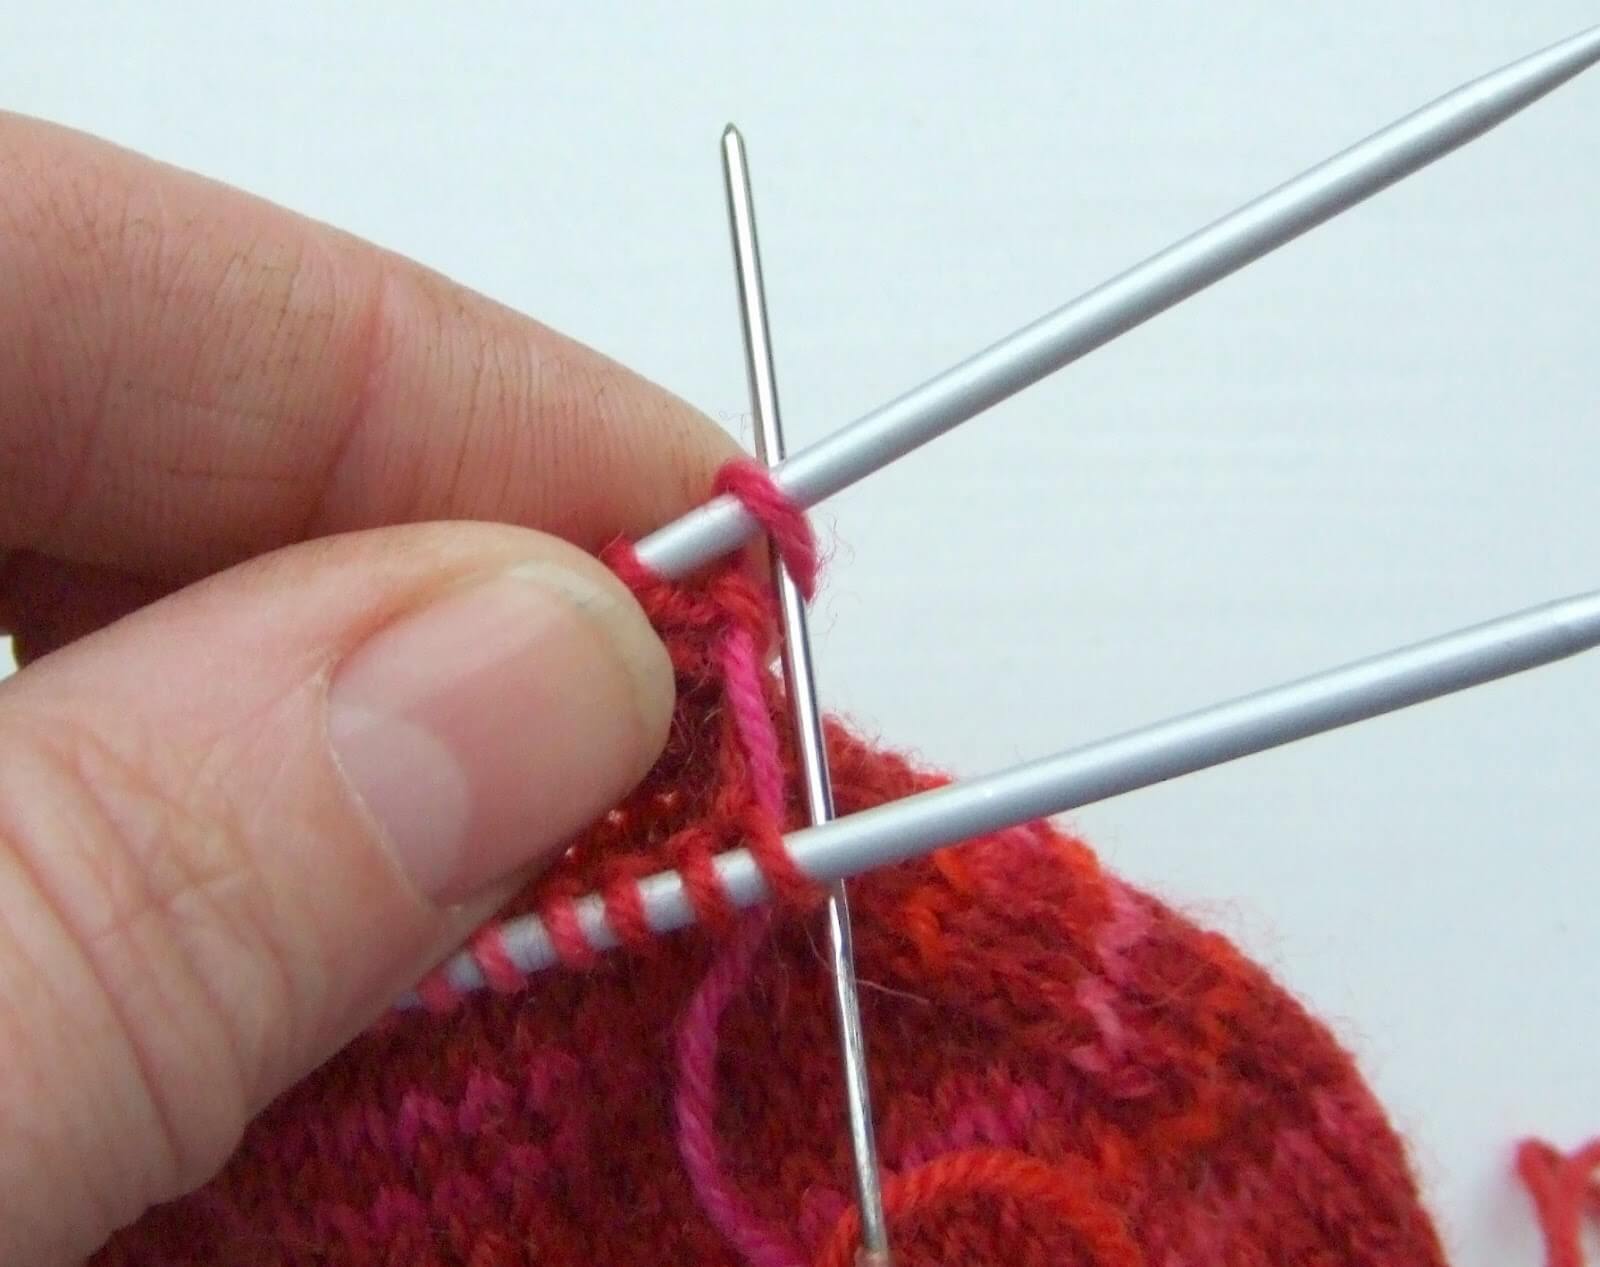
4 Insert the wool needle purl-wise into the second stitch on the front DPN and don’t slip it off.

5 Insert the wool needle purl-wise into the first stitch on the back DPN and slip it off. (I’ve already slipped it off in the photo below!)
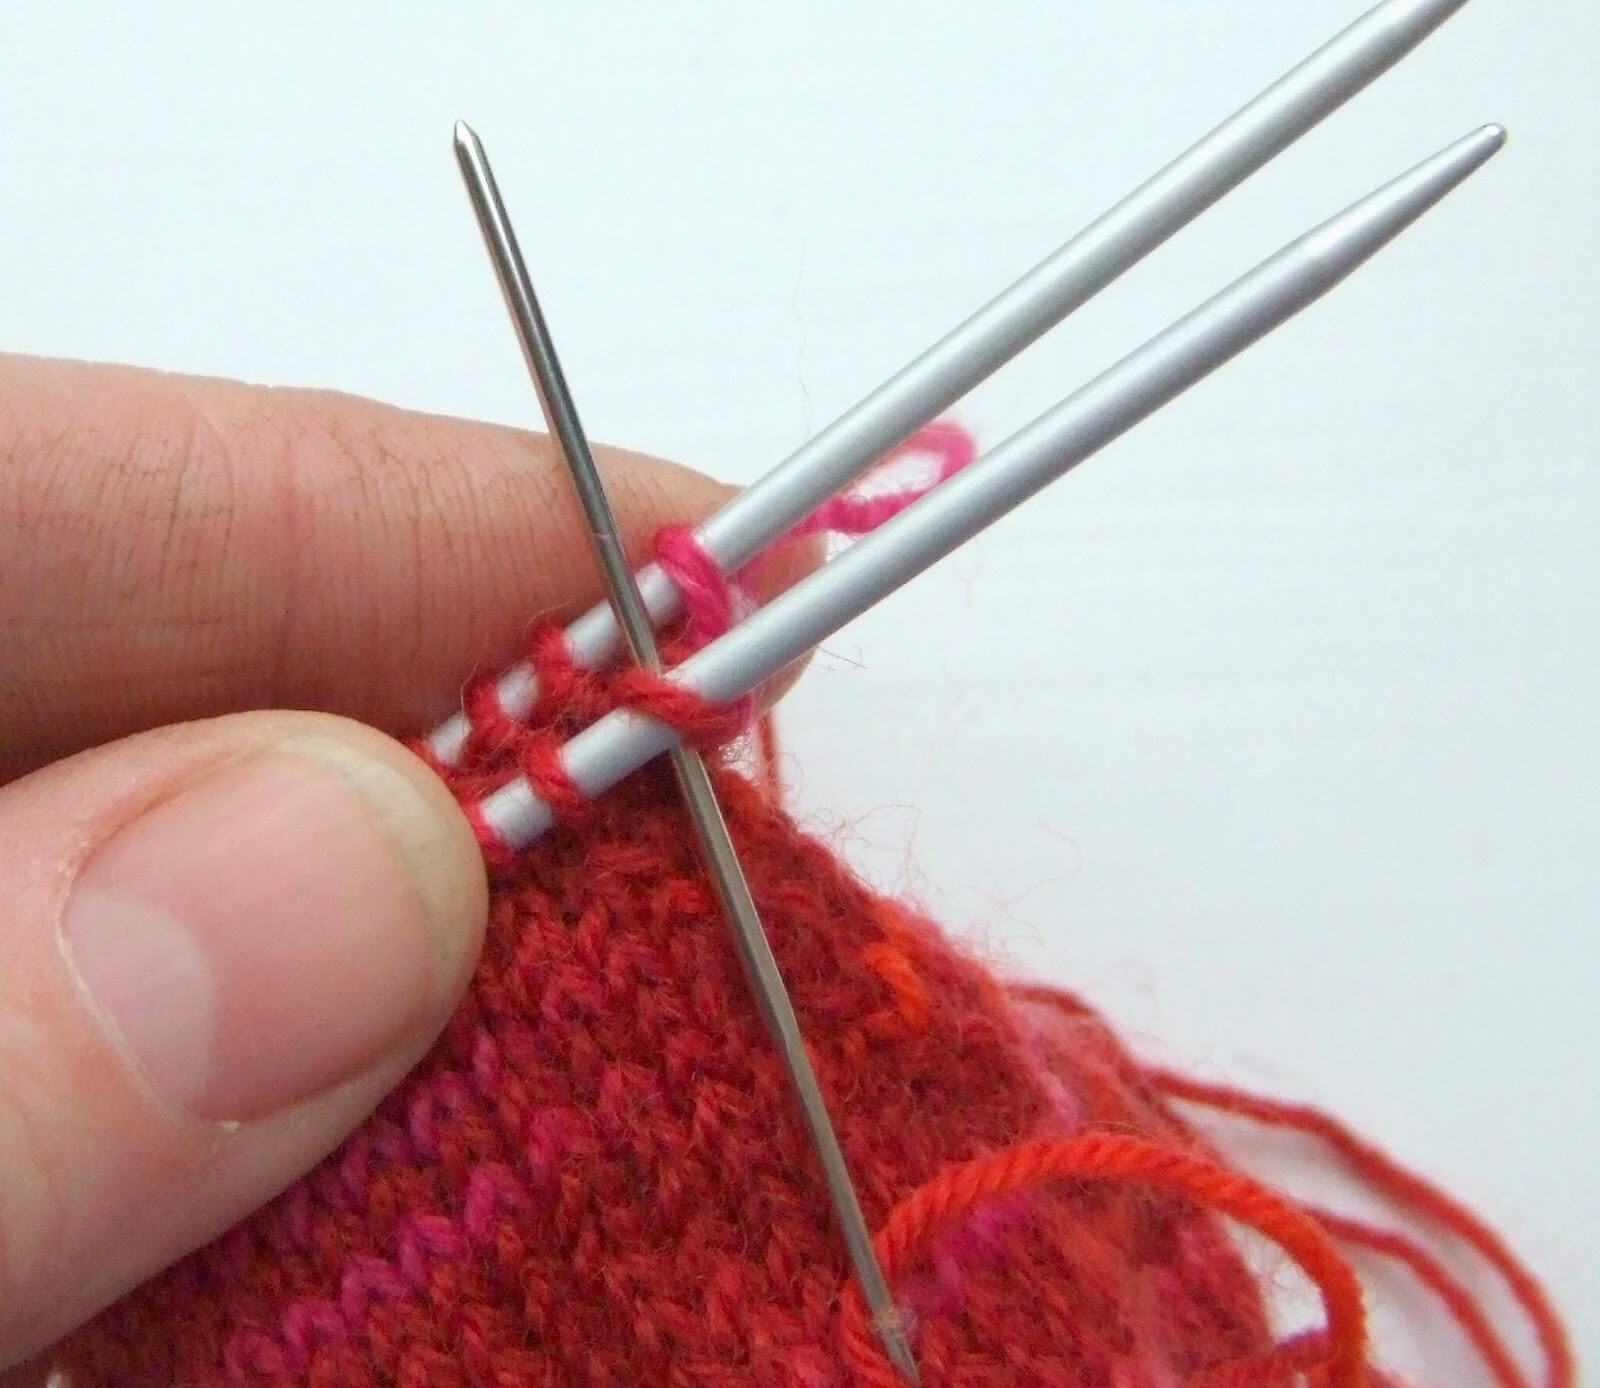
6 Insert the wool needle knit-wise into the second stitch on the back DPN and don’t slip it off.

Repeat steps 3 to 6 until you get to the last two stitches on the DPNs. You will already have taken the yarn through the front stitch so after you have taken the yarn through the back stitch, you can slip both stitches off the DPN. The single yarn thread through the first stitch will be strong enough to hold it and it will sit flatter when you weave the end back into your sock (ie, you won’t get an “ear”).

5 Weave the end securely into the sock and cut the yarn.
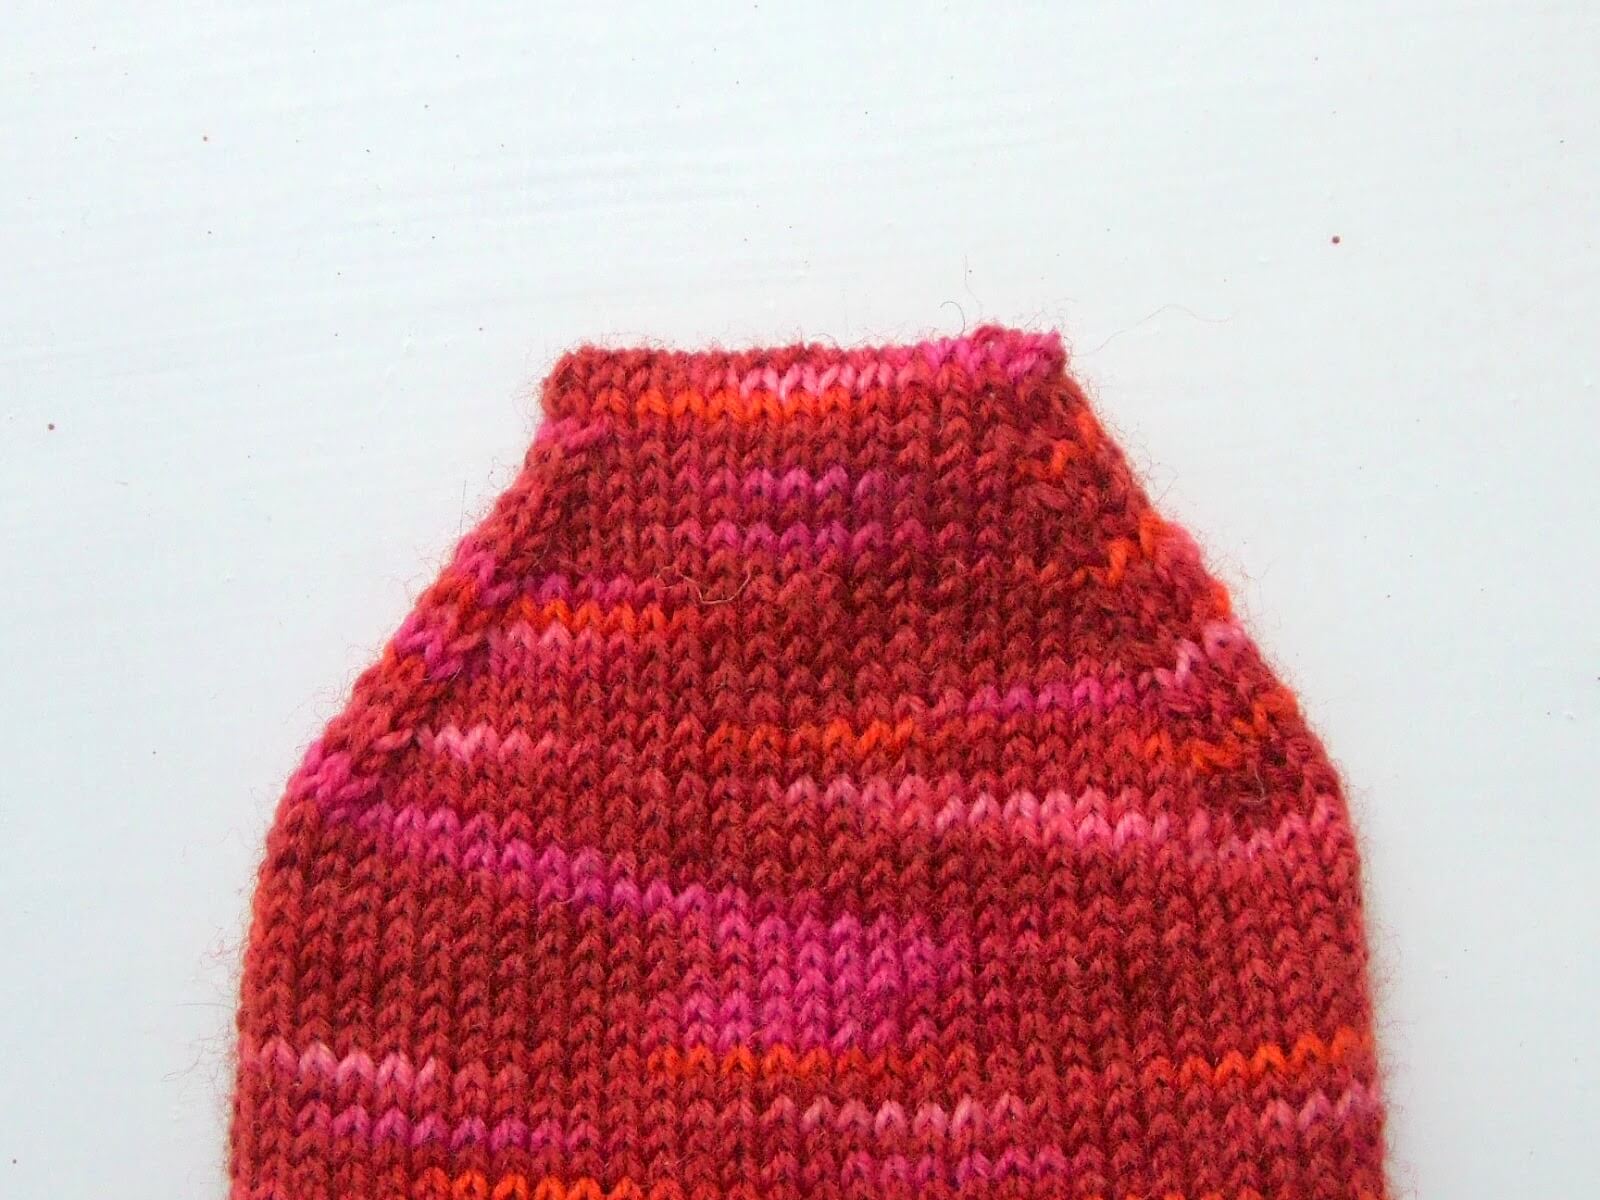
And that’s it – you’re done! Make two socks if you don’t want to hop everywhere and wear them with pride! If you’re on Ravelry, please link your project to the pattern here so that I can see your socks – I always love seeing new pairs of socks!
New to sock knitting? These might help:
Is sock knitting suitable for beginners?
Yes—many beginners learn to knit socks successfully using a simple pattern and step-by-step tutorials like the Winwick Mum Sockalong. It doesn’t matter if you knit or crochet – I can help you learn to knit socks!
What do I need to start knitting socks?
You’ll need sock yarn (usually 4ply), knitting needles (DPNs or circular), and a basic pattern. The Sockalong tutorials walk you through everything you need.
What is the easiest way to knit socks?
A cuff-down sock with a heel flap is often the easiest method for beginners, as it follows a clear, structured sequence.
Where can I find free sock knitting tutorials?
You can find free step-by-step tutorials in the Winwick Mum Sockalong, which is designed specifically for beginners.
Ready for your next pattern?

Browse all my patterns!
New to socks? Click here!
For updates & discounts

Love this free pattern?

This pattern copyright © 2014 Winwick Mum All rights reserved.
Not to be included in any collection or used for profit without written consent of Winwick Mum.


Hello there, I've just called over from Beetles, Bikes & Books blog and wanted to say how much I like your blog. I'm your newest follower. Barbara
marchhousebookscom.blogspot.co.uk/
Hello Barbara, it's so nice to meet you, and thank you for your comments! I've visited your blog before and it's lovely – certainly an inspiration! xx
Wow… I really should learn to knit… the socks look so warm and comfy. #weekendbloghop
Thanks – and yes, you should! 🙂 xx
I'm currently banned from knitting as my mum refuses to rescue me and my disastrous projects anymore. I do find it relaxing though. think i'll stick to scarves!
Oh, that did make me laugh and thanks for visiting! The only reason I seriously got into knitting things to wear was because my Mum refused to make me what I thought was the most amazing jumper in the world. Think 80s, think colour, think completely over the top … it was wonderful! xx
Your message made me smile as my mum recently tried to ban me and my disasters too! Starting to get the hang of it though.
That's great, Vicky! You know your Mum is going to want a pair of socks for herself soon 😉 xx
Wow! I am a show me person. I don't do well with knitting how to books. Your pictures are spot on amazing. Now I feel confident to knit socks. I am a novice knitter. But I'm excited. Thank you so much. I will surprise my daughter, who says I will not get past wash cloths.
I'm so glad you think the tutorials are going to help you, Jacque! I think it will be fun to surprise your daughter – I'd love to see her face when she sees your new socks! You'll find some videos on my YouTube channel now too – at the moment, I've only got videos for my new Easy Cable Socks but they cover the basics of casting on, the heel flap and turn, picking up gusset stitches and Kitchener stitch which will still be relevant. During this year, I'm intending to add videos for the Sockalong tutorials so do keep checking my YouTube channel if you get stuck! xx
Wow – this is SOOOO clear! Thank you so much for taking detailed photos of all the little steps – that's what I'm always longing for with an unfamiliar pattern to see if mine looks ok. I think I will be able to kitchener stitch successfully with this to refer to. Now I just need new sock yarn – I'm going to hold out and get some at Yarndale! Thank you!
Thanks, Jen, glad you think it's OK! Hopefully the pictures will help to show that socks aren't as scary or fiddly as people might think – and I'll look forward to seeing your next pair of Yarndale socks! xx
Oh, that is so impressive, you are a real professional when it comes to sock knitting. I can't get over the picture of your picked up stitches, I have never seen any so neat! Oh dear, I'll NEVER meet this standard. I just need to measure my Addi knitting needle which looks similar to yours, however I found it didn't seem to stretch around enough, because of the length of points. Maybe you could 'point' me in the right direction to buy one like yours, as it looks perfect.
Love the colour yarn by the way – and you could do classes in sock knitting!
Oh my goodness, what lovely comments, thank you! I find that slipping the stitch on the heel flap makes picking up the stitches much easier, so if you don't do that already then give it a go. My DPNs are 20cm Addi ones, I've put a link in higher up the page (just after the second picture from the top where I talk about needles) so that you can see them on Amazon although you might also find them elsewhere as well. I look forward to seeing pictures of your next pair very soon! xx
Thank you so much, my grams has been knitting my socks on 4 needles forever but now she can no longer see to do it, I have had to make my one, I have been using two needles (hangs head in shame) but I brought a hiyahiya circular and your instructions for using a circular needle are perfect – thank you so much for sharing xoxox
Wow, you've made my day with your comments, thank you! I'm so pleased you found the sock pattern helpful, and I'm sure your grams will be delighted that you're able to continue the tradition of "proper" socks! xx
PS Isn't it easy on a tiny circular? 🙂
I have just come across your delightful blog. Socks! I would love to learn to knit a pair. After I have
knitted a hat I will have a go. A great project for 2015.
Hello Sarah, it's lovely to see you! Do let me know how you get on with your socks – although be warned, they can be very addictive! 🙂 xx
Popped over via Attic24. Love your blog! Loads more lovely things to see & do! Thanks!
I like to knit my socks 2 at a time (magic loop) to avoid 'second sock syndrome'. I've only ever knitted them 'toe up' though! I'm worried that I'll knit them 'top down' & they won't fit! :o/ Any tips'tricks for avoiding that??
Hi Sarah, it's lovely to see you! I suggest that you have a look at the "tension squares" post as there's some information on there about working out the number of stitches for your socks based on your knitting gauge. You can still try your sock on whilst you're working on it as you would for a toe up, so I'd recommend that you do that when you can as well to make sure you're happy with the size xx
winwickmum.blogspot.co.uk/2015/04/sockalong-tension-squares.html
Thanks SO much! I'll look at that now! xXx
Is it o.k. to use just four needles as that is all I have? Already frustrated as when I was counting my stitches I forgot there was no knob at one to keep the stitches on the needle and off they came. I did this three times. Grrrr. I'm determined to make a pair of socks though.
Anne
Yes, it's absolutely fine to use four needles. I'll be talking about that in the first post on Sunday so don't worry, your socks will turn out perfectly! xx
Already underway here with 12 rows ribbing (k2p2) and 12 rows knit on 4 square needles (US #3)! Your blog and project came up while searching Ravelry for instruction on the heel. This is my very first sock.
It's lovely to see you, and to hear that the sock is progressing so well! 🙂
Thank you so much for sharing this sock pattern….inspires me to continue 🙂
You're very welcome, Gail! xx
Great instructions – easy to follow 🙂
Thank you! xx
Hello there–just a quick question for you. I usually knit my socks toe up so I can get the most out of my yarn, but I find I get a more satisfying sock working cuff down. How is the best way to determine your yarn usage? I don't want a ton left over, but I'd really like to not run out. Any suggestions to that point?
That's a really good question, Bethany! I've never worried too much about it as the largest socks I knit are about a UK size 8 and I know that I'll get those out of a 100g ball of yarn, and I use up my leftovers for blanket squares. I'd like to know the answer myself now, though, so I've had a look around on the internet and found this calculator which might solve your problem:
thedietdiary.com/knittingfiend/tools/EstimatingYardageSock.html
Hope that helps! xx
Oo, that does, thank you!!! Although I never considered blanket squares and am thinking that would be a wicked fun project, so now I don't know if I mind my leftovers 🙂
Some people also choose to knit their leftovers into new socks, mixing the yarns to get unique colourways. There's always something you can do with it, it's never wasted! xx
HI got here via Lucy's Attic……..do not usually use the evil pointy things, but am going to give it a try tonight. Living in rural Spain halfway up a mountain, it gets cold here in the winter lifeinextremadura.blogspot.com.es/
Hello Tanya, it's lovely to see you! You might prefer the circular needles to the DPNs – which actually aren't that evil once you get to grips with them 🙂 xx
can I use stylecraft DK have loads left from blankets
It's better to use sock yarn with a percentage of nylon in it and wool or another fibre if you're making everyday socks to wear as they will be more hard-wearing and won't make your feet sweaty as acrylic yarn might do, but if you just want slouch or bed socks it would be OK, and certainly for practicing it would be fine xx
Hi from Holland!!!
wow you have put so much time into this!!!thank you sooooooo much for sharing!! I never knitted socks for myself before ( I have knitted baby socks with a heel in the past)because I was sort of dreading it but now I have read through all the posts and i think I have built up enough courage to get started! thank you for giving me that courage to push myself and learn new skills! hugs from Holland xo Dees
Hello Dees, it's lovely to hear from you! I'm so pleased that you feel you can tackle socks now – you'll be surprised how easy they are! Do let me know how you get on, and of course shout if you get stuck! xx
Absolutely love your blog! Great pattern! Oh yes, hi from Ky. USA!!! Will read this regular. Thank you so much!!!
Love and hugs, Pat B.
Thank you, Pat, and thanks for visiting! xx
Hi. Can you tell me why I am having such a problem sourcing 2.5mm 30cm circular needles? The lady in the wool shop I visited today looked at me agog when I asked her if she had any, and all my usual online sources don't seem to sell them or they are sold out. I struggle with the magic loop and I'm itching to get going! Thank you for any helpful advice.
I think we've depleted the world's resources of 30cm needles, Kate! You could try using a 25cm KnitPro circular needle which will feel very similar in your hands as it has the same 7cm tips. Try blacksheepwools.com as I know they did have some, and you can use our Sockalong code WINWICK10 until Christmas for a 10% discount too 🙂 So glad you're joining in with the Sockalong! xx
Hi and thanks for the great instructions. I am a knitter and love sock yarn but have never understood the mumbo jumbo of the heels etc. just too hard. Your instructions and photos are awesome and I have ordered a short circular – as I have signature needle arts ones and they don't come that small. I cannot wait to get started and have clicked to follow on facebook etc. again thank you for you generous time and effort and thanks the Lucy at Attic 24 for the link to find you……here we go…. funtatic…..hugs from me in sunny western Australia….
Hello, and thanks for visiting! You're going to love knitting socks, and the heels really aren't that difficult. Well done on managing to order a short circular – they seem to be in short supply at the moment! 🙂 xx
I've been so fearful of doing socks and the term "turn the heel" invokes anxiety just looking at the words, but we are entering a new year so new adventures are in order. I will at least try! Thank you so much for sharing your story and pattern… I feel a bit braver than I did before reading your blog 🙂 thank you again.
That's great, Marie! Socks aren't scary once you get into knitting them, it's all about trusting that the pattern will turn out as it should do – and it will 🙂 xx
"I'm a pretty fair knitter, but I also go into panic mode on "turn the heel" and have just been afraid to try socks! Did you have a link to do these on Dpn's only as mentioned above? Your instructions are so well-detailed, I'm just going to go for it!!
Each of the tutorials is written for short circular, DPNs and magic loop so you can follow along using any of the needles 🙂 xx
I received your book for Christmas. On page 20 paragraph 2 it says to multiply the width of your foot in inches by the number of stitches per inch. O.K. got that. Next paragraph says in your case it would be 8inches (foot measurement x 8) equals 64. Is your foot really 8 inches wide. It must surely be the length of your foot. Could you confirm this for me please.
Hi Kate, thanks for getting in touch. You need to measure around the ball of your foot which is the widest part and that will give you the measurement that you need for the calculation. I'd recommend that whatever that figure is, you take off about 10% to allow for negative ease (stretch) and choose whatever the closest figure is that which is a multiple of 4. Hope that helps! xx
Thank you for this pattern. I decided just before Christmas to make socks for my mother who doesn't like a seam under her toes. I gave one sock with an IOU in Christmas Day and have just finished the other.
Now back to the jersey and blanket I was doing.
I've made a small donation to the Peru fund and wish your daughter well on this expedition.
Thank you so much, that's very kind of you and we're very grateful for every donation! I hope your Mum loves her socks (my Dad thought it was hilarious the year he got one sock and an IOU) and maybe it's a pair for you after your jersey and blanket? 🙂 xx
Thanks for the pattern and tutorials. My socks are improving but so slowly! I'm also having a go at the mittens.
I've made a small donation for Peru. My daughter did this one nearly 17 years ago! She was the only Spanish speaker in the group and boy did she learn some new words! Hope your daughter enjoys it!
Thank you so much for your donation, we really appreciate it! I'm so glad that you're finding the patterns and tutorials helpful, both warm socks and mittens are useful for the weather right now, wherever you are in the world! Learning Spanish is still on the to-do list, but as the date gets closer the incentive to get on with it grows. I think it's so important to have least have a grasp on the basics when you go to somewhere like this – and I'll look out for the new words when she comes home! 🙂 xx
Hello Christine, I found your Facebook group and joined a few weeks ago. I finally sorted out all my knitting needles and yarn. I remembered I had started some cabled socks a while ago, one is finished and the other is to start so I'll get on with that one. I also found some beautiful wool that I had forgotten I'd bought! They will make a lovely pair. I'm so inspired to get sock knitting again, I can't wait. I'm going to have a look at your free pattern and I seem to think you have a book as well? I must get hold of it.
We went to Peru a few years ago and I loved looking at all the wool over there, your daughter will love it. I hope she will visit Machu Picchu, it is incredible especially if you go up at dawn.
Thank you xx
Hello Sheila, it's lovely to see you! I think you'll really enjoy getting back into sock knitting, there are so many wonderful yarns and patterns that you could quite conceivably never knit anything else! Yes, Machu Picchu is on the itinerary with an intention to see it at dawn – I'm very envious and hope she takes plenty of photos! I've dropped hints about the yarn as well, or perhaps just leaving her clothes behind and bringing home a baby alpaca in her rucksack. Or perhaps not! 🙂 xx
Hello Christine, I just found your facebook page today and love it. Thank you so much for these wonderfully clear instructions. I'm new to knitting and looking forward to doing socks. Following your tutorial, I may not be quite so intimidated. Thanks again, Mary G.
That's fantastic! Xx
Greetings! Found this on Ravelry, as I was searching for a basic sock tutorial. I've been knitting for about 6 months, and thought it time to try my first socks, so here I am.
I've made it through the heel flap and turning the heel, but I'm a bit lost on the next step of picking up the stitches. Maybe I'm not quite understanding _which_ stitches to pick up, or maybe it's because (I think) your numbers don't quite sound right — 19 sts and 19 sts = 38 sts, which is 8 more than half (assuming a CO of 60 sts), but I have half on the working needle (to make the flap) and half on a stitch holder. In my case, I cast on 72 sts, so I left 36 sts on my needle (I'm doing magic loop) and transferred the other 36 to a stitch holder.
Can you please tell me what I'm (probably) misunderstanding or not getting quite right? I really appreciate this great tutorial. Just got stuck in this one teeny spot! Thanks!
Hello, it's lovely to see you! Don't worry, the heel and gusset work out just right with the numbers – if you cast on 72 then you'll have 36 for the heel flap and 36 for the top of the foot so you're just right. You work your heel flap on the first 36 stitches of your round (always keep going in the direction you've been knitting) and then you pick up one stitch for every two rows of heel flap – this is easy to work out as you just pick up the big slipped stitch at the end of each heel flap row. It doesn't matter if you have a few more or a few less picked up stitches as the number of heel flap rows you did may be different to me, but you will have considerably more stitches on your needle as that's what's creating the gusset down the side of your foot. As you complete the gusset, you decrease down to the number of stitches you started with (in your case 72) and carry on down your foot. Does that help?
Thanks for the timely reply! This does clear up a few things, so I'll try it again tomorrow and see how it goes from here. Overall, your directions have been very easy to follow, so I think I just needed a breather. 🙂 I've got a couple other spots that I could improve on, so thankfully I decided to make a "prototype" first. Thanks again 🙂
That's great to hear! Yes, sometimes you need to look with fresh eyes and it all becomes clear. If you're on Facebook and haven't joined our Sockalong group, it might be something you'd like to do as there's always someone around to help and it's easy to post pictures of where you're up to if you're stuck. You'll be amazed at how easy your second sock is! 😉 xx
Yes, I'm really looking forward to the second sock. 🙂 Unfortunately I'm the only person on the planet who doesn't use FB. Another quick question: When using a long tail-type cast on, should I count 2 rows worked flat at the beginning in addition to the CO, or including the CO row? Incidentally, I'm using the Channel Island cast on, but what do you usually use for these? Thanks once again for the help!
Any stretchy cast on will work fine for socks – as long as you can get the cuff over your foot then the choice is yours! I don't know if it really matters where you start counting either as long as you do the same for both socks; an extra round here and there really isn't going to make much difference!
Thank you ever so much for this pattern. I'm usually seen crocheting blankets but you have inspired me to take up the pins. One (silly) question though, when shaping the gusset, do you repeat rounds 2 and 3 until you have decreased to the required amount, or is it rounds 1 and 2? Also, if decreasing using rounds 2 and 3, when at round 2 it says at the end knit to marker, does it mean knit to marker and then do round 3, or does it mean at the end knit to marker however 3 sts before that marker do the decrease (ie the end of round 2 incorporates the start of round 3) sorry confused!
Also (sorry) at what stage do you take the marker out which denotes the start of the round – inserted at round 3 of the ribbing?
Hello Emma! I'm glad you've been tempted to try out the pointy sticks! No question is a silly question, so don't worry about asking. For the gusset, you repeat rounds 2 and 3 until you are back to your original number of stitches. Rounds 2 and 3 merge into each other so perhaps it's easier to consider it as Round 2: slip marker, knit to next marker, slip marker, knit to 3 stitches before end of round, k2tog, K1 Round 3: slip marker, knit to next marker, K1, SSK, knit to marker. On your decrease round which is every other round, you are decrease before and after the top of the foot markers to create your gusset. You'll need to take out your original marker from the ribbing when you come to do the heel flap – it will fall off your needle then anyway so there's no need to try to keep it on. Hope that helps! xx
Thank you very much for your help!
I am Pleased to say I have made it ready to shape the toe! However I have a problem. At this stage I have two markers in my socks. (FYI I originally cast on 52 sts). (Small feet).
My first marker marks the start, however, my second marker, working anti clockwise, is only a few sts away from the first. (Each marker representing where the shaping of the gussets happened).
If I follow your instructions and k1 ssk, k24 sts etc, and place a marker, this will result in my toe shaping being top to bottom rather than either side of the toes. What have I done wrong?
I started off shaping the toes and when I realised the seams were going to be vertical rather than horizontal, I have removed the second marker and frogged back to the first marker. Was I supposed to remove the second marker when I started doing the foot length? Even so, had I have removed the second marker, my toe shaping would still be vertical rather than horizontal. Not sure where I have gone wrong. However I am now sat at the first marker, in the top of the foot, wondering what to do now.
Feeling a bit silly now, I must have gone wrong somewhere because your instructions are wonderful. Sorry.
Don't worry, Emma, we'll sort it! If your markers are so close together then it sounds like something might have gone wrong with your gusset decreases. Did you keep the number of the top of the foot stitches the same (in your case it would have been 26) and decrease on either side of them or do you think you might have decreased across the top of the foot instead? That would explain the markers in the wrong place. If that's the case, you've got two choices now: either frog it right back to the gusset and re-knit it from there (which I will agree feels rather soul-destroying) or if you sock fits you just fine, then treat this one as a practice sock with unique design elements and leave it as it is (you might even want to make the other one to match!). To get your toe shaping from where you are, then work from the first marker if you are sure that is in the right place. Just count 26 stitches from that marker and that's where your next marker will go, so in between you'll have K1, SSK, K20, K2tog, K1 on both sides of your foot (you have a decrease either side of each marker). Does that help?
Thank you for your reply. I'm not sure what went wrong either! As I had a marker at the start of the round (just about to toe shape), I worked out where the toe shape decreases should be (well equal spots both sides) and placed a marker, and duplicated the same on the other side so the decreases would be equal in both sides. It ended up ok! I'm afraid I'm not a frogger – all those stitches to drop and pick up (Thats the reason I crochet and not knit lol!)
It's not put me off though – on to sock two!!
If your sock has worked out OK then it's a success! And you'll find that number two will be much easier. Well done on working it out! 🙂 xx
on shaping the toes, the pattern only tells you to place one marker in round one so I don't know where to place the second marker what have I missed this is my first time knitting socks please help
Hello! You should already have one marker in place showing where your round starts, and you place the second marker after your decreases and knitting across the toes. If you've cast on 60 sts, the second marker should be between the 30th and 31st st – ie, exactly half way round your round. Hope that helps! Don't forget that there are lots of pictures in the Sockalong tutorials although it sounds like you're pretty much there with your first sock! 🙂 xx
This is a fantastic tutorial and pattern, so easy to follow. Thank you for making it freely available – now on the sixth pair of socks and totally addicted!
That's brilliant to hear, I'm so glad you've got a drawer full of "proper" socks now! 🙂 xx
Hello Christine,
Today I mentioned to my mum I'd love to get into sock knitting (we mainly crochet and I also quilt), she mentioned she'd heard of you over at the attic24 instagram, so I popped over here to take a look. Just wanted to say thank you so much for taking the time to write up all of your wisdom and patterns, and for you generosity in making them freely available! I've found this post inspiring and reassuring and now I'm even more excited to get some needles and pretty wool and start my first pair! Beth xxx
Hello Beth, it's lovely to see you! There are so many fabulous sock yarns you're going to be spoilt for choice and the self-striping ones are one of the reasons that sock knitting is so addictive! Good luck with your socks, and do shout if you get stuck! xx
I'm on my 2nd sock with dpns, and apart from grappling a bit with the Kitchener stitch, loving it. Must try a circular needle. I've tried a long circular before for sweaters etc, but found the knitting got too heavy, but socks are a different thing. Already planning my next pair. Thank you for posting this easy to follow pattern.
Socks are much easier on a long circular as they're not as heavy so you find that you can go much faster. It sounds like the sock bug has got you already! 😉 xx
Hi from New Zealand! I'm about to knit a pair of socks in men's sizing by casting on 68 stitches. When picking up the gusset stitches, instead of the 19, would I have to pick up 21? Thanks for a great pattern 🙂
Hello! The number of stitches that you pick up for the gusset is dependent on the number of rows you have in your heel flap. Your heel flap should be about 2" long (you can measure it against the foot to check if it needs to be longer) and you pick up one stitch for every two rows. Where you will have to change the numbers is on the heel turn – your set up row will be p1, p18, p2tog, p1. Hope that helps! xx
Sure does – thanks 🙂
Hi, thanks for your lovely pattern, I have been determined to master sock knitting for a while but I am completely stuck 🙁 I just don't understand the turn heel part. Do I just repeat rows 1-4 until all the stitches are used or am I being completely dense? 🙁 Thanks in advance :).
Hi Jane, what you're doing is creating a V-shaped heel and row 1 is your set up row to get you to the middle of your heel flap. Rows 2 onwards are your decrease rows which decrease one stitch on every alternate row, pulling the sides of the flap around to make the V shape. After row 4, row 5 will be Sl1, P8, P2tog, P1 and then K9, then P10, then K11 etc so that you're increasing the size of the heel flap and decreasing the number of stitches at the ends of your needle with each row. Does that make sense? xx
Dear Mum, just wanted to tell you that I did as you said and I was able to turn the heel successfully. Doing 2 socks at one time and it will help greatly when I tackle the second one. Thank you again so much.
Faye from CA
Hooray! I knew you would get there in the end! 🙂 xx
Hi There Thanks for sharing the pattern. This is my first attempt at knitting socks so here goes my first question; after I have knitted the 16 rounds of rib, you say on to leg part now 'knit each round' isn't the leg part knitted in stocking stitch therefore 1 row knit and 1 row purl ??
Hi Maree, because you're knitting in the round you're always going in the same direction so you only need to knit to produce the stocking stitch. Trust me, it works! Have you found the Sockalong tutorials to help you along as well? Xx
Hi there, i'm a crocheter and spied attic 24's blog posts about learning to knit socks, i'd love to learn but i find it difficult to learn new things with written patterns and pictures alone and wondered if there was a video tutorial for your pattern at all? Thank you
Hi Gwinni, it's lovely to see you! I don't have any video tutorials at the moment, although I think that's something I should definitely consider to go along with the Sockalong tutorials. If you're on Facebook you could join our Winwick Mum Sockalong group so that you'd get real-time help if you get stuck xx
Hi Gwinni, it's lovely to see you! I don't have any video tutorials at the moment, although I think that's something I should definitely consider to go along with the Sockalong tutorials. If you're on Facebook you could join our Winwick Mum Sockalong group so that you'd get real-time help if you get stuck xx
Hi, Christine,
Just wanted to say thank you so much for your blow-by-blow instructions here. I followed them to the letter for the first pair of socks I've ever made (and the first time I've used circular needles and DPNs!) and it was much easier than I anticipated. The worst part was the grafting at the end!
Plan now to make several more pairs.
Best wishes,
Linda
That's great to hear, thanks Linda! xx
Another one from NZ – this time the South Island. Fantastic pattern, have made a first sample so I know it works. Will pull it apart and complete a proper version.
Suggestions – turn heel – specify to repeat rows 3 and 4, state how many stitches there should be at a couple more stages. but these are just ideas. The pattern is intuitively correct, easy to follow. Nice shape to the sock. My go to pattern for socks now and I tried quite a few before yours.
The part I got lost in was after the pick up stitches for the gusset but this was because it was just a sample, will use a pencil and paper I'm sure it will be fine. I also tried it on DPNs, which weren't long enough for the number of stitches. Lesson learnt. Do you find that the circular needles come apart at the join? Oh well they're still the best bet.
Thanks for the pattern. Much appreciated.
Hello, thanks for taking the time to leave a comment! I'm glad your socks have turned out OK, don't forget that there is more information and more photos in the Sockalong tutorials if there are places where you get stuck 🙂 xx
Great instructions!
Thank you so much
Teresa
You're very welcome! xx
I love your sock tutorial. I am a "show me how" person. Your pictures are worth a thousand words. I am working on my first pair of socks. Thank you, thank you. Jacque Dooley
That's great to hear, I'm so glad they're helping, Jacque! xx
I am enjoying you blog so much. I feel fortunate I found it. Especially love the socks tutorial. Thank you, thank you
Thank you very much! xx
You say to knit 2 rows of rib before transferring to circular needles. Is that to say that you will join the round on the third "row"? I'm imagining 2 rows of rib not connected and then joined in the round only when you start with the circular needles. How do you get it connected all the way to the top of the sock? Thanks!
Yes, that's quite right, Trish, you join at the end of the third row after you have transferred your stitches to your circular needle. Yes, there is a gap, but you've got a tail end to sew in so you can just sew up the small gap with your tail end and no one will ever know. You can join into the round straight from the cast on if you like, but I have found with beginners that it's easier to rib two rows first so that your stitches are less likely to twist xx
Hi, I learned of you and your sock tutorial on Attic24 with Lucy. She has given me the confidence to try! I ordered my sock yarn and was just about to get my needles out when I came to find that here in the U.S. we don't have 2.5mm & 3.0mm equivalents. What do you suggest I use? I so wanted to start these over the Christmas holiday but I don't know what to use. Can you help me please?
Hi Lori, it's lovely to see you! I suggest you try either a US1 (which is equivalent to our 2.25mm) or a US2 (which is equivalent to our 2.75mm) depending on whether you are a tighter or looser knitter. When you cast on, just choose a size bigger to make sure that your edge isn't too tight to get your foot through. Hope that helps – and have a lovely Christmas! xx
Hi, I'm so sorry it has taken me so long to reply to you. Christmas was busy! 🙂 Thank you so much for your help, I really appreciate it. I wasn't able to cast on as planned, I had to order the needles. Hopefully it will be a New Years cast on. Happy New Year! Kind regards, Lori
My New Year's resolution for 2017 was to learn to knit. I can now cast on, knit and purl stitch, It looks messy but I'm staying with it. My goal is to make tons of beautiful socks and hats and maybe, just maybe a sweater or too. I'm an intermediate crocheter and I must say it's apples and oranges right now, lol
Stick with it, Peggy, and it will all get better – you were a beginner crocheter once too! Once you can knit socks you can knit anything, so that sweater isn't out of your grasp at all 🙂 xx
I've just completed my first pair of socks and I've only had two very small sections that had to be unpicked. This was such an easy pattern to follow. My children now want their own pairs. Will it be possible to use a 30mm short circular. They have small feet so I'm sure I won't need too many stitches. ( I've not worked out how many to cast on yet). I have a feeling the 30mm circular will be too long.
Hello Susan, it's lovely to see you! You've done really well to only have to unpick twice on your first socks – you should be super-proud of yourself! I would suggest that for children's socks you go down to a 25cm needle or smaller – I can't use the smaller ones as they make my hands hurt but the 25cm needle doesn't feel that much different to the 30cm one but you can get less than 60 sts on comfortably. I cast on about 56 for my youngest daughter's socks and they stretch just a bit too much on a 30cm needle. The 25cm one is made by KnitPro so you should be able to track it down quite easily online if not at a local store that sells KnitPro needles. I have a range of needle lengths in my sock knitting kit – they're never wasted! xx
Thank you. x
Hi I am getting to the scary bit ,turning the heel 16 stitches ,first row looks like I can follow but 2,3,4 rows it says turn and I will not have used the 16 I know I am just being dim ….Thanks for the lovely tutorial x
Hi Linda, your first row is the set up row to get you into the middle of your stitches and then after that you're just working on the middle stitches, leaving the others on your needle. I've got a YouTube channel now with videos to help – I'm still working on the Sockalong ones but this video from my latest tutorial might show you more easily how to turn the heel: youtube.com/watch?v=ocovtFAY0B0 Hope that helps! xx
Ha just watched it going to go back to it again and have another look but now I know where I am thank you this is my first ever sock x
Really nice woolen socks you have here !
Love this…my first sock ever and thats why i do have a question…as to where exactly tre the markers? coming from teh heel, picking up the stitches…place the marker…and then before i pick up the stitches? a bit forlorn here….
Yes, that's exactly right. You want one stitch marker on either side of the top of the foot stitches, although you'll probably find that you need to put the one on the K2tog side on last otherwise it will fall off your needle whilst you're picking up the stitches on the other side. If you're using DPNs you may not need stitch markers at all to begin with if you split your stitches across the needles so that your decreases are always at the start/end of a needle. If you are using stitch markers, you only need two for your decreases, you don't need to mark the start and end of the round any more. Hope that helps! xx
thanks loads, now i am close to the toe part, i have 68 stitches on my needles ( did the sole with 1 round of slip one, knit one ) now on which side did you start with the decreasing instructions?
Hi Sila, I always decrease from the right hand side of the top of the foot stitches which, if you consider the first gusset decrease to be the start and end of your round, is actually the start of the next round. You can decide whether to continue the heel stitch up the toes if you want 🙂 xx
Thanks again for your quick reply! with the next pair ( yarn given as a present is plenty for 3 pairs ) it will be much easier! yours was the best instruction i could find! much love and happy easter!
I'm so glad it all helped! I hope you have a lovely Easter too xx
Please can you tell me which wool you used to make the purple striped socks in your blog. I've been trying to find it without success.
Do you mean the ones in the pictures above? It's Regia Design Line by Kaffe Fassett in shade 2904 Delphinium. You can still find it online if you do an internet search. Hope that helps! xx
Hi Christine
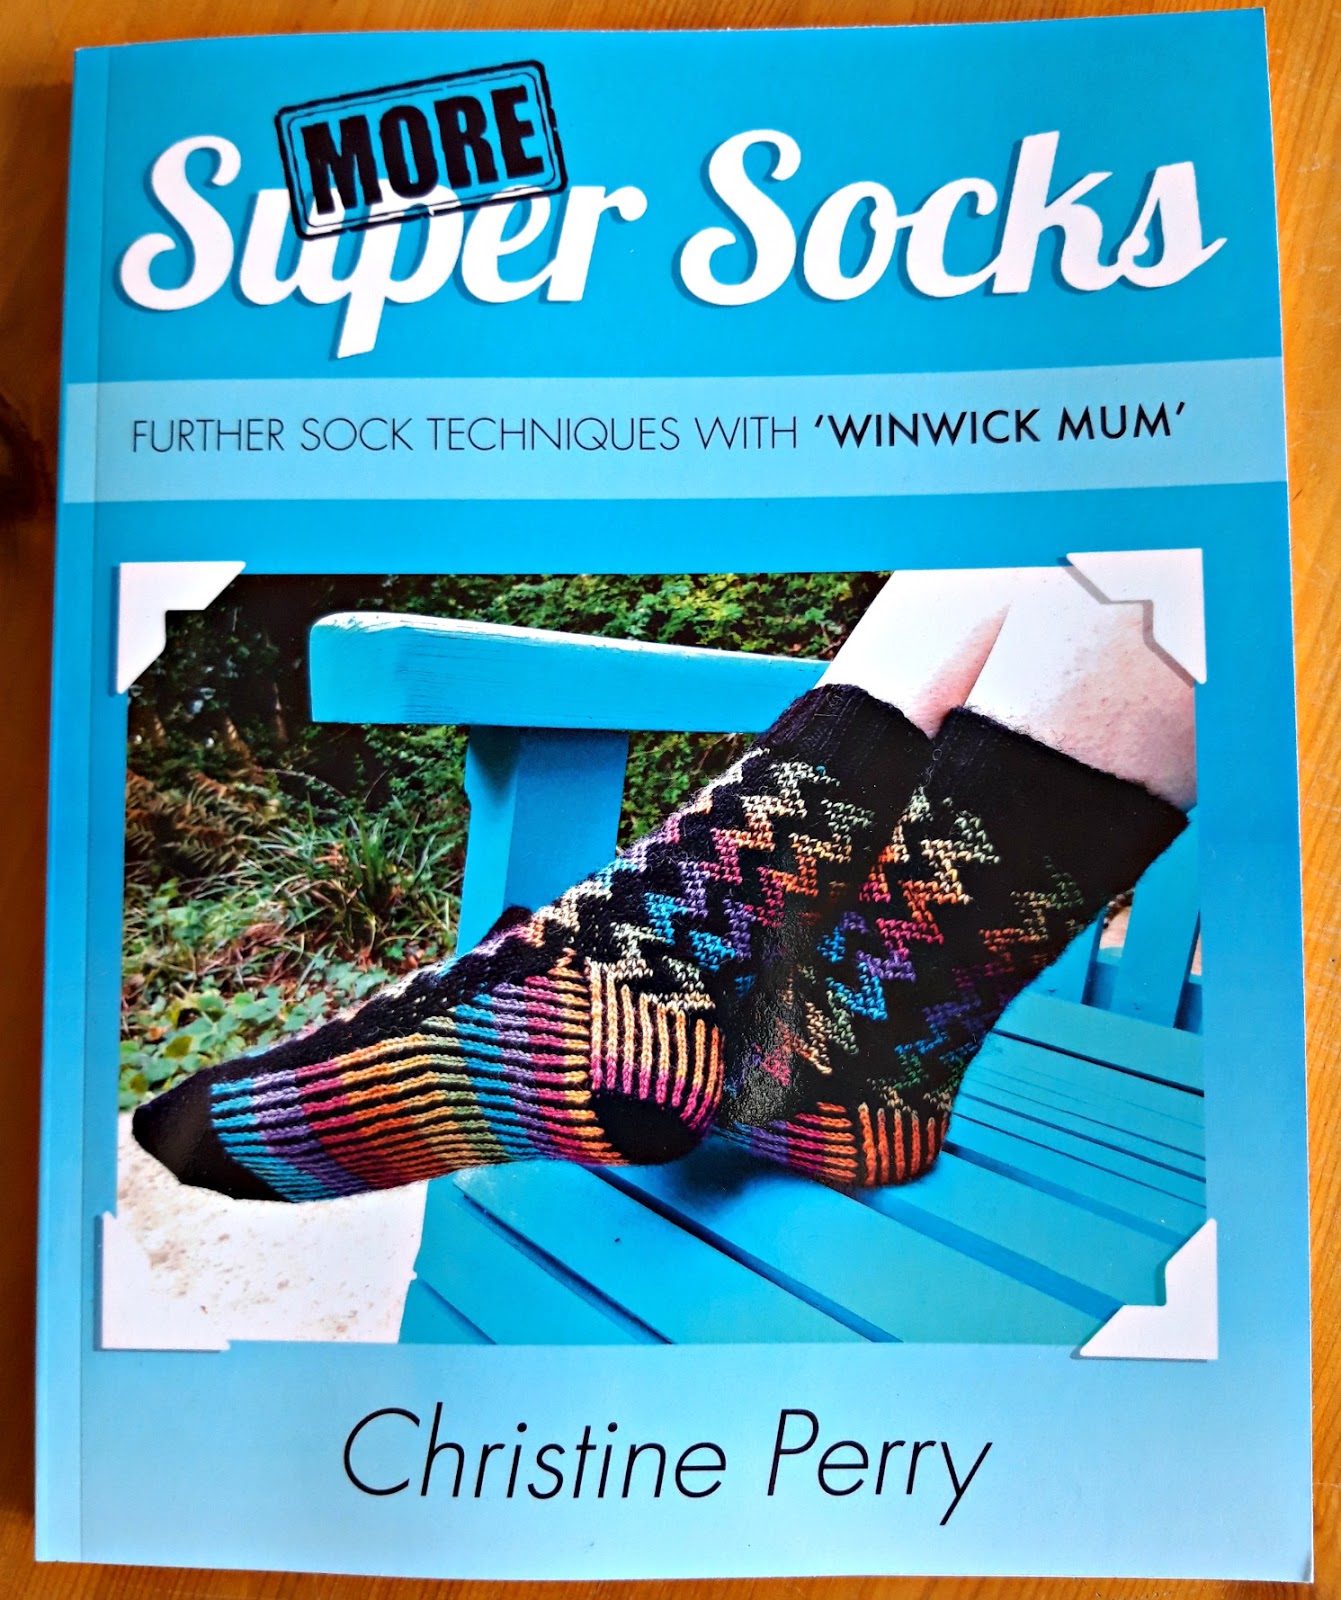
I have now made at least half a dozen pairs of socks following your great patterns . How , though ,do you get the great shape to the foot that the photo on cover of book shows ? My socks are ok as bed / slouch socks or even in case of worse pair ,Christmas stockings! They never have the fit that yours do . Is there a secret ? Different pattern ? Is it just bad knitting on my part ?
Hi Clari, it won't be bad knitting on your part at all, I'm sure! Have you done the stitch calculation to work out exactly how many stitches you need for your socks? It's in the tension tutorial section of book and it's worth taking a few minutes to check your knitting and work out the numbers for your foot. I hope that helps! xx
I have a question which I am hoping you can help me with. I've finished the heel flap and have a total of 60 stitches on my needles. To start with the next part ('turn heel'), it seems that you only need to work 20 stitches ('Row 1:Sl1, P16, P2tog, P1, turn'). I'm confused about what to do with the remaining 10 stitches from the heel flap- any advice? Thanks, Carrie
Hi Carrie, what you're aiming to do with the heel flap is to bring stitches in from both sides to create a V shape. The first row of the heel flap is a set-up row to get you into the middle so that you can start decreasing to create that V. You can find more info in the Sockalong tutorial for the heel ( winwickmum.co.uk/p/sockalong.html) and also videos of how I create the heel turn on my YouTube channel (they are different sock patterns but the process is the same) at youtube.com/channel/UCKm-VF_Q5vmzOVOJx_dtoHg I hope that helps! xx
Hi so I've never made socks before so I was going to try this pattern but 60 stitches total seems awfully small. I don't know if I working with needles that are too small or what. I know I could increase the number of stitches, but I wanted to do the pattern as written first. So I guess my question is why is my sock so small and how do I fix it?
Hi! I think you'd be best taking a look at the Sockalong tutorials if you've never knitted a sock before – the Sockalong uses the same pattern but goes into much more detail about knitting it, including how to work out the right number of stitches for your feet. You'll find the Sockalong tutorials if you click on the yellow picture at the top right of the page xx
Hello,
I have been enjoying your patterns and tutorials, and I'm wondering if you would consider designing a knee-high sock pattern (with a shaped calf)? I know there are plenty of knee high sock patterns out there, but as I am familiar with yours, I would much prefer to follow a pattern that you have made.
So far I have been a very basic knitter-only knitting scarves and hats. Thanks to your site I have now jumped into knitting in the round with DPN's and making socks!
Hello! Thanks for your message! I don't have any plans to create a knee-high pattern at the moment, but will add it to my list of future ideas. In the meantime, I can only suggest that you have a look on Ravelry to see if there's a pattern that you can adapt to the Sockalong sock, or if you're in the Winwick Mum Knit n Natter group on Facebook, ask for suggestions there as I know that more than a few people have knitted knee-high socks and may be able to offer some advice xx
If you increase the number of purl stitches in the first row of turning the heel, do you need to adjust the other number of knit and purl stitches in the following rows? I did not, and something is not looking quite right.
No, it should work out fine. The set up row is the one that gets you into the middle of your heel flap which is why you adjust the number of stitches if you cast on more. You can still work the rest of the heel turn as it is written. One way to check that it's right is to count the number of stitches left after you turn for your set up row, and then count the number of stitches after your first heel turn row and they should be the same. If they're not, you've not got the set up stitches quite right. Hope that helps! xx
Hi, Christine. Making my first pair of socks using these tutorials as they were recommended by many as the place to go! Thank you for such clear instructions and photos-they are most helpful. I have read through the comments and don't see my particular question answered, so can you please just verify that when turning the heel, we are to simply turn the work vs. doing a wrap-and-turn? Many thanks, Nancy
Hi Nancy, I'm glad you're finding the tutorials helpful! Yes, you just turn your work after the decrease stitch (plus K1 or P1) – there is no wrap and turn on this type of heel turn as the decreases pull the stitches together to make the V shape xx
I've got to try knitting socks. My feet get so cold through the winter so looking into this with wool yarn.
Your feet should definitely be warmer when they're wrapped in wool! 🙂 xx
These are the best instructions for picking up stitches (and how to calculate the correct number of stitches for the heel turn) I've ever found. Thank you!
That's brilliant to hear, thanks for letting me know! 🙂 xx
Thank you for this brilliant pattern — especially for all of the clear and detailed pictures. I'm going to use your pattern in combined with Cat Bordhi's basic sock pattern (with 2 circulars), and then for the toes a method that a Lithuanian friend uses. Should be an interesting combination!
I like that your pattern uses plain stocking stitch after a ribbed cuff — a lot faster for me.
All best wishes!
That definitely sounds like an interesting combination! Good luck! 🙂 xx
I would like to thank you for the amazing tutorial and knitalong – it was such an enabler to finally make the first pair of my very own socks!
I blogged about it and my ravelry project page is: ravelry.com/projects/ItWasJudith/basic-socks
You've been so kind to help people making their own beautiful socks, and I love this simple but pretty pattern.
with gratitude <3
I'm so pleased that you found the tutorial useful – and it's great that you've blogged about your socks too, as I don't always get to see first pairs when they're finished 🙂 xx
Hi
just called by to say thank you for your wonderful instructions on how to do the Kitchener stitch i have just finished my first pair of socks and am sooo proud of myself lol I will definately be making more.
p.s. your name reminds me of when my now partner first came to Warrington and he pronounced the area Win Wick….. instead of Winick.. 🙂
Lots of people pronounce it Win Wick! 🙂 There are so many place names in our country that aren't said as they're written, aren't there? Glad the Kitchener instructions have helped you! xx
Hi
Just to say thank you for the tutorial on your sock pattern helped me so much now
I'am knitting them for all the family thanks again Mandy X
That's brilliant to hear, thanks for letting me know! 🙂 xx
I just found this site – I’ve knitted socks for quite awhile but there is lots of useful infomatiom here. Thanks
I'm really glad you've found it useful, thank you! xx
Hi Christine. Thanks for the great pattern and advice. Just a question – when you are doing the gusset do you have to write down the rows so you can remember which is 2nd row and which is 3rd row. I should point out that I am on pair no 12 !! Thanks again.
Hi Vicki, no I don't have to write it down as I can see from the row below whether the stitch is a decrease or not – a decreased stitch has two stitches going into on and a knit stitch is just plain. If you look closely, you'll be able to see it on your knitting and then you shouldn't have to write it down in future 🙂 xx
Thanks Christine. No longer need the pencil and paper! Thanks so much.
Hi, Sorry if this has been asked before, when it comes to sizes, you say the pattern is a Medium and you are a size 5 Uk. What would you say a large is? 6-8? DO you count each size as the 4 extra stitches? If I wanted to make a pair of size 11 socks would I have to add another 24 stitches?
To be honest, using the terms "small", "medium" and "large" can often be confusing with hand-knit socks because the actual size is based on the person's foot – the longer I have been knitting and designing socks the more I try to encourage people to actually measure their feet rather than work to a shoe size. My size 5 foot is an average size for the UK so, therefore, a "medium", but in real terms if I measure around the ball of my foot it is 8" which is far more useful for working out whether a sock is going to fit or not. You can always knit more rounds to make a sock longer, but if it is too tight or too loose then it won't be comfortable even if it's the right length.
For the size 11 foot that you're knitting for, the best thing to do is to measure the ball of the foot and use the Sock Stitch Calculation from the Sockalong tutorials (click the turquoise link picture in the right hand side bar to go straight there) so that you get the right width. My husband's size 8 foot is a 68 stitch cast on, my daughter's boyfriend's size 14 foot is based on 76 stitches – using the Sock Stitch Calculation will give you the perfect size for that person and you'll have bespoke socks far better than anything you can buy. Give me a shout if you need help working it out – and good luck! 🙂 xx
Hi Christine. Just wondering what your preferred method of joking wool is. Thanks for all your help.
I'm assuming you mean joining wool here! 🙂 I tend to weave my colours together (you'll find a tutorial for contrast cuff, heel and toes socks which uses my technique in the patterns and printables section) but I've recently started to use a Russian join in some places where it doesn't work as well to weave the ends in xx
Hello! Loved using this pattern, so easy to follow and result is so neat! Do you have a baby version anywhere? Not quite confident enough to figure it out myself (and get a second sock the same!) thanks in advance!
Hi! I'm glad you found the pattern helpful! I don't have a baby version, I'm afraid, it would just be a case of reducing the numbers but as long as you make notes from the first sock then the second one should work out OK 🙂 xx
Hello there I want to make socks for Someone with large size feet. I don't have opportunity to measure the Feet. Could you give me approximate stitch count (using 4ply yarn) I should start with? I think it is ok if they are a little big but will be shame if I make them and they are too small. And for large size feet should I use 100g ball or would I need more?
Do you have any idea what size feet they are at all? People's definitions of "large" can be quite different! 🙂 In general, though, a 100g ball should be OK unless they really are very large feet.
I am an American knitter and I am very confused about the British use of ply for size of yarn. I have looked all over the web and have found (usually) that ply is used to notify the knitter of how many strands of wool are twisted to make a piece of yarn. Does it then stand to reason that the higher the ply, the larger the yarn? I am used to American name like lace (for very fine),fingering or sock yarn (size 1), sport yarn (size 2), DK yarn (size 3), Worsted or Aran (size 4) and so on. When you give a pattern for 4 ply, or six ply yarn, what size of yarn to I use? I am very confused. Perhaps you can help me get a handle on this. Thanks in advance.
Hi! In theory, you are right and the higher the ply the thicker the yarn although it's not always the case these days that you can pull a yarn apart to count the plies. DK yarn is also known as 8ply, and 6ply is (as far as I can tell), mostly used for accessories rather than garments – it's quite easy to get hold of in European brands such as Regia and Opal but you don't always see it around otherwise. 4ply sock yarn here is the equivalent of your fingering yarn – you might already have seen this website post but this is quite a useful comparison: tricksyknitter.com/blogs/knitting-resources/yarn-weights-terminology-and-us-vs-uk-standards.
I think the best way to tell the difference is to look at the recommended needle sizes – for 4ply here, we would use 2.25-3.25mm, for 6ply 3.25-3.75mm (although I use 3mm for 6ply as it makes a tighter fabric) and 3.75-4.5mm for DK (I would use 3.5mm for socks). I'm not entirely sure if this helps you, but I hope so! 🙂 xx
Thank you so much for your wonderful, informative tutorial. I have tried – unsuccessfully- in the past but with your help I'm almost finished my first sock! You have explained everything so well, I'll be sharing this site's link, if that's OK with you, with customers at the fabric/wool shop where I work. Once again, many thanks, Michelle
That's brilliant to hear, thank you, I'm glad the tutorials helped you! xx
I have knitted socks for well over 50 years, mainly because I couldn't find socks that were long enough for hubby to wear in his wellies. My first attempt was from a pattern in Pins & Needles, wonder how many folks remember that magazine. It was using double knitting and on two needles, the join was down the back. The original pattern itself is long gone, along with the one for sideways knitted gloves, but I had the foresight to type them out for future use, and is now installed on my laptop.
Several years ago I decided to have a go at knitting them on four needles. Fine until I was involved in a road accident that wrecked my thumb. I found it a real struggle to manipulate four needles, but then I happened to hear about the method of using two circular needles. Soooo much easier. I have found it to be a good idea to knit the first stitch from each needle somewhat tighter than the norm.
There are so many lovely sock yarns out there that I have even made them for myself. 😉
I'm not understanding heel flap instructions. If there are 30 stitches, row 3 indicates an odd number. So is the 30th stitch a knit?
Thank you
Yes, on row 3 you're working (Sl 1, K1) all the way along the row. If you're brand new to socks, can I suggest that you take a look at the Sockalong tutorials (go up to the top of this page and click on the purple picture on the right marked "Join the Sockalong") and there are videos on my YouTube channel which might help as well – different patterns but same process – youtube.com/c/WinwickMumSocks
Basic????4 ply sock pattern??? I have to say that you made an easy knitting task very annoyingly difficult! All the silly markers when written instructions could have described the method without! I am an experienced knitter but was a little out of touch with sock knitting. I found a real basic sock pattern on Ravelry which provided the same end result without all the complications of markers, circular, DPNs, magic loops, just using four DPNs and the outcome was perfect. Please don't use the word 'basic' if you are going to complicate matters and put people off. I see you advertise markers so that is probably why you advocate the use of them. Sorry, but I have really had enough of crafters who make life difficult and patterns that are either wrong or so long winded that I just want to give up! I am in the process of knitting kilt socks with quite a complicated design and they are still easier than your basic pattern.
Hello Lucy, thank you for your comment. I hope you feel better having got that off your chest. This tutorial was written for a short circular needle which is my preference; if you had wanted a DPN tutorial without using stitch markers then you’d have been better looking at the Sockalong tutorials which gives information on using those, plus long and short circulars. I’ve updated my links to make it more obvious where to find the Sockalong tutorials as it seems that you missed those.
Not every pattern will suit every person and obviously mine doesn’t suit you – that’s the way of the world and that’s perfectly fine. It means there’s room for everyone. I’m very glad that you’ve found a pattern that works for your skill level and I hope that you will enjoy knitting socks for many years to come.
Hi,
You tutorial and socks look great. Could I ask for some advice? I’m a complete new-start with knitting but it’s socks I’m interested in learning how to do…could you recommend any videos suitable for a complete newbie re casting/ knit, purl etc? Then I can start in socks after practice? When I look at videos I get bogged down in American ones that I’m unsure are relevant. Thanks so much.
Hi, knitting terms aren't that different in the UK and US (unlike crochet) so you should be OK with American videos (offhand, all I can think of is that they use "bind off" instead of "cast off" but I think the rest is the same). Try the Knit Freedom or Very Pink websites as they have free videos that should get you started xx
Just to throw another option out there, the team at Tin Can Knits has a collection of patterns titled "The Simple Collection" with full tutorials for beginners. They begin with casting on, knitting, and purling, and work up to knitting in the round and more. They can be linked by searching Google or through Ravelry. Best of luck!
Your pattern and my newfound TAAT skills have made me love knitting socks! Thank you for the clear, simple and very easy to follow instructions and images that make it very simple to adapt the pattern to DPNs, magic loop and TAAT. I am now finishing up my third par and have 5 more skeins waiting in the wings to become cozy winter socks. Grateful in Ottawa, Canada
That's great to hear, I'm so glad the pattern and tutorials have worked for you! It sounds like you've certainly got the sock bug – and here's to cosy toes for the winter! 🙂
I have some wool but have not knitted socks before. This tutorial looks super and I don't mind working in DPNs as I can't find circulars small enough. I often seem to be sewing up holes in socks I have bought. Do keep my nails trimmed. Any hints on this? Robyn
I've got pokey toes too so even though my nails are short I usually manage to put holes in the toes of my socks. I use the heel stitch across the toes as well as the heel flap and that helps – there's another tutorial on reinforcing if you have a look at the patterns page. Hope that helps! 🙂
Hi! I cast on 80 stitches to start.
Now I'm turning the heel with 40 stitches to start, and I'm not sure how many stitches I'm supposed to end with once the heel is turned. In the sock calculator, it said the heel/toe section would be about 13 stitches. Is this the number of stitches I should have once the heel is turned, or does that refer to something else?
Thank you!
-Cate
Hi! I think you should have 22 sts left after your heel turn. I'm not quite sure which sock calculator you're using and how you've ended up with 13 sts – can you give me any more details on that?
Thank you! I used the calculator at: goodknitkisses.com/sock-calculator/
Ah right, I've got it! OK, so it's telling you that for your 80st cast on you're working 40sts for the heel – that's right as it's half the number of stitches you cast on – and I think the number 13 refers to a short row heel and not a heel flap and gusset heel. Is there a pattern associated with the calculator that you've used? Don't worry if not and you've already started on a heel flap/gusset heel, you can continue with that – just ignore the 13 for now, work your heel turn as you are doing and then pick up the stitches down the side to make a gusset. I think the 13sts also refers to the number on each side of the toes for when you finish but it's up to you if you want to go that small – I usually reduce to 14 sts on each side. I hope that helps!
Thanks so much for a so easy to follow pattern this is my second pair of adult socks and these instructions have made it super easy!🥰🥰🙏🙏
I’m so glad that it all helped you – I hope you’re super-proud of your socks and here’s to many more pairs! xx
I have been knitting socks for 60 odd years on 4 DPNs and never knew the circular needle method. Am definitely going to try this as i am sure it will be quicker. Interested re sizing etc. Thank you so much for your generosity and sharing. I follow Lucy and her crochet blankets and stumbled upon the socks. So all the way from sunny South Africa thanks !!
Hello, thanks for taking the time to leave me a message! I started on DPNs and changing to a short circular was amazing, it was so much faster for me! I hope you can track some down to try them out! xx
Hello, I have just started knitting socks and as a beginner decided to fo Judy’s Magic Cast On and knit toe-up. Do you have an easy sock pattern incorporating an easy to do heel. Or a video tutorial. Very nervous. Had thought the Fish Lips Kiss heel might be worth trying.
Hello! As you’ll see, my tutorial is for a cuff-down sock – I don’t knit toe up, I’m afraid. I can certainly help you if you want to use my pattern – there are step by step photo tutorials here and there are videos to help here.
Hi,
I wanted to ask if you are happy for me to use your method and links to teach people to knit socks? I work in an adult education centre and I think it would make a really nice workshop for some of our students. As I used it to learn to knit socks (approx. 150 pairs in now) I think I am confident to show others how to do it and extend their knitting skills.
Hi Kirsty, thanks for your message and for asking about the pattern. I’ve sent you an email about it! 🙂 xx
Wow!!! What a blog. The way you explain it the way you use this word is mind-blowing. I just love this. Thanks for spreading this knowledge to us.
Thank you, you’re very welcome! xx
Started knitting from scratch in March, now knitted four pairs of socks thanks to you Christine – much appreciated! The only problem I have is finishing the tops of the socks – I knit with small circular needles and find that the top of the cuffs ‘break’ too easily and I have to try to repair them – any advice would be gratefully received.
Hi! Four pairs of socks is amazing – well done to you! It sounds like your cast on is a bit tight if it’s breaking so I would suggest going up a needle size or if you already do that, you could try casting on over two needles held together. Alternatively, you could try a different cast on which is more stretchy than the one you currently use – I use cable cast on which I know isn’t the most stretchy one around (which is why I use a bigger needle to cast on) but you could try a long tail or I think Old Norwegian which is meant to be one of the stretchiest around. If you find that having a rib cuff is causing the problem, you could try knitting the first four rounds after casting on (using whatever method you usually use) and then work 12 rounds of rib (or however many you usually like to knit for your cuff) – that will give you a rolled cuff which won’t cut into your leg so should be resistant to breaking. I hope those ideas help! 🙂 xx
This is a great tutorial for a beginner sock knitter!
Thank you! 🙂 xx
Maybe I’ve missed it but what size sock is this for? I have smaller than average feet (size EU 36 or UK 3 ½). Should I decrease four from the original amount to cast on? Complete beginner here!
Hi! This pattern is written for an 8″ circumference foot – hand knitted sock size is based on foot circumference, not shoe size, as it’s easy to change the length but getting the width of the sock right is more important. If you’re brand new to socks, have a look at my Sockalong tutorials (I think the link is in the post you’re looking at but I’ll give it to you again) – http://www.winwickmum.co.uk/sockalong – as they will talk you through using that pattern so that you can adapt it to fit your feet. The tutorial that will be particularly useful for you to look at is the one on tension squares with the Sock Stitch Calculation, and then the following tutorials will help you through the rest of the pattern if you get stuck. Do let me know how you get on! 🙂 xx
This is a true gem for beginners clear, Approachable and full of helpful tips that build confidence in sock knitting from the very first stitch. Its Wonderful to see such a supportive and well structured guide in the community. For those looking to socmk qaulity yarns and blank socks in bulk accompany tourists like this, Mega Wholesale Inc offer a dependable range perfect for knitters, small shops and crafting educators alike.