
Easy Mosaic Socks – free pattern and tutorial
When is a colourwork sock not a colourwork sock?
When it’s an Easy Mosaic Sock!
I know that sounds like a bad cracker joke, but it’s actually a bit of magic that will let you create two-colour socks even if you have always found the idea of working with two yarns at once to be something that sends shudders down your spine.
I love to create patterns that look more complicated than they actually are to knit, and to incorporate a technique that may be something new for you (as it was for me not that long ago!) is even better. Not only is it fun to try something new, but we’ll be starting the New Year off in fine style as well!
Mosaic knitting is different to colourwork in that although you have two working yarns, you only knit with one of them at once. The colour change pattern is all down to slip stitches which pull the yarn from the round below up into the new colour and creates a pattern without you having to worry about floats or dominant colours or which hand to hold your two (or more!) yarns in. It really is a bit of magic, perfect for this time of year – and for a knitalong that’s all about resting and recharging our batteries!
The pattern is the same for both socks which makes it easier than having to remember whether you’re knitting the right or the left foot 🙂 It’s only actually 4 stitches wide as well so it’s really easy to work each pair of rounds … but more about that in the pattern!
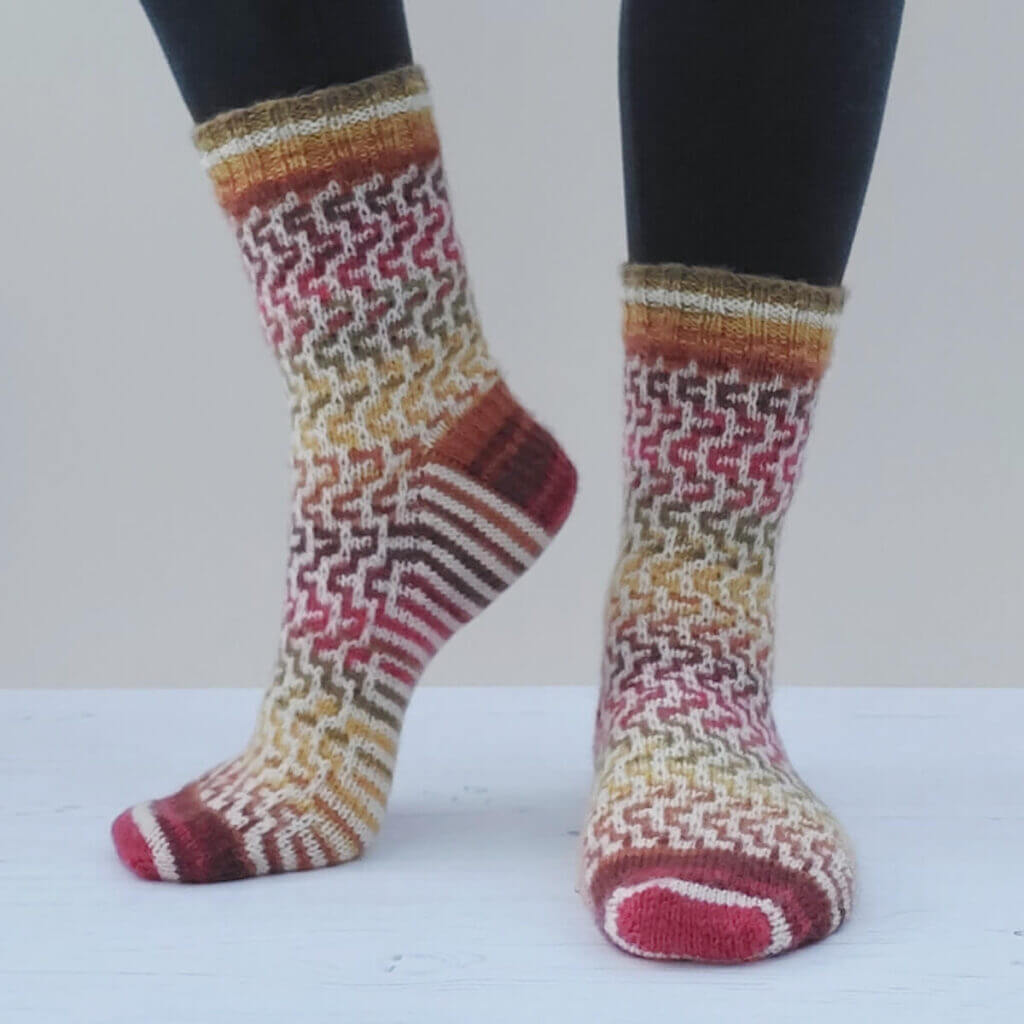
You’ll see that the sole of the sock is worked in stripes and that’s how you’ll knit all of the socks, in stripes of colour. Ooh, those stripes are just gorgeous!

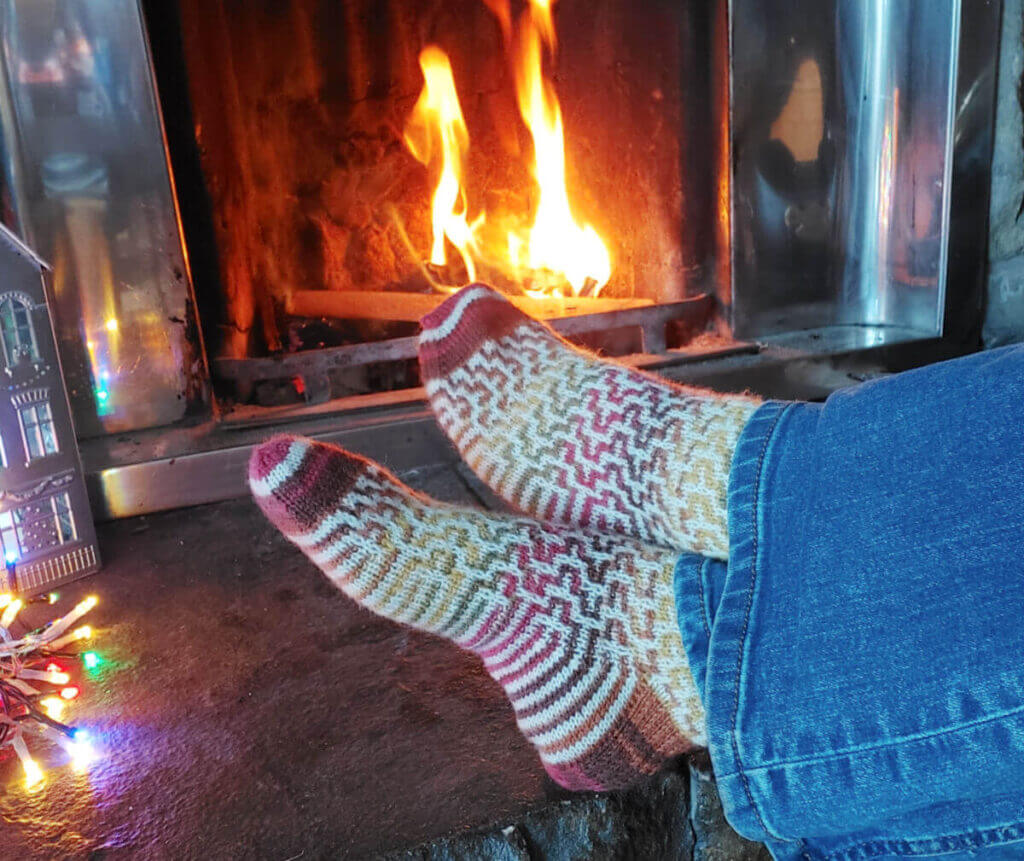
I’ve used West Yorkshire Spinners Signature 4ply in Autumn Leaves, one of my Seasons colours, and West Yorkshire Spinners Signature 4ply in Milk Bottle to create these socks. I think they blend beautifully together, and they don’t look quite as stripy as they would do in a plain sock as the rounds are broken up between the colours. Any of the Winwick Mum colours would be fabulous with this pattern, I think, and a contrast that isn’t too close to the main colours so that you don’t lose it when it’s worked with a similar colour in the yarn. Milk Bottle is an ideal contrast here; Liquorice would work well too, and some of the other bright solid colours that you might have in your stash – have a play, you might find your favourite is one you don’t expect!
The heel is the slip stitch heel that I use for most of my socks and in the Winwick Mum Sockalong tutorials so you can always get a reminder of how it works in the photo tutorial there.
I’ve designed this pattern for the Winter Haven KAL 2022 but they really are anytime socks and they’ll add a bit of fun to your sock drawer all year round – and the added bonus is that they are surprisingly quick to knit. You can even add the 4 stitch pattern to yarns of different weights as it works for every size.
So what do you think? Are you ready for a bit of sock magic?
I’ve written the pattern out for you below, and there’s a photo tutorial you can follow as we go along. This pattern isn’t complicated but it’s worth reading ahead just a little as I’ve added some notes to certain sections. Having said that, no overthinking or worrying about what to do before you get to a particular section is allowed here, the pattern will work out if you trust the magic! 🙂
Don’t forget that if you’re brand new to socks, you can use the Winwick Mum Sockalong tutorials to help you.
If you would like a PDF copy of the pattern to work from, you can download that HERE.
Easy Mosaic Socks
Size To fit ball of foot circumference 8 [8.5:9:9.5] inches; 20 [22:23:24] centimetres.
Tension 30 stitches to 4 inches (10 cm) in stocking stitch (worked in the round) on 2.5mm needles
Materials
1 x 100g ball West Yorkshire Spinners Signature 4ply in Autumn Leaves (MC)
1 x 100g ball West Yorkshire Spinners Signature 4ply in Milk Bottle (CC)
2.5mm needles – short circular needle, DPNs (double pointed needles) or 80 cm circular for magic loop
1 set DPNs size 3.0mm (optional)
1 set DPNs size 2.5mm (not required for magic loop)
stitch holder (optional)
stitch markers
wool needle
Abbreviations
CC Contrast colour
K Knit
K2tog Knit two stitches together
MC Main colour
P Purl
SSK Slip the first stitch on the left hand needle knitwise onto the right hand needle, slip the second stitch on the left hand needle purlwise onto the right hand needle, slip both stitches back onto the left hand needle and knit together through back loop
Sl1 Slip 1 stitch purlwise
St(s) Stitches
( ) Repeat instructions within brackets
Pattern Notes:
- These socks are knitted on 2.5mm needles, not 3.25mm as stated on the ball band. This will produce a different tension but will ensure a firmer, more hard-wearing fabric for your socks. The ideal tension for these socks is 30 stitches to 10 cm (4 inches) so use whatever size needles are required to reach that tension and do check that your knitted fabric is firm but not stiff.
- It is often easier to cast on using DPNs before changing to the short circular needle. If you want to use magic loop you will be able to cast on with the larger circular needle if you prefer to do so, but remember not to pull your cast on stitches too tight. If you use DPNs, you might find it easiest to cast on and work 2 rows before dividing the stitches across the needles.
- Only one colour is used on each round; the second colour is brought from the round below by slipped stitches. Twisting the yarns on each colour change round will help to avoid a hole. It’s really important not to pull the new working yarn too tightly for your first stitch of the round as that will increase the chance of your sock becoming a “banana” shape (more about that later!).
- When working the mosaic pattern be careful not to pull the working yarn too tightly across the back of the slipped stitches. Strand loosely across back of work to retain the elasticity of the fabric. When working your tension swatch, it’s a good idea to sample your mosaic pattern. If you are concerned about working too tightly, knit the next size up.
Pattern
Using West Yorkshire Spinners Signature 4ply in Autumn Leaves (MC), cast on 60 [64:68:72] sts using 3.0mm double pointed needles. The pattern has been written for a cast on with straight needles; if you wish to join into the round straight away, work row 1 twice and omit row 2.
Row 1: (K2, P2) repeat to end, turn.
Row 2: (K2, P2) repeat to end, turn.
Change to a 2.5mm short circular needle, magic loop or divide the stitches across DPNs and join into a circle, place marker. You will sew up the small gap where you knitted the first two rows later.
Work 2 more rounds of K2, P2 rib in MC then without breaking MC, join in CC.
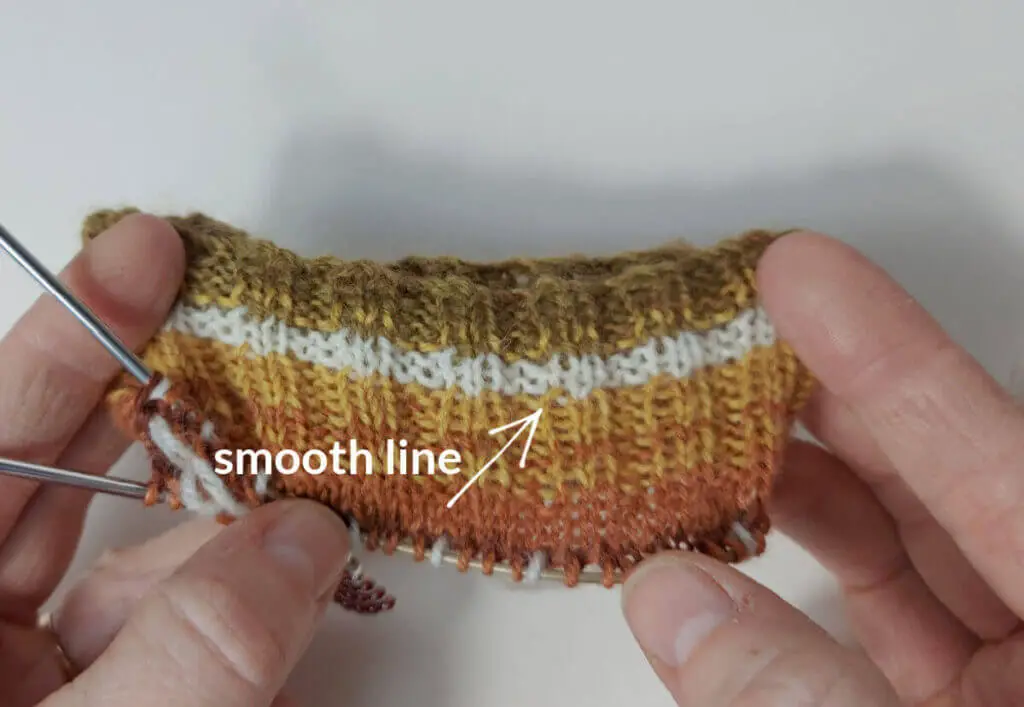
Now, we’re going to do something called “bipless rib”. This means that when we change colour, you won’t see the colour change “bips” between the rib columns but instead it will look continuous and smooth. Obviously, this is optional if you like the “bips”!
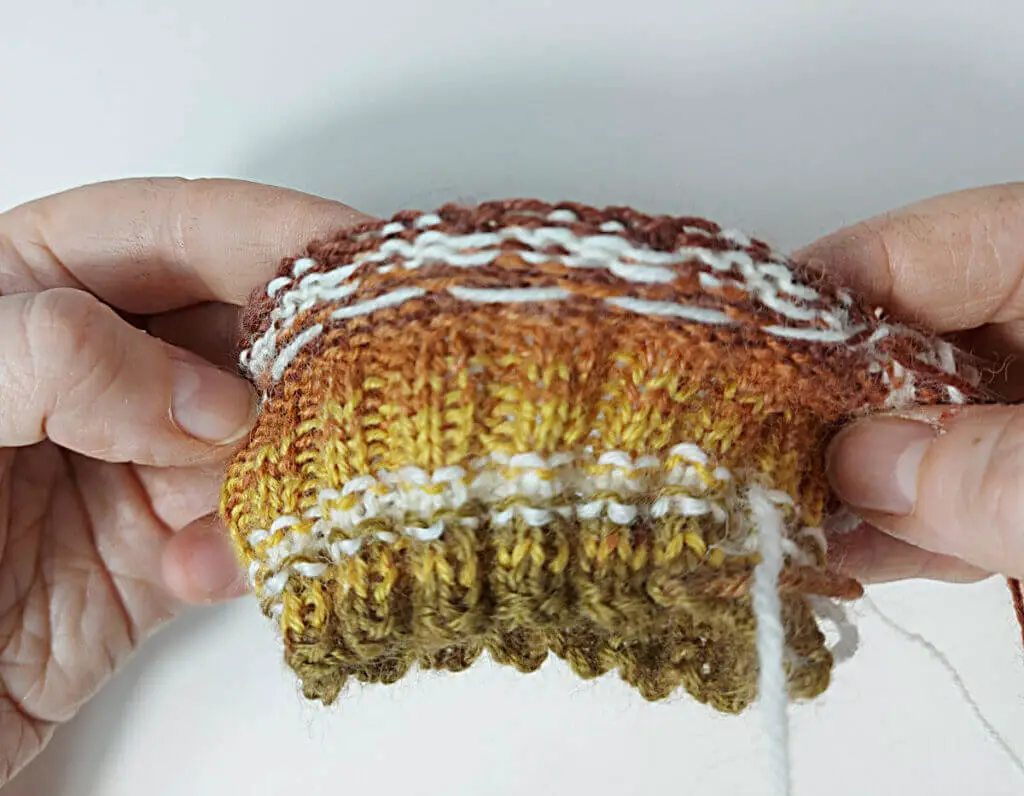
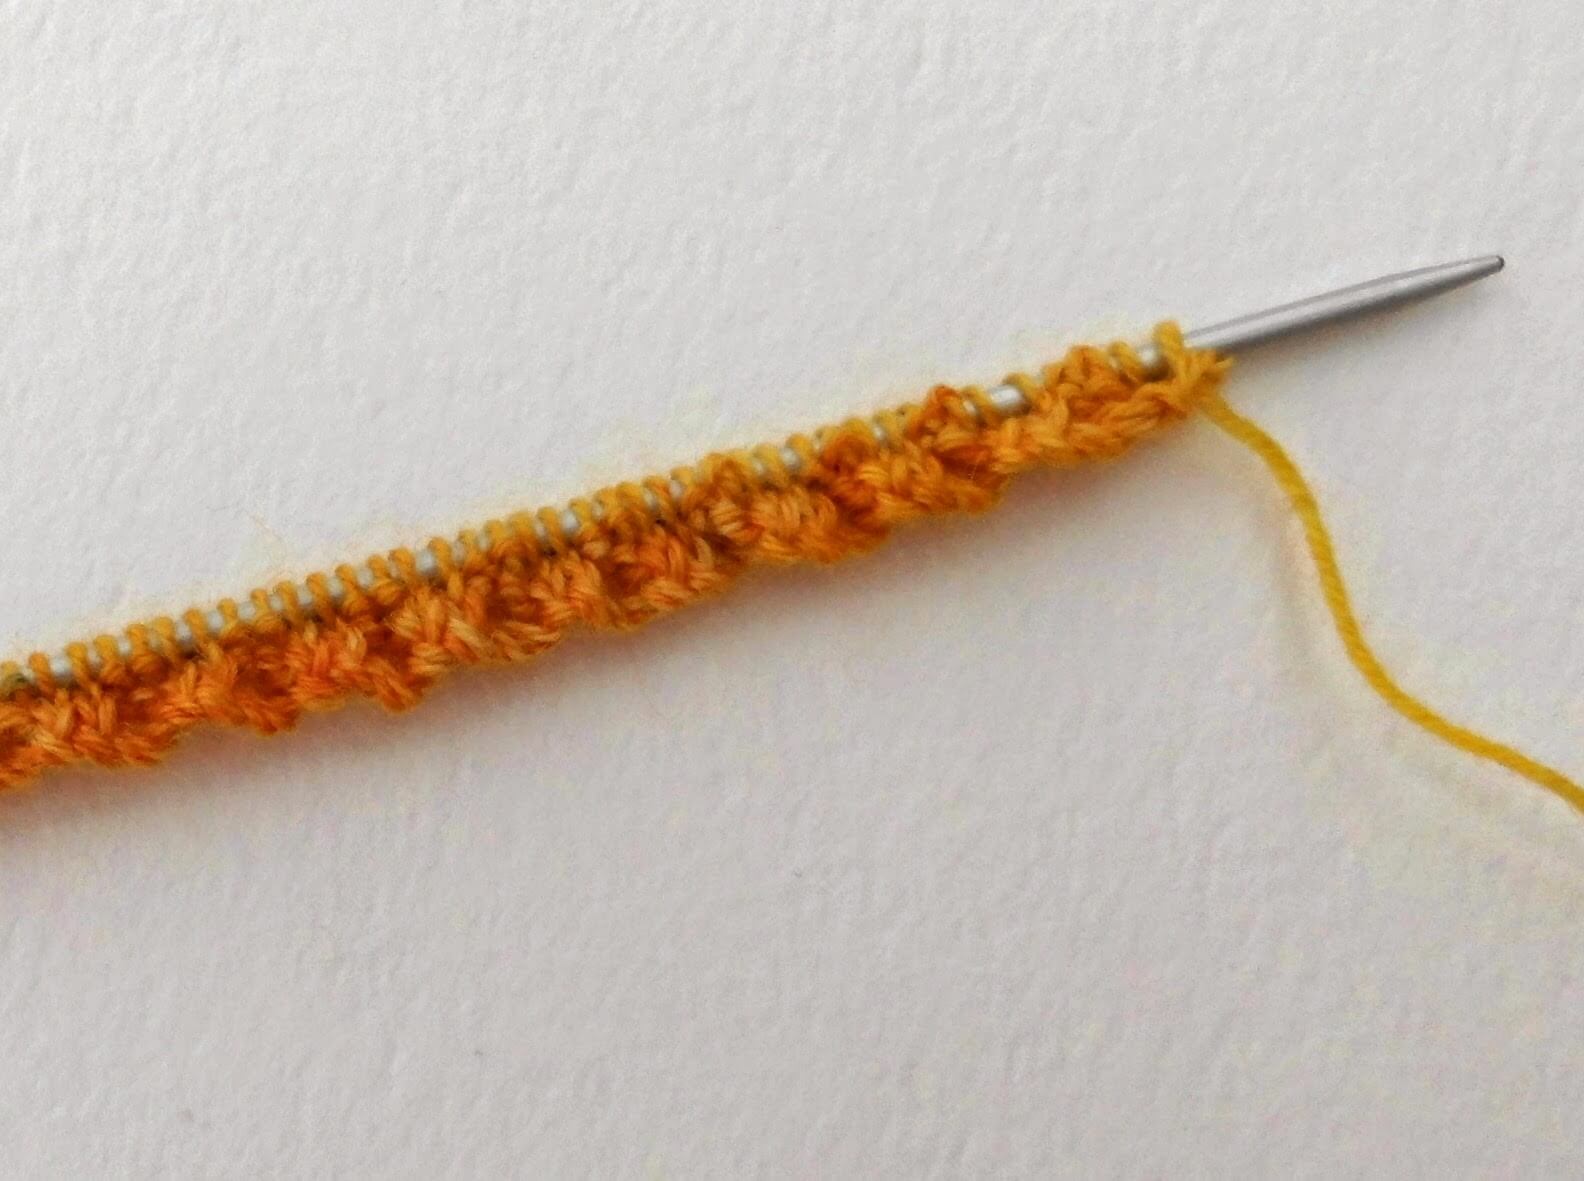
You can see the difference here. In this photo, the bips are underneath the white stripe where the white yarn shows against the yellow …
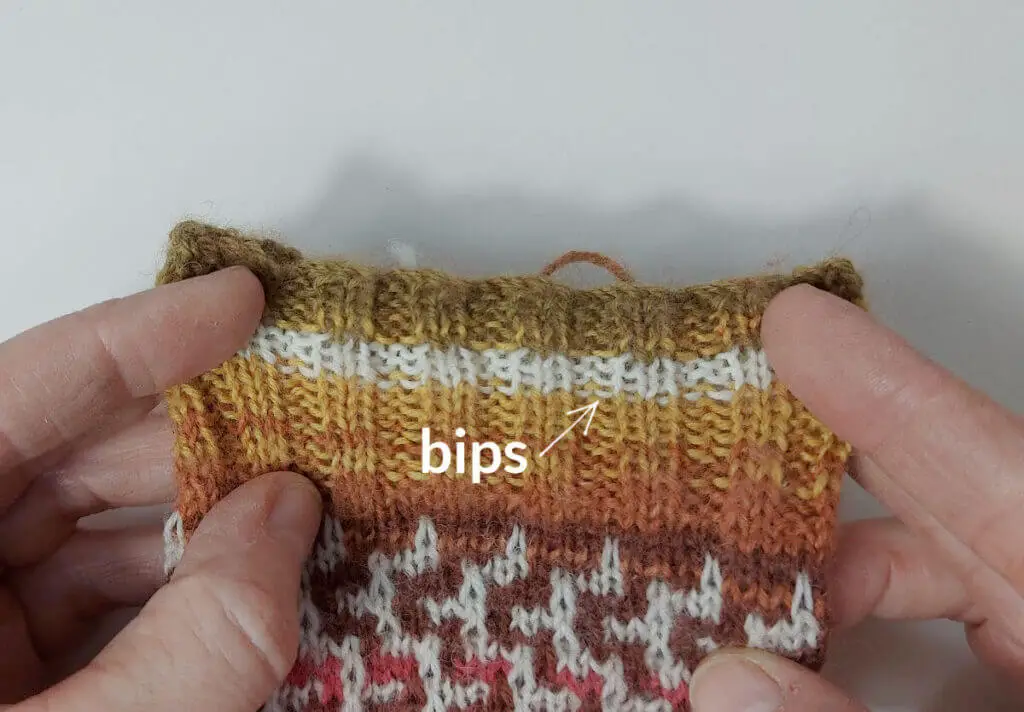
and this stripe has no bips at all. You can choose which version you like best. If you don’t want to do the bipless rib, just change colours as you would do normally – or even leave the stripe out completely if you don’t want to do it at all!
There’s also a video on how to work bipless rib in my Easy Colourwork Socks tutorial – you can find the sock tutorial with photos here and the video here.
Knit 1 round in CC then work 2 rounds of K2, P2 rib. You can break CC at this point if you don’t want to carry the yarn down the cuff.
Knit 1 round in MC followed by 8 more rounds (or until desired length) in K2, P2 rib.
Leg
Knit 2 rounds in MC. Join in CC (if you broke yarn earlier).
Now, I know I said that you only use one colour at a time in mosaic knitting, but that’s not quite true for this sock. I promise that it’s only one round, though, and it’s the very first one which gets it out of the way quickly so stick with me! 🙂 There are photos to show you what to do, and if this is new to you then I suggest you read this bit first before starting.
Set up round: (K3MC, K1CC), repeat to end.
To make the mosaic pattern work properly, we need a contrast colour stitch to be able to pull up into the next round but the only way to get that is to knit a round in the contrast colour – I chose not to do that as there would have been an odd contrast stripe in the pattern so instead I’ve included a colourwork round to give us that contrast stitch without making the pattern look odd.
All you have to do is exactly what the set up round instruction says, so knit 3 stitches in MC, then join in your CC and knit 1 stitch.
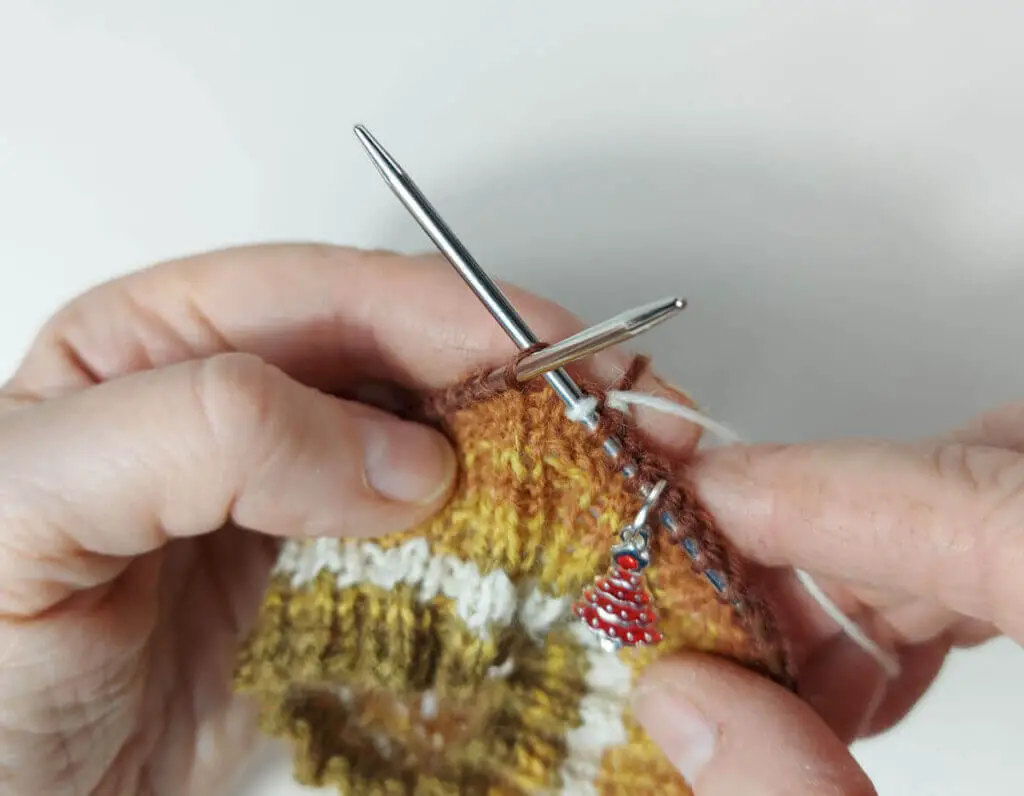
Next, knit 3 sts in MC and then, making sure that your CC is underneath your MC, bring the yarn across to knit 1 st in CC. You don’t have to hold your yarns as I am doing, it’s fine to hold one at a time, picking the other up when you need it, or hold them both in your right or left hand if you prefer. You just need to make sure that the CC yarn stays underneath the MC yarn so that it makes a slightly bigger stitch (this is called colour dominance, there’s more on it in my Easy Colourwork Socks pattern if you’re interested) and that will make it easier to slip it on the next round.
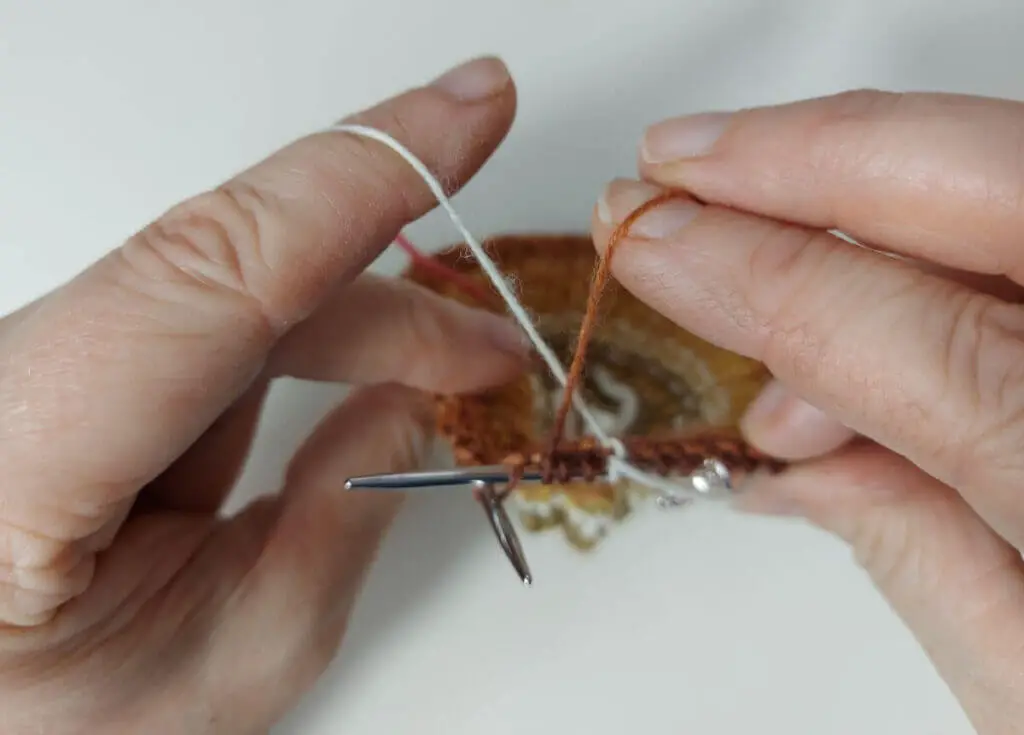
This is what your first round will look like on the outside …
and on the inside. Be careful not to pull the CC floats too tightly across the MC stitches – if anything, you want them to be quite loose (but not so loose that you’ll get your toes stuck in them when you put your sock on) so check by stretching your sock stitches along your needle to make sure you can still move them and they’re not held too firmly together.
Once you’ve done that, you’re going to start working from the main pattern. You work each pattern round twice and you’ll only use one colour per two rounds from now on. We need to work the second round of the first two rounds (round 1 is the colourwork one) and I’ll explain that next. First, though, here are the pattern instructions, and I’ll show you some more photos after you’ve read these:
Next round: (all sizes) Using either the chart or written instructions and starting from round 2, work each until the leg measures 6 [7] inches; 15 [17] cm or desired length from cast on edge, finishing on a CC round.
Written Instructions
Rounds 1 – 2: Using MC (K3, Sl1) 15 [16:17:18] times. 60 [64:68:72] sts.
Rounds 3 – 4: Using CC (Sl1, K3) 15 [16:17:18] times.
Rounds 5 – 6: Using MC (K1, Sl1, K2) 15 [16:17:18] times.
Rounds 7 – 8: Using CC (K2, Sl1, K1) 15 [16:17:18] times.
Rounds 9 – 10: Using MC (K1, Sl1, K2) 15 [16:17:18] times.
Rounds 11 – 12: Using CC (Sl1, K3) 15 [16:17:18] times.
Rounds 13 – 14: Using MC (K3, Sl1) 15 [16:17:18] times.
Rounds 15 – 16: Using CC (K2, Sl1, K1) 15 [16:17:18] times.
Rounds 1-16 set pattern and should be repeated.
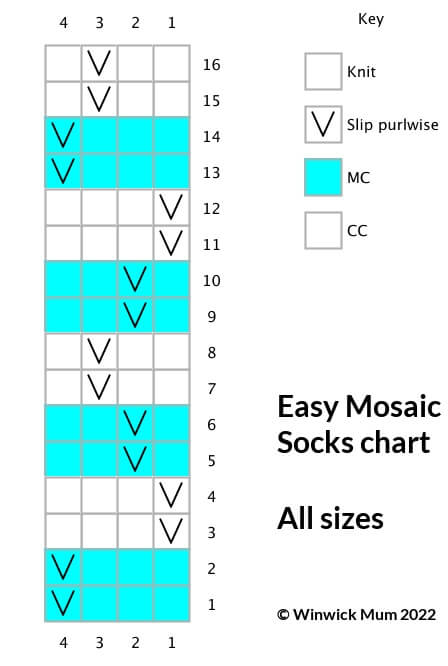
Chart instructions
Rounds 1-16: Using MC and CC, work chart 15 [16:17:18] times. 60 [64:68:72] sts.
Rounds 1-16 set pattern and should be repeated.
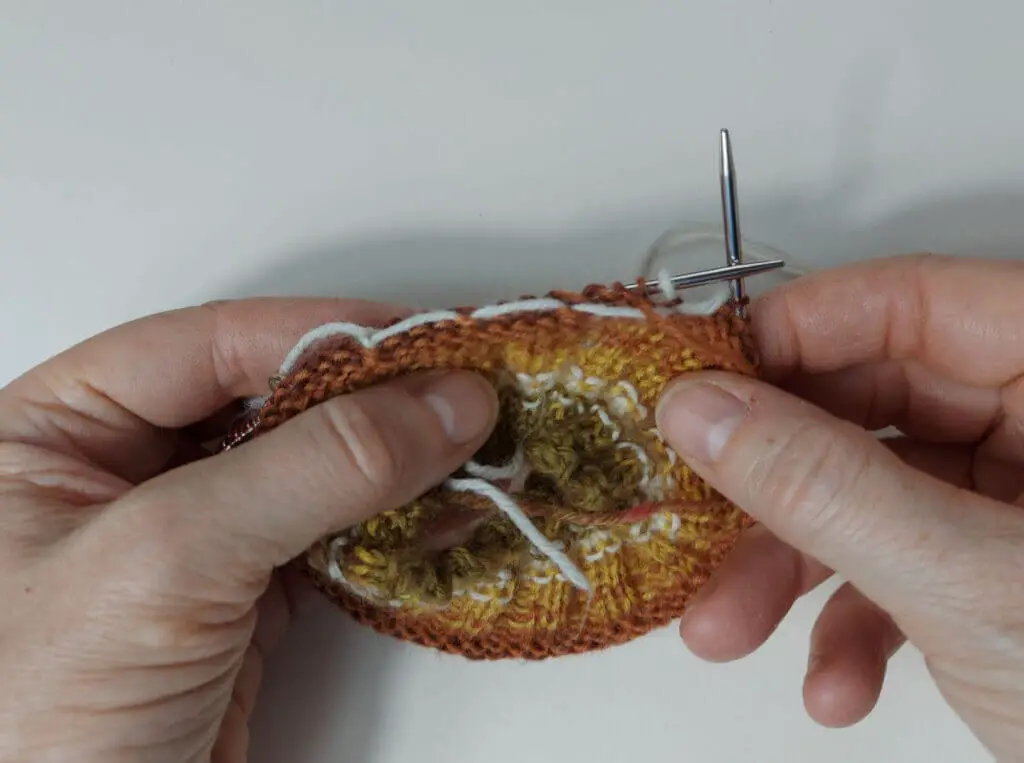
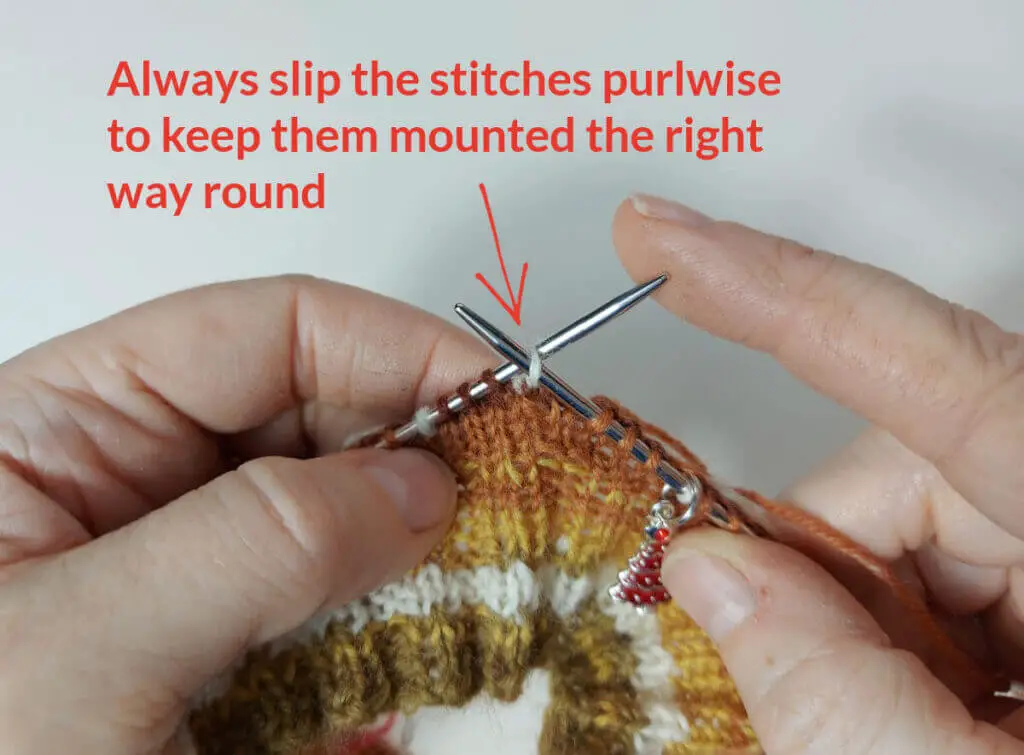
OK, so here we are working on the leg section now, and you can see from the pattern that it’s either knit or slip purlwise stitches. You’re slipping the stitches purlwise so that they stay mounted on the needle in the right direction and don’t end up twisted.
Working round 2 of the pattern, you’ll work it like this:
Rounds 1 – 2: Using MC (K3, Sl1) 15 [16:17:18] times.
This means that you’re only going to use the MC yarn for this round and you’ll work the stitches pretty much as you did for the previous round. When you reach a CC stitch, you’re going to slip it purlwise so that your round is now made up of knit and slip stitches.
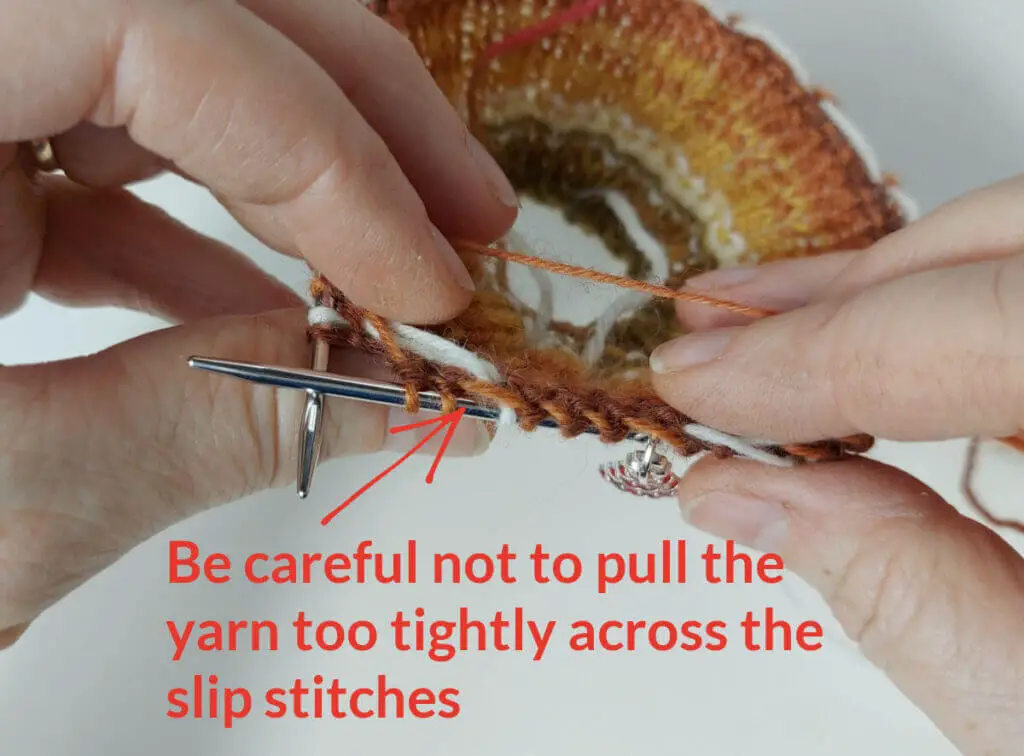
It’s really important with this sock that you don’t pull your yarn too tight when you’re working the slip stitch pattern as you’ll find that it pulls the fabric in tightly and you won’t be able to get your sock over your foot very easily. It’s a good exercise in relaxing whilst you’re knitting! 🙂
For the next two rounds (rounds 3 and 4) you’ll use Milk Bottle and you’ll follow the instructions as they’re written or charted, slipping and knitting as it says. Just trust that the pattern will work out – I know that the charted pattern doesn’t look anything like the socks but it will do when you knit it!
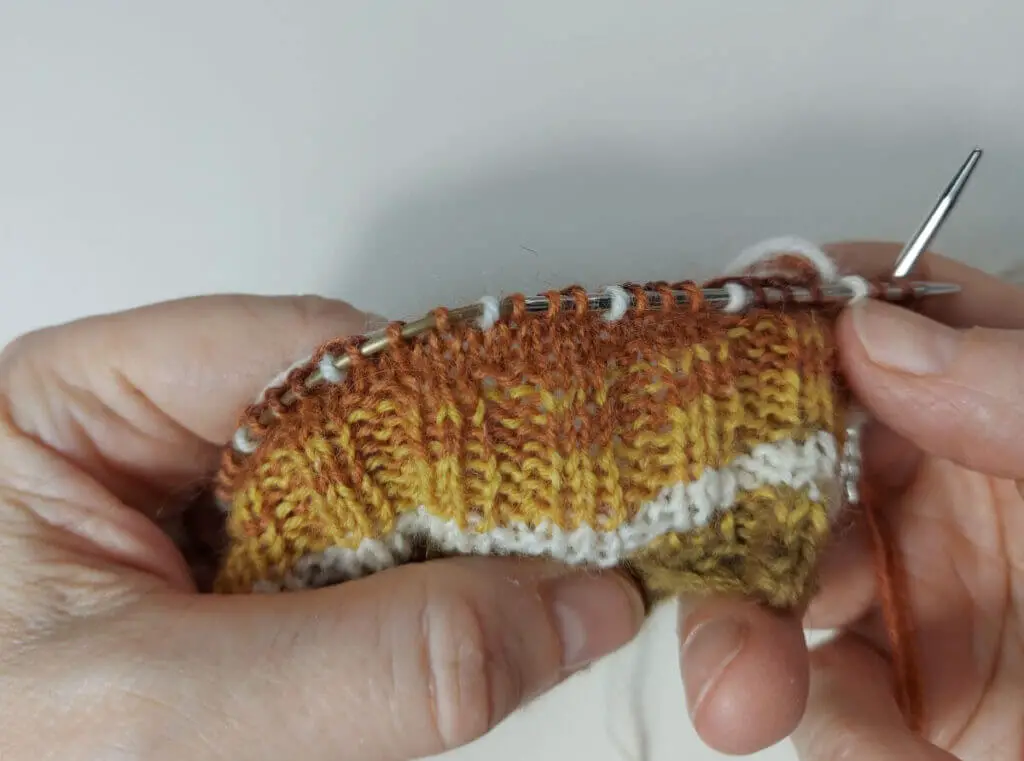
Can you see how the pattern is forming with the slip stitches? I’m only a few rounds into the pattern here but it’s already starting to take shape.

This is what it looks like on the inside. The long floats are from the first set up round and after that, the fabric is much more dense. It makes these very warm socks!
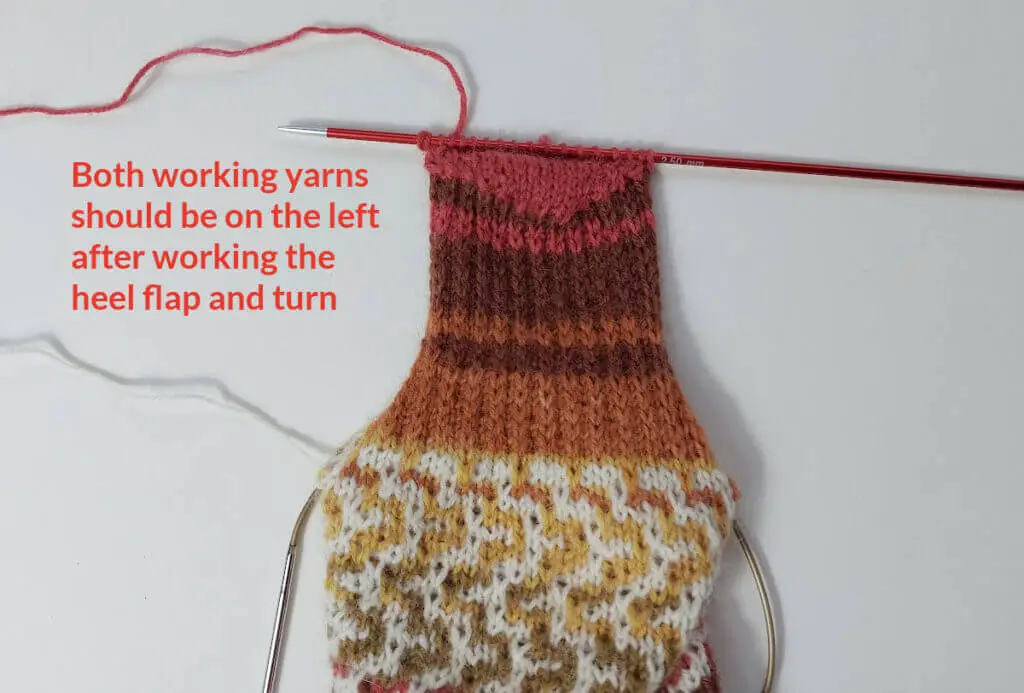
Keep working the leg section to the length that you want, remembering to finish on a CC round so that your yarn will be in the right place for when you work your gusset.
Heel Flap
Do not break CC yarn. Using MC, work 30 [32:34:36] sts in pattern and remember which round you finished on for later.
This instruction will put you on the “back half” of your stitches so that when you’ve worked your heel flap and gusset, you’ll be able to follow the slip stitch pattern as it’s written and it will fit with what you’ve knitted for the leg of your sock.
Change to 2.5mm DPNs if you are using a short circular needle. There is no need to use DPNs if you are using magic loop. You may prefer to place the spare stitches from the top of the foot onto a stitch holder if you are using a short circular or DPNs whilst you work the heel.
Using MC yarn, work heel flap as follows.
Set up row: K30 [32:34:36] sts, turn
Next row: Sl1, P to end, turn
The two set up rows are there so that when you start your slip stitch heel, you don’t pull the slip stitches up from the round before which would make them too big and give you a gappy start to your heel. It also means that when you slip the stitches on the next row, they’ll be in the MC yarn so they’ll blend in without an odd row of colour.
Row 1: (Sl1, K1) to end, turn.
Row 2: Sl1, P to end, turn.
Repeat rows 1 and 2 until heel measures 2 [2:2.5:3] inches; 5 [5:6.5:7.5] cm long or desired length, finishing on row 1. If you want to make the heel flap longer, continue knitting rows 1 and 2 until you reach the desired length, but remember that you will need to pick up more stitches to create the gusset.
Turn heel
This is exactly the same as the heel for the Basic 4ply Socks so if you need extra photo help, have a look at the Sockalong tutorial here.
Row 1: Sl1, P16 [17:18:19], P2tog, P1, turn.
Row 2: Sl1, K5, SSK, K1, turn.
Row 3: Sl1, P6, P2tog, P1, turn.
Row 4: Sl1, K7, SSK, K1, turn.
Continue in this way, adding one stitch between slip stitch and SSK or P2tog on each row (ie, Row 5: Sl1, P8, P2tog, P1; Row 6: Sl1, K9, SSK, K1) until all of the heel stitches are used. You may find that the K1 and P1 stitch is not required at the end of the last two rows.
Now, before you start the gusset, this is a moment to pause and see how you’re feeling about the pattern. It will change down the foot as you’ll be working the slip stitch pattern across the top of the foot but knitting plain across the sole. This is where, if you’re not careful, your sock can turn into a banana as the slip stitch fabric is very slightly shorter than the plain knitted fabric 🙂
It’s important not to pull the new working yarn too tight (it’s tempting to do this as the last stitch from that round will seem loose) because it ends up creating a tight stitch on the first stitch of the round when it’s later pulled up as a slip stitch. The result of this (and you can ask me how I know this for sure 🙂 ) is that your sock starts to look like a banana and the whole foot feels tight and uncomfortable.

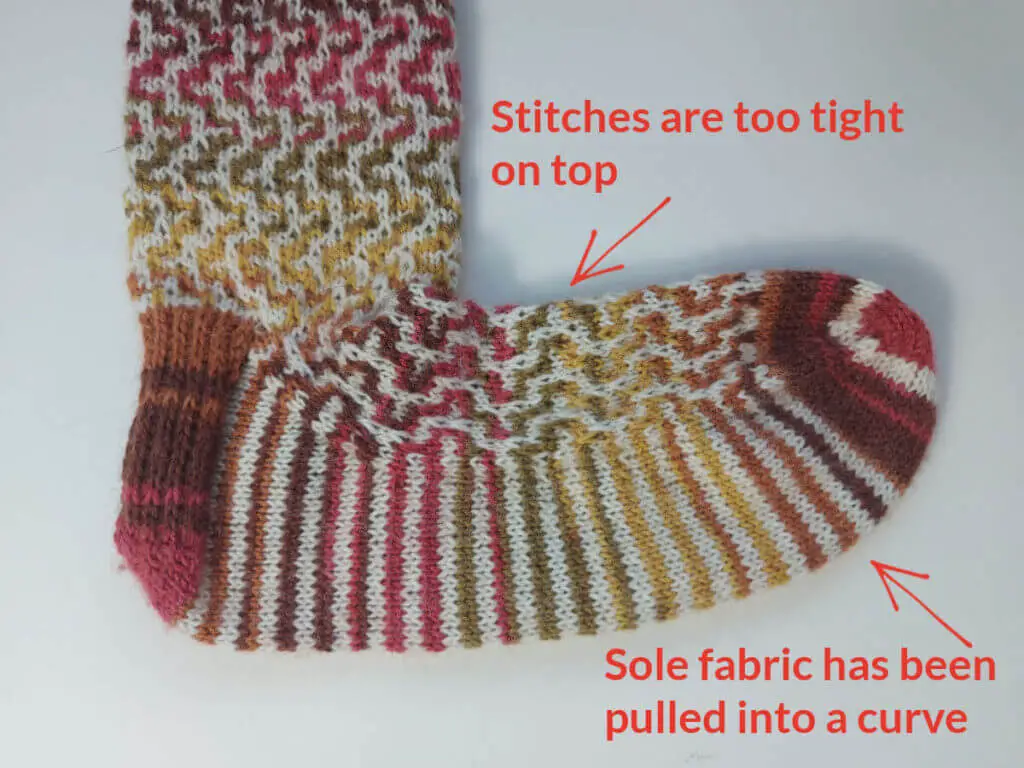
The trick here is to make sure that you don’t pull the yarn too tightly across the slip stitches (yes, I am repeating this yet again but it’s important!) – in fact, if you can, knit the top of the foot slightly more loosely than the bottom and that will give your fabric more stretch when you come to block it later.
If all of this feels too complicated (although it really isn’t once you get going), feel free to work the foot plain or in stripes of the main and contrast colours.
Shape gusset
Knit across the heel stitches if required to bring you to the left hand side of the heel flap (with the outside of the flap facing you), ready to pick up 1 stitch for every 2 rows knitted. Remember that if you made the heel flap bigger, you will need to pick up more stitches. Once you have picked up the stitches, place marker to indicate the new beginning of the round.
Work across the top of the foot sts in pattern for 30 [32:34:36] sts as per chart or written instructions, starting with the round after the one you were working before you started the heel flap (ie, if you worked round 1 before the heel flap, work round 2 now), place marker, then pick up 1 stitch for every 2 rows of heel flap knitted up the other side of the heel. Knit across the top of the heel and then shape gusset as below, remembering to change colour every two rounds as per the pattern; you will always change colour at the K2tog decrease side of the sock. Don’t worry if you don’t work full 4 stitch blocks across the top of your foot, the pattern will still work!
Note: If you are using DPNs and/or have placed your stitches on a stitch holder, you can arrange the needles as follows: Needle 1 for stitches across heel, Needle 2 for picked-up stitches down side of foot, Needle 3 for stitches across top of foot (knit stitches off stitch holder if required), Needle 4 for picked-up stitches on other side of foot. You may find that stitch markers are not required at first.
Round 1: Knit to 3 sts before the marker, K2tog, K1, slip marker, knit in pattern to next marker, slip marker, K1, SSK, knit to marker.
Round 2: Slip marker, knit in pattern to next marker, slip marker, knit to 3 sts before marker.
Round 3: K2tog, K1, slip marker, knit in pattern to next marker, slip marker, K1, SSK, knit to marker.
Repeat rounds 2 and 3 to shape the gusset. Continue in this way, decreasing by two stitches at the gusset on every other round until there are 60 [64:68:72] stitches on the needle. You can remove the second stitch marker at this point if you want to.
Once you have reached the required number of stitches, continue to work each round in pattern as set until you reach approximately 2 inches (5 cm) before the desired length ready to start the toes. Don’t be afraid to try your sock on before decreasing for the toes!
Toes
Create the toes as follows:
Knit 1 round in MC before starting the decreases.
Round 1: K1, SSK, K24 [26:28:30] sts, K2tog, K1, place marker (if required), K1, SSK, K24 [26:28:30] sts, K2tog, K1. 56 (60:64:68) sts
Round 2: Work one round, slipping markers as you come to them.
Round 3: K1, SSK, K to 3 sts before marker, K2tog, K1, slip marker, K1, SSK, K to 3 sts before marker, K2tog, K1. 52 (56:60:64) sts
Repeat rounds 2 and 3 until you have 28 [28:32:32]sts left and divide these between two needles so that front and back of socks match.
If you want to add in the CC stripe, work 5 sets of decreases in MC then join CC and work 3 rounds (including the decrease where appropriate), then work the remainder of the toes in MC.
Graft toes using Kitchener stitch, weave in all ends and sew up the small gap at the cuff where you cast on.
If you can use Ravelry and you’d like to, you can link your socks to the project page so that others can admire them, and if you would like to share them other social media platforms you can use the hashtags #WinwickMumSocks and #WinterHavenKAL. I’m really looking forward to seeing how your Easy Mosaic Socks turn out!
This pattern is free on this blog and will always remain so. If you’ve enjoyed using it and would like to support my work so I can keep blogging and designing, you can browse my shop for patterns and books or buy me a brew – both are very much appreciated. Thank you! xx


This pattern copyright © 2022 Winwick Mum. All rights reserved.
Not to be included in any collection or used for profit without written consent of Winwick Mum.
This pattern is based on my Basic 4ply Socks pattern, which means that you can find photo and video help in the Winwick Mum Sockalong tutorials. You can find out more here:
If you can already knit socks but would like to stay in touch, click the link below to join the Winwick Mum mailing list to hear about the latest blog posts, pattern updates, tutorials and more … but no spam, I promise!


A nice tutorial and the socks look so great in your yarn choices.
Thank you! 🙂 xx
I am certainly not alone to have a count-down for the KAL🤩.
Mosaic knitting is a new technic for me, and I am looking forward to learn it. I will print out the hole pattern, it is easier to follow than look at a small phone.
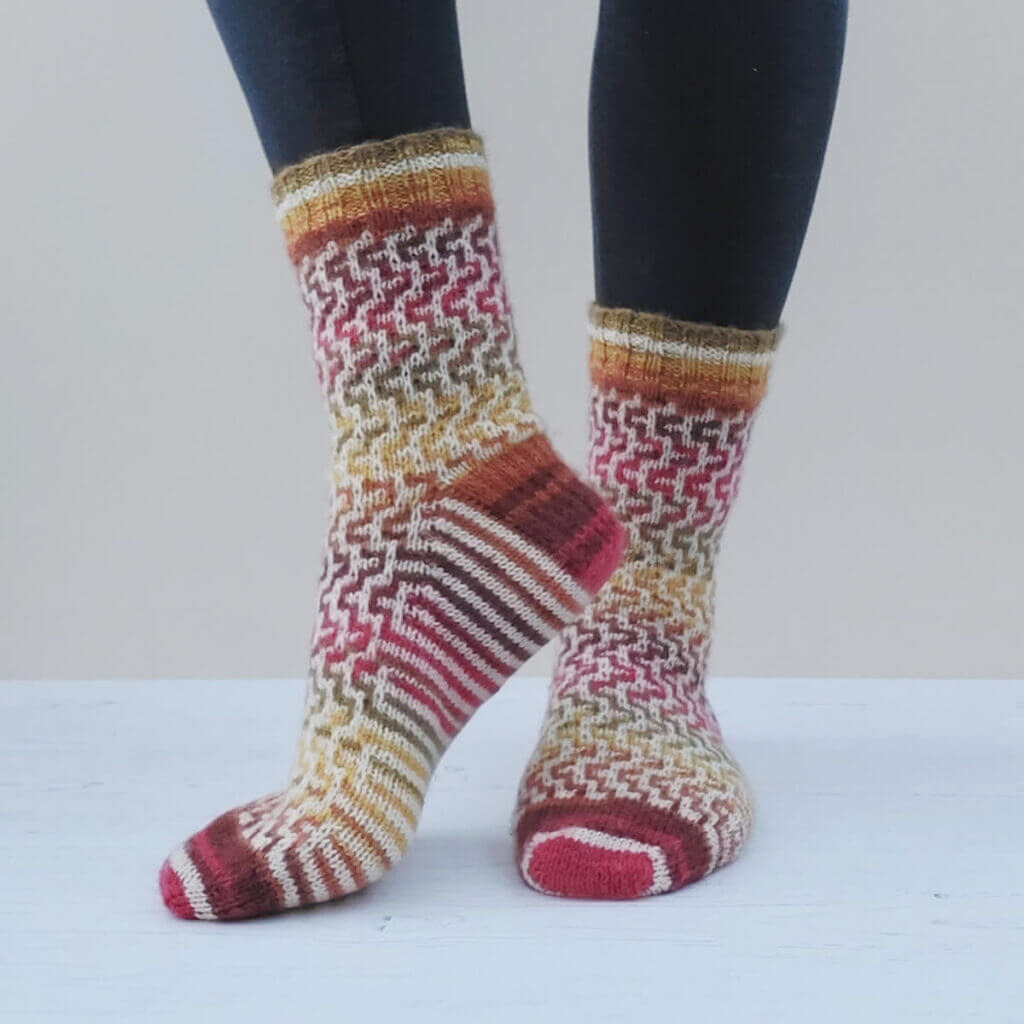
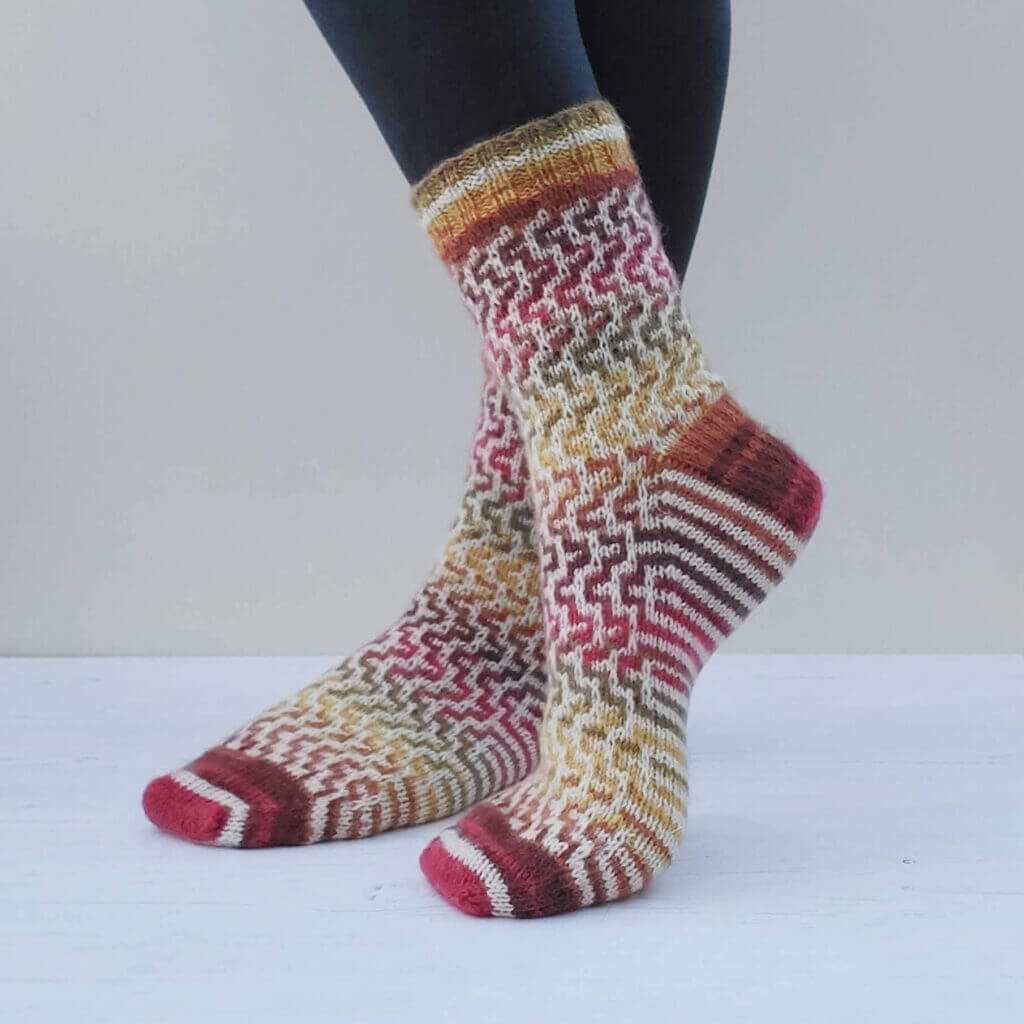
I have only one question: did you forget 1 round of white on purpose🤪 ( between brown and red stripes under your right foot at the picture abowe🧶?)
No, it’s the photo, my foot must be slightly bent and the sock has crinkled! 🙂 You can’t really forget to work the rounds as it’s very obvious! I hope you enjoy knitting the socks! 🙂 xx
Ooh they look amazing! I’ve got a Jazzy striped yarn to use but waiting for a hand dyed solid one to arrive tomorrow 🤞🏻 for contrast #excited (although also rather tempted to have a go at your lacey sock pattern cos this pair will be for me)!!
Ooh, choices! These are the best sort to have, aren’t they? 🙂 xx
Starting today👏👏. I’m going to knit your shortie socks with the mosaic pattern on the top of the foot as I have Lucy’s blanket and a cross-stitch SAL happening at the same time. Thank you for such a lovely pattern. Xx❤️🌺
Oh that’s a good idea! When are you planning to sleep with all these project-a-longs going on?! 🤣 xx
Thank you for such a stunning free pattern, much appreciated, I’m looking forward to trying them…..in a slightly nervous way 😀😬
You’re very welcome – and I hope you find they’re much more fun to knit than you think at the moment! 🙂 xx
I am sorely tempted! I am dipping my toe into colourwork socks and much unpicking is involved. However, your instructions make this pattern sound possible. Fingers crossed!
Ah, there is no colourwork in this apart from the first set up round, I promise! It’s much easier! 🙂 xx
Being from the us I am not familiar with the yarn. Is the cc a single striped yarn? Or do you add in a series of colors ?
You can get West Yorkshire Spinners yarn in the US as there are stockists there, but yes, it’s a self-striping yarn so the colours come out of the ball as you knit it and you don’t have to make the changes yourself. The yarn I’ve used is one that I’ve designed and you can see how it looks in this post, but any stripes, gradient or even variegated yarn should look nice. I think you could even make these socks with two solid colours – but I do love a stripe so that’s what I’ve used! 🙂 xx
Many thanks for this lovely pattern! I’ve never tried mosaic knitting before so I’ll give it a go!
Brilliant! I hope you enjoy knitting it! 🙂 xx
So looking forward to mosaic knitting as I love mosaic crochet. As always when I come to use up my stash I haven’t got quite enough! I have lots of variegated yarn but not enough plain. Can I either use them the opposite way around ie where you have the plain milkbottle I use my variegated and where you use the Autumn leaves I use my plain? Or can I use two variegated in contrasting colours?
Yes, absolutely – quite a few people are going to try the socks with the solid and stripe/variegated colours reversed so do give that a go! I don’t see why two contrasting variegated yarns wouldn’t work either, but do make sure they’re different enough to stand out from each other! 🙂 xx
Can’t wait to have a go at the Mosaic Socks – I have some of your Seasons wool left – too many other projects and will be having a go soonest! The pattern is printed off and ready to go! Thank you very much.
Oh fantastic, I hope you enjoy knitting them! 🙂 xx
Great design. I don’t have the patience for complicated and this makes it so easy to have something different. Thanks for your hard work.
You’re very welcome! It really is easy to knit once you get going and it looks very complicated so it’s the perfect magic-trick sock! 🙂 xx
Hi Christine,
I have used 2 of your photos (the Winter Haven KAL and a picture of the mosaic socks) on my Ravelry project page. I hope this is ok with you; if not just let me know and l’ll delete them lickety split. Looking forward to casting on later today.
J x
Hi Julie, that’s fine, but thanks for checking. I’m looking forward to seeing yours when you add them! 🙂 xx
Phew, that’s a relief! I think I got a bit over excited when I was setting up the page. x
Lovely pattern – looks like a challenge! I’m new to any kind of colourwork.
I have a question about the pattern – in the rib section after completing the CC row what does it mean to carry the yarn down the cuff? Will this create a large float at the back of the work or is it woven in somehow? Thanks 😊
You can weave it in as you work the following rib rounds and some people like to do that, but I prefer to cut it then there isn’t a float and there isn’t a risk of it showing through 🙂 xx
I’m joining in and knitting the sizzling rays socks in Summer Sunset. By complete chance the only yarn left from the seasons collection I have left is the Autumn Leaves one and I also have an almost full ball of milk bottle. I am looking forward to casting on the new pattern next. Thank you for all your hard work. June
Oh that’s fantastic! I hope you enjoy knitting both of them! 🙂 xx
Really looking forward to trying this mosaic technique, just waiting for yarn to arrive.
Brilliant! I hope you enjoy knitting the socks! 🙂 xx
Oh my brain cannot do fair isle at all but I can do slip stitch – and I love the mosaic stitch. I’ve been wanting to do a less basic sock, and I think this will be it! (Got a couple urgent wips to finish first . . . . .)
I never knew how to manage bips! Now I do! Hurray!
Hurray indeed! I’m glad it helped! 🙂 xx
Thanks so much for this pattern for beautiful socks – as always very detailed and well written. You make it easy for knitters to be successful. Casting on today 👏👏👏
That’s brilliant, I do hope you enjoy knitting the socks! 🙂 xx
Hmmm. Read this up and I think I can do the decreases now…. Tomorrow I’ll get to and progress. Hugs WAHx
Brilliant! I’m glad you found it useful! 🙂 xx
My first ever Mosaic sock and such an easy pattern to follow. I’ve knitted many socks in many patterns and yours is awesome! I have knitted a slightly banana foot but it fits, thankyou.
I’m so glad you enjoyed it and you’re pleased with your socks! The banana foot will stretch out as long as it’s not too curly 🙂 xx
Looking on the knit and natter page, these seem to come up slightly tight and im usin a non WYS yarn for the first time so as this is less stretchy im going to try one size larger for my cast on. Love the look of the pattern, getting excited to make a start.
I think it depends on how tightly you pull the yarn across the slip stitches – I left mine really loose (perhaps looser than you might think is wise) and my socks were the same size as they usually are. There’s certainly no harm in working a bigger size as you’ll be sure they’ll fit – I hope you enjoy knitting them! 🙂 xx
My husband is going to LOVE these socks. He has a condition called Raynaud’s and wears hand knitted socks all the time because they make it so much better. He loves the variety of styles and asked me to make these. Next pair on the needles.
Oh brilliant! These will be really good as they are a double layer with the slipped stitch fabric so hopefully they’ll help to keep his feet warm xx
I love the look of these socks. is it possible to adapt it to toe-up ?
Yes, you should be able to work the pattern the other way up – just follow it as it is written and it should work for you 🙂 xx
Hi, I have been wanting to knit these for a long time. I just read the pattern but I don’t understand how you work the stripes, how do you get both colours across the foot ready for the pattern on the top. I am looking forward to knitting these.
Hi! You only work with one colour at once and change colours every 2 rounds with these socks, so the stripes on the sole are created as you go along. Don’t worry – if you follow the pattern as it’s written it will work out right. Mosaic knitting is magic! 🙂 xx
Thank you, thank you, thank you!
I’m in a bit of a knitting rut and need (for my sanity) something different to knit. I have a drawer full of my hand knitted socks, some are mosaic, but none quite like these. Now to dive into my stash and find the perfect combination of colors.
I can’t wait to start!
And thank you again!
Oh that’s wonderful, I’m glad I’ve been able to provide something different for you to knit! 🙂 xx
Hi Christine, can you advise me how many stitches for a 10.4” circumference foot please? If I get correct tension I should cast on 72 according to the calculator, but the music pattern says that’s for 9.5” foot.
Hi Julie, thanks for your message. Using the measurements from your Facebook post, I would actually round them down slightly so 7.5sts x 10.4in would become 7.5 x 10 = 75 – 10% = 67.5 … so I’d be suggesting that you looked at casting on 68sts for a basic sock, although you might find that 72st would be more comfortable … you do have to take a view on how snug you want your socks to be! For the Easy Mosaic Socks, I’d be definitely looking at 72sts because the fabric will pull in slightly because of the slipped stitches (you do have to keep the yarn pretty loose so that the fabric will stay stretchy) or even 76 if you find that you are knitting a bit tight. When you look again at your photo, does it look like the fabric pulls in as you get further away from your cuff? It’s really easy to pull the yarn a bit tight over the slipped stitches so check whether you’ve been doing that. The fabric should still be flexible in your hands when you pull it if you’ve got it right. I hope that helps! xx
Thank you for such a comprehensive answer Christine. I’ll have a look at the sock I started to check how tightly I pulled yarn
You’re very welcome, I hope it helps – and thank you for the brew too! 🙂 xx