
Beginner sock knitting: Sockalong – Week 2 – Heel flap, heel turn and gusset
Hello everyone, it’s Week 2 of the Winwick Mum Sockalong! How are we all doing? It’s been fabulous to see so many pictures and conversations this week -if you’ve not already joined our Winwick Mum Sockalong Facebook group and you’d like to, then please do get involved. Thank you so much to everyone who’s making this Sockalong such a success – I never imagined there would be so many pairs of socks on the go and from so many places around the world!
This week, in our beginner sock knitting tutorial, we’re onto the dreaded heels. Dreaded heels? No, not at all! We’re just going to take it slowly and you’ll see there’s not much to knitting a heel on a sock at all. I like to use a heel flap heel because I think it’s one of the easiest heels to create. Yes, there is picking up of stitches involved but I’m going to show you how to do that without creating holes. If you do find a hole, that can usually be rectified later with a bit of nifty stitching so it’s not the end of the world!
As we did last week, I’m going to talk about each of the needles in turn – short circular, DPNs and long circular (magic loop) so just jump to the section that’s relevant to you. Everybody ready? Let’s tackle those heels!
If you’ve just joined us and want to learn to knit basic top down socks, you can download the free Basic 4ply Socks pattern here and you’ll find the first tutorial in this series here. There are also getting started tutorials for choosing yarn and needles and adjusting the sock size here.
Heel Flap – short circular needle
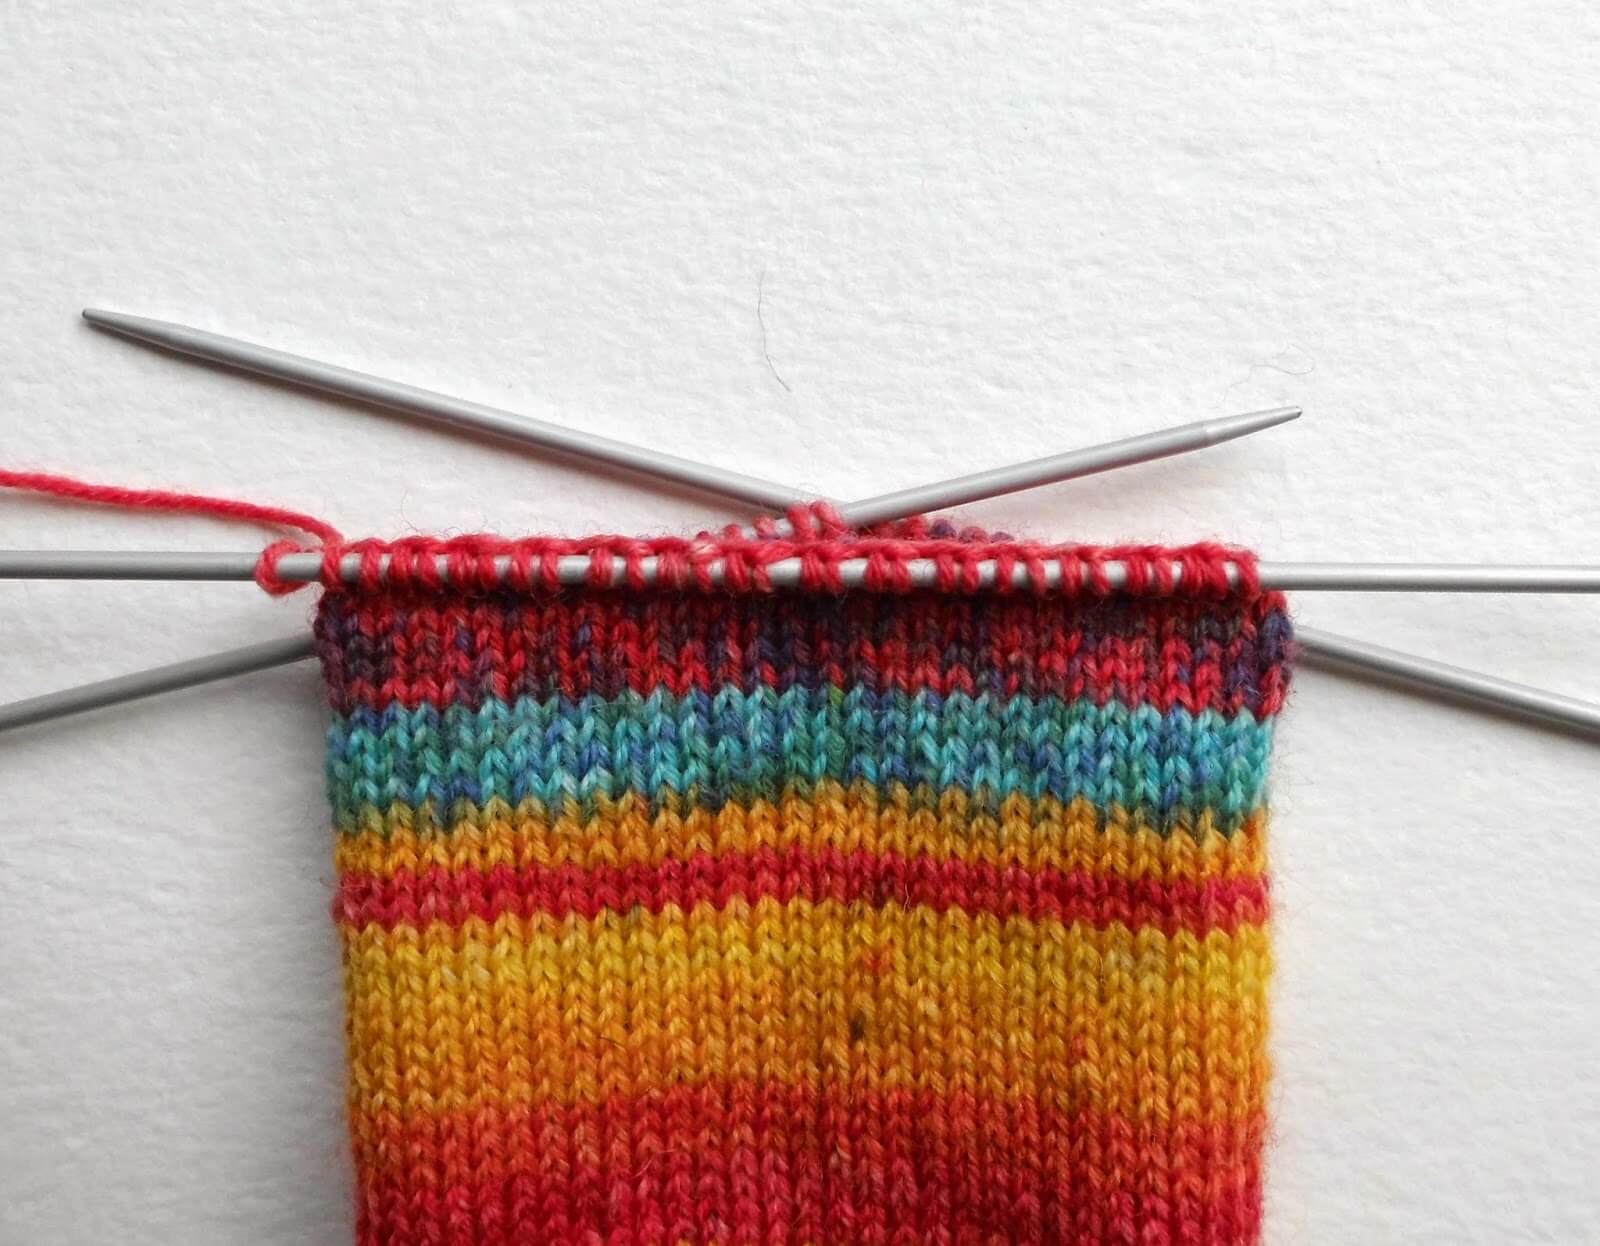
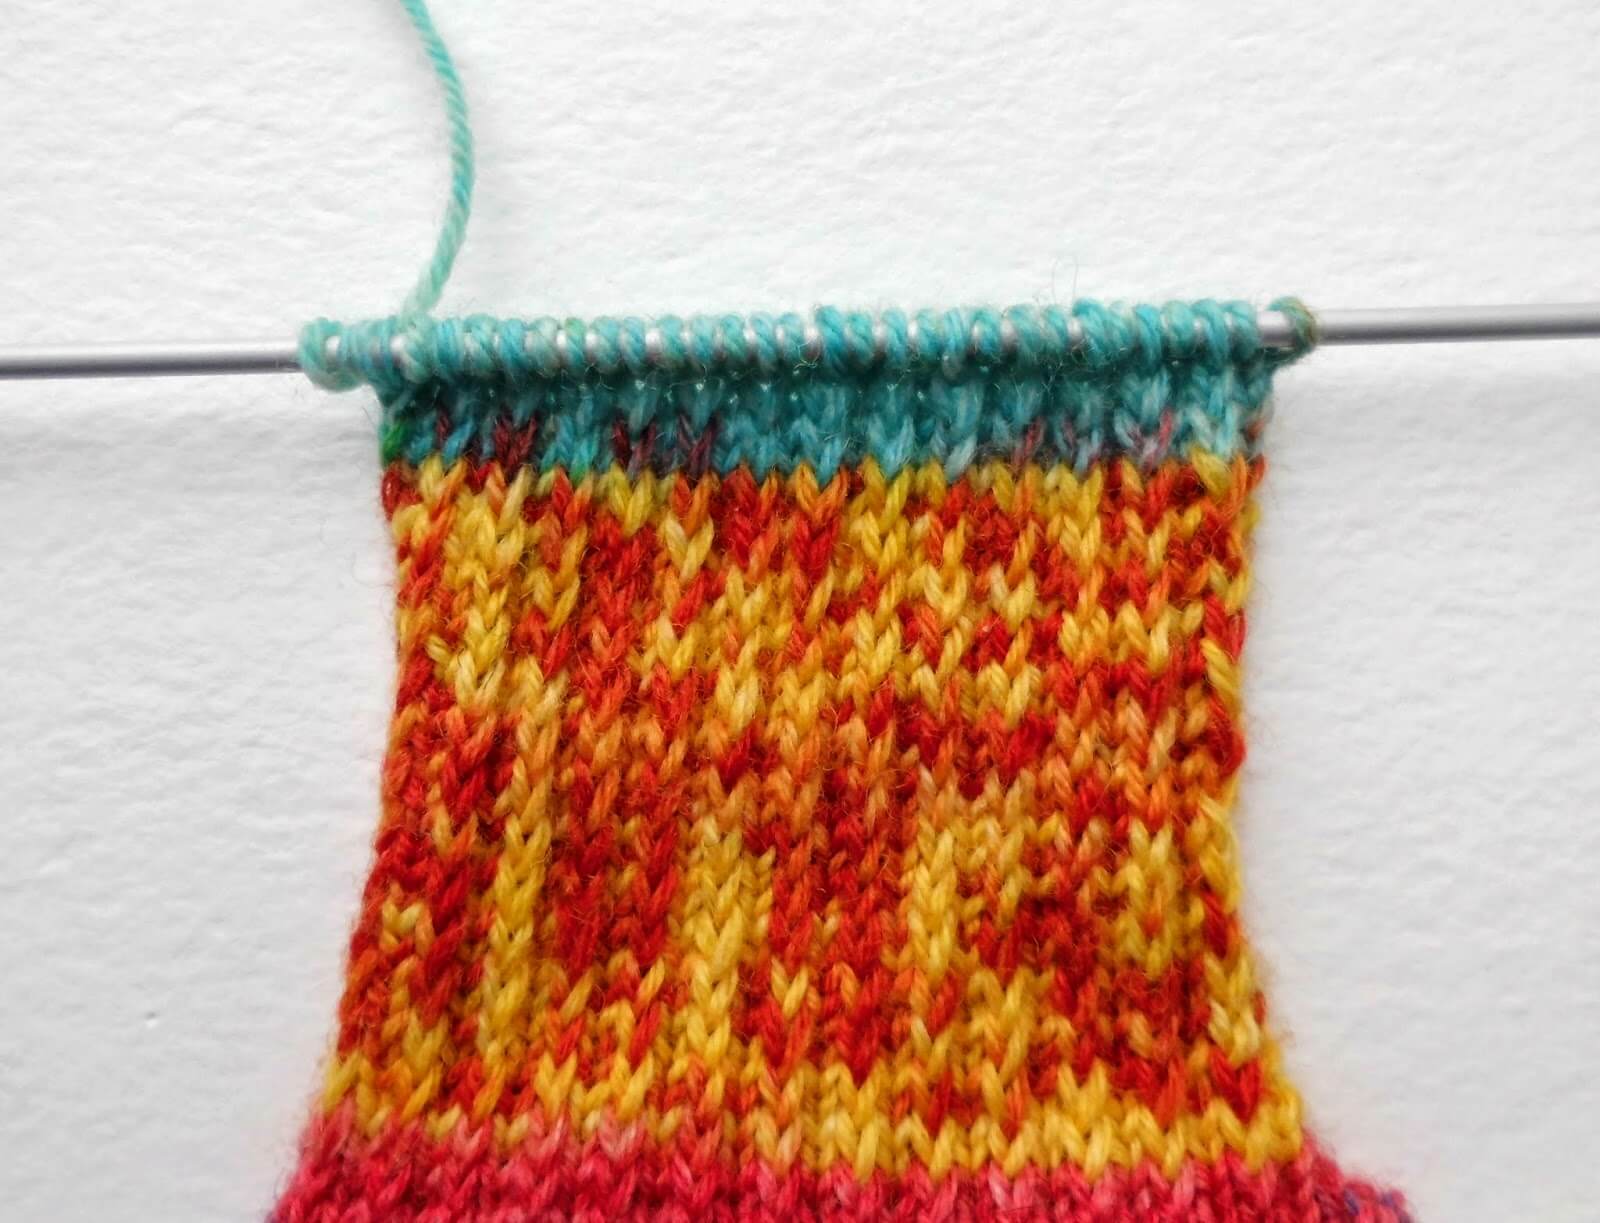
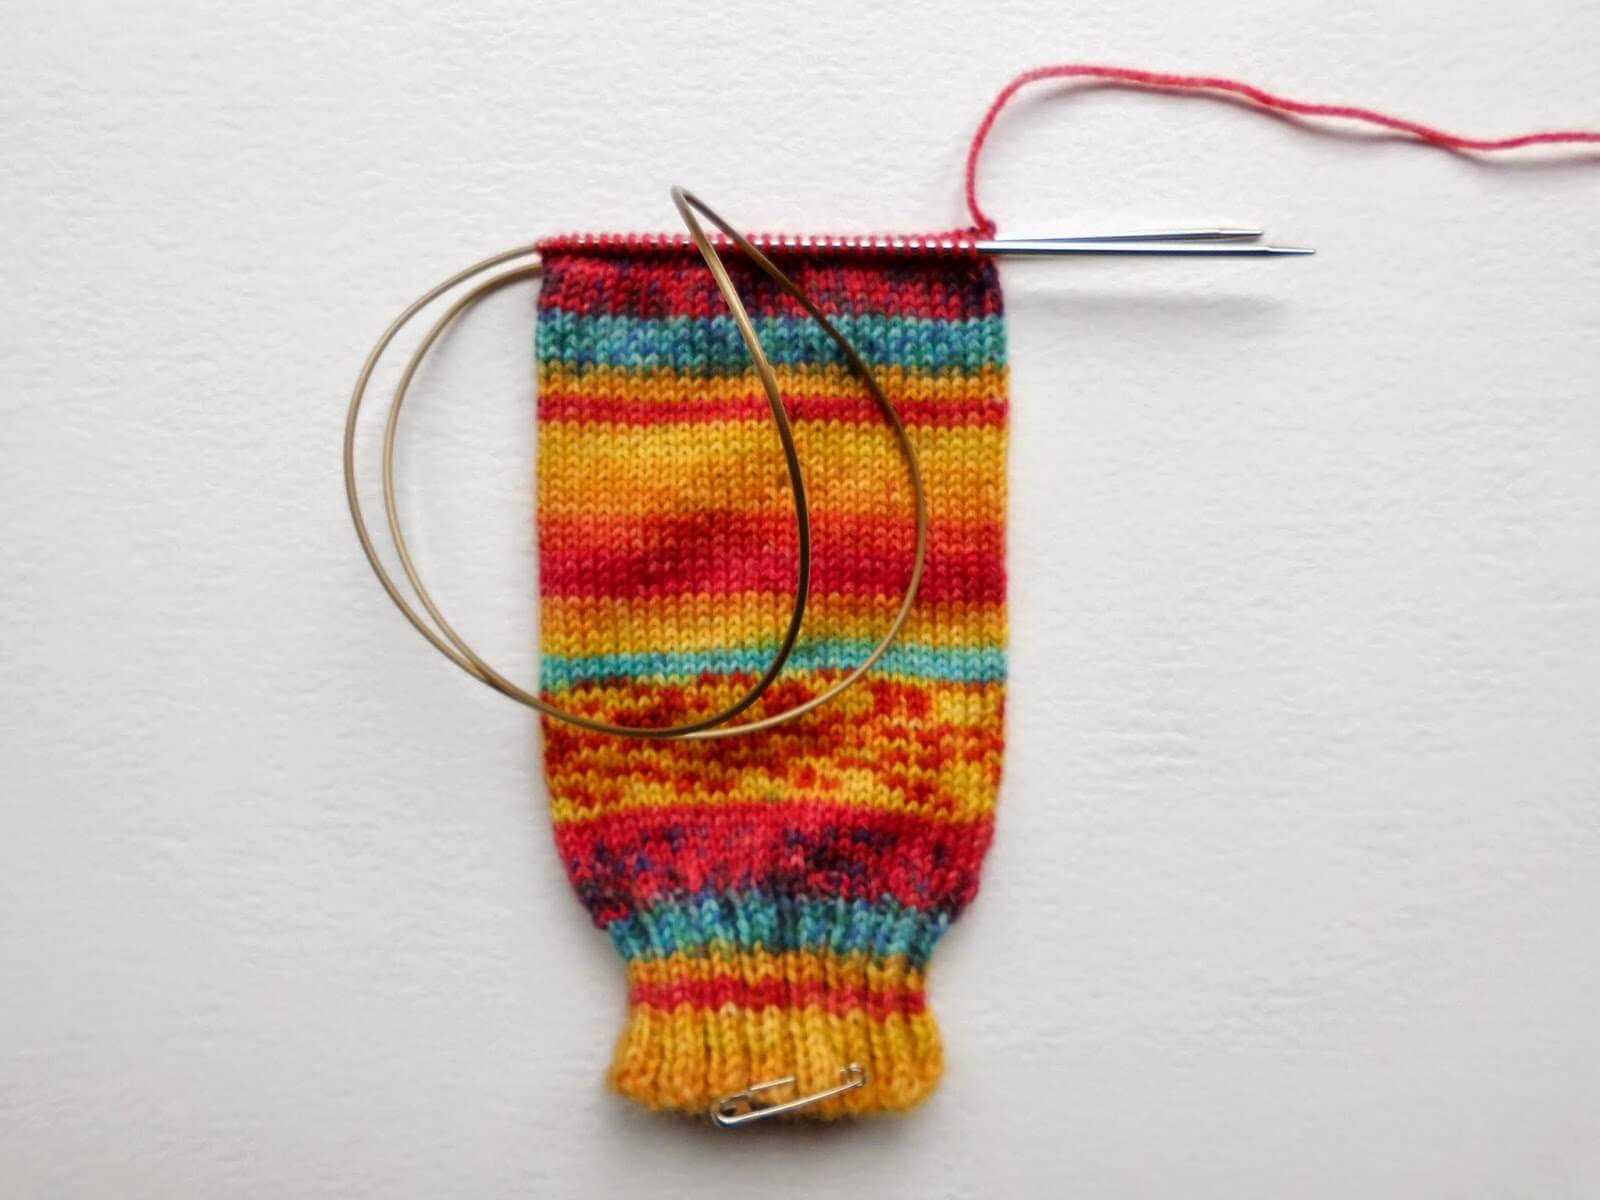
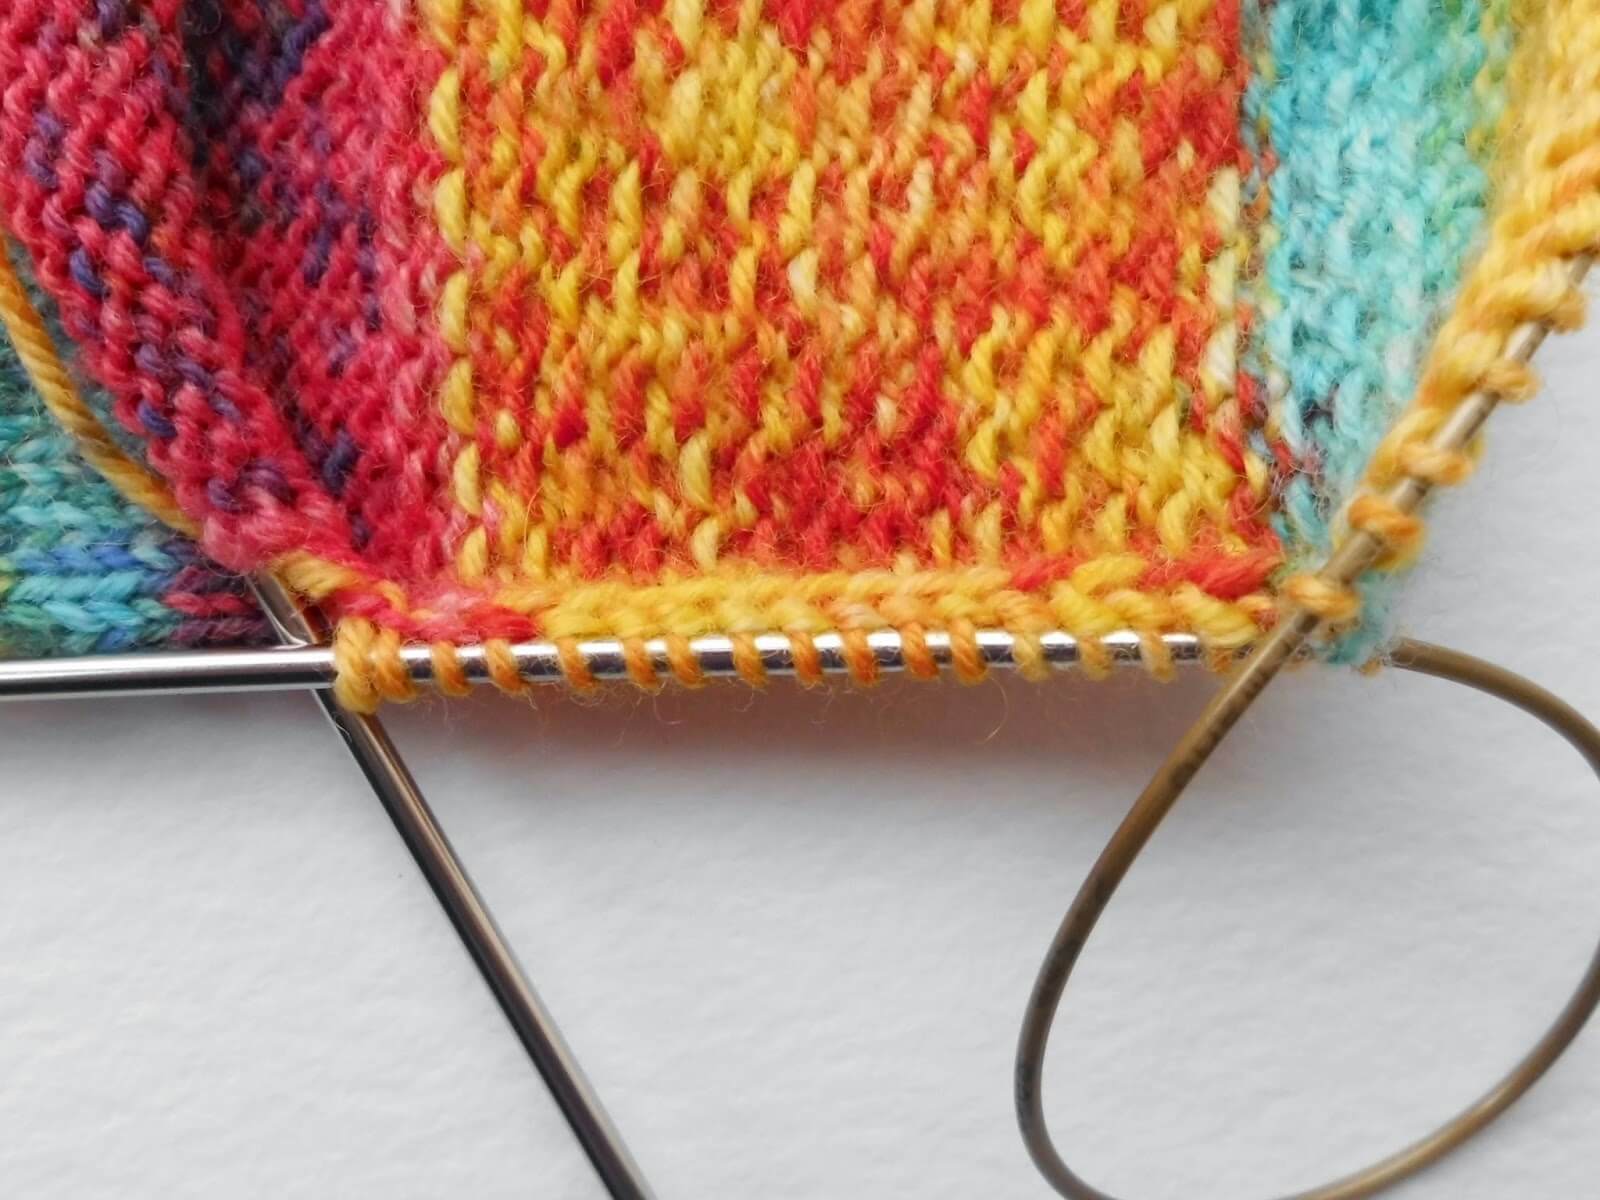
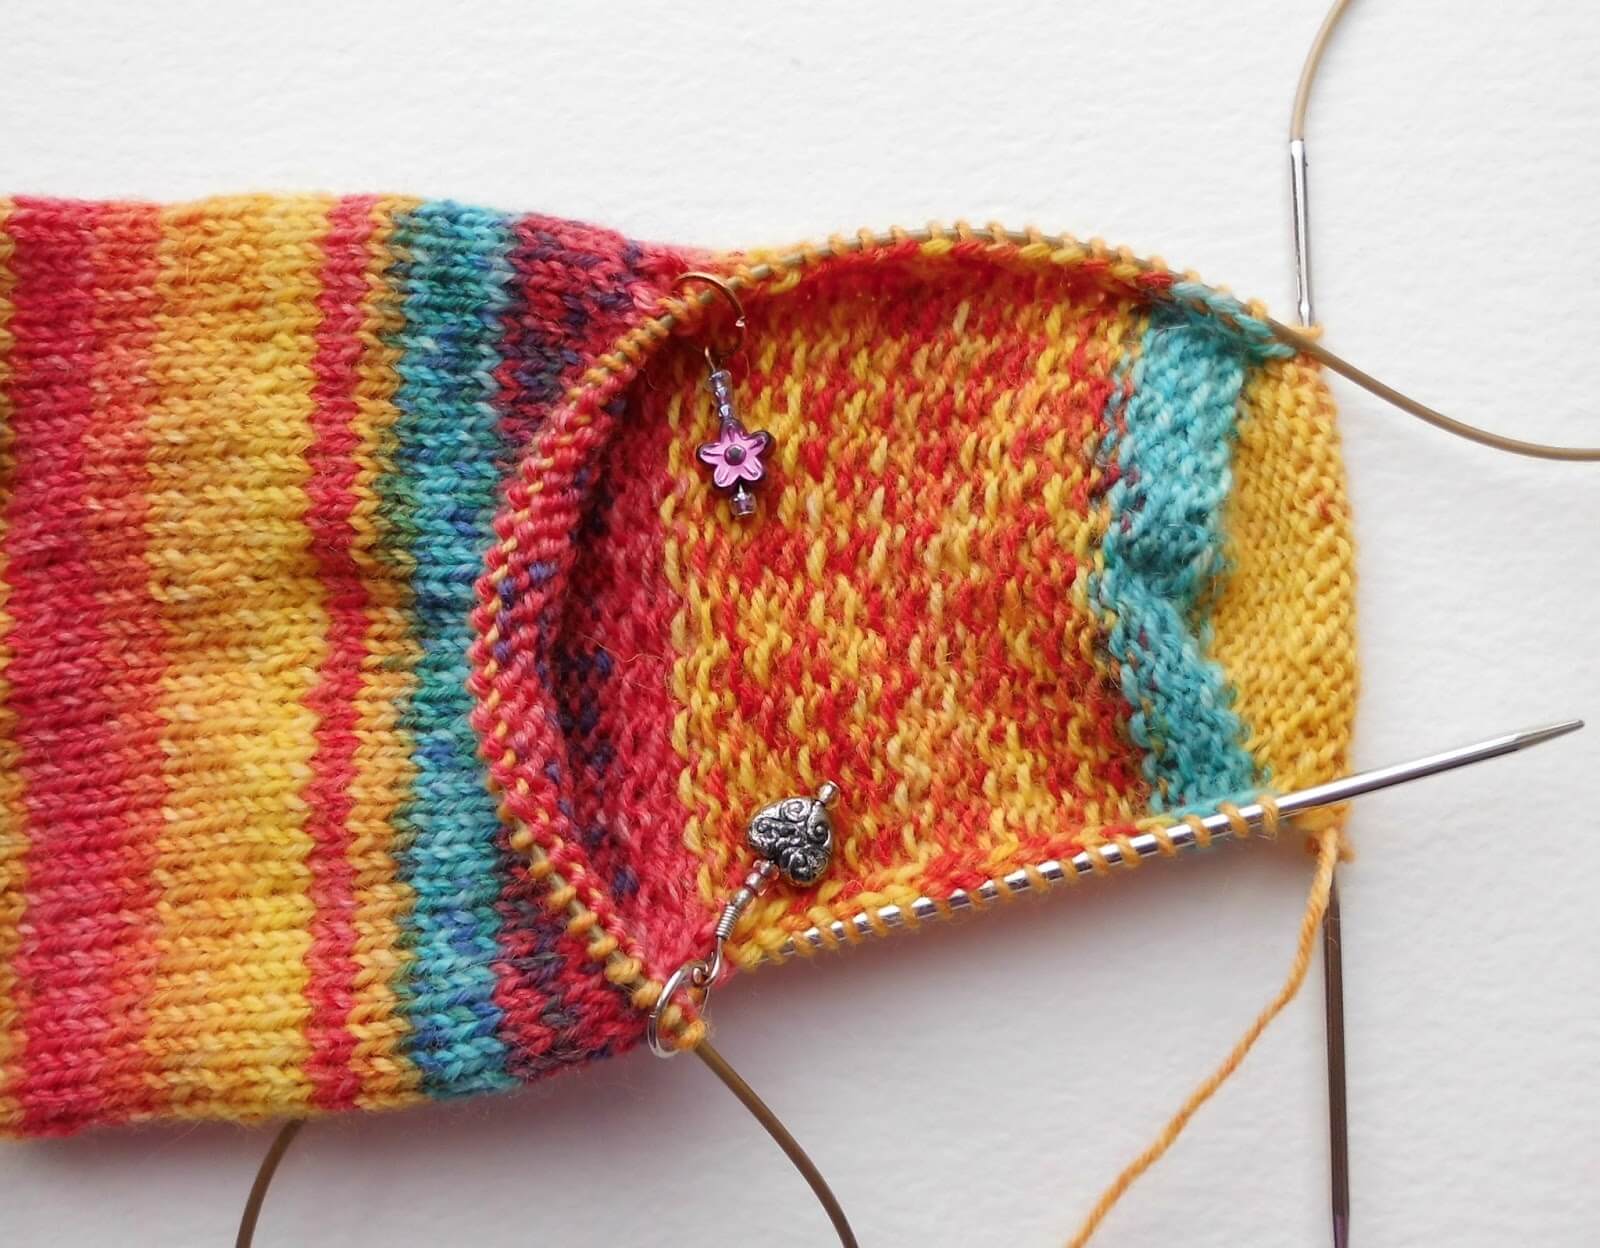
This is what your sock should look like at the moment. You’ve cast on, worked your rows of rib and knitted the leg of your sock to the length you want it to be.
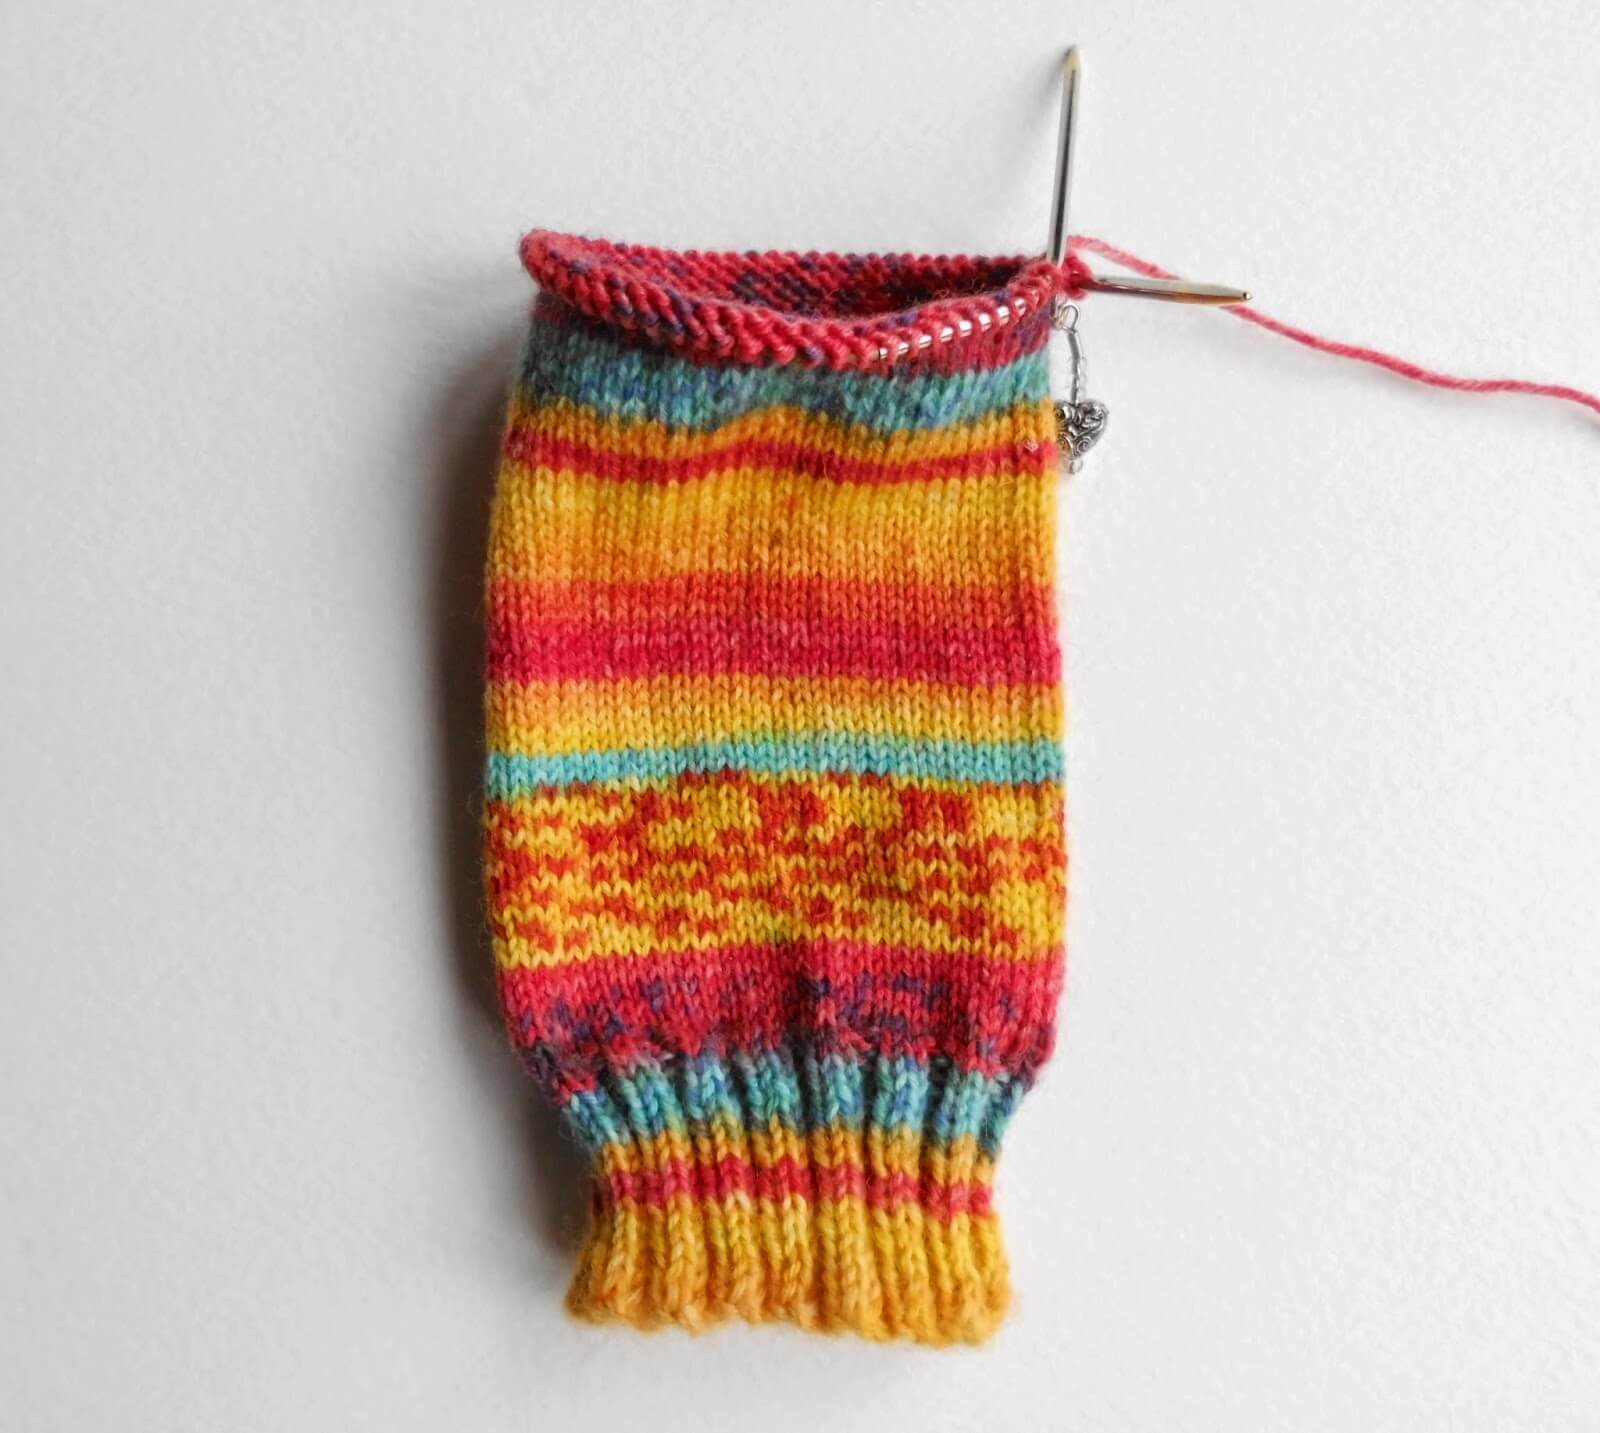
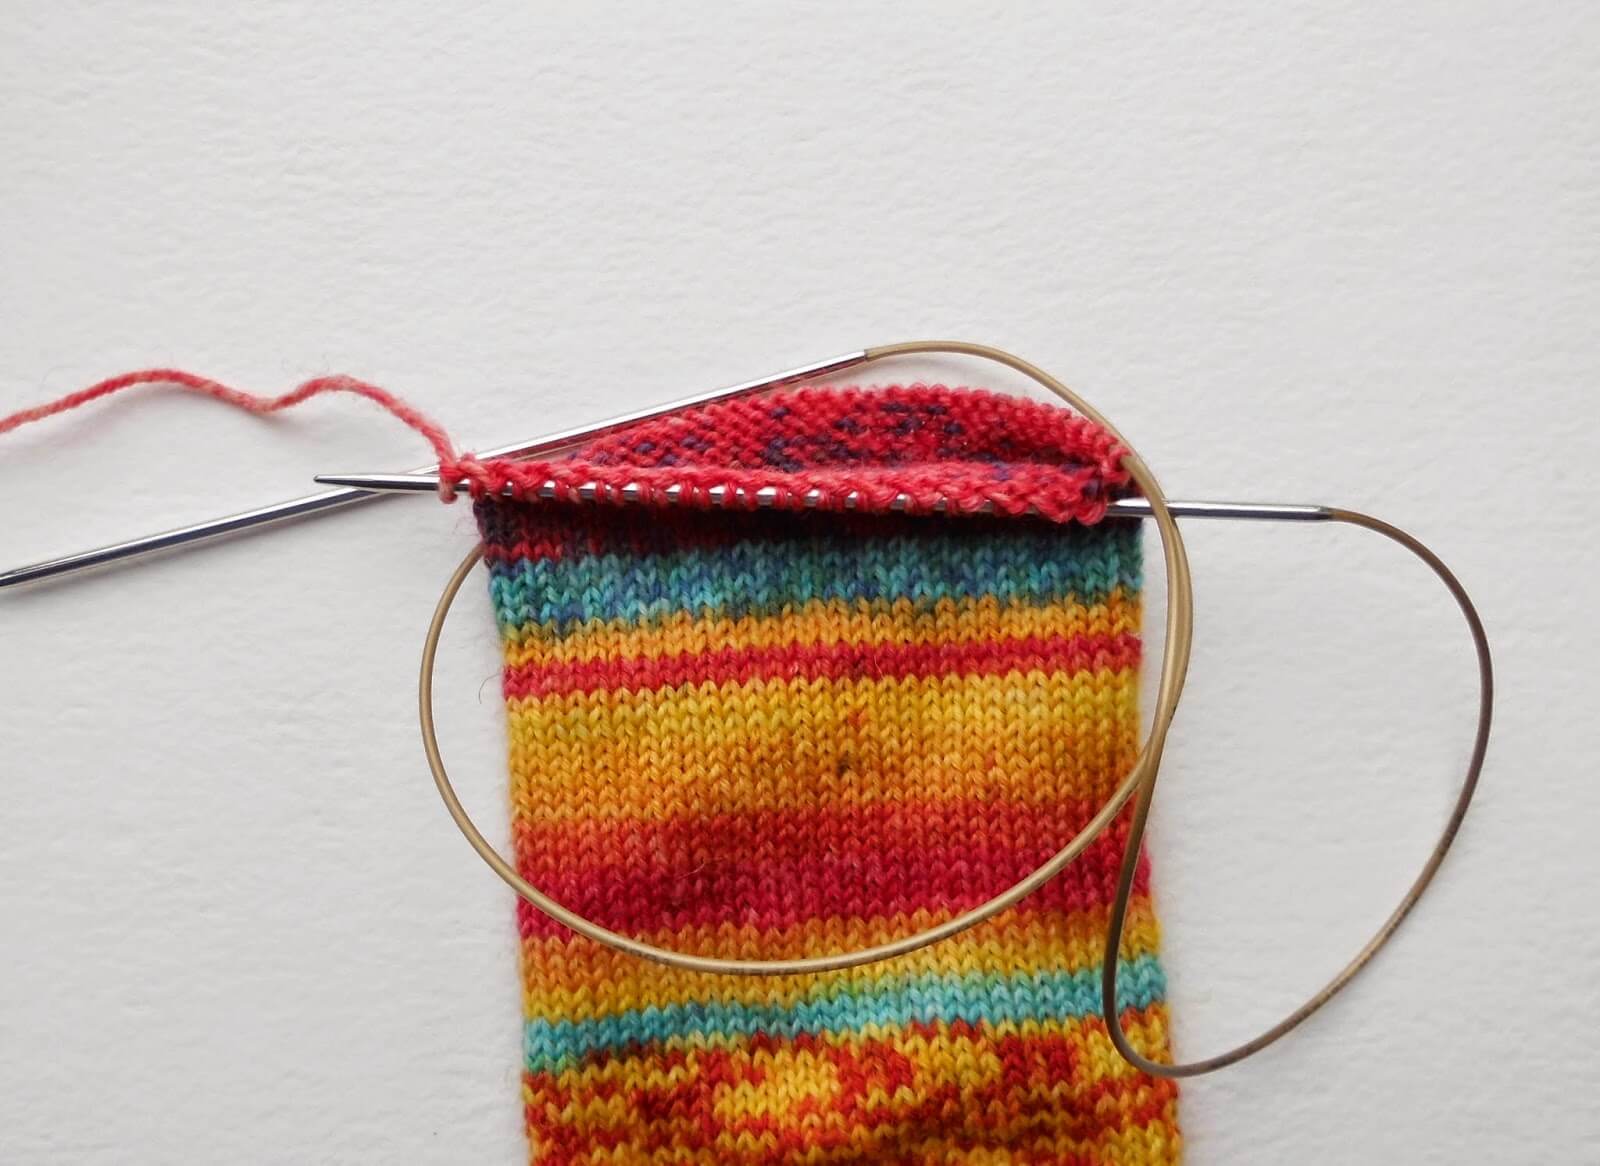
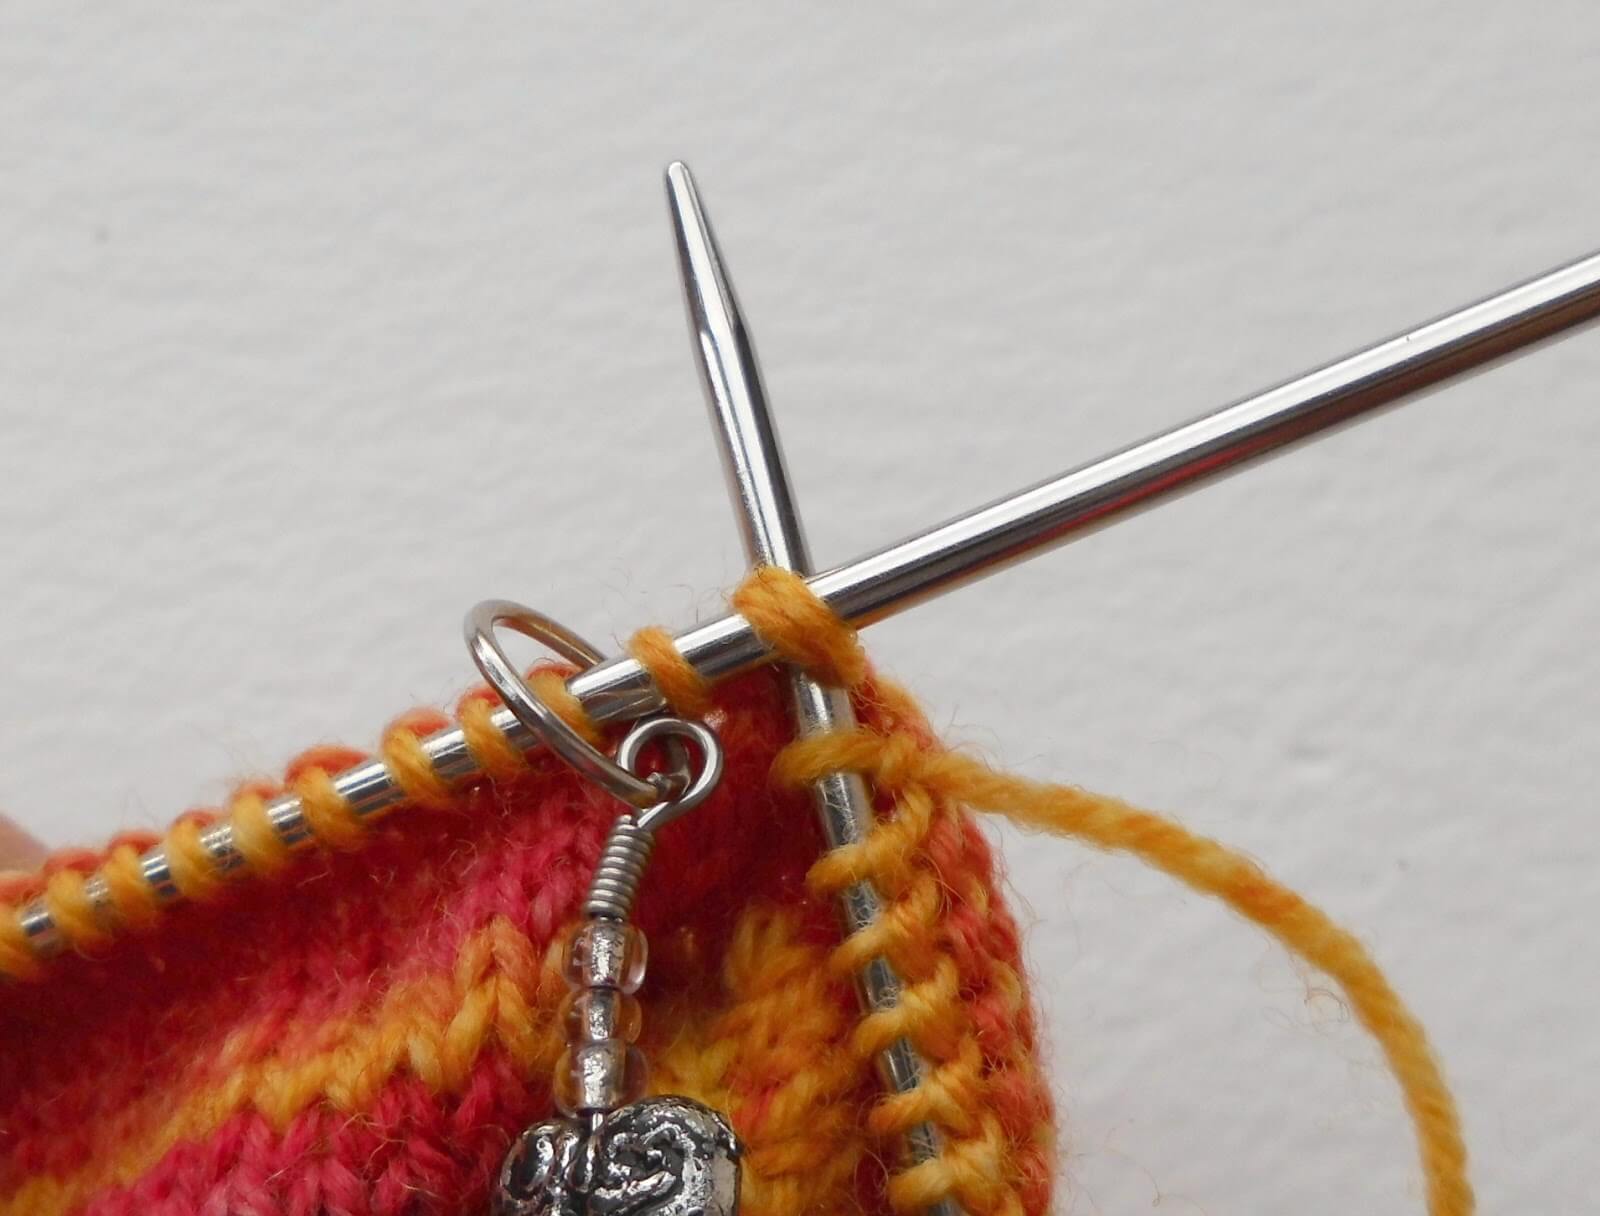
I find that it’s too awkward to create the heel flap on the small circular needle so at this point we need to change back to the pair of 2.5mm DPNs that you used to start off your cuff. You only need two needles as we’re going to go back and forth as you would for straight knitting.
You are going to create the heel flap from half the number of stitches that you cast on, so if you have cast on more or less than 60 stitches, you need to remember to adjust the number of stitches when you start the heel flap. You won’t need your stitch marker whilst you’re knitting your heel flap so you can put it away safely for now.
Continuing in the direction you have been knitting:
Row 1: K2, *Slip 1, K1* until you have 30 stitches on your needle, ending with K1, turn.
(Repeat instructions inside * and slip the stitch by sliding it from one needle to the other without knitting it.)
The reason that this row is different is because you’re knitting the first stitch rather than slipping it as you will for the rest of the heel flap rows. This helps to stop a hole forming where your gusset will be created later.
At this point, you can tuck the ends of your circular needle down inside the tube of your sock leg to keep them out of your way.
Row 2: Slip 1, P to end, turn.
Row 3: *Slip 1, K1* to end, turn.
Repeat rows 2 and 3 until heel measures approximately 2 inches, finishing on row 3 (approx. 35 rows for me – although remember this might be different if you’re using different sized needles). If you want to make the heel flap longer, continue knitting rows 2 and 3 until you reach your desired length.
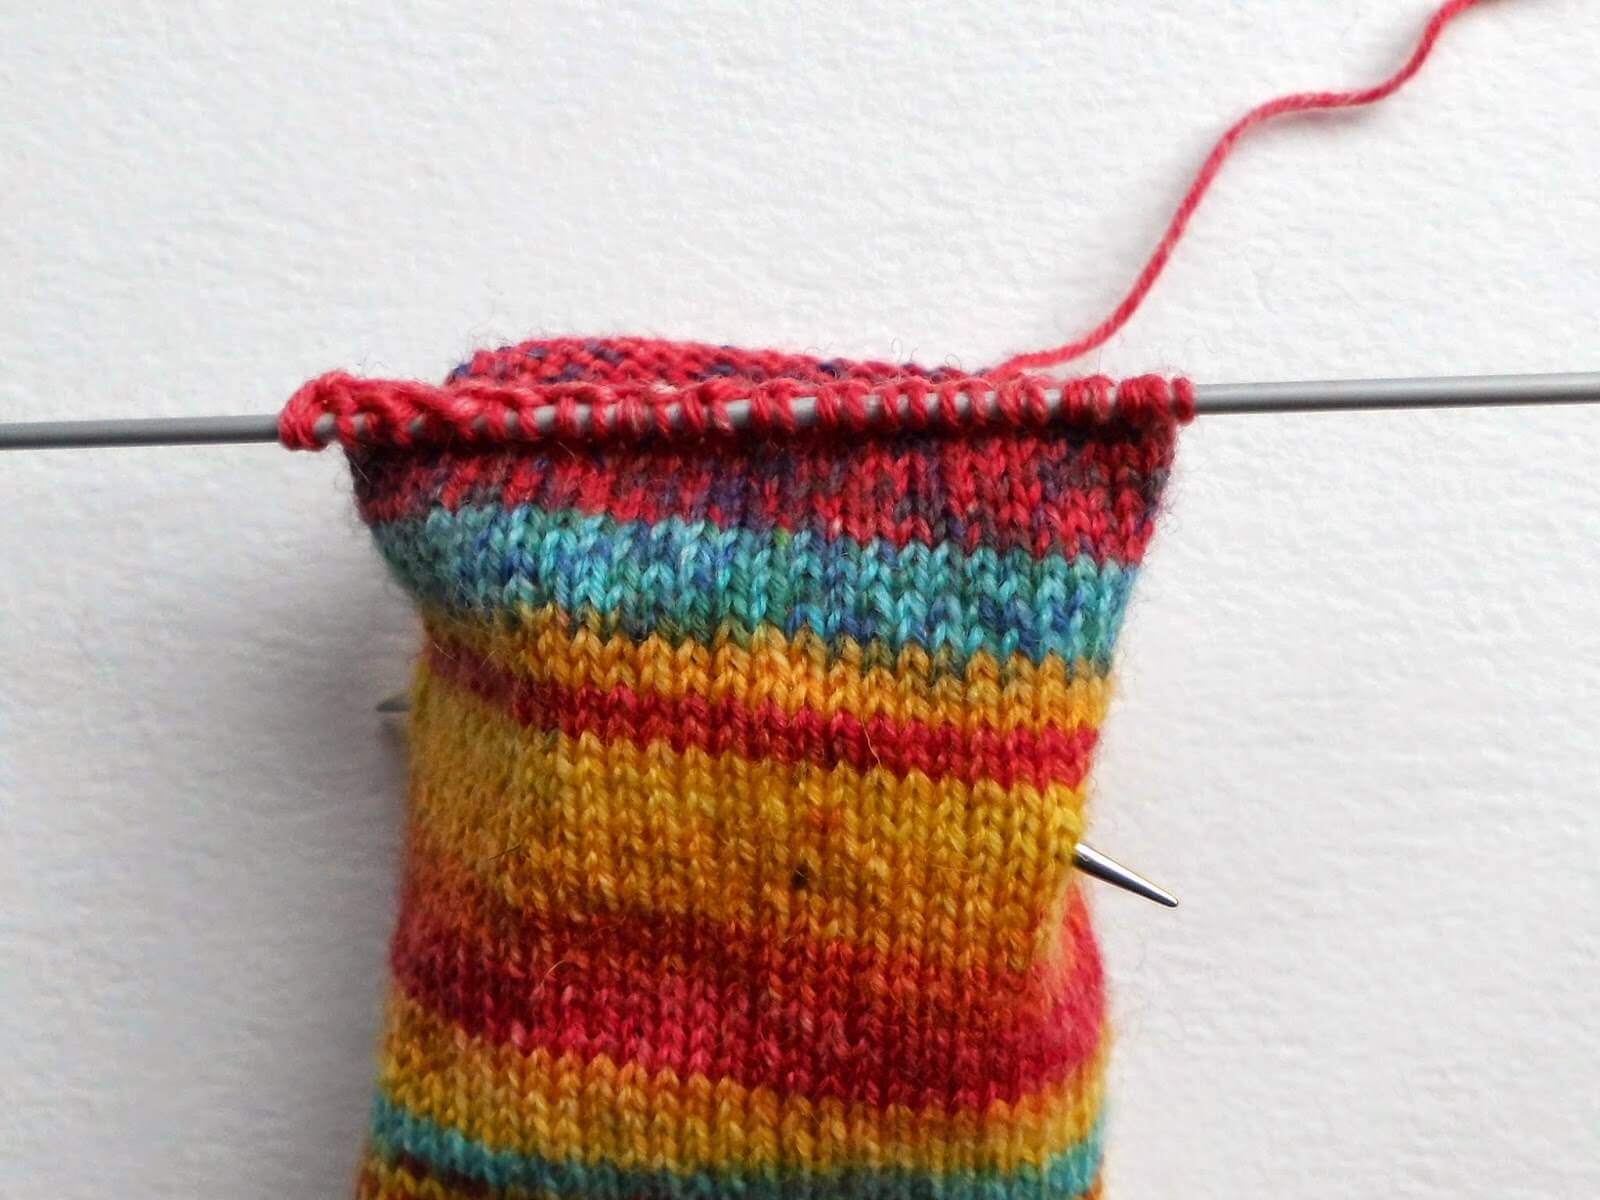
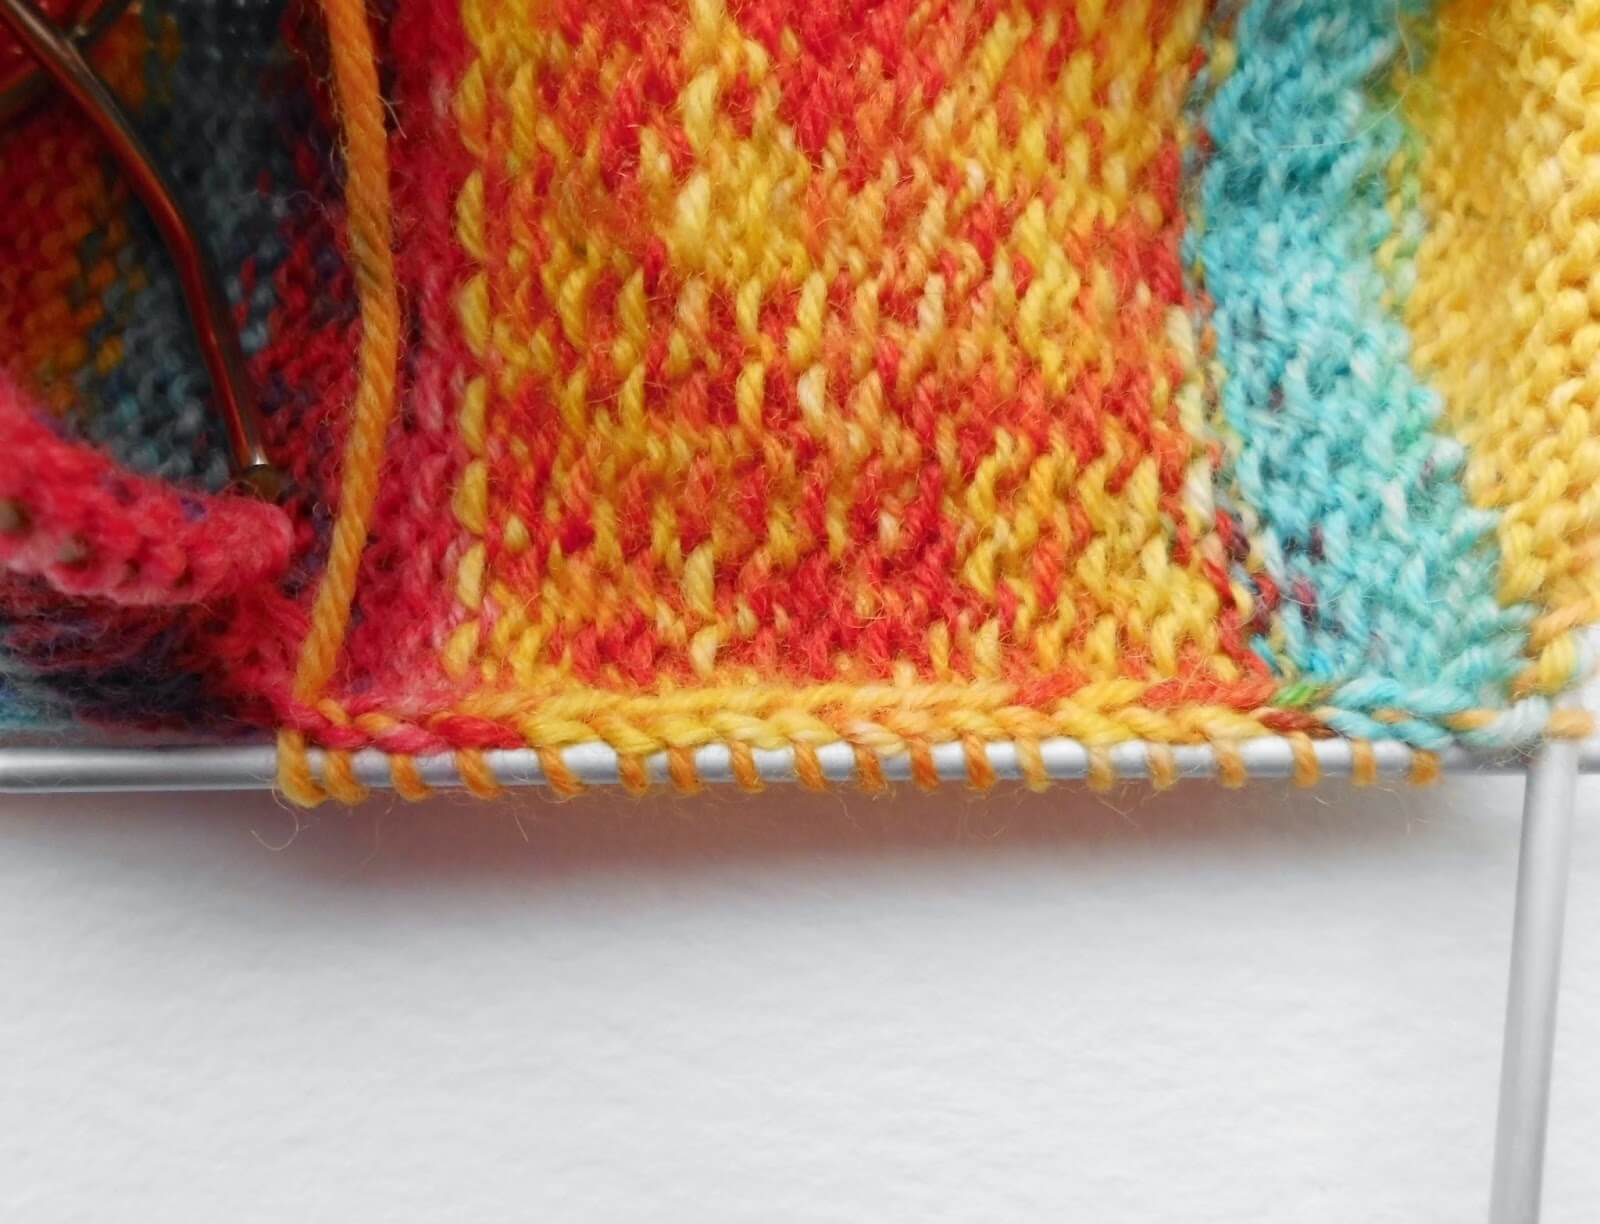
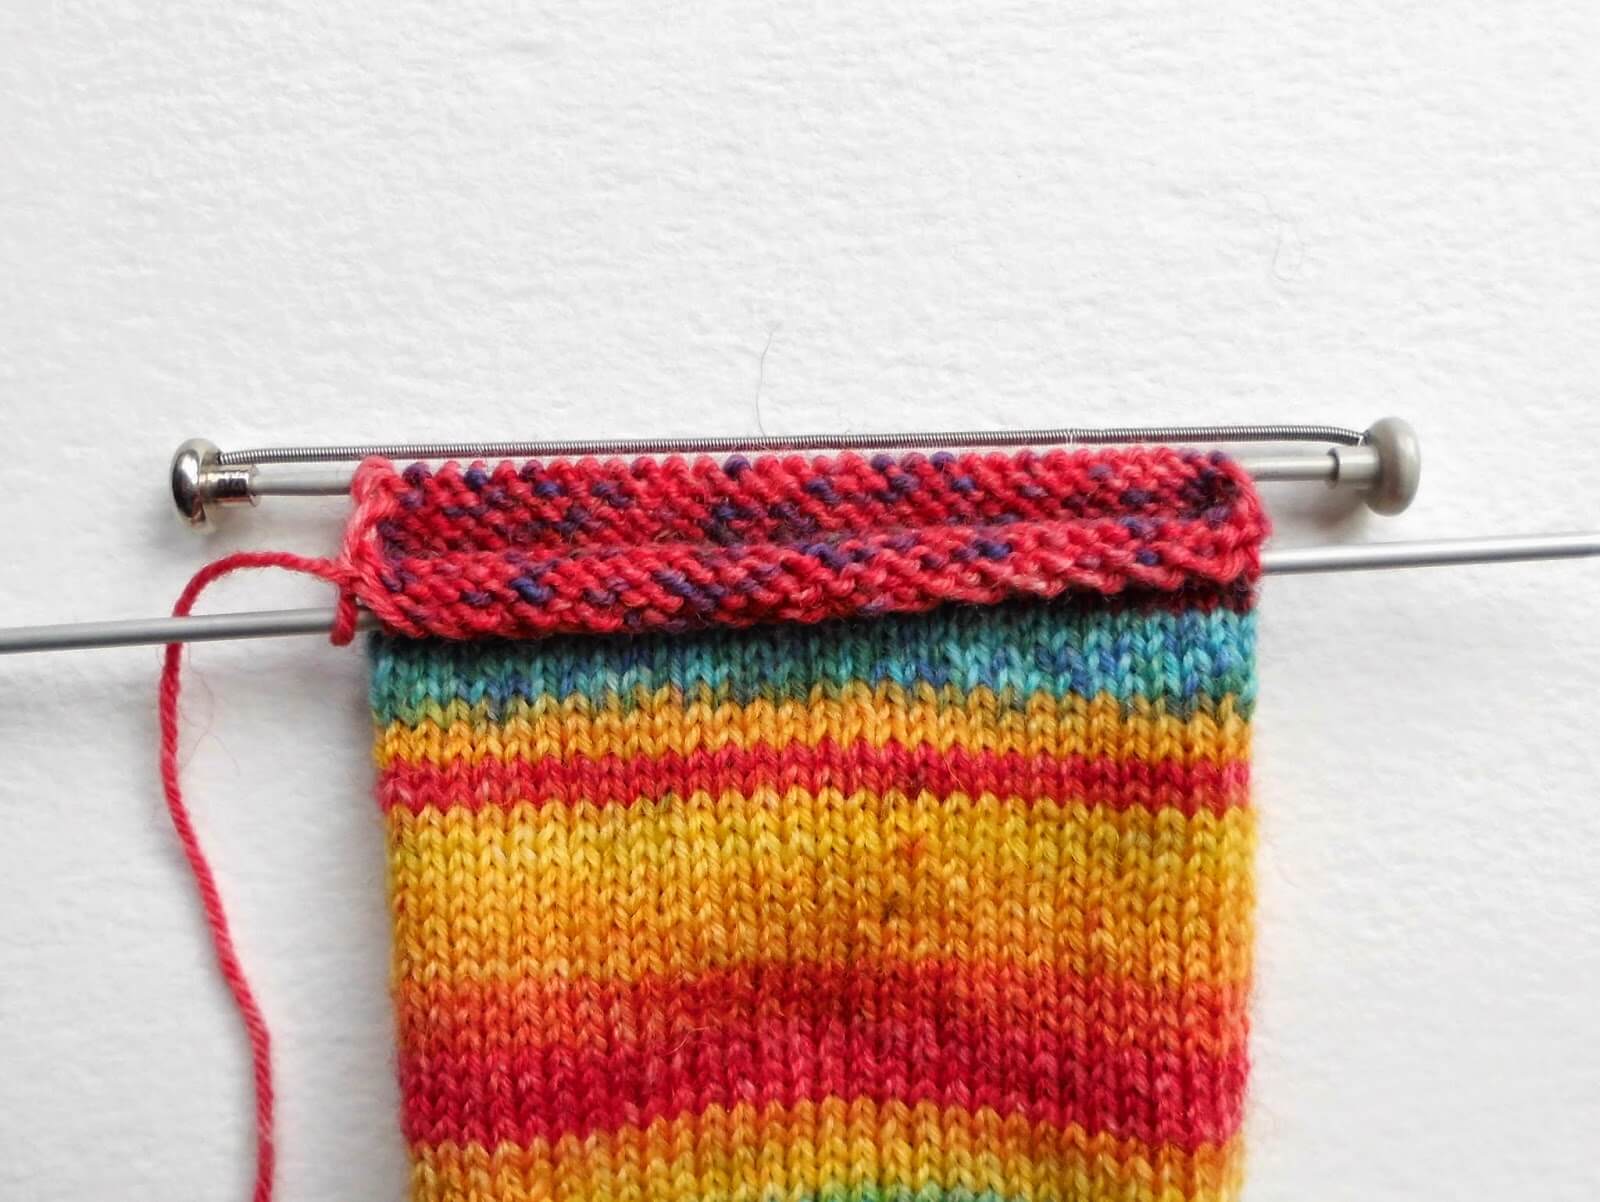
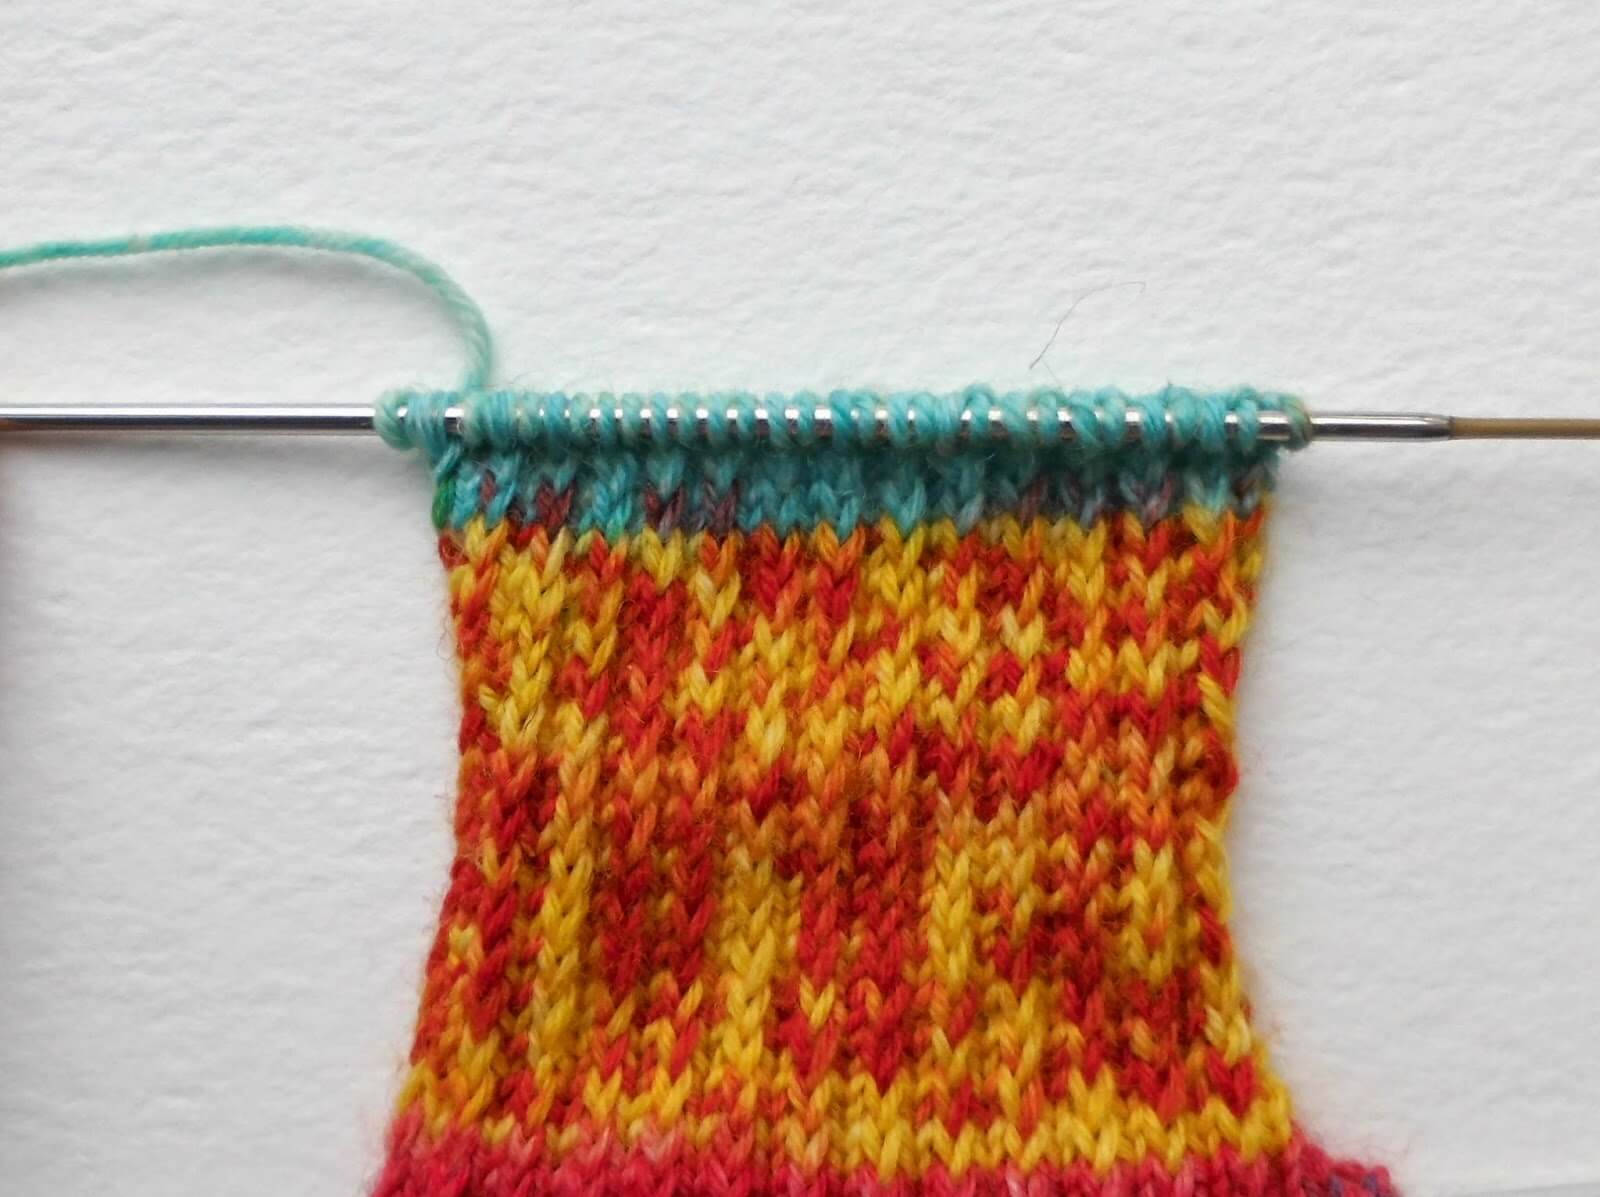
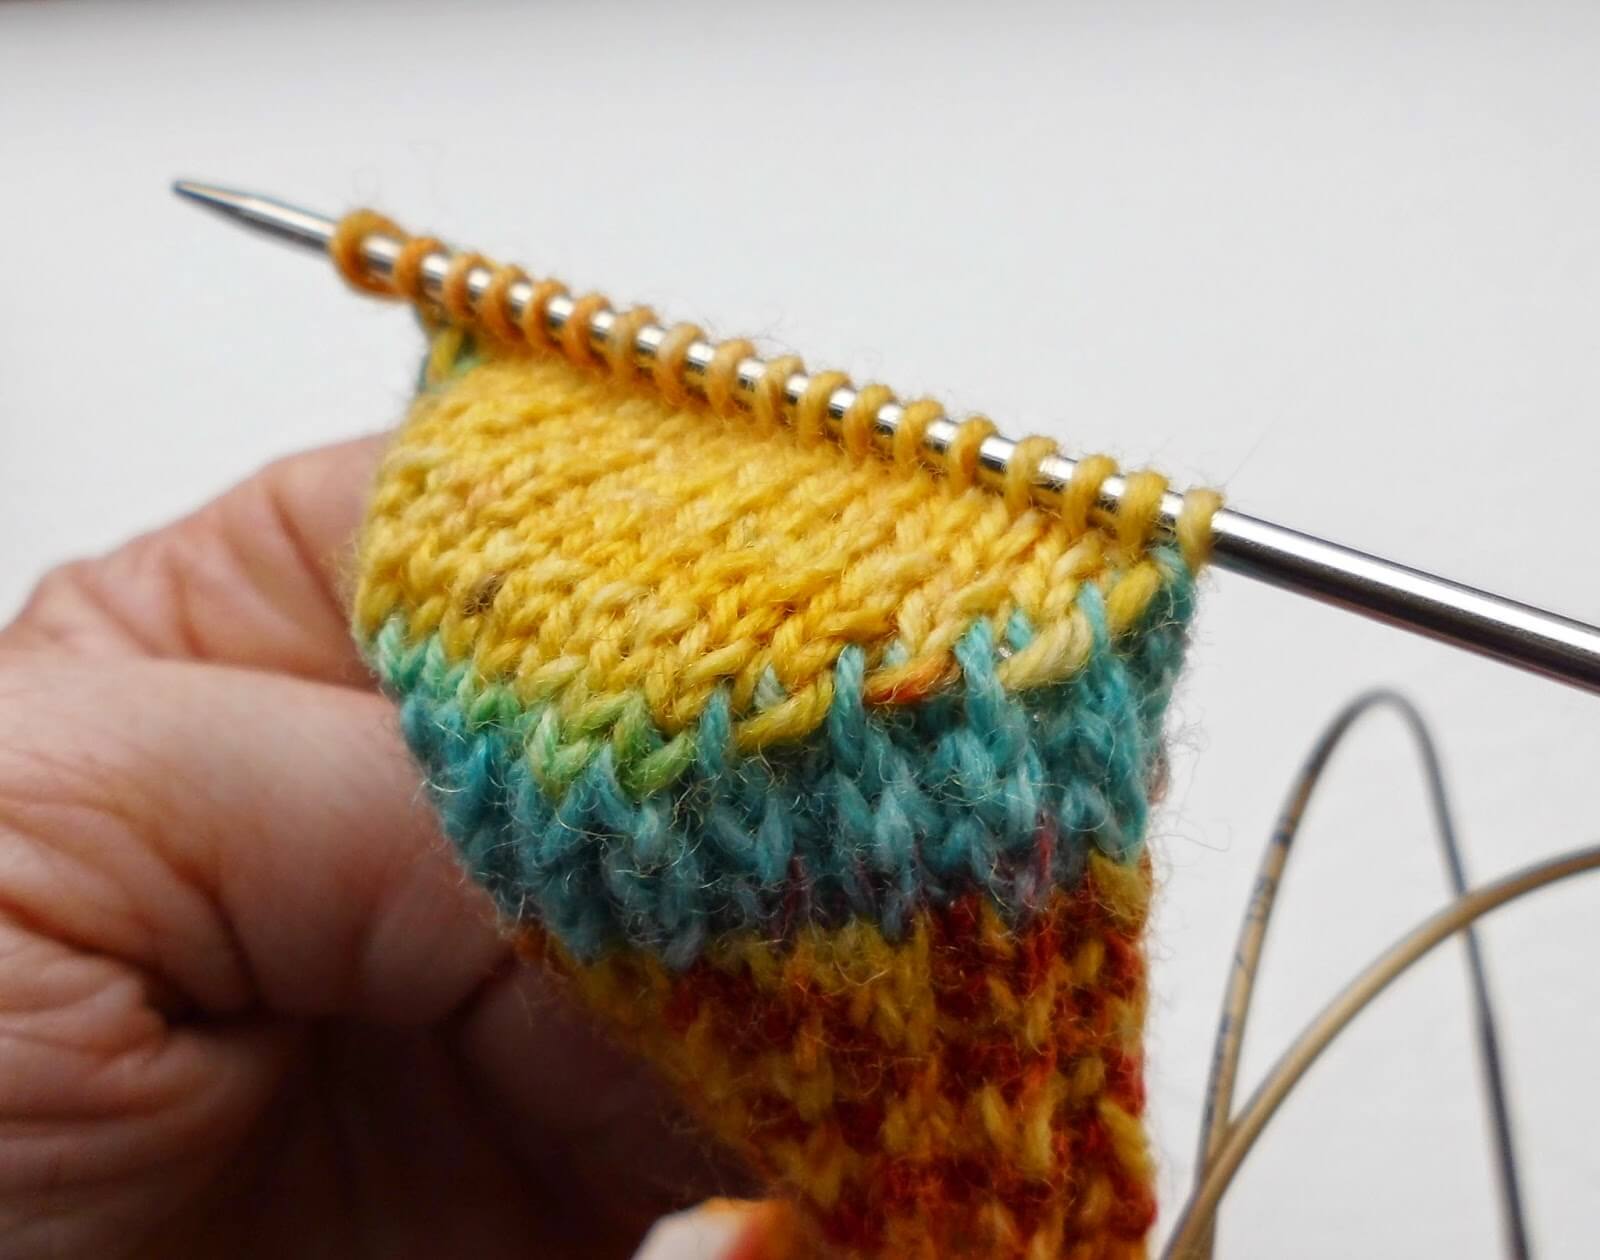
This is what your heel flap will look like on the outside …

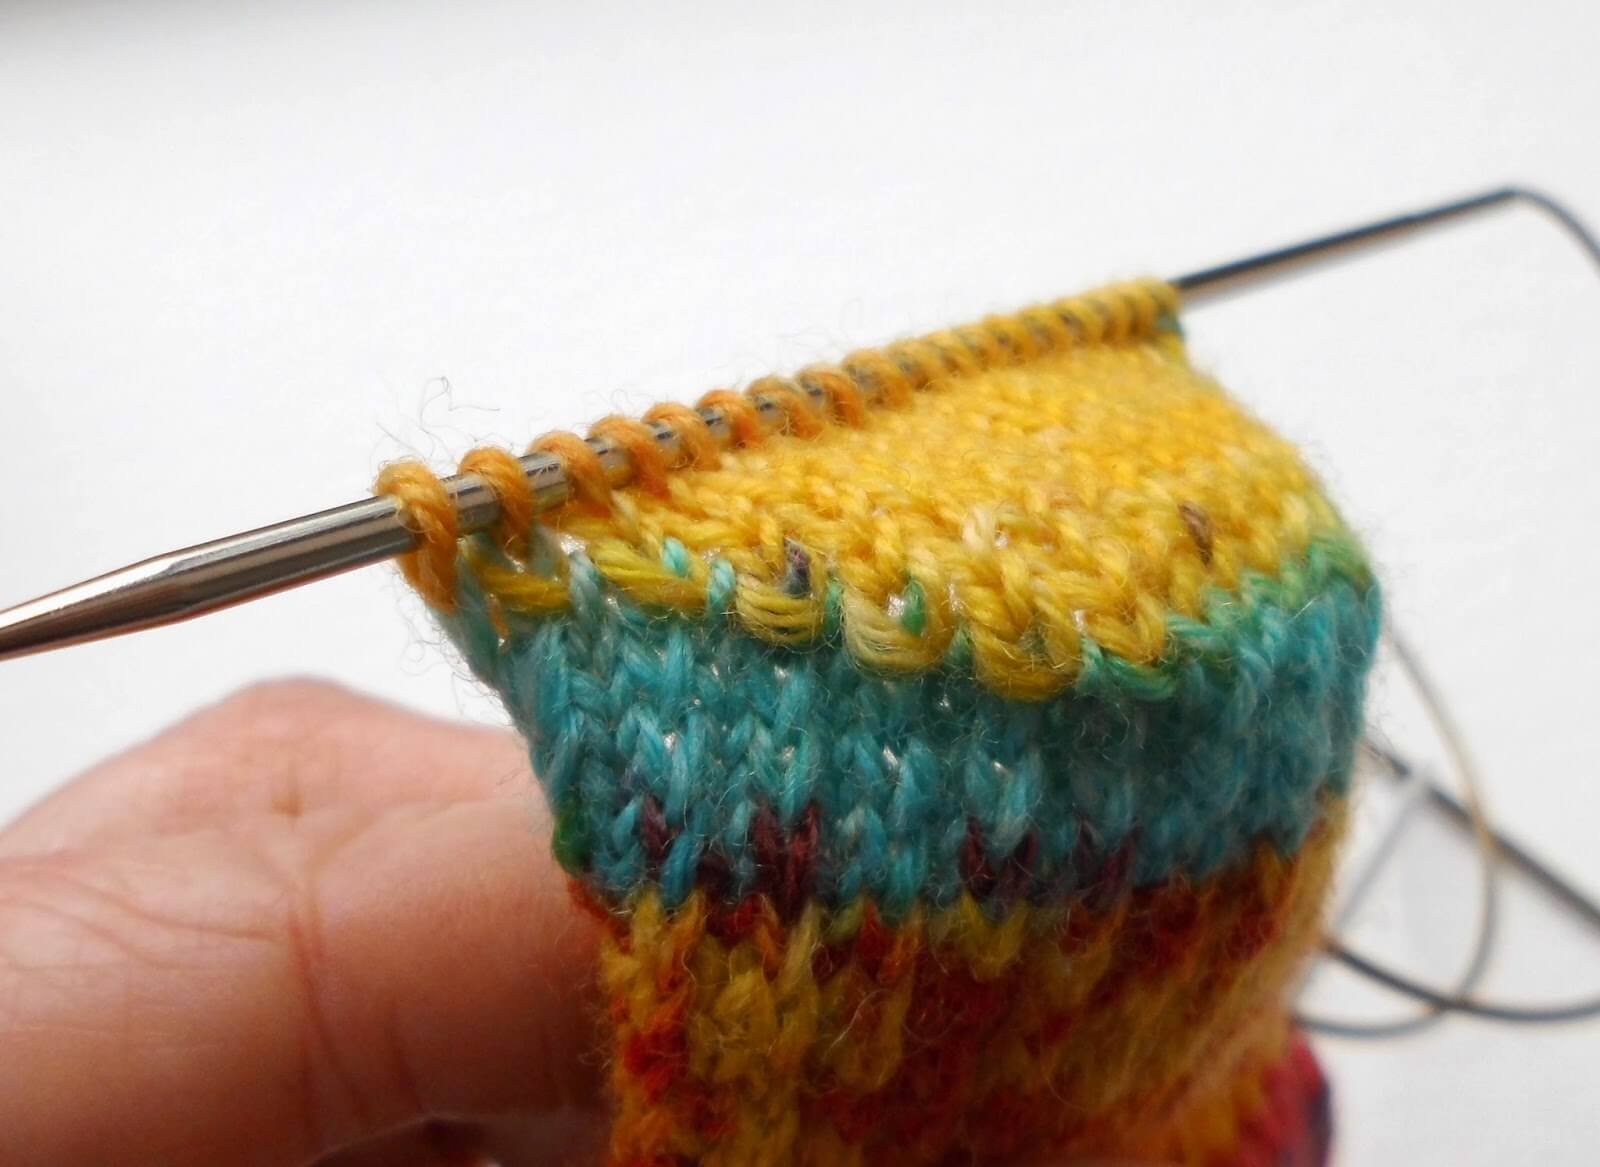
… and on the inside.
The heel stitch that you have used creates a reinforced, cushioned heel, which is more comfortable and durable than plain knitting.
Turning the heel
This is the part of the sock that many people find off-putting, but we’re going to take it slowly and you’ll see that it’s quite easy. I like this bit of the sock construction because this is where your sock starts to look like a sock. There are pictures of how to do the SSK and P2tog decrease stitches below.
You might like to read through the whole of this section before starting to make sure that you are quite happy with how the heel turn works.
We’re still working on the same two DPNs with the rest of the stitches held on the circular needle. Create the heel as follows:
Row 1: Slip 1, P16, P2tog, P1, turn.
This is your set-up row to get you into the middle of your heel. After this first row, you will still have stitches left on your needle that you haven’t used. These are the stitches that you are going to decrease on every alternate following row to pull your heel into a V shape.
Row 2: Slip 1, K5, SSK, K1, turn.
Row 3: Slip 1, P6, P2tog, P1, turn.
Row 4: Slip 1, K7, SSK, K1, turn.
Continue in this way, increasing the number of stitches worked between slip stitch and SSK or P2tog on each row (ie, P8, K9, P10 etc) until all of the heel stitches are used and you won’t need to turn after your last row. You should find that you finish on an SSK stitch and have 18 stitches left on your needle.
If you have cast on more or less than 60 stitches then your heel flap will need to be made larger or smaller. It’s very easy to do this. All you need to do is to alter the number of purl stitches in the first row of the heel (marked in bold above), increasing by 1 stitch for each block of 4 stitches extra that you cast on, or decreasing by 1 stitch for each block of 4 stitches less than 60 stitches. For example, if you cast on 64 stitches, your first row would be Slip1, P17, P2tog, P1, turn. You can work the rest of the heel as from Row 2 above without changing anything else. Note that you will have more or less than 18 stitches left on your needle when you have worked all the decreases if you make the sock bigger or smaller.
You will notice as you start your heel turn that there’s a gap between the end of your knit or purl stitches in the middle of your heel and the remaining stitches to be worked. This will help you to see where you’re up to. You can see that you are always knitting the stitches in the middle of the heel flap whilst the remainder stay safely on your needles until they are required.

The heel rows require you to use P2tog and SSK stitches. These are simply decrease stitches worked on either the purl side or the knit side of your work.
To create P2tog, put the right hand needle purlwise into the first two stitches on the left hand needle and purl them together.
To create SSK, put the right hand needle knitwise into the first stitch on the left hand needle and slip it onto the right hand needle.

Put the right hand needle purlwise into the second stitch on the left hand needle and slip it onto the right hand needle.

Slip both stitches back onto the left hand needle, then knit into the back of the stitches. This gives a neat decrease on the outside of your heel.

This is what you’ll see on the outside of your sock. This is the P2tog side …
and this is the SSK side. It gives a nice neat finish with no gappy holes.
Shaping the gusset
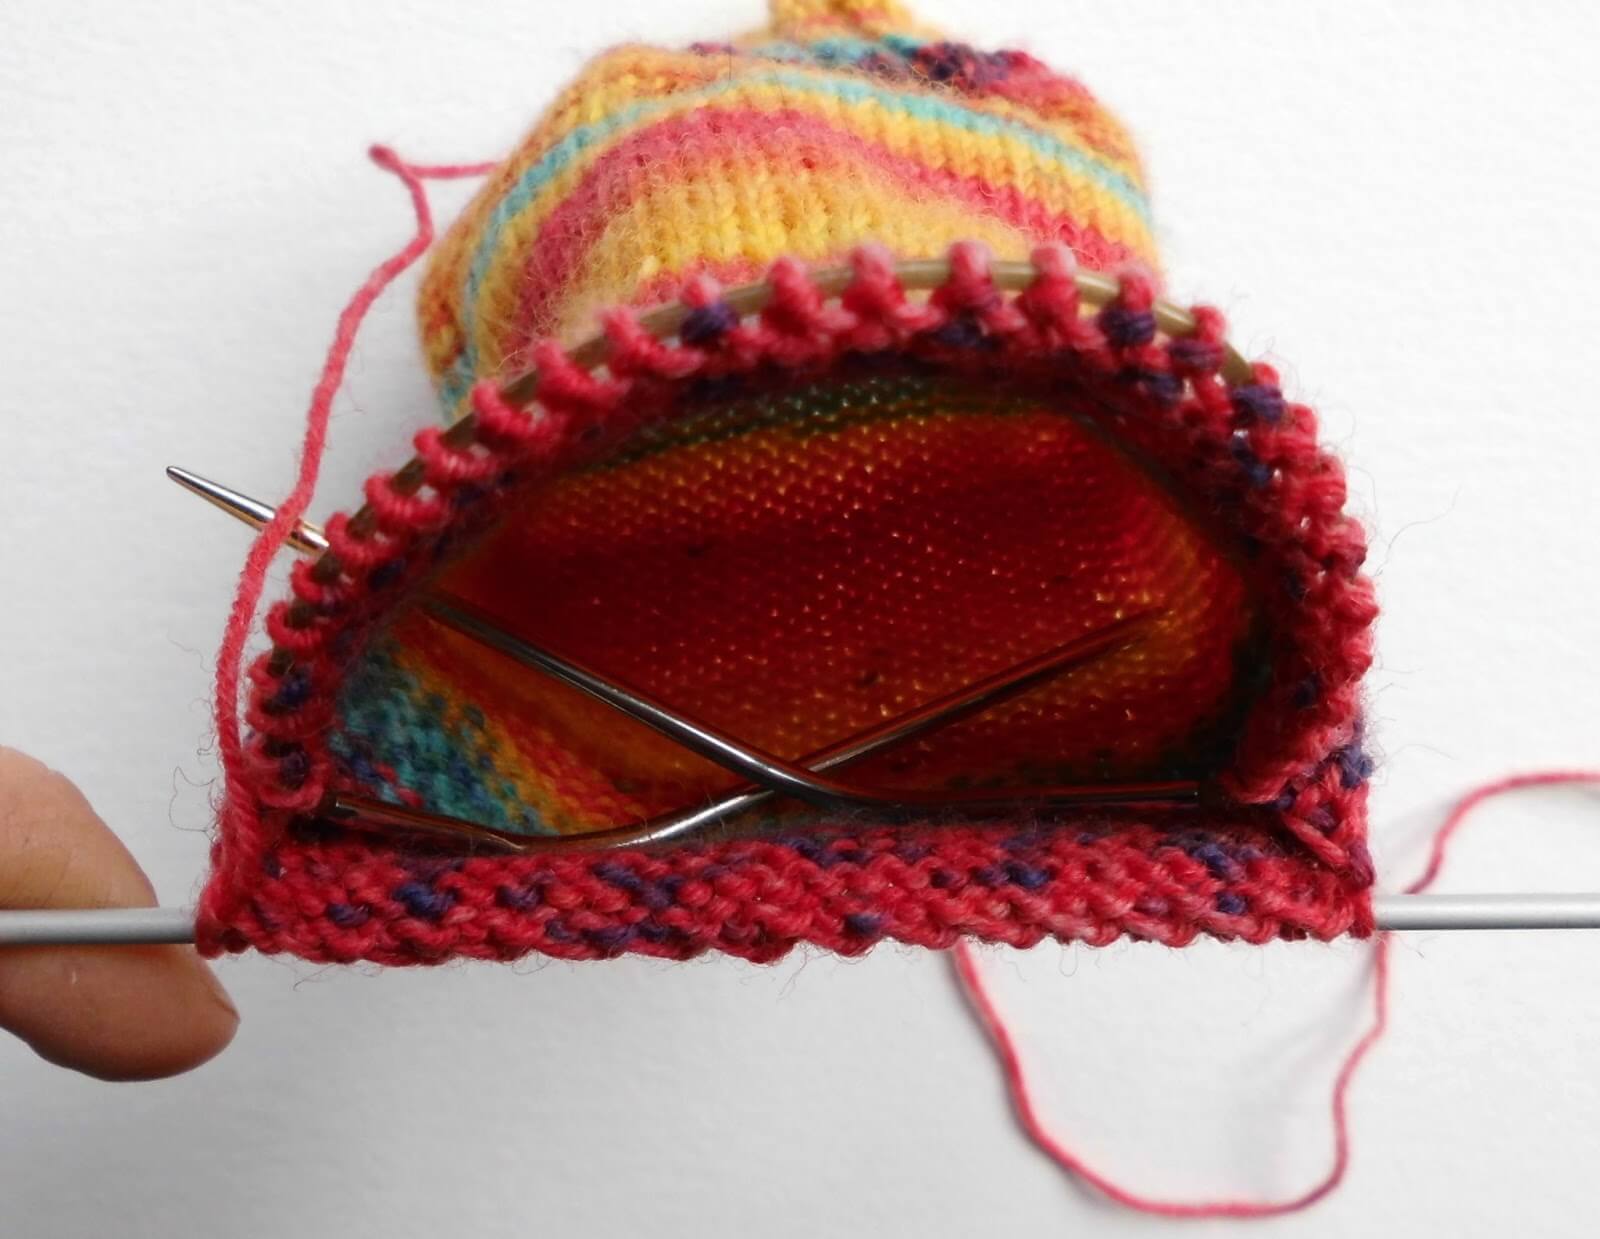
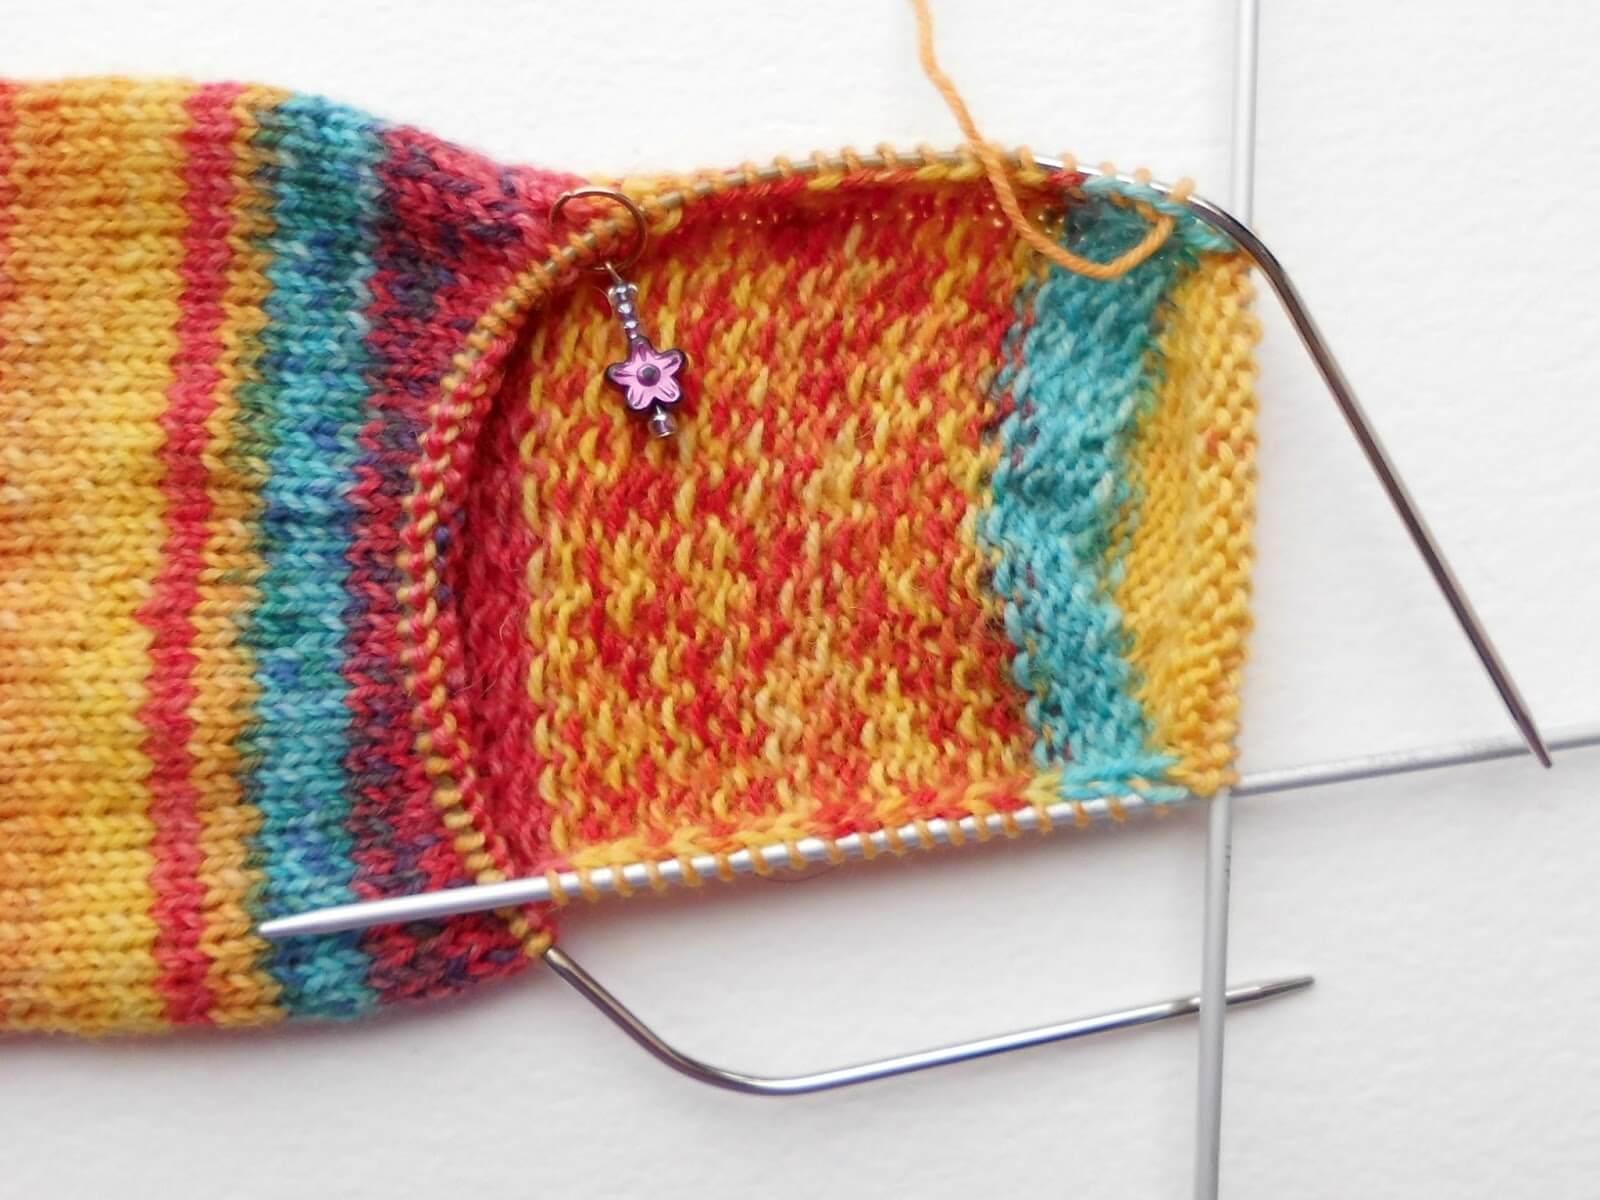
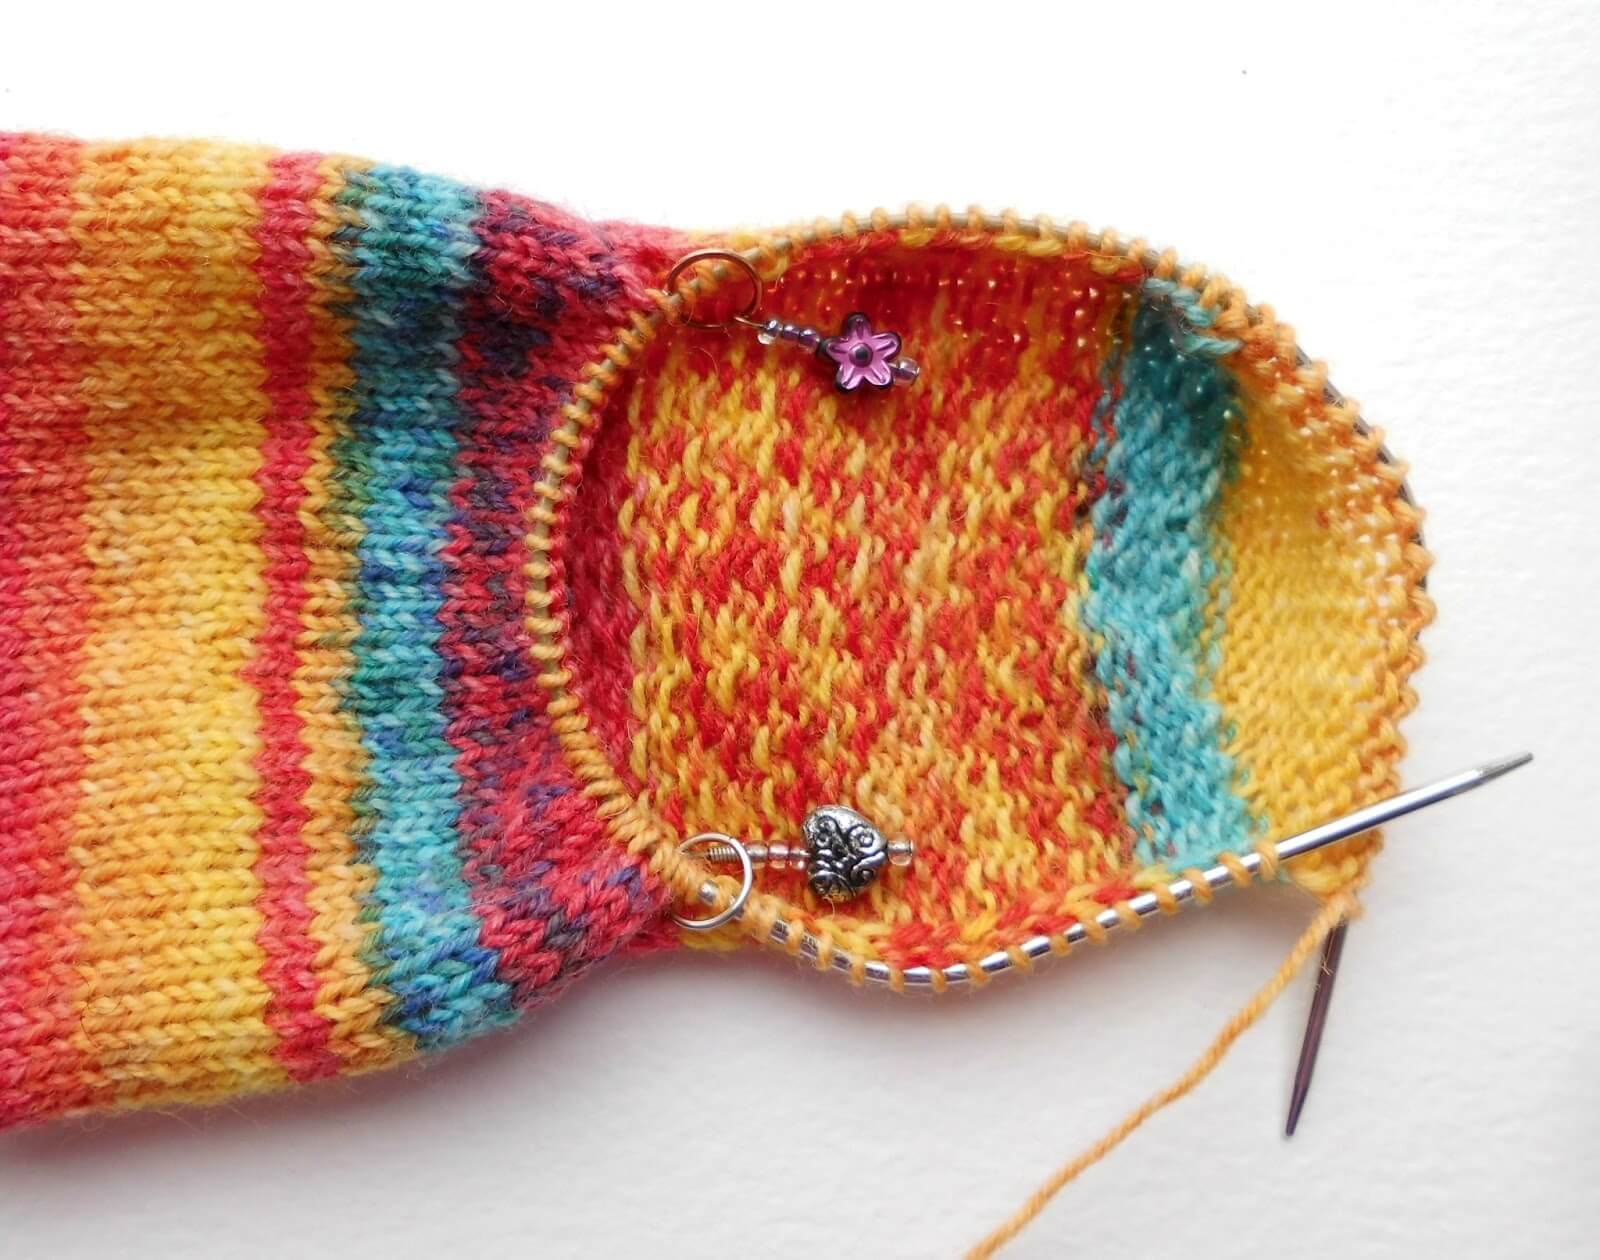
Having finished the heel turn, your sock should look like the pictures above. You can see how it’s taking on a sock shape now, and the next job is to create the gusset, which fills in the gap between the heel flap and the foot part of the sock.
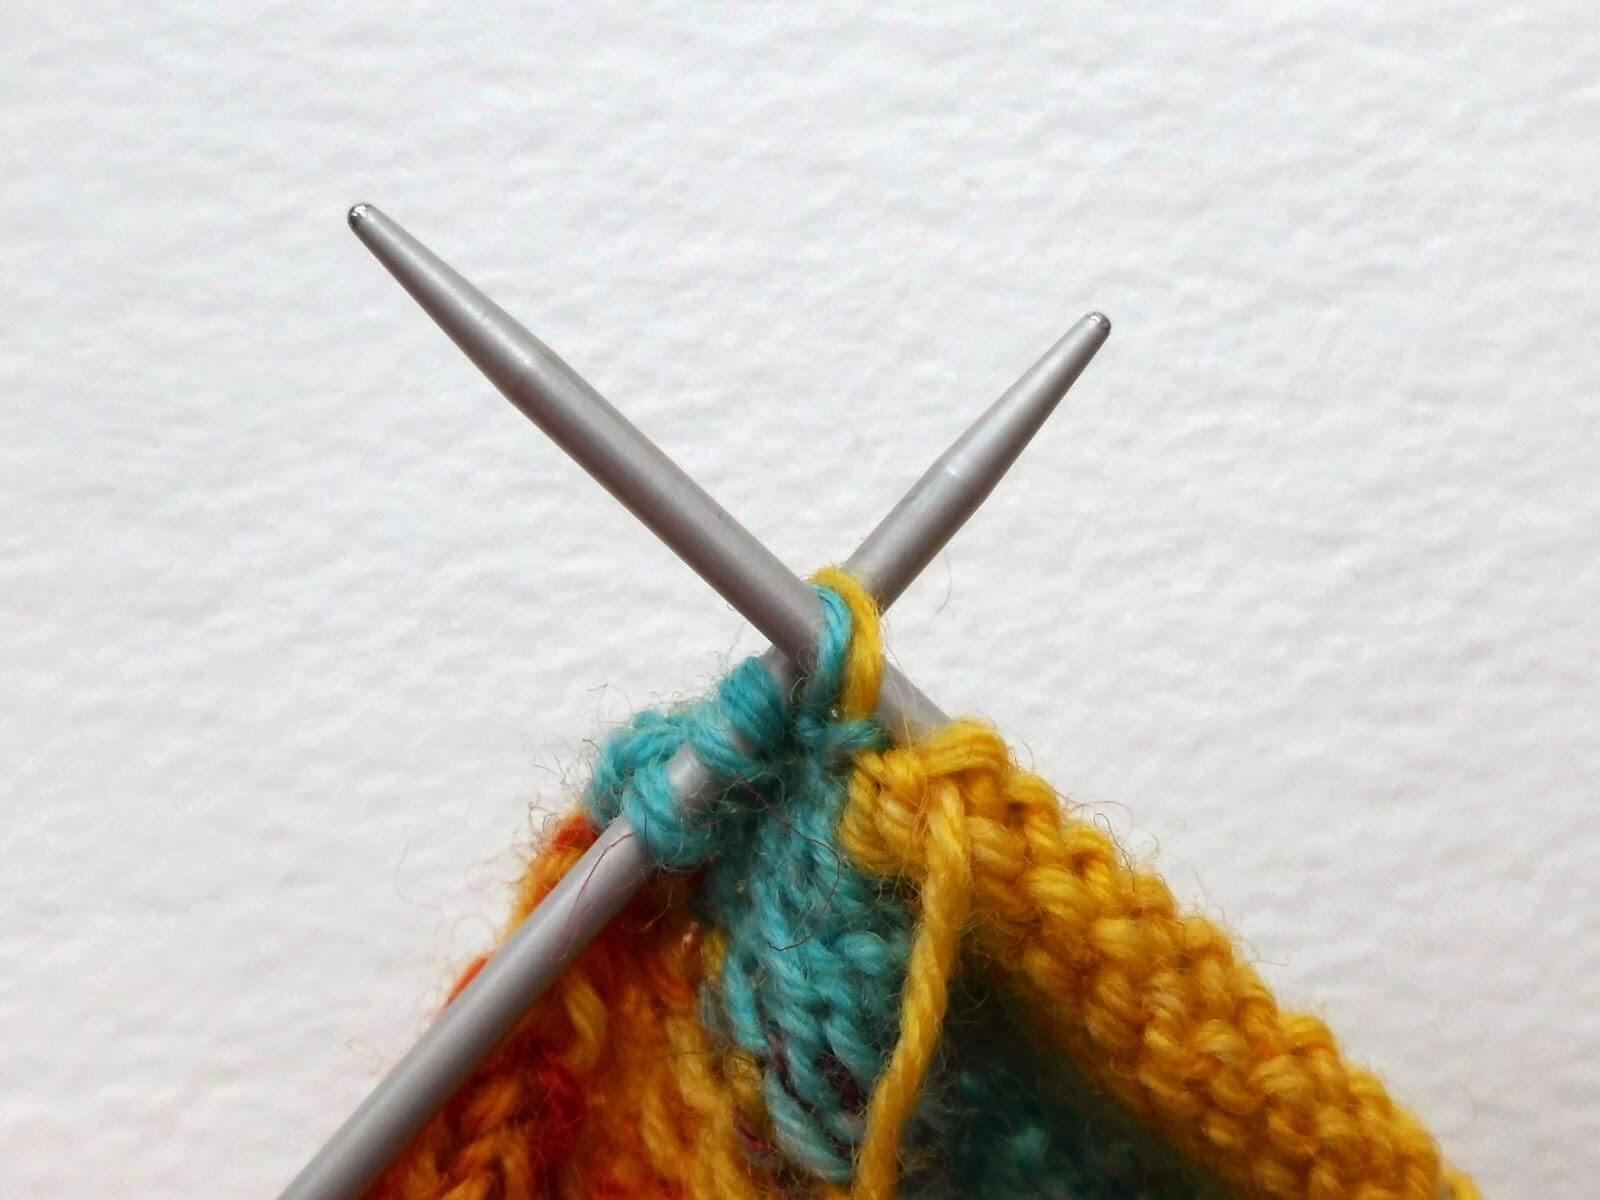
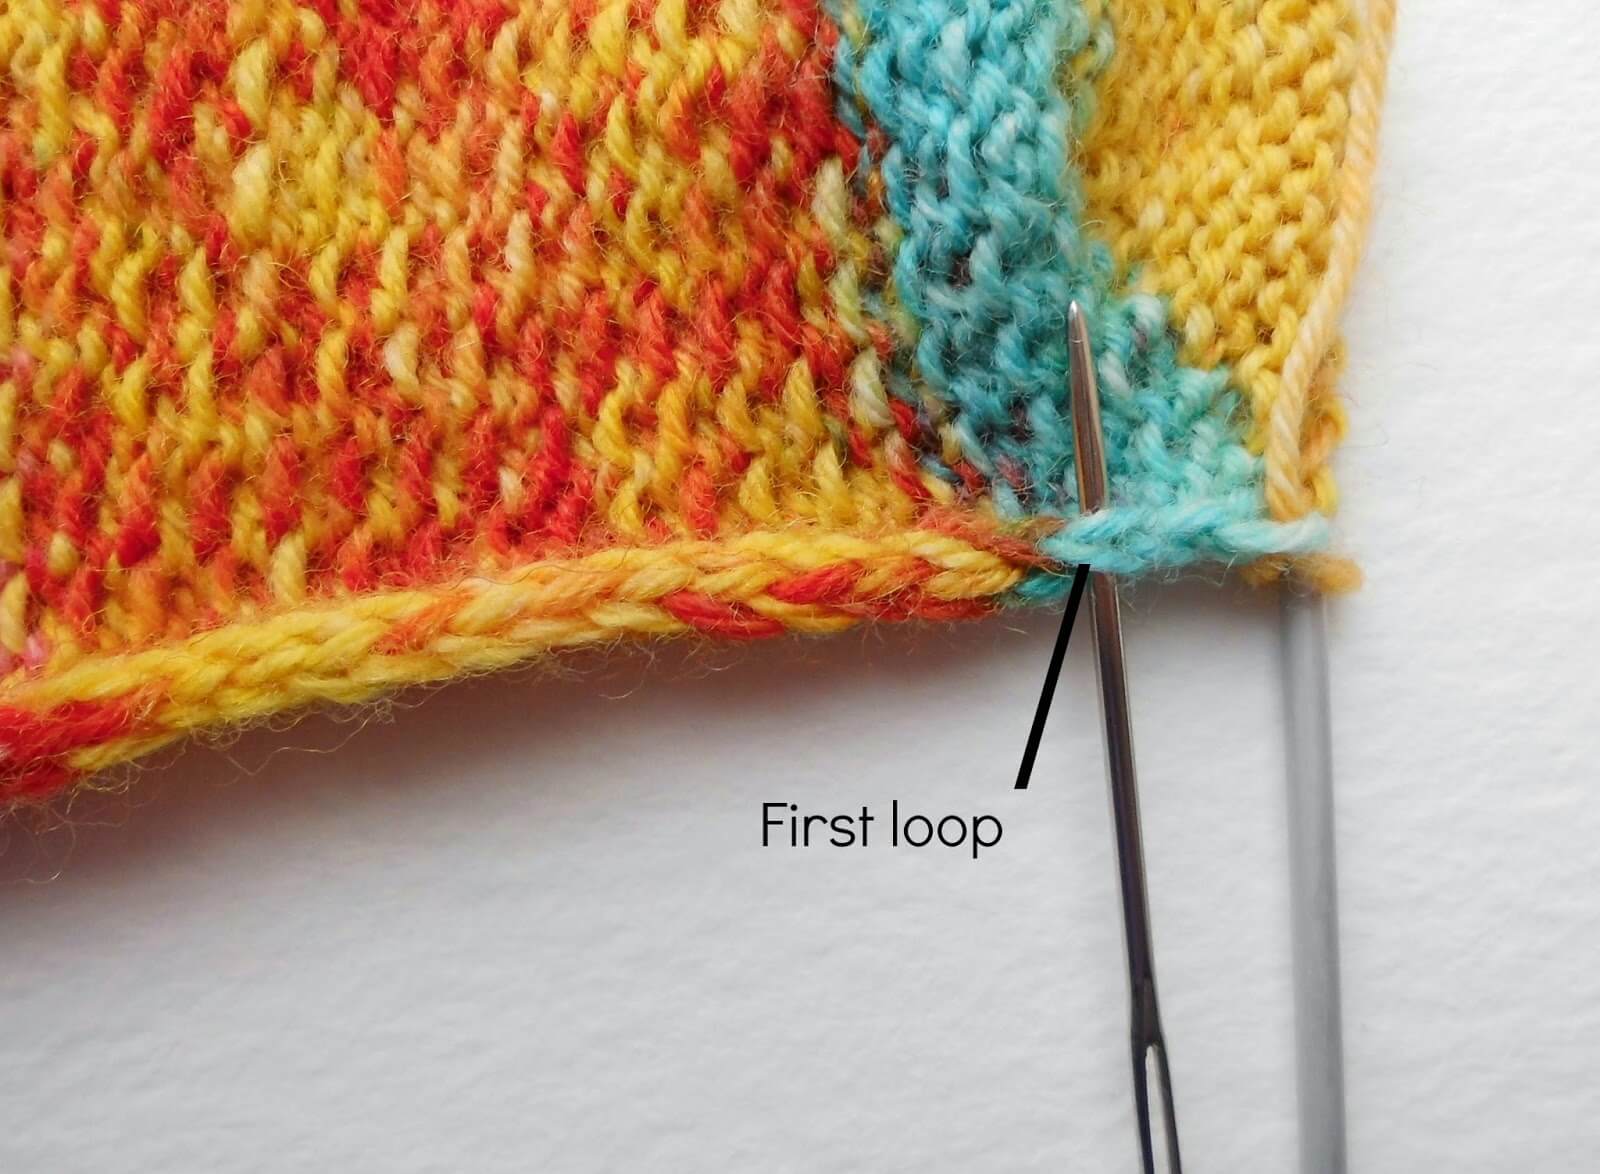
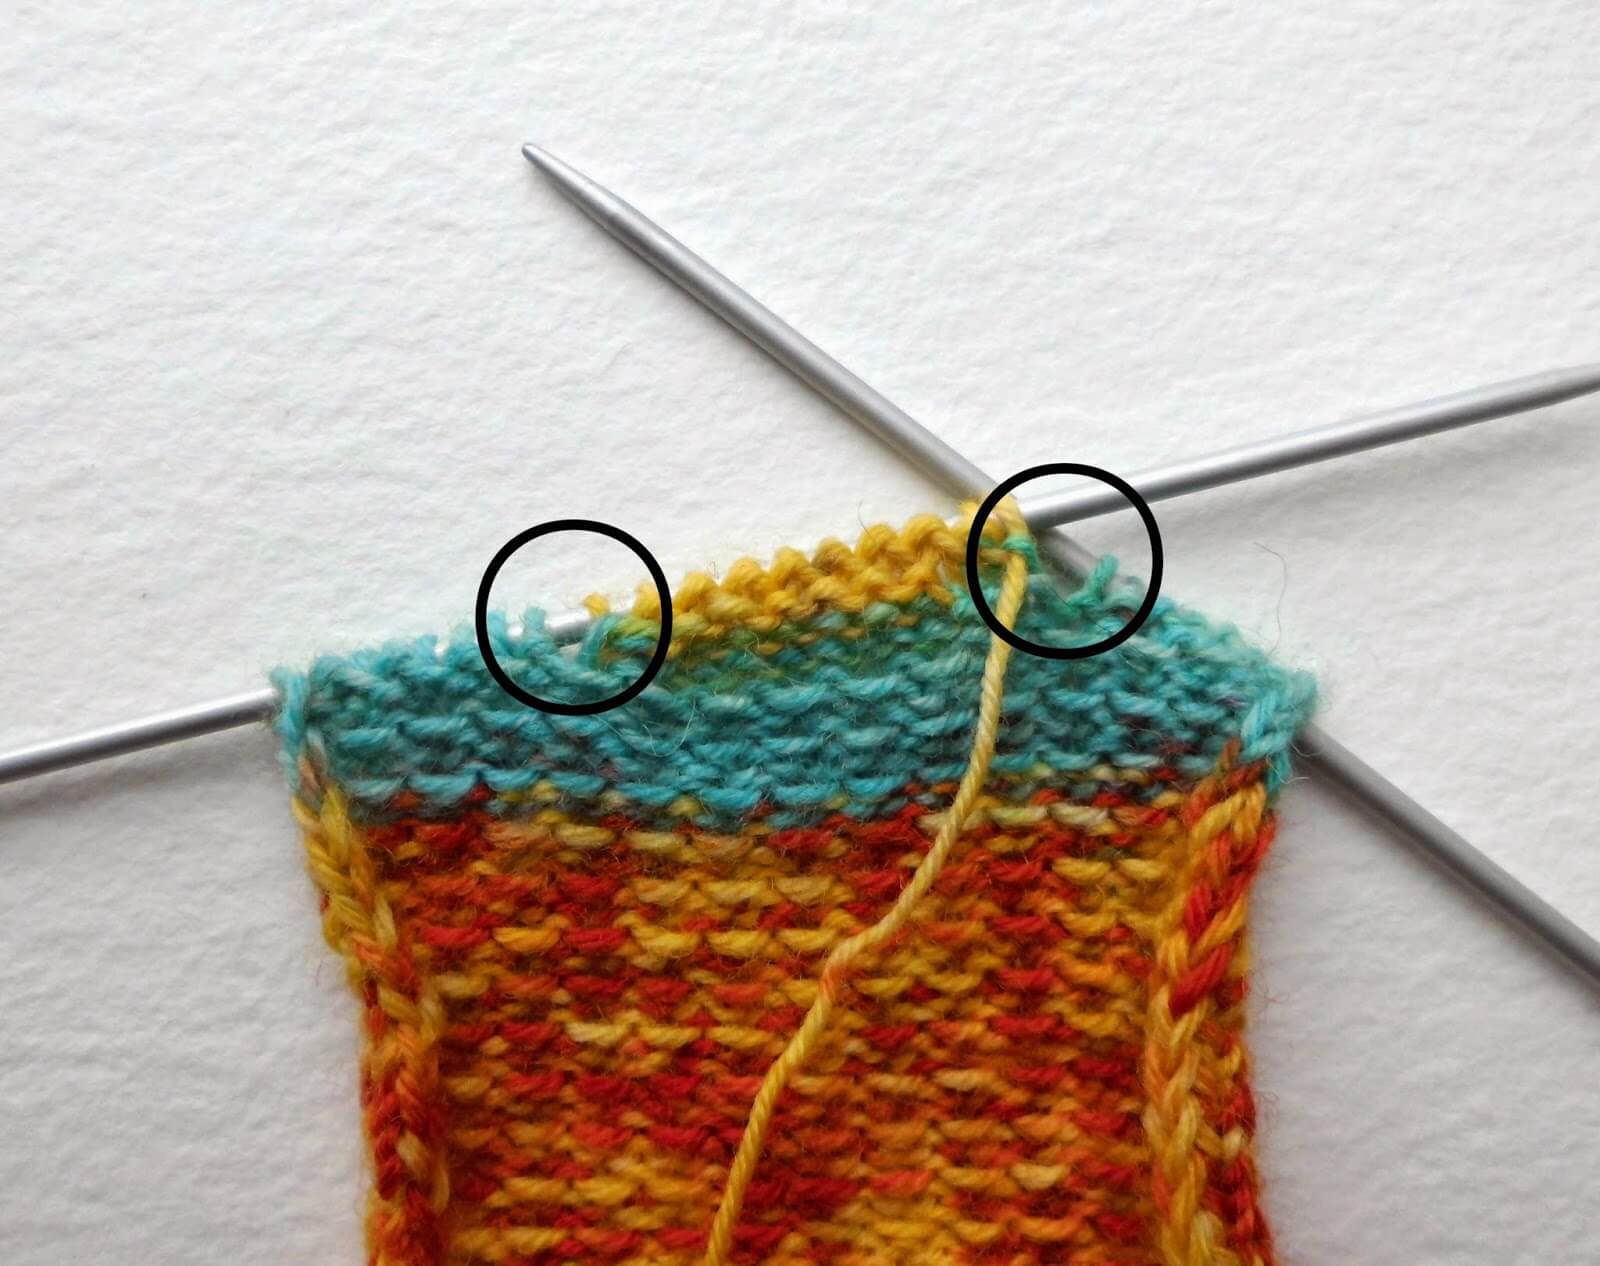
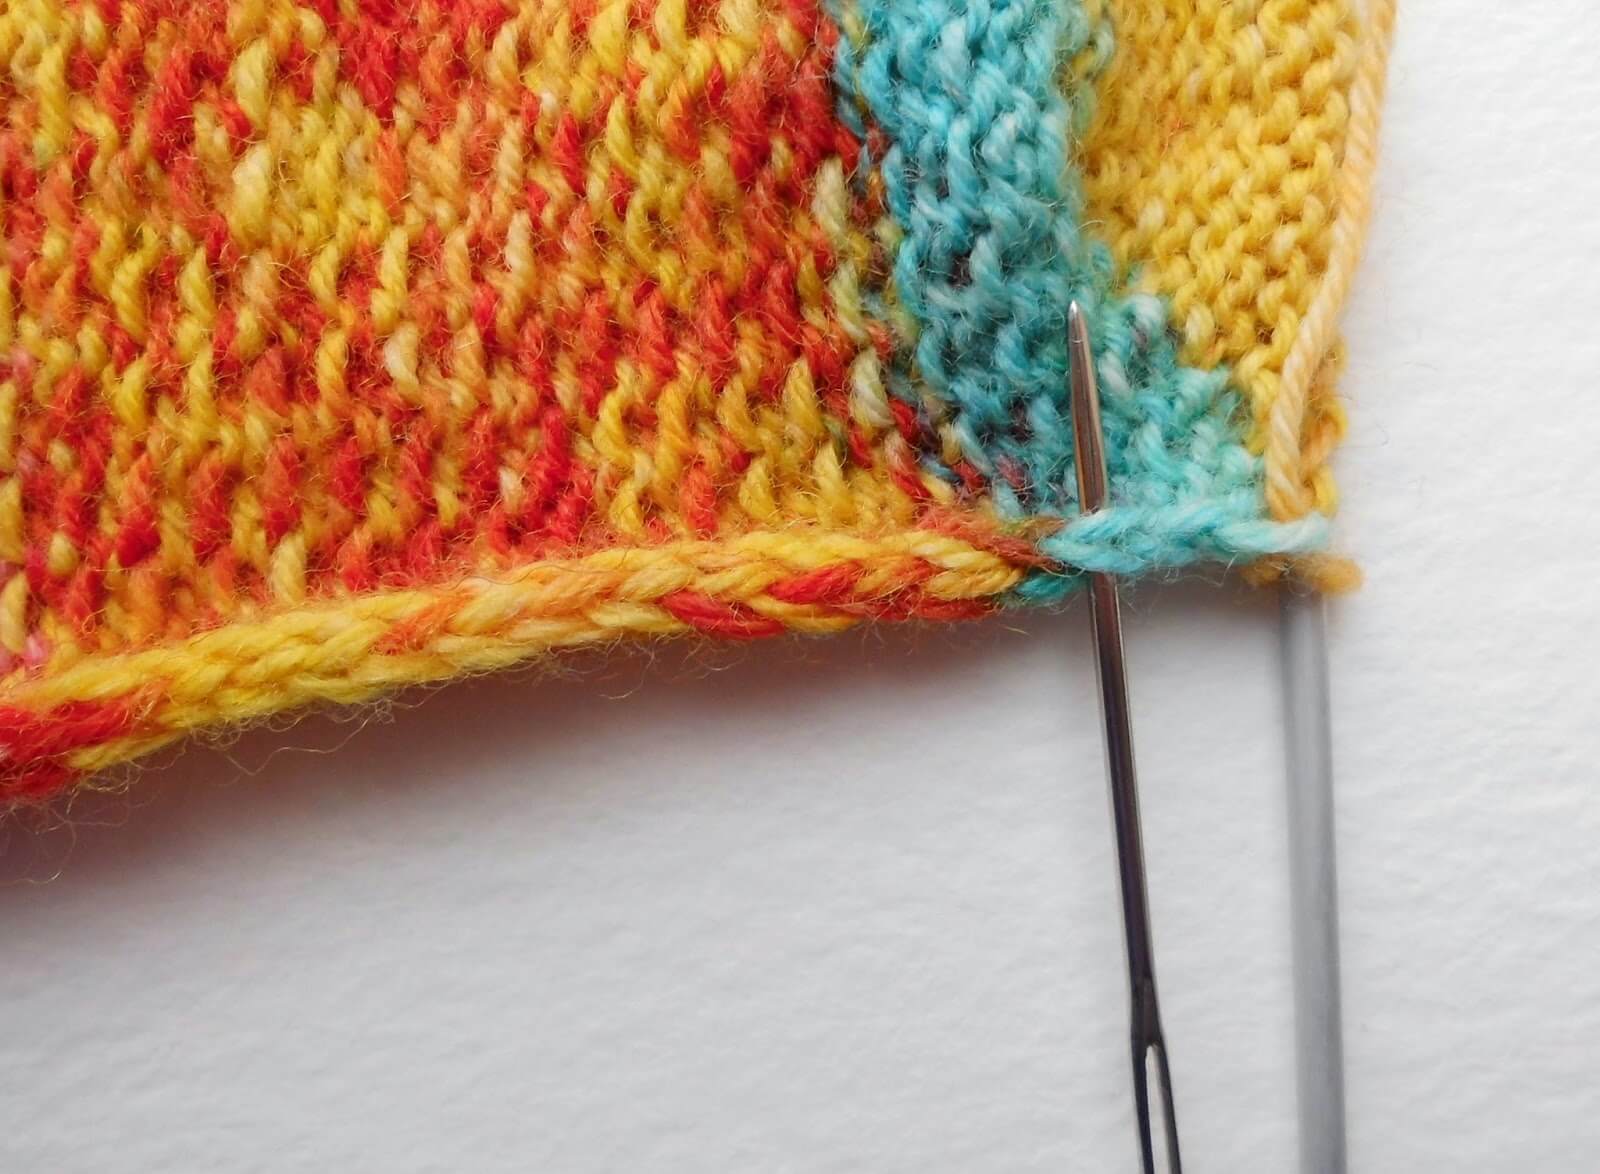
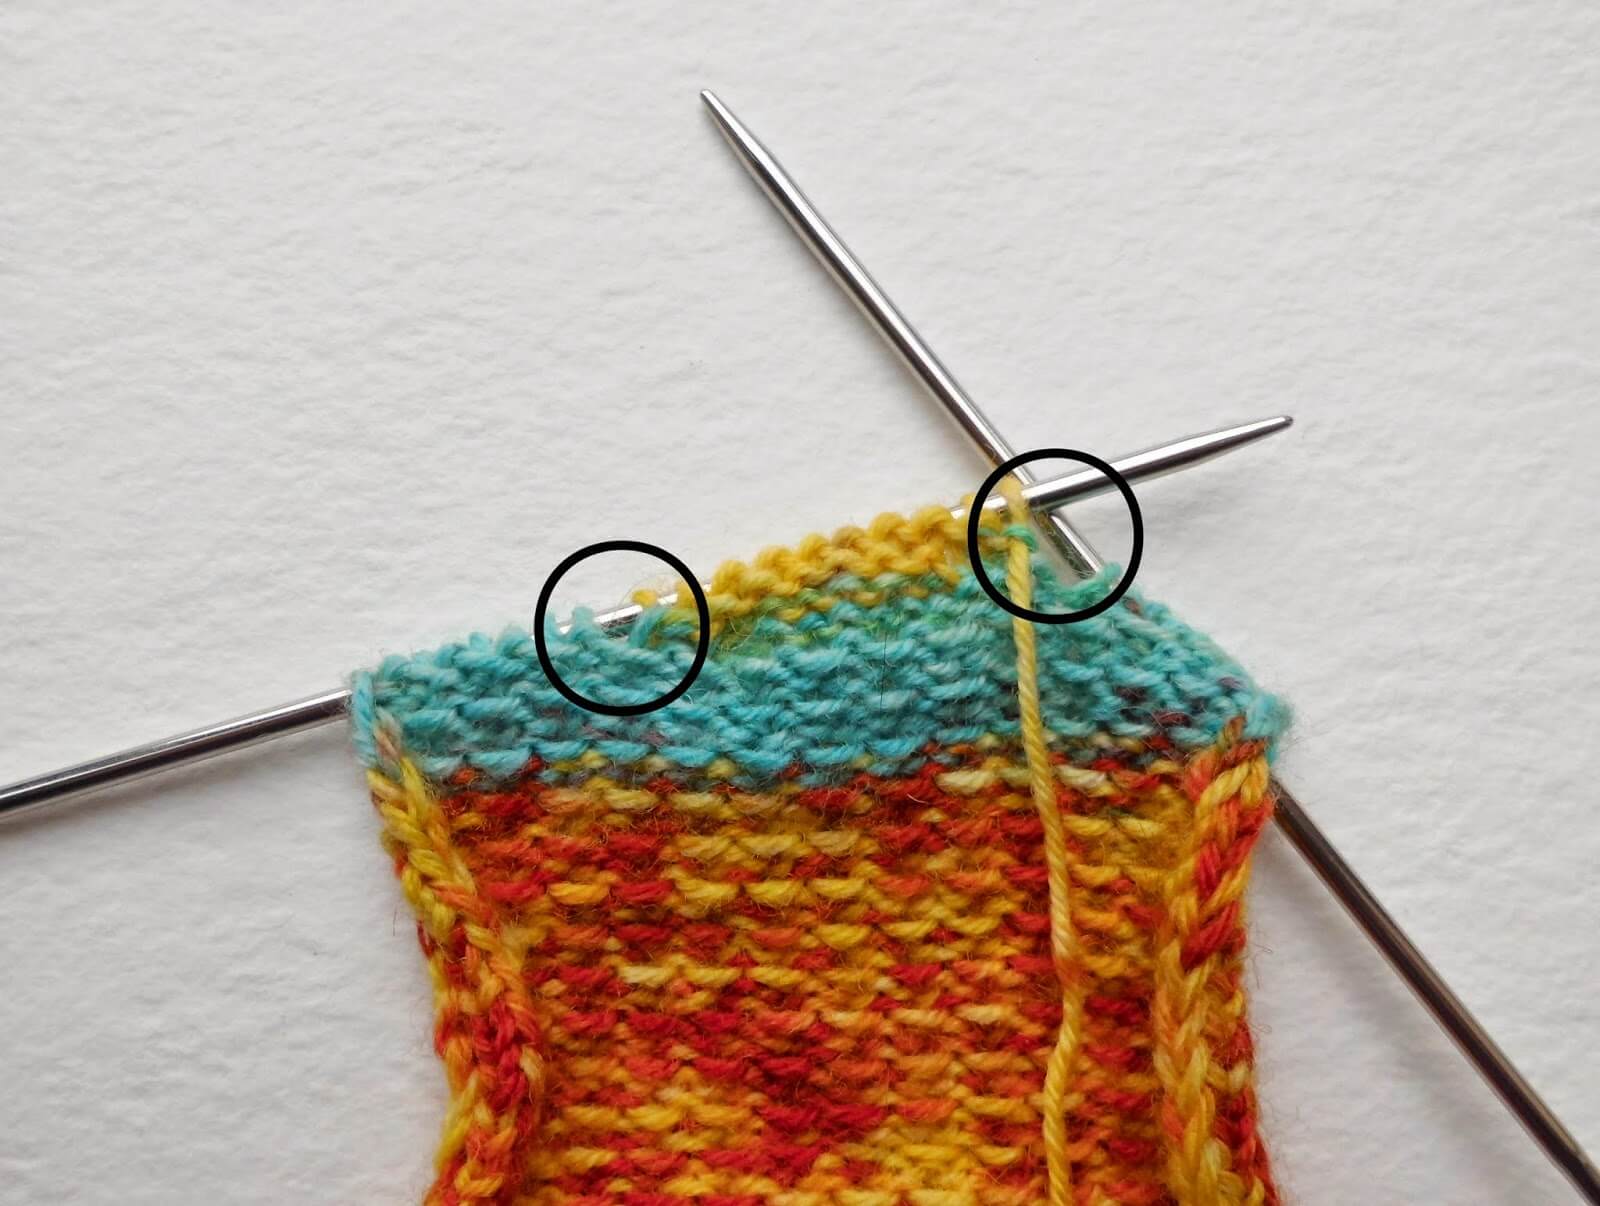
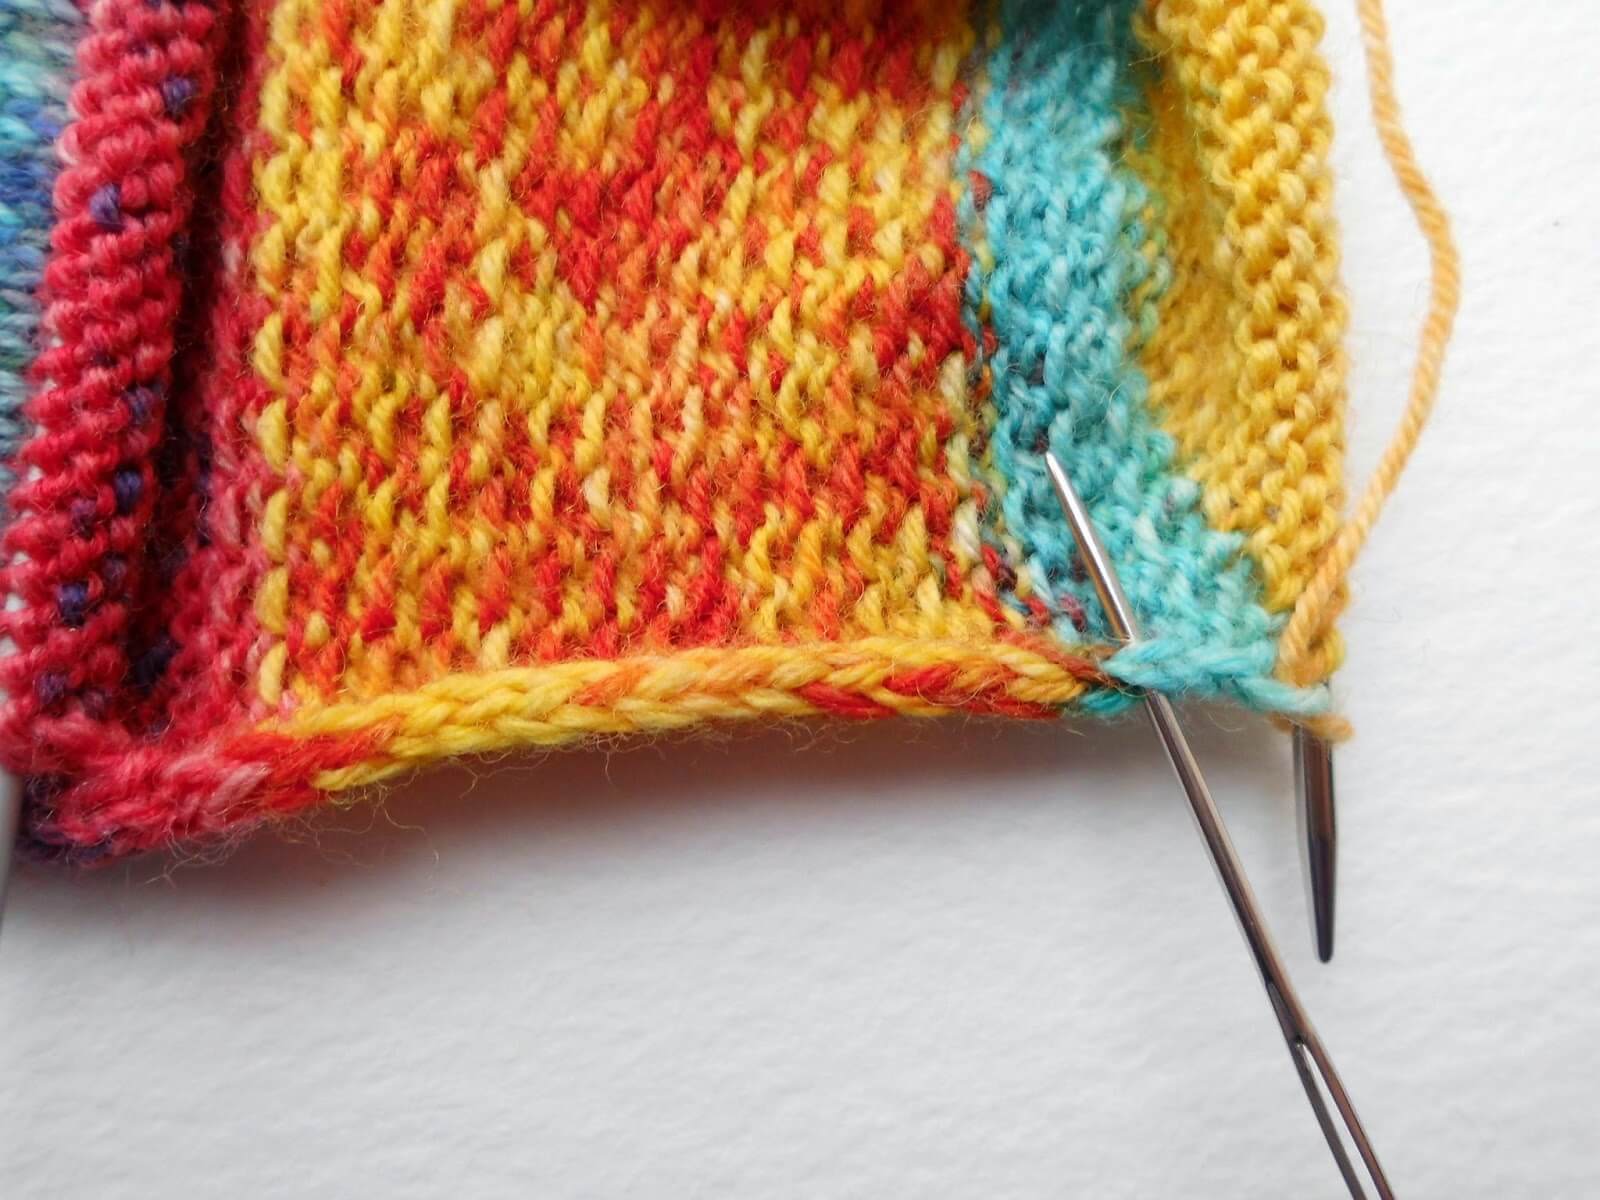
We do this by first picking up stitches from the heel flap. This is quite easily done, even if picking up stitches isn’t your favourite thing to do. Do you remember that you slipped the first stitch of the heel flap on every row? That slip stitch is what’s going to help you pick up the stitches because it creates a slightly bigger loop for you to knit into. You can see in the picture the stitch is indicated by the wool needle.

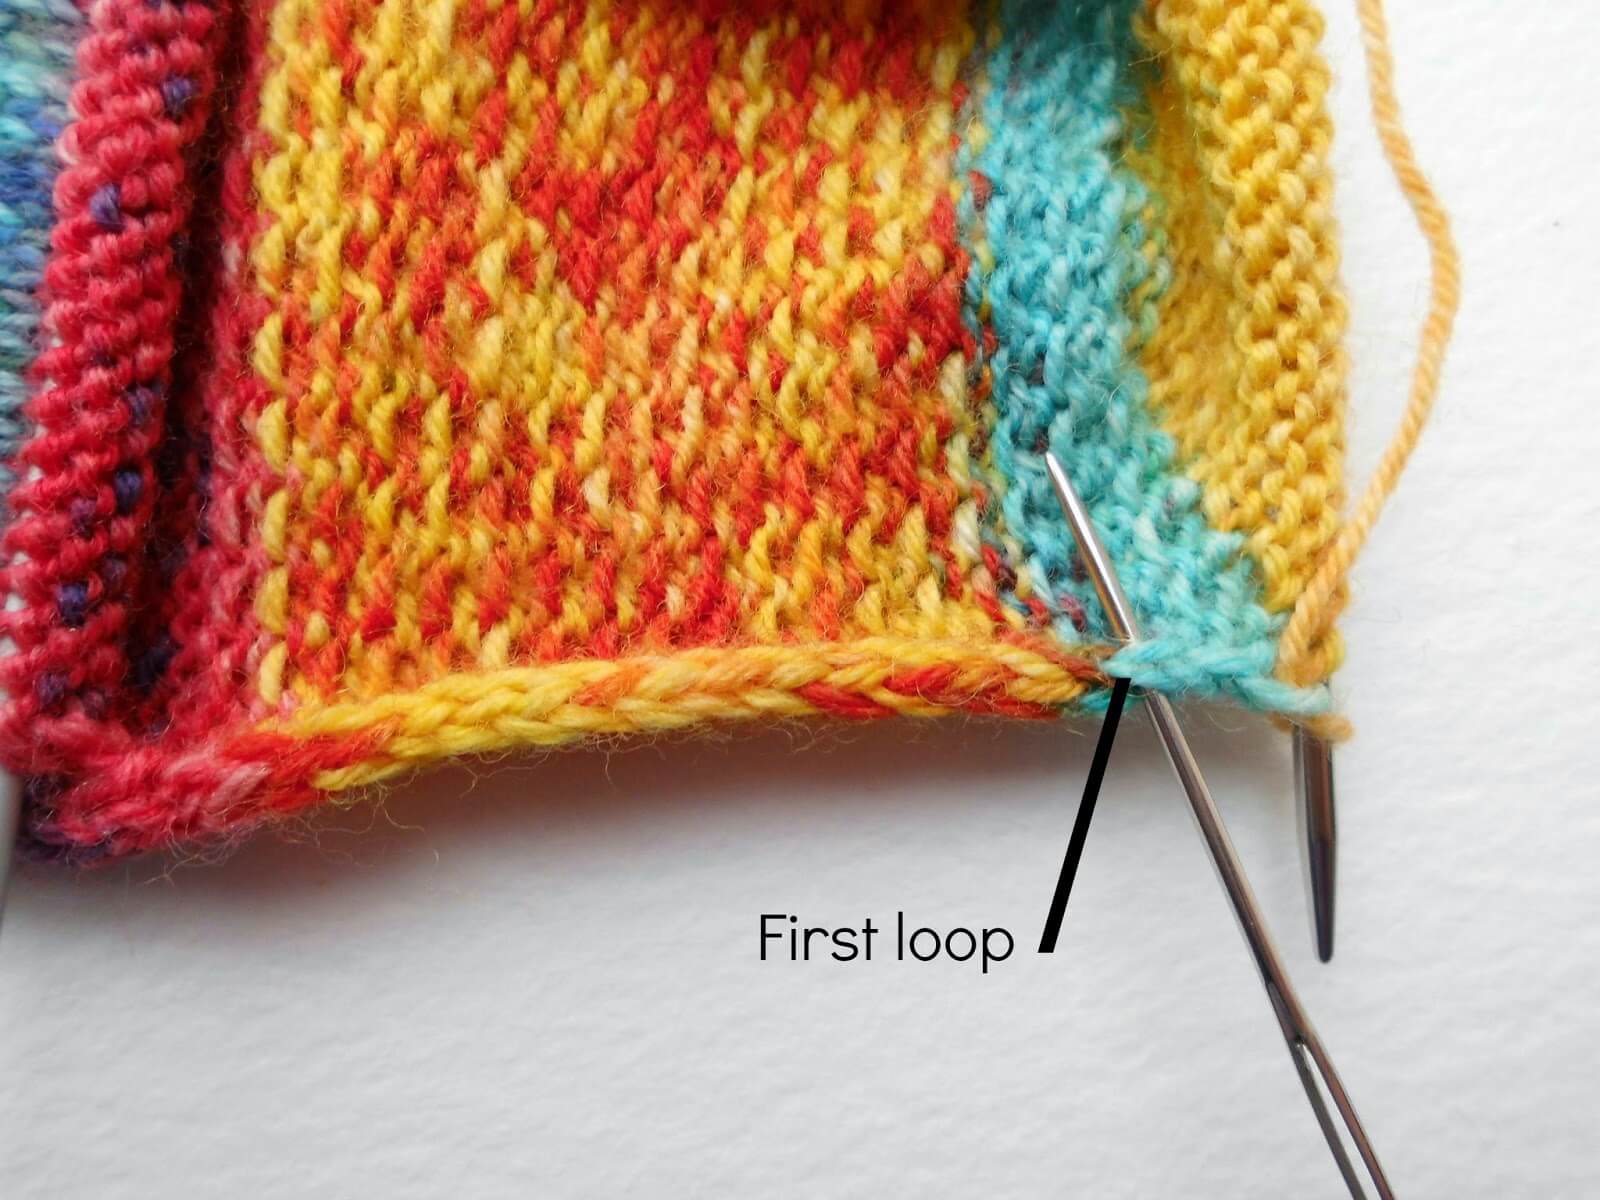
Hold your sock so that the outside of the heel flap faces you. You should be at the left hand side of your heel ready to pick up your stitches but if you aren’t , simply knit across the heel stitches to bring you to the right place.You are going to pick up and knit every slipped stitch (one stitch per two rows of heel flap) using a second DPN. I always pick up the first loop of the stitch as I feel that it gives a neater edge; some people like to pick up the second loop or both loops and that’s fine – whichever you prefer!
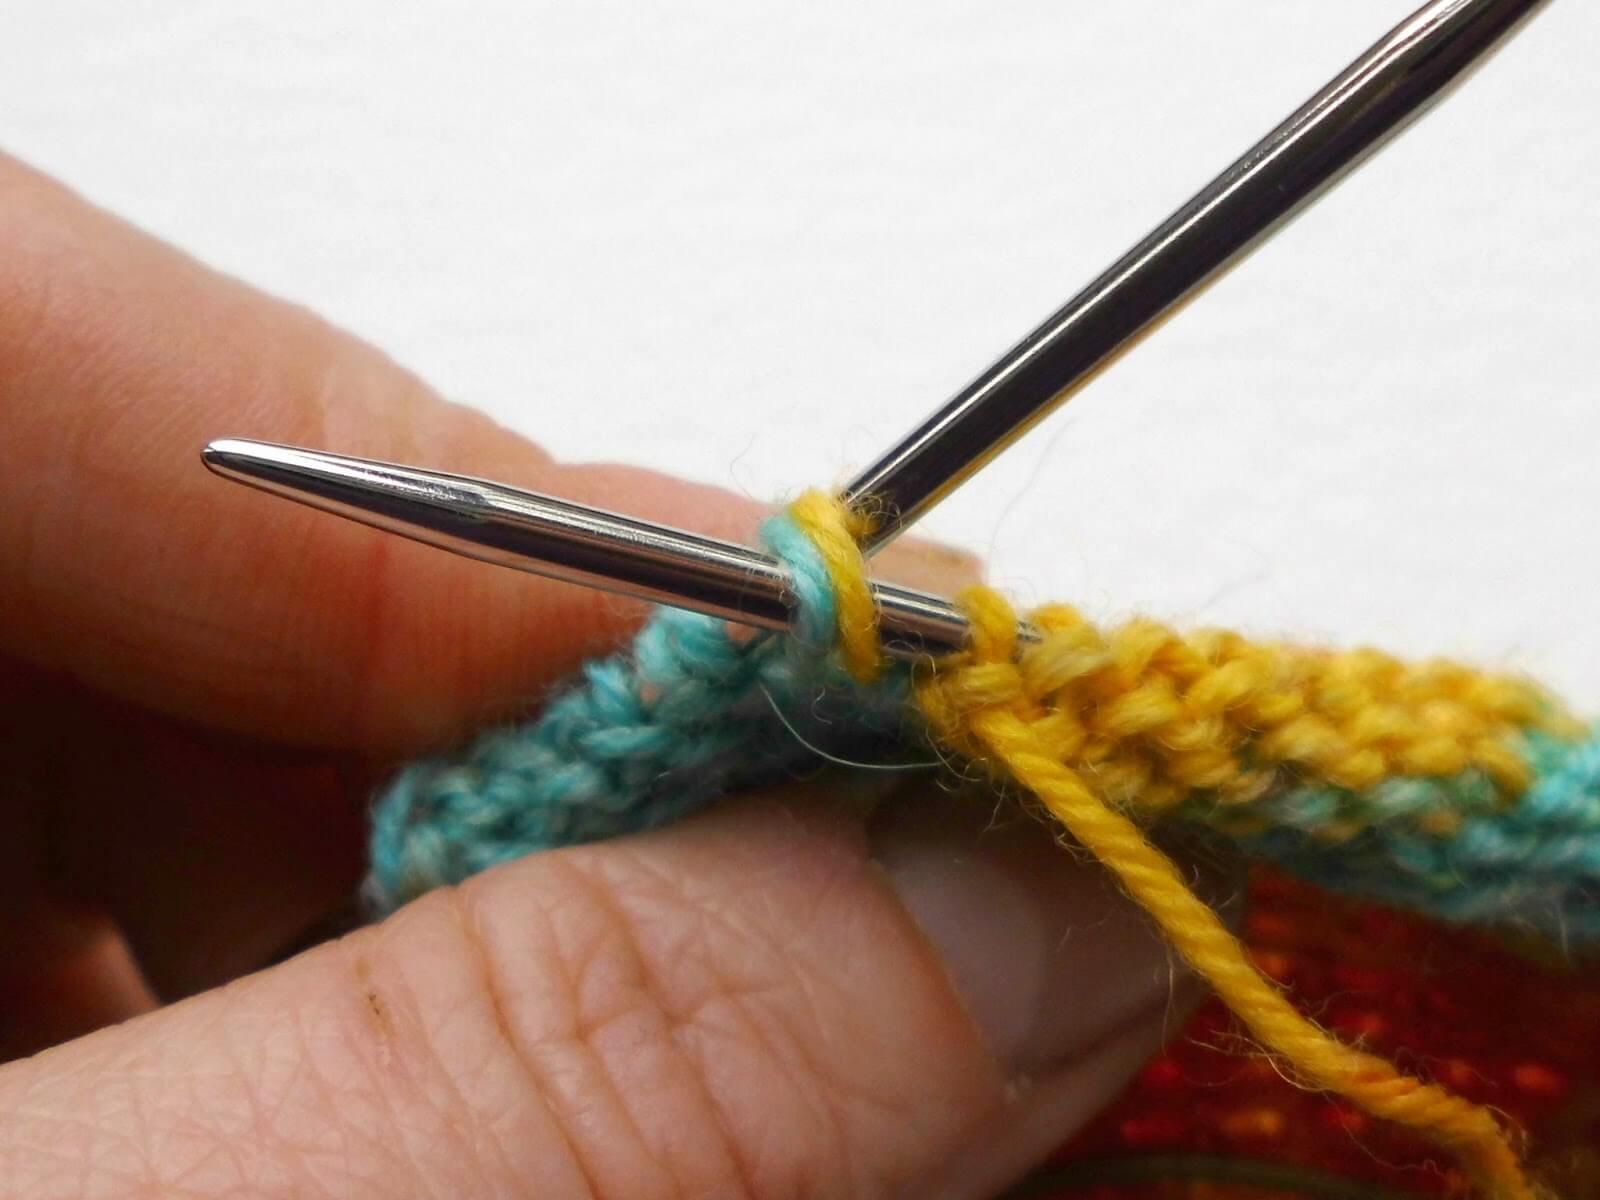
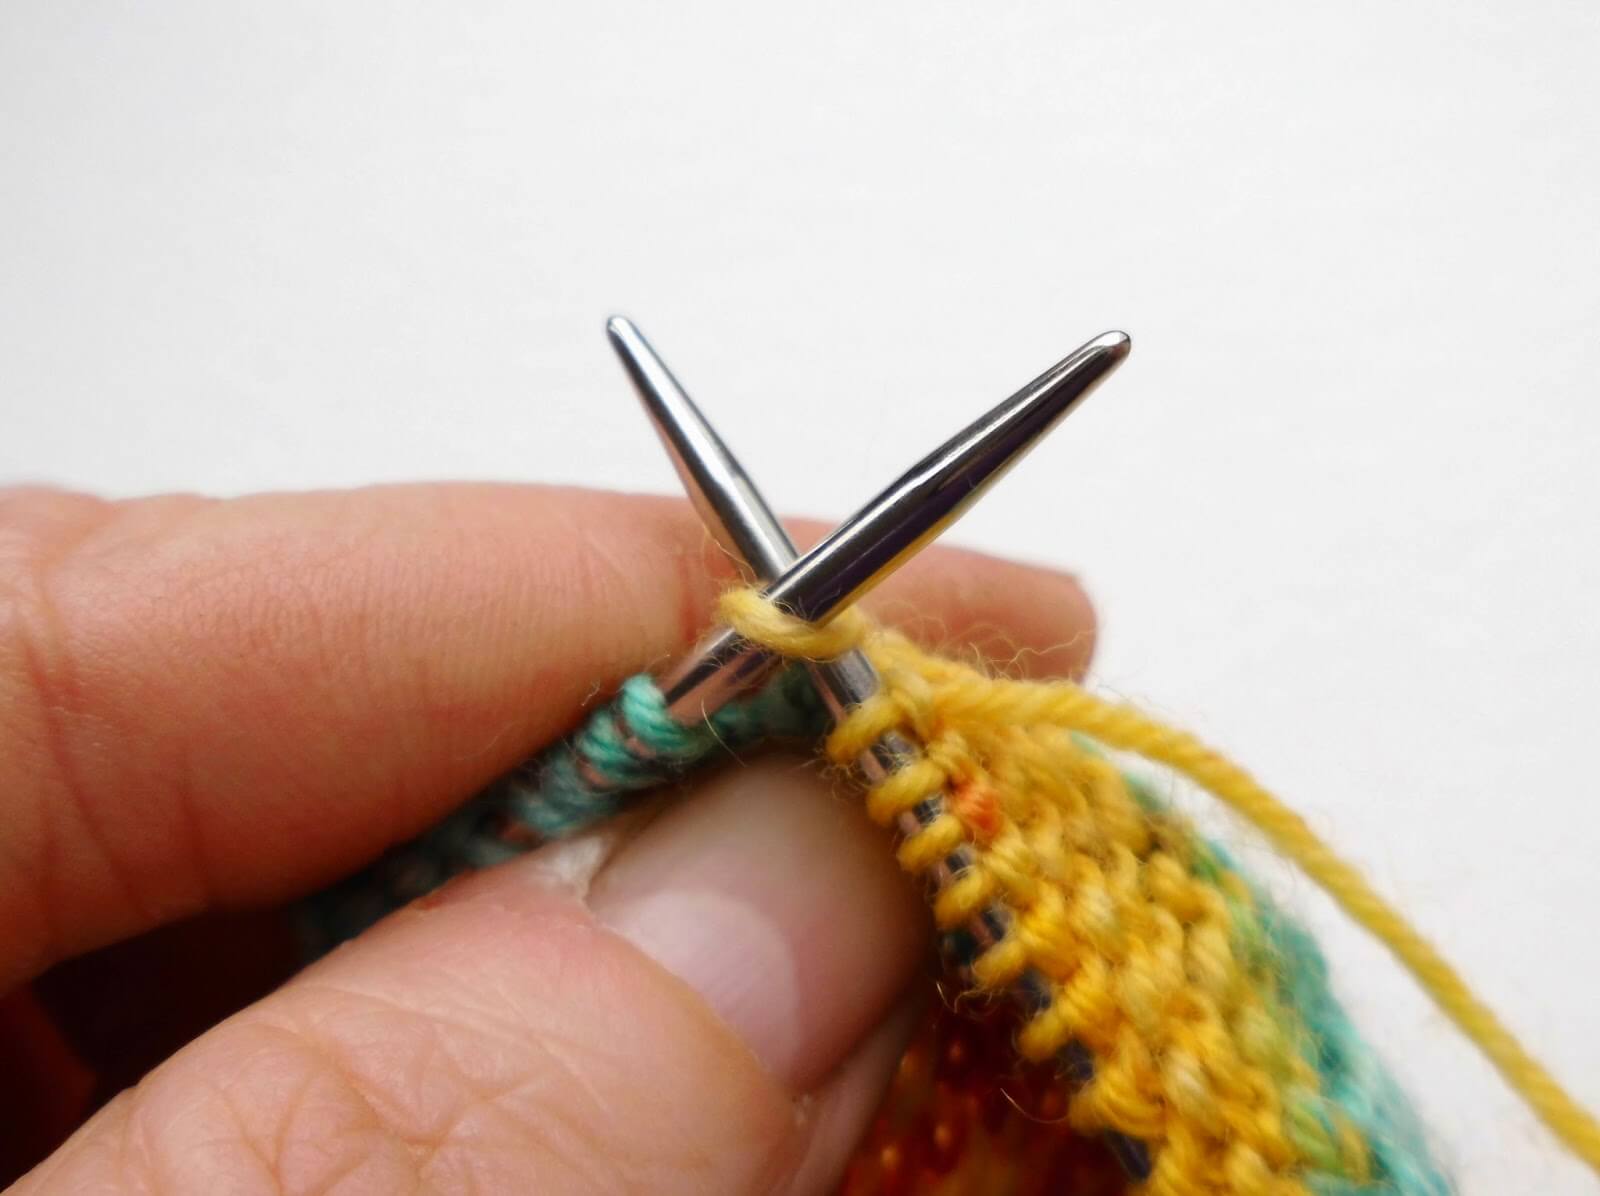
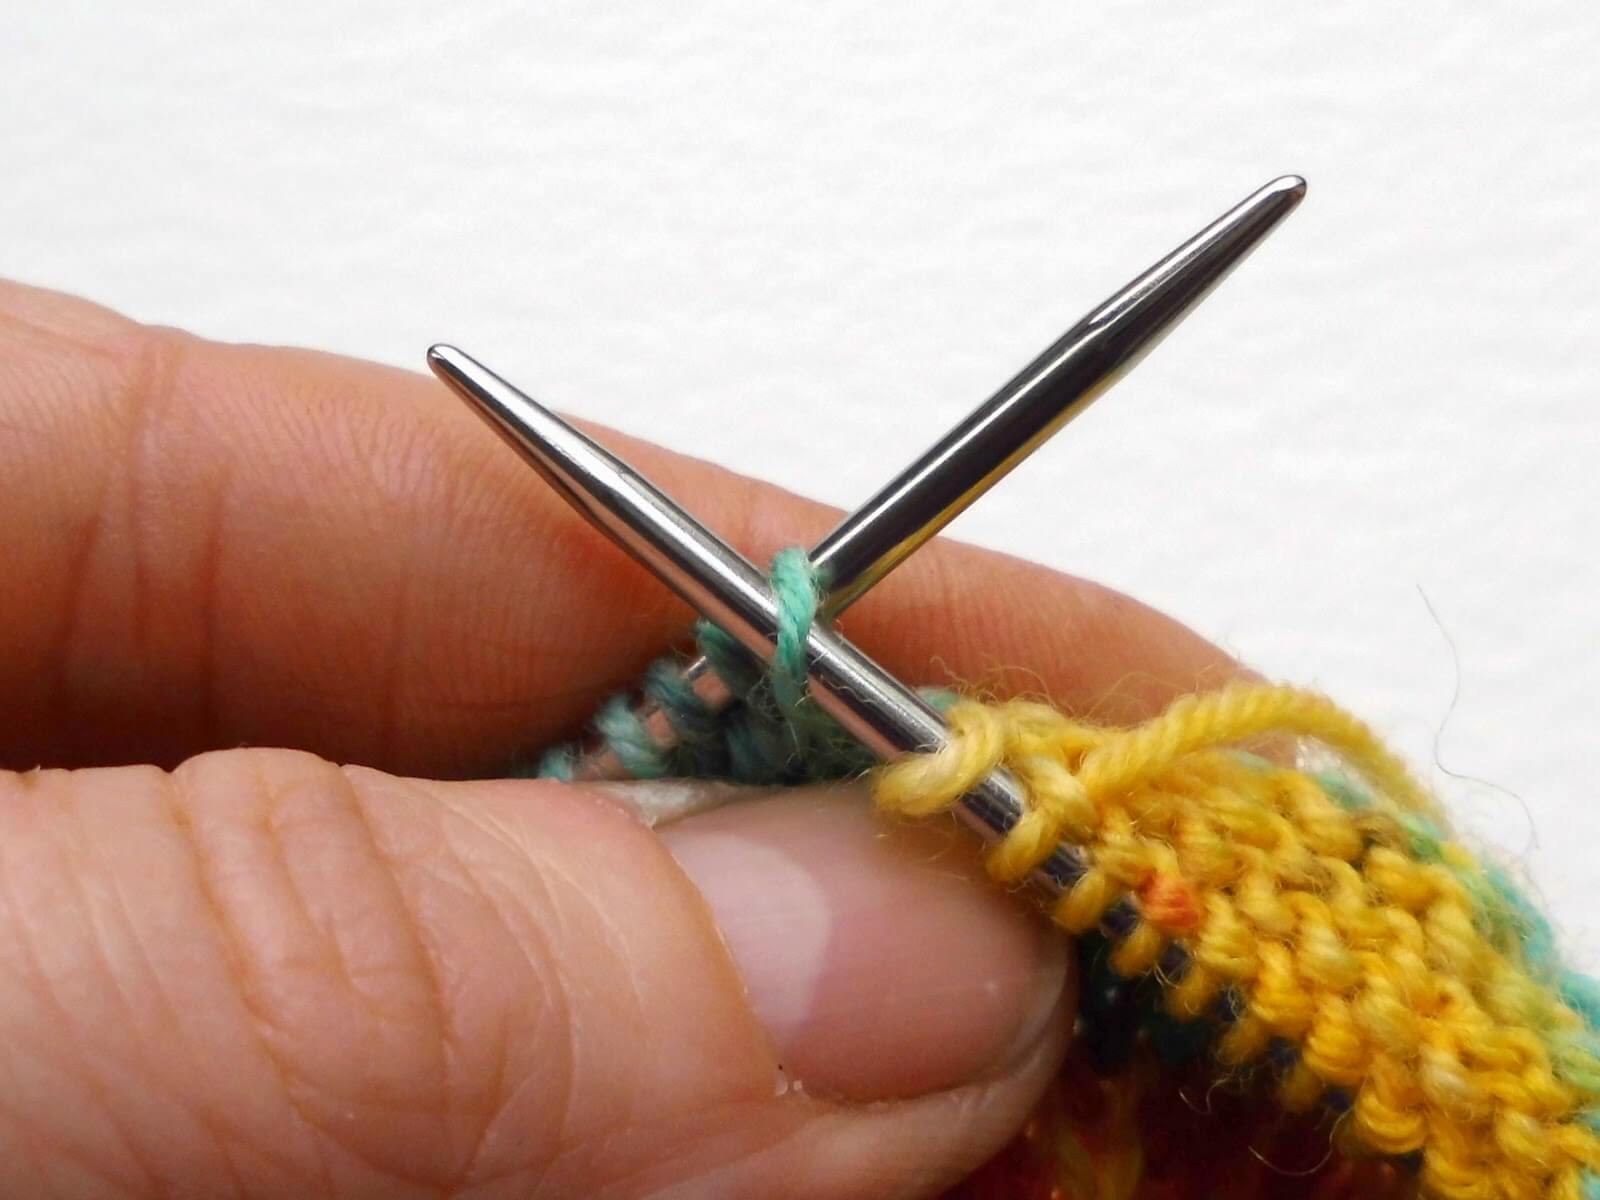
Pick up the stitch by putting the needle into the stitch, wrapping the yarn around the needle and pulling it through the stitch to make a new stitch. Remember that if you made the heel flap bigger, you will need to pick up more stitches. You should find this easy to do because you will have more slip stitches to knit into. As a guide, I usually pick up about 19 stitches, but you may have more or less stitches than this depending on your yarn and needles.
Tip: if you think you are going to have a big gap between the end of your picked-up stitches and the first of the stitches held on your circular needle, pick up an extra one or two stitches as required in the gap. Don’t worry about the extra stitches as you will just decrease them as you go along.
Knit across the top of the foot using your circular needle by bending the ends around to knit in a tiny circle (if you find this too fiddly, knit across the stitches with a DPN, knitting them off your circular needle), place marker (I usually make sure that my markers are both different – it’s easier to tell which side of the sock you’re working on later), then pick up and knit 19 stitches (or more or less if required) up the other side of the heel. If you have knitted off your circular needle across the top of the foot, use your circular needle to pick up the gusset stitches, or use another DPN if you prefer.
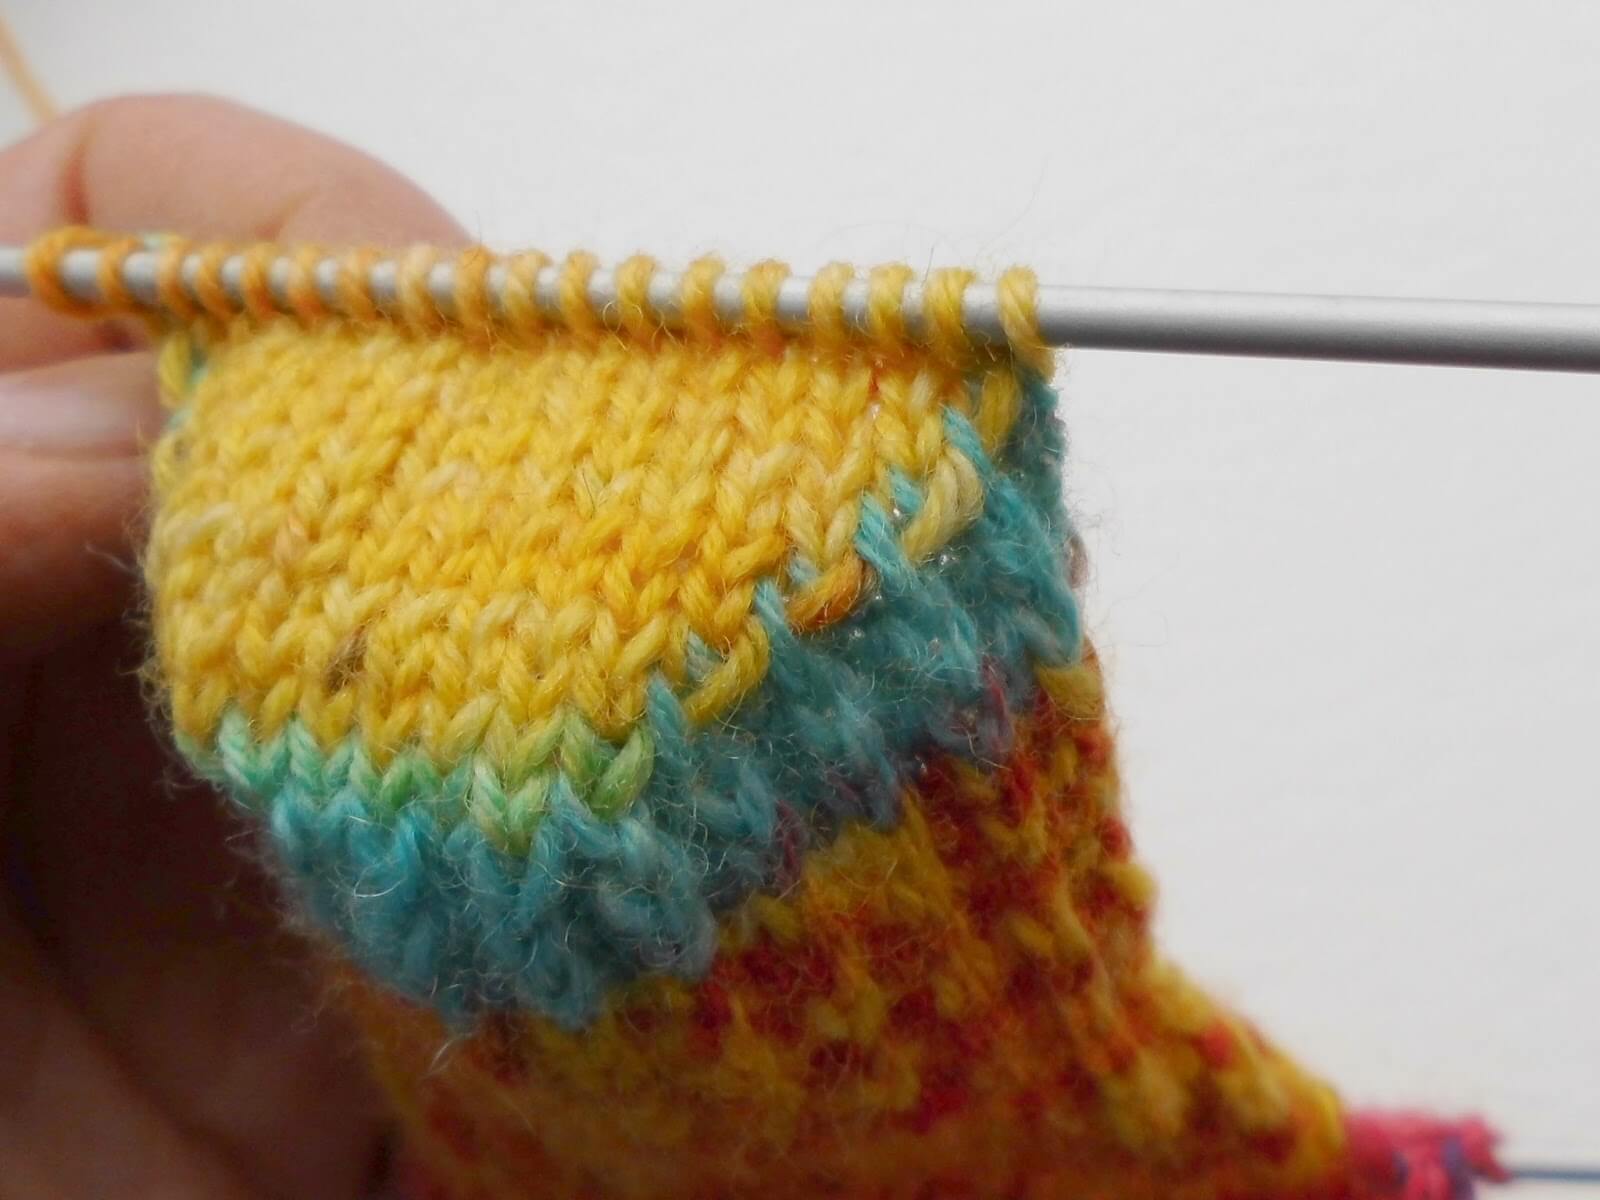
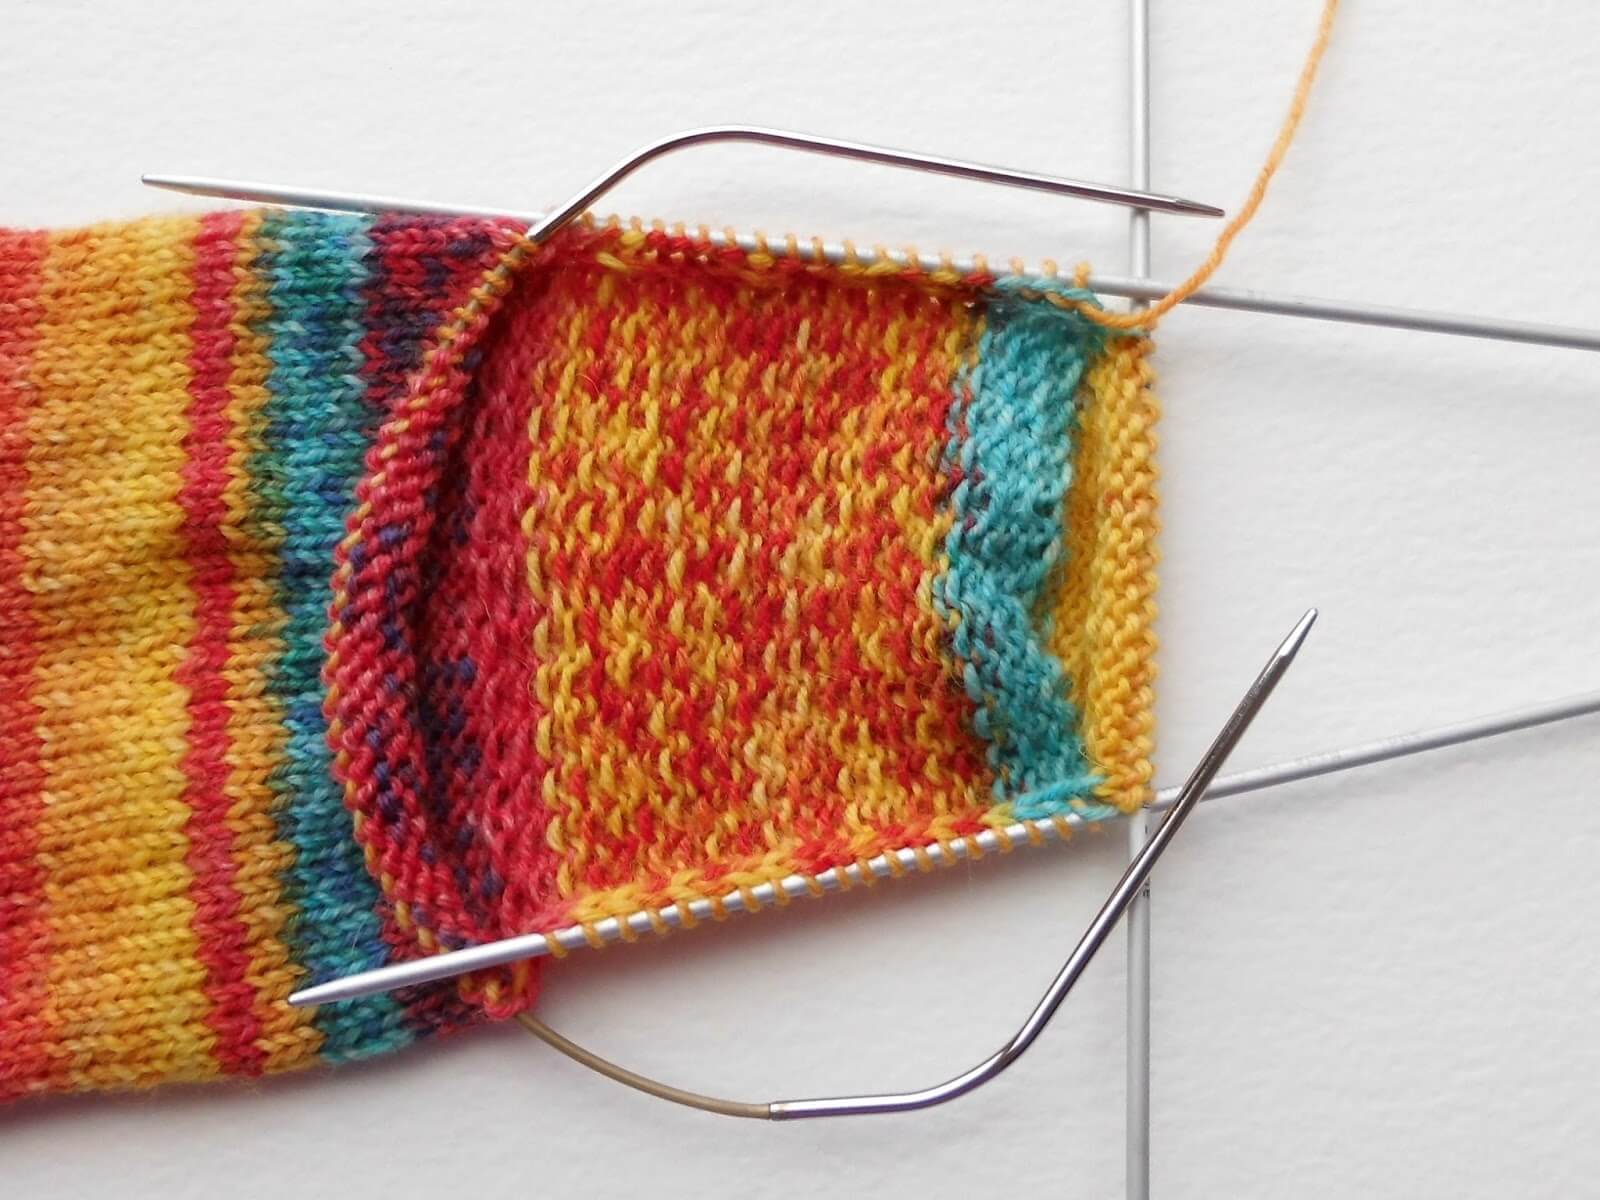
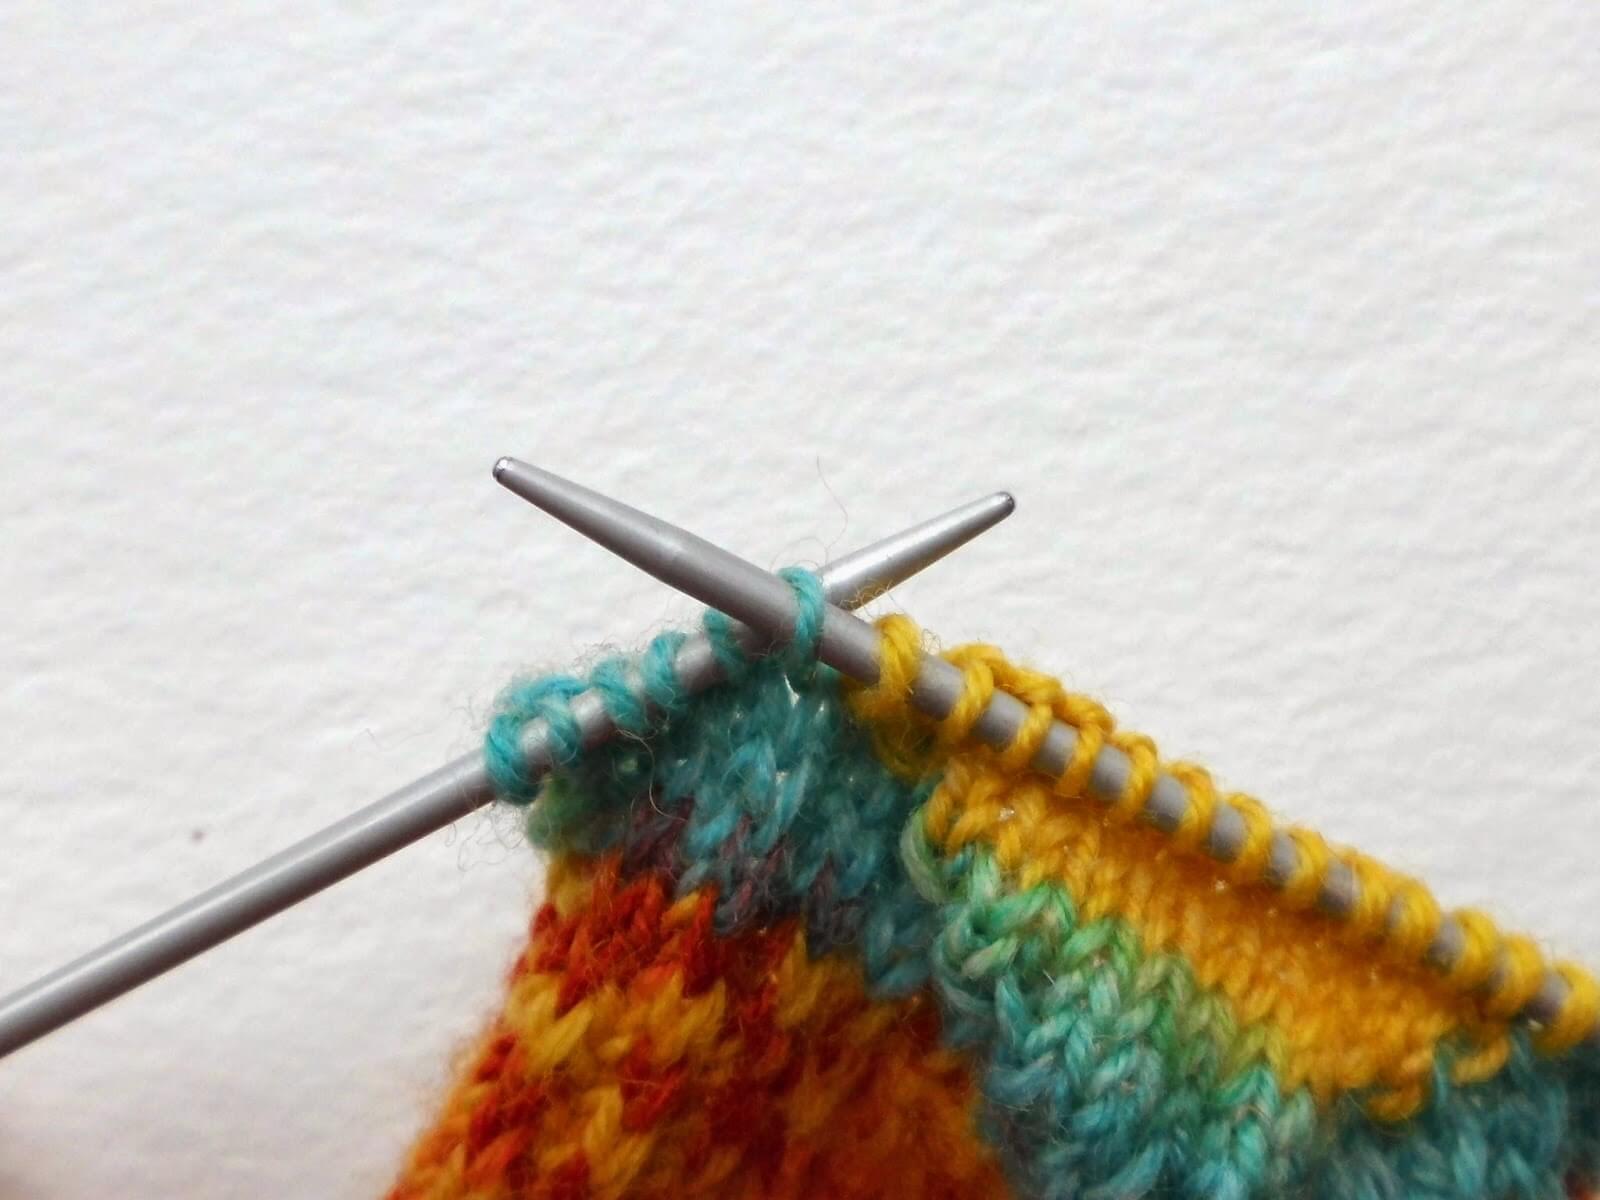
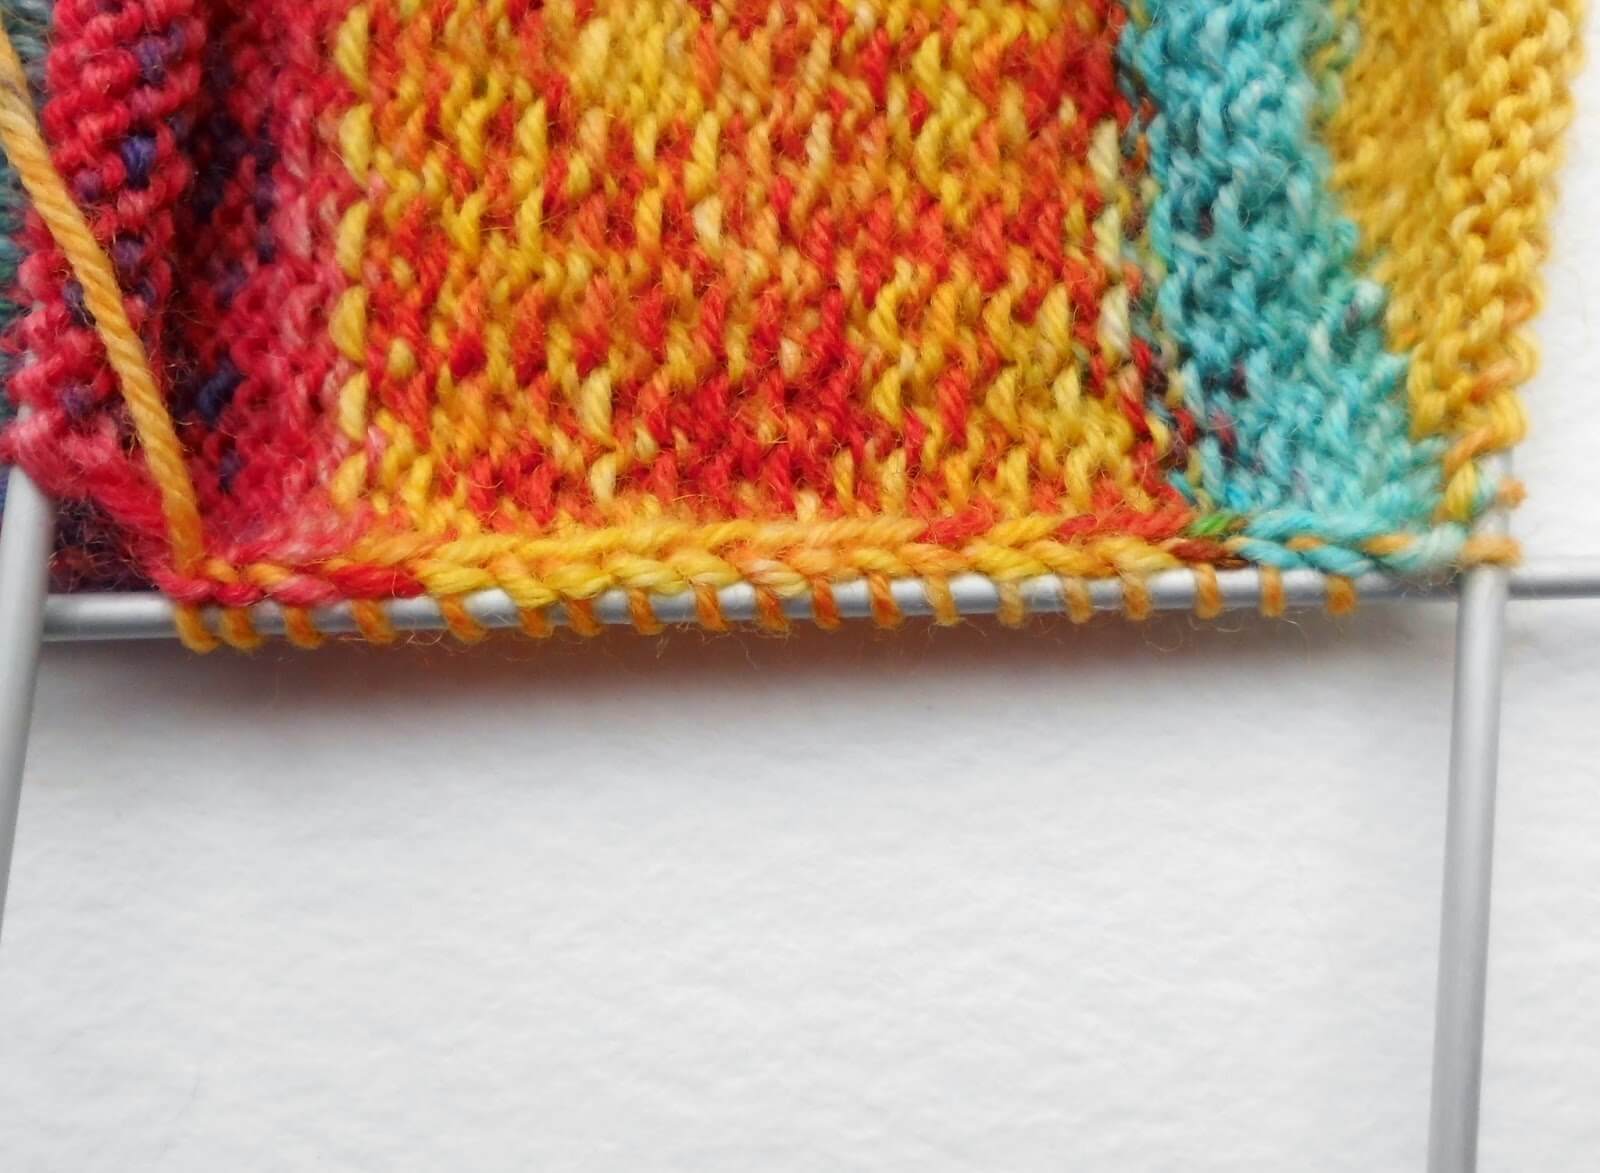
You can choose to knit back onto your short circular needle whenever you like – either as you go along picking up the stitches or as you get back round to it on your first decrease round. Your sock should look like this if you pick up the stitches with your circular needle … (Note: I’ve stopped at the end of the second set of picked up stitches to take the picture.)
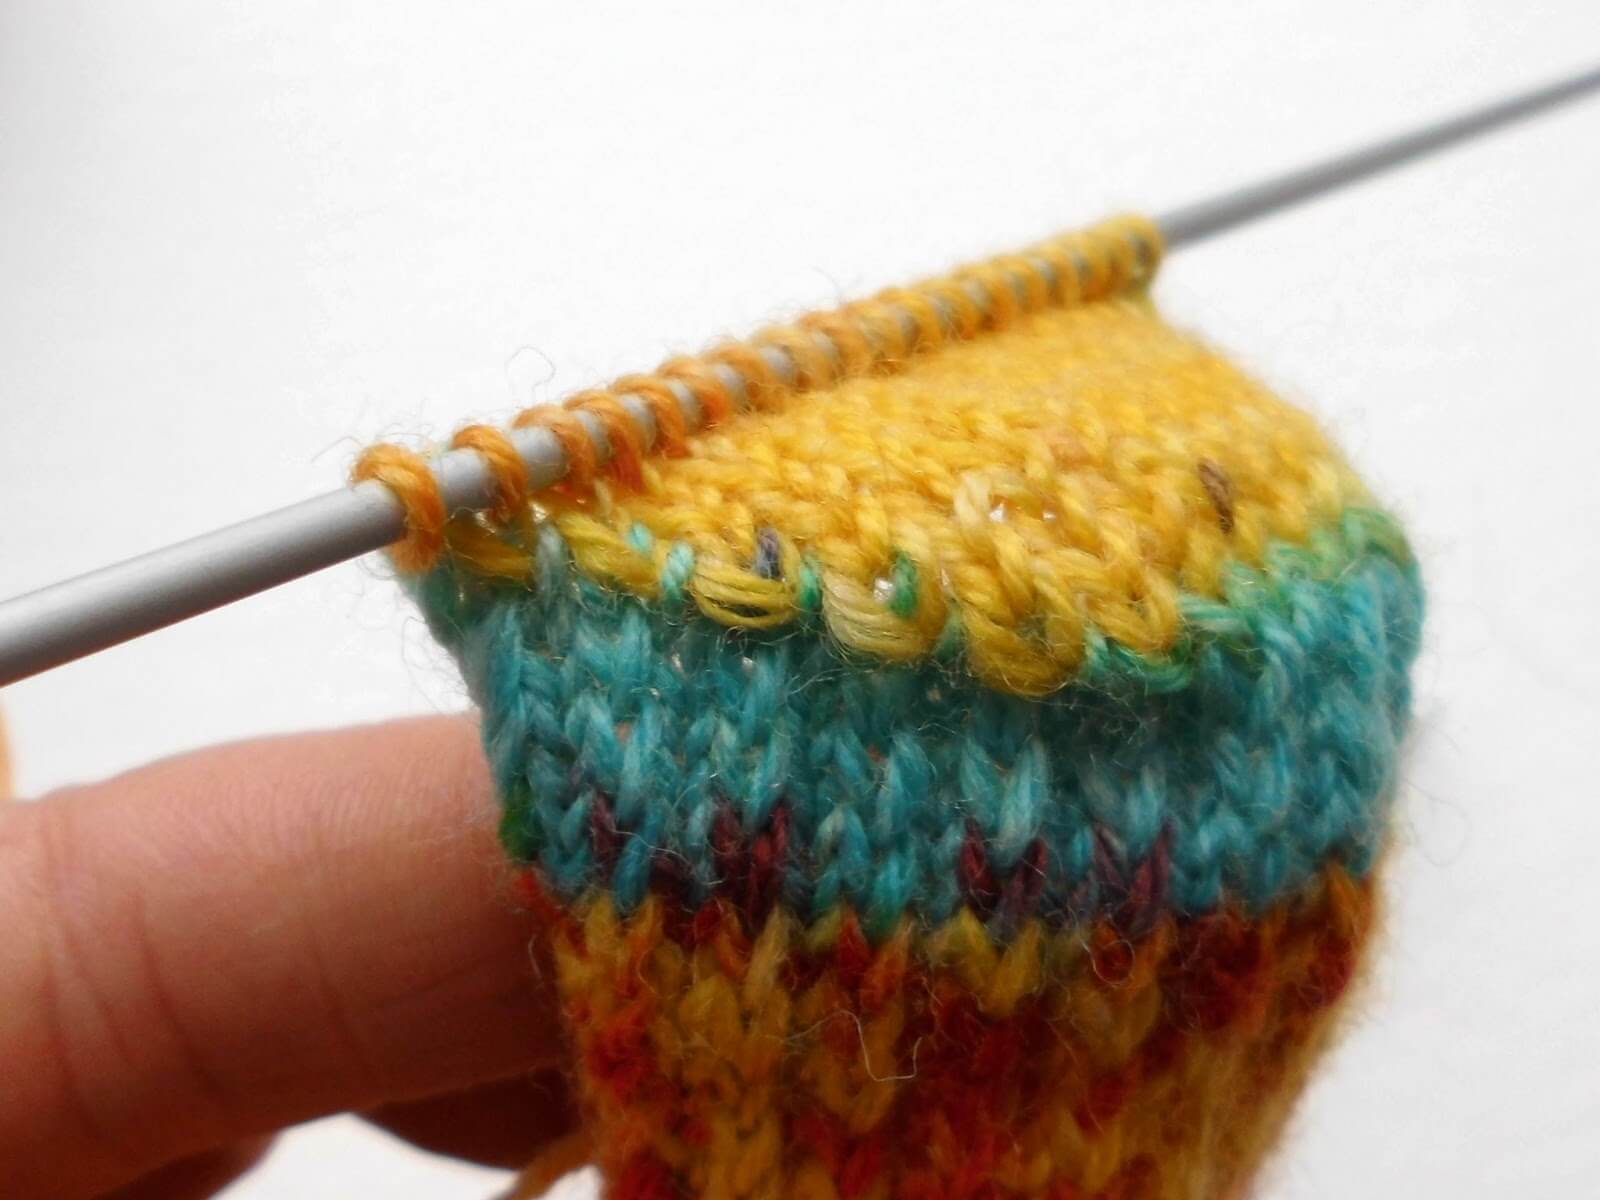
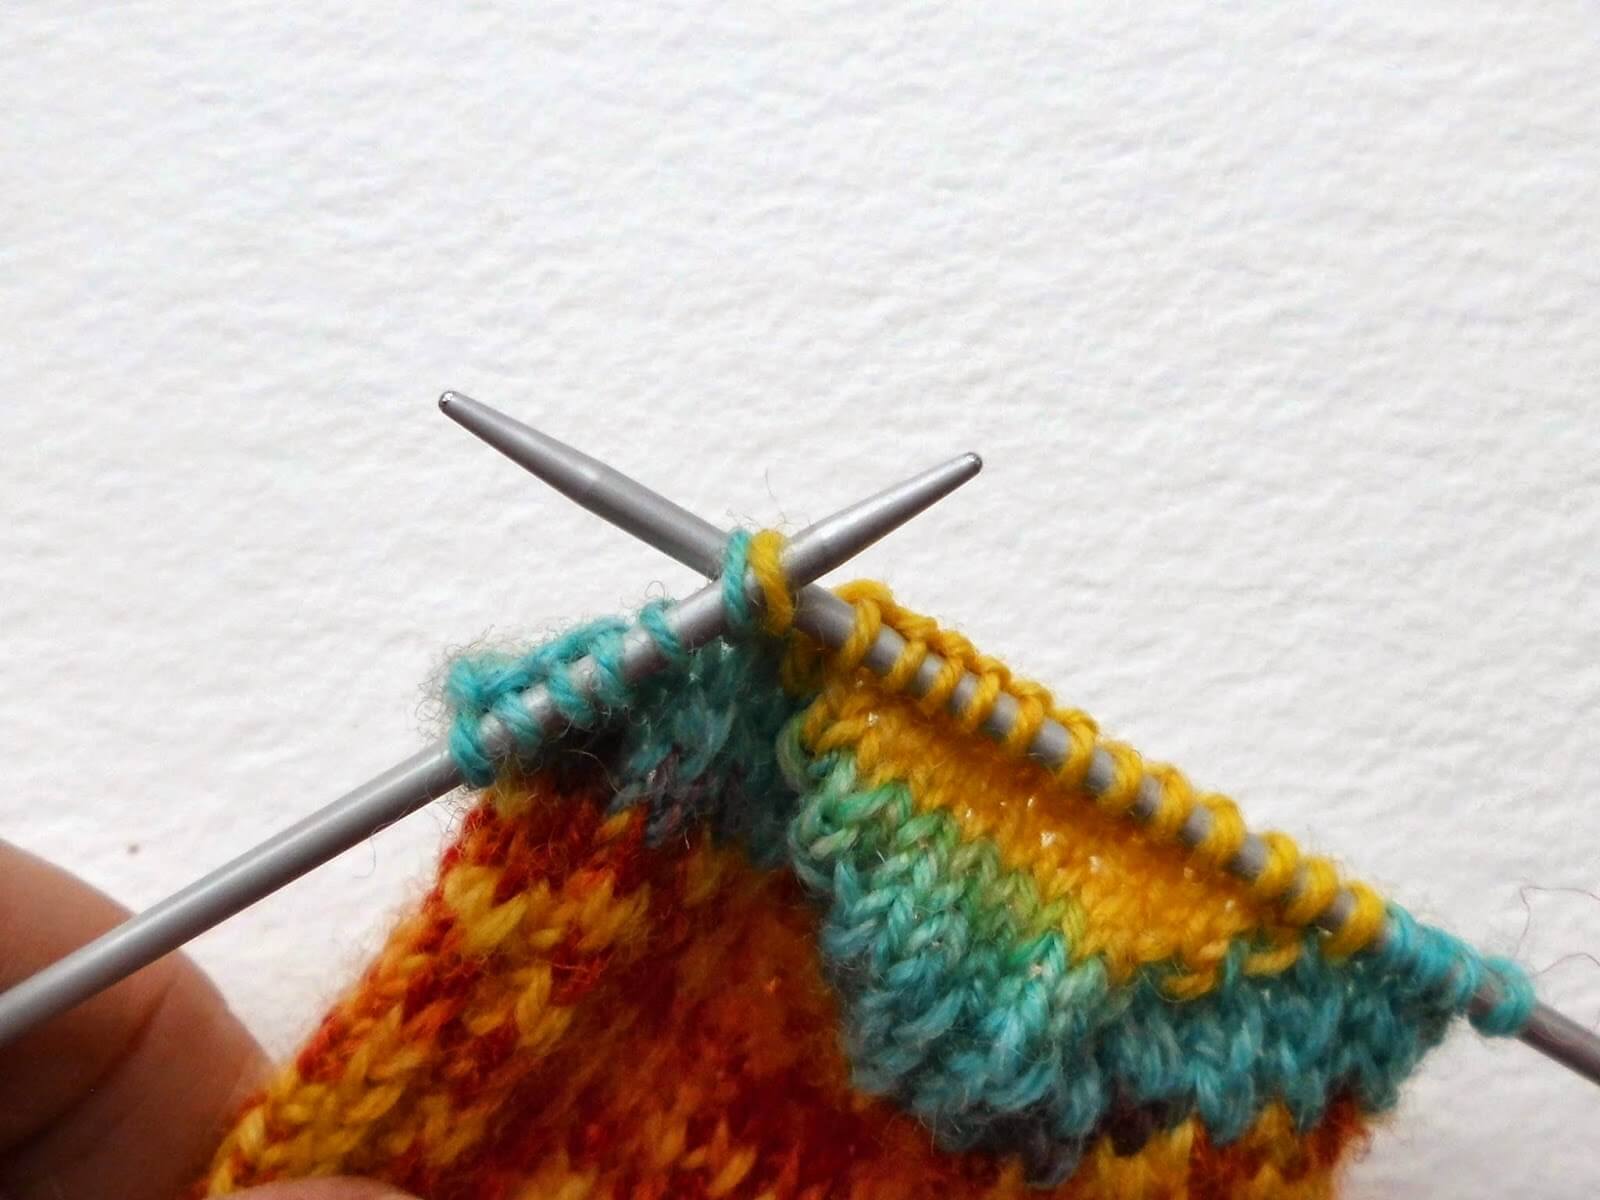
and like this if you use a DPN. (Note: I’ve stopped at the end of the second set of picked up stitches to take the picture.)
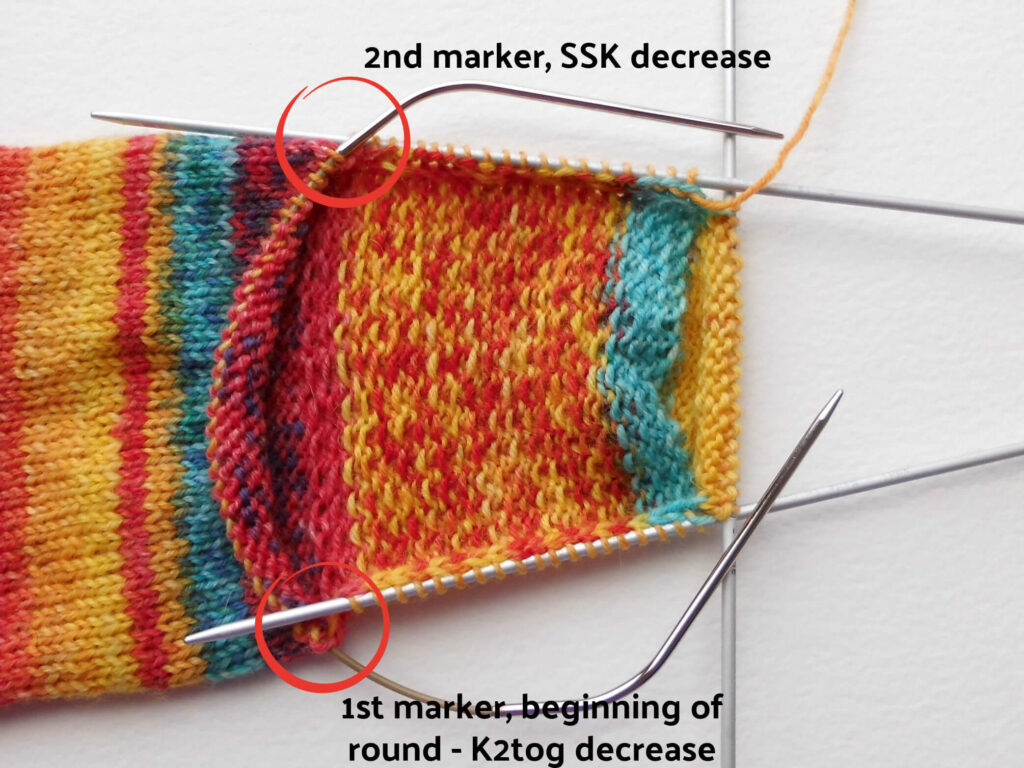
Knit across the heel stitches until you are back at the start of your first set of picked-up stitches. You will need to place a marker at the end of the first DPN just before you knit your top of the foot stitches which you will do as part of round 1 below (but don’t do it before you get to that point as it will just fall off the needle).
After knitting across the top of the heel, shape the gusset as below.
Round 1:K to 3 sts before the end of the 1st DPN, K2tog, K1, place marker, knit to next marker, slip marker, K1, SSK, K to marker.
Round 2: Slip marker, knit to next marker, slip marker, knit to 3 sts before marker.
Round 3: K2tog, K1, slip marker, knit to next marker, slip marker, K1, SSK, K to marker.
Repeat rounds 2 and 3 to shape the gusset. Make sure that you are always decreasing on the heel side of your sock and not across the top of the foot stitches.
Once all of your stitches are back on your circular needle, your sock should look like this:
To make the K2tog stitch, simply knit into the first two stitches on your left hand needle at the same time.

You are using the same SSK stitch that you used to create the heel, so if you need a reminder of how to make the stitch, go back to the heel turn section above.
Continue in this way, decreasing by two stitches at the gusset on every other row (one on each side) until there are 60 stitches (or whatever number you cast on) on the needle.
Now is a good time to try on your sock again to check whether you need your sock foot to be wider than the number of stitches you cast on. You can see how the gusset is formed in this picture.

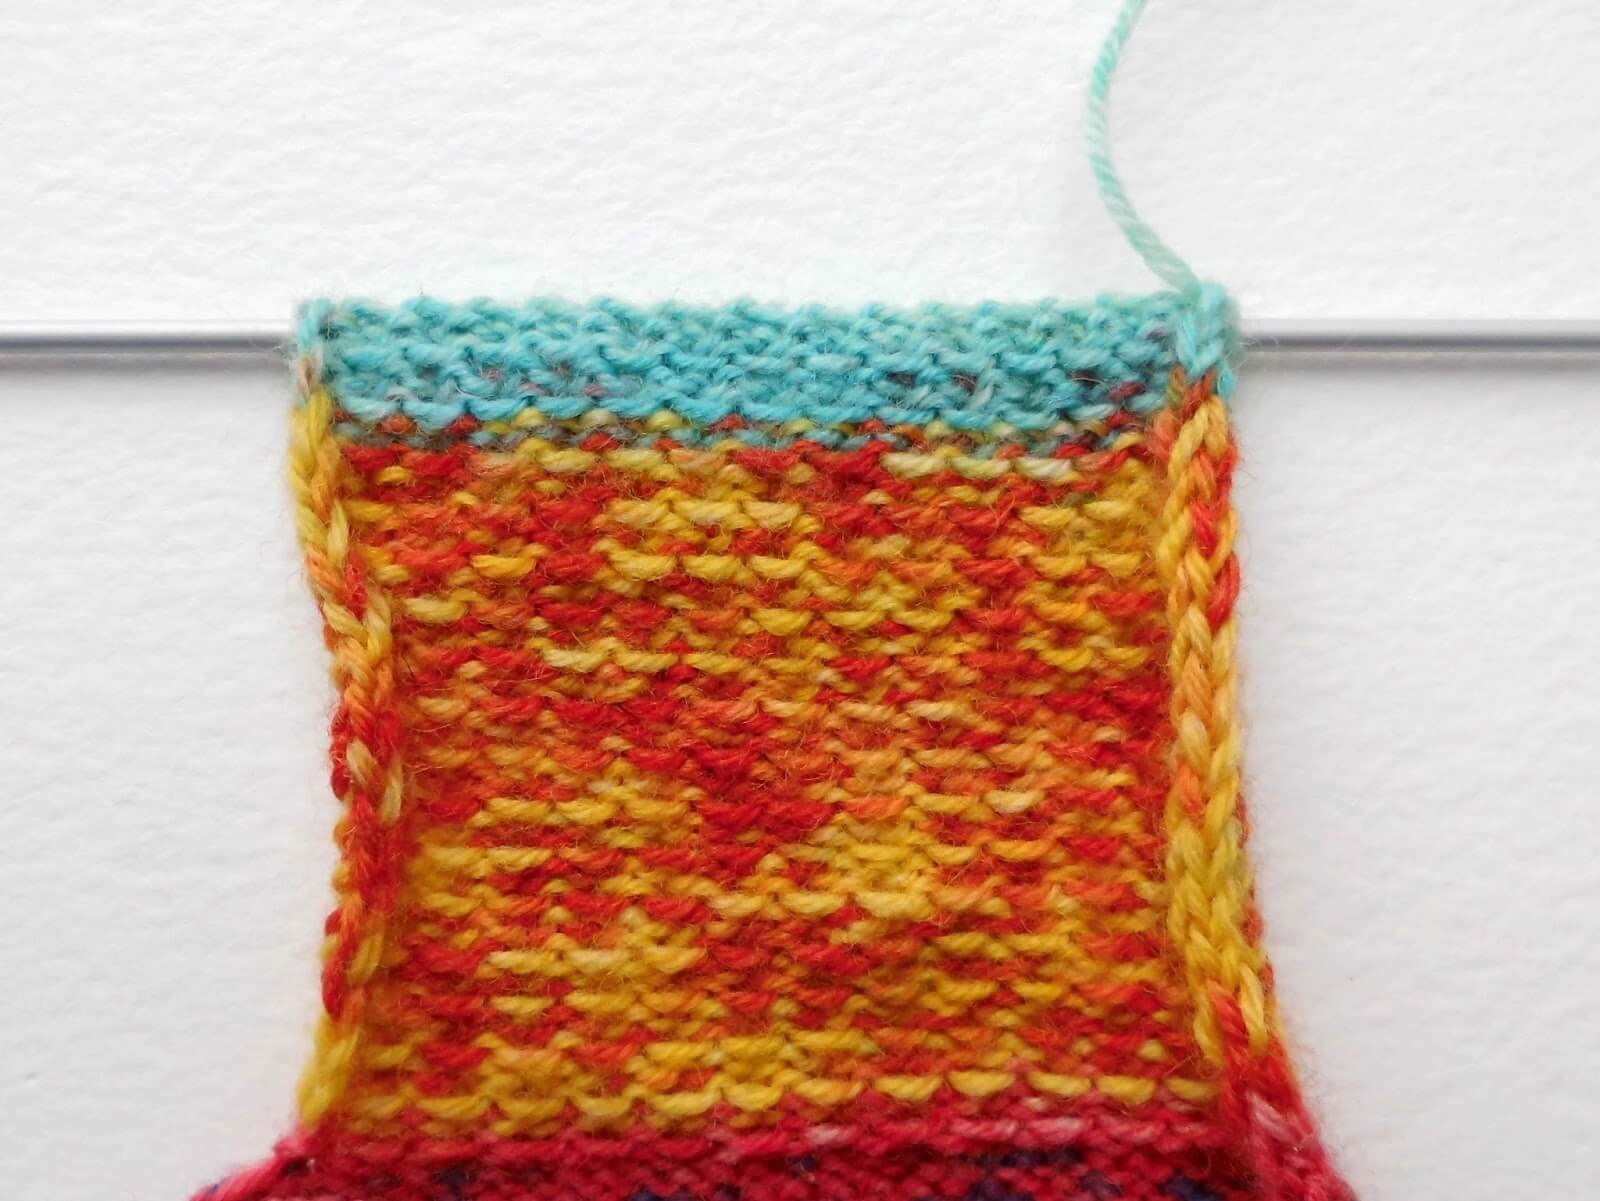
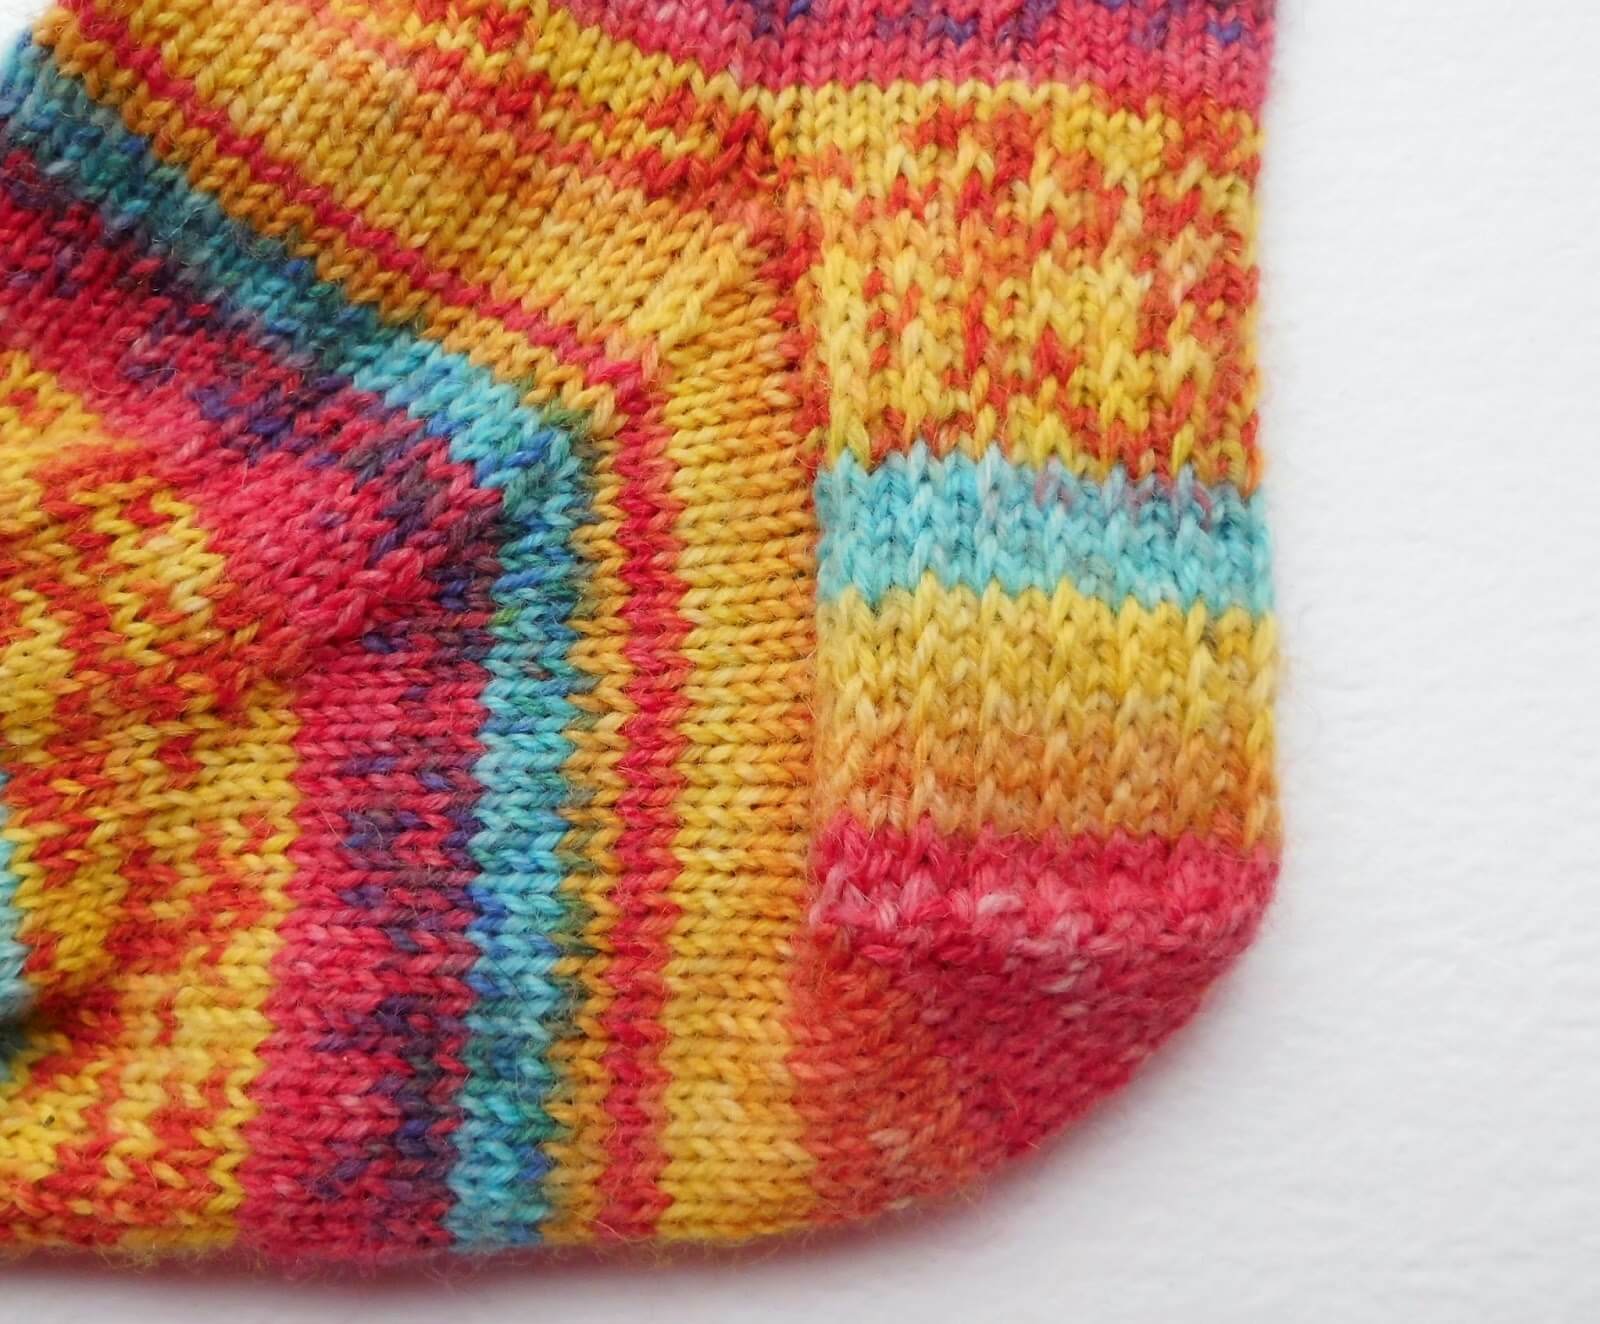
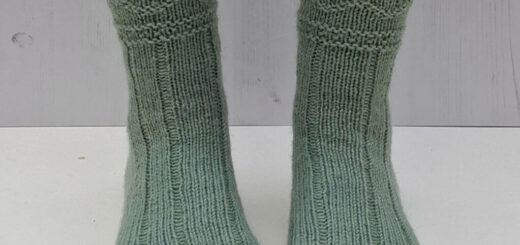
This is what your heel flap and gusset will look like once they are completed.
And that’s it for this week! There’s been a lot to get through and you might need to read it more than once before you start to make sure that you’re comfortable with it all. Just take your time and it will all fit together. Jump down to the bottom of the page to see what we’ll be up to next week!
Heel Flap – DPNs
This is what your sock should look like at the moment. You’ve cast on, worked your rows of rib and knitted the leg of your sock to the length you want it to be.

When you reach the end of your final leg round, it’s time to create the heel flap. You only need two needles to create the flap as we’re going to go back and forth as you would for straight knitting. You can just leave the rest of the stitches on the other two needles, or if you prefer you can slide them off onto a stitch holder.
You are going to create the heel flap from half the number of stitches that you cast on, so if you have cast on more or less than 60 stitches, you need to remember to adjust the number of stitches when you start the heel flap.
Continuing in the direction you have been knitting:
Row 1: K2, *Slip 1, K1* knitting across needles 1 and 2 until you have 30 stitches on your needle, ending with K1, turn.
(Repeat instructions inside * and slip the stitch by sliding it from one needle to the other without knitting it.)
The reason that this row is different is because you’re knitting the first stitch rather than slipping it as you will for the rest of the heel flap rows. This helps to stop a hole forming where your gusset will be created later.
You can choose to leave your stitches on needles 3 and 4 as shown:

or if you think you will find that too fiddly, you can slip the stitches from needles 3 and 4 onto a stitch holder for the time being.
Row 2: Sl1, P to end, turn.
Row 3: *Sl1, K1* to end, turn.
Repeat rows 2 and 3 until heel measures approximately 2 inches, finishing on row 3 (approx 35 rows for me – although remember this might be different if you’re using different sized needles). If you want to make the heel flap longer, continuing knitting rows 2 and 3 until you reach your desired length.
This is what your heel flap will look like on the outside …
and on the inside.

The heel stitch that you have used creates a reinforced, cushioned heel, which is more comfortable and durable than plain
knitting.
Turning the heel
This is the part of the sock that many people find off-putting, but we’re going to take it slowly and you’ll see that it’s quite easy. I like this bit of the sock construction because this is where your sock starts to look like a sock. There are pictures of how to do the SSK and P2tog decrease stitches.
You might like to read through the whole of this section before starting to make sure that you are quite happy with how the heel turn works.
We’re still working on the same two DPNs with the other two holding the rest of the stitches. Create the heel as follows:
Row 1: Slip 1, P16, P2tog, P1, turn.
This is your set-up row to get you into the middle of your heel. After this first row, you will still have stitches left on your needle that you haven’t used. These are the stitches that you are going to decrease on every alternate following row to pull your heel into a V shape.
Row 2: Slip 1, K5, SSK, K1, turn.
Row 3: Slip 1, P6, P2tog, P1, turn.
Row 4: Slip 1, K7, SSK, K1, turn.
Continue in this way, adding a stitch between slip stitch and SSK or P2tog on each row (ie, P8, K9, P10 etc) until all of the heel stitches are used, and you won’t need to turn after your last row. You should find that you finish on an SSK stitch and have 18 stitches left on your needle.
If you have cast on more or less than 60 stitches then your heel flap will need to be made larger or smaller. It’s very easy to do this. All you need to do is to alter the number of purl stitches in the first row of the heel (marked in bold above), increasing by 1 stitch for each block of 4 stitches extra that you cast on, or decreasing by 1 stitch for each block of 4 stitches less than 60 stitches. For example, if you cast on 64 stitches, your first row would be Slip 1, P17, P2tog, P1, turn. You can work the rest of the heel as from Row 2 above without changing anything else. Note that you will have more or less than 18 stitches left on your needle when you have worked all the decreases if you make the sock bigger or smaller.
You will notice as you start your heel turn that there’s a gap between the end of your knit or purl stitches in the middle of your heel and the remaining stitches to be worked. This will help you to see where you’re up to. You can see that you are always knitting the stitches in the middle of the heel flap whilst the remainder stay safely on your needles until they are required.
The heel rows require you to use P2tog and SSK stitches. These are simply decrease stitches worked on either the purl side or the knit side of your work.
To create P2tog, put the right hand needle purlwise into the first two stitches on the left hand needle and purl them together.

To create SSK, put the right hand needle knitwise into the first stitch on the left hand needle and slip it onto the right hand needle.
Put the right hand needle purlwise into the second stitch on the left hand needle and slip it onto the right hand needle.
Slip both stitches back onto the left hand needle, then knit into the back of the stitches.This gives a neat decrease on the outside of your heel. When you come to use this stitch for the gusset decreases, you can knit into the back of the stitch on the knit rounds if you choose to, as this will help to keep the decreases straighter.
This is what you’ll see on the outside of your sock. This is the P2tog side:

and this is the SSK side. It gives a nice neat finish with no gappy holes.

Shaping the gusset
Having finished the heel turn, your sock should look the pictures above. You can see how it’s taking on a sock shape now, and the next job is to create the gusset, which fills in the gap between the heel flap and the foot part of the sock.
We do this by first picking up stitches from the heel flap. This is quite easily done, even if picking up stitches isn’t your favourite thing to do. Do you remember that you slipped the first stitch of the heel flap on every row? That slip stitch is what’s going to help you pick up the stitches because it creates a slightly bigger loop for you to knit into. You can see in the picture the stitch is indicated by the wool needle.
Hold your sock so that the outside of the heel flap faces you. You should be at the left hand side of your heel ready to pick up your stitches but if you aren’t, simply knit across the heel stitches to bring you to the right place. You are going to pick up and knit every slipped stitch (one stitch per two rows of heel flap) using a second DPN. I always pick up the first loop of the stitch as I feel that it gives a neater edge; some people like to pick up the second loop or both loops and that’s fine – whichever you prefer!
Pick up the stitch by putting the needle into the stitch, wrapping the yarn around the needle and pulling it through the stitch to make a new stitch. Remember that if you made the heel flap bigger, you will need to pick up more stitches. You should find this easy to do because you will have more slip stitches to knit into. As a guide, I usually pick up about 19 stitches, but you may have more or less stitches than this depending on your yarn and needles.
Tip: if you think you are going to have a big gap between the end of your picked-up stitches and the first of the stitches held on your circular needle, pick up an extra one or two stitches as required in the gap.Don’t worry about the extra stitches as you will just decrease them as you go along.
Once you have picked up the stitches, knit across the top of the foot using DPNs three and four which were holding the stitches then pick up and knit 19 stitches (or more or less if required) up the other side of the heel flap and then knit across the top of the heel so that your yarn is in the right place to start round 1 of the gusset. Your sock will look like this and you will have the following number of stitches on your needles:
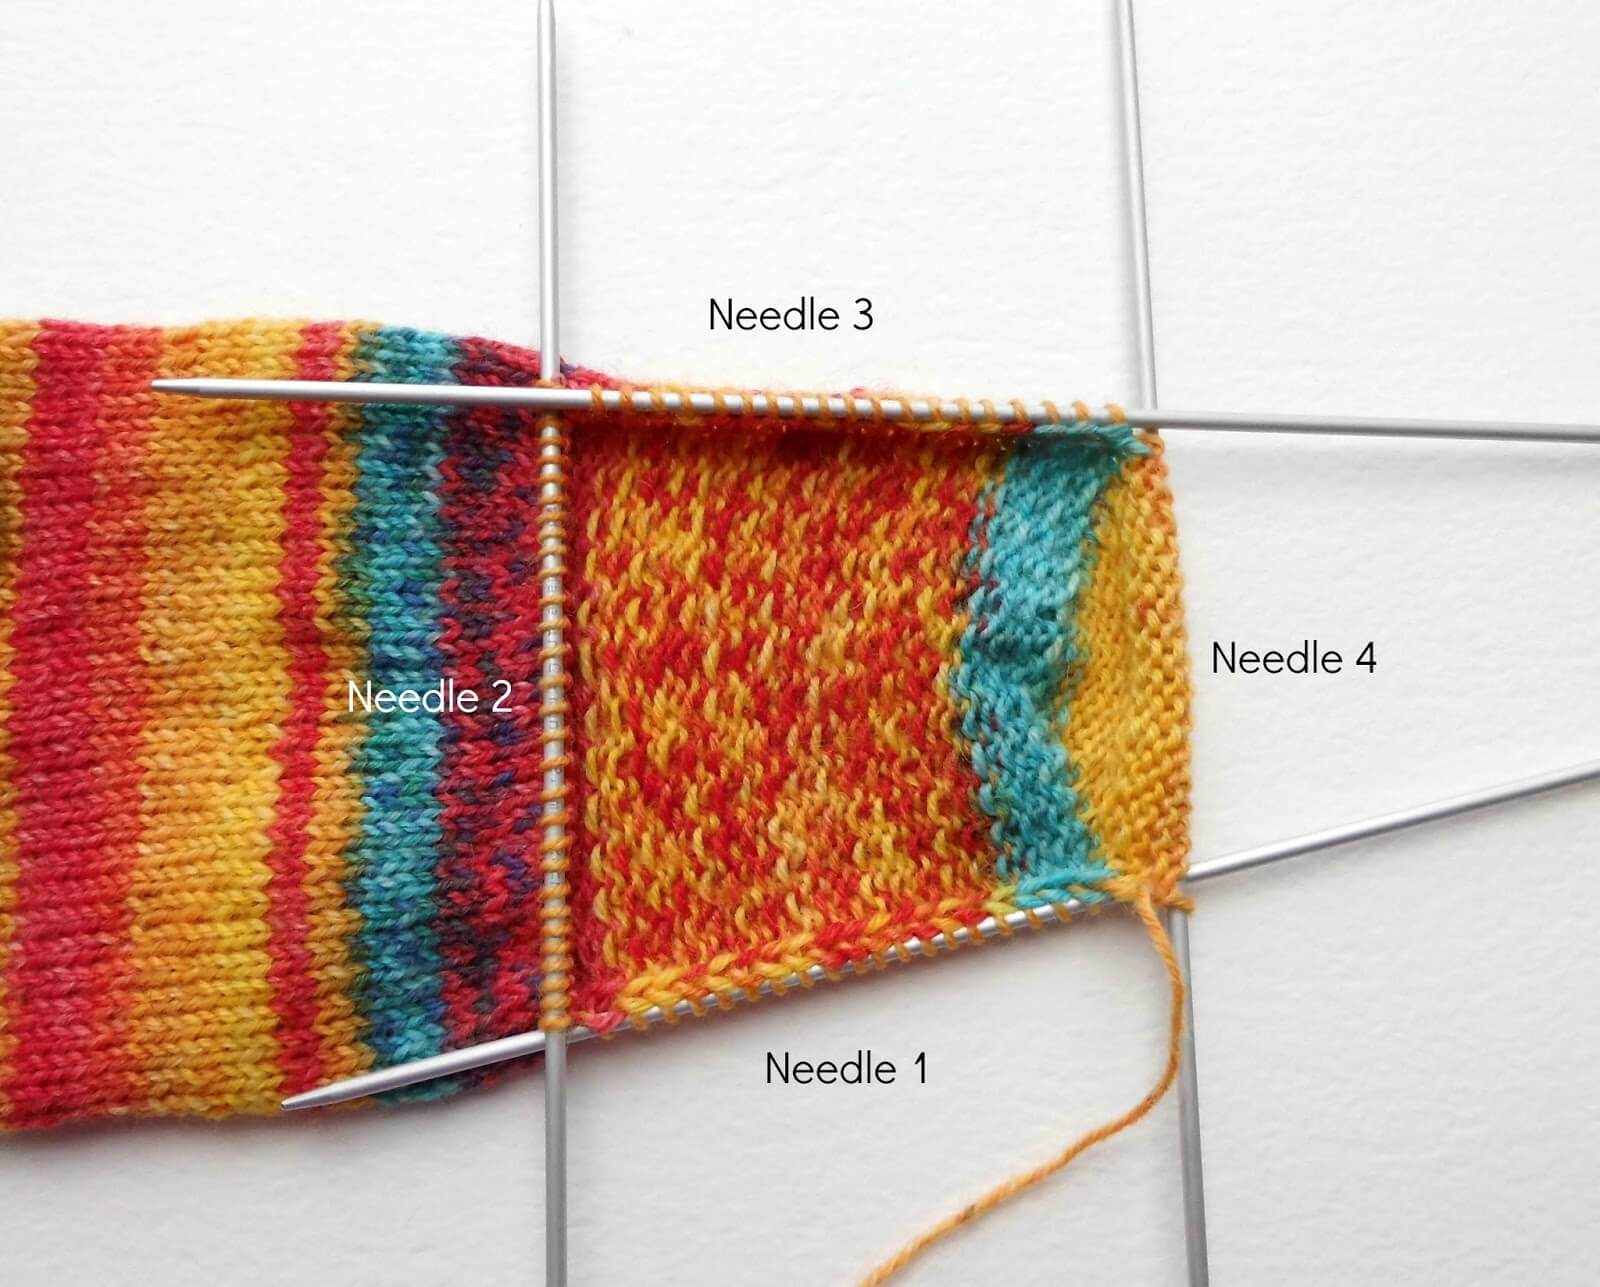
Needle 1 – 19 stitches (or more or less depending on how many you picked up)
Needle 2 – 30 stitches
Needle 3 – 19 stitches (or more or less depending on how many you picked up)
Needle 4 – 18 stitches
Note: if you are working on 4 needles, you will need to split your picked up stitches and top of the foot stitches across 3 needles, so use stitch markers to show where your decreases should go.
Round 1: (Needle 1) K to 3 sts before the end of the needle, K2tog, K1. (Needle 2) knit across all stitches. (Needle 3) K1, SSK, knit to end of needle. (Needle 4) knit across all stitches.
Round 2: Starting with needle 1, knit across all stitches on all needles, finishing on needle 4 ready to start round 1 again.
Repeat these two rounds to shape the gusset. Make sure that you are always decreasing on the heel side of your sock and not across the top of the foot stitches.
To make the K2tog stitch, simply knit into the first two stitches on your left hand needle at the same time.
You are using the same SSK stitch that you used to create the heel, so if you need a reminder of how to make the stitch, go back to the heel turn section above.
Continue in this way, decreasing by two stitches at the gusset (one on each side) on every other row until there are 60 stitches (or whatever number you cast on) on the needle. Now is a good time to try on your sock again to check whether you need your sock foot to be wider than the number of stitches you cast on. You can see how the gusset is formed in this picture.
This is what your heel flap and gusset will look like once they are completed.
If you are working on 4 needles, you will need to have all of your stitches distributed across 3 needles which might feel a little bulky until you start decreasing them. After completing the heel turn, pick up 19 stitches with Needle 1, knit across 30 stitches for the top of the foot with Needle 2, pick up 19 stitches with Needle 3 plus 9 stitches from the heel. Knit the next 9 stitches plus the 19 picked up stitches originally held on Needle 1 and this will become your new Needle 1 – don’t forget that you will need to decrease (K2tog) 3 stitches before the end of Needle 1 on this round (round 1 of the gusset decrease). Continue to work rounds 1 and 2 of the gusset as above until you have 60 stitches on your needles.
And that’s it for this week! There’s been a lot to get through and you might need to read it more than once before you start to make sure that you’re comfortable with it all. Just take your time and it will all fit together. Jump down to the bottom of the page to see what we’ll be up to next week!
Heel Flap – large circular needle (magic loop)
This is what your sock should look like at the moment. You’ve cast on, worked your rows of rib and knitted the leg of your sock to the length you want it to be.
Making sure that you have the front of your knitting facing you so that you have completed your last round, it’s time to create the heel flap. We’re going to go back and forth as you would for straight knitting, but the nice thing about the long circular is that you can just leave the rest of the stitches on your circular needle as there is plenty of room for you to work and hold your stitches securely.
You are going to create the heel flap from half the number of stitches that you cast on, so if you have cast on more or less than 60 stitches, you need to remember to adjust the number of stitches when you start the heel flap.
Continuing in the direction you have been knitting:
Row 1: K2, *Slip 1, K1* until you have 30 stitches on your needle, ending with K1, turn.
(Repeat instruction inside * and slip the stitch by sliding it from one needle to the other without knitting it.)
The reason that this row is different is because you’re knitting the first stitch rather than slipping it as you will for the rest of the heel flap rows. This helps to stop a hole forming where your gusset will be created later.
Row 2: Slip 1, P to end, turn.
Row 3: *Slip 1, K1* to end, turn.
Repeat rows 2 and 3 until heel measures approximately 2 inches, finishing on row 3 (approx 35 rows for me – although remember this might be different if you’re using different sized needles) . If you want to make the heel flap longer, continuing knitting rows 2 and 3 until you reach your desired length.
This is what your heel flap will look like on the outside …
and on the inside.

The heel stitch that you have used creates a reinforced, cushioned heel, which is more comfortable and durable than plain
knitting.
Turning the heel
This is the part of the sock that many people find off-putting, but we’re going to take it slowly and you’ll see that it’s quite easy. I like this bit of the sock construction because this is where your sock starts to look like a sock. There are pictures of how to do the SSK and P2tog decrease stitches below.
You might like to read through the whole of this section before starting to make sure that you are quite happy with how the heel turn works.
We’re still working on the circular needle with the rest of the stitches held on the cable. Create the heel as follows:
Row 1: Slip 1, P16, P2tog, P1, turn.
This is your set-up row to get you into the middle of your heel. After this first row, you will still have stitches left on your needle that you haven’t used. These are the stitches that you are going to decrease on every alternate following row to pull your heel into a V shape.
Row 2: Slip 1, K5, SSK, K1, turn.
Row 3: Slip 1, P6, P2tog, P1, turn.
Row 4: Slip 1, K7, SSK, K1, turn.
Continue in this way, adding one stitch between slip stitch and SSK or P2tog on each row (ie, P8, K9, P10 etc) until all of the heel stitches are used and you won’t need to turn after your last row. You should find that you finish on an SSK stitch and have 18 stitches left on your needle.
If you have cast on more or less than 60 stitches then your heel flap will need to be made larger or smaller.It’s very easy to do this. All you need to do is to alter the number of purl stitches in the first row of the heel (marked in bold above), increasing by 1 stitch for each block of 4 stitches extra that you cast on, or decreasing by 1 stitch for each block of 4 stitches less than 60 stitches. For example, if you cast on 64 stitches, your first row would be Slip 1, P17, P2tog, P1, turn. You can work the rest of the heel as from Row 2 above without changing anything else. Note that you will have more or less than 18 stitches left on your needle when you have worked all the decreases if you make the sock bigger or smaller.
You will notice as you start your heel turn that there’s a gap between the end of your knit or purl stitches in the middle of your heel and the remaining stitches to be worked. This will help you to see where you’re up to. You can see that you are always knitting the stitches in the middle of the heel flap whilst the remainder stay safely on your needles until they are required.
The heel rows require you to use P2tog and SSK stitches. These are simply decrease stitches worked on either the purl side or the knit side of your work.
To create P2tog, put the right hand needle purlwise into the first two stitches on the left hand needle and purl them
together.
To create SSK, put the right hand needle knitwise into the first stitch on the left hand needle and slip it onto the right hand needle.
Put the right hand needle purlwise into the second stitch on the left hand needle and slip it onto the right hand needle.
Slip both stitches back onto the left hand needle, then knit into the back of the stitches. This gives a neat decrease on the outside of your heel. When you come to use this stitch for the gusset decreases, you can knit into the back of the stitch on the knit rounds if you choose to, as this will help to keep the decreases straighter.
This is what you’ll see on the outside of your sock. This is the P2tog side …
and this is the SSK side. It gives a nice neat finish with no gappy holes.
Shaping the gusset
Having finished the heel turn, your sock should look like the pictures above. You can see how it’s taking on a sock shape now, and the next job is to create the gusset, which fills in the gap between the heel flap and the foot part of the sock.
We do this by first picking up stitches from the heel flap.This is quite easily done, even if picking up stitches isn’t your favourite thing to do.Do you remember that you slipped the first stitch of the heel flap on every row? That slip stitch is what’s going to help you pick up the stitches because it creates a slightly bigger loop for you to knit into. You can see in the picture the stitch is indicated by the wool needle.
Hold your sock so that the outside of the heel flap faces you. You should be at the left hand side of your heel ready to pick up your stitches but if you aren’t, simply knit across the heel stitches to bring you to the right place. You are going to pick up and knit every slipped stitch (one stitch per two rows of heel flap). I always pick up the first loop of the stitch as I feel that it gives a neater edge; some people like to pick up the second loop or both loops and that’s fine – whichever you prefer!
Pick the stitch up by putting the needle into the stitch, wrapping the yarn around the needle and pulling it through the stitch to make a new stitch. Remember that if you made the heel flap bigger, you will need to pick up more stitches. You should find this easy to do because you will have more slip stitches to knit into. As a guide, I usually pick up about 19 stitches, but you may have more or less than this depending on your yarn and needles.
Tip: if you think you are going to have a big gap between the end of your picked-up stitches and the first of the stitches held on your circular needle, pick up an extra one or two stitches as required in the gap. Don’t worry about the extra stitches as you will just decrease them as you go along.
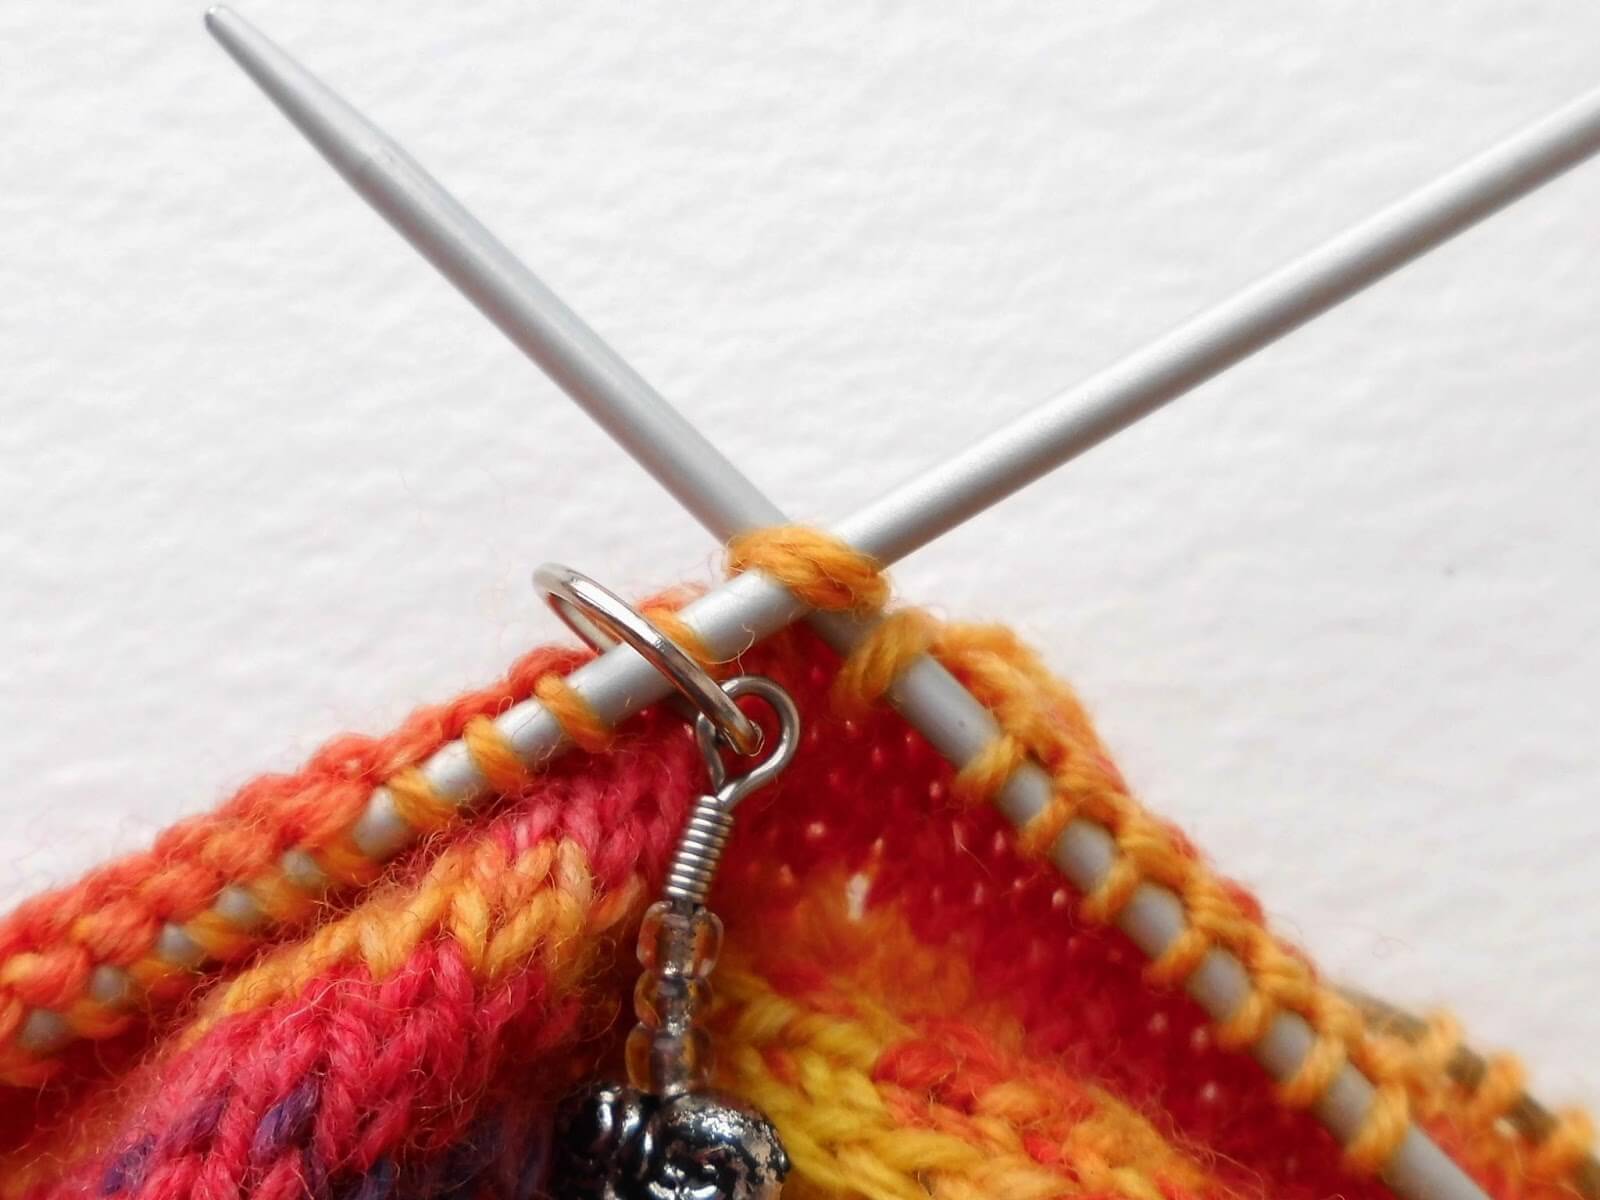
Once you have picked up the stitches, place a marker over the end of your right hand needle. Knit across the top of the foot using your circular needle, place marker (I usually make sure that my markers are both different – it’s quicker to tell which side of the sock you’re working on later), then pick up and knit 19 stitches (or more or less if required) up the other side of the heel. Knit across the heel stitches until you are back at the start of your first set of picked-up stitches and then shape gusset as below.
Round 1: K to 3 sts before the first marker, K2tog, K1, slip marker, knit to next marker, slip marker, K1, SSK, K to marker.
Round 2: Slip marker, knit to next marker, slip marker, knit to 3 sts before marker.
Round 3: K2tog, K1, slip marker, knit to next marker, slip marker, K1, SSK, K to marker.
Repeat rounds 2 and 3 to shape the gusset. Make sure that you are always decreasing on the heel side of your sock and not across the top of the foot stitches.
To make the K2tog stitch, simply knit into the first two stitches on your left hand needle at the same time.
You are using the same SSK stitch that you used to create the heel, so if you need a reminder of how to make the stitch, you can look back at the heel section above.
Continue in this way, decreasing by two stitches at the gusset on every other row until there are 60 stitches (or whatever number you cast on) on the needle. Now is a good time to try your sock on again to check whether you need your sock foot to be wider than the number of stitches you cast on.
You can see how the gusset is formed in this picture.
This is what your heel flap and gusset will look like once they are completed.
And that’s it for this week! There’s been a lot to get through and you might need to read it more than once before you start to make sure that you’re comfortable with it all. Just take your time and it will all fit together.
So there you go – your sock should be looking more like a sock now! Time to congratulate yourself on a job well done! 🙂
Next week, we’re going to finish the foot of the sock, decrease the toes and graft them using Kitchener stitch, which isn’t nearly as difficult as some people believe. If you really can’t wait until next week and have to keep going with your sock, then your foot section needs to finish 5cm before your toes.
As always, please do ask questions if you’re stuck, either here on the blog or through the Facebook or Ravelry groups. No question is a daft question as we all had to start somewhere, and don’t worry if you feel you’re not keeping up – there’s no time limit, it’s not a race or a competition and what’s important is that you end up with a pair of socks, so go at your own pace.
If you need a reminder of any of the earlier tutorials, then you can find them all here. Happy knitting everyone, see you next week for the final tutorial!
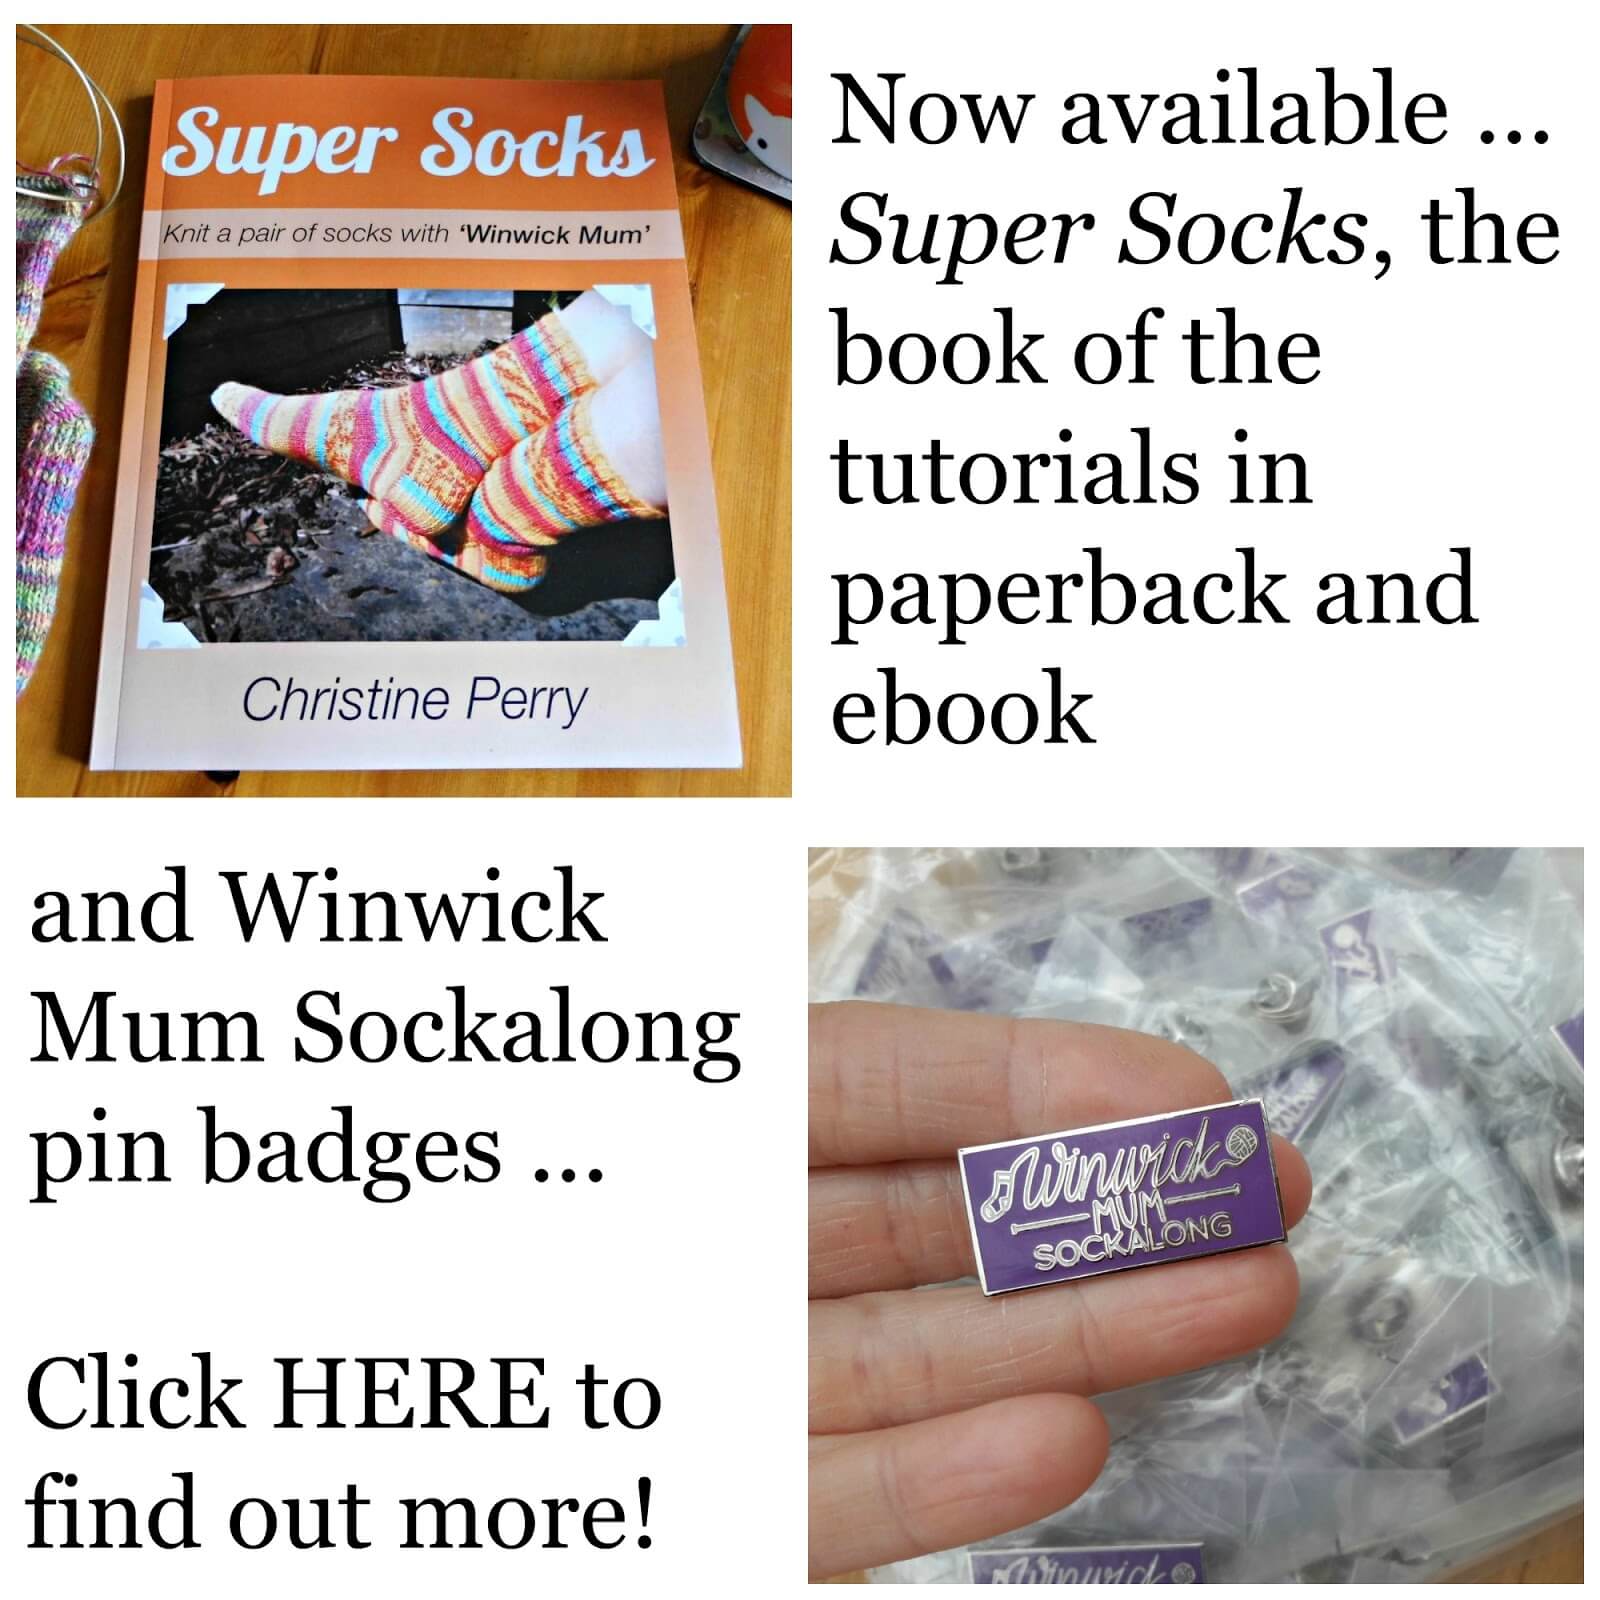
This Sockalong tutorial is free on this blog and will always remain so. If you’ve enjoyed using it and would like to support my work so I can keep blogging and designing, you can browse my shop for patterns and books or buy me a brew – both are very much appreciated. Thank you! xx


Basic 4ply Socks pattern copyright © 2014 Winwick Mum All rights reserved.
Sockalong tutorials copyright © 2015 Winwick Mum All rights reserved.
More Sockalong posts:
Sockalong – tension squares, casting on and stitch calculations
Sockalong – accessories and matching yarn
Sockalong – Week 1 – Cast on, cuff and leg
Sockalong – Week 3 – Foot, toe and grafting the toes
Sockalong Basic 4ply Socks pattern
Facebook Sockalong group for help, advice and encouragement


Thanks Christine. Lovely and clear instructions as always.
Thanks, Selma! Glad they make sense! Looking forward to seeing your heels very soon 🙂 xx
Brilliant, thanks Christine. I'm so glad this is so successful for you and it's pretty clear from facebook that you've created a lovely sock community, it's so lovely to see crafters all enjoying their craft together! Lil xx
Thanks, Lil! It's been good fun and the Facebook group is full of very enthusiastic people so it's lovely to see them all knitting their socks! xx
Will get started on my heel as soon as I have finished baking a cake. Struggling to fit in everything I want to do today. Xx
I have that sort of day every day, Jan! 🙂 xx
You make it look easy Christine thank you for the clear instructions. 🙂 xx
You're very welcome 🙂 xx
Wow, so much work! Just amazing!! xx
Thank you! 🙂 xx
I think you only have to turn the heel once to realise it isn't so scary. My worst bit of sock knitting is picking up the stitches, I'm always glad when I'm past that bit.
I think it gets easier the more you do, Jo! When you're on your 10th pair of socks you won't think twice about it 🙂 xx
Really enjoying this but I have one (potentially silly) question. When I'm back to the number of stitches I began with, after decreasing the gusset, where do my rounds begin and end? I just can't work it out! X
Hi Elaine, glad it's going well for you! Use the first stitch marker (the one after your first K2tog, K1) as the start of your round. You can take the other marker out for now if you want to and put it back in again when you come to do your toes xx
Hi Christine, you have done a superb job putting together this great tutorial. The photos and instructions are so good even for a sock knitter like me. I'm sure you're having a great time doing this sock knit along. My best wishes to you. Hugs, Pat
Thanks, Pat, that means a great deal! I'm having a wonderful time! 🙂 xx
Hi thanks for that. I finally sussed it. It's great having you on hand to help – thank you for all the effort you put into this! X
You're welcome! It's fab to see so many people getting pleasure out of seeing their socks grow on their needles! 🙂 xx
Delightful. I come to the blog at the odd times allowed in my schedule. Most convenient to print out and study as I sit at the old sofa on the enclosed porch. Still struggling along but the concepts are becoming clearer. Perhaps someday you might but all this in a simple published volume?
Isn't that the wonderful thing about the internet – you can access information at whatever and in whatever time you have. Yes, the plan is to put all the blog posts into a book and also into Kindle format – I'm working on it at the moment and hope it won't be too much longer before it's available!
Hi, I am very much enjoying knitting my first sock and I am approaching the heel turn. I have one question before I plough on though. I am working with 68 stitches and I understand that I will need to do the following on the first row 'sl1,p18(instead of 16),p2tog, p1 turn'. Do I need to make any allowances for the rows after that? For example, row 2 – instead of 'sl1,k5,SSK,K1,turn' would I need to change the k5 to K7 or something? Thank you very much in advance!
Hi Tracy, I never bother changing the heel turn rows so even using your example of sl1, p18, I would still k5 on the next row. The heel works out just fine. Glad you're enjoying knitting your sock! xx
Hello – I don't know if you're still monitoring this – it's 2021, but here goes. I cast on 72 stitches and so in the heel turn I sl1, P19 and as I continued I finished the k side sooner than the P side so I ended up with about 4 or 5 rows just hanging out – not connected to the rest of the sock. I tinked it and did it over and the same thing happened so I picked up stitches to attach it to the rest of the sock. This is my first time knitting a sock. I guess I wasn't in the middle of the heel. I fudged it and completed the sock and it "works"! I'm starting another sock because now I'm addicted but I feel I'll probably have the same problem so I'm gong to increase the heel turn rows by adding three stitches for each EX: sl1, K8, etc.
Hi Lelah, yes, I'm still here 🙂 It sounds like you might be missing out some decreases if you're finishing the stitches on one side before the other. Your set up row for 72 sts should be Sl1, P19, P2tog, P1, turn and then you work the rest of the heel turn as written, remembering to work a decrease at each end of the row. I'm wondering if you've forgotten the decrease on your set up row which will have caused the problem? This video might help too (different pattern, same process): bit.ly/EasyLaceHeelTurn. Hope that helps! 🙂
Hello there, late to the sockalong and, indeed to knitting socks in general. I am using 4dpns and am a little confused at which point, having picked up the stitches either side of the heel flap, do I reduce down to 3dpns, please?
Otherwise, am really impressed with the tutorial 🙂
Hello there! It's never too late to join in with the Sockalong, so it's great to have you with us! Yes, just divide your stitches across the three needles when you've picked up your gusset stitches and carry on knitting. There's no rule as to how many stitches for each needle, so you can just divide them evenly across the three that you're using. You'll probably find that you'll need to use stitch markers to show where your gusset decreases are, but as long as you have stitches on either side of them so that they don't slide off, that's absolutely fine xx
Hi! Your tutorial is soooo complete! Thanks a lot! I have both DPNs and long circular needle. I think I'll try the long circular first. Do yo think I can get socks a try even if I am a beginner with needles? I know how to knit and purl and nothing else really. Is it better if I try something simpler on circular before trying your pattern?
Thanks for sharing your knowledge in such precise and complete manner!
Chiara (Italy)
I don't see why not, Chiara – I know of quite a few people whose first knitted project was a pair of socks! My own tendency is always to just launch in as I'm too impatient to want to practice first, but of course it is up to you. If you're on Facebook, you might want to join the Sockalong group as there will be plenty of help and encouragement there as you get started 🙂 xx
I'm normally impatient too! It's my husband that make me do thoughts on everything 🙂 Now I have the excuse: "she said I can"! I'll join the FB group too, and as soon as the shop opens, I'll get the yarn (already found the colour!)
Thanks a lot!
I'll look forward to seeing your socks! 🙂 xx
I have a basic question! For the first row for the heal, it says to K1, Sl1, K1 until you have 30 stitches (34 for me, since I CO 68). Does that 34 on the needle include the slipped stitches? So, k1, sl1, k1 should result in 3 loops on the needle? Sorry if this is very stupid, I have not slipped stitches yet, so I'm not sure if that is correct. Thank you!
Hi Zoe, yes the total stitch count does include the slipped stitches as you're going to knit them on the next row. You just need to slide them from one needle to the other without knitting them and the yarn across the back as you knit the next stitch is what gives the cushioned effect to the heel xx
One more question. 🙂 I've turned my heel and I'm trying to start the gusset. I'm using circular needles (currently tucked into my leg). My DPN has all my heel stitches on it, ready to knit, but which needle do I use to start picking up my heel flap into the gusset? A new dpn, or do I pick them up with 1 end of my circular? Hope that makes sense. Thanks!
Use a new DPN for the gusset stitches – it's too awkward to try to use the heel DPN. You can even knit off your circular onto a DPN if that's easier, and then use a DPN or your circular to pick up the second set of stitches. You want it to look like a square – have a look at the picture in the DPNs section and imagine that the needle on the left (top of the foot stitches) is your circular 🙂 xx
Hi, I'm new to knitting (I usually crochet!) but I saw these socks and I loved it so I had to try it!!! 🙂 I now know how to knit and purl (yay!!!) got to the heel and can do the SL stitch too. NOW decreases, I think I understand how to do ssk and p2tog… I have 30 stitches on my dpns…. now your instructions say "1st row p16"…. this is the setting to get u to the middle of the heel…. My question is: am I suppose to adapt this number to my 30 stitches? Do I take into account the other stitches mentioned in row 1? I'm a bit confused. Tia! Thank u for taking the time to make such a great and so well explained tutorial. Sam
Hi Sam! You're doing really well with your sock and I hope this helps you to complete the heel: when you create the heel turn you are making a V shape, pulling the sides of your heel flap round as you decrease. You're working on 30 sts, the same as me, so you won't have to change anything. You're absolutely right that the slip1, P16, P2tog, P1 is the set up row, and you just leave the rest of the stitches on your needle as you turn your work and then do the second row – slip1, K5, SSK, K1. You should have the same number of "spare" stitches on each needle and you're going to decrease one from each side as you continue with your heel turn until you've used them all up. You should have 18 stitches on your needle and your yarn should be on the left hand side (with the outside of your heel flap facing you), ready to pick up the stitches for the gusset xx
Hello! I have got to the end of turning the heel with no mistakes! Until now (I was doing so well I thought!)… I started to pick up the stitches and I did a few rows, but it has all gone wrong!! I know there are no pictures for the steps of shaping the gusset, but any guidance would be greatly appreciated! I am so tempted to give up!
Don't give up! Without seeing what you've done it's hard to say what's happened, so do you want to email me a picture so that I can help? My email is winwickmum[at]gmail.com. The usual problems are to do with picking up from the wrong side so that when you knit the purl bumps are on the outside of the sock, but that's easily sorted. Another problem is that some people decrease on the top of the foot side of the marker instead of the heel side, but again that's easily sorted. If you can get in touch I'll see what I can do to get your sock on the go again 🙂 xx
Hi Thought I was doing very well with my socks but I must be a bit silly. Can you please tell me what SL1 is and what SSK is please.
Thank you
Sl 1 is a slip stitch where you slide the stitch from the left hand needle to the right hand needle without knitting it. I slide knitwise on knit rows and purlwise on purl rows. SSK is a slip slip knit decrease and there are pictures of how to do it in the tutorial – the reason that I use this one instead of K2tog is that it lies flatter and gives a more professional look to your sock. Hope that helps! xx
I am having a terrible time turning the heel. I have ripped it out several times and it is so hard to pick the stitches up as the stitches are so tiny and the yarn I am using splits. I cannot understand when we sski and p2tog and then increase the stitches between each one. HELP
Do you know how to put a lifeline into your knitting, Faye? It's where you thread a piece of cotton or dental floss through your stitches so that if you have to take them out, they stay safely on the thread so that you can pick them up. YouTube is great if you need to see how that works. As for turning the heel, what you're trying to do is create a V shape, so the first row is your set up row to get you into the middle of your heel so that you can create the V by decreasing the stitches on either side on every alternate row. You use SSK on the knit (right side) rows and P2tog on the purl (wrong side) rows as they're the neatest decrease stitches. Increasing the stitches between the decreases simply means increasing the number of stitches that you knit or purl, not actually making a new stitch – so, the first row is k5, then P6, K7, P8, K9, P10, K11, P12, etc until you run out of stitches to decrease. It doesn't really matter if you finish on a wrong side or a right side row with your decreases as long as your yarn is at the left hand side of a right side row ready to pick up the gusset stitches. Does that help?
Thank you and you are my lifeline but I will try the dental floss trick next time. Everything is so good, thank you for your hard work. And I sent a very small donation for your daughter's trip to Peru.
I'm so glad that you're back on track again, and thank you for your donation – I hope my thank you email reached you – every donation is a huge gift to us so we very much appreciate it xx
Hello Christine
First of all , thank you so much for your generous tutorial.
This is my first ever knitting project and I am at a point that I need help.
I am knitting on DPNs and I am at the stage of the gusset , I did twice the first two rounds using my 4 needles , than you are writing to knit on three needles ( I just added the fourth one only few rows ago ) , this is the stage I have to split my picked up stitches or I should have done it earlier ? I don't understand how to split ? how many stitches and on what needle ?
I will appreciate very much any help 🙂
Thanks again
Talia from Tel Aviv
Hello Talia, it sounds like you're doing very well with your sock! The instructions are based on you knitting with 5 needles (4 to hold your stitches and 1 to knit with) but some people like to knit on 4 needles (3 to hold your stitches and 1 to knit with). It doesn't matter which method you choose, what's important here is that you know where your gusset decreases are so if you're on 5 needles in total, you can leave your needles looking like they do in the picture and decreasing at the end of needle 1 and the start of needle 3, but if you are knitting on 4 needles in total, you will need to arrange your stitches so that they are across only 3 needles and you will need to use stitch markers to show where your decreases are. Does that make sense?
Thank you for your very fast answer Christine
What a relief 🙂
I am knitting with 5 needles in a total, so I understand I can go on with my knitting without any split.
I have to decrease until I reach to the same number of stitches I cast on in the very first ? And at this point if I understand, the instruction starts again?
Yes, that's right. Once you get back to your original number of stitches, you can just knit plain rounds until you reach where you want your toe decreases to start.
My first sock is full of mistakes but I am very proud of it anyway ;-))))
Thank you so much for your help and wonderful tutorial.
Hooray! You should always be super-proud of your socks, and the second sock will be so much easier as you've done all your learning with your first sock 🙂 xx
Hi Mum, I really need help. I have now finished my heel and turn and picked up all the stitches and am back with all my stitches on my small circular needle. I don't understand how to start decreasing for my foot.Thank you for any help.
Hi! When you look at your sock, can you line it up with the photos in the tutorial? If you look at the photo where are the stitches are back on the circular needle, your yarn is on the right hand side and you have a stitch marker on either side of the top of the foot stitches. You are going to knit to 3 stitches before the first marker, do your K2tog decrease, then slip the marker and knit to the next marker, slip it and do your SSK decrease. This is round 1 of the gusset decreases; you need to repeat rounds 2 and 3 until you have the same number of stitches that you originally cast on. Does that help? xx
Hi Christine, Clare from FB here! Ok I've got this far! Ok I'm on a magic loop, knitted my 30 but stuck as I've got 4 stitches left on my needle and don't know what to do next? Also, when you say knit a row, I take it that one town with both needles knitted….I think this sounds stupid even typing it!
Hi Clare, I'm not quite sure whereabouts you're stuck – I think it might be on the heel flap as you go into the heel turn, but without being able to see it's difficult for me to say. Do you want to email me a photo (winwickmum[at]gmail.com) or alternatively post the picture in the Facebook group and tag me in? xx
Hi Christine, I've just finished my rib and starting the heel, doing the flap…so I have 30 stitches on each needle. when I am knitting a row, am I working with only one set of the 30 stitches and leave 30 on the loop and do that for 2 inches.msorry I know I'm being thick at this but I'm just doing this one wee step at a time!
Yes, that's absolutely right, Clare. You'll work your heel flap on half of your stitches and the rest just sit safely on your cable until you're ready to use them again 🙂 xx
Dear Mum, I am still having so much trouble decreasing my gusset. I am knitting and frogging and have my decrease rows spiraling around my sock. I just need to know where to place my markers and I will be good to go. Sorry to be so miserable about this.
Hi Faye, don't worry, we'll get this sorted! When you picked up your gusset stitches, you should have worked down the left hand side of your sock (with your heel flap facing you) first, then across the top of your foot stitches. You should have placed a marker over your needle when you got to the end of your top of the foot stitches and before you started to pick up your second set of gusset stitches – that's your SECOND marker where you will do your SSK decrease. Then you'll have knitted across your heel stitches and back down your first set of picked up stitches. When you got to 3 stitches before your top of the foot stitches, you'll have done a K2tog decrease and put another marker on your needle – that's your FIRST marker. You have to put them on in that order otherwise the first marker just drops off the needles whilst you're working your way around the sock. I use two different markers so that it's easy to see which one is which. You will always do a K2tog decrease at your first marker and an SSK decrease at your second marker. Does that help? xx
I'm a leftie – followed instructions fine until picking up stitches which I had to do on right hand side first, so am now purling rather than knitting. Should I carry on translating knot to purl or turn and put in an extra row to get mack to right place at top of foot? Thanks!
Hi Nicola, I think what you might have done is not knitted across your heel turn so that your yarn was on the left hand side with the outside of your heel flap facing you before you picked up the stitches. I know it's not easy to do that when you're left-handed – we do have quite a few lefties in the Facebook group so there's always someone to ask there. Your knitting has turned to purl because you're now knitting in the opposite direction (anti-clockwise instead of clockwise) so I'd recommend that you either embrace it as a difference and knit the other sock the same or take it back and pick up the stitches the other way around. I hope that helps! xx
Yes, I had to pick up on the right, not the left, as this was impossible for me. I realise that's why I'm now purling rather than knitting, but I'm not sure whether I'll be able to translate your instructions, which are in knit, to purl!
Are you on Facebook, Nicola? If you can join our Sockalong group then I'm sure someone will be able to help you out as I know plenty of lefties have knitted socks. All you'll need to do to translate the instructions is change the decrease around so instead of K2tog you will P2tog and then you'll need to choose another decrease in place of the SSK xx
Many thanks, will try one or both of these!
I am working on #7 Heel Flap. After Row 1 I end up with 19 stitches on needle. Do I then turn and do Row 2 on those 19 stitches?
Yes, and that should bring your yarn over to the right hand side ready to pick up the stitches xx
Hi Winwick Mum! When decreasing for the gusset using magic loop, do you put all the instep stitches on one needle and all of the heel and gusset stitches on the second needle? or do you split evenly at the center back of the heel with decreases on both needles?
Hi! You can organise your cable however you like as long as you keep track of where your decreases are going to be. I usually keep the top of the foot stitches together on one needle and then split my loops around the gusset stitches – I've usually got two loops which I move around as the number of stitches changes. There's no hard and fast rule, you'll find that the more you do, the easier it is for you to find the way that works best for you. Hope that helps! xx
Hi there – thanks so much for the very clear instructions! I'm having an odd problem with the variegated yarn I'm using… Once I've worked the heel flap and turn and joined it up with the top of the sock, I end up with an abrupt colour change on the top (because the yarn colour has 'moved on' while I've been knitting the heel). It looks quite messy and I wondered if you knew a way around this?
Hi Ziggy! I know exactly what's happening with your yarn and that drives me mad as well. I think you're using a gradient yarn that blends from one colour to the next and when it does this at the gusset, it's very obvious. You've got two choices here – firstly, you can embrace the colour change and make sure that your second sock matches your first (this is never my preferred option but some people don't mind!) or you can knit the heels in a different colour – either a completely different yarn but complimentary to the colours you're knitting with, or using yarn from the other end of the ball which will mean that your colours will still flow along the gusset. You'll need to go back to your heel flap and knit that again, leaving your main working yarn still attached and then when you've turned the heel, pick up your main yarn and knit the gusset using that one. You'll have a colour contrast underneath the heel but that won't be noticeable and the colours will still flow properly across the top of your foot. I hope that helps! xx
Getting ahead of myself again…. I'm still only half way down the leg. I just wondered if its possible to do the heel colour in a contrasting colour with this method or would you recommend I try something different? I'm using a self striping yarn.
It's always good to look ahead! Yes, absolutely you can change the heel colour – all you need to do is work your heel flap and turn in your contrast colour and then use your main colour for picking up the gusset stitches 🙂 xx
Thanks! Is it as simple as just using the different yarn at the start of a row or do I need to do anything else?
It's as simple as using a new yarn at the start of the row! 🙂 xx
Hi Christine
Just reading through the stitch instructions for my second sock and notice that your SSK is a SSK tbl[through back loop]. I didn't do mine through the back loop for the first sock as the print-out pattern said SSK not SSK tbl. Does it matter at all as long as I do the same for my second sock??
Many thanks Christine.
Sharon xx
No, it won't matter at all, Sharon. The reason that I use that decrease is that it lies nice and flat but it doesn't matter if you use a different one – people have their own preferences and as long as you do a decrease of some description at that point, your sock will still fit 🙂 xx
I'm just starting the heel flap, on row 3. I'm noticing that mine is inside out. The pattern of stitches is opposite of the pictures you show in the tutorial above. Can I change it?
Hi Kim, I suspect what you've done is turned your sock to start the heel flap rather than continued knitting in the direction you were going. Your choice is either to leave it as a design feature (the inside of the heel flap is quite interesting in it's own right!) and knit the other one the same, or if you're only on row 3 you might want to take it back and knit it the right side out. It's easily fixed; just keep going for the next 30 stitches to create your flap and then turn your sock. Hope that helps! 🙂 xx
Hi there! I made the same mistake as Kim, but when I fixed it I accidentally knit the heel flap using 30 stitches of my 64 stitch cast on. Would it be difficult moving forward with the uneven count? Should I reknit the heel flap? This is a practice sock, so I’m less worried about fit as I am about understanding the process. Thank you so much for this guide! I’m absolutely giddy to be knitting something that looks like a real sock on the first try!
Hi Kathryn, if this is your practice sock then don't worry about it as you'll be able to follow the tutorial as it's written and then reduce to 64 stitches after the gusset. It'll be fine! 🙂 xx
Hi hi (sorry if this posts multiple times, I've tried and failed a couple times). Thank you so much for the sockalong, it's my savior as I'm sitting at home being sick.
I think I might have the same problem. I'm about to start the heel and I'm working on long circular/magic loop. When it says to continue in the same direction, I don't really know what to do because then I've finished the final row of the leg, I have no more stitches to pick up without turning my work?!
A related question I have is whether it's correct we're not decreasing for the first row (since getting 30 stitches on the needle for the first heel row is exactly half of 60 and what we've been doing for the leg so far, right? and I will just leave the rest alone and only work on one side of the sock for now?). Thank you so much for this!!
Hi Kim, if you're on a long circular then when you reach the end of your round you need to turn your sock so that a "new" set of 30 stitches is ready for you to work on – this is the equivalent of knitting in the same direction (if you were to turn your sock and purl back along the stitches you'd just knitted, you'd be going backwards). With the heel flap, you're not decreasing any stitches at all, it's only when you get to the heel turn that you need to start decreasing so yes, just work on the 30 stitches on your needle and leave the other 30 sitting safely on your cable. Does that help? xx
Thank you so much, this was super helpful! Yes, it clarified my question and is what my intuition was but I was worried to mess it up. Today will be the heel flap day 🙂
Hi Christine, thanks so much for your great guide! I have a query about the end of turning the heel. I cast on 56 so have been working off 28 stitches in this section. I find I am ending on a p2tog row rather than ssk and with 17 stitches on my needle. Is this right? Thought I should check before I go too much further! Thank you
Hi! You will have less than 18 stitches at the end of your heel turn as you started with less than 30, but usually you do finish on an even number – if you work your last p2tog does this even it out? It's fine to end on a purl row, you'll just need to knit back along the row to make sure that your yarn is at the left hand side ready to pick up your stitches. I wouldn't worry too much about the number of stitches on your needle at this point as long as you don't have any holes (unless you really want to take it back to see if you've missed one) – you will even it all out when you return to your original number of stitches after the gusset. Hope that helps! xx
I have this too. I ended the purl row with the P2tog. So I should turn and do another knit row: slip 1, K14 instead of 15 because I couldn't do the P1 at the end of the purl row, and end with the SSK? That would leave me with 16 stitches.
Does this purl row use up the last of your side stitches, Jill? If so, just slip 1 and knit across to the other side so that your yarn is in the right position for picking up the stitches on the gusset – there's no need to keep decreasing if you've brought in all the stitches from the side. You should have an even number of stitches across your heel turn xx
Hi, Christine, the purl row ended with the P2tog, so that was the last side stitch if I understand it correctly. But that left me with 17 stitches, so I did decrease once more at the end of the knit row with a SSK. Thanks for your help!
Glad you managed to sort it out! 🙂 xx
Hoi Christine, have got to where i need to pick up stitches but i don't understand , do i use the ball we're busy with to make new stitches?
I feel a bit stupid because i guess its really simple.
Thanks sarah
Hi Sarah, yes, you use the same ball to pick up the stitches – have a look at this video which might help to explain it a bit more. It's a different pattern but the process for picking up the stitches is exactly the same 🙂 youtube.com/watch?v=-gyJZQd7bDo
Hi Christine!
First of all, thank you so much for putting together such a lovely and thorough tutorial. This is my first attempt at knitting (besides the tension square you suggested) and I'm amazed that I've made it this far! So thank you so much!
I'm near the end of my heel turn, however my last purl row seems to end on p2tog instead of p2tog p1. In the comments above you suggest knitting across the last row so that my working yarn is in the right place, but I'm afraid I haven't used up all of my side stitches yet, as there is still one left on my right-hand needle. Any advice (or a clue as to where I went wrong!) would be greatly appreciated!
Thanks very much,
Jenny xx
PS – Not sure if it makes any difference, but I'm knitting with 72 stitches total, and increased the number of purl stitches in the first row of the heel turn from P16 to P19.
Hi Jenny, you haven't gone wrong at all – depending on how many stitches are in your heel flap, you don't always have to do the K1 or P1 at the end. If you turn and work one more row across your heel turn to use up that last stitch on your right hand needle then you should be in just the right place to start picking up the gusset stitches. Hope that helps! xx
You are completely correct, my heel turn has worked out beautifully and I'm in just the right spot for the gusset stitches 🙂
Thanks so much for your help!
Jenny xx
Oh good, I'm so glad it worked out! 🙂 xx
Hi Christine..Im a bit baffled, I'm on done and have got to Page 59,shaping the gusset..I have 4 needles on the go with 19 stitches on needle 1,30 stitches on needle 2, 19 sts on needle 3 and 18 sts on needle 4. How do I put them into 3 needles please? Many Thanks Helen xx
Hi Helen, keep your 30 top of the foot stitches on one needle and divide the rest between two needles. You need to decrease on either side of the top of the foot stitches so that you always keep 30 stitches on that needle and that should help you to keep your decreases in line xx
do you have instructions for a german short row heel? The flap and gusset does not fit my heel so well and have knit gsr in worsted weight yarn and want instructions for it in sock weight yarn. thanks for sharing your sock knowledge!
Hi Susan, my sock patterns all use a heel flap and gusset heel because I think they're the easiest for beginners to get to grips with so I don't have instructions for a short row heel, sorry. You might want to have a look at the Ribbed Heel Stitch heel flap that I used for my Patchwork Socks as it's a more flexible fit than a standard heel stitch flap and better suited to someone with a wider heel – it's another option, anyway! 🙂 xx
Have just started my first ever sock and I am really confused by the shaping gusset part! Have read through the instructions so many times but it still doesn't make sense to me… I don't know where my markers are supposed to be, where my decreases are supposed to be or what needle I'm supposed to be using where, please help!!
Hi Gemma, have a look at this video: bit.ly/EasyLaceGusset (different sock but same process) and see if that helps. If you're on Facebook, you might want to join the Winwick Mum Sockalong group as there's always someone around to help and it's easier to upload pictures to show where you're stuck. Basically, the markers should be either side of the top of your foot stitches and you decrease on the heel side next to the markers so that might help to get you going again! xx
Hi, I love the pattern and completed a couple of pairs of socks from it, and they fit nicely. What I love most is that it is scaleable so it is easy to adjust for different tension or different yarn.
I have one question about the heel flap though (I hope I didn't miss it in the previous comments):
In the instructions you mention that the heel flap should be about 2" long which equals about 35 rows for you.
I am wondering if this should be 4" rather than 2"?
The 35 rows make sense to me since you pick up about half that many stitches on the side of the heel flap later.
If I am judging the information your give about your tension square in the beginning correctly though, 35 rows equal approximately 4". I don't think you ever mention it specifically but I think you had about 32 stitches for 4" for your tension square which typically (at least for me) means that the number of rows for 4" is a little larger – that kind of agrees with 35 rows for your heel flap.
Plus in the pictures you show of the heel flap it seems to be approximately square. And even though it's not knitted the same way as a normal tension square with 30 stitches across it should be about 4" wide. Again, that seems to fit better with a 4" long heel flap.
I hope I explained my question understandable enough.
And obviously it's not too important since I successfully made a couple of pairs of socks by doing about 2" of heel flap but I am starting to think it should be closer to 4".
Thanks for such a great and detailed pattern.
Hi Sven, thanks for your comment! The reason that the heel flap doesn't seem to match up to the tension swatch is that the heel flap is knitted with heel stitch and not plain knit; the slipped stitches of the heel stitch pull the rows and stitches more tightly together to make a more dense and therefore more hardwearing fabric, which will obviously affect the gauge. For the rest of your sock, you're using the plain knit stitch and for 4ply, your tension needs to be 7-8 stitches per inch (the industry standard gauge for 4ply in the round is 30 stitches per 4 inches which works out at 7.5 stitches per inch) to make the fabric sturdy enough for socks.
If the 2 inch heel flap suits your foot then just keep on doing that, but if you think it's a bit short then measure your heel from the floor and make the flap to suit and then work a longer gusset.
I hope that makes sense!
Christine
Thank you so much for this tutorial. I refer back to it over and over when I'm picking up stitches for any sock pattern. I don't know why I struggle with that so much, but your tutorial is perfect.
That's brilliant, I'm so glad it helps! 🙂 xx
Hello, Christine!
On the heal flap, do you Sl1 purlwise or knitwise? Would it matter? Thank you so much for sharing your lovely pattern & invaluable help.
Hi Loren, the general convention is that you slip purlwise unless otherwise stated as that keeps your stitch the right way round on the needle. I don't think it matters that much with a heel flap, although you do have to be careful on the purl row as the stitch will twist – I actually quite like the look of that and usually knit my socks that way but it's personal preference! xx
Also, looking at the wrong side of my heel flap, the left edge has nice loops that will be easy to pick up, but the right isn't clean like yours. Any idea what I'm doing wrong. I think it must have something to do with how I'm slipping the first stitch??
It could be, but without seeing what you're doing it's hard to tell. You could have a look at one of my YouTube videos and see if that helps – they're different patterns but the same process – try the Easy Colourwork Socks ones ( youtube.com/c/WinwickMumSocks) xx
Hi,
just a question on picking up stitches: In the photos above it actually looks like you don't pick up the front loop of the slipped selvedge stitch but the loop of the stitch next to it…wouldn't this make an extremely bulky ridge inside the sock?
Hi, the photo shows the needle going through both loops just so that you can see which stitch it is that you pick up. I pick up the front loop of that, so if you look at the photo with the wool needle through the stitch, I pick up the leg of the loop that's at the bottom. It doesn't make it bulky at all. Other people choose to pick up the top loop, and some prefer to pick up both loops but again, it's not bulky as it just becomes part of your sock. If you have a look at one of my YouTube videos on the gusset, you might be able to see more clearly (try the Easy Colourwork one) – my YouTube channel is youtube.com/c/WinwickMumSocks. Hope that helps! xx
Okay thanks, I guess it looked different on the pictures! Thanks!
Hi I'm on row 1 of the heal flap, it says you need to end on a k stitch. To get 30 means I've had to k the last two stitches, is that correct?
No, you should be able to work "slip, knit" right the way to the end as it's an even number of stitches. Instead of knitting the last two of your 30sts, you can slip one and knit the next and that should work out. Hope that helps!
Hi Christine, I have a few questions if you’re still active on this account?
My first is how do I make my heel flap edge neater? My pattern says to slip the stitch on each side but I’ve noticed this has created really loose stitches. So when I’ve picked these back up my sock heel looks kinda holey? How do I tighten these stitches or can I do something different to make them neater rather than slip the stitches?
My second question is can I replace a k1 s1 k1 psso with a ssk? When shaping my gusset I’ve noticed again that where I’ve decreased my stitches are big and untidy and uneven. How do I combat this?
Last question 🙈 when my pattern says to knit to within 3 stitches of marker, does this mean to knit til I have 3 stitches left including the one with the marker on? And when it says k2tog k1 slip marker onto needle, am I literally just slipping the stitch that has the marker onto the right needle?
I appreciate there are a lot of questions here. It’s just been really frustrating cause I feel like I’ve done everything right but they look untidy.
Thank you for this tutorial btw, it’s been helpful to have pictures!!
Kind regards,
Gina
Hi Gina, thanks for your comment!
– The larger slip stitch is to make it easier for your to pick the stitches up when you start the gusset. They shouldn't be too big – if so, next time check that you're not letting your yarn be too loose at the end and start of the row – and they should tighten up as you wash and wear your socks.
– You can use K1 S1 PSSO if you would rather do that than use SSK, it's still the same decrease but will look slightly different. I use SSK in the way I've written it (slipping knit and purlwise) as it usually sits flatter in your knitting, but you can change it if you want to. If you want to check out some other ways to work that decrease, have a look at this video from yarnsub.com as it's got all the options!
– If your line of SSK stitches is a bit wibbly, knit into the back of the stitch on the plain knit round and that usually evens it out.
– Yes, you knit till there are 3 stitches before the marker – the marker should be on your needle and not on a stitch. Then you can just slide the marker from one needle to the other when you come to.
Hope that's helpful! xx
Working on turning the heel and I’m slightly confused. I started with 64 stitches but am still ending up with 18 before starting the gusset, when I’m assuming I should have 20. I’ve done it twice and it’s come out that way both times.
No, that’s right, you still get 18 sts after the heel turn when you start with 64 sts so you’re doing it right 🙂 xx
Hello Christine,
I wonder if you would be able to help me out.
I’m a short way into my heel flap and I have been slipping my stitches knitwise on the knit rows (both at the beginning and along the row) and purlwise on the first stitch of the purl rows as this seemed to make sense in my head, I did it without even thinking (as I do with so many things, often with disastrous consequences…)!
I came to check the tutorial here to see if it was specified, and in a previous comment on this thread, you have said to slip knitwise on k rows and purlwise on p rows. However in a later one, you’ve said that it’s best to slip purlwise unless otherwise stated – I’m in a bit of a muddle as to how to proceed so thought it best to ask for clarification!
Should I be slipping all/any of my stitches purlwise/knitwise?
Thank you 🙂
Hi Lily, thanks for your comment! The convention when knitting is to slip stitches purlwise so that the stitch stays mounted on the needle the right way round for when you next knit or purl that stitch and doesn’t become twisted as it would do if you slipped the stitch knitwise. This is something that you’d really want to take note of with a project where a twisted stitch would be really noticeable, but with a sock heel flap, I really don’t think that it matters. I have slipped my stitches knitwise on the heel flap for years (and that’s what the photos on the Sockalong tutorials show) because I like the twisted effect, but you can do that and “untwist” the stitch on the purl row if that’s what you want to do instead. It’s absolutely fine to do either so you can choose the effect that you like best – if you have a look at this blog post, you can see the slip knitwise and slip purlwise next to each other so you can see the difference. At the end of the day, like so many things with sock knitting, it’s personal preference so choose the one you like best! 🙂 xx
Hi Christine,
I would love to give these socks a go i’m just a bit nervous to start as I am left handed. The only pair of socks I have manged to knit were toe up and had video tutorials specifically for a left handed person.
Do you have any advice for some one left handed?
Thank you,
Gigi
Hi Gigi, I don’t have any specific left-handed advice, I’m afraid, other than that the pattern should still work out because the sections of the sock are the same whichever way you work them. If you are right-handed, you knit in a clockwise direction so being left-handed will mean that you’ll knit in an anti-clockwise direction, is that right? The only thing that might be different might be that you would work your gusset decreases the other way around so when you get to the heel turn, your working yarn will be on your right so that you can pick up the stitches and continue to work anti-clockwise. That means that the SSK decrease will be your first decrease, not the K2tog one, but the process of getting to that point should be the same, just the other way around. I am more than happy to try to help if you get stuck and want to drop me an email, or alternatively I know there are left-handed knitters in my Winwick Mum Sockalong Facebook group if you’re on Facebook and they would be able to help you as well. Don’t let being left-handed put you off – I’m quite sure that it won’t be as difficult as you think once you get going! 🙂 xx
Hi, I have made a start on my first pair of socks and the leg and cuff are looking great. I am a little stuck now though as I approach the heel flap. I am using the short circular needle and see that I need to change back to the DPNs but I’m not sure how to do that. Do I need to turn what I’ve done so far so my length of wool is on the left? It’s currently on the right hand side of my needle. Thank you!
Hello! Are you following the photo tutorial to go with the pattern? When you need to change to the DPNs, you just keep going in the direction that you were previously knitting but instead of using the short circular, you use a DPN instead so that half of your stitches end up on the DPN. The other half stay safely on your short circular which you can tuck inside your sock. There are photos to show you what your sock should look like at this point. I hope that helps! 🙂 xx
Hello, Winwick Mum!
I’ve completed the heel flap on my first sock, and am ready to start the heel turn. I’ve read through the instructions, and it makes sense (that’s encouraging! 🙂
I do have one question, though. In your instructions for how to do the SSK decrease, you say to slip the first stitch knitwise and to slip the second stitch purlwise. I am wondering about this, as all the different instructions I’ve seen for SSK always say to slip both of the stitches knitwise. What would be the effect of slipping the first one knitwise and the second one purlwise, as compared to slipping both of them knitwise?
I’m asking because I’m a combination knitter. If you’re not familiar with this, it means we make our knit stitches in the Western-style, but our purls are made Eastern-style (we wrap the yarn in the opposite direction when purling), which means our stitches are then mounted with the back leg leading (what some people would call “twisted”). Knitting the next row is then done tbl (this “untwists” the stitch). So when a combination knitter comes to an SSK in a pattern after a purl row, the stitches are already mounted as if they had been slipped knitwise. This means we don’t need to slip those 2 stitches at all. All we have to do is a K2tog tbl.
That’s why I’m wondering about the difference in the way you do the SSK, and how its effect might be different from the usual instructions to slip both the first and the second stitches knitwise. Because if there is a significant difference in the resulting appearance, I’ll need to make an adjustment in how I normally do the SSK.
Thank you!
Hi Jaya! Wow, you’re doing really well! The SSK is written as it is because when I first learnt how to do it, I was told that slipping the stitches knitwise and purlwise meant that the decrease would sit flatter on your knitting so that’s how I write it. It’s absolutely not compulsory to do it this way – lots of people prefer to slip both stitches knitwise and other people prefer to slip one, knit one and pass the slip stitch over. Work the decrease however it fits for the way that your stitches are mounted and see if you like the way the decrease lies. There are other decrease options here too, in case you need another one: https://yarnsub.com/articles/techniques/k2togl/ Let me know how you get on! 🙂 xx
Thanks for your speedy reply, Christine, and for the explanation and the link! Very interesting about the change in how you slip the second stitch being a help to getting the decrease to sit flatter. I love learning new things about knitting technique, and understanding how and why they produce the results they do. As a combination knitter, it’s sometimes essential, so that I can adapt the technique for the way I knit, and still get the same result. (Ravelry has a forum for combination knitters which I found especially helpful when I was a beginner)
I really appreciate all the work you did to create these tutorials, and your willingness to keep helping those of us who are just discovering your sock pattern now! Thank you!
You’re very welcome! I love that there’s always something new to learn as well, there’s no end to the knowledge you can pick up, even if you’ve been knitting for years! 🙂 xx
Just finished turning the heel – and it worked!!! I was half holding my breath the whole time, not knowing if I’d come to the end and find out I’d done it all wrong, but I have 18 stitches left on the needle, the heel “turned”, and it looks like your photo. That was like a little bit of knitting magic. This is so much fun, and so satisfying! 🙂
We’ll see how the picking up stitches goes. I don’t have a lot of experience with that, and don’t always manage to make it look nice. I’m going to read your instructions very carefully!
Oh well done, it sounds like you’ve found the heel magic! Isn’t it great? You feel like a knitting superstar, don’t you? 🙂 Just take your time with picking up the stitches and I’m sure you’ll be fine 🙂 xx
Hello, Winwick Mum!
I have finished picking up the stitches, and am ready to start the gusset shaping. Two questions:
1) The instructions on this web page and those on the printed-out pattern seem to be different. I’m working with 5 dpns, and my stitches are distributed exactly as you pictured above. The instructions on this page for dpns give 2 rounds that you just keep repeating until you are back to your original # of CO sts (60, in my case). This all makes sense to me. But the printed out pattern confuses me – it shows 3 rounds for shaping the gusset, of which you then keep repeating rounds 2 and 3 until you’re back to your original stitch count. I don’t understand the difference in the pattern, and which instruction I should follow. I’m sure there’s something I’m not getting here, but I don’t know what it is!
2) If I’m on 5 dpns, where is the start of my round? Right now, after picking up stitches and having knitted across the heel, the beginning of my round is where the heel joins the side of the heel flap where I first picked up stitches, but reading the instructions, it seems that at some point, I’m supposed to consider a different place the beginning of the round. I’m confused about this, too!
Thank you!
Hi Jaya! The gusset instructions are actually the same on the tutorial page and the printed pattern, I’ve just written them in a different way for the tutorial specifically using DPNs. You are still working one decrease round followed by one knit round whichever version of the pattern you look at; the reason it’s written slightly differently on the paper pattern is to show the set up of the gusset round but you still work one decrease round and one knit round to complete the gusset.
When you start the gusset, the beginning of the round is at the point where your top of the foot stitches meet your gusset stitches, so that would be after the K2tog, K1 stitches. This will mean that you can follow the line of your decreases up the foot to where you will start your toe decreases later.
Hope that helps! Christine 🙂 xx
Yes, that helps! Thank you!
Hello Winwick Mum! I’m a little bit stuck and hope you can help me. First of all, it’s great you’ve got pictures because they have been so helpful along with the written instructions, but i’m up to the bit where i have to pick up the stitches after doing the heel flap. I’m using a second DPN, i’m picking them up from where you have a sewing needle illustrating in your picture, but can’t for the life of me get a stitch going. Is there a knack to how to wrap the wool around the needle to get it to come through the slipped stitch loops? I’m just trying to pull the needle through with the wool around it, and the wool stays behind whilst the needle comes through. It is possible that i’m just misunderstanding the instructions.
Hello! Well done on getting as far as the gusset – it’s great when your sock starts to look like a sock at that point! Have a look at this video at 18.53 minutes – I’m picking up the stitches and hopefully you can see what I’m doing. Don’t worry about the video tutorial – you just need to see how to pick up the stitches. Try this one as well and see if it helps 🙂 xx
Thank you, Mum! This is probably a really silly follow up question but am I to cut the wool, obviously leaving enough for the 19 picked up stitches? It doesn’t mention it in the pattern but I can’t see any other way of working with the wool when it’s still attached to the ball.
No, you don’t need to cut anything, you can just keep knitting as it all follows on. I think you’ll see more easily when you get going 🙂 xx
hi Christine. I’ve actually started my socks after 2 years of umming and arring! After 3 rip backs I’ve finished the cuff. I now need to know how I measure the length I need before starting the heel. Is there a chart somewhere? I can’t find it. Many thanks
I usually work the leg of my socks for 6″ before the heel flap but that’s personal preference – you can make the leg of your socks as long as you like 🙂 xx
trying to knit your buddy baby sock but can’t work out how to set the turn down top. whichever way I have the first 14 rows, the next bit is the same way round
Hi Jane, once you’ve knitted the cuff, you need to push it inside your needles and then re-join your new yarn on the outside, as if the working stitches were cast on stitches and then knit the rest of the sock. It will grow away from the cuff which will look as if it’s inside out until you turn it over when you’ve finished. I hope that helps! 🙂 xx
After heel is completed how many inches to knit not cm do I knit before toe? Thanks
Mary
Hello Mary, it will depend on the size of your sock how many inches you need to knit – it will be different for every size. The best thing to do is to have a look at a foot size chart from a shoe store website (this chart is a good one as it gives inches as well as cm) and then remember that you’ll need to start your decreases about 2″ from the end of the longest toe. Hope that helps! 🙂 xx
Hi Winwick Mum! Hoping you can help as I’m a little stuck on the gusset. I’m using the magic loop method, and have picked up my stitches down the left side on a DPN but a little confused as to what needle I use to knit along the top of the sock!
Do I use a 2nd DPN? Do I carry on using the needle the needle holding my heel turn?
Hoping this makes sense!! Xx
Hi Beth, if you scroll down towards the bottom of this tutorial there are photos of how I pick up the gusset stitches on a long circular needle – you don’t need to use DPNs at all with this method 🙂 xx
I didn’t see this answered in any of the comments and I’m feeling really stupid right about now. I wanted to print this off so I could keep it in my lap while I’m trying to follow it, but I can’t figure out how to print it.
Hi, it’s not possible to print the online instructions unless you do a print-screen, but you can get a full copy of the tutorials in the book “Super Socks” – rather than PDFs, I wanted to created a proper book for people to be able to refer to time and again. You can see the book here.
I added a shield using duplicate stitch on the upper portion of the sock using the first stitch of a row as the centre back. Now do I need to adjust where I start the heel flap? If I start it per your instructions, won’t it put my shield off centre?
Yes, you’ll need to align your heel flap with the shield, so you’ll need to count back from the centre of the shield to the right hand edge to see where your heel flap needs to start. It’s absolutely fine to do that – you can start your heel flap from wherever you like! 🙂 xx
Hi Christine. Thank you for your instructions. I have managed to make 2 pairs now. But now I have a question and hope you can help me.
I have cast on 72st for the first time and am confused at the heel flap. To start with, instead of p16, I did p19. I just followed the row 2&3 instructions.
The problem is that I seem to end with p2 together without being able to do p at the end of the row. At the same time, I have a stitch on the left-hand side of my needle (I am right handed) that has not been used. Is it ok to finish shaping here and just another knit row to move to the left-hand side?
Another issue is that I have 21 stitches on the needle. So when it comes to reducing stithces back to 72st, it won’t be. What is the best solution? Please advise.
Hi Mari, it sounds like you’re doing it just right! You need to do one more decrease row to use up that last stitch and bring your working yarn to the left hand side. Depending on how many stitches are in your heel flap, sometimes you don’t need the last K1 or P1 stitch and that will be the size that you’re working on. You should finish on an even number of stitches so once you’ve decreased that last stitch on the left, you’ll have 20sts on your needle and you’ll be good to go 🙂 Don’t worry if you end up picking up an odd number on your heel flap (often, I’ll pick up 19 on one side but only 18 on the other) as you will just keep decreasing at the gusset until you get the number that you started with. Hope that helps! 🙂 xx
Truly one of the best tutorials, THANK YOU!!!! <33
Thank you! I’m really glad it helped you! 🙂 xx
Fantastic tutorial! I have a question, I’m just shaping the gusset right now, but I’m using DPNs, but noticed that on all the other types of needles, round 2 only says “starting with needle 1, knit across all stitches..” whereas the other needles for round 2 say: “slip marker, knit to next marker, slip marker…”. I just want to verify the instructions are a bit different there depending on the needle is that correct?
Yes, that’s right. You generally don’t need markers with DPNs as long as you keep your top of the foot stitches on one needle as you’ll decrease on either side of that on the heel side – a stitch marker would just fall off! The only time you’ll need markers is if you shuffle your stitches so that the decrease is part-way along a needle. Hope that helps! 🙂 xx
Hi, firstly thank you for the tutorial! This is my first attempt at an adult sized sock and I’m really happy with how it’s turning out so far. I’m currently shaping the gusset and have a question about the stitch count. I cast on 64 stitches to start and based on the number of stitches I picked up, will get back to that number with an unequal number of decreases on each side of the foot. Does this matter and should I just stop decreasing once I have 64 stitches left?
Hi! I’m really glad you’re getting on so well! Yes, just decrease until you’re back to 64sts – don’t worry about the unequal number as it’s probably only one or maybe two out and you really won’t notice that when you have your sock on. Just make sure that you double-check your stitch marker is in the right place for the toes when you get there (info in the tutorial) and all will be good! 🙂 xx
Hello, thanks for your pattern and tutorials, I have a question about slipping the stitches. I am knitting the heel flap of my first ever sock and in your pattern it says Sl1 means “Slip 1 stitch purlwise holding yarn to the back of your work”. On row 2 of the heel flap/the purl row – Sl1, P to end, turn – Should I still be holding the yarn behind or should I slip purlwise with the yarn in front? I’m confused because on a purl row slipping with yarn in front makes more sense to me, but your pattern says have the yarn in back. Sorry if I’m splitting hairs I’ve just so scared to get it wrong.
Hello! You only slip the first stitch on the purl row to give you a bigger stitch to pick up later, then you purl the rest of the stitches. You can slip that stitch knitwise or purlwise depending on your preference. You might also like to see this blog post on the way to slip the stitches: https://www.winwickmum.co.uk/2022/08/should-i-slip-knitwise-or-purlwise.html 🙂 xx
Thank you so much for your helpful reply. I’ve just read the article you posted. It’s brilliantly explained so helpful.
I’m so glad it helped and I hope you’re well on your way to the toes now. Don’t forget there’s a tutorial for that, too, if you get stuck! 🙂 xx
Hi, thank you for a lovely, pattern this is my first time making socks and a as given your pattern as a Christmas present. I’m just starting to shape my gusset but I’m purling now instead of knitting. I’m not sure where I’ve got wrong. thanks
Hello! It sounds like you might have picked up your stitches from the right hand side of your heel flap rather than the left, so you’ve been picking up from the inside rather than the outside and your knitting is now going anti-clockwise rather than clockwise. I know it’s going to be a faff but I think the best thing to do (if you think this is what you’ve done) is to take it back, work another row across the top of your heel turn so that your working yarn is on the left hand side and pick up the stitches again. You should be able to see where they are more easily now that you’ve picked them up once. If you don’t think this is what you’ve done and you want to drop me an email so we can look at it further, feel free! 🙂 xx
Thank you so much, I think I got confused and worked an extra row after the heel turn which put me out. I took it back as you suggest and picked up via knitting instead of purling and then I was correct knitting in the round. I’ve just finished my shape the gusset section and is looking ok. I really appreciate you taking the time to respond to my query and helping me. Thanks Sarah
Oh brilliant, I’m glad you got it sorted, Sarah! 🙂 xx