
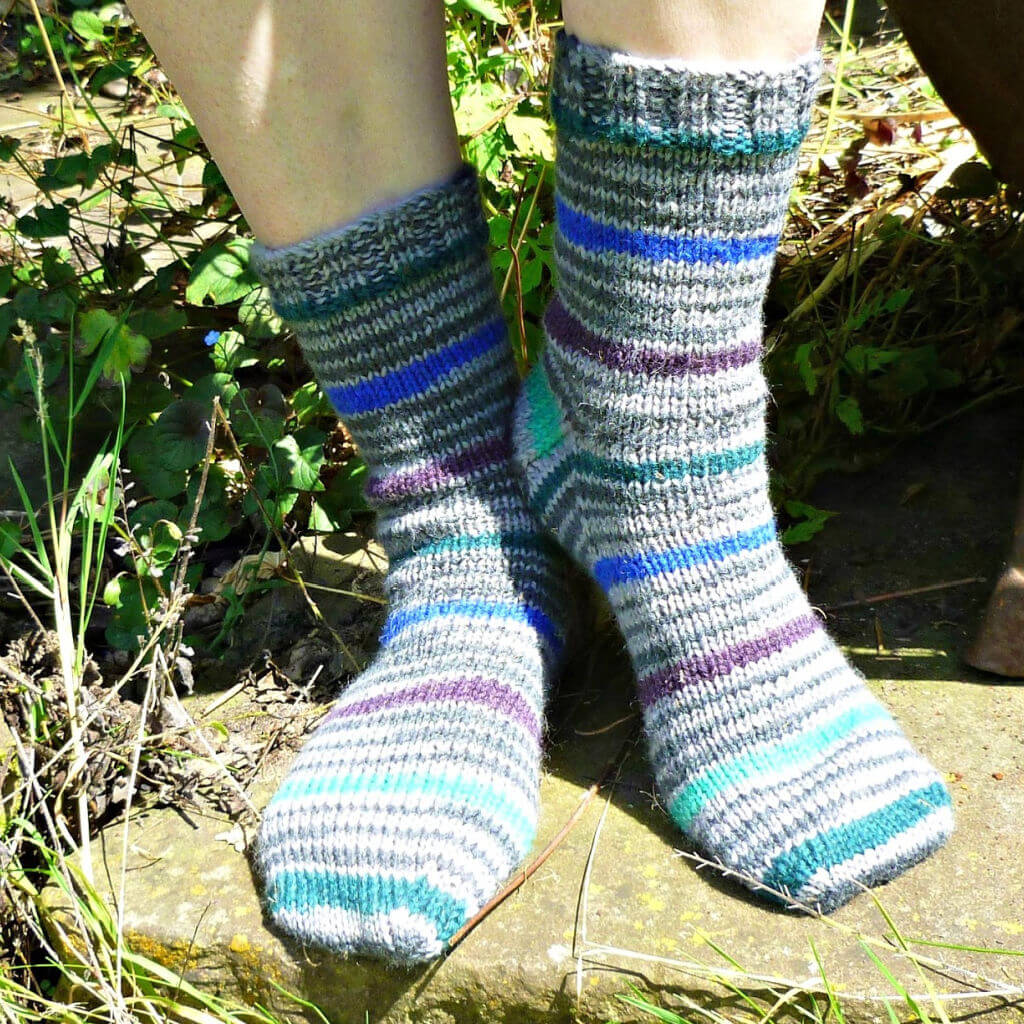
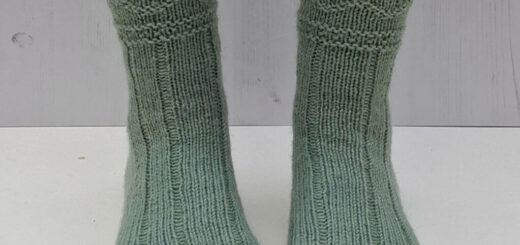
Basic 8ply (DK) boot socks – free pattern and tutorial
One of the best things about sock knitting is the sheer number of yarns that there is to choose from – not just in colours but in weights as well. It means that you can knit a sock for all seasons, and for all occasions!
So far, we’ve concentrated on 4ply and 6ply yarns to create socks, but sometimes you need something a bit thicker. 8ply yarn (English DK or double knitting, light worsted in the US) is not quite as heavy as Aran but is thicker and warmer than both 4ply and 6ply (as you would guess from the name!) and makes a great boot sock. It’s quick to knit up too, taking less stitches and rounds to create a sock so you’ve got plenty of yarn to knit even the biggest pair of socks in the 150g balls that the yarn is usually sold in **.
You can use any DK yarn for these socks, but do think about the composition before you start – acrylic will make your feet a bit hot and sweaty, and yarns with a nylon content with make them more hard-wearing. You can use 100% wool yarns, but you will have to be careful when washing your socks in case they felt or shrink in hot water.
I’ve used my Basic 4ply Socks pattern for this sock, adjusting the number of stitches to suit the thicker yarn. You can do this with any yarn and for any size of sock by working out the number of stitches that you need through a tension swatch – there are instructions on how to do that in this tutorial here. If you need help with matching the stripes in your yarn, you can find it in this tutorial here.
If you’re not familiar with knitting socks, you can find my step-by-step Sockalong tutorials here which will guide you through every aspect of knitting a pair of socks from choosing the yarn and needles to turning heels and creating seam-free toes. Although the Sockalong tutorials are written for 4ply yarn, the process of knitting the sock is the same so you can use this pattern but follow along with the pictures. If you have knitted socks before but still find that you need more pictures than are provided in this tutorial, the Sockalong pages are the place to go!
Are you ready to get started?
Basic socks in 8 ply (DK) yarn
(you can download a PDF copy of the pattern here)
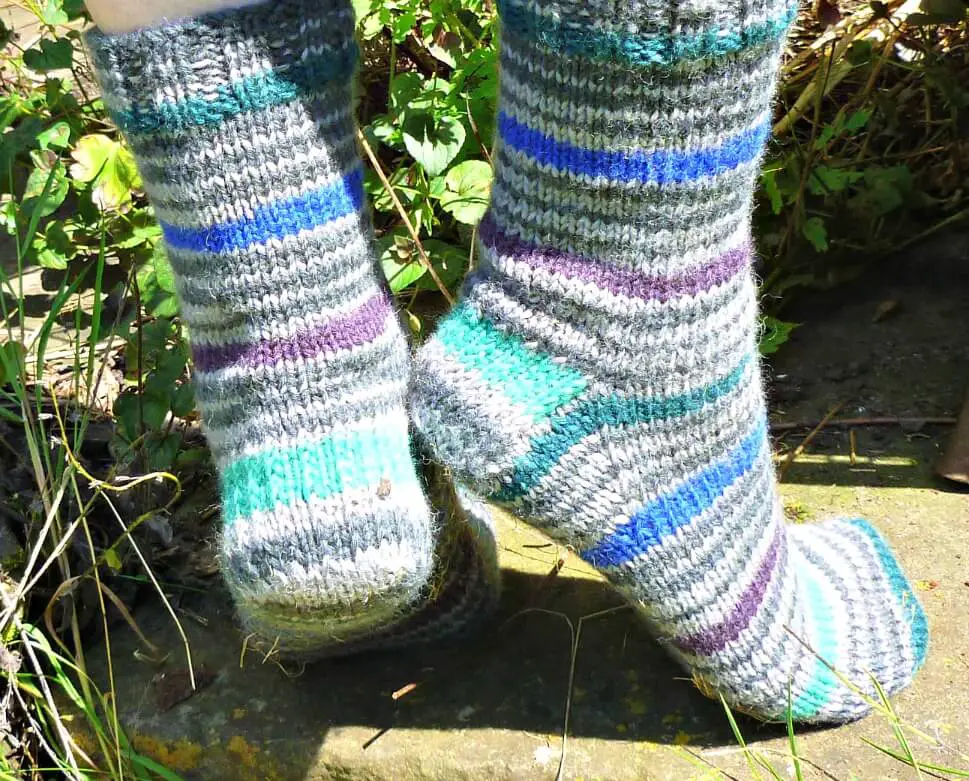
These socks are constructed as top down socks with a gusset heel. The heel is knitted in heel stitch which creates a durable, cushioned heel. This pattern as written will create a sock to fit a ball of foot circumference of 8″. If you want to make the pattern bigger or smaller, simply increase or decrease the number of cast-on stitches by 4, but remember that you will need to make adjustments when you turn the heel. If you need help working out how many to cast on, have a look at this tutorial from the Sockalong.
Materials
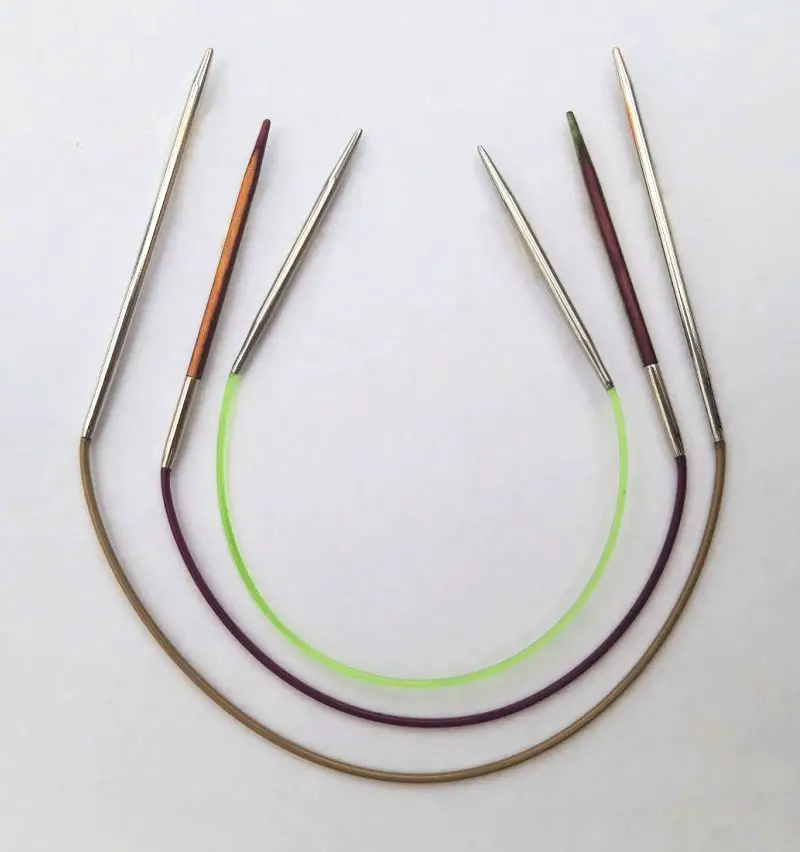
3.5mm needles – I use a 30cm circular needle but DPNs or magic loop will also work
1 x 150g ball of 8ply sock yarn – yarn pictured is Regia Iglu Color in shade 8991 Lappland ** you can use a 100g ball (depending on the size of your feet) – this yarn was only sold in 150g balls!
1 pair DPNs size 4.0mm (optional)
1 pair DPNs size 3.5mm (in addition to a circular needle)
stitch markers
wool needle
Note: I cast on using DPNs then change to my circular needle – it’s not easy to cast on using the circular as it’s so small. If you want to use magic loop you will be able to cast on with the larger circular needle. If you use DPNs, you might find it easiest to cast on and work 2 rows before dividing the stitches across the needles.
Pattern
Cast on 44 stitches using 4.0mm needle (this is optional – I find that casting on with a larger needle gives a looser edge for getting your foot in and out of the sock but it’s fine to cast on with the needle size you intend to use).
Row 1: K2, P2, repeat to end, turn.
Row 2: K2, P2, repeat to end.
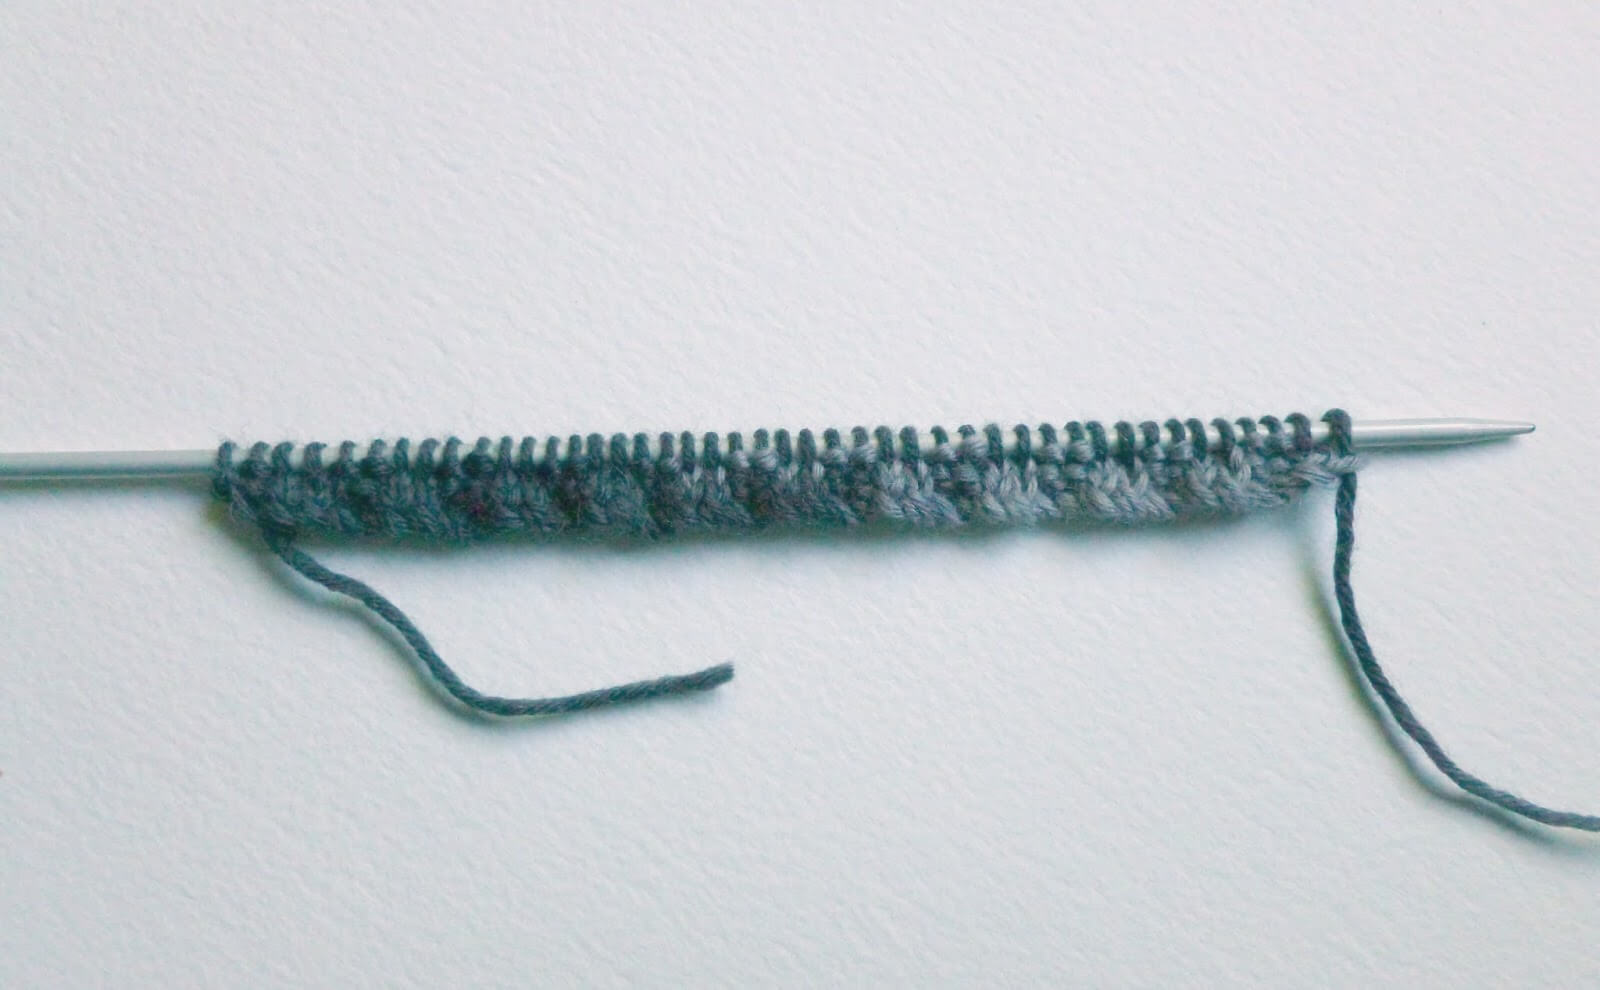
Change to 3.5mm needles. At this point, change to a small circular, magic loop or divide the stitches evenly across three or four DPNs according to preference. To knit your stitches onto the circular needle, just use it in place of the DPN for the next row.
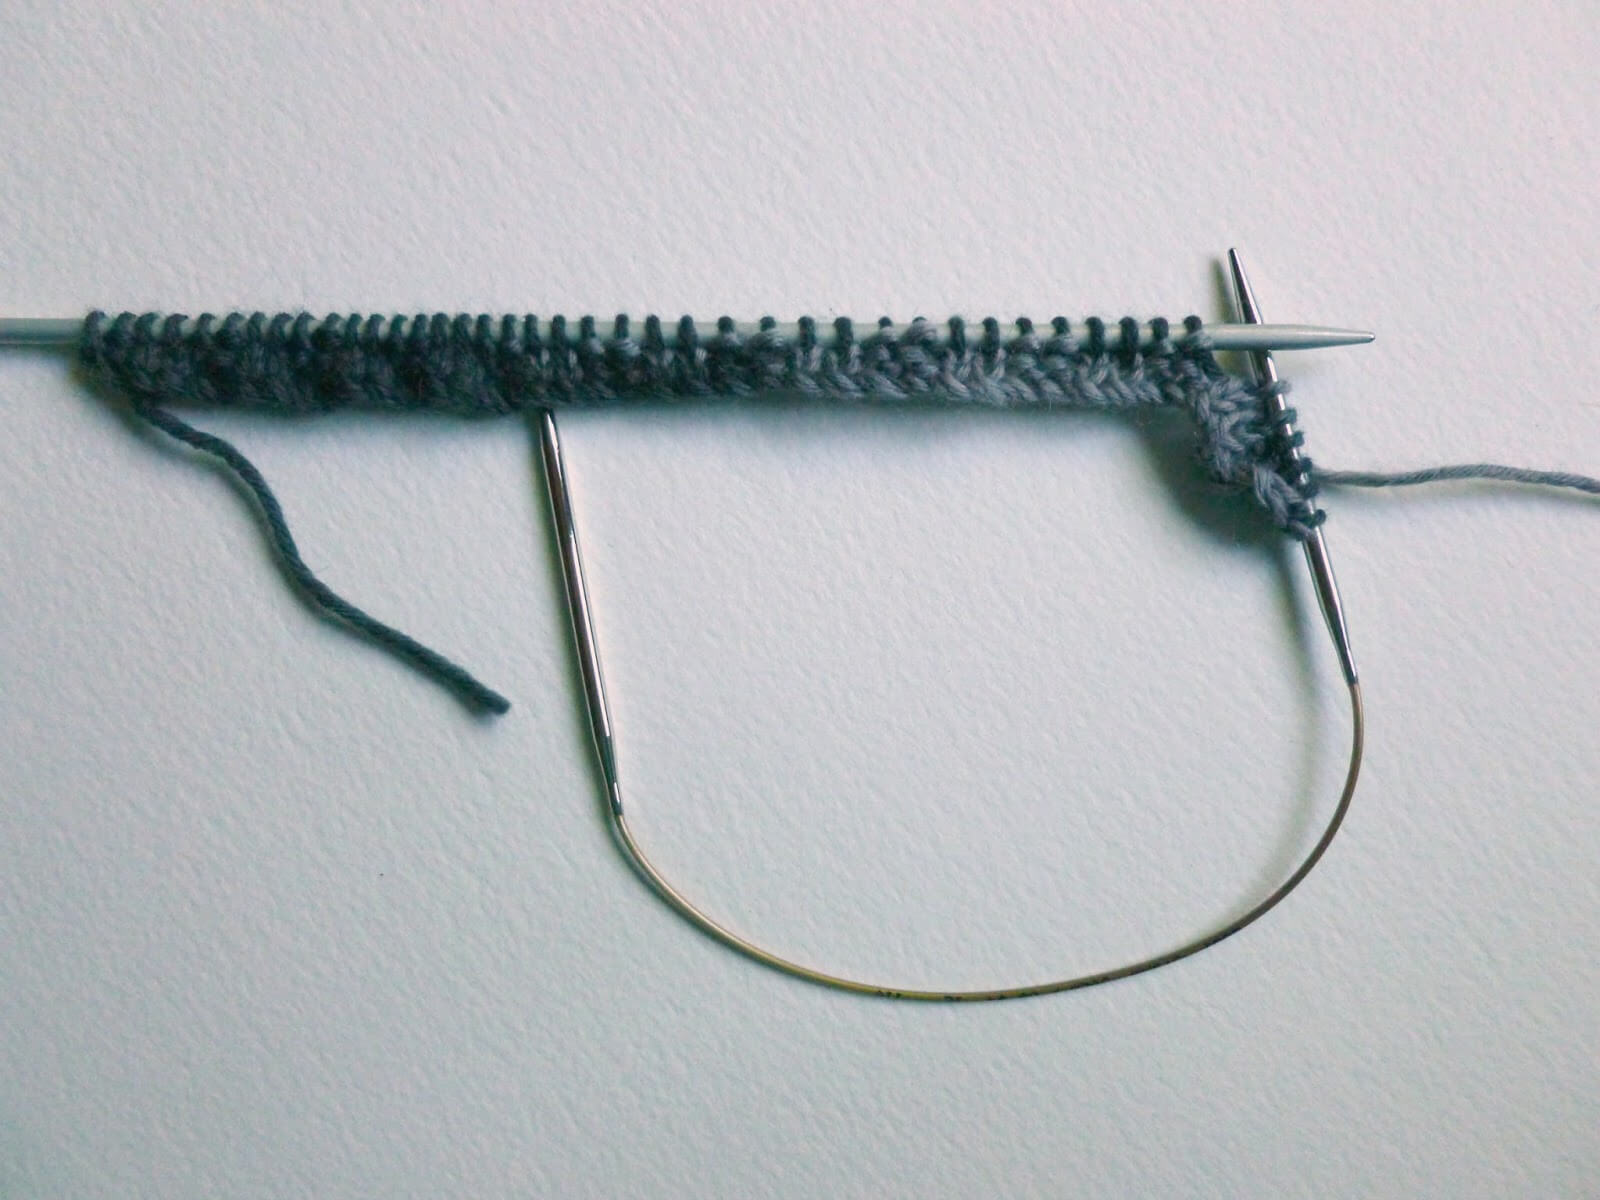
then join into a circle by bringing the needle with the working yarn around and knitting into the start of the round. Place a marker over your needle so that you know where your round starts and finishes. You’ll be able to sew up the small gap where the join is later when you sew in your tail end.
Continue in K2, P2 rib for 10 more rounds or until desired length of rib (I knit 12 rounds of rib).
Continue to knit each round until desired length before start of heel (for me, this is 48 rounds in total including the rib).
Heel Flap
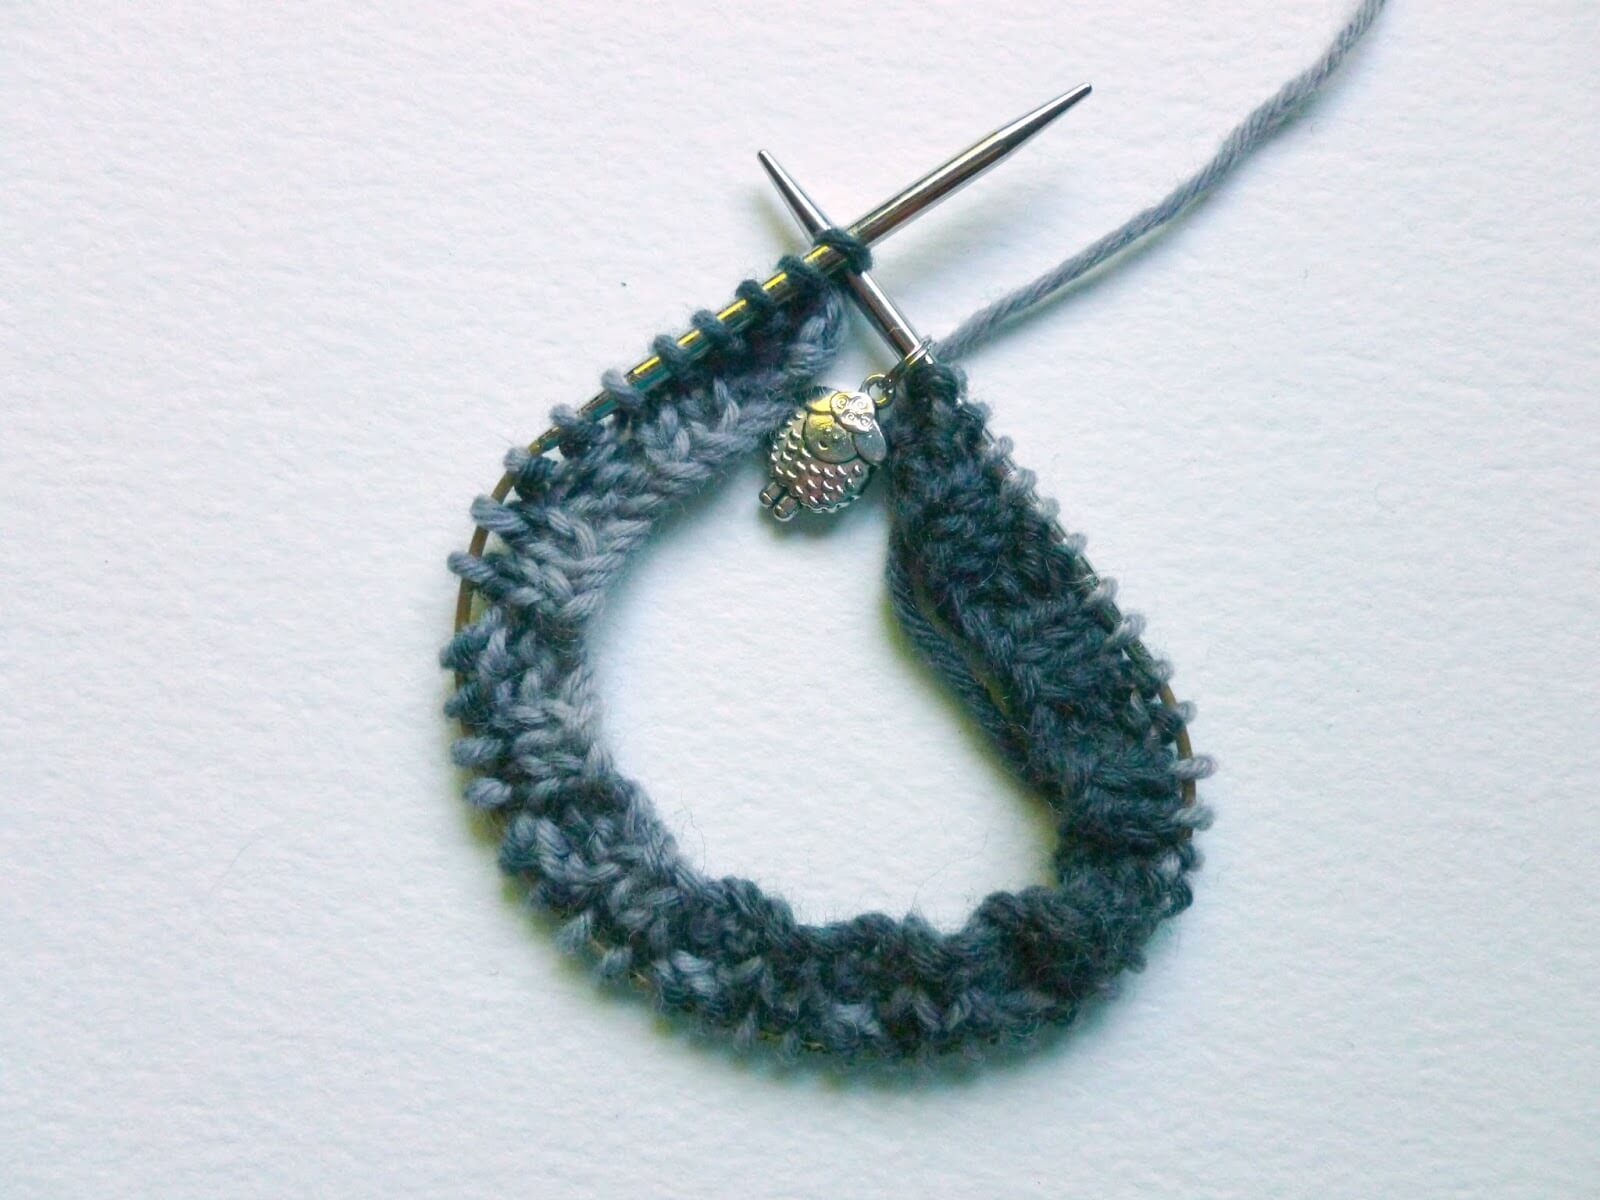
If you are knitting with a 30cm circular needles, you will need to change to 3.5mm DPNs to start the heel flap.

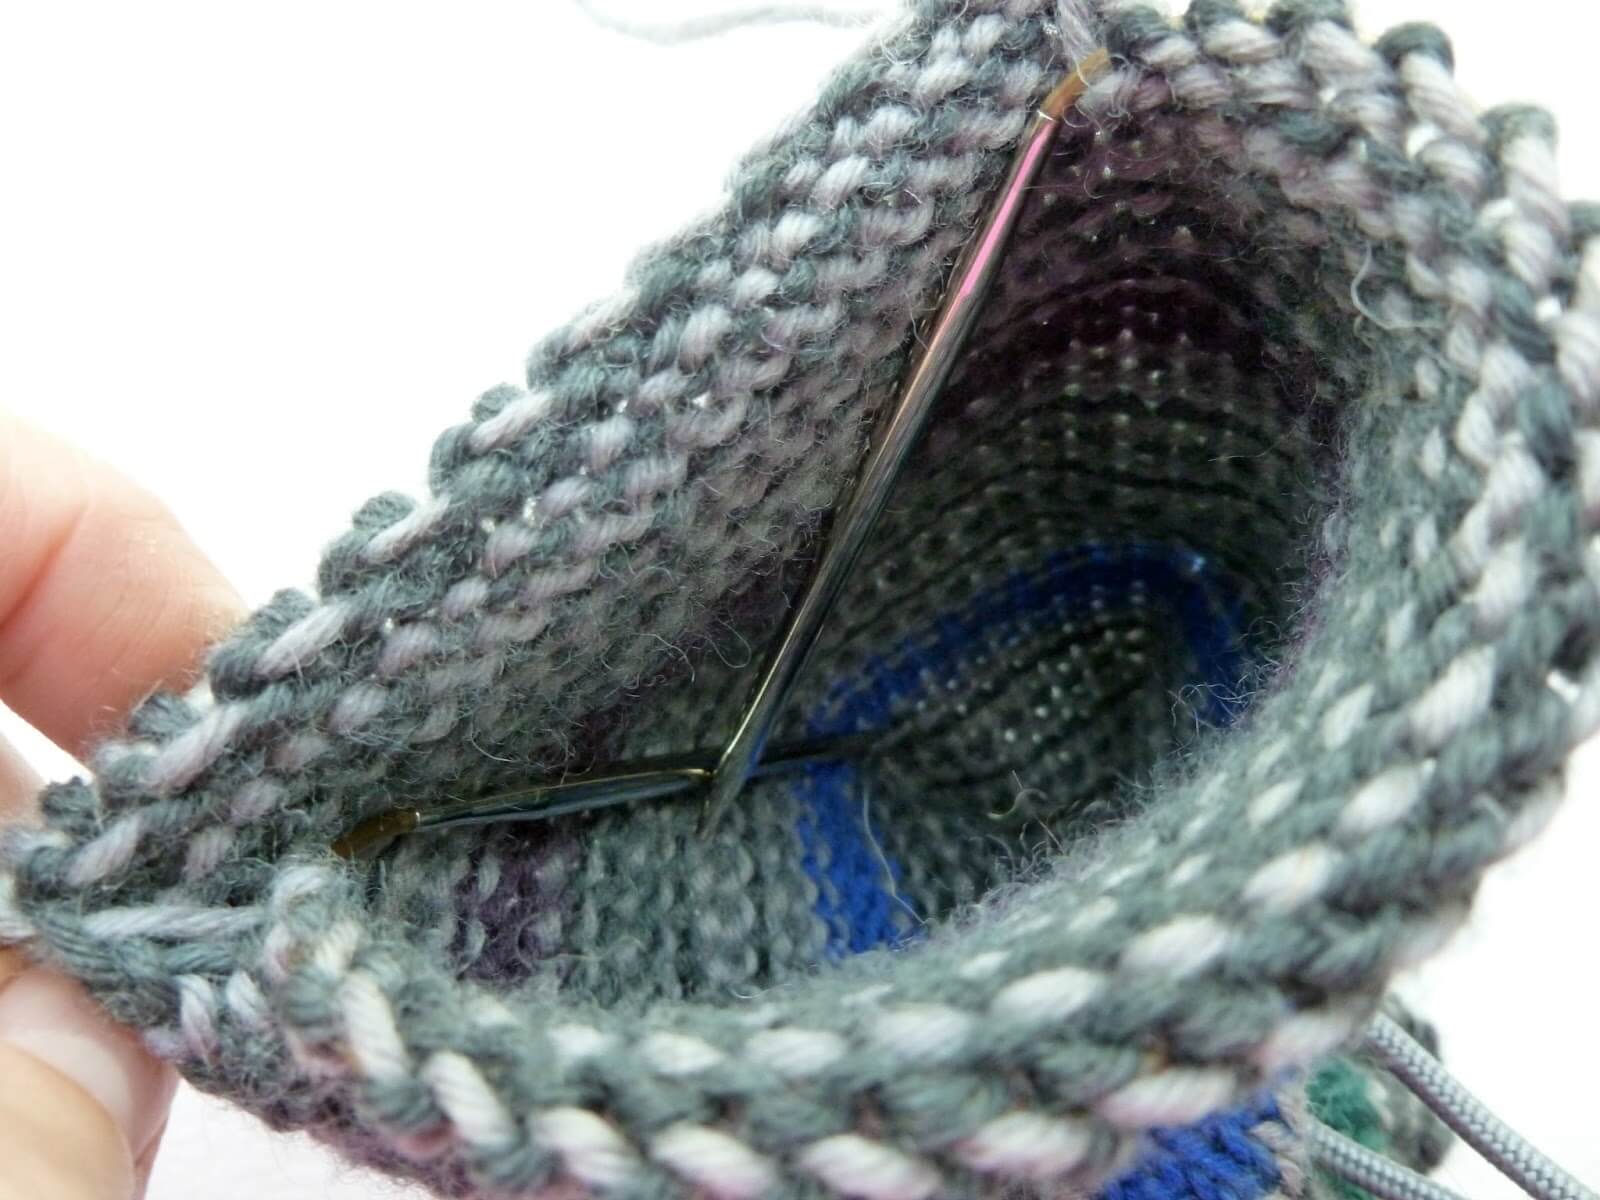
At this point, I tuck the ends of my needle down inside my sock so that it doesn’t get in the way. If you are using DPNs or magic loop, you don’t need to change needles.
You are going to create the heel flap from half the number of stitches that you cast on, so if you have cast on more or less than 44 stitches, remember to adjust the number of stitches when you start the heel flap.
Row 1: K2, *Sl1, K1* until you have 22 stitches on your needle, turn (slip the stitch by sliding it from one needle to the other without knitting it).
Row 2: Sl1, P to end, turn.
Row 3: *Sl1, K1* to end, turn.
Repeat rows 2 and 3 until heel measures approximately 2 inches, finishing on row 3 (for me, that is approx 19 rows). If you want to make the heel flap longer, continuing knitting rows 2 and 3 until you reach the desired length, but remember that you will need to pick up more stitches to create the gusset.
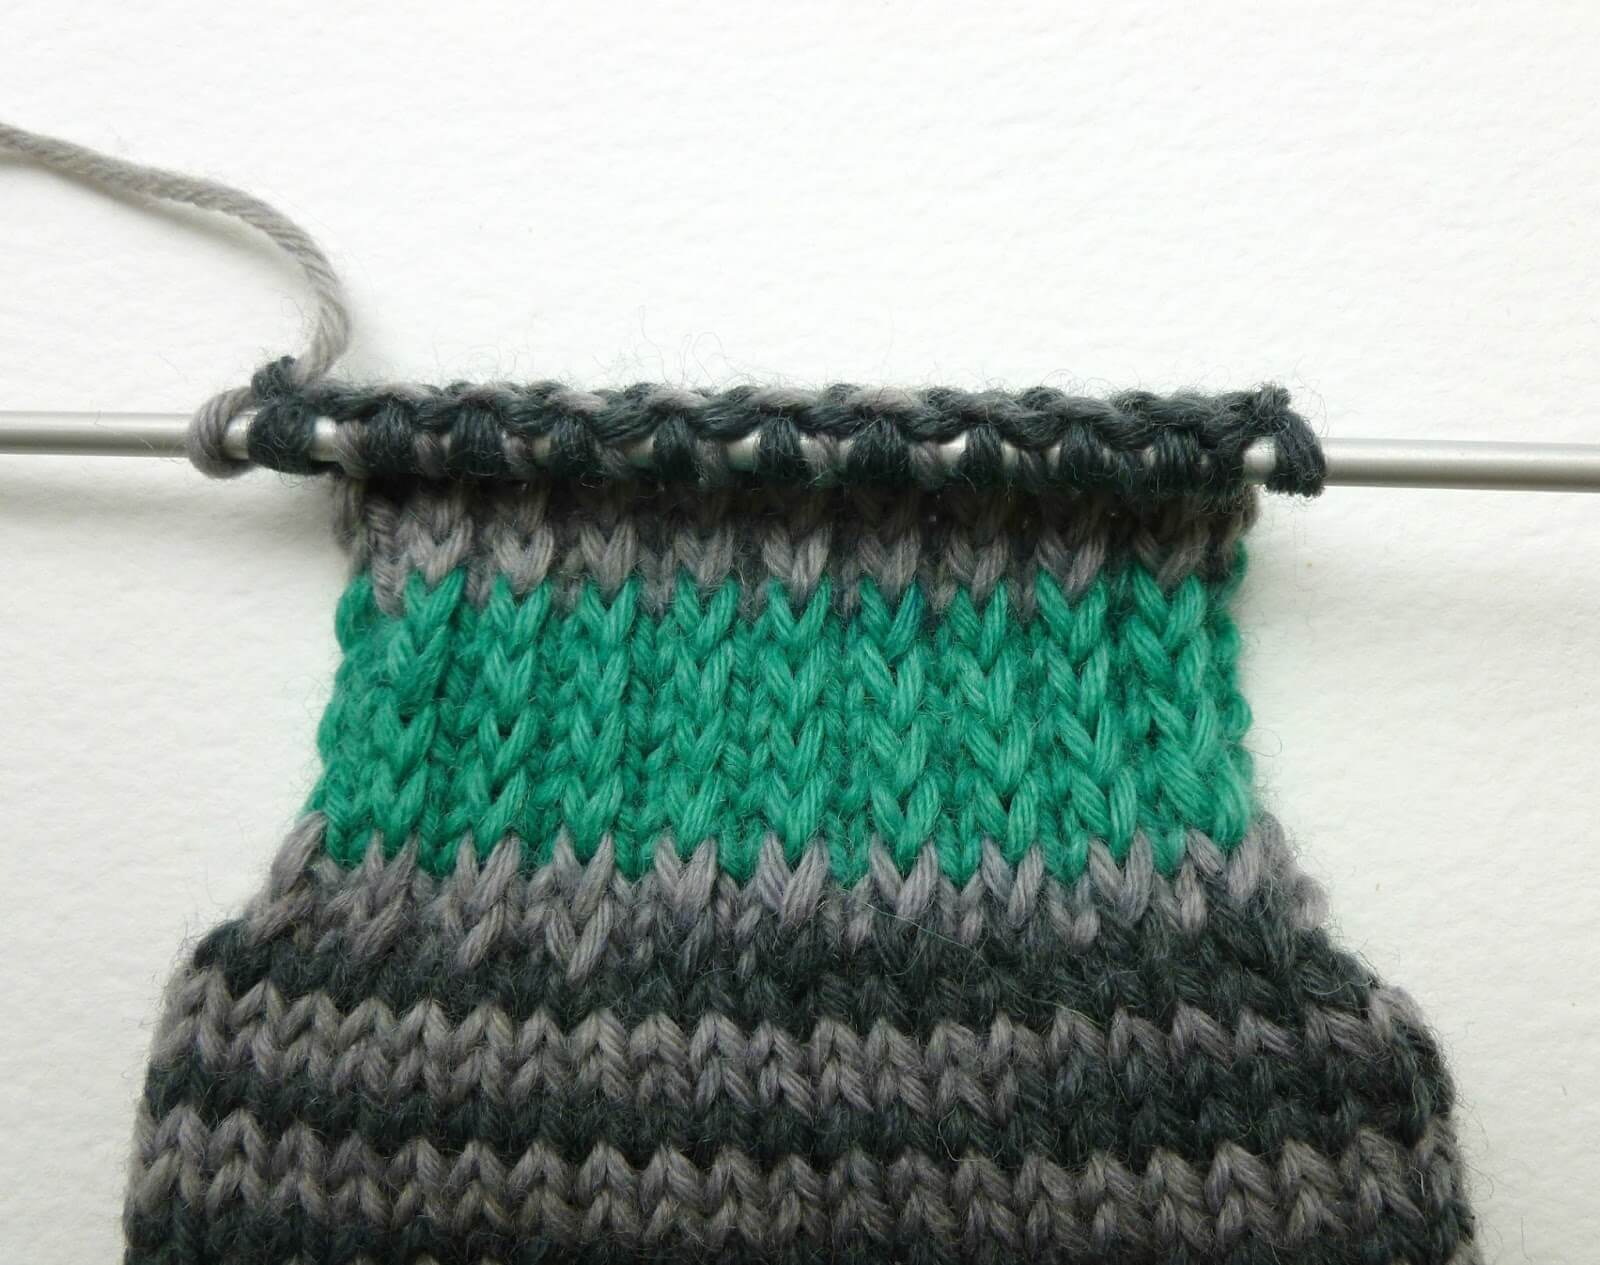
The fabric will be different on both sides: a ridged stitch on the right side …
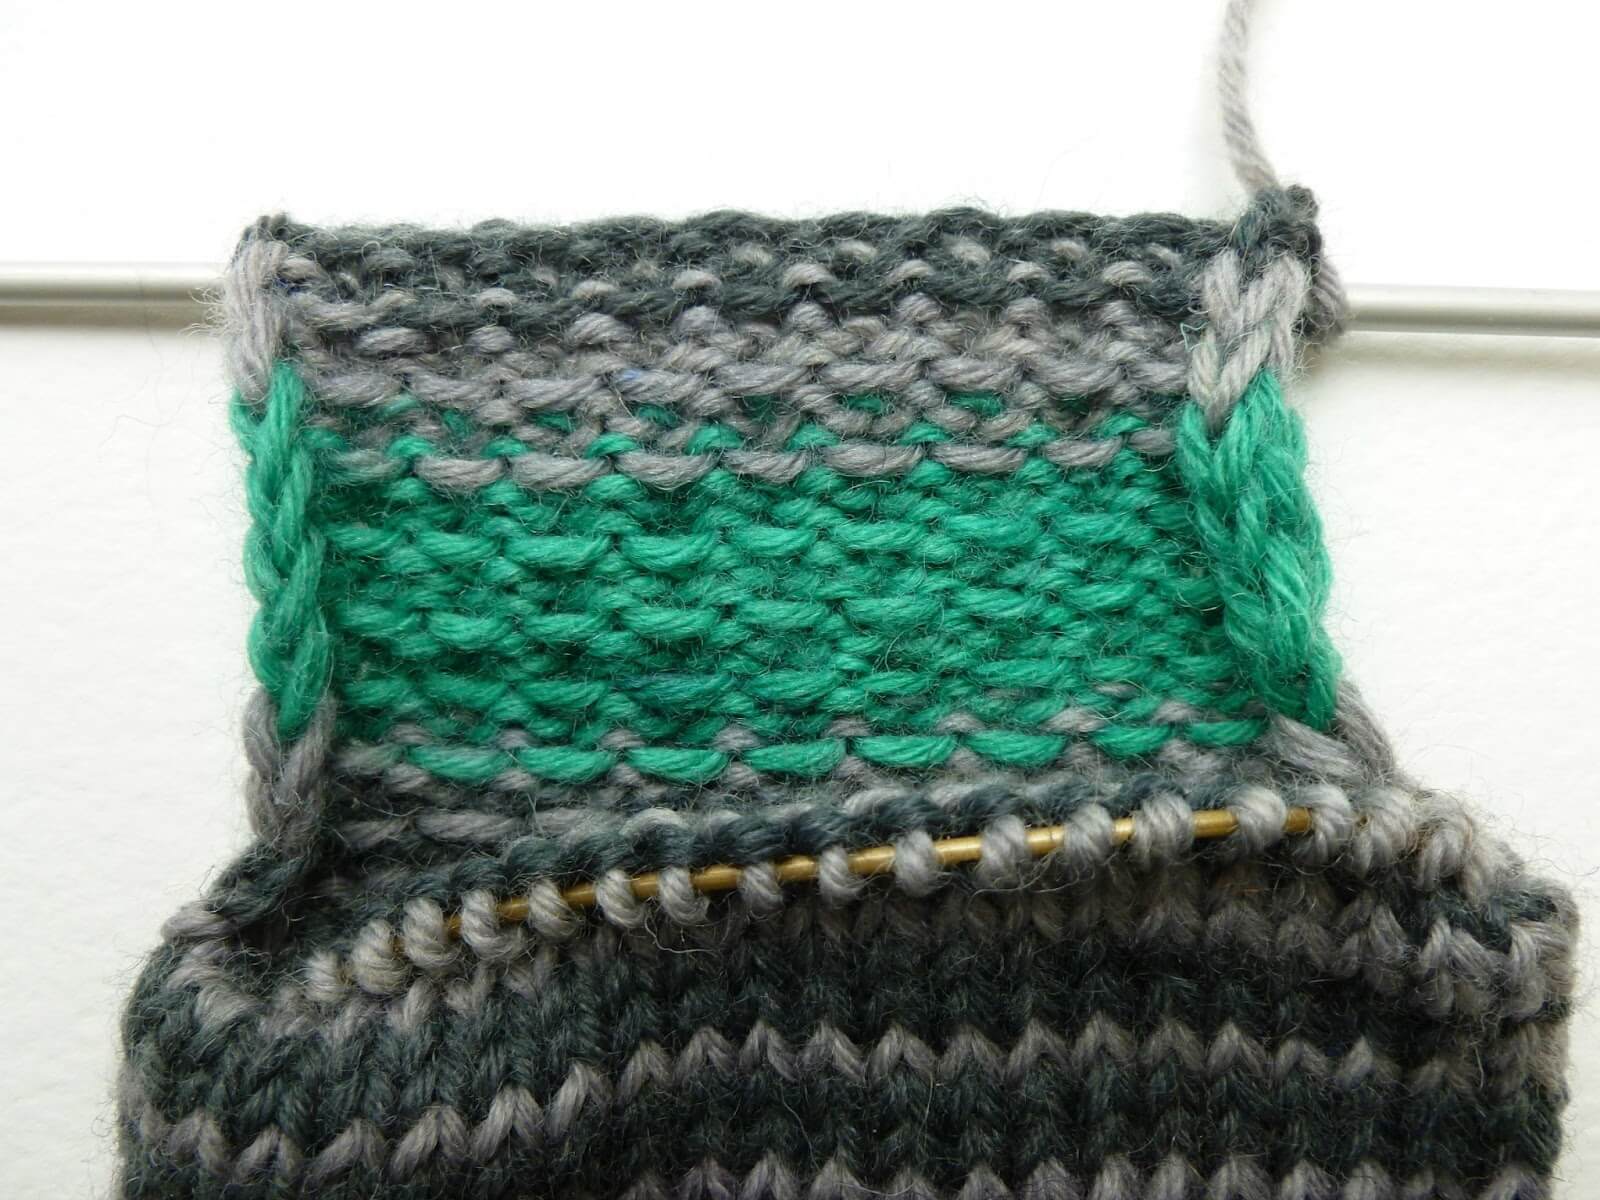
and a slipped stitch on the wrong side. This gives the cushioned heel.
Turn heel (You might want to read all of this section before starting!)
For a larger or smaller sock, you will need to alter the number of purl stitches in the first row of the heel (marked in bold below), increasing by 1 stitch for each block of 4 stitches extra that you cast on, or decreasing by 1 stitch for each block of 4 stitches less than 44 stitches. For example, if you cast on 48 stitches, your first row would be Sl1, P13, P2tog, P1, turn*
Row 1: Sl1, P12, P2tog, P1, turn.
This row is your set up row which gets you to the middle of your heel with stitches left on your needle on either side. You are going to work the stitches in the middle of your needle all the time, bringing one stitch in from either side on every other row to create a V-shaped heel.
Row 2: Sl1, K5, SSK, K1, turn.
Row 3: Sl1, P6, P2tog, P1, turn.
Row 4: Sl1, K7, SSK, K1, turn.
Create the SSK stitch by slipping the first stitch on the left hand needle knitwise onto the right hand needle, then the second stitch on the left hand needle purlwise onto the right hand needle, transfer them both back to the left hand needle and knit them together through the back of the stitches.
You can always tell where you’re up to as there will be a gap between the last stitch worked on the previous row and the stitches that are still be included in the heel.
Continue in this way, adding one stitch to each row until all your stitches are worked across your needle – eg, Sl1, P8, P2tog, P1; Sl1, K9, SSK, K1 etc.
This is what the heel looks like on the SSK side (left)
and the P2tog side (right):
Holding your sock with the outside of the heel flap facing you, knit across the heel stitches if required to bring you to the left hand side of the needle ready to pick up the gusset stitches. Remember that if you made the heel flap bigger, you will need to pick up more stitches. When you pick up the stitches, you will notice that you have a line of bigger stitches at each edge of the heel flap. This is created by the slip stitch at the start of each row and will make it easier to pick up the stitches. You are going to pick up every large slipped stitch which is the equivalent of 1 stitch for every 2 rows.
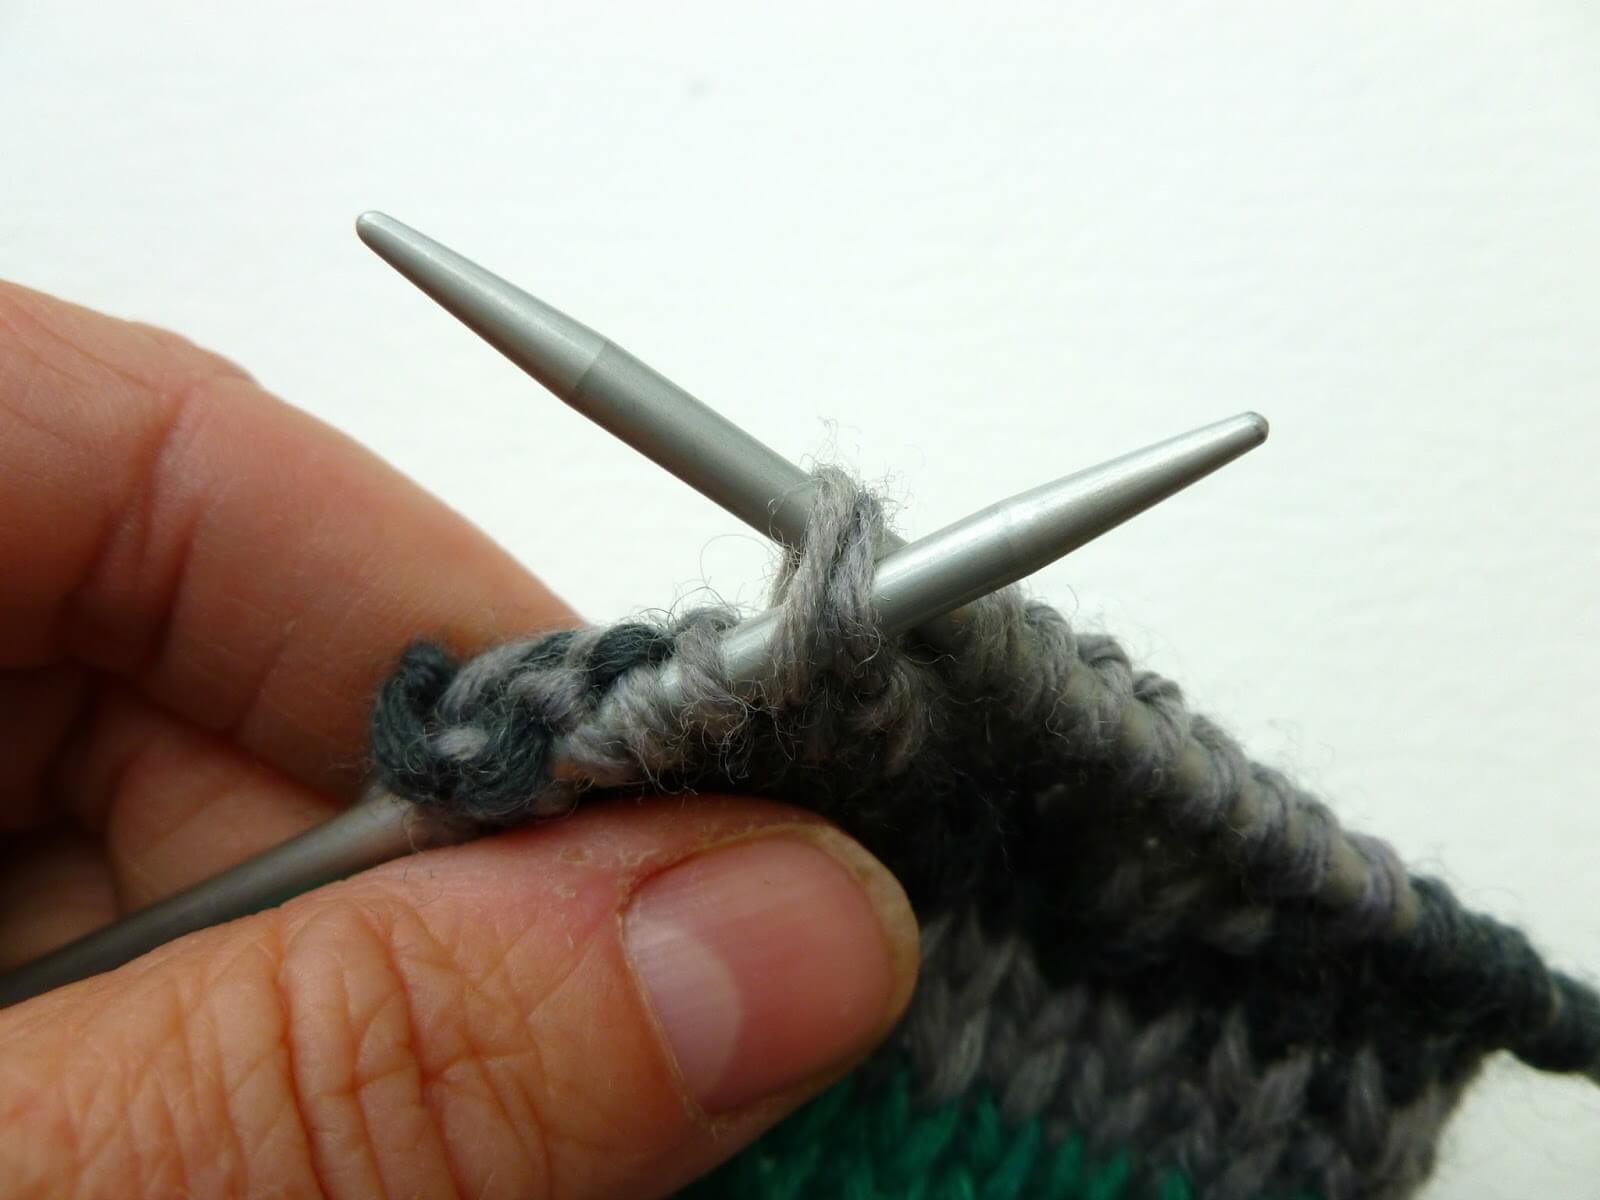
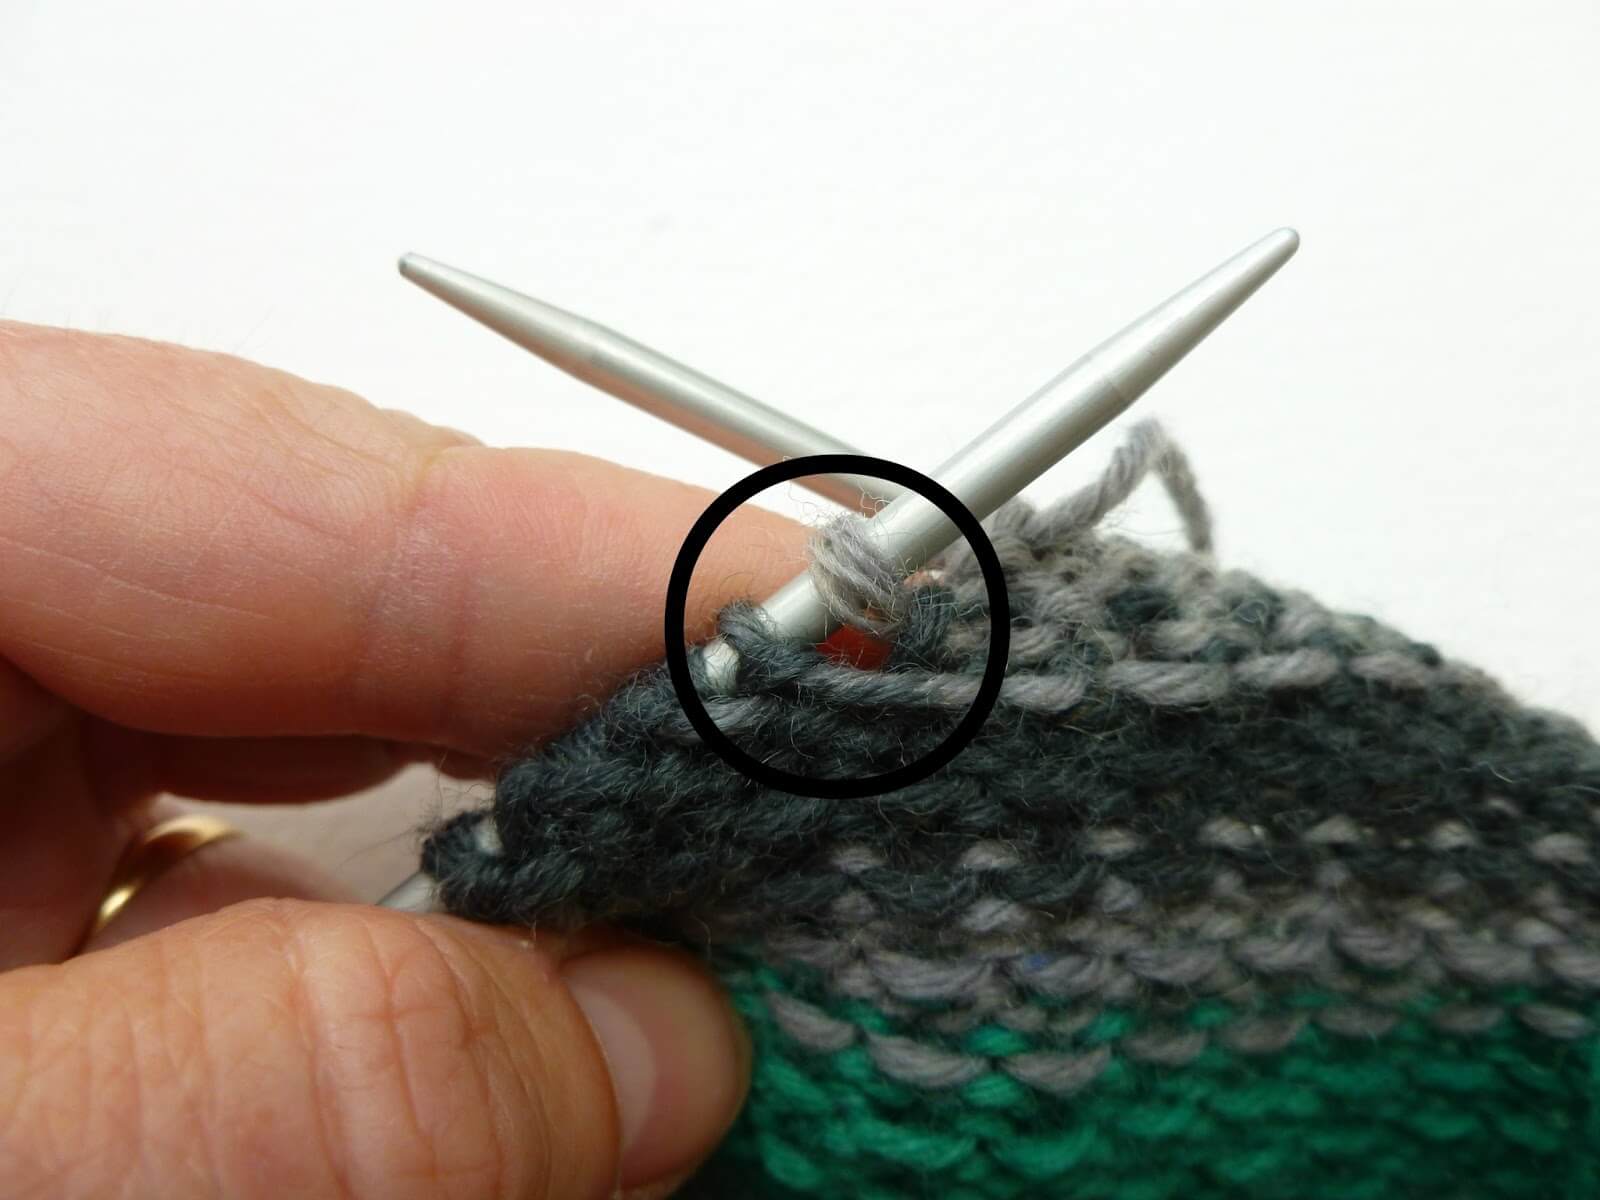
To pick up a stitch, you are going to insert your needle into the inside loop of the large stitch (some people prefer to pick up two loops – it’s entirely personal preference) and wrap the yarn around the needle as if to knit the stitch …
then pull the yarn through the loop as if you were knitting an ordinary stitch and there’s your new stitch!
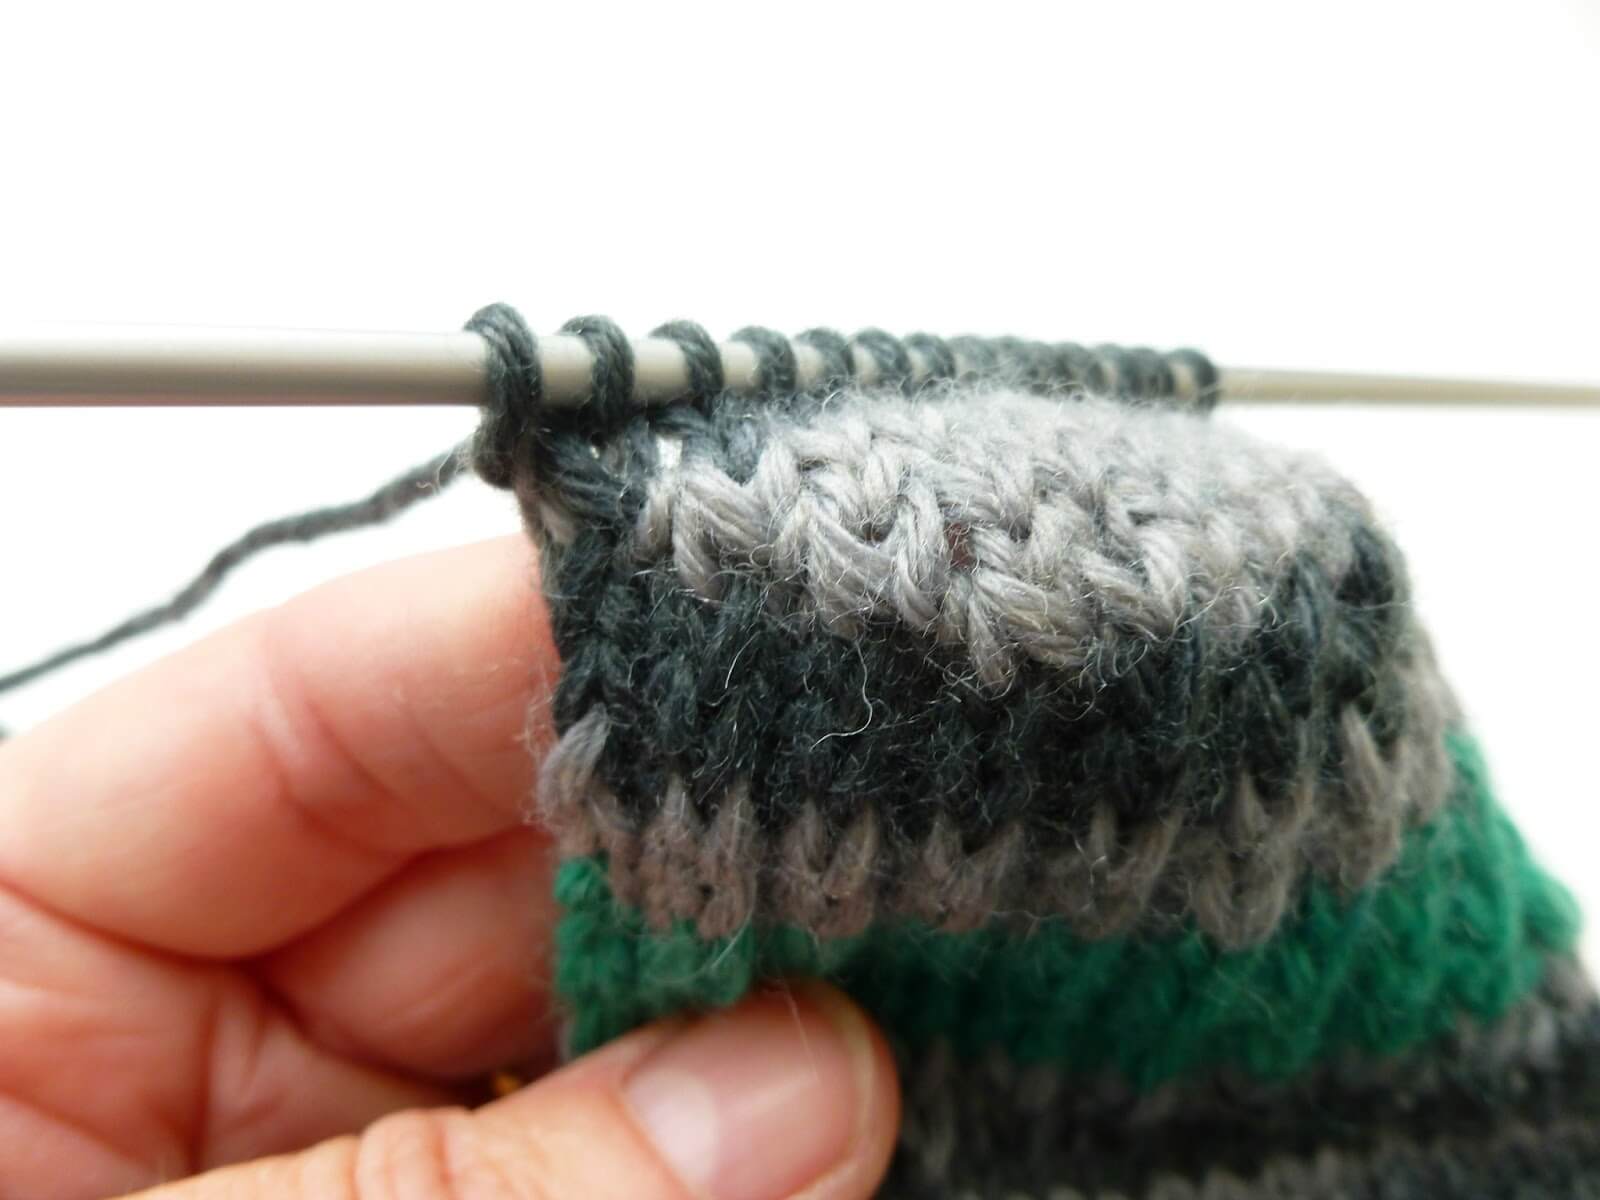
Repeat this for each of the slipped stitches plus one extra stitch between the heel flap and the top of the foot stitches which will stop a hole forming there. This will give you a nice neat line once you have picked up all of your stitches.
If you are using a long circular for magic loop, place a marker over your needle at this point – there’s no need to do this if you’re using a short circular or DPNs as it will just fall off!
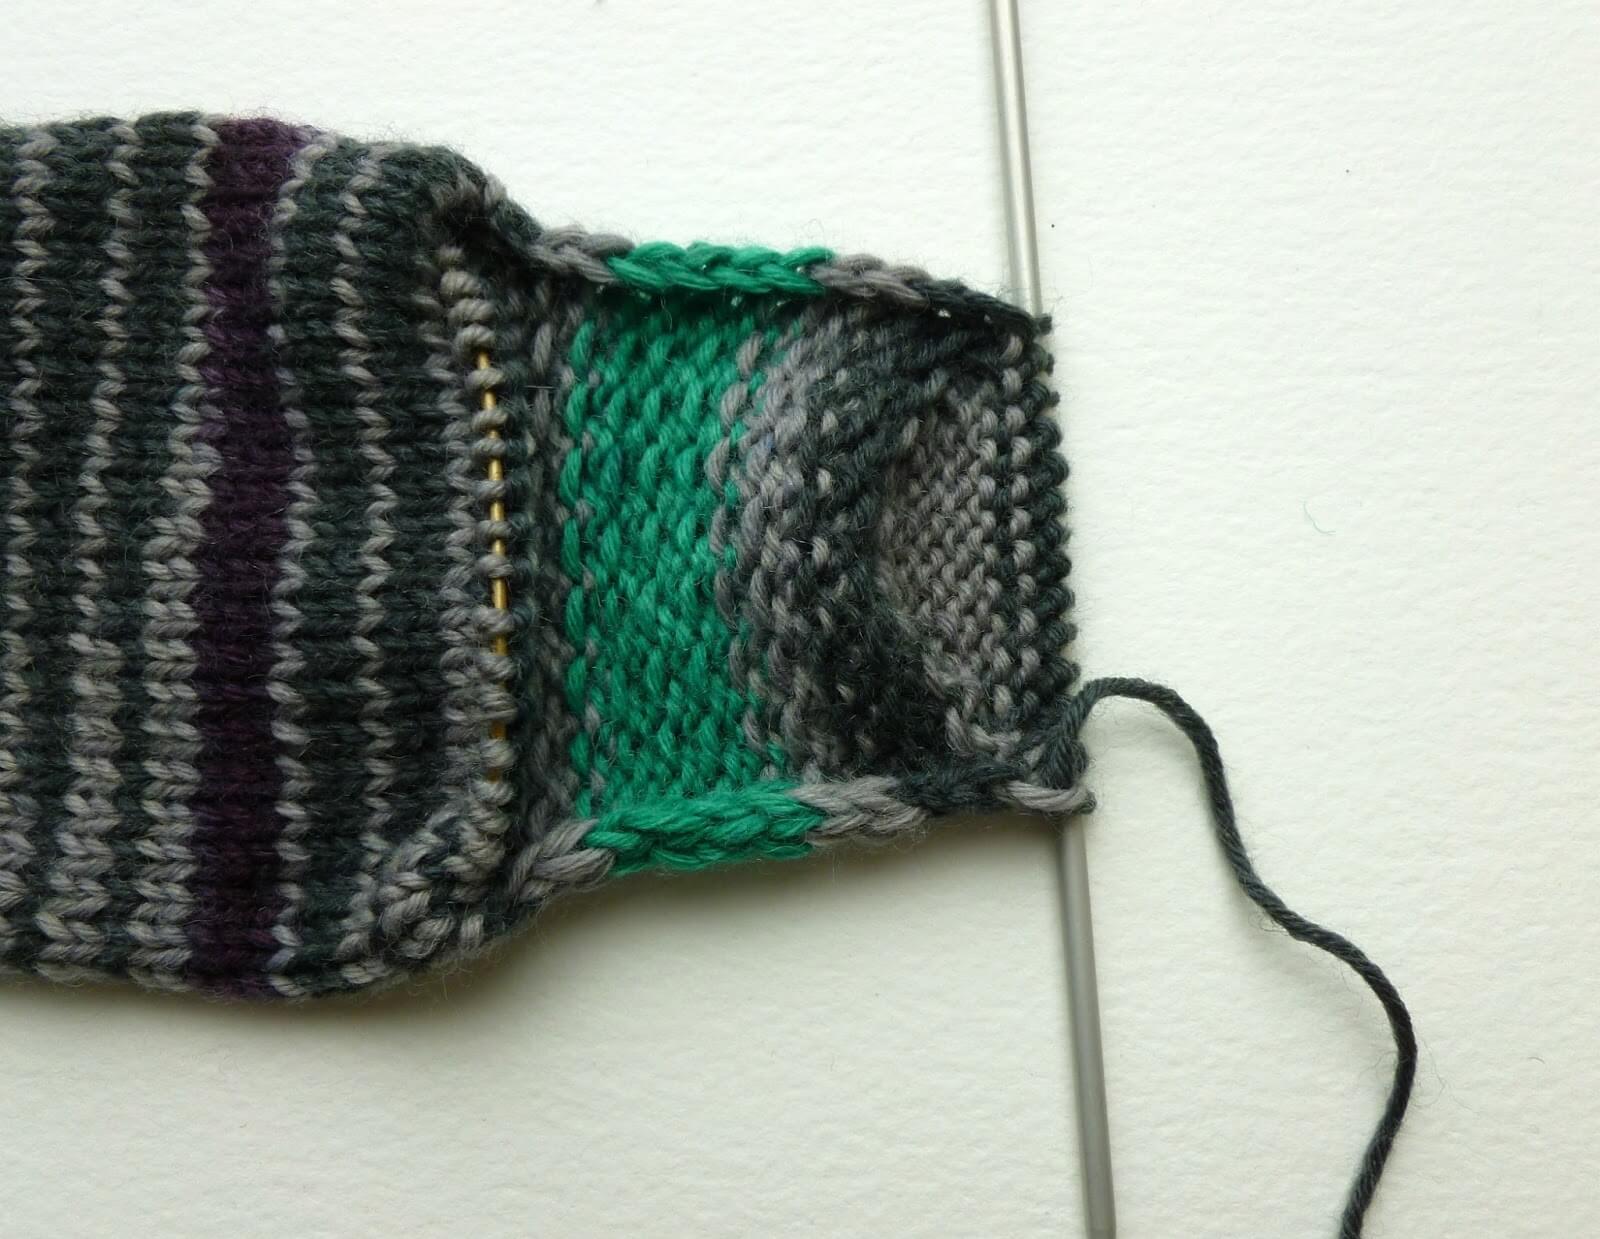
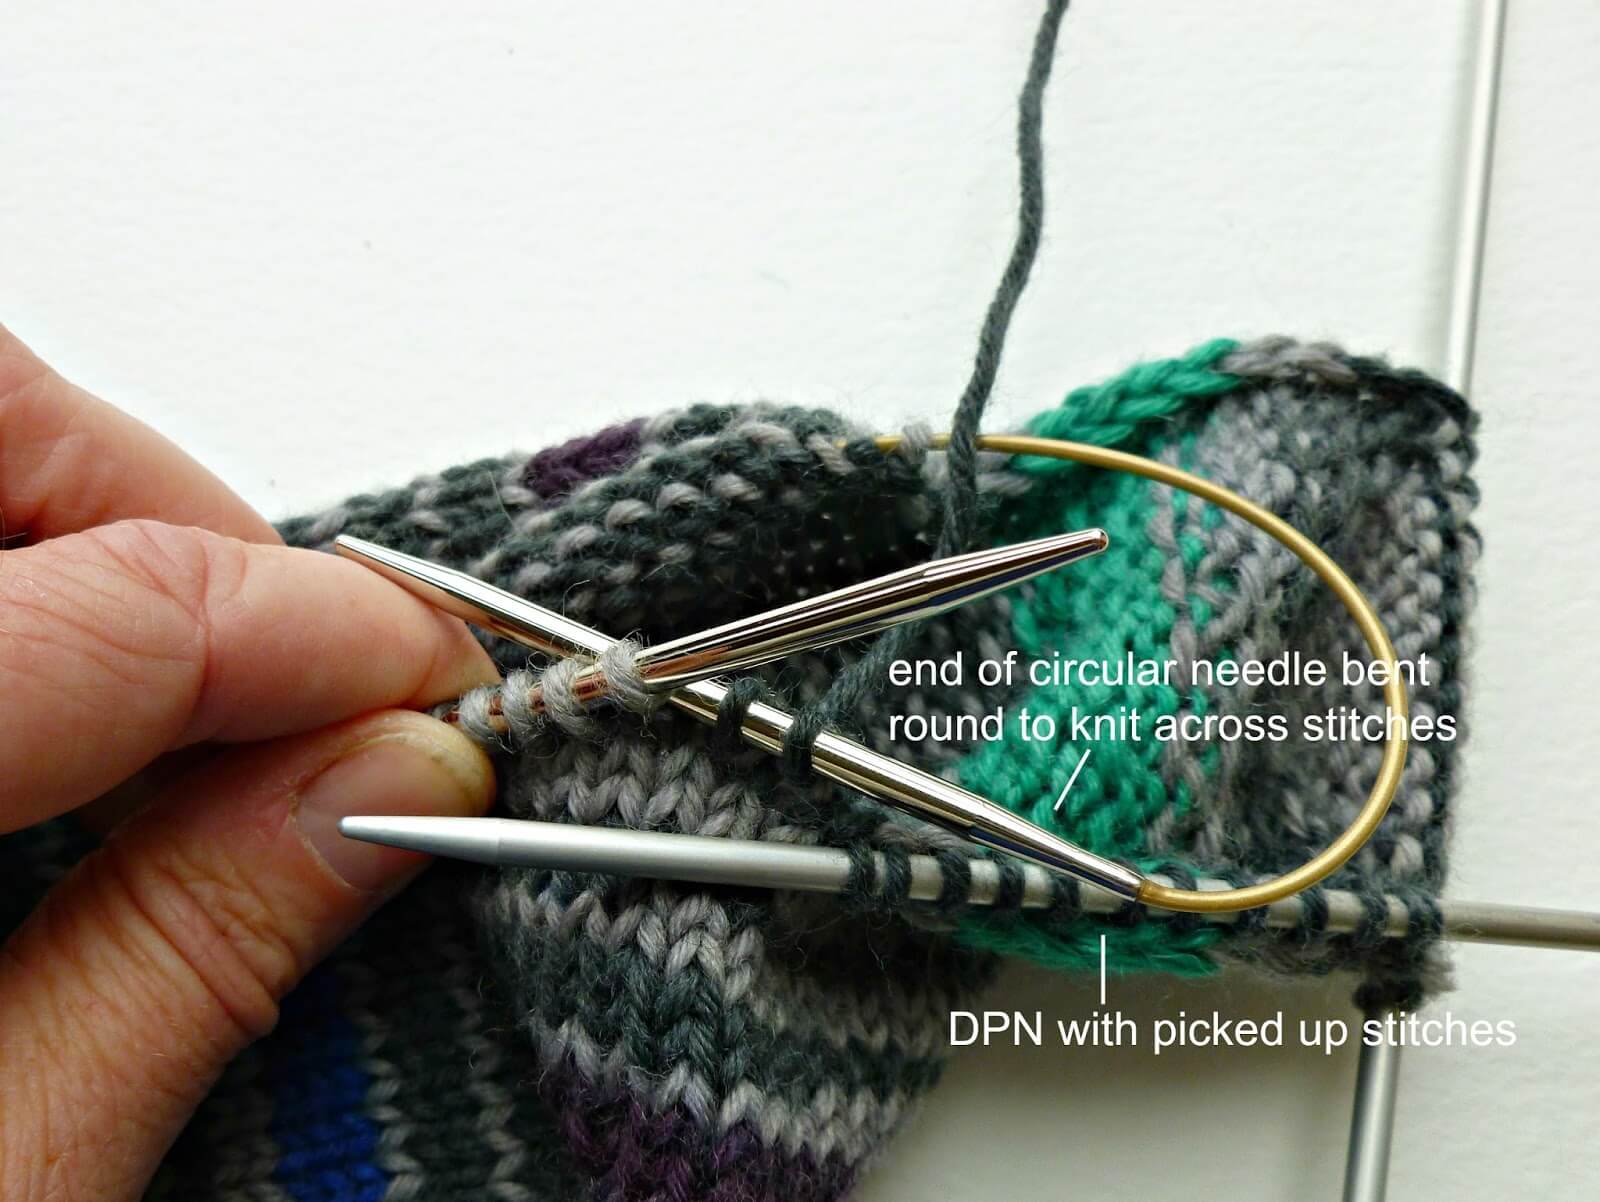
Knit across the top of the foot stitches – I usually knit back onto my circular needle at this point by bending the ends of the needle around to knit the stitches in a tiny circle …
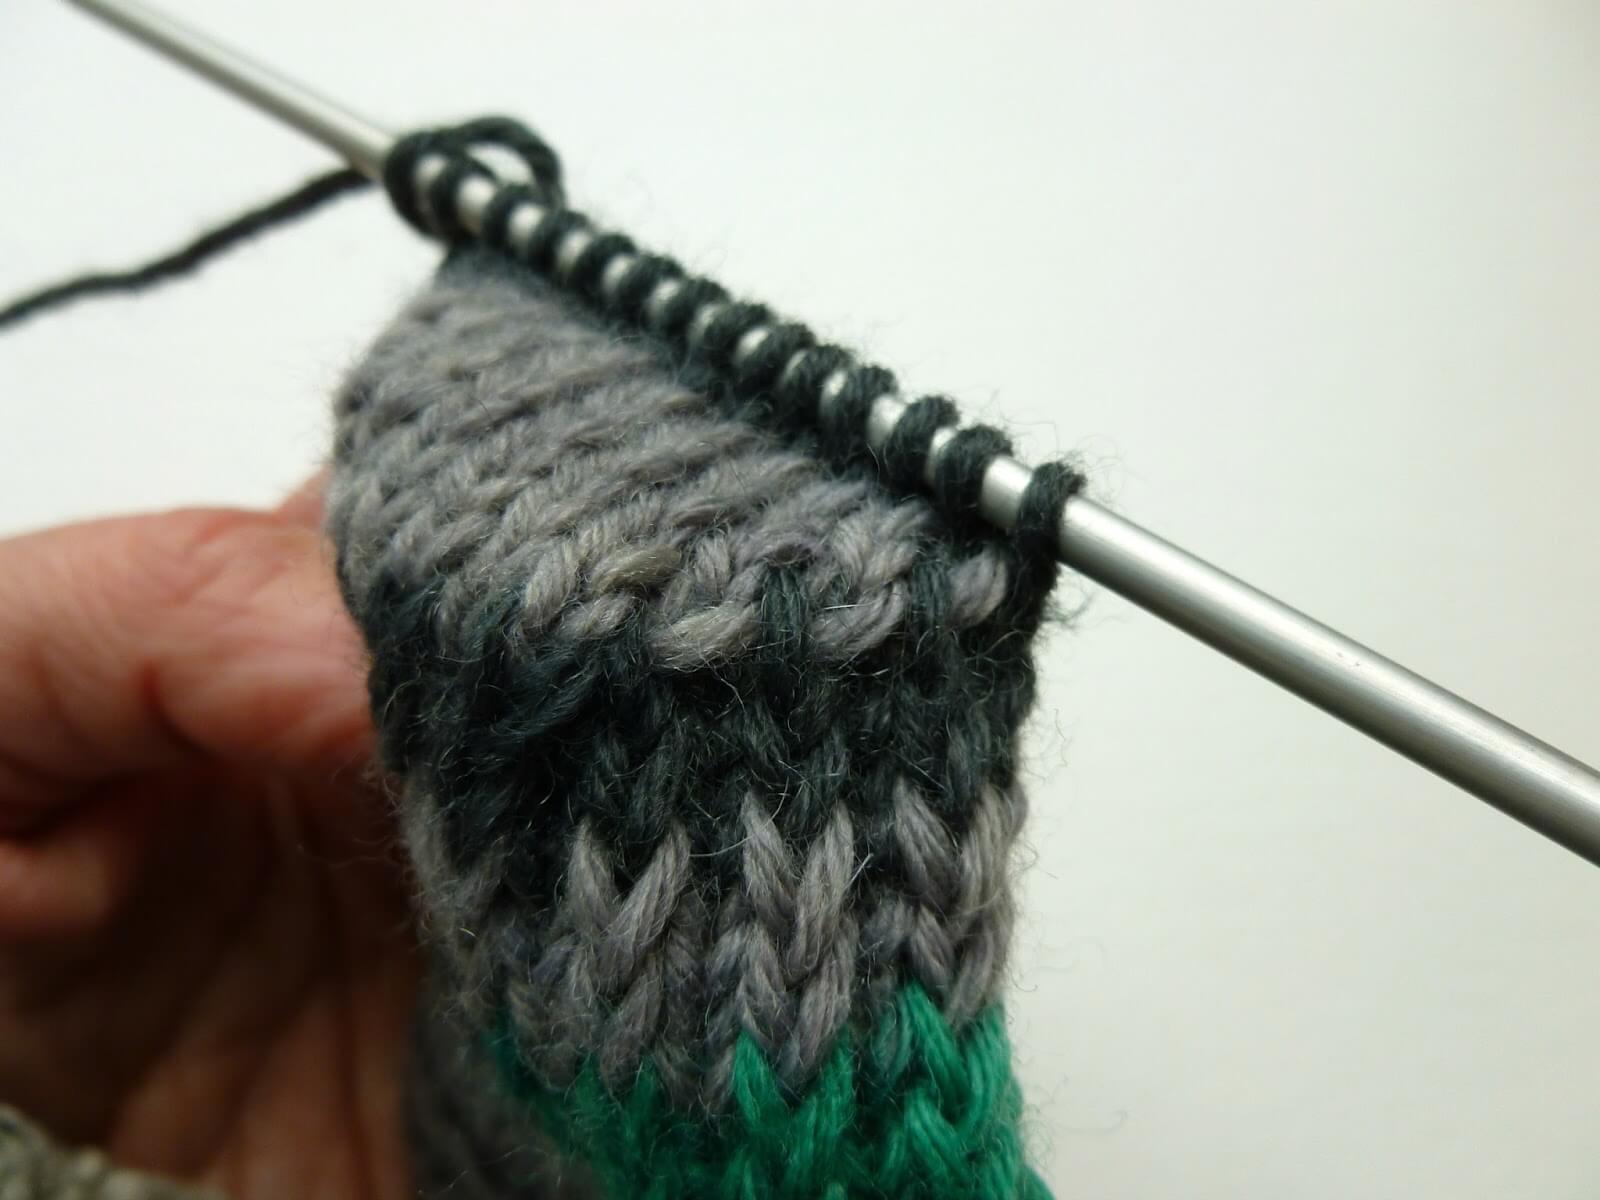
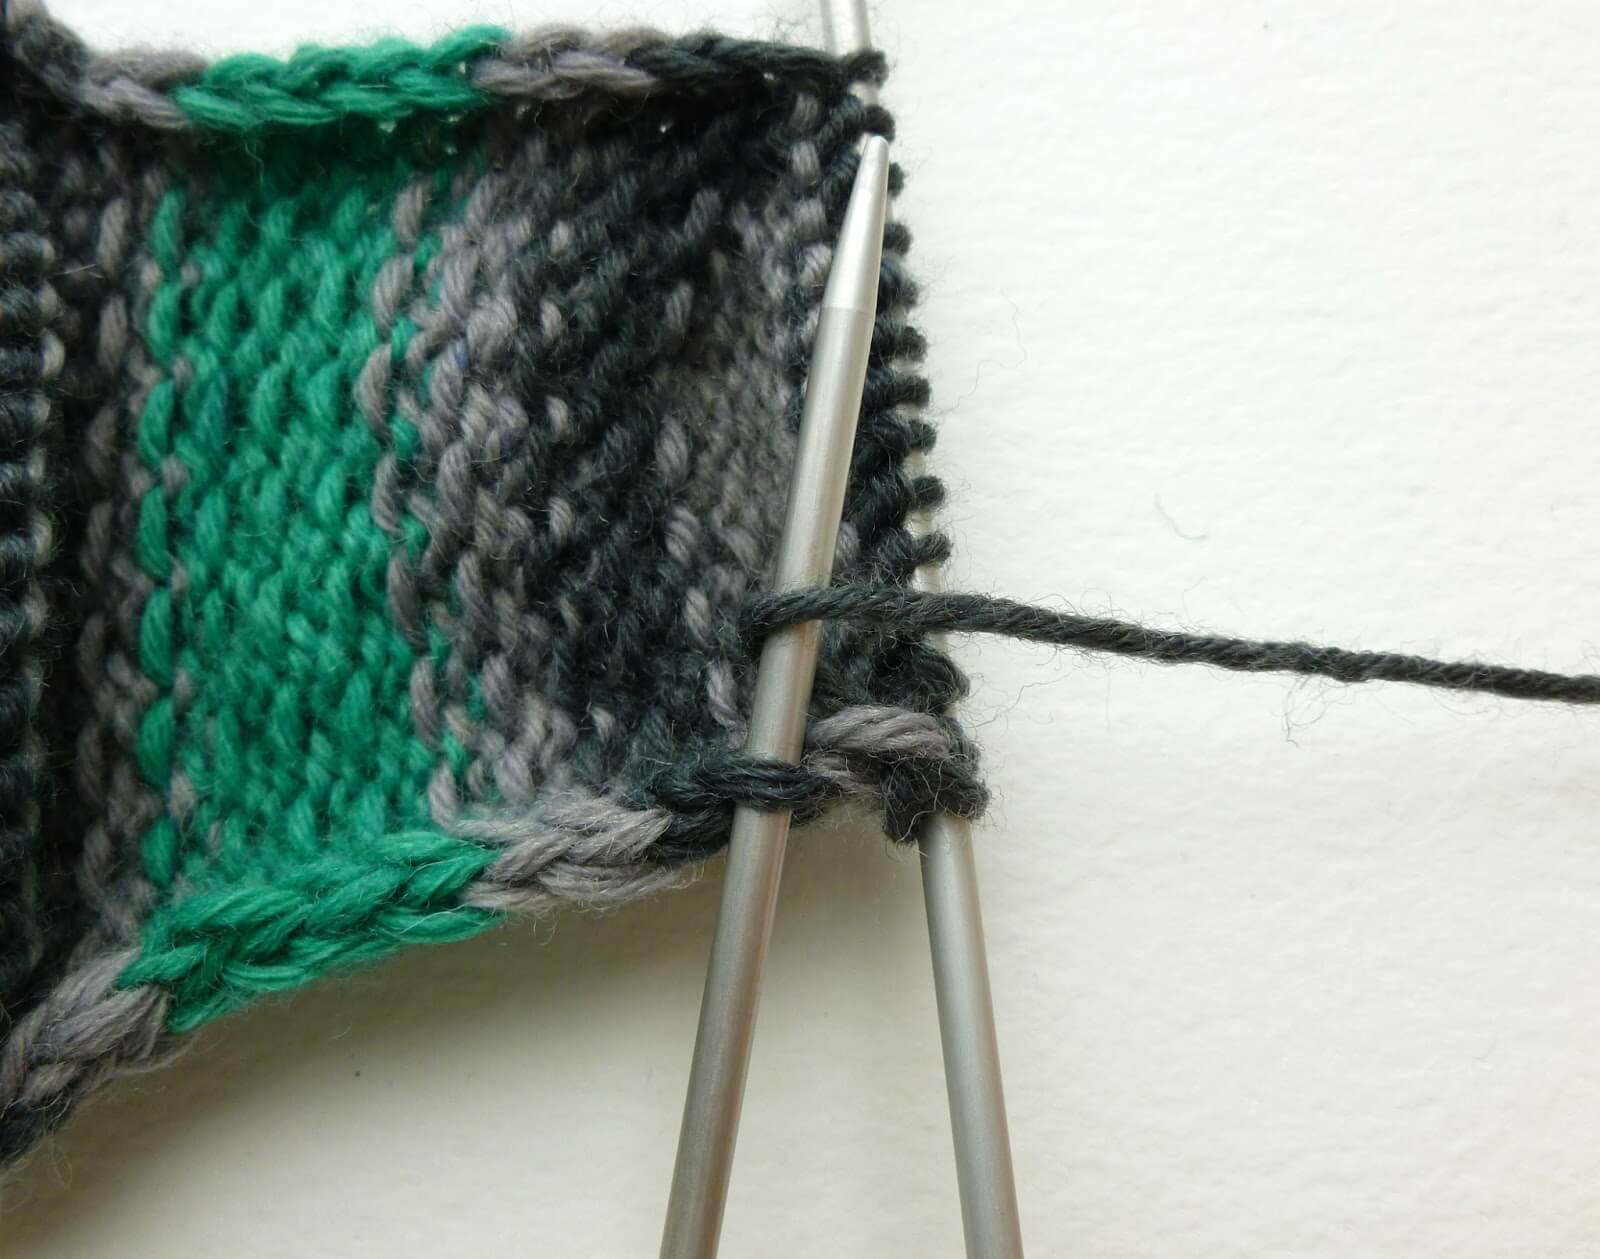
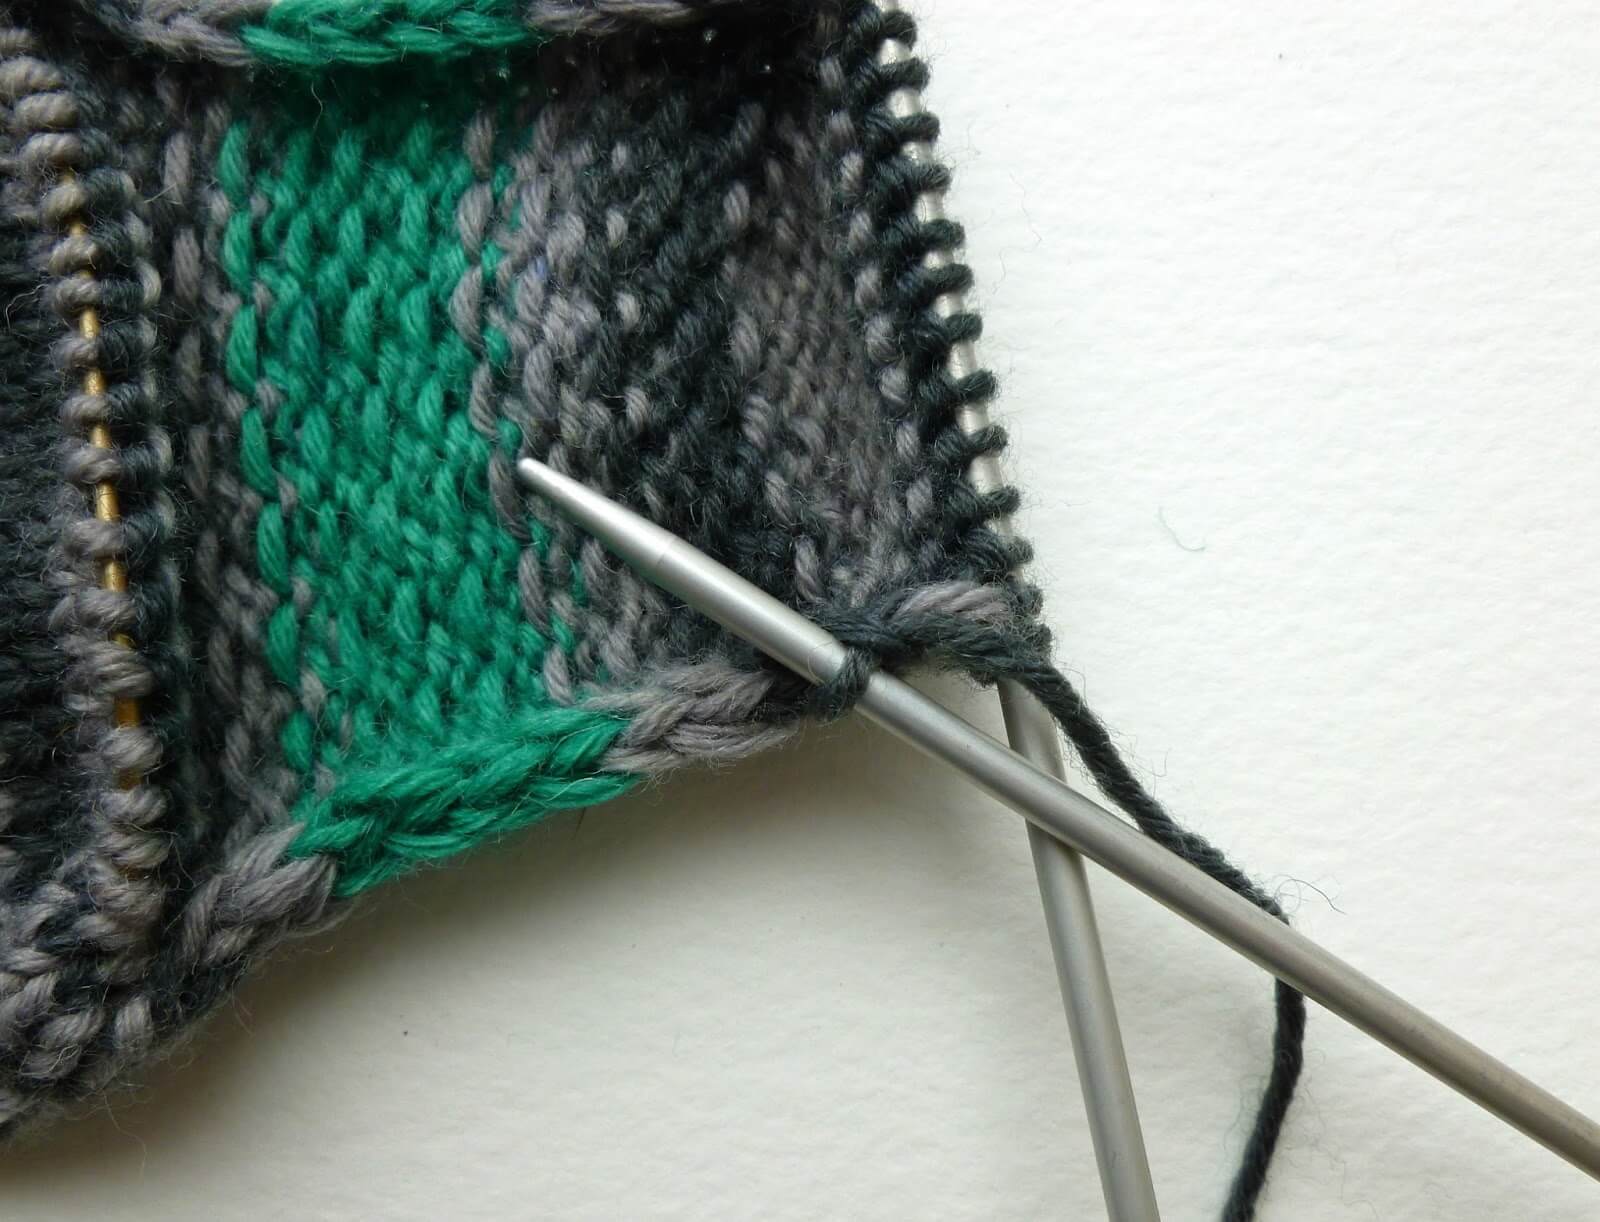
place a marker (if you’re using short or long circulars), then pick up the stitches up the other side of the heel. If you’re using a short circular, you can either pick up your stitches with your circular needle – your sock will look like this (note that I’ve stopped to take the picture at the top of the second set of pick up stitches):
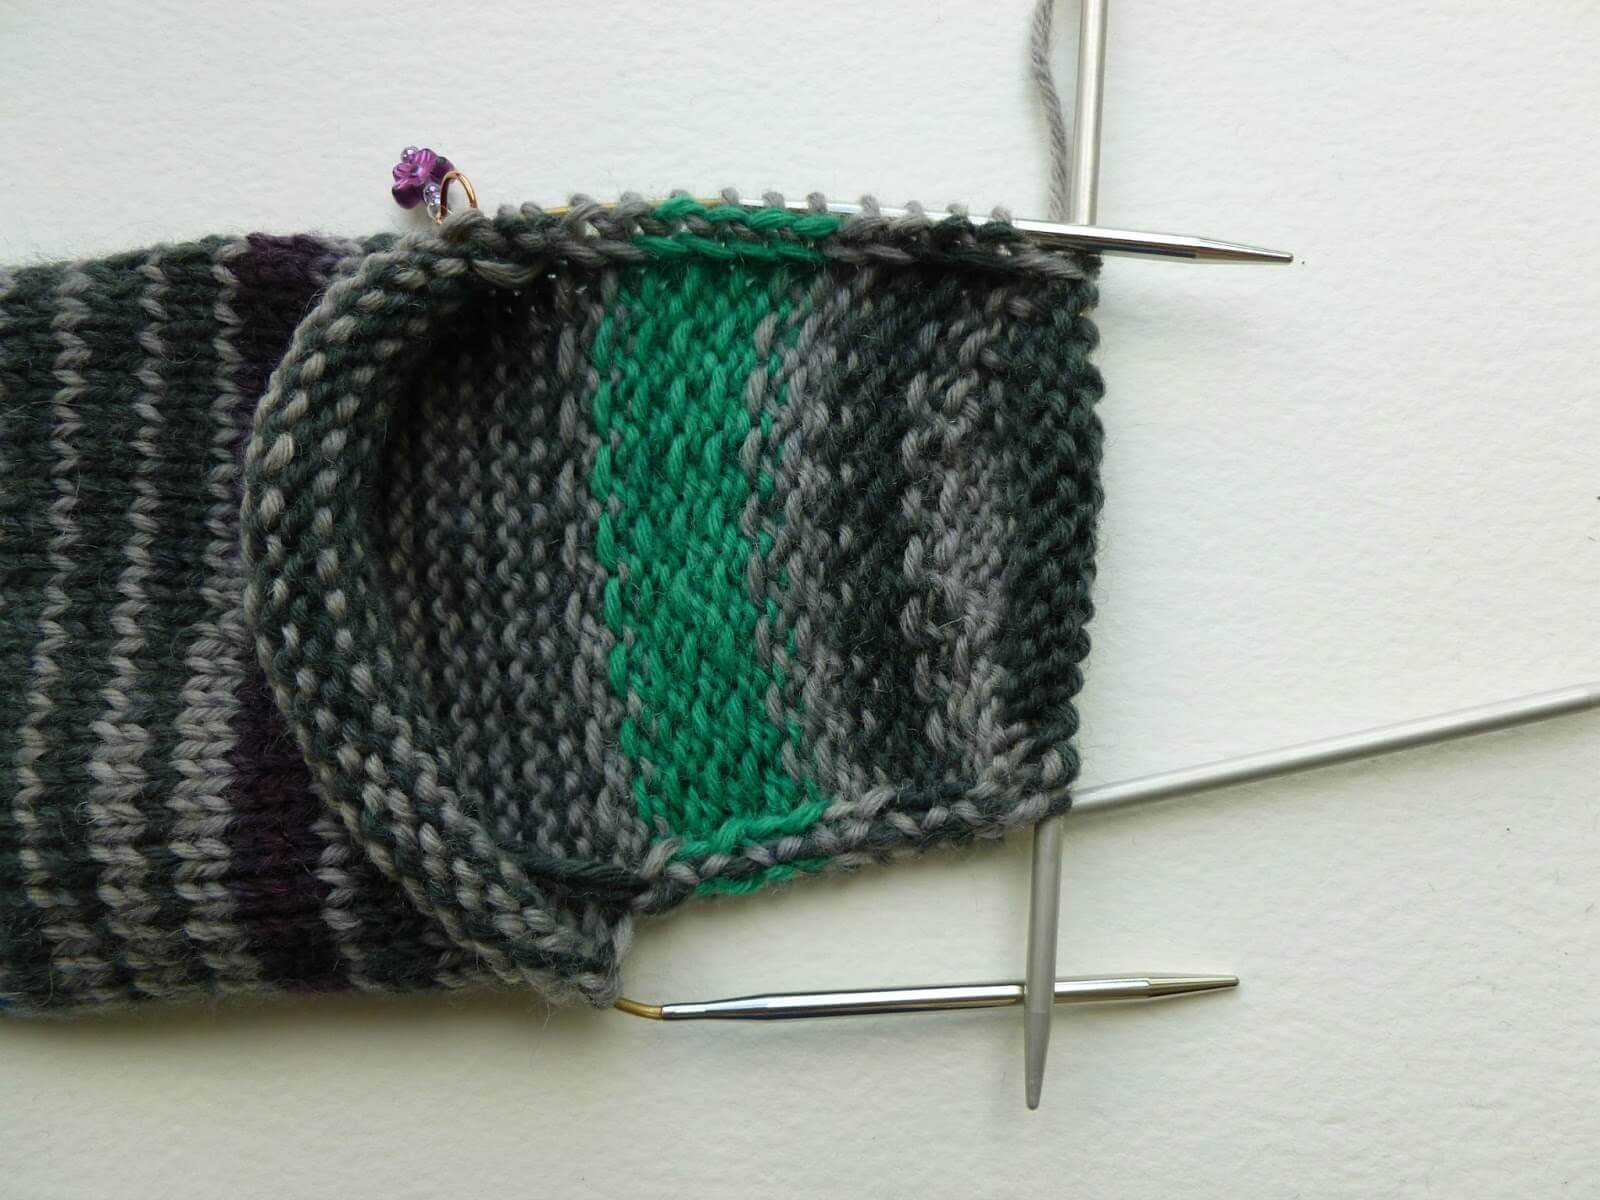
or if that seems too fiddly then use a DPN to pick up the stitches (or even knit across the top of your foot stitches) and then join the short circular in again later. There’s no hard and fast rule here, just do what works best for your hands.

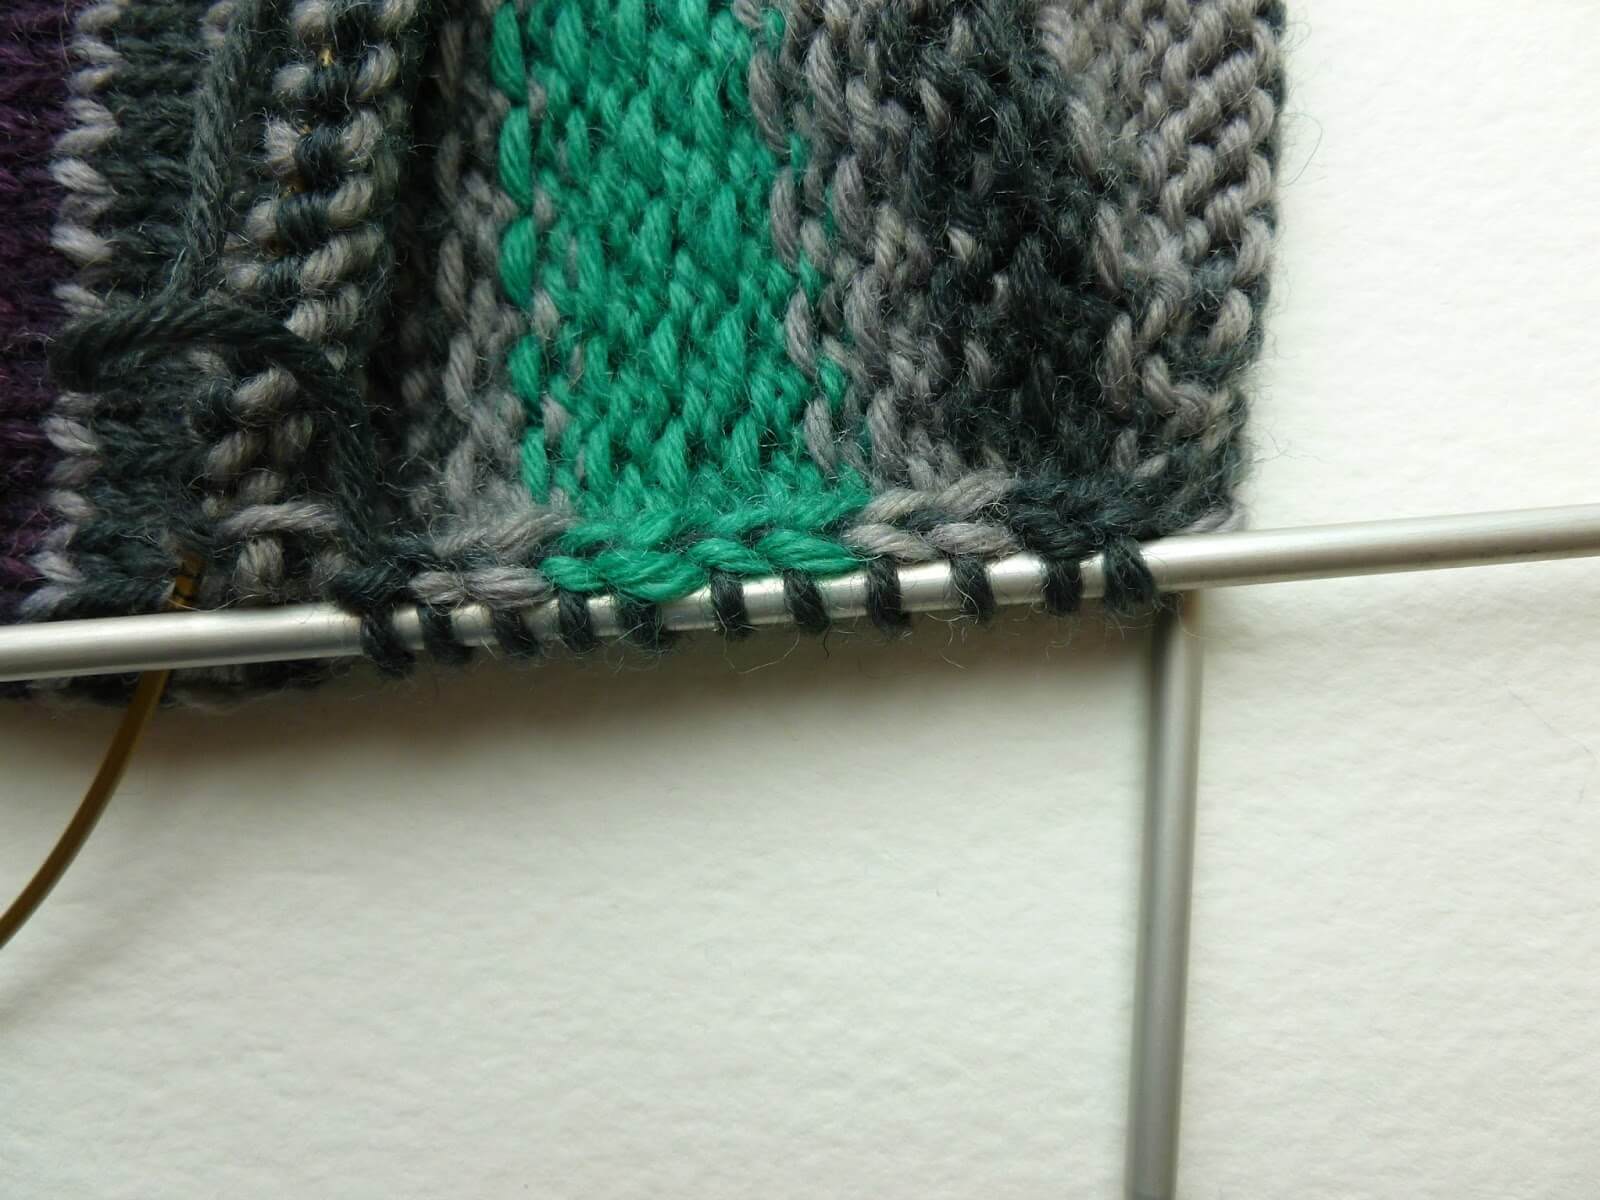
As a guide, I picked up 11 stitches on each side but you will pick up as many stitches as you have slipped stitches so it may be different to mine.
Knit across the top of the heel and then shape the gusset as below.
Shape gusset
Round 1: K to 3 sts before the marker, K2tog, K1, slip marker, knit to next marker, slip marker, K1, SSK, K to marker.
Round 2: Slip marker, knit to next next marker, slip marker, knit to 3 sts before marker.
Round 3: K2tog, K1, slip marker, knit to next marker, slip marker, K1, SSK, K to marker.
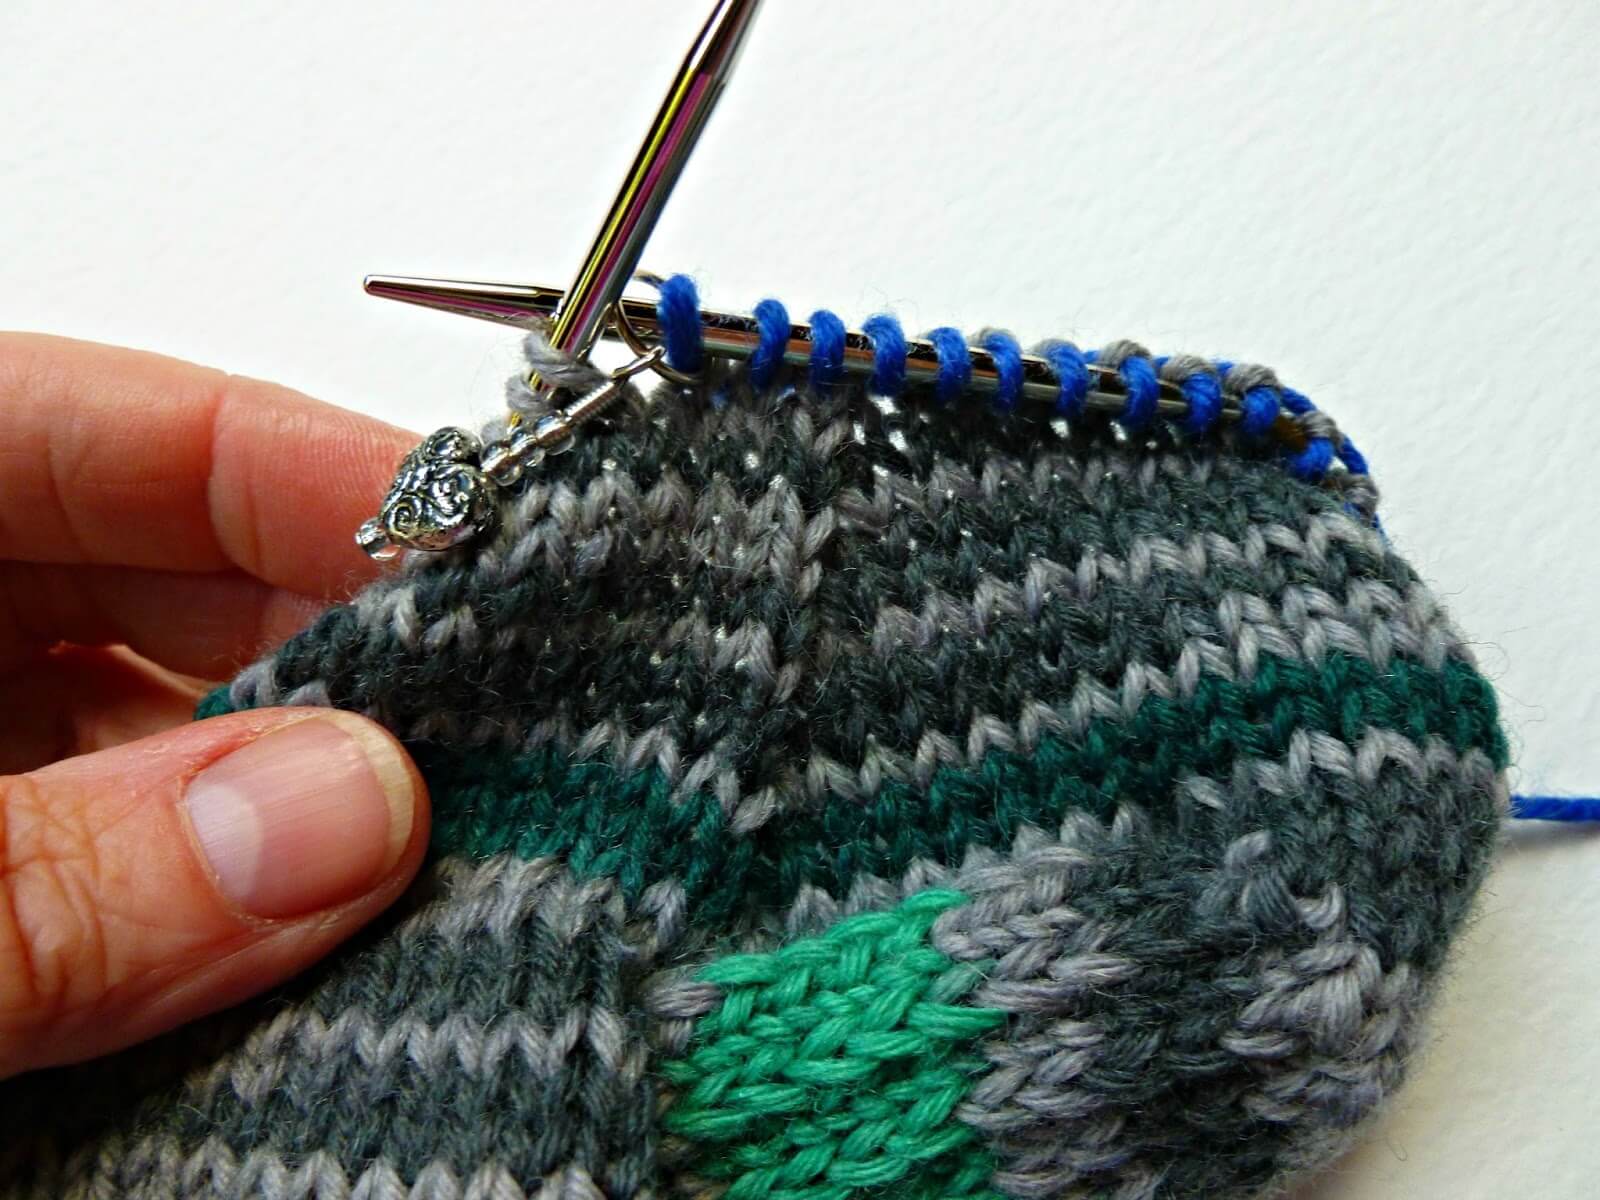
Repeat rounds 2 and 3 to shape the gusset. Continue in this way, decreasing by two stitches at the gusset on every other row until there are 44 stitches on the needle. Your gusset line will look like this:
Once you have 44 stitches again, continue to knit each round until you reach approximately 3cm before the desired length ready to start the toes. For my size 5 feet, this was about 42 rounds. Don’t be afraid to try your sock on before decreasing for the toes!
Toes
At some point whilst decreasing for the toes, if you are using a small circular you will need to change back to DPNs as the number of stitches becomes too small for the circular. It’s up to you when you choose to do that, and how you distribute the stitches across the needles; just keep following the pattern as set below. Create the toes as follows:
Round 1: K1, SSK, K16 sts, K2tog, K1, place marker, K1, SSK, K16 sts, K2tog, K1
Round 2: Knit one round, slipping markers as you come to them
Round 3: K1, SSK, K to 3 sts before marker, K2tog, K1, slip marker, K1, SSK, K to 3 sts before marker, K2tog, K1
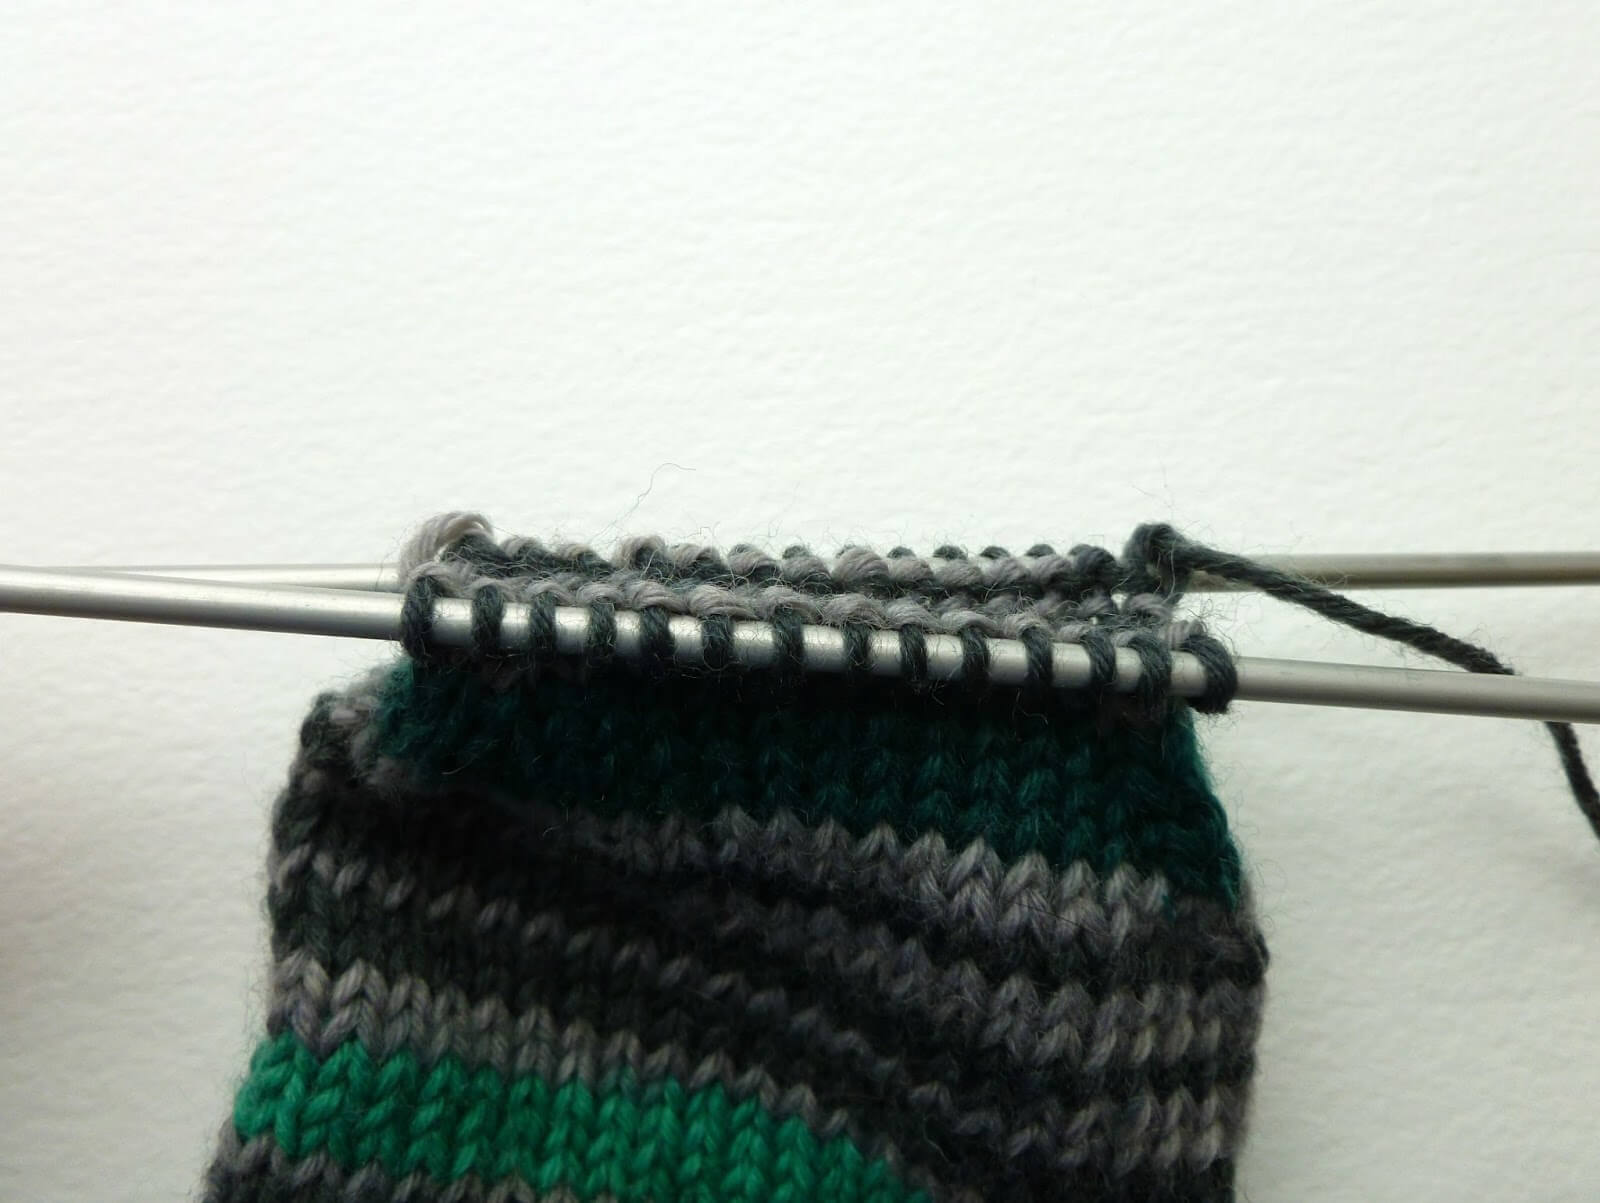
Repeat rounds 2 and 3 until you have 28 stitches left and divide these between two needles so that the front and the back of the socks match.
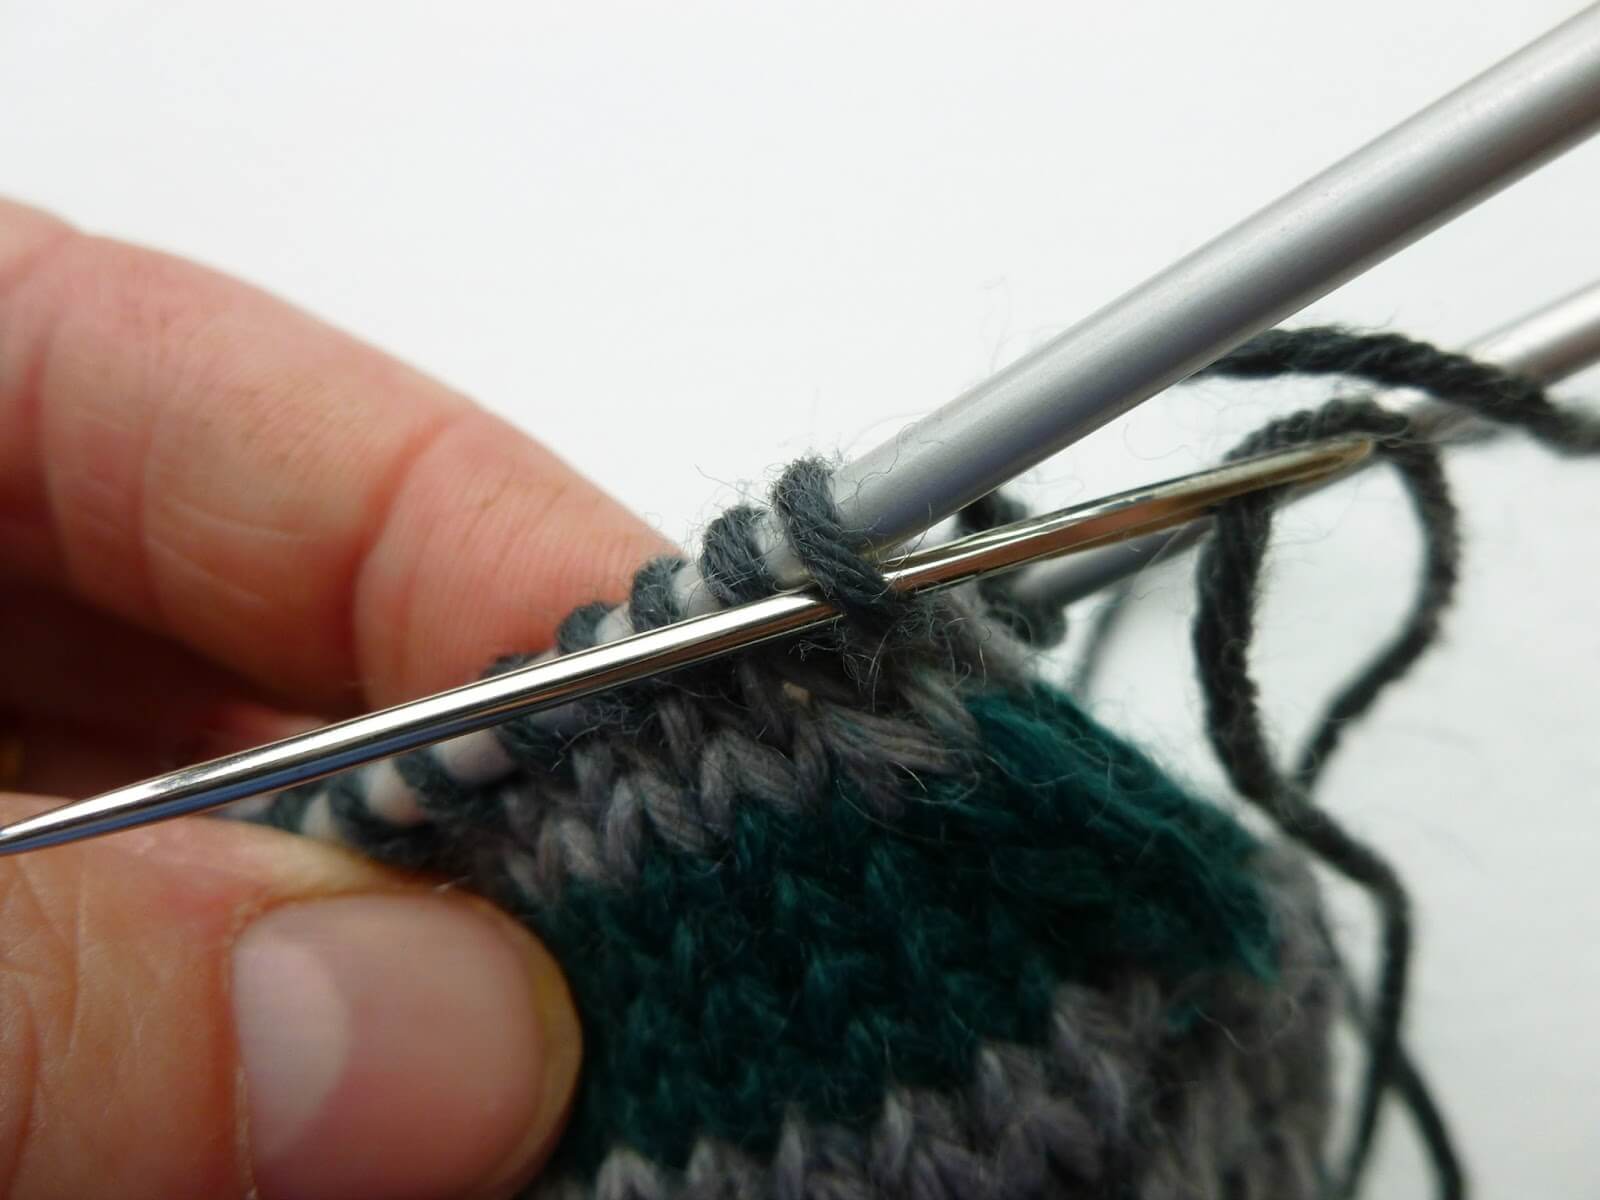
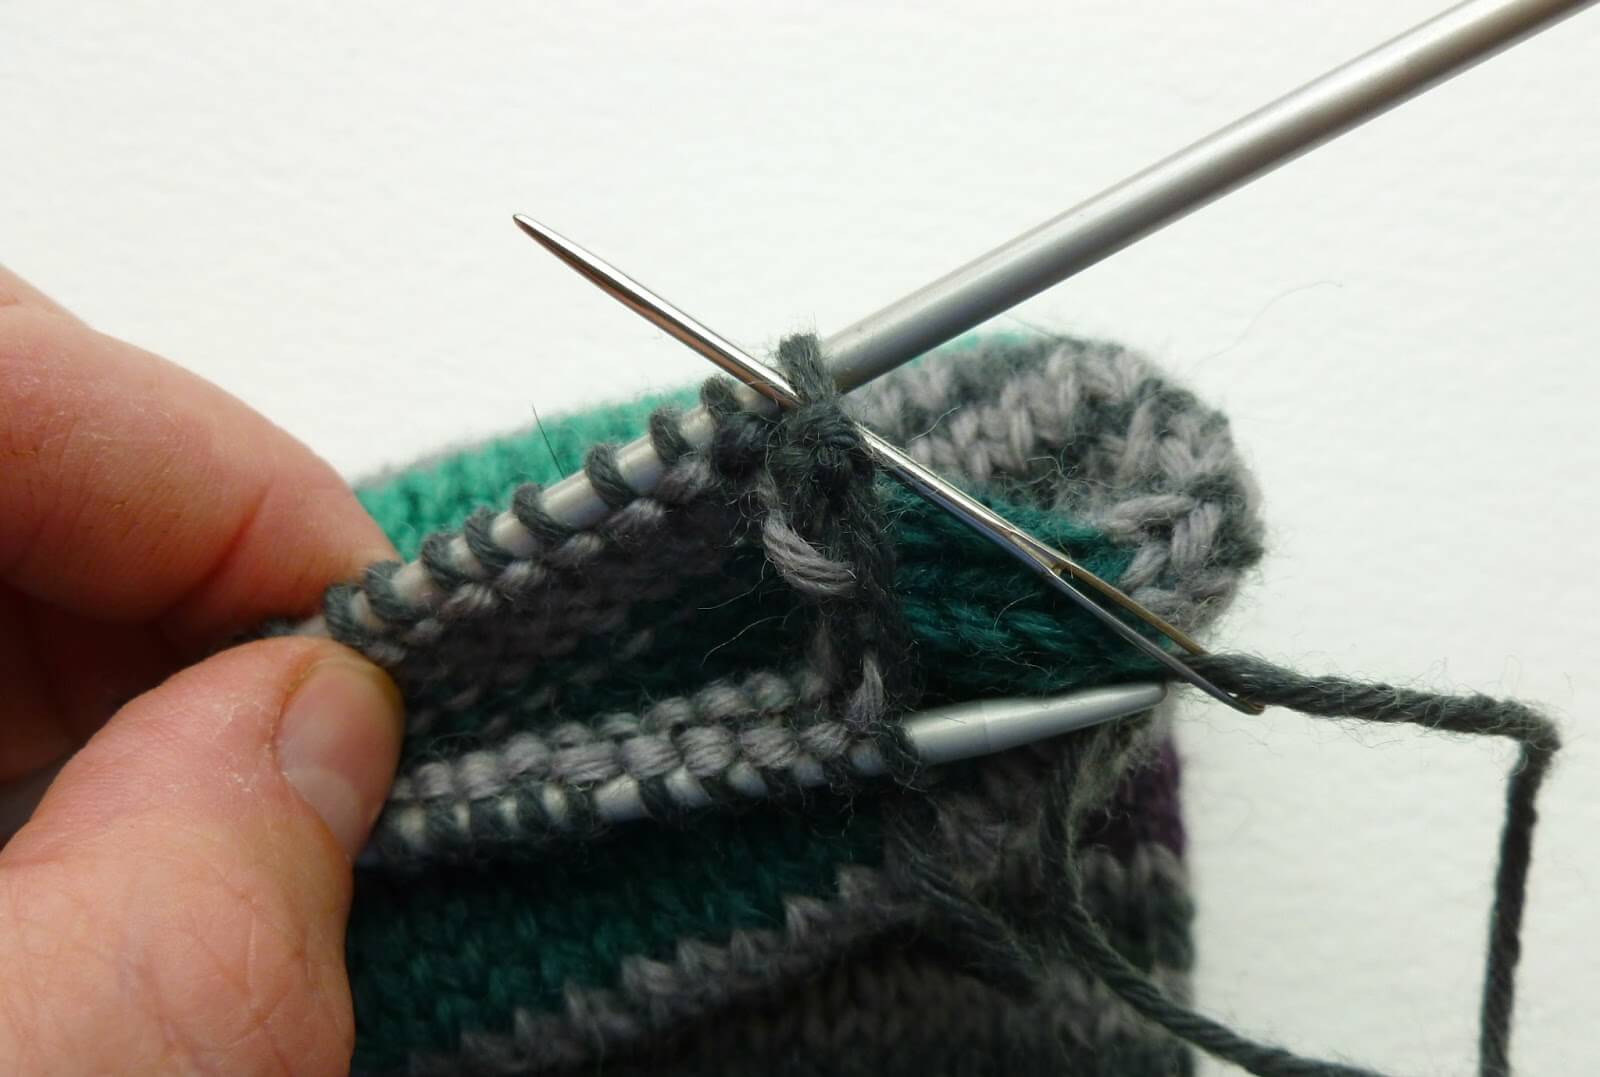
Graft toes using Kitchener stitch. If you’ve used my Basic 4ply Socks patternn, you’ll have seen these instructions before but if not, then hopefully this will take some of the confusion out of it! Just take it slowly and graft each toe in one go (don’t start and then leave it half-way through or disaster is guaranteed!). Cut a long length of yarn and thread it onto a wool needle. I’m giving you right-handed instructions here.
1 Hold the two DPNs with your left hand. Insert the wool needle purl-wise into the first stitch on the front DPN and pull the yarn through. Don’t take the stitch off the DPN.
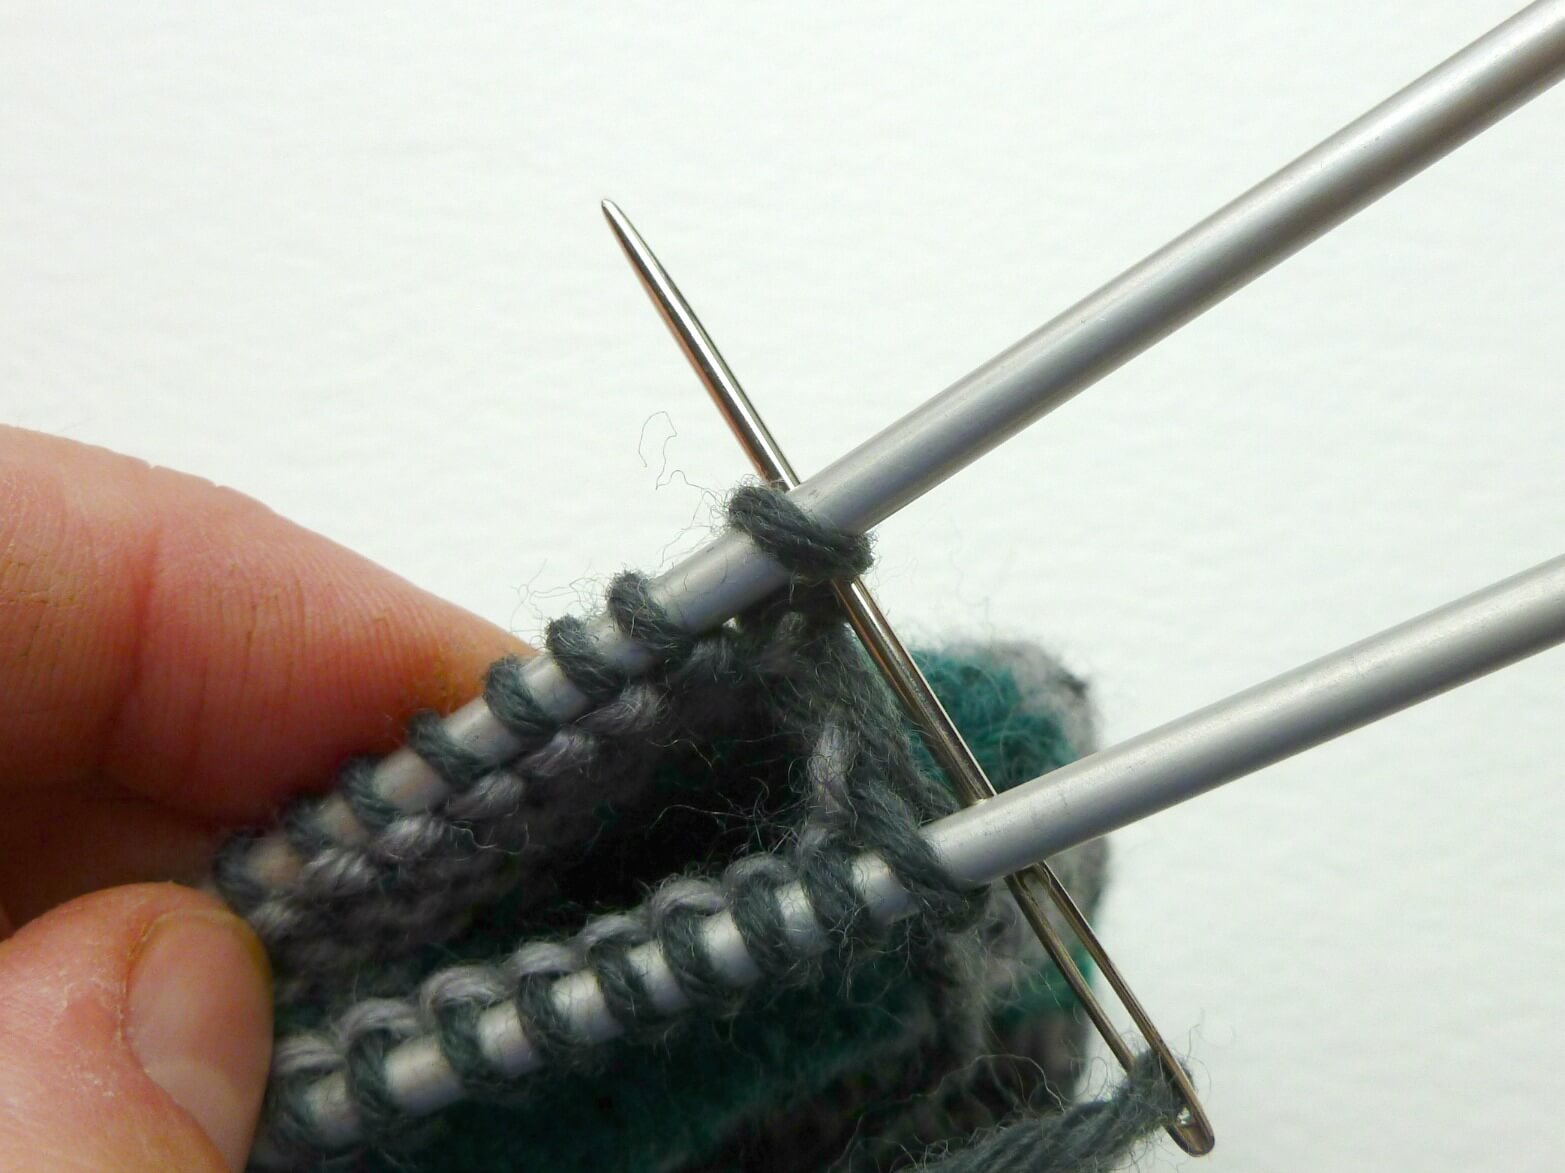
Next, insert the wool needle knit-wise into the first stitch on the back DPN. Don’t take the stitch off.
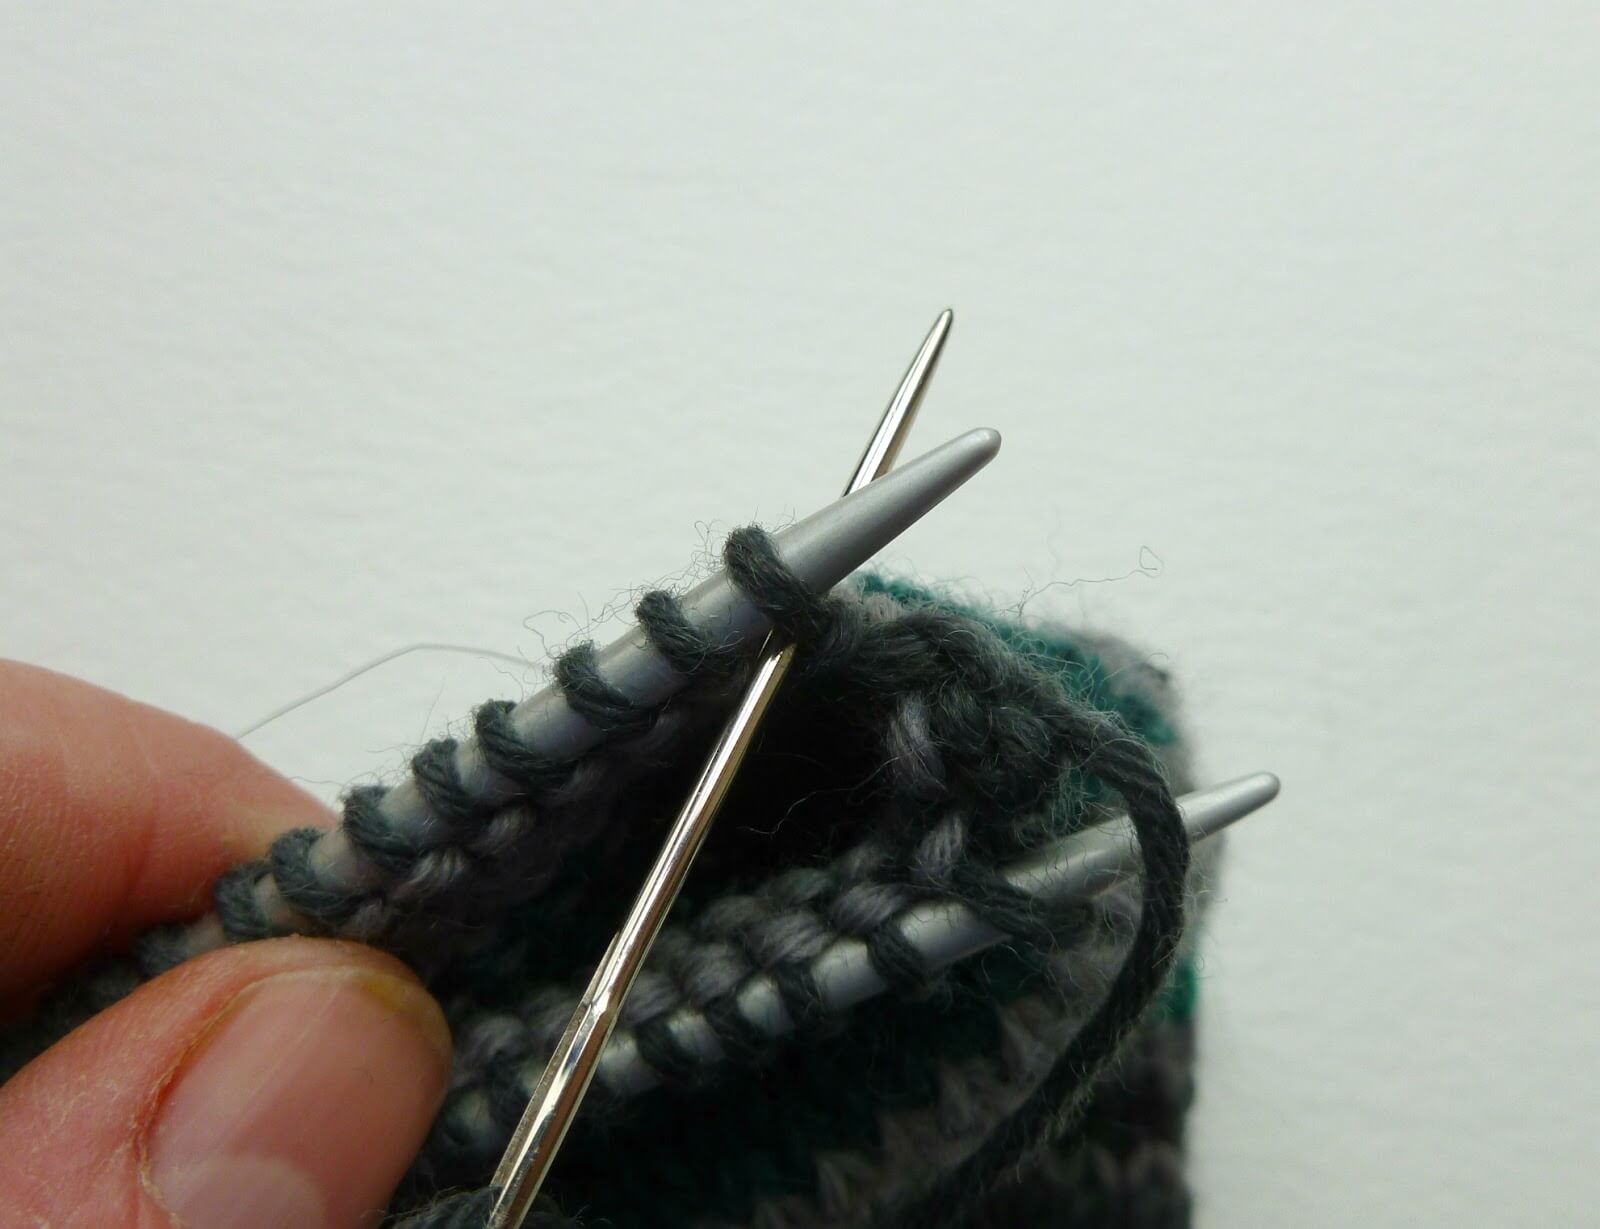
2 Insert the wool needle knit-wise into the first stitch on the front DPN and slip it off.
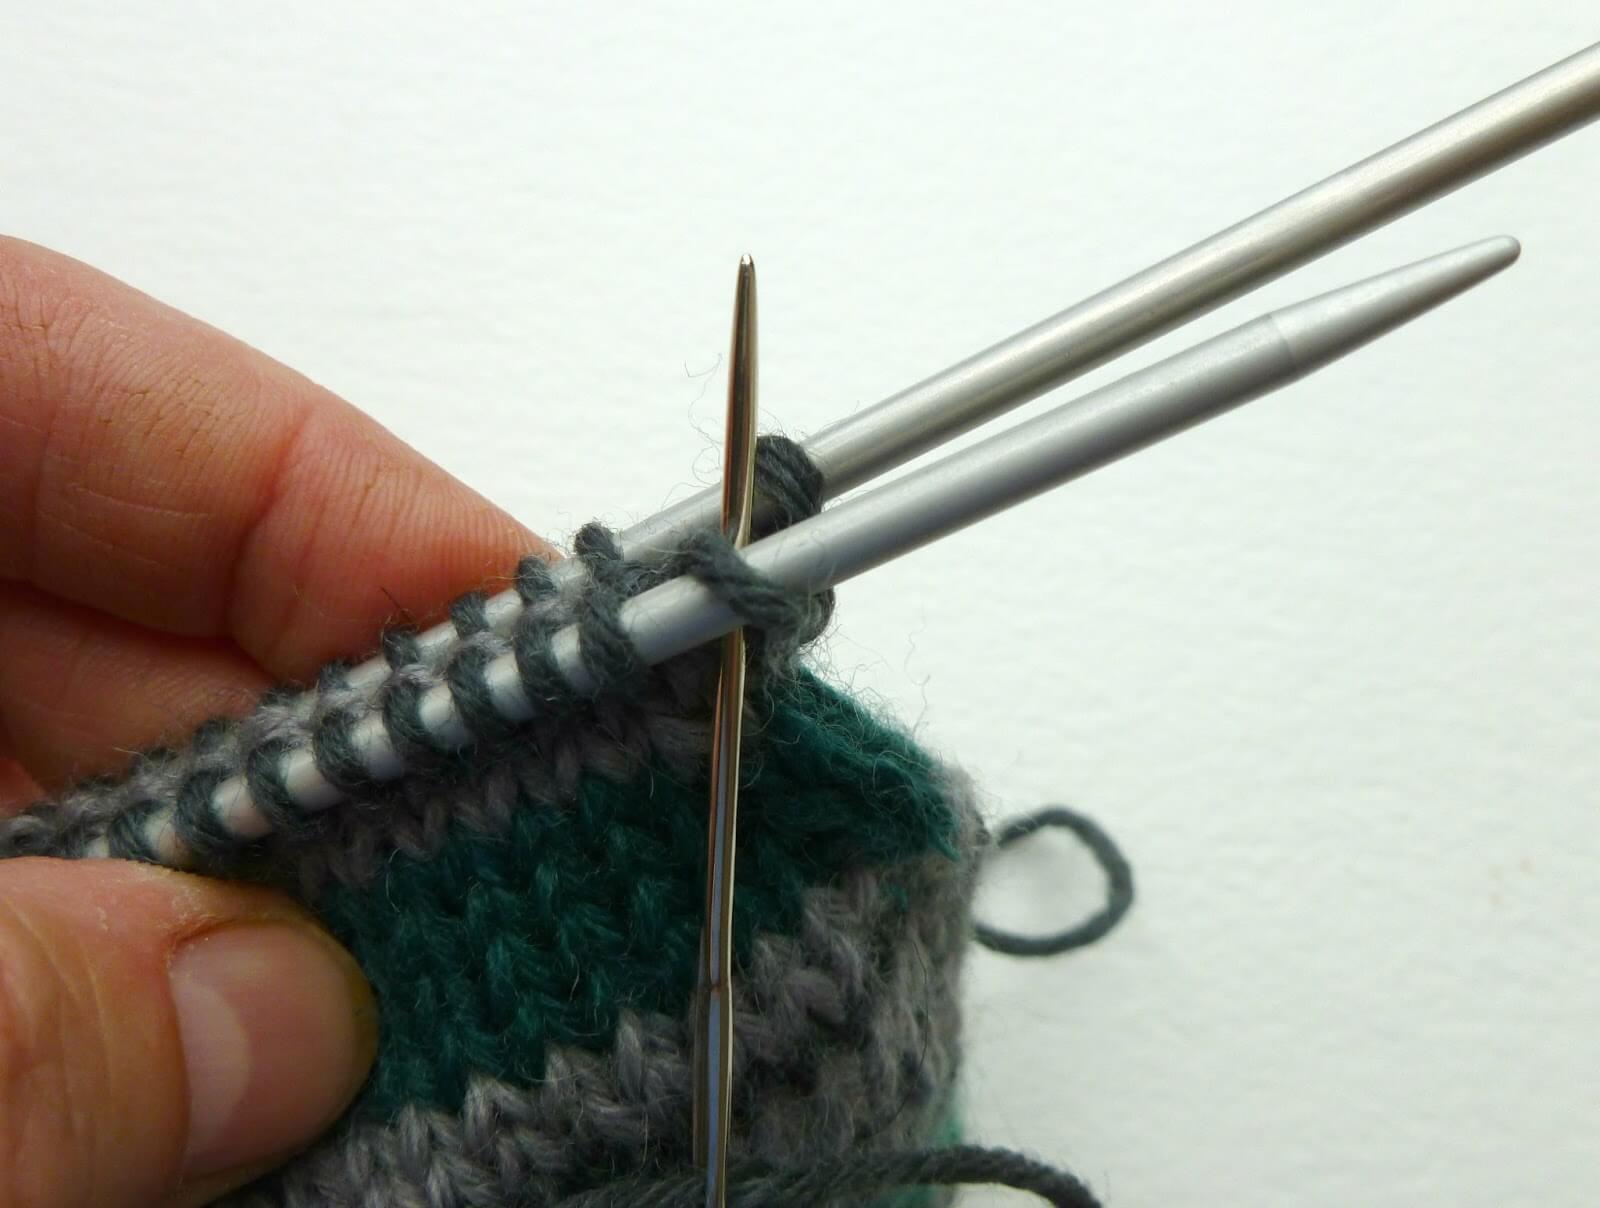
Insert the wool needle purl-wise into the second stitch on the front DPN and don’t slip it off.
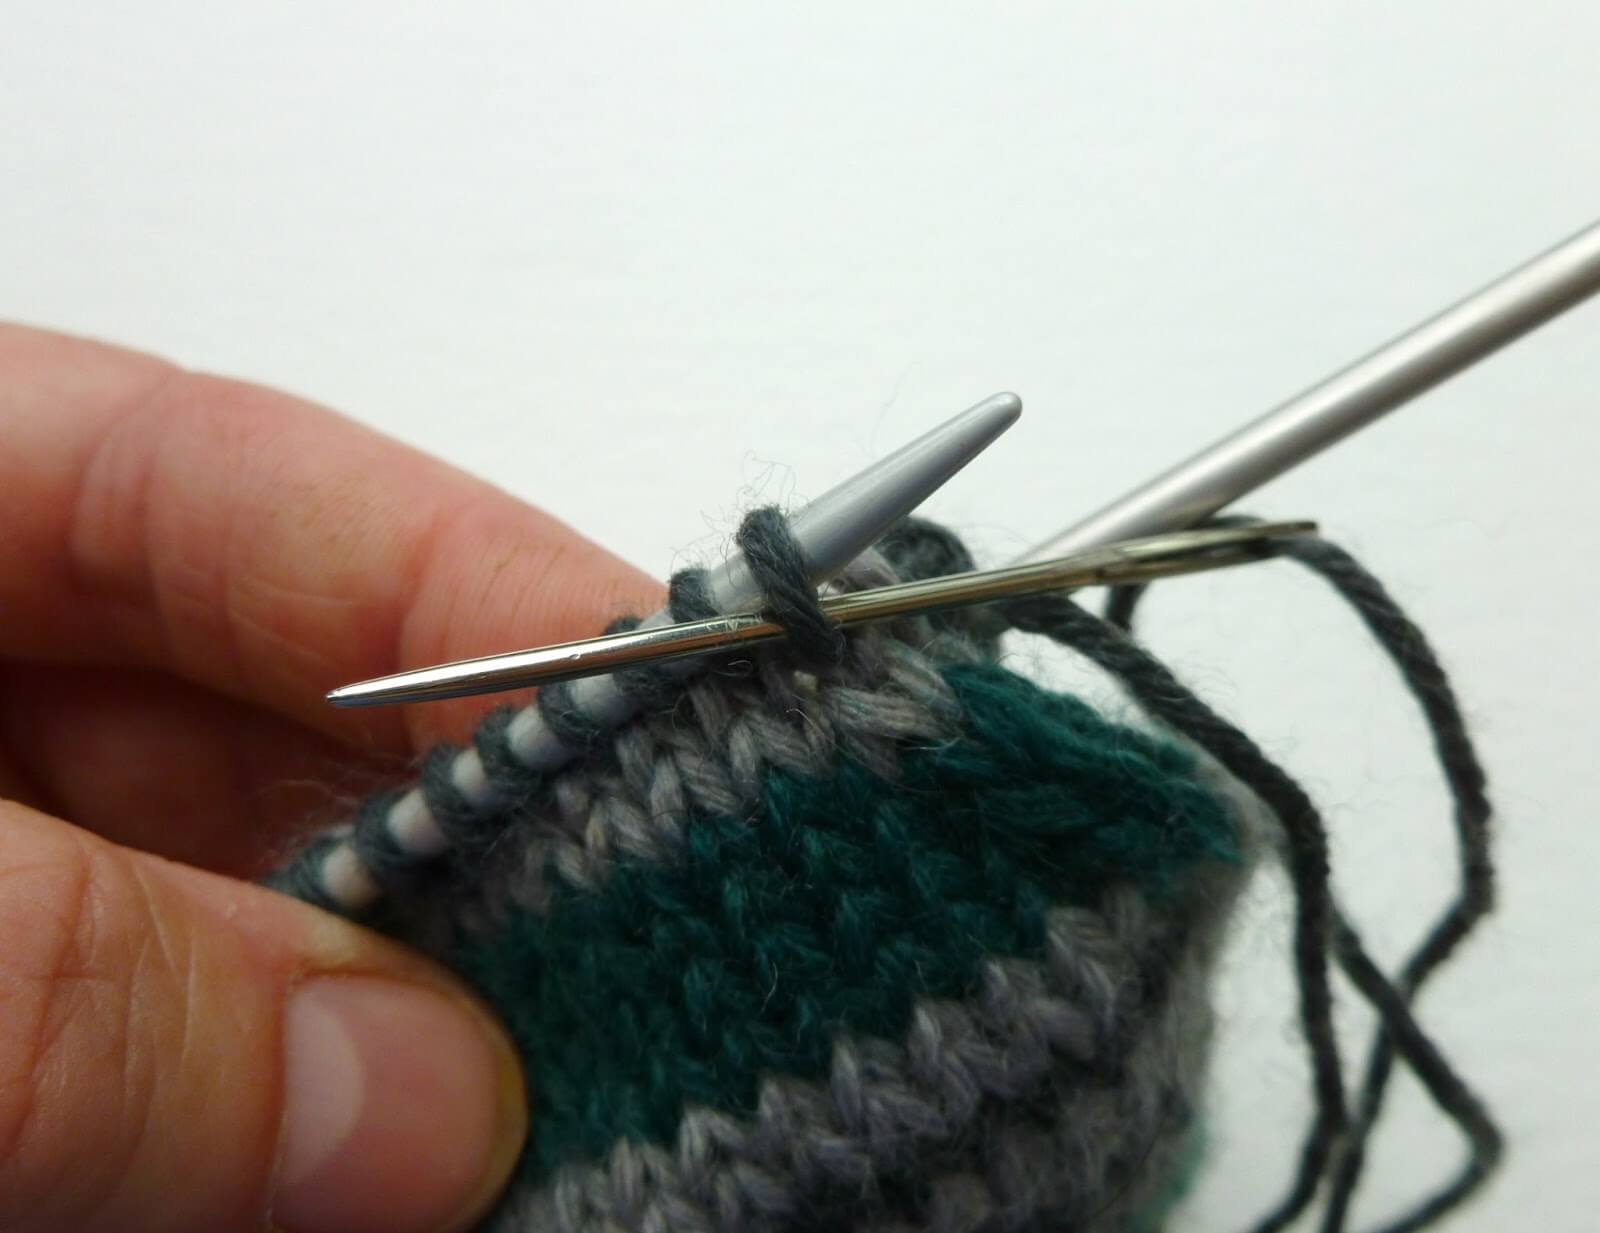
3 Insert the wool needle purl-wise into the first stitch on the back DPN and slip it off.
Insert the wool needle knit-wise into the second stitch on the back DPN and don’t slip it off.
4 Repeat 2 and 3 until you get to the last two stitches on the DPNs. You can see how the Kitchener stitch creates a new row of “knitting” so that there is no seam on your toes.
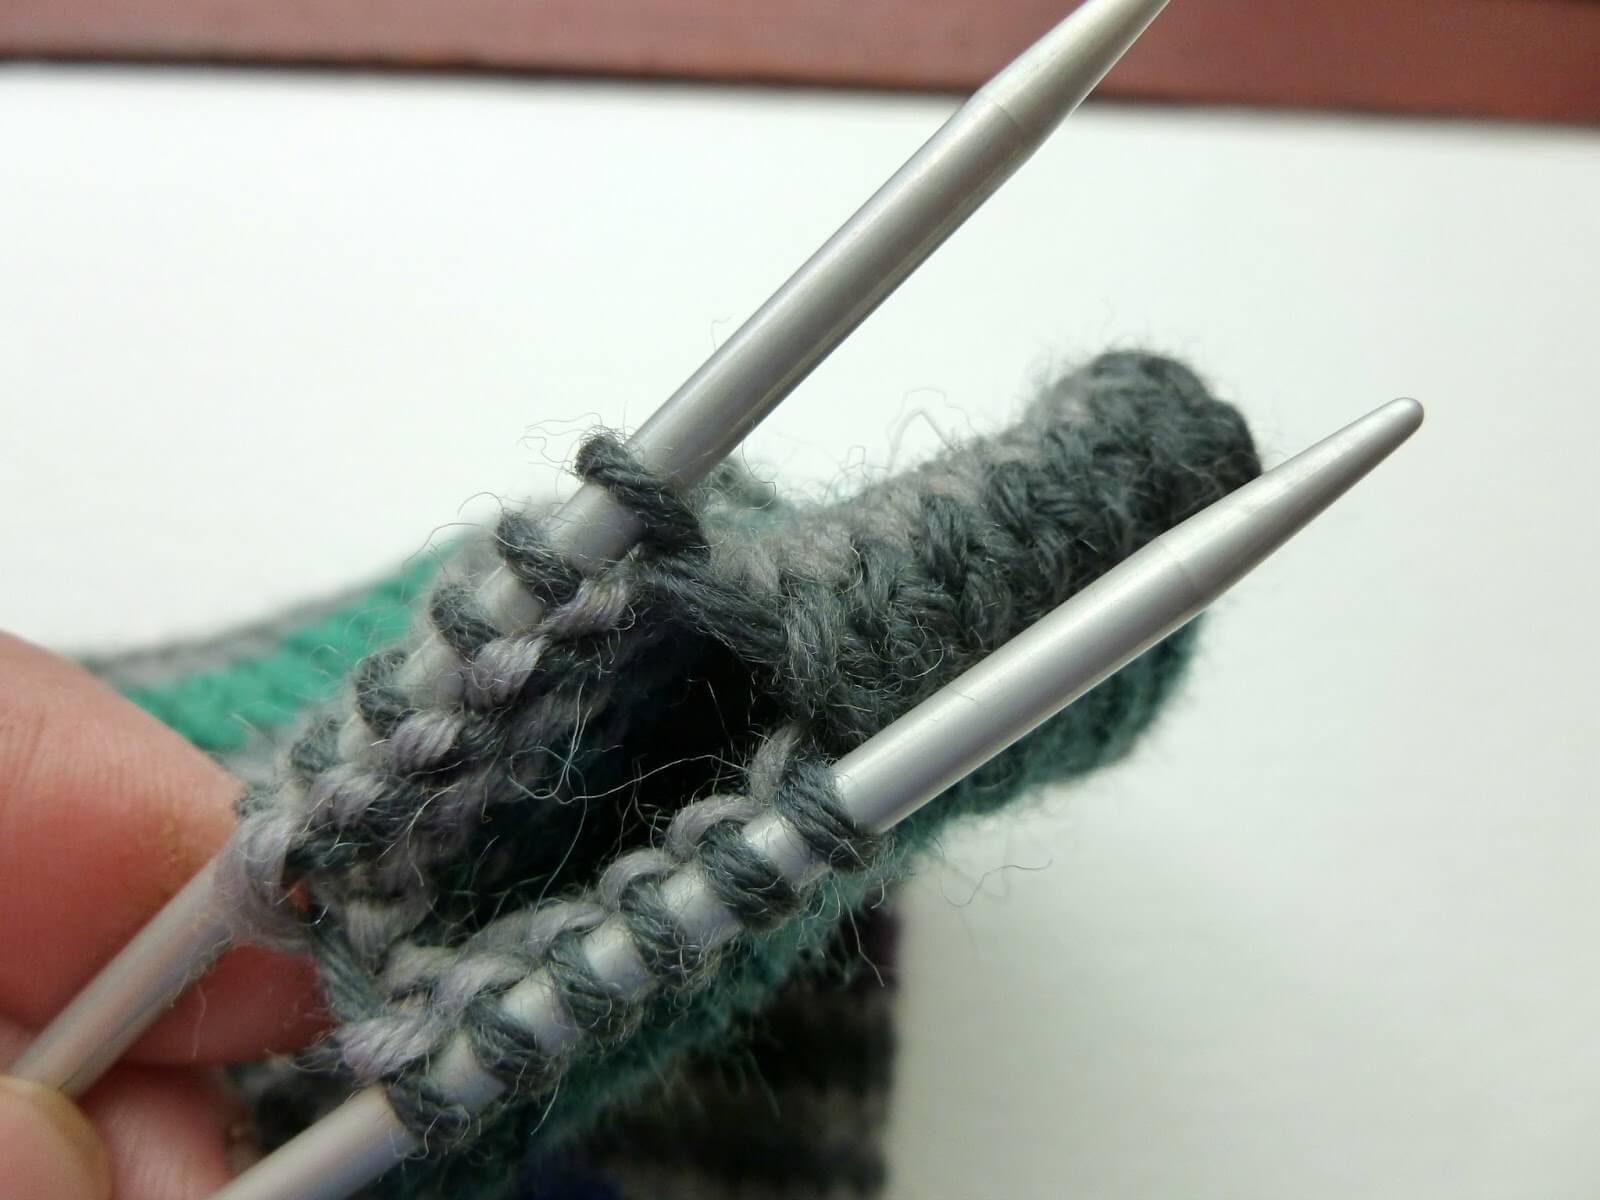
You will already have taken the yarn through the front stitch so after you have taken the yarn through the back stitch, you can slip both stitches off the DPN. The single yarn thread through the first stitch will be strong enough to hold it and it will sit flatter when you weave the end back into your sock.
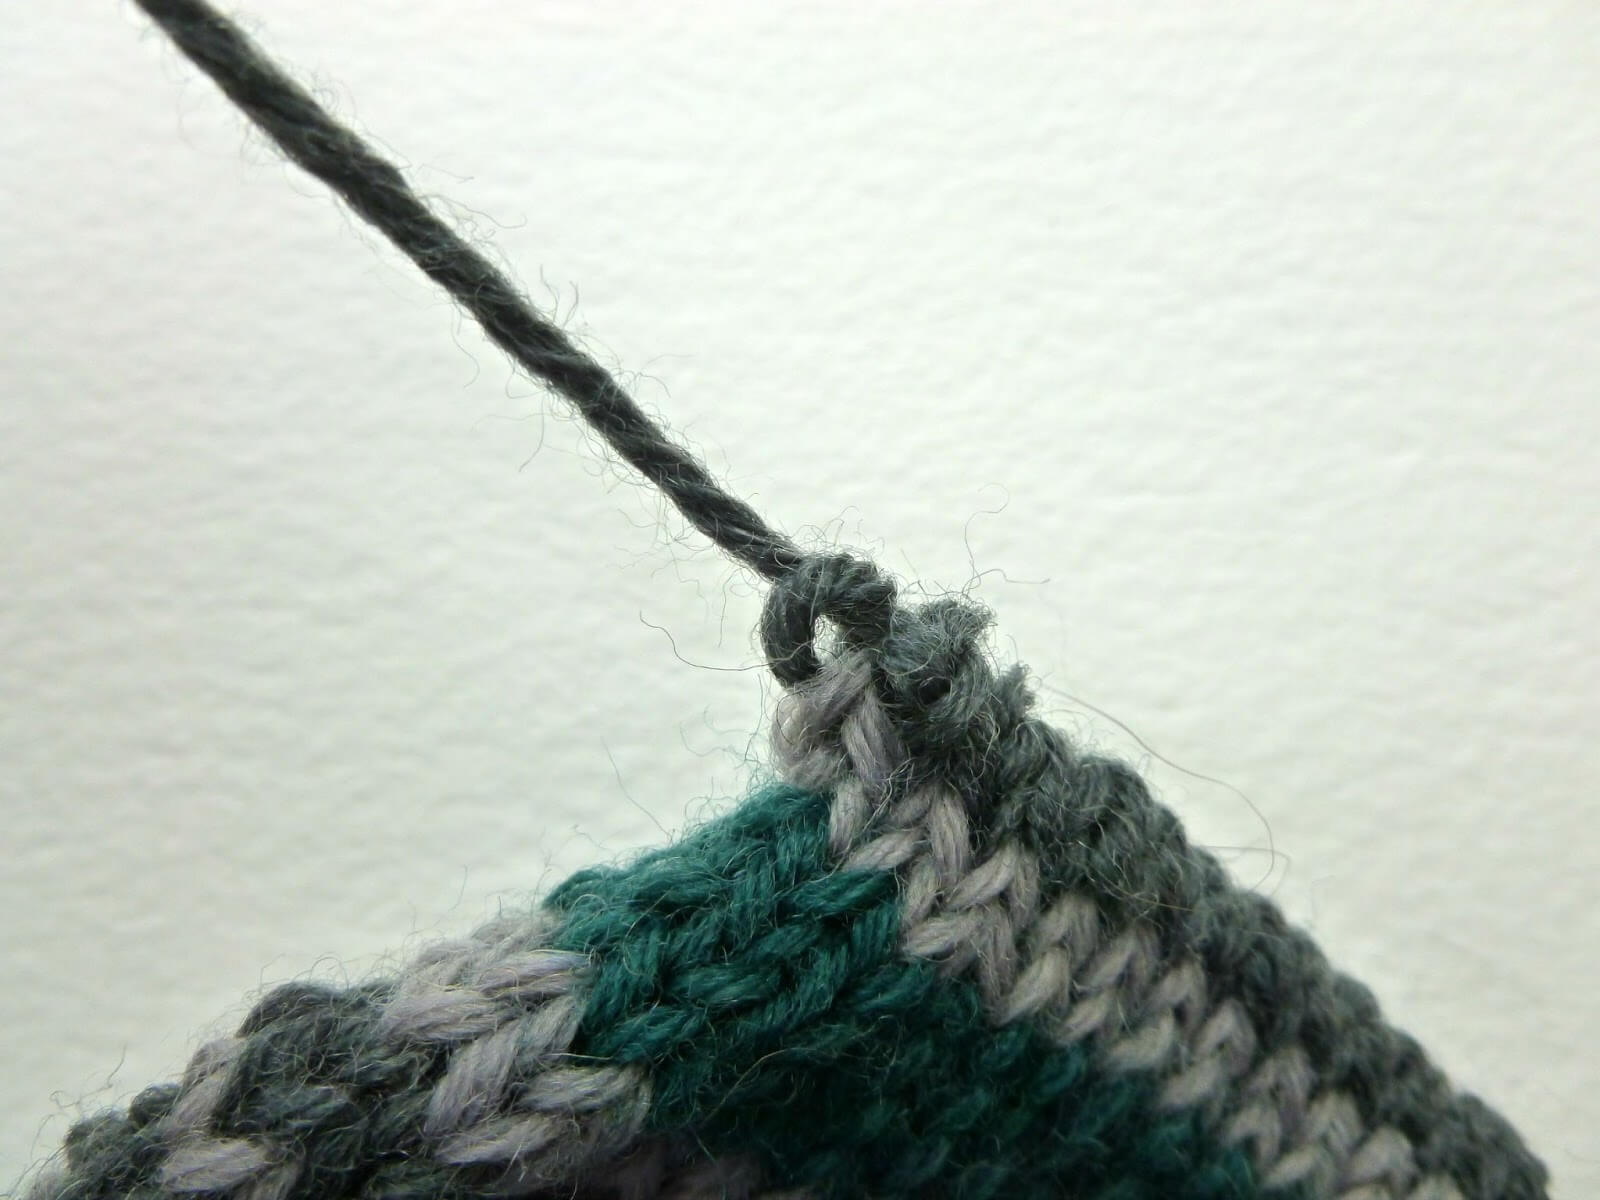
When I come to sew the end in, I usually make sure that I catch the last stitch if it’s a bit loose and sew it into place so that I don’t get the “ears” on the end of my sock. If you do get those, don’t worry about them too much as they will generally disappear once you’ve worn and washed your socks.

And there’s your sock! Remember to sew in the tail end at the cuff and tighten up any stitches if you need to, make another sock to match and you’re good to go. This pattern is also listed on Ravelry so if you have enjoyed using it then please consider linking to the pattern so that I can see your socks – I always love to see people’s socks!
This pattern is free on this blog and will always remain so. If you’ve enjoyed using it and would like to support my work so I can keep blogging and designing, you can browse my shop for patterns and books or buy me a brew – both are very much appreciated. Thank you! xx


This pattern copyright © 2016 Winwick Mum All rights reserved.
Not to be included in any collection or used for profit without written consent of Winwick Mum.
This pattern is based on my Basic 4ply Socks pattern, which means that you can find photo and video help in the Winwick Mum Sockalong tutorials. You can find out more here:
If you can already knit socks but would like to stay in touch, click the link below to join the Winwick Mum mailing list to hear about the latest blog posts, pattern updates, tutorials and more … but no spam, I promise!


It is almost time to get the sock knitting needles out again. All my knitted socks wear out really quickly, which is a shame. Still, this gives me a reason to make new ones. x
It is a shame, but it's always good to have an excuse to knit new socks! 🙂 xx
Thank you Christine – I'll need to hunt for 8ply and give these a try.
You're very welcome! Any DK or light worsted yarn should work for these socks if you don't have any sock 8ply in your stash 🙂 xx
Hi Christine. Just got your book this morning and it has some great tips and sock patterns. I have just finished a pair that were knitted from the toe upwards , but they are not the traditional socks at all. I knitted my first socks as a girl of 10, but my mother was one of 7 sisters who all knitted socks as they lived on Islay in the inner Hebrides. I'm still knitting socks today at 77. Loving the Arne & Carlos design sock wool. Isn't it clever. I hope you don't mind me joking your lovely blog. Hugs Rita xxxx
Hello Rita, it's lovely to see you and thanks for buying the book! I hope you're going to find it useful. Toe up socks aren't my favourite, I much prefer to knit them from the top down. I'm very impressed that you're still knitting socks – you've obviously done more than a few pairs over the years! Yes, the Arne and Carlos yarn is great, I love the way that it knits up in the Scandinavian design. Thanks for visiting! xx
Thank you Christine. I see in my post I wrote Joking instead of joining. Sorry. Hugs Rita xxx
I assumed that it was one of those auto-corrected text moments, Rita, don't worry. Good job it didn't change it to anything rude! 🙂 xx
These look like the cosiest socks in the world! Fantastic job.
I think all hand-knits are cosy but definitely the thicker the yarn the cosier the socks! 🙂 xx
Great tutorial Christine. Thank you xx
I recently bought DK instead of 4 ply for socks, I was devastated! So glad I stopped by today to say Hi and now, Thank you!
Hugs, Gez xx
You must have known! 😏 xx
Lovely pattern – a very enjoyable knit. Even better that mine are made of WYS DK, after reading your post about WYS! I have posted in Ravelry, linked to the pattern. Thank you, Christine.
That's wonderful, thank you Valerie! Your socks look fabulous, great colour choice! xx
Hello and thank you for the pattern! This is my first attempt at knitting socks and I'm wondering how best to do the slipped stitches. Should they be done knitwise or purlwise wise or differently on different rows?
Hello Luci, it's lovely to see you! There is quite a bit of debate about this one; some people always like to slip purlwise as it puts the stitch the right way round on the needle for the next row, others like to slip in the direct that they're knitting (so knitwise on knit rounds and purlwise on purl rounds). I usually slip in the direction that I'm knitting and haven't noticed a problem with it – choose whichever way you like and are most comfortable using and your sock will be just fine 🙂 xx
Hello,
First…. excuse my english… I'm a french girl who'd like to succeed in this pattern.
I am arrived at the gusset. Your are talking about markers. I knit with DPN. I thougt that we don't have to put markers before… only if we use circular needles (witch is not my case).
So i don't understand :"3 stiches before the marker" because i have none ? How many do i need ?
Thanks for your help
Marie-pierre, Normandie, France
Hello Marie-pierre, it's lovely to see you! You are quite right, you don't need stitch markers if you are working on DPNs – this pattern is written as if you are working on a short circular needle. If you are at the gusset you will find it easiest to divide your stitches across your needles so that your heel, top of the foot and picked up stitches are all on separate needles so that it is easy to see where your decreases will go. If you have a look at the Sockalong tutorial on the heel and gusset, you'll find pictures of how to create the gusset with DPNs which might help. The link is: winwickmum.blogspot.co.uk/2015/05/sockalong-week-2-heel-flap-heel-turn.html xx
thanks a lot for you reply !!
I think I did it well…
See you…perhaps for a future knitting !
marie-pierre
That's great! I hope you are super-proud of your new socks! 🙂 xx
Hello, I have looked but I can't see what size of sock the instructions are for. I want to knit socks in various sizes, firstly size 7 followed by a size 5 for a wide foot and a.10 and 11. I would like to knit the socks in 4ply as well as DK. My problem is that I really have great difficulty working out stitches needed as I'm numerically dyslexic. I would very greatful of for any help or advice you can give me, as I really want to knit socks! Thank you.
Hello Sea-Breeze, thanks for your message. The pattern is written for a medium-sized foot (mine, in fact 🙂 ) but it's easy to adjust it to suit any size of foot. The length of foot doesn't matter as you keep knitting to the right size, but the width of the foot is important as that determines the sock size. There's a stitch calculation in the Sockalong tension tutorial here winwickmum.co.uk/2015/04/sockalong-tension-squares.html but I appreciate that might not be much help to you if you struggle with the numbers. You will still need to measure around the ball of each foot that you are knitting for to get the size in inches and you will need to knit a small tension square as shown in the tutorial (it doesn't need to be as big as the tutorial one) so that you can see how many stitches per inch you are working at. After that, it's a calculation to get the stitch number which isn't too difficult but if there's nobody close by who can help you then email me the numbers (click on the little envelope in the social media icons towards the top left of this page) and I'll give you a hand 🙂 xx
Hello there 😀How many stitches should I cast on for men's size 8.
Many thanks carol
Hello Carol, thanks for your message! The number of stitches to cast on determined by foot width, not foot length. There's a tutorial in the Sockalong tutorials about how to work it out so that you get the perfect fit: winwickmum.co.uk/2015/04/sockalong-tension-squares.html For DK weight yarn on 3.5mm needles, you usually expect to be knitting at about 5-6 stitches per inch 🙂 xx
Thanks for your help. I'll give it ago😊
Good luck! 🙂 xx
Hi, I've just found you and am going to try knitting some socks. I've used short circular needles but not dpn or magic circle, I'm not sure which one to go for first! I'll have to google magic loop! Thanks
Is there a printable pattern for the 8ply pattern here. I printed out the 4ply one, but prefer working from a paper than keeping laptop on… and I can take it with me.
Thanks
Jeanne
Yes, if you scroll down to where the pattern starts, there's a link to a PDF copy of the pattern 🙂 xx
I am making socks for my son that is a 9 1/2 shoe size. How many stitches should I cast on for the 8 ply sock yarn? Should I use a larger needle size? I am using Opal X-Large Polarwolf yarn.
Thanks in advance
Hi Barbara, the number of stitches you need depends on the width of your son's foot – you'll find a link to the sock stitch calculation in the right hand side bar of the blog – so you can work out what's right for him. Hand-knit sock size is based on the width of a foot, not the length which is easily adjusted. I usually knit 8ply socks on 3.5mm needles but if the yarn is new to you then it's worth doing a quick swatch to see how the fabric turns out (you want firm but not stiff) and then use that for the stitch calculation as you'll need to know how many stitches per inch you're knitting at. Hope that helps – and good luck! 🙂 xx
Thank you so much for your quick reply. I made the 6 ply socks for my daughter in law and she loves them. Your patterns are so easy to understand.
That's great to hear! I'm glad you find the patterns helpful – now on to your son's pair! 🙂 xx
Thank you so much you beautiful thing!! for giving me this pattern.
You are very welcome 🙂
Hi Christine
What sort of cast on would you recommend for these socks? I have made lots of your 4 ply socks and I love them, but looking at internet i think I should have been using some kind of stretchy cast on (long tailed)? I have never done anything except cast on needle with no thumbs or long tails involved!
Thank you
Alex
Hi Alex, I always use the cable cast on for all of my socks but cast on with a bigger needle to make sure that they don't get too tight. There are so many different types of cast on and I think a lot of it comes down to the preference of the designer so whilst you can try out different ones if you want to, if you're happy with the one that you're using then I'd say to stick to it! 🙂 xx
Hi Christine, Thank you for your excellent tutorials. I'm knitting a pair of socks for the first time and am finding your lessons very helpful indeed. One question. I followed the instructions wrt how many stitches to cast on and ended up with 52. I've shaped the gusset and got to the point where the instructions said "continue decreasing in this way … until there are 44 stitches on the needle". I assumed that would be 52 in my case but am now stuck on how to adapt the instructions for shaping the toe for 52 stitches. Is there a method to follow or is it the same as you've written, irrespective of the number of stitches? Many thanks! Cheers, Jacquie
Hello again, Christine, Please ignore my previous question. Silly me didn't read your toe-shaping tutorial. Thanks again for creating such a helpful website! Cheers, Jacquie
I love your tutorials! I wish to make a gift pair of mens socks. I only know that he wears a US size 14 shoe, yes he is a tall man. I cannot find a pattern anywhere that instructs how to make a mens size 14 pair of boot socks! Please help? I see that your last reply was in 2020 and so I am desperately hoping for a reply. I have only made 6 pairs of socks so I am not particularly skilled, to say the least. Thank you kindly, Tam
Hello! You can use this pattern to make your boot socks – if you can get a ball of the foot circumference measurement you can use the Sock Stitch Calculation from the Sockalong tutorials which will give you the best results, but if not then you can take a view of what you think that figure might be and use that. Hand knit sock size is based on foot circumference and not shoe size as you and I might wear the same size shoes, for example, but our feet might not be the same width. I think that if you’ve made 6 pairs of socks then you’ll have no trouble with these and DK yarn knits up very quickly so they won’t seem so bad even though they’ll be big socks! I hope that helps! 🙂 xx
THANK YOU 🙏
You are very welcome! 🙂 xx
Thank you Winwick Mum for your beautiful patterns and clear explanations – using them, I knitted my first sock at the age of 80. It was not good enough to wear/give to anyone but it (along with some other efforts since pulled undone) has helped build my confidence. I’m now planning my first pair of gift socks for winter here in Australia. Thanks again.
Well that is a wonderful message, thank you! It’s always the right time to start knitting socks, whenever you pick up your needles to do it, and I am delighted that you are feeling confident enough to gift your socks! 🙂 xx
hello and thanks you so much for your pattern. new to knitting and got carried away and have a longer heel flap to sit above the ankle knobbly bone bit to heel and hoping it won’t cause any grief as I continue your pattern.
however, I’m lost trying to do the heel turn and wonder if you have a link to a video ?
thanks so much . enjoy your day.
Hi Anthony, I think you should be fine with your longer heel flap – you’ll just have a longer gusset on your sock and you can see how that feels when you wear it and whether you want to alter it for the second sock. If you’re at the heel turn, you could take it back a couple of rows (just un-knit each stitch as there won’t be many) – see how you feel. Have a look at this video for help with the heel turn … it’s the magic bit and you’re going to love it! It’s for a different pattern but is still based on the Basic 4ply Socks pattern and therefore this pattern that you’re using. I hope it helps! 🙂
hello and apologies for my delayed thanks. I have not had access to www. I am very grateful for your reply and hope to check the link out very soon. it’s very pleasing to know I should be okay and I’m excited to experience the “magic ” you mention 😃 . thank you and until next time .
Oh don’t worry, I’m glad you got my reply and I hope everything goes well with your socks! 🙂
ps I cast on 44 stitches
Hello, I’m attempting my first pair of socks but it’s not working following the directions for the heel. I’m left with 3 floating stitches because row 1 doesn’t equal 22 stitches. I’m following your size, please could you explain. Thank you.
Hello! Are you working on the heel flap or the heel turn? Your heel flap should be 22 sts (half of the 44sts you cast on) so I’m not quite sure why you have 3 floating stitches. If you can give me some more information, I’ll be able to help you 🙂
Thank you so much for your response. I have abandoned that attempt and have restarted for the umpteenth time! Your patterns are wonderful, thank you for all the work you’ve put in to them. I’ll keep you posted on my progress.
Oh, I hope this version goes well! 🙂 xx