
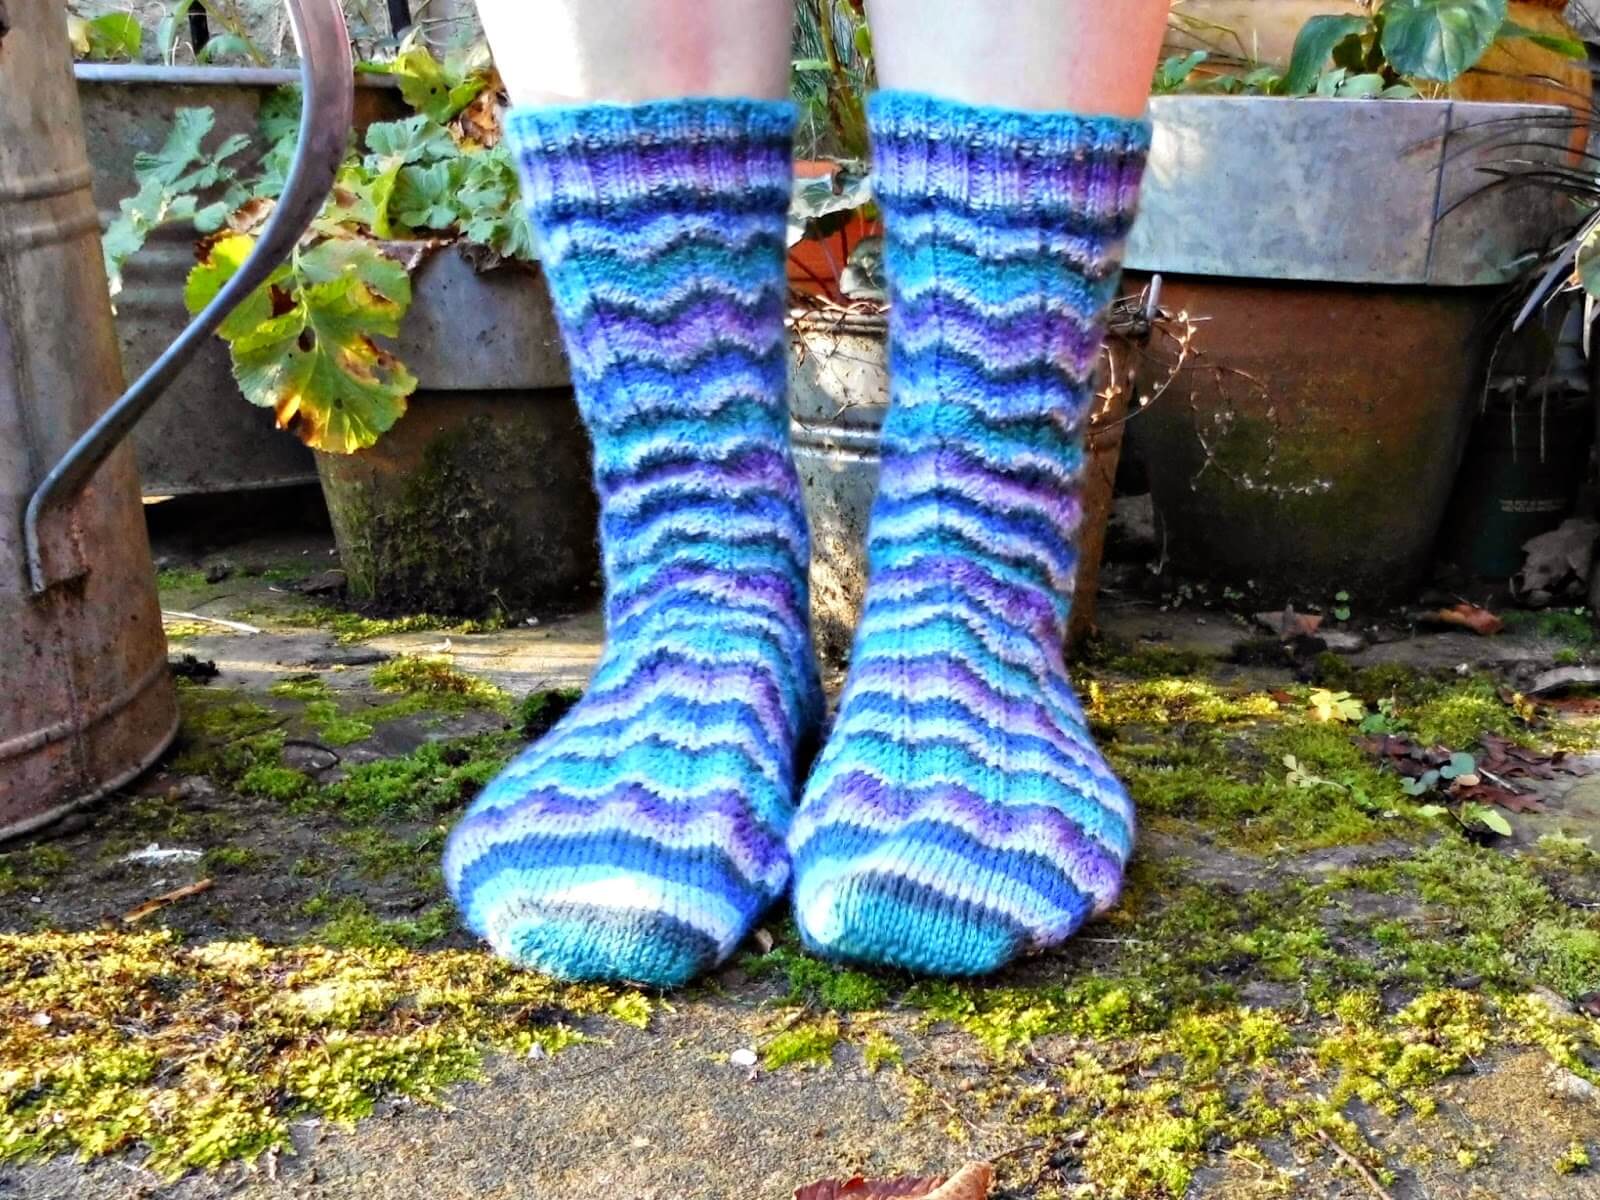
Neat Ripple Socks – free pattern and tutorial
Ever since I made my Neat Ripple blanket, I’ve fancied a pair of socks to match. There’s something about those undulating stripes that make me feel calm – perhaps it’s because they remind me of the sea, or perhaps it’s because I think that stripy sock yarn would be just perfect to create something that would wrap my feet in the same stripes I can wrap myself in with my blanket.
There was something almost hypnotic about crocheting the blanket, creating those dips and hills, and I knew that knitting a sock in the same pattern would have the same wonderful effect. So I looked around at various patterns but didn’t see anything that really fitted the bill. Not the way that I’d imagined them in my head, and not the way I wanted them to fit my feet.
In the end, I decided to make my own Neat Ripple socks, basing it on the crochet stitch pattern that I used for the blanket and my Basic 4ply Socks pattern. You’ll be pleased to know that Lucy’s given her seal of approval to their name and here they are!
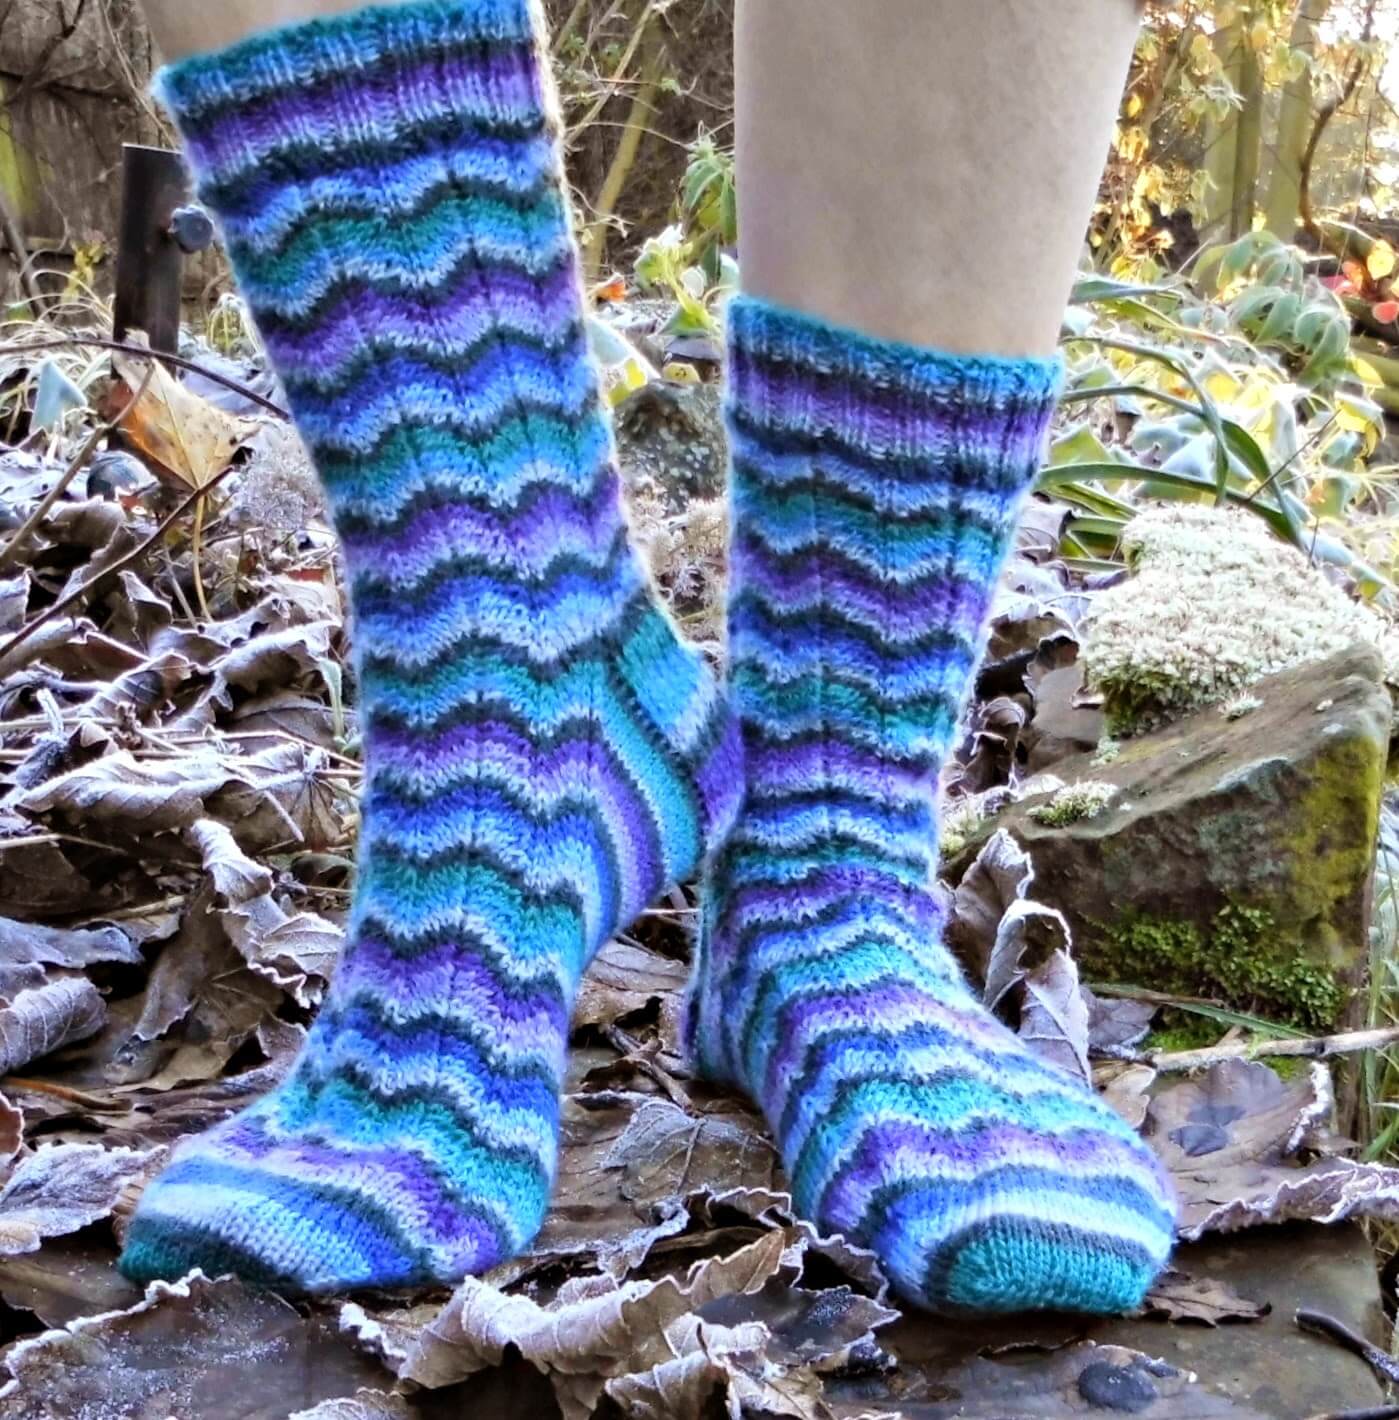
What do you think? Suitably ripply?
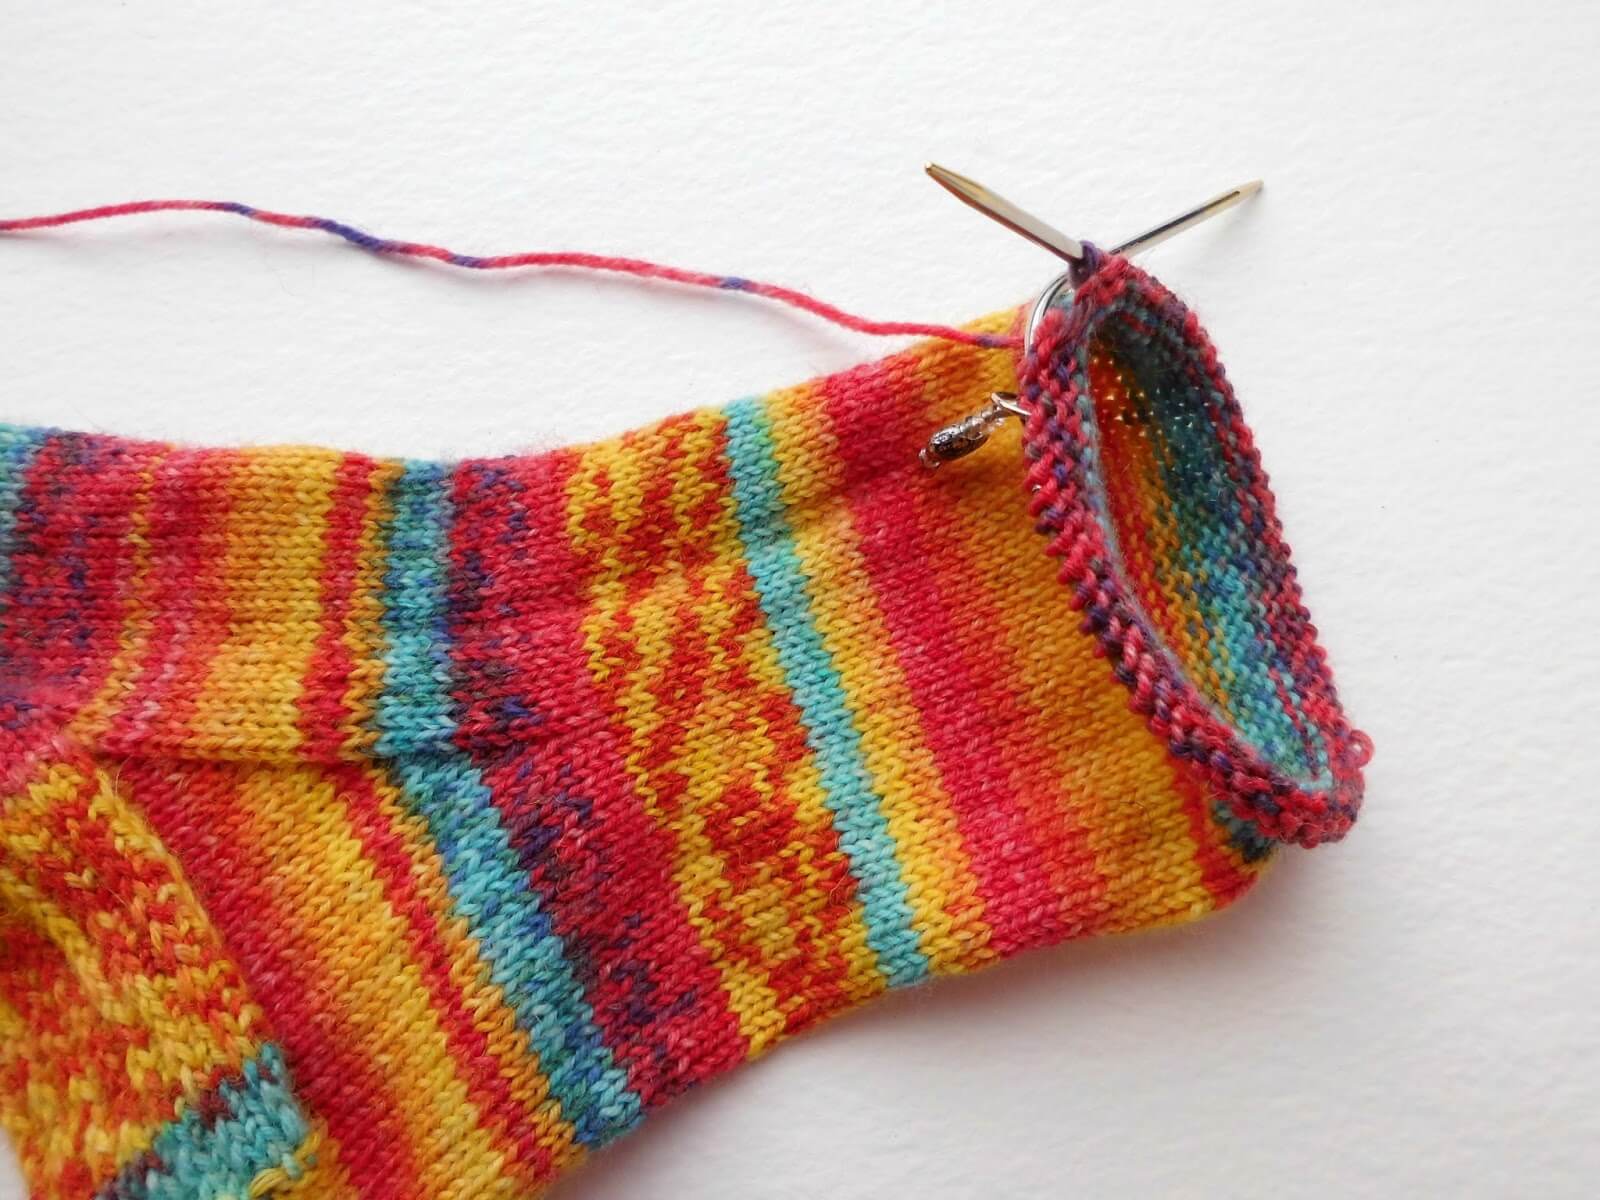
I just love the way the yarn creates sock waves, and they’re super-simple to make with no complicated pattern stitches to remember. I think self-striping sock yarn is my very favourite sort of sock yarn. Sometimes there’s a tiny picture on the ball band of how the stripes will turn out, and sometimes there’s no picture and it’s a surprise. Woolly surprises are a nice kind of surprise. Plus, I never have to worry about which colours to put together, or about ends to weave in or that I’m going to feel the join as the colours just blend together and come out of the ball as they were dyed. Magic!
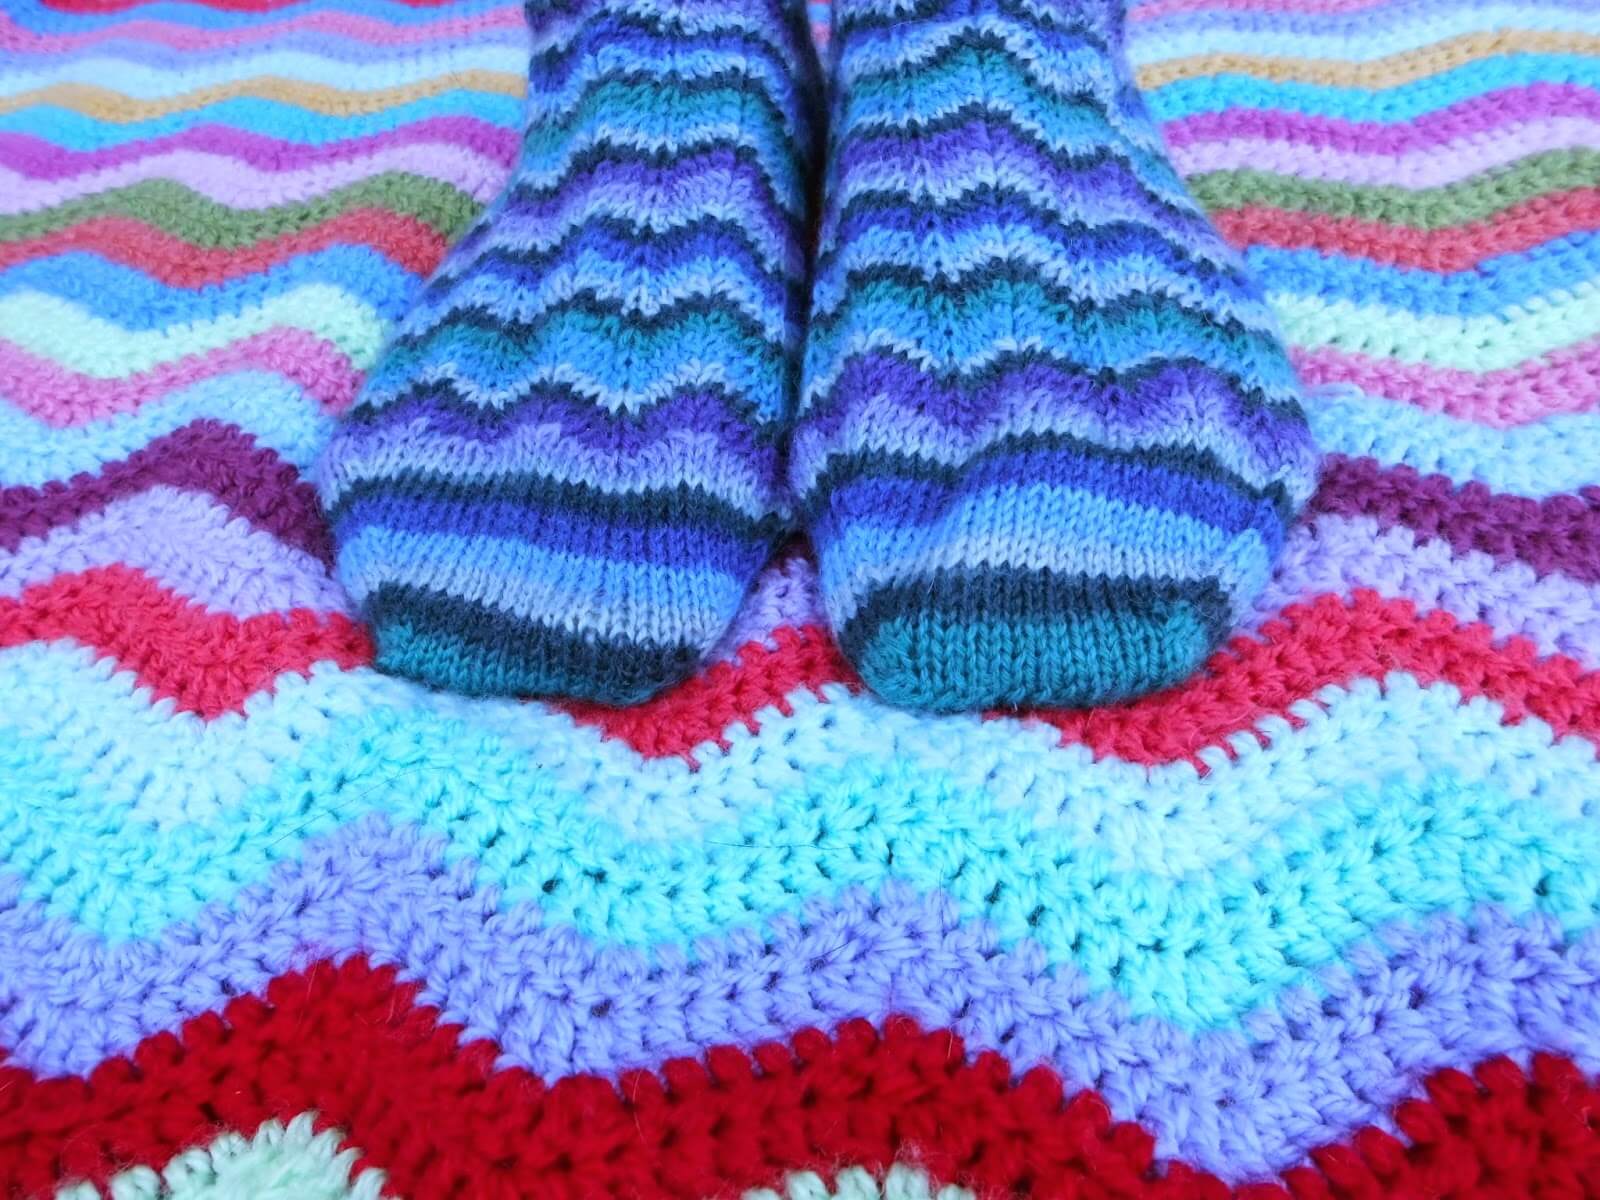
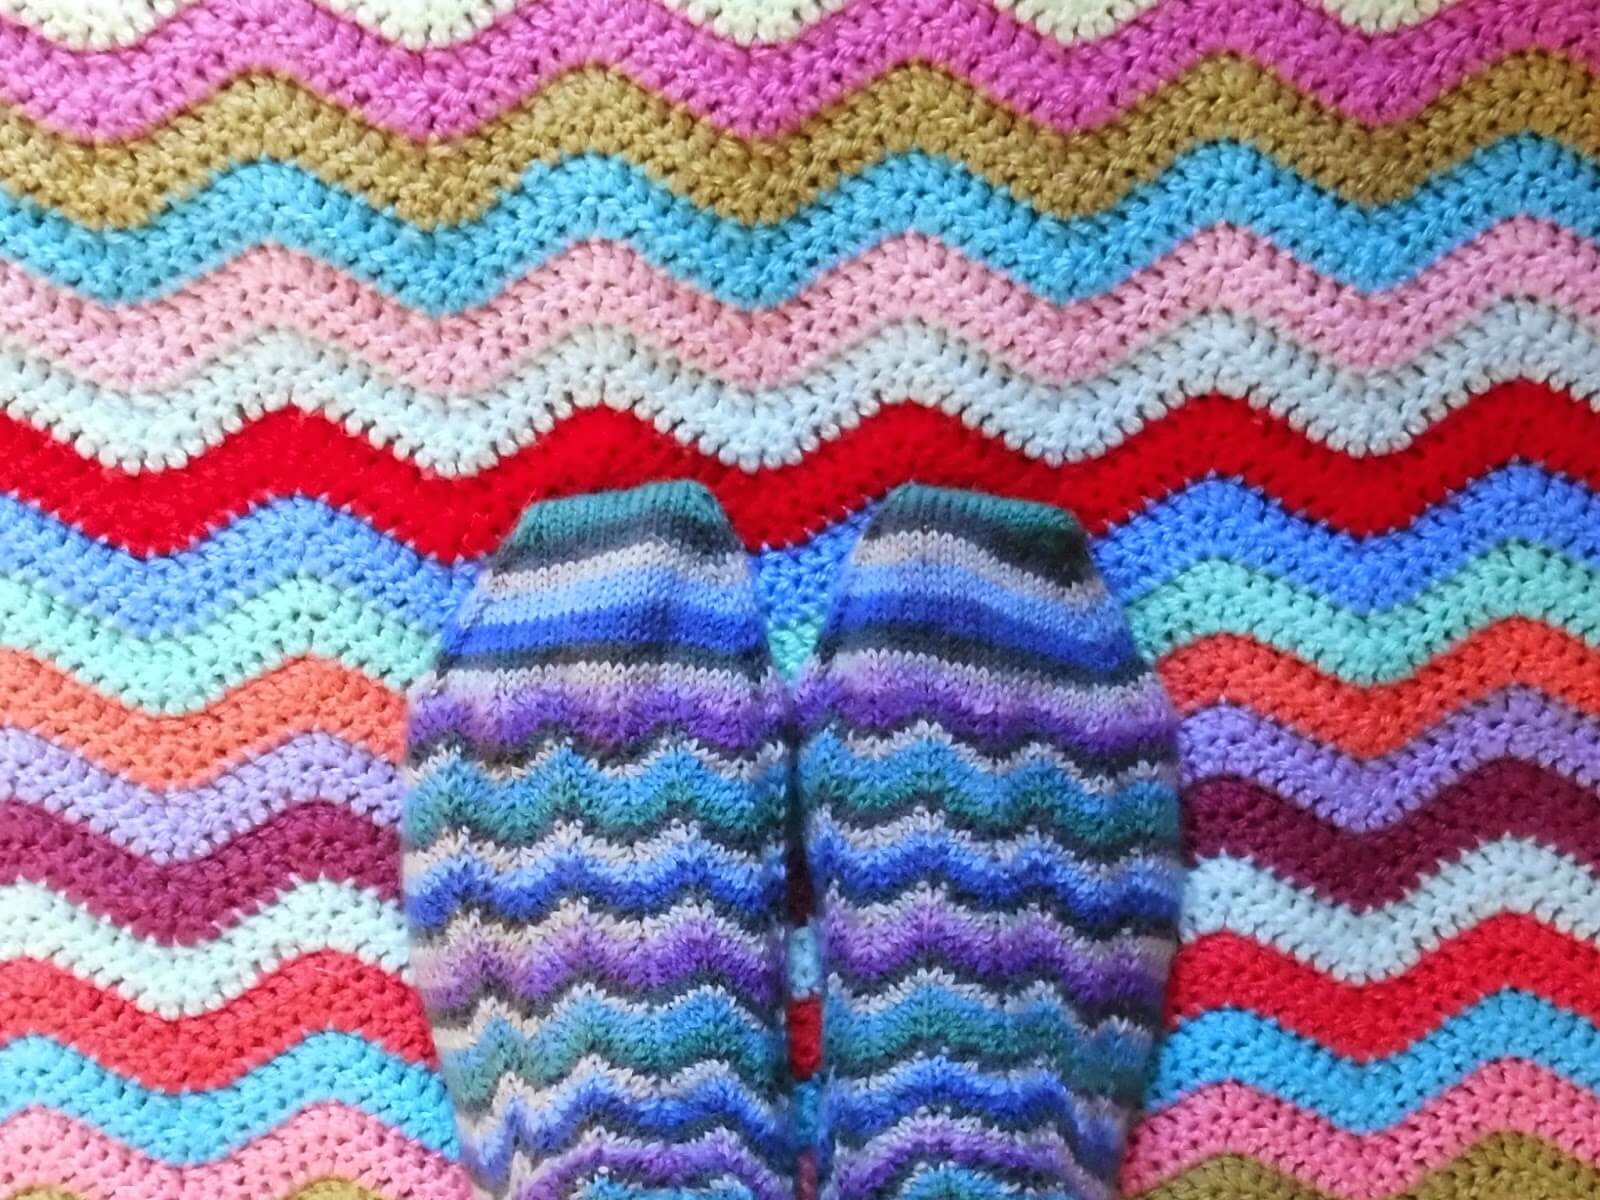
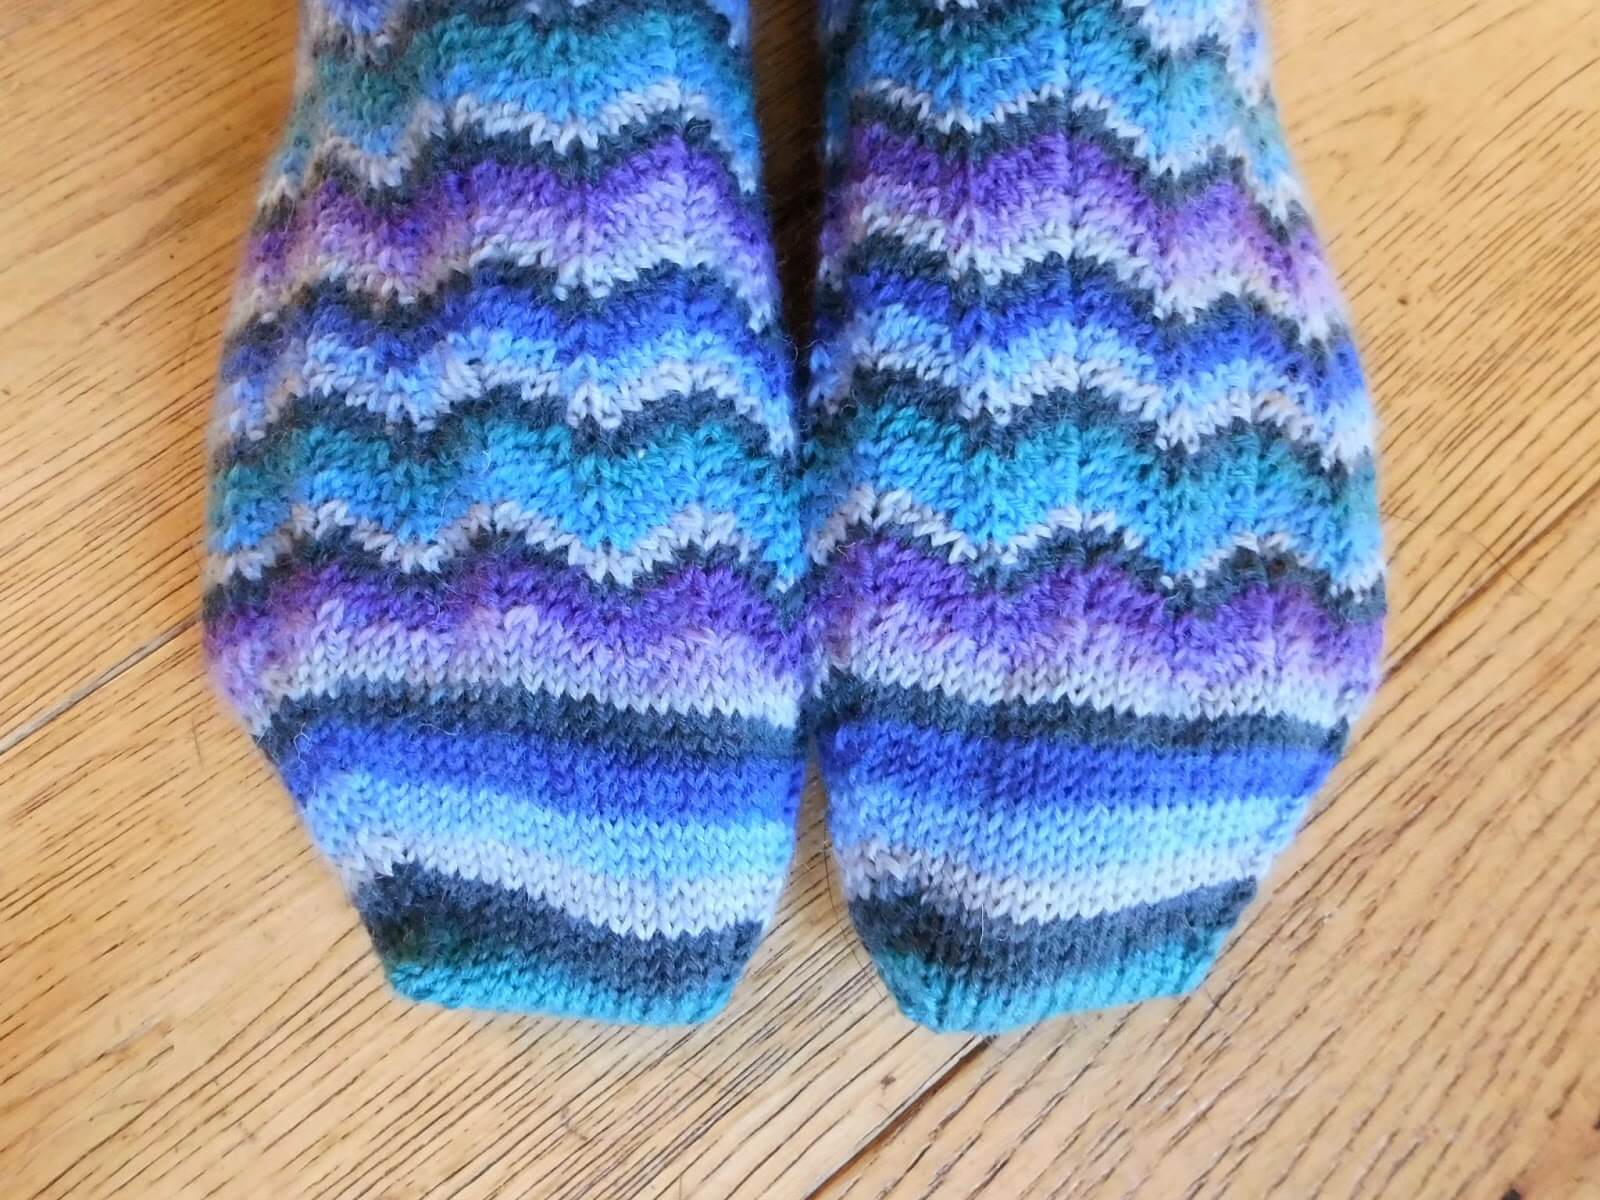
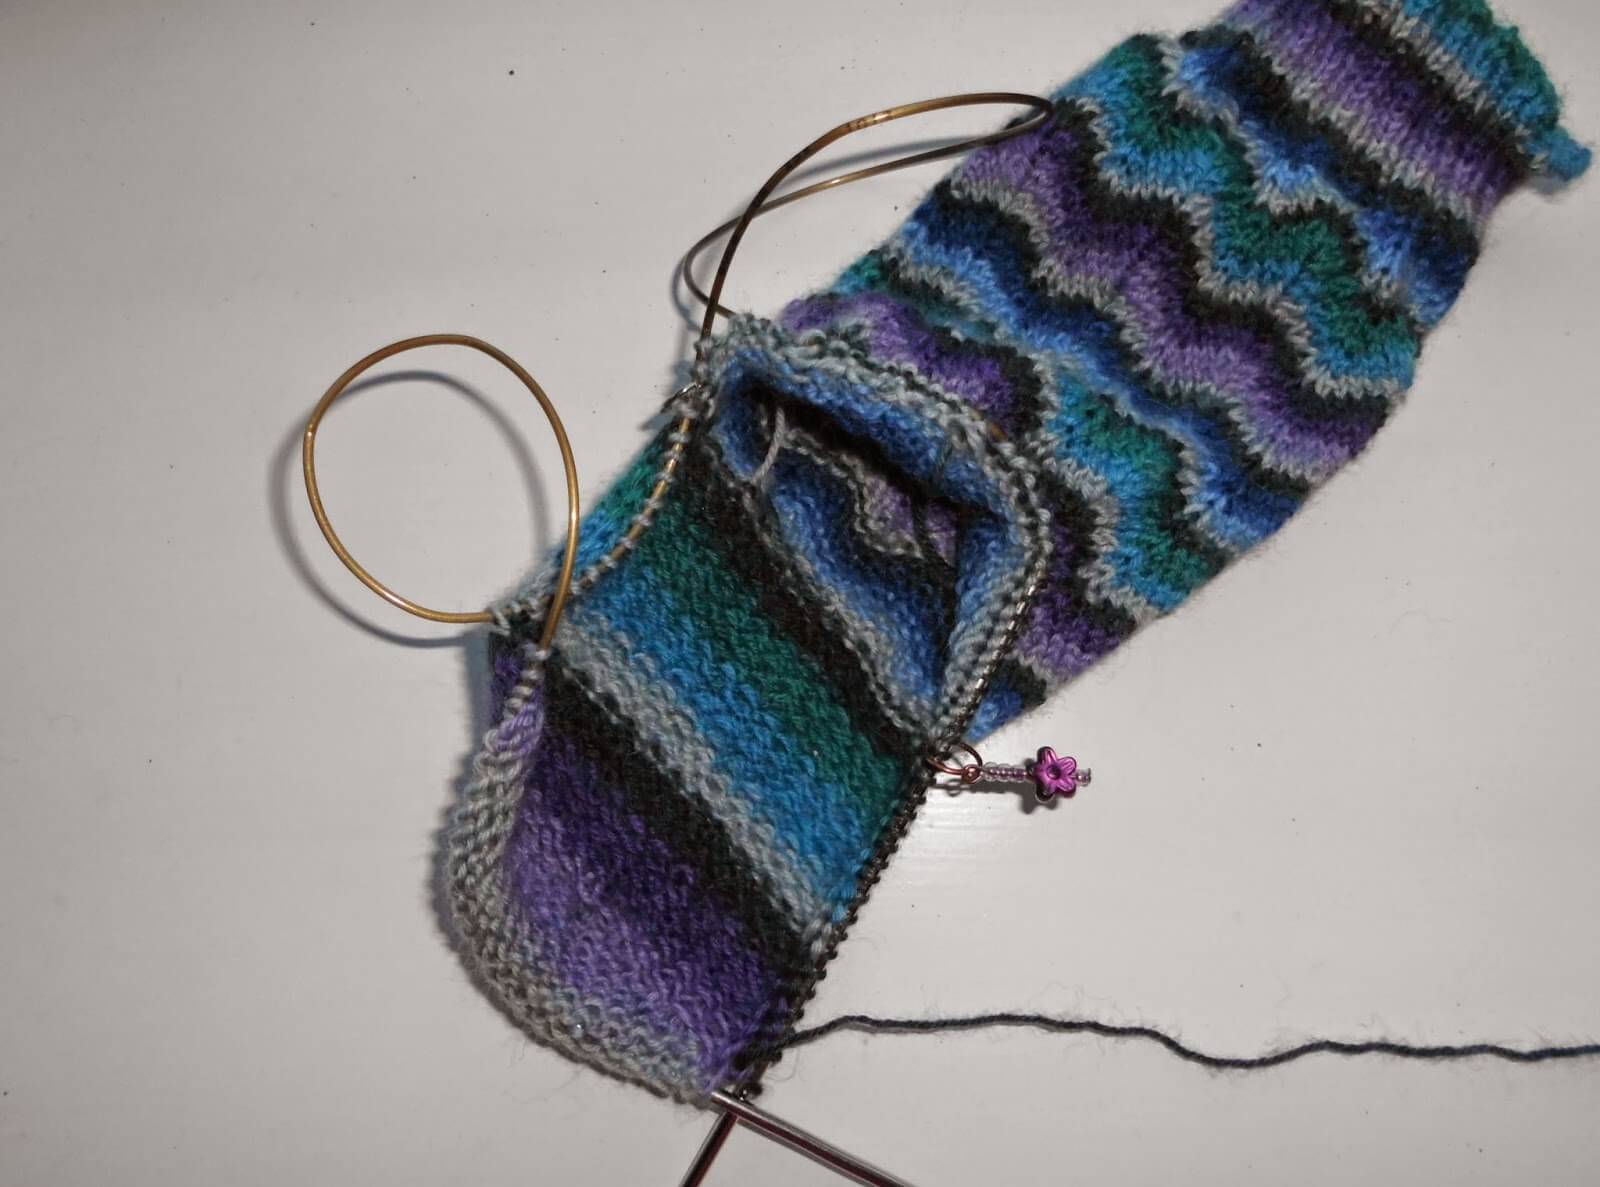
I also love the way that the pattern turns into stripes across the bottom of the sock. You could continue the ripples if you wanted to, but I decided that might be too uncomfortable for my taste and wanted smooth stripes instead. When I was small, I was never a child who liked wearing those mittens strung through your coat on a length of wool so that you didn’t lose them – I could always feel the wool and it was always uncomfortable. My Mum used to say I was like the Princess and the Pea and I’d complain about things no one else would ever notice. It’s the same now with labels inside clothes. And very definitely the same with my socks.

And of course, being me, I have to have the stripes match exactly. I didn’t want one sock rippling out of time with the other. Oh no, that wouldn’t do at all!
So here’s today’s question. Would you like to make your own pair of Neat Ripple Socks? Would you like to wrap your toes up in waves to match your blanket, just like I wanted to? You would? How lovely! And handy that I’ve got a pattern just here … 😀
Now, before you get stuck in, just a quick word about needles and yarn. I used Regia Ombre yarn for these socks and found that a pair of size 5 socks used two balls with some left over. Unless your feet are particularly large, I would say that two balls would be fine, but if you have big feet or you want to go up a needle size, then I would recommend that you buy a third ball to make sure you don’t run out. You can always pull the ball apart to find the right section to continue your stripes.
I found that the best gauge for the pattern was on 2.75mm needles. I would usually use a 2.5mm needle but the pattern came out too tight, and knitting on a 3.0mm needle made the socks quite a lot bigger. This is useful to know if you have wide feet and usually need to cast on extra stitches – there are 70 stitches in the round for this sock which compared to the usual 60 stitches that I would cast on for socks makes them pretty big. The pattern pulls that in enough to make them fit comfortably, but if you need wider socks then try using a 3.0mm needle to relax the knitted fabric a little before attempting to add another block of pattern in – there are 10 stitches in a block so you can see that they would start to become very wide socks indeed!
I also chose to knit these socks on an 80cm circular using magic loop. “Hang on a minute,” I can hear to say, “I thought you didn’t like magic loop. What about that tiny circular needle you usually use?” A good question! I started off with my tiny circular and whilst it is possible to use it, I found it awkward and the stitches didn’t slide easily across it. I used DPNs for a while and they work fine, but decided to try magic loop to see if it was faster and I found that it was. No, magic loop still isn’t my favourite way to knit socks, but it worked very well for this pair! (If you need help with doing magic loop, try this video as a place to start.) I had to buy a new circular – I usually use Knitpro Nova interchangeable needles whenever I need a circular but Knitpro don’t make tips as small as 2.75mm so I bought this one made by Addi instead. All of my sock needles are made by Addi and I’ve been very happy with them – they’ve seen me through a lot of pairs of socks!
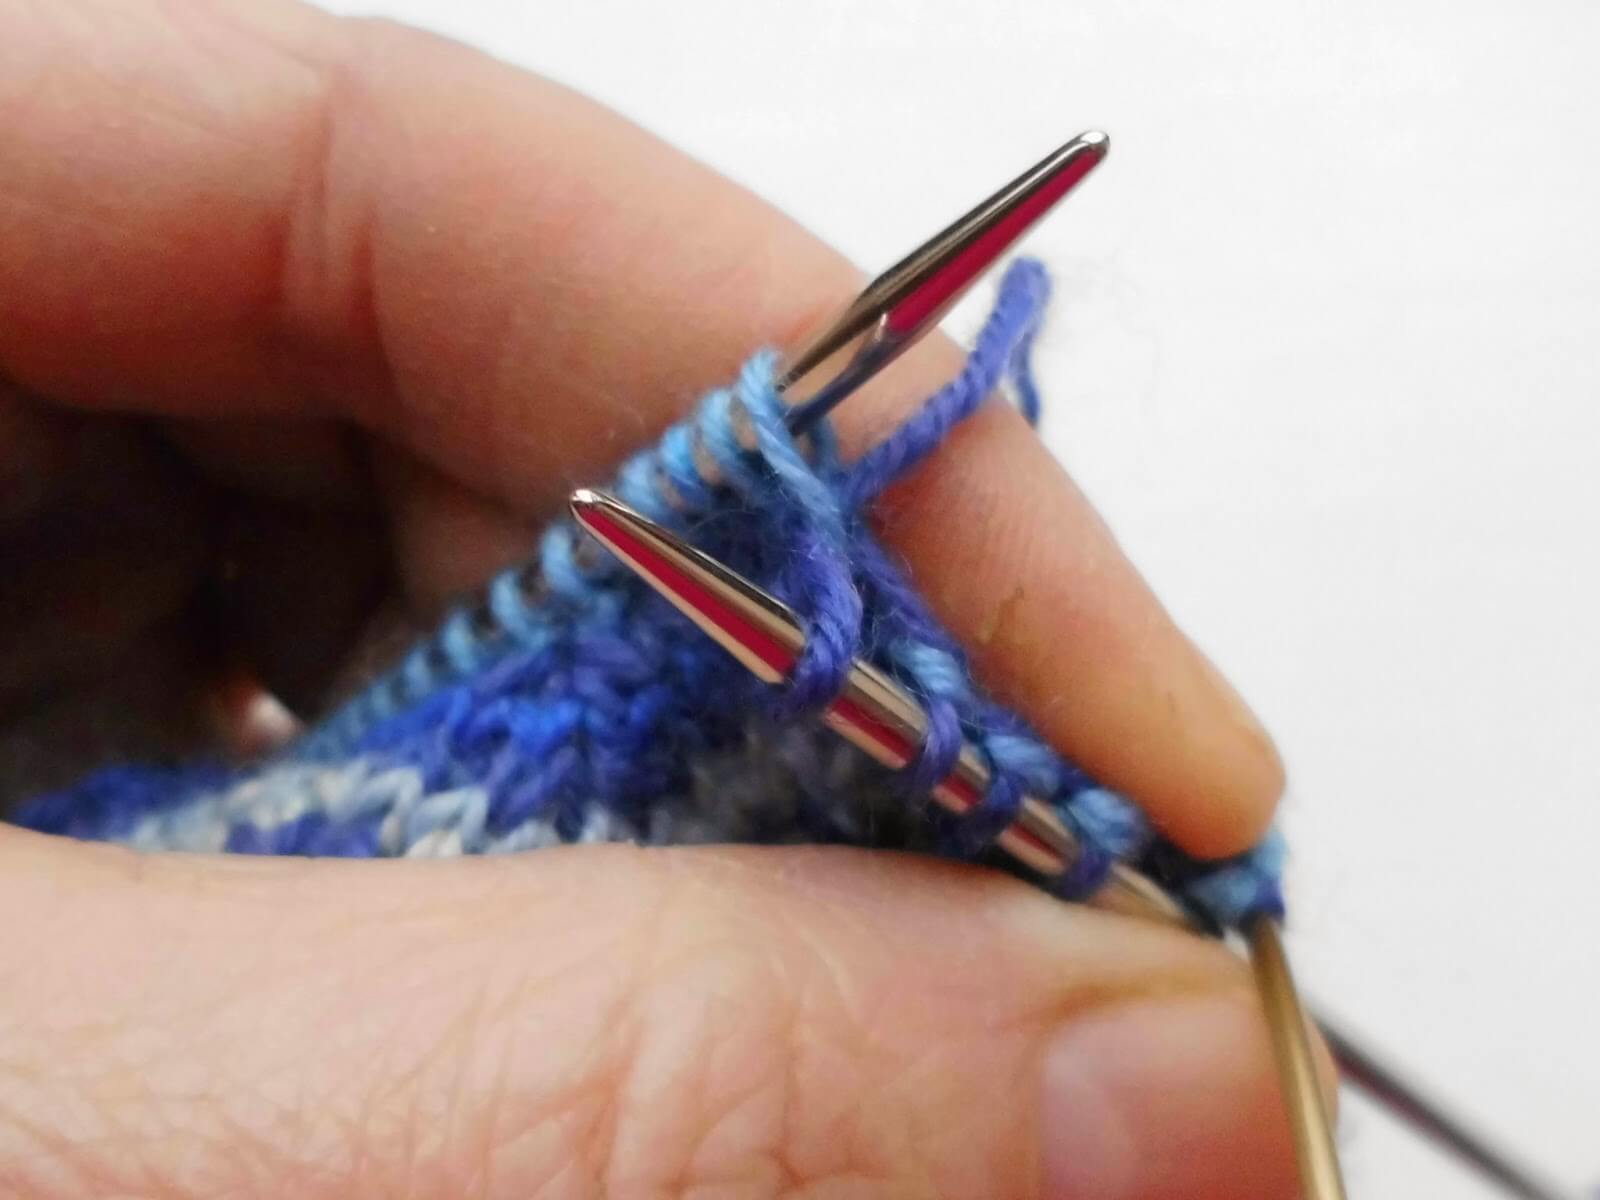
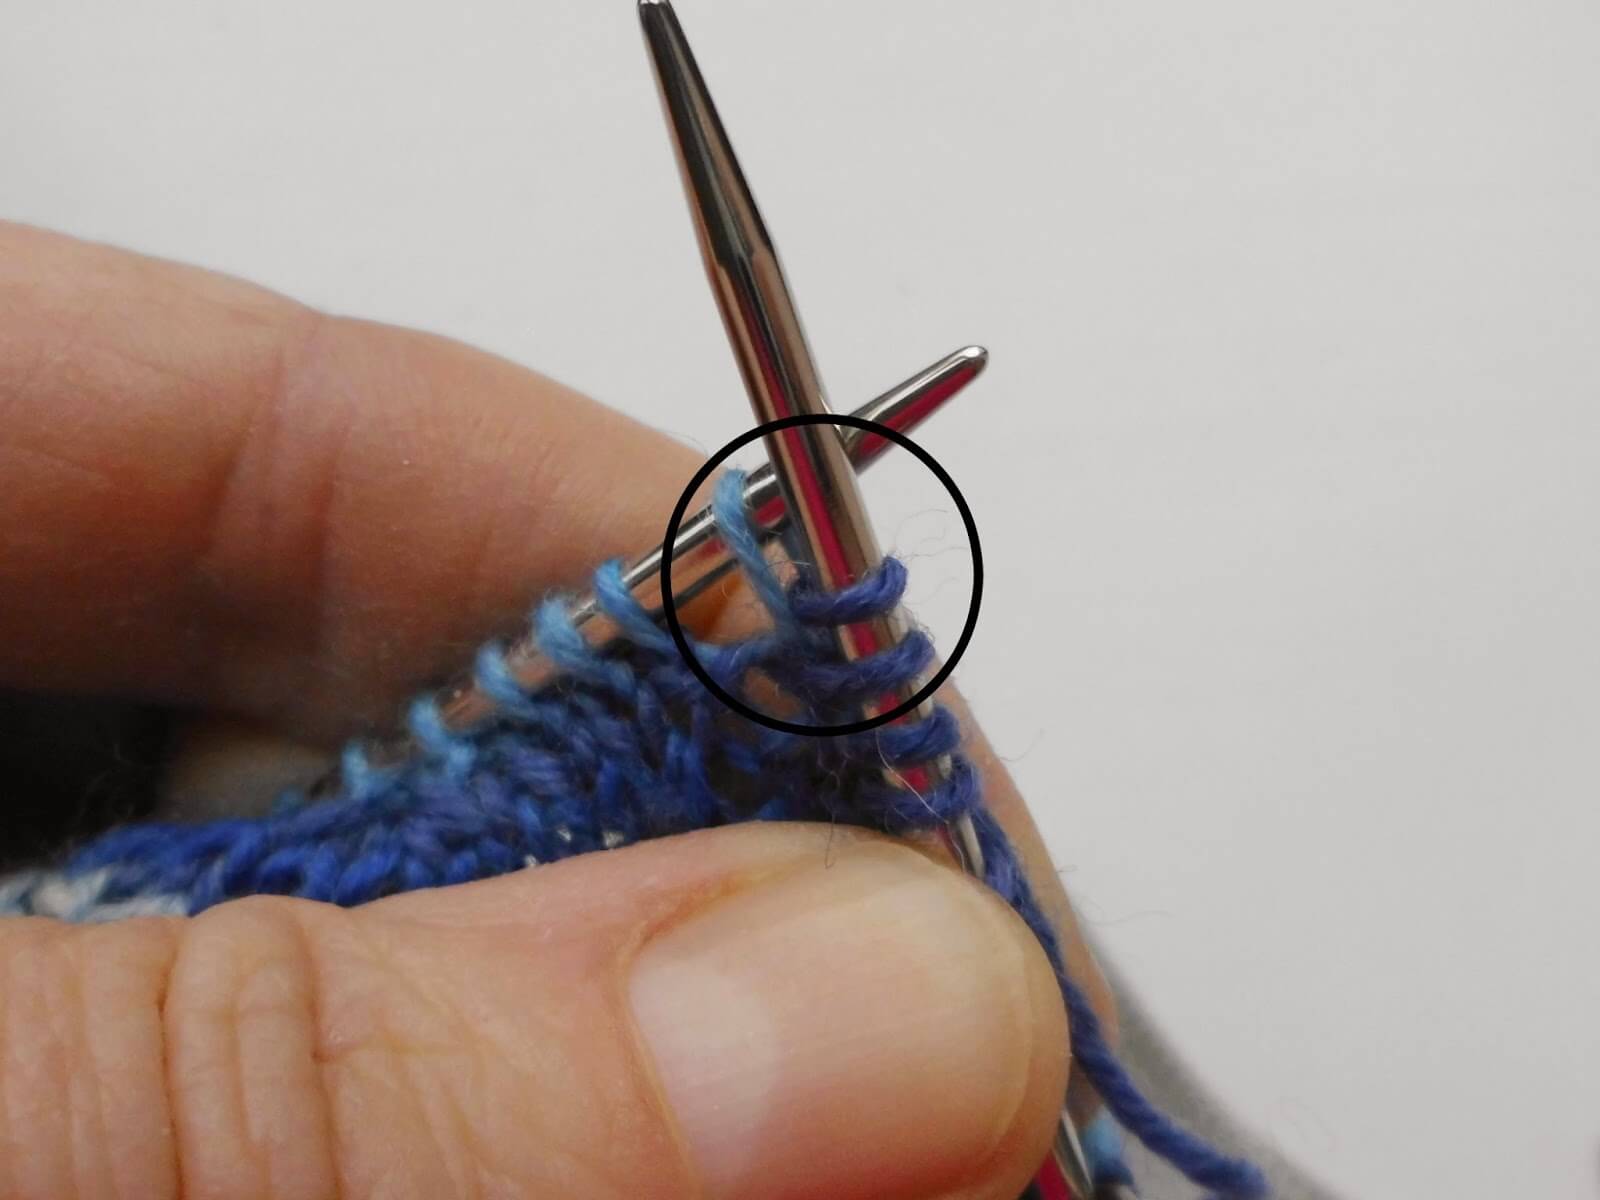
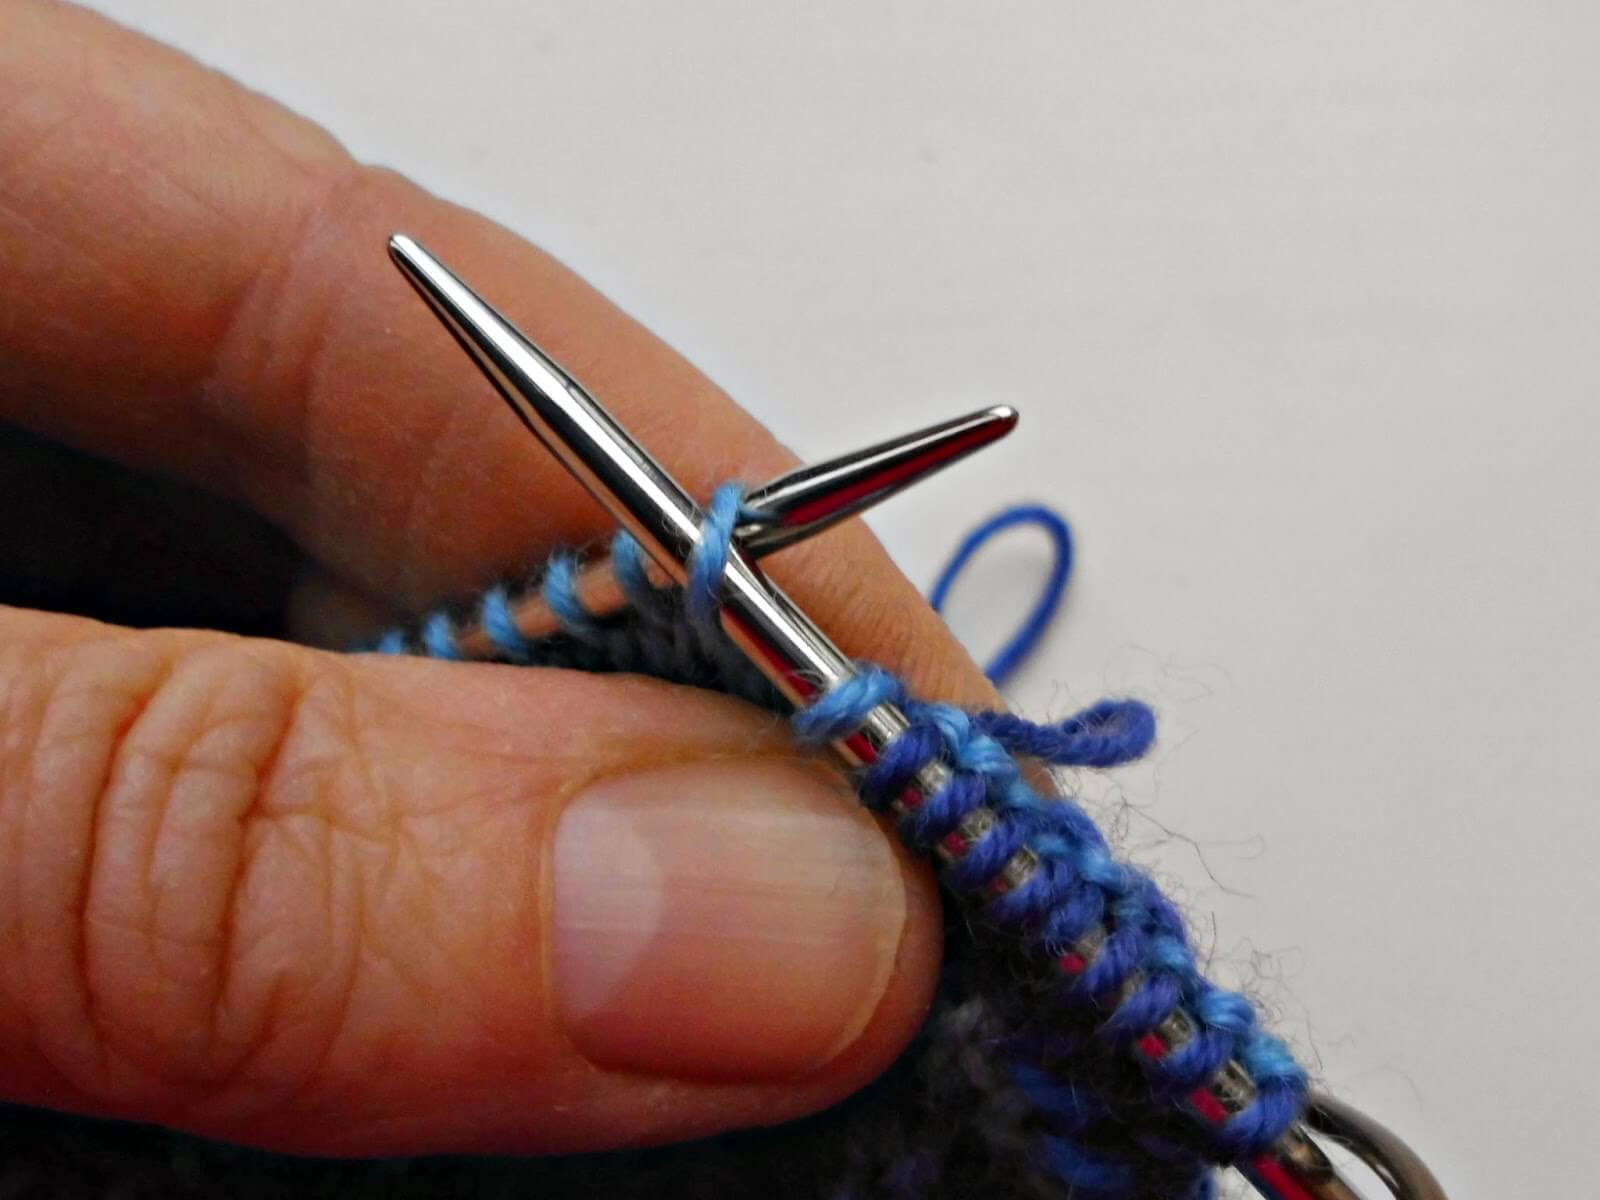
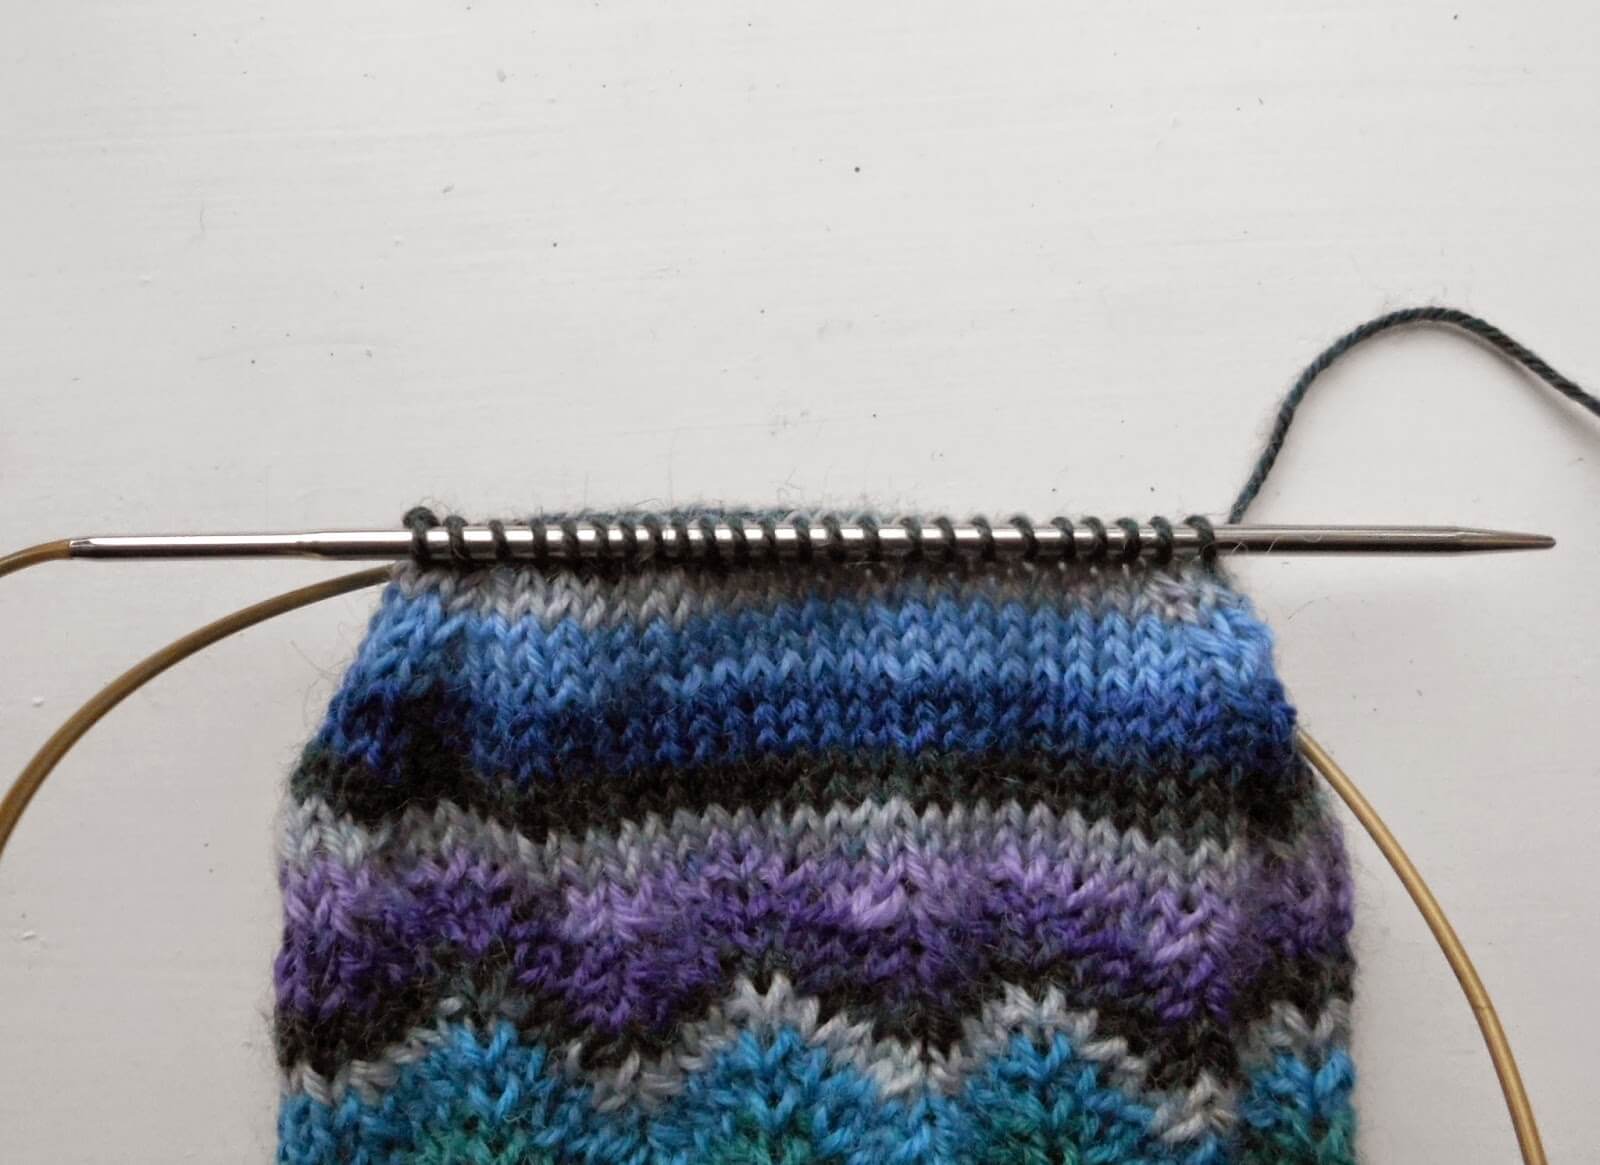
Finally, I want to show you how I made the stitches in the pattern. If you’re comfortable working kfb, ssk and k2tog stitches then you can just jump to the pattern below, but if you need a refresher, hopefully these photos will help!
I made the hills of the ripple using kfb. This is an increase stitch which you create by knitting into the front and the back of the same stitch. Like this …
1 Knit into the first stitch on the left hand needle, but don’t take the stitch off the needle.
2 Swing your right hand needle round to knit into the back of the same stitch and this time, take the stitch off the needle.
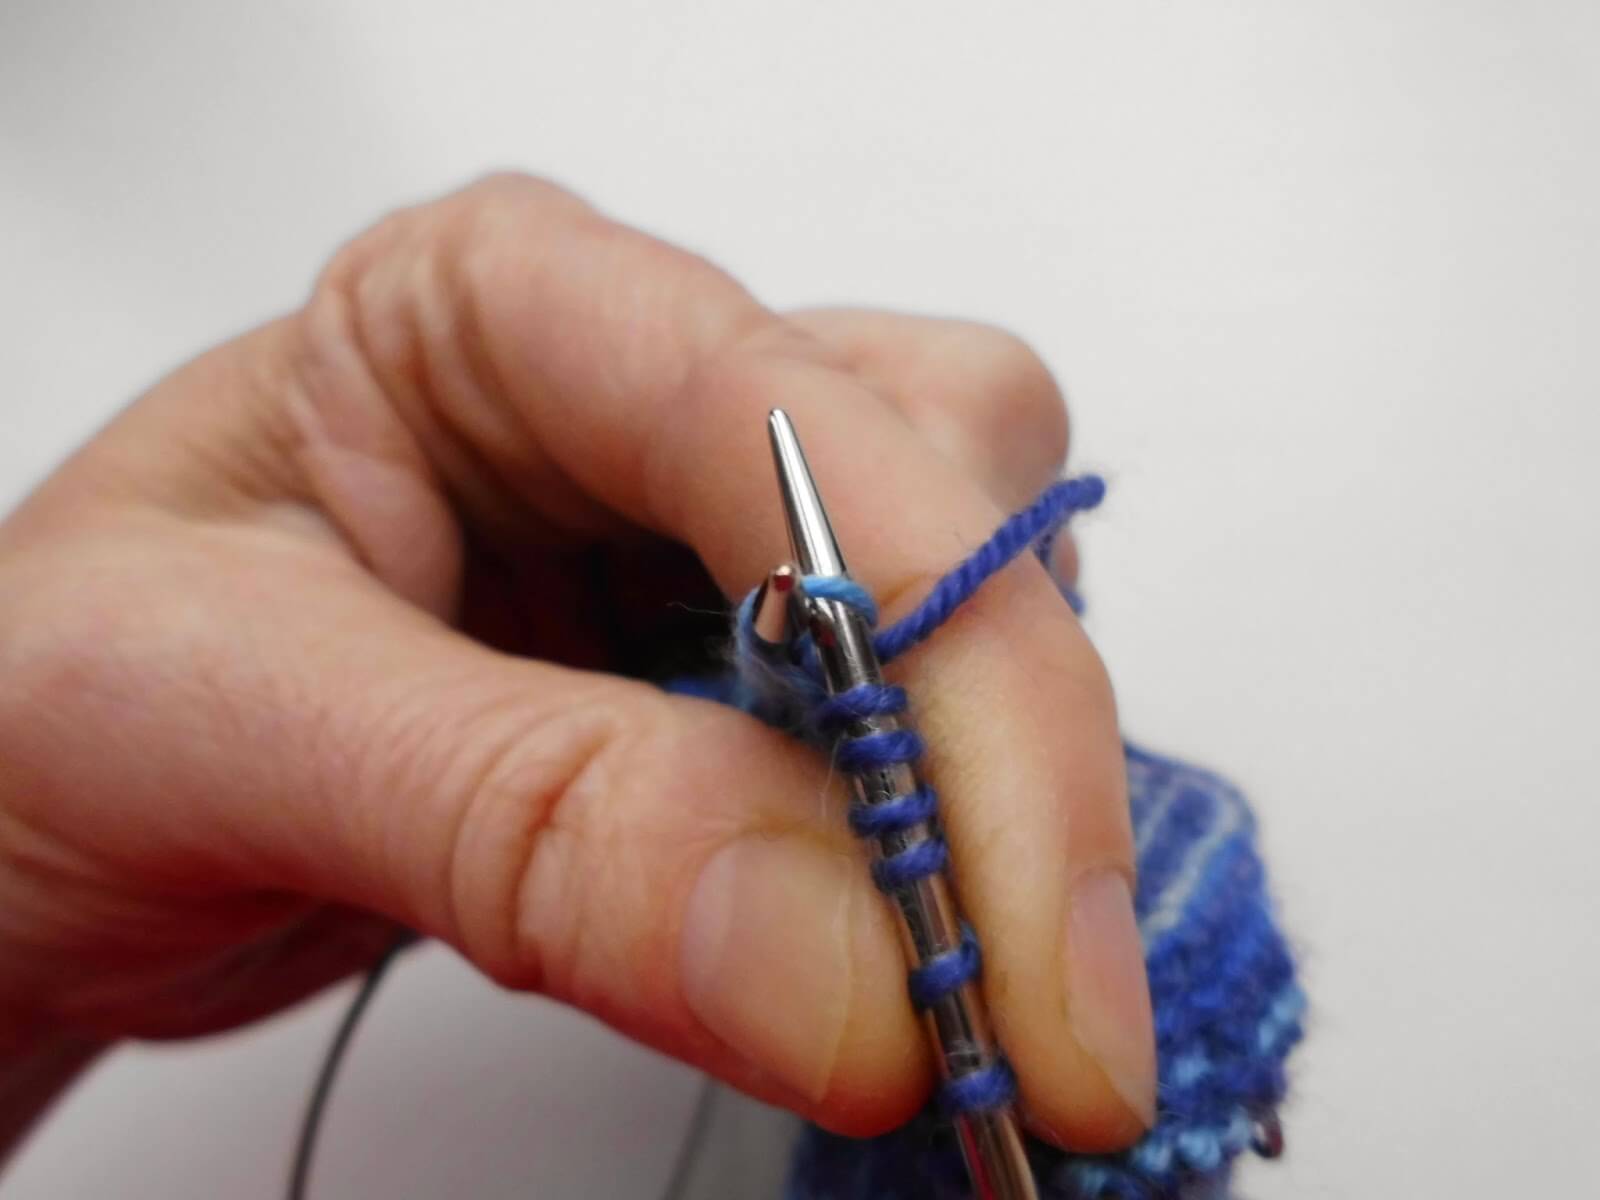
3 You now have two stitches created from the same stitch.
I created the dips by using two different decrease stitches – both lean in opposite directions so together, they make a nice flat decrease. The first is ssk. Create it like this ….
1 Slip the first stitch on the left hand needle knitwise onto the right hand needle.
2 Slip the second stitch on the left hand needle purlwise onto the right hand needle.
3 Slip both stitches back onto the left hand needle and knit through the back of both loops.
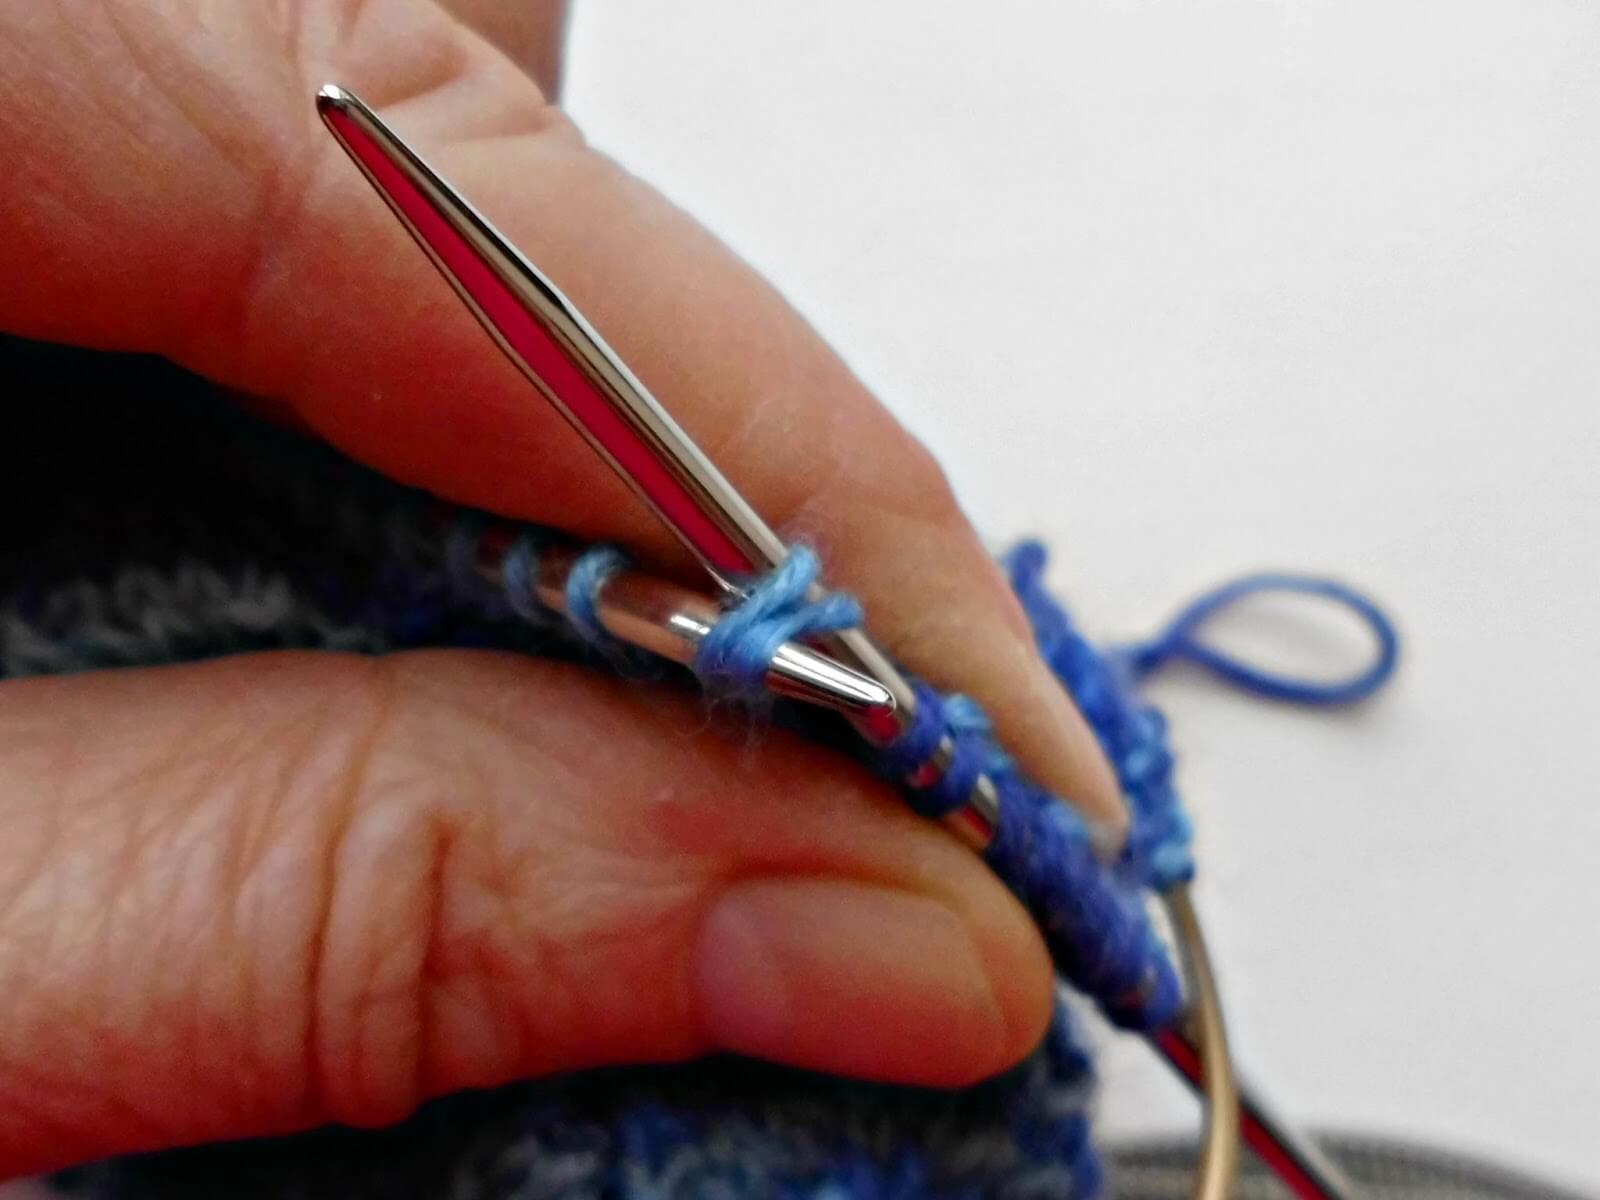
4 Slide both stitches off the needle.

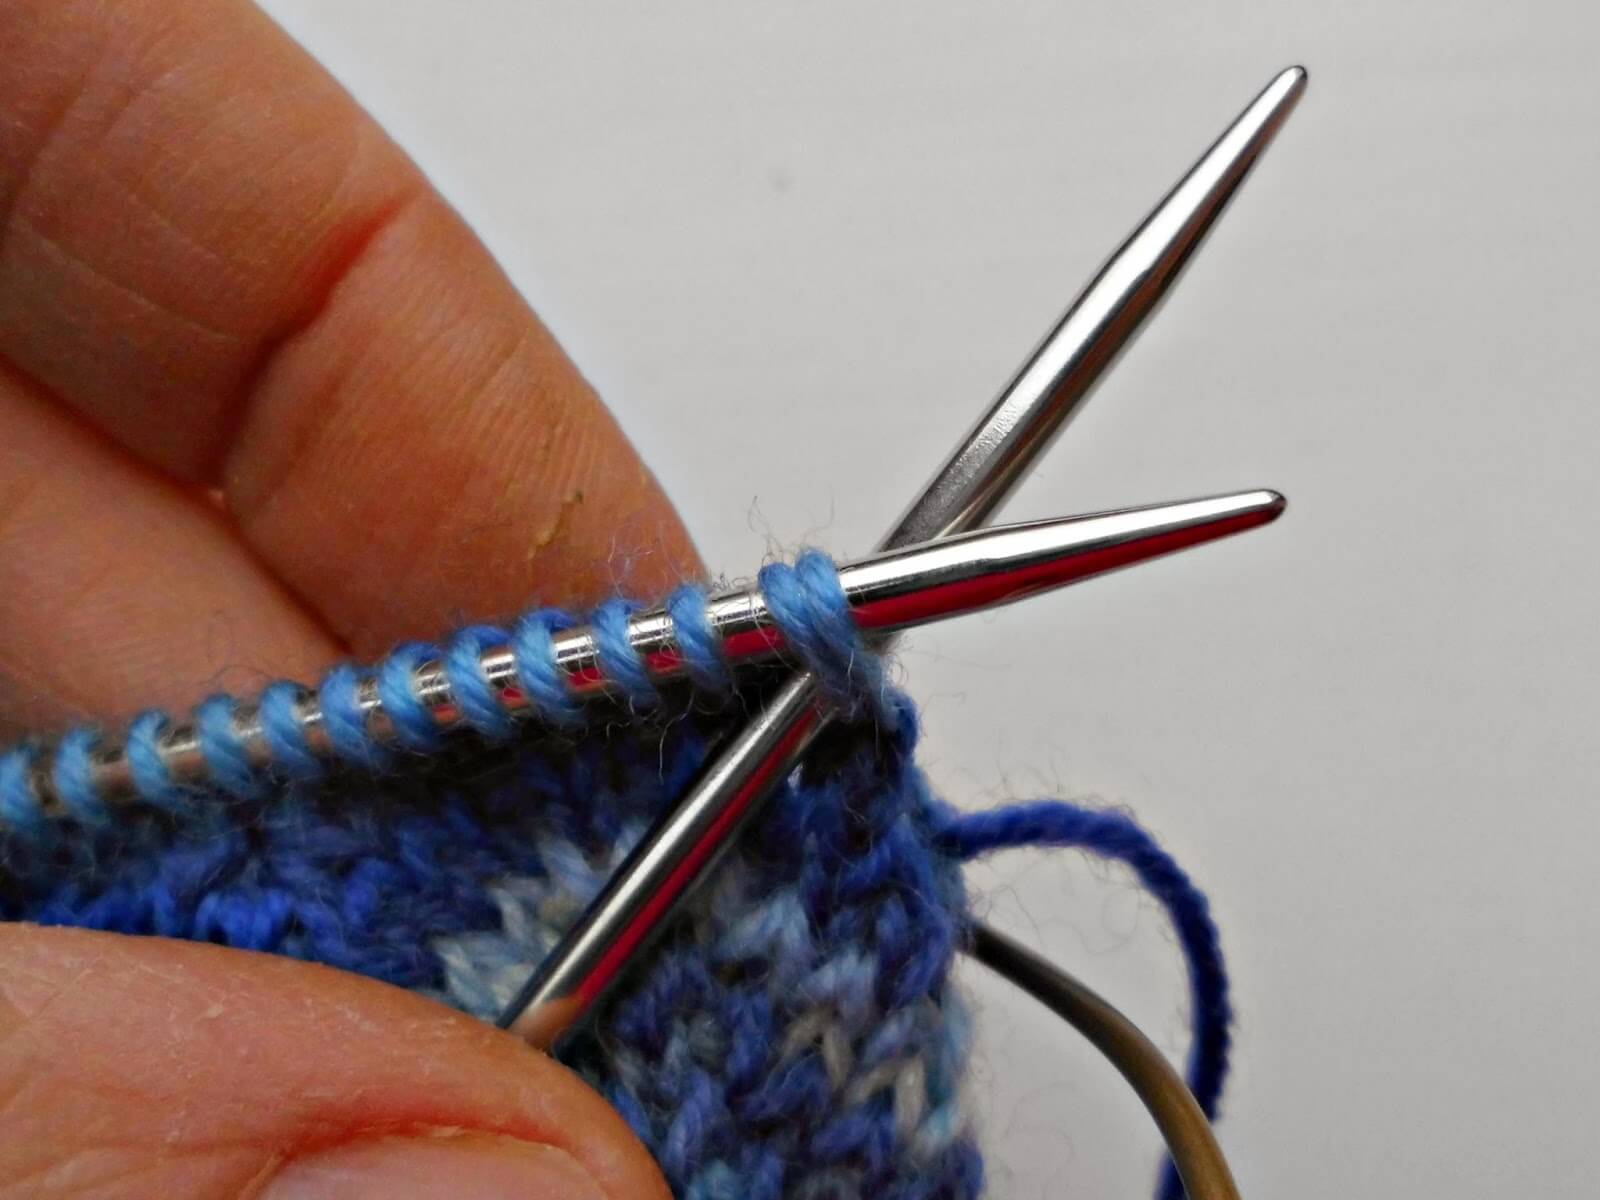
For the second decrease of the hill, I used k2tog. For this stitch, all you do is knit the first two stitches on the left hand needle together and slide off the needle.
Right! I think we’re all ready to make a start on the sock!
Neat Ripple socks
(you can download a PDF of the pattern here)
These socks are constructed as top down socks with a gusset heel. The heel is knitted in heel stitch, which creates a durable, cushioned heel. This pattern will create a medium-sized sock.
I found that I got the best fit for my feet using 2.75mm needles; 2.5mm produced fabric too tight and 3.0mm produced a sock that was too big for me. I wouldn’t recommend using needles smaller than 2.75mm but if you have very wide feet, it is better to try a bigger needle size before altering the number of stitches.
Materials
1 x 80cm circular needle size 2.75mm* (these socks can also be knitted on DPNs if desired)
1 x 100g ball (or 2 x 50g balls) of 4ply sock yarn* – yarn pictured is Regia Ombre Stripe in shade 4482 (2021 update – now discontinued)
1 pair DPNs size 2.5mm (optional)
Stitch markers
Wool needle
* This pattern was designed to create a sock with a foot circumference of 8″. If you have large feet or choose to go up a needle size to make a bigger sock, you may wish to purchase an extra ball of yarn to make sure that you don’t run out.
Gauge
28 sts and 42 rows to 10cm on 2.75mm needles in stocking stitch.
Abbreviations
K Knit
P Purl
Sl1 Slip stitch from left to right needle as if to knit.
Kfb Knit into the front and back of the stitch to make a new stitch
SSK Slip the first stitch on the left hand needle as if to knit, slip the second stitch on the left hand needle as if to purl, transfer them both back to the left hand needle and knit into the back of both stitches together
K2tog Knit the first two stitches on the left hand needle together as one stitch
* Repeat instructions inside asterisks
Pattern
Cast on 70 stitches using 2.5mm double pointed needle (this is optional – personally, I prefer a tighter rib). If you want to use magic loop you will be able to cast on with the larger circular needle, but I would still recommend knitting the first two rows as if on straight needles to avoid any joining issues. If you use DPNs, you might find it easiest to cast on and work 2 rows before dividing the stitches across the needles.
Row 1: K1, P1, *K2, P2, K2* to last 2 sts, P1, K1, turn.
Row 2: P1, K1, *P2, K2, P2* to last 2 sts, K1, P1, turn.
At this point, change to the 2.75mm needle for magic loop or divide the stitches evenly across three or four DPNs according to preference and join into a circle, place marker. If you prefer, you can knit the whole of the rib on the smaller needles and change up for the pattern.
Work each round as follows: K1, P1, *K2, P2, K2* to last 2 sts, P1, K1
for 14 more rounds or until desired length of rib (I knit 16 rounds of rib).
Next round: Knit to end.
Pattern set-up:
Round 1: *K2, Kfb, Kfb, K2, SSK, K2tog* repeat to end of round.
Round 2: Knit to end.
Main pattern
Round 1: K3, Kfb, Kfb, K2, SSK, K2tog, *K2, Kfb, Kfb, K2, SSK, K2tog* repeat to end of round.
Round 2: Knit to end.
You will find that you need to keep moving your marker to accommodate the K2tog at the end of the round. Continue to knit rounds 1 and 2 of main pattern until desired length before start of heel, ending with round 1.
Heel Flap
Slip the last stitch knitted in pattern onto a new DPN and use this as your first knitted stitch of the heel flap – this will help you to keep the pattern correct across the top of the foot.
Row 1: K2, *Sl1, K1* until you have 34 stitches on your needle, turn.
Row 2: Sl1, P to end, turn.
Row 3: *Sl1, K1* to end, turn.
Repeat rows 2 and 3 until heel measures approximately 2½ inches, finishing on row 3 (approx 27 rows). If you want to make the heel flap longer, continuing knitting rows 2 and 3 until you reach the desired length, but remember that you will need to pick up more stitches to create the gusset. Note that 36 stitches are left in the pattern block across the top of the foot.
The handy thing about using the magic loop method is that you can keep all of your stitches on one needle whilst you’re creating the heel flap!

Turn heel
Row 1: Sl1, P18, P2tog, P1, turn.
Row 2: Sl1, K5, SSK, K1, turn.
Row 3: Sl1, P6, P2tog, P1, turn.
Row 4: Sl1, K7, SSK, K1, turn.
Continue in this way, adding one stitch between slip stitch and SSK or P2tog on each row until all of the heel stitches are used.
Knit across heel stitches if required to bring you to the left hand side of the heel ready to pick up 15 stitches. Remember that if you made the heel flap bigger, you will need to pick up more stitches. Once you have picked up the stitches, place marker. Knit across the top of the foot place marker (round 2 of pattern), then pick up 15 stitches (or more if required) up the other side of the heel. Knit across the top of the heel and then shape gusset as below. Again, with magic loop you keep all of your stitches on one needle.
Shape gusset
Round 1: K to 3 sts before the marker, K2tog, K1, slip marker, K1, *Kfb, K2, SSK, K2tog, K2, Kfb*, slip marker, SSK, K to marker.
Round 2: Slip marker, K to next marker, slip marker, K to 3 sts before marker.
Round 3: K2tog, K1, slip marker, K1, *Kfb, K2, SSK, K2tog, K2, Kfb*, slip marker, K1, SSK, K to marker.
Continue in this way, repeating rounds 2 and 3 and decreasing by two stitches at the gusset on every other row until there are 70 stitches on the needle.
Once you have 70 stitches again, continue to knit each round until you reach approximately 4cm before the desired length ready to start the toes, remembering to keep in pattern across the top of the foot. It doesn’t matter if you finish on round 1 or 2. Don’t be afraid to try your sock on before decreasing for the toes!
Toes
You will remember that you have 36 sts across the top of the foot and 34 stitches for the heel (70 sts in total). To ensure that the toes are not baggy, I decrease the extra 2 stitches across the top of the foot in the first two rows of creating the toes as follows:
Round 1: K1, SSK, K to 3 sts before marker, K2tog, K1, place marker, K1, SSK, K to 3 sts before marker, K2tog, K1.
Round 2: K1, SSK, K across all sts, K2tog, K1, slip marker, knit to end, slip marker.
Round 3: K1, SSK, K to 3 sts before marker, K2tog,K1, slip marker, K1, SSK, K to 3 sts before marker, K2tog, K1.
Round 4: Knit across all stitches, slipping markers as you come to them.
Repeat rounds 3 and 4 until you have 28 stitches left and divide these between two needles so that front and back of socks match.
Graft toes usingKitchener stitch. If you need a reminder of how to do this, there is a tutorial on my Basic Socks post. You can get a free Kitchener Stitch guide to download and keep in your project bag when you join my newsletter list – click here!
You’re all done! Enjoy wearing your ripply socks and don’t forget to let me know how you got on! You can link your project in Ravelry here if you would like to.
PS If you liked this post, you can find me on Ravelry, Facebook, Instagram and Bloglovin! 🙂
This pattern copyright © 2014 Winwick Mum All rights reserved.
Not to be included in any collection or used for profit without written consent of Winwick Mum.
This pattern is free on this blog and will always remain so. If you’ve enjoyed using it and would like to support my work so I can keep blogging and designing, you can browse my shop for patterns and books or buy me a brew – both are very much appreciated. Thank you! xx


This pattern is based on my Basic 4ply Socks pattern, which means that you can find photo and video help in the Winwick Mum Sockalong tutorials. You can find out more here:
If you can already knit socks but would like to stay in touch, click the link below to join the Winwick Mum mailing list to hear about the latest blog posts, pattern updates, tutorials and more … but no spam, I promise!


Loving the socks hun, glad you finished them in time.
Thank you! I'll have you knitting a pair soon … 🙂 xx
Christine…gorgeous. I love them. Just looked at the tutorial on the magic loop…think I'll stick to double pointers 😉 however…I can now do kitchener competently without looking it up each time xx have a lovely Christmas xx
Mastering magic loop could be your New Year's resolution, Fiona! I'm glad you like the socks, thank you – looking forward to seeing your fabulous pair especially now that you're a grafting expert! 🙂 xx
I love them!! Absolutely fantastic, I have never tried to knitt socks but is definately something I would like to do soon. Very good post, thanks!
Lluisa xx
Thank you! I think everyone should have a go at knitting socks – but it's very addictive so be warned! 🙂 xx
I love your socks and I would like to make them, but I am worried about the number of stitches. Normally I use 2.5mm (or 2.25mm) dpns with 56 (60) stitches, although I have the same size as your feet. Does this pattern tighten that much that I can use the 70 stitches that are called for?
Thank you!
Hi Klaine, thanks for visiting! Yes, you will need to cast on 70 stitches with these socks otherwise they're just too tight – the pattern block is10 stitches and taking the pattern down to 60 stitches will mean that you won't get them over your feet. I don't find these socks too baggy although I do knit the cuff with a 2.50mm needle rather than 2.75mm to make it a bit tighter. You could try a smaller needle if you wanted to, but I found that knitting them on 2.50mm made the fabric a bit stiff but I'm very happy with them on 2.75mm. I hope that helps! xx
Thank you for your answer (that was super quick!!!). This helps me a lot and I will do as the pattern says!
Take care!
No problem at all, do let me know how you get on! xx
So have I got this right. I get to the end of the pattern row and I have the 1st slip of the SSK as the last stitch. I take off the marker, do the 2nd slip and complete the SSK, K2tog and then replace the marker. So the marker moves round by 3 stitches each round. I have done 9 rows of pattern plus the set up pair and can't see any recognisable pattern developing
Fiona
Hi Fiona, thanks for getting in touch. Yes, you've got it right with the marker, you just need to move it so that you can see where your pattern starts again on the K2. You should be seeing the pattern by row 9 so I'm not quite sure what's happened there. Do you want to email me a picture and I'll see if I can spot what might have gone wrong? It certainly sounds as if you're doing everything right but it's hard to tell without being able to see your sock. My email is winwickmum[at]gmail.com.
what is your opinion of knitting socks toe up instead of starting at the cuff, easier or not preference? I have tried knitting socks, calf portion needed adjusting but will give it a go again. I need to find the correct formula for my foot and then I will knit lots:) Thanks for sharing your vast amount of sock knitting knowledge!
I've tried a few pairs of toe up socks and I'm just not keen on them, although I know that other people love them. There are certainly plenty of patterns on Ravelry if you want to give them a go. As far as finding the formula for your foot goes, have a look at the Sockalong tutorial on tension and stitch calculations as that might help, although it is for a cuff down sock so you'd need to bear in mind the changes you want to make to the calf. winwickmum.blogspot.co.uk/2015/04/sockalong-tension-squares.html
This socks are faboulose, I absolutely want to try them. I am a bit confused about the ''pattern set up'' and the main pattern; should i knit first one and then the other?
Yes, you need to do the set-up rounds first so that your hills and dips are in the right place, and then you continue with the main pattern. Once you get going, it will be easy to see where your ripples are going up and down 🙂 xx
Thank you a lot! Can't wait to get started! 🙂 Susan
These look fabulous, Christine! Thank you so much for the pattern. Can I ask another question about stitch numbers? I have size 5 feet, but I knit very loosely, so use 2mm needles and 52 stitches for your sock pattern. They fit fabulously and second pair is nearly finished. What size needle and number of stitches would you suggest for this pattern, please? Many thanks, Trish.
Thank you, Trish! I would suggest that you try a 2.5mm needle and do a swatch to see what the fabric looks like – I usually knit on a 2.5mm needle but it came out too tight with the ripples hence the 2.75mm. The pattern is in blocks of 10 so you would need to drop to 60 stitches to make the ripples still work – that might be OK or you might find that it's better to stay at 70. It's going to be a bit of trial and error I think, but it will definitely be worth doing a swatch as that will give you an idea of how it's going to knit up and you'll be able to take a view from there. Glad you're enjoying knitting your socks! xx
Hi Christine, I wonder if you could help me out please? I've done my heel flap and heel turn and picked up all the gusset stitches, but I'm struggling with the pattern across the top of the foot. As per your instructions I have 36 stitches but when I K1 then do 3 repeats of the pattern that's only 31 stitches so I have 5 left over… I have puzzled over this and can't figure out what I'm doing wrong! Any help much appreciated!
Hi Sally, it's been quite a while since I last knitted this pattern so I'll need to do a quick swatch to see what's going wrong. If you can bear with me, I'll get back to you on this as soon as I can xx
Hi again Christine! I think I have probably taken the instruction too literally! I just carried on with the pattern until I ran out of stitches and it seems to look ok…..But thank you anyway for your offer of help! Love your Facebook page too by the way, it's amazing that you have got so many followers and it's a constant source of inspration! Thank you so much! Xx
Ah, I did wonder if that was what it was but without doing it for myself I couldn't say. If it doesn't work out and you need any more help then give me a shout. Thanks for your lovely comments too xx
I decided to try your ripple sock pattern, too, and am having the same concern as the person in this post. With 36 stitches across the top of the foot and a block repeat of 10 stitches plus 1 additional knit stitch I don’t use all 36 stitches.
The person who originally posted this query seems have resolved her problem but it isn’t clear how she resolved it.
I’m getting to the point where I may just knit the foot as stripes and forget continuing in the ripple pattern.
I realize that the post is now over 8 years old but it is a beautiful pattern that I would love to complete.
Thanks in advance for any help that you may provide
Hi! You should be able to continue the ripple pattern by following the pattern as you have already set it up across the top of the foot, and then working the sole in plain knit. You’ll find that you’ll still need to move your stitch marker to get the pattern to fit, but it should work out fine. This pattern is on my list to update … 🙂 xx
Thank you so much for your reply Christine, that's really kind 🙂
I cannot find the correction for the ripple sock pattern. After the set up row the main pattern shows 71 instead of 70 stitches unless I am reading it incorrectly.
There isn't a correction, 70 stitches is the right number. The last stitch on one round is always worked with the first stitch on the next round so perhaps that's where you're a stitch out? xx
I’m stumped as to where to put the SM. Round 1 – K3, Ktb, Ktb, K2, SSK, K2tog. Does the SM go at the end of the ‘first’ K2tog in the pattern. Or, Round 1 – K3, Ktb, Ktb, K2, SSK, K2tog, *K2,Ktb, Ktb, K2, SSK, K2tog* repeat to end of round. Does the SM go at the end of the ‘second’ K2tog in the pattern? Please give a detailed answer as I am really eager to proceed. Thank you.
Hello Katherine, thanks for trying out the Neat Ripple pattern! You should already have a stitch marker in place after your rib cuff, and all you are doing is moving the marker one stitch over so that it sits between the K2tog and the K2 stitches. When you work round 1, you work K3, Ktb, Ktb, K2, SSK, K2tog to get your ripples to line up in the right place, and then you repeat *K2, Ktb, Ktb, K2, SSK, K2tog* as many times as you need to so that you get back round to your stitch marker. You’ll find that the marker is between the two stitches that you need to use for the final K2tog (that’s why you worked K3 in the beginning) so you take it off your needle, work the K2tog decrease and put the marker back on the needle to indicate the new beginning of the round. It should all make sense when you work it through on your needles! I hope that helps! 🙂 xx
Hello, Winwickmum, thank you for your prompt reply. I live about an hour’s drive northeast of Toronto, ON, Canada. I was so pleased to see your response to my query as it arrived in short order. I have followed your most explicit directions carefully. I believe I am on the ‘right track,’ so to speak, but I’ve only knit four rows of the main pattern to date. With my knitting a few more, I believe I’ll see the ‘ripple effect.’ I certainly hope so. If not, I’ll touch base with you again to determine where I may be misinterpreting your very detailed directions. They were easy to follow. This isn’t the first pair of socks of your design that I’ve knit. I so enjoy making socks using the free patterns to which you provide online and the accompanying video tutorials. They are of great help. Thank you so very much for your support. KS
I’m glad it seems to be going well – it does take a couple of rounds for you to be able to see the ripples properly, but I’m sure that you’re doing it right and your socks will look great. I imagine that it’s pretty cold where you are so you’ll be glad of cosy socks! 🙂 xx
Hi,
Looking into knitting this pattern (which looks amazing), I normally do TAAT, with mosaic and your easy mosaic socks. I am guessing these will have to be knitted separately because of the last stitch becoming the first or could I do these TAAT?
Thanks in advance,
Bethan
Ooh, now there’s a question, I haven’t thought about this before! 🙂 I think you could do it, but it might be awkward trying to transfer to last stitch across needle tips to make the decrease so you could perhaps move the stitches around so that the join wasn’t between the two needle tips at the side but was instead on one needle tip, if that makes sense. It should work for the leg, and by the time you get to the foot it works slightly differently anyway so you might be OK there too. I’d give it a go and see what you think! 🙂 xx
Hi. I have UK size 6 foot circumference 8.75”. I usually knit with 64 stitches with 2 circular needles. As there is a pattern repeat of 10, do I do 70sts/80sts or go up by 4 and have 74sts?
Thanks Amanda
Hi! You’ll need to keep the pattern as a block of 10 otherwise it won’t work so I’d recommend that you either work with 80sts or try going up a needle size. I found 2.75mm was the minimum size I could use to get a fabric that wasn’t too tight, and 3.0mm made the sock too big for me but it might work for you. It’s worth trying both to see which you like best 🙂 xx
Hi christine. Thank you for your wonderful patterns. I have just started making the neat ripple socks and I have a question about the rib. It reads to me as a k4p2 rib, ( with the *k2, p2, k2*)but looks like a k2p2 rib in the photos. Thank you in anticipation. Kind regards, Tracey
Hi Tracey, you’re right, my socks are K2, P2 but the pattern reads as K4, P2 … I’m not quite sure why I’ll have written it like that other than it could be a typo – the main thing is that you end up with two stitches over at the end so you need to work K1, P1 into those stitches to keep in pattern, albeit only 1 st of each rather than 2. It’s up to you whether you want to work K2, P2 or K4, P2, either way will work out fine. Thanks for spotting it, I will need to update this pattern at some point so I’ll make sure to check that out! 🙂 xx