
Blocking socks with sock blockers
If you’re knitting socks to be gifted or to photograph for a blog or social media, you might not always want them to look as if they’ve come straight off the needles. That’s where blocking comes in; you can do this with or without sock blockers, and this post is all about blocking socks with sock blockers.
Blocking is when you stretch and shape your finished socks (or another project) to make the stitches more even and to show patterns to their best advantage. There’s debate about whether blocking is actually necessary for socks or not, and if they’re just for you or someone close who will want to wear them straight away then the answer is probably not, but if they’re being gifted or photographed then blocking will help them to look their best, especially with a lace or other pattern that needs to be shown off.
If you’ve been following the blog for some time, you’ll probably have seen quite a few posts where I’ve shown you the sets of sock blockers that I have. My socks are usually always blocked, either because they’re going to be photographed for the blog or they’re a commission (you absolutely do want your socks to look their best then!), or they’re a (rare) gift as I usually offer to help someone knit their own pairs these days, rather than knitting them for them 🙂
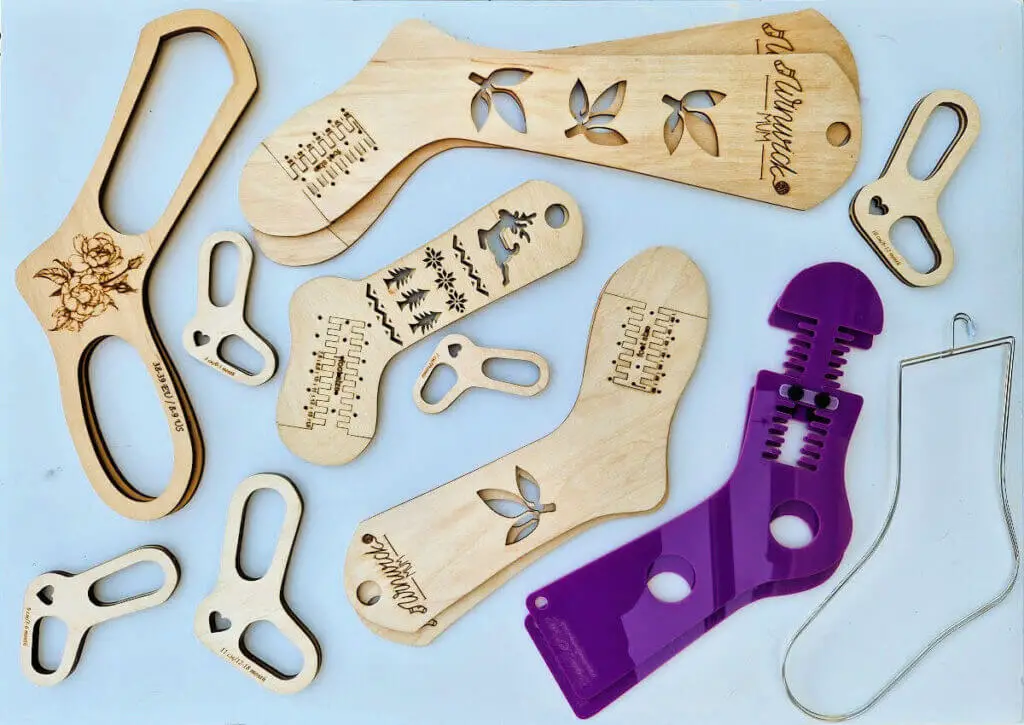
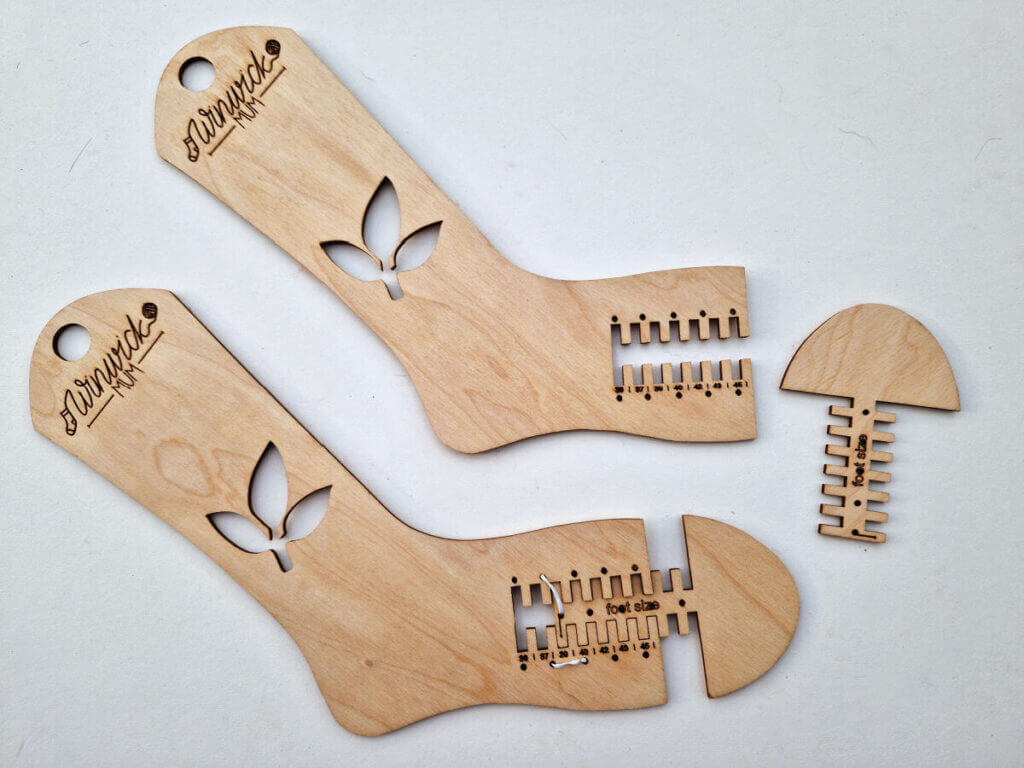
I’ve got quite a collection now! The good thing about that is that I can show you a range of different styles in one photo – I’ve got perspex (acrylic) ones, wooden ones, metal ones, adjustable ones, single size ones … the only sort that I don’t have are the kind you can make yourself but you can find tutorials on those on YouTube if you want to go and look for them.
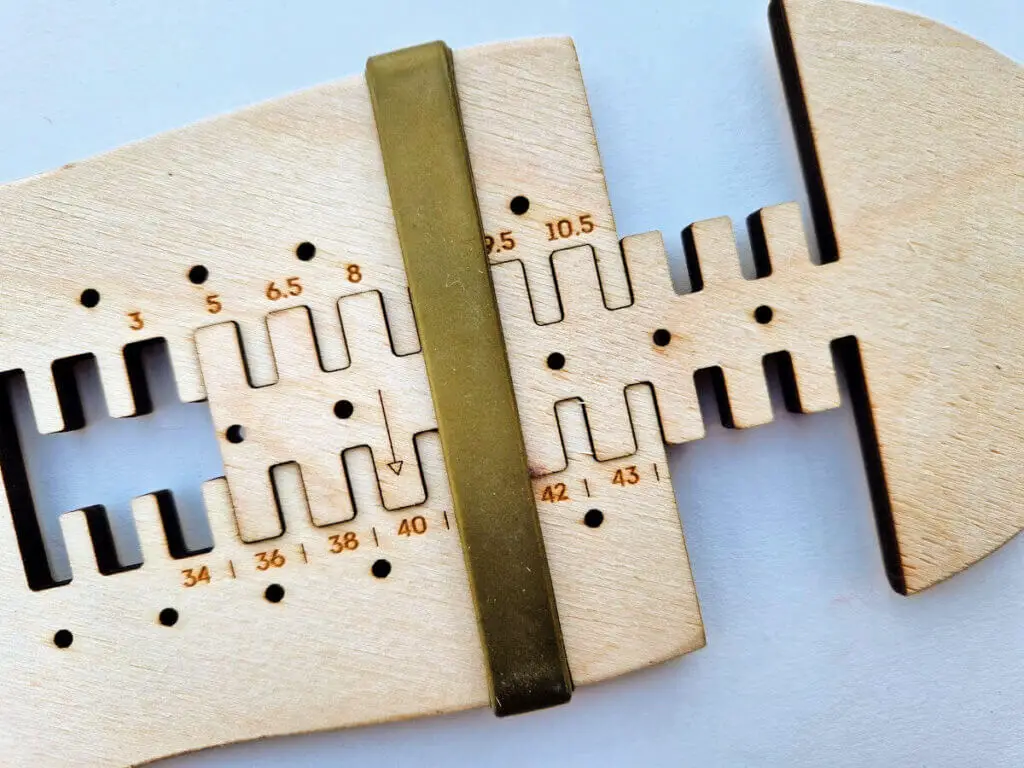
The single size blockers look like a foot shape and the adjustable blockers have a section that you can move to extend the foot depending on the sock size. The ones that I use most of the time are adjustable ones made for me by Vicky of D19EcoFriendlyLife, and I think that all of my wooden ones except for one pair were made by her.
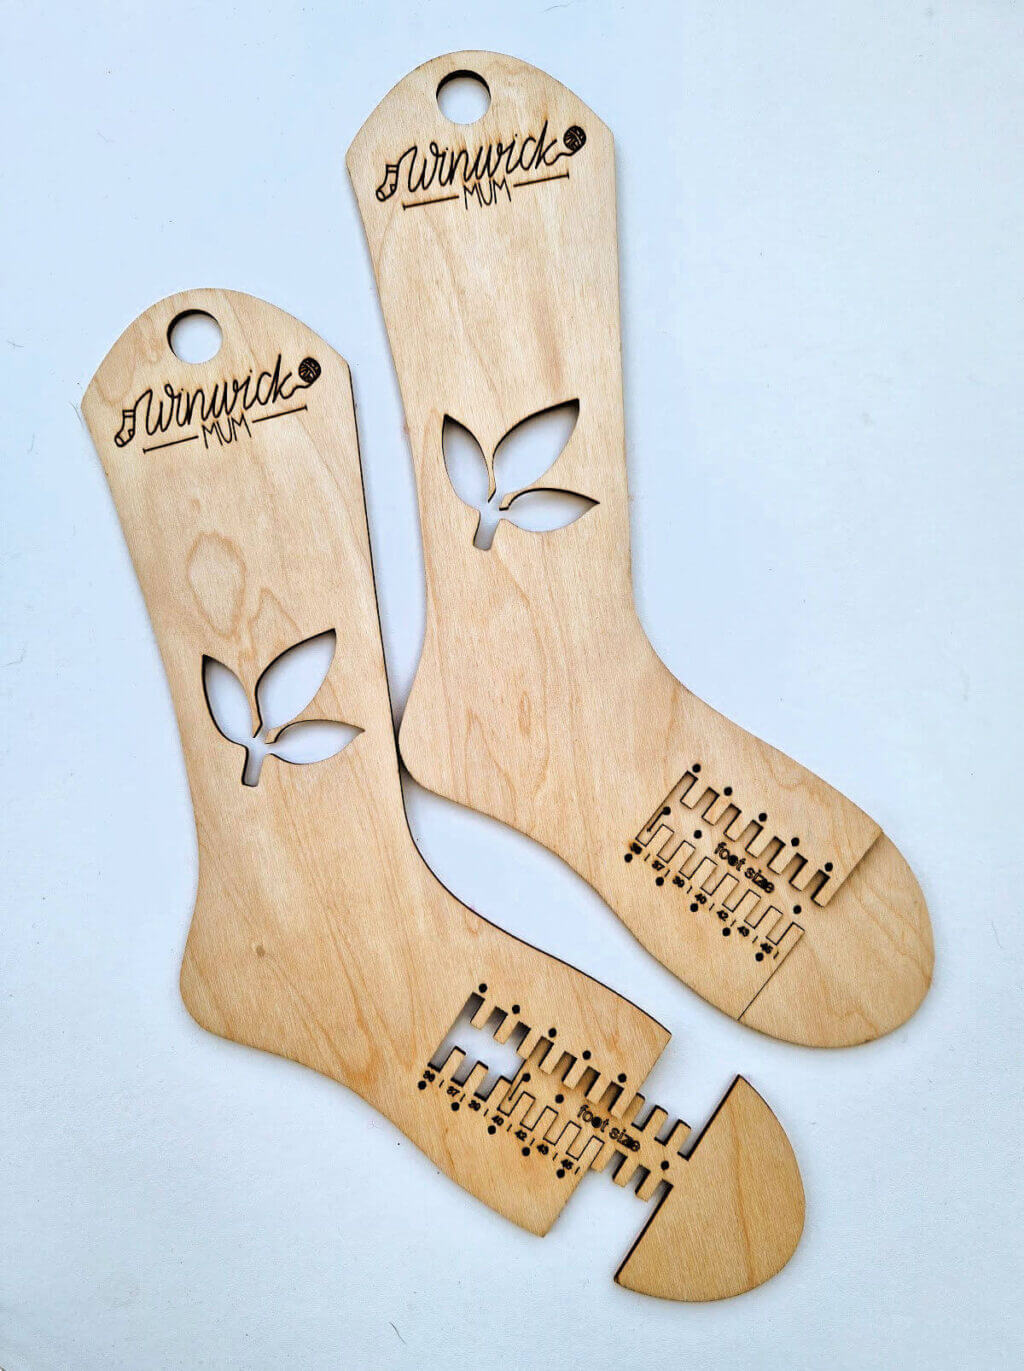
Adjustable blockers can be used for a range of sizes simply by moving and re-attaching the extending section to the main blocker, and that’s what the little holes are for.
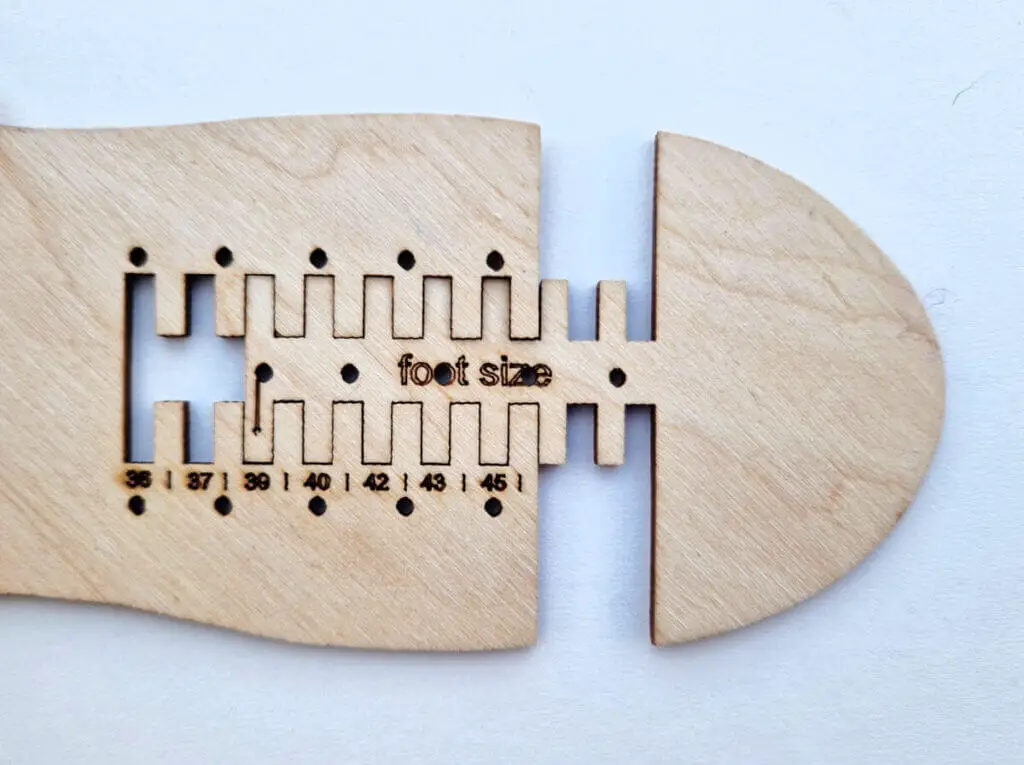
You can thread a piece of yarn through the holes and that works well, but I use a piece of plastic-coated wire that came wrapped around an electric cable and that works well for someone who’s a bit lazy about threading yarn through the holes when she’s got socks of different sizes to block 🙂
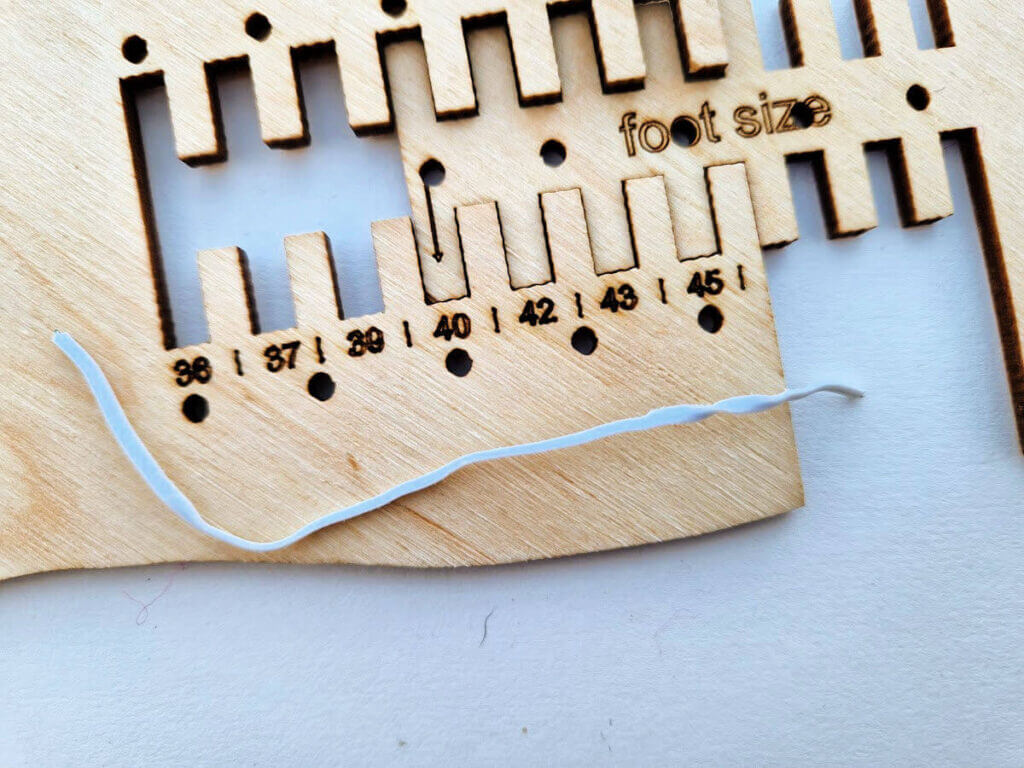
I poke the end of the wire through the hole and bend it the end over on the back so that it doesn’t stick out …

I don’t tend to have a problem with it getting stuck in the knitting as long as I make sure the ends are tucked right in.

There are other methods of doing this. My only pair of wooden blockers that weren’t made by Vicky have a band around them …
This is very secure but I found that my socks didn’t dry completely flat at the sides because of the lump created by the band. You can compensate for the gap at the sides by pulling the sock into shape, but there’s nothing you can do about the lump from the band so that’s not my favourite method.
This is another method; these plastic screws came with the acrylic blockers originally from Doodlestop (I don’t think they’re trading any more) …

These worked well although they were a bit fiddly; I’m happy with my piece of wire and it does the job!
Right, on to blocking the socks!
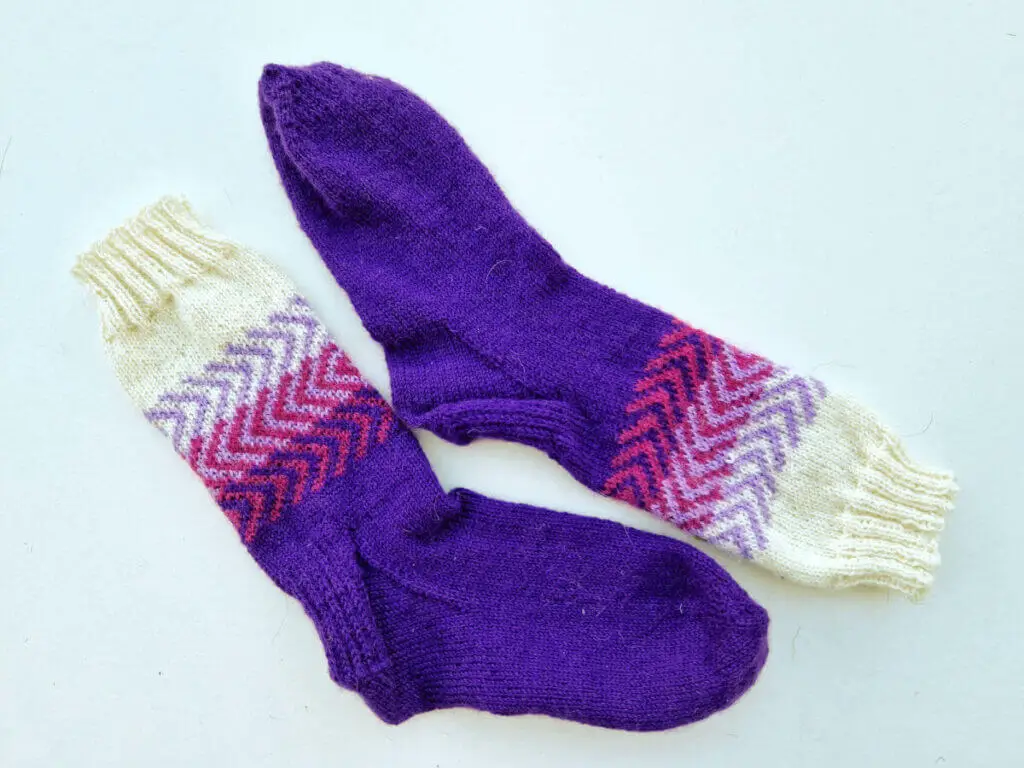
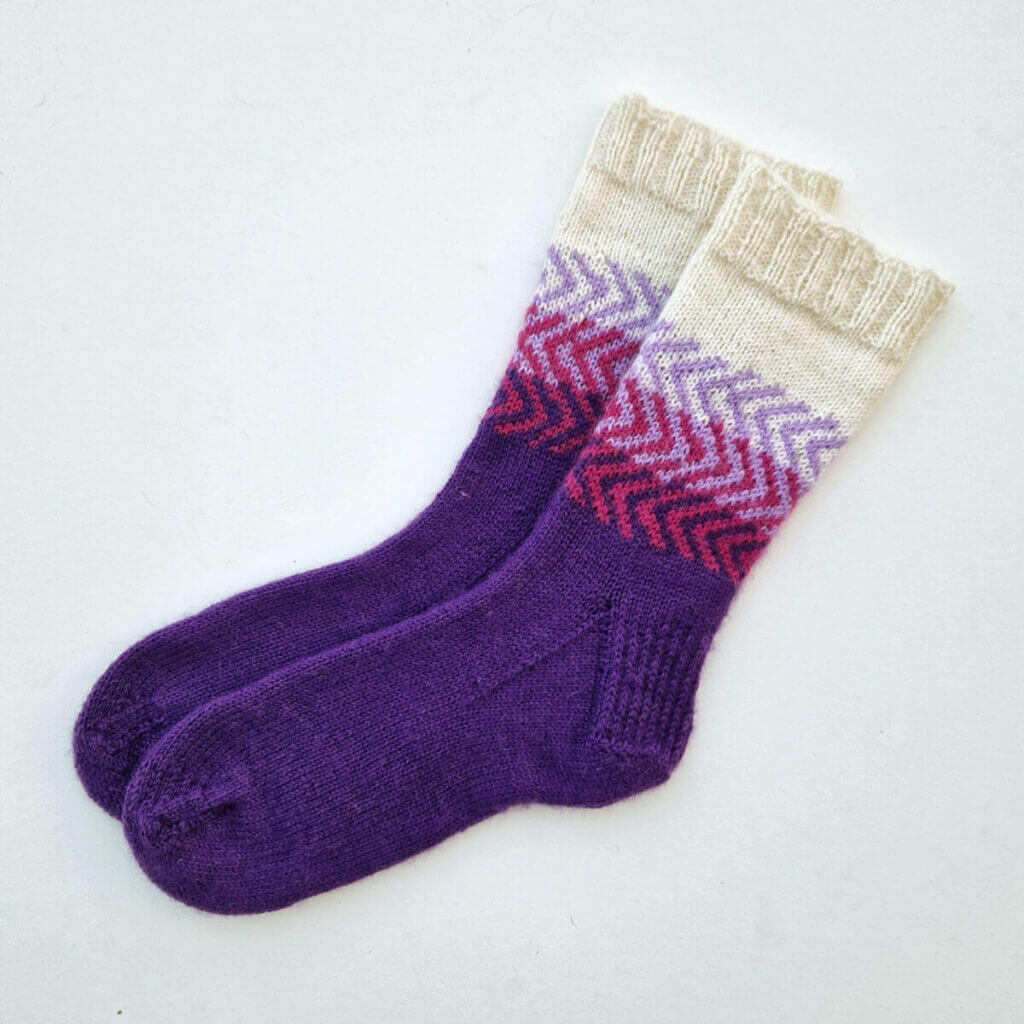
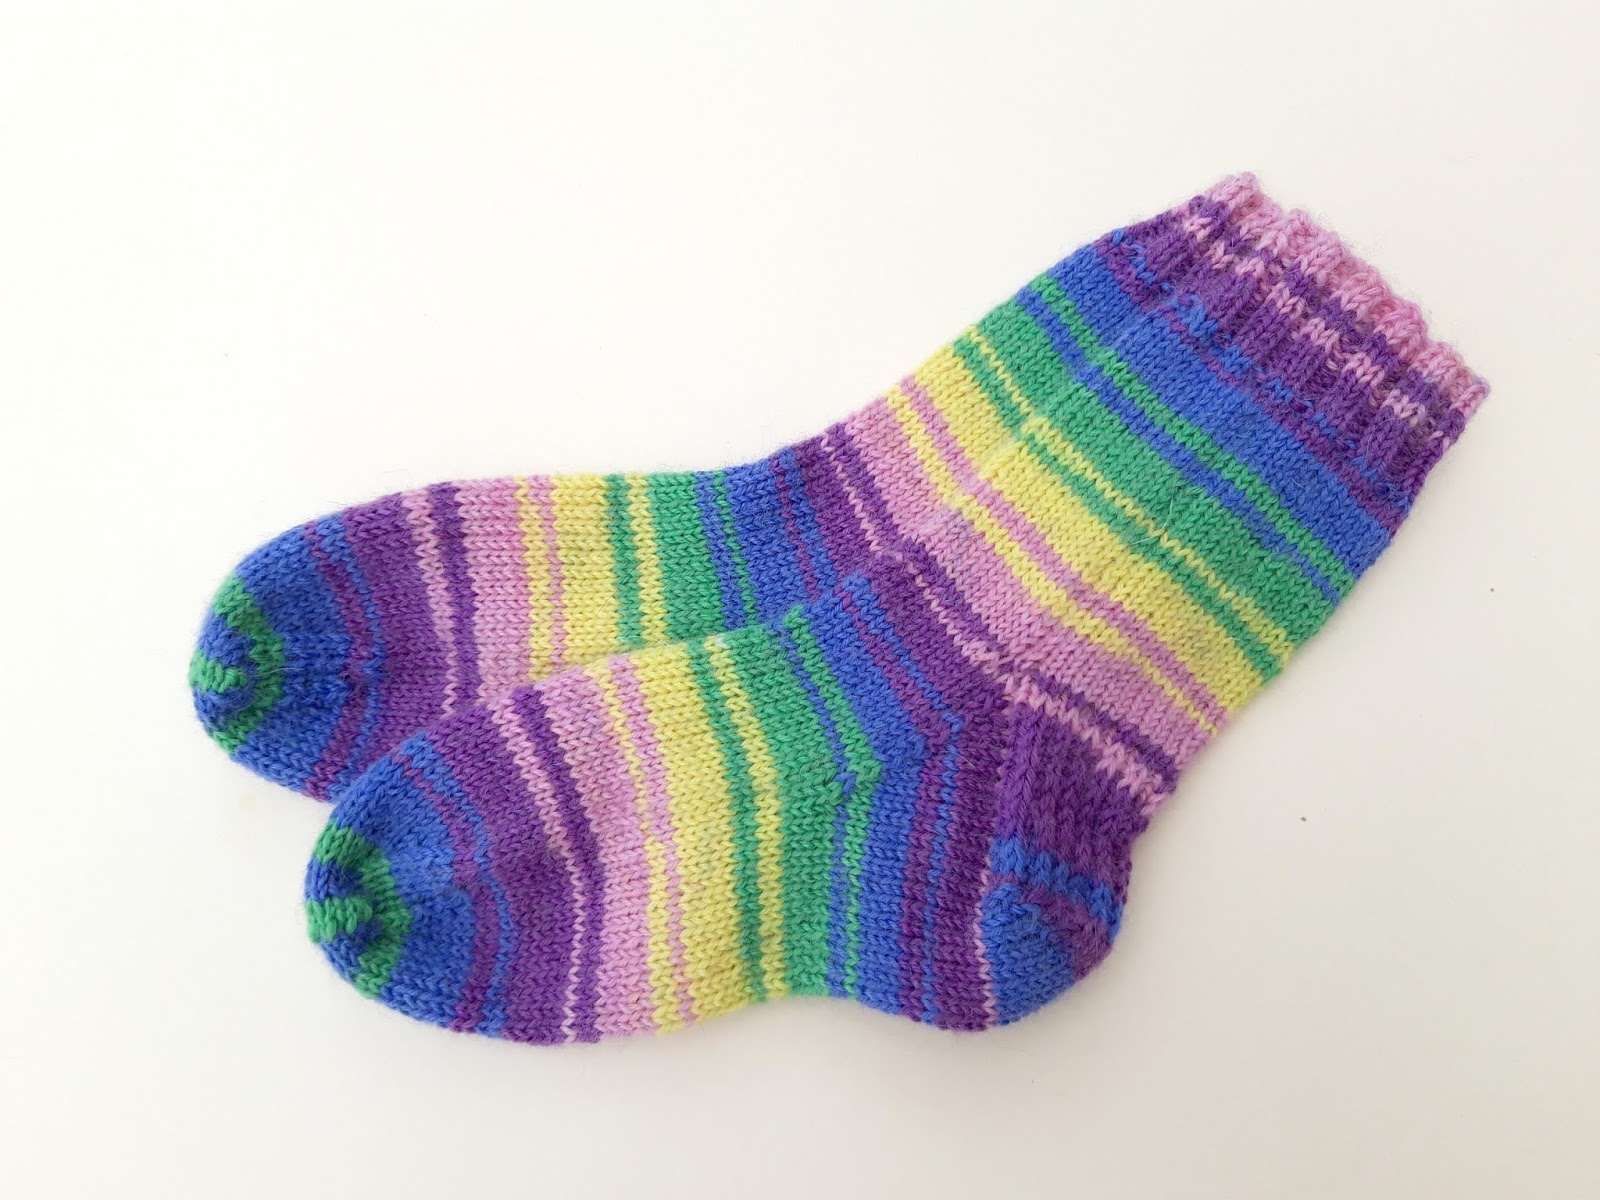
This pair is my prototype pair of Zoom socks, designed for the West Yorkshire Spinners Happy Feet pattern book. They would have been the pair that you see in the book except that I knitted them with a shade that’s now discontinued (that’s the pale purple colour) and they couldn’t be used … such a shame as now I have my own pair of Zoom socks! 🙂
They have sat in a project box for a long time whilst I moved onto other things and forgot all about them, but finally, after re-knitting the toes using heel stitch so that my pokey toes don’t come through them too quickly (something that I do with all of my socks; if you have the same problem, this tutorial might help you) and now having another Top Sock Tip to share with you another day about knitting with unravelled yarn, they’re all ready to go into my sock drawer.
I wouldn’t usually bother blocking socks that are just for me, but it’s handy that they’re here so I can take photos to show you 🙂
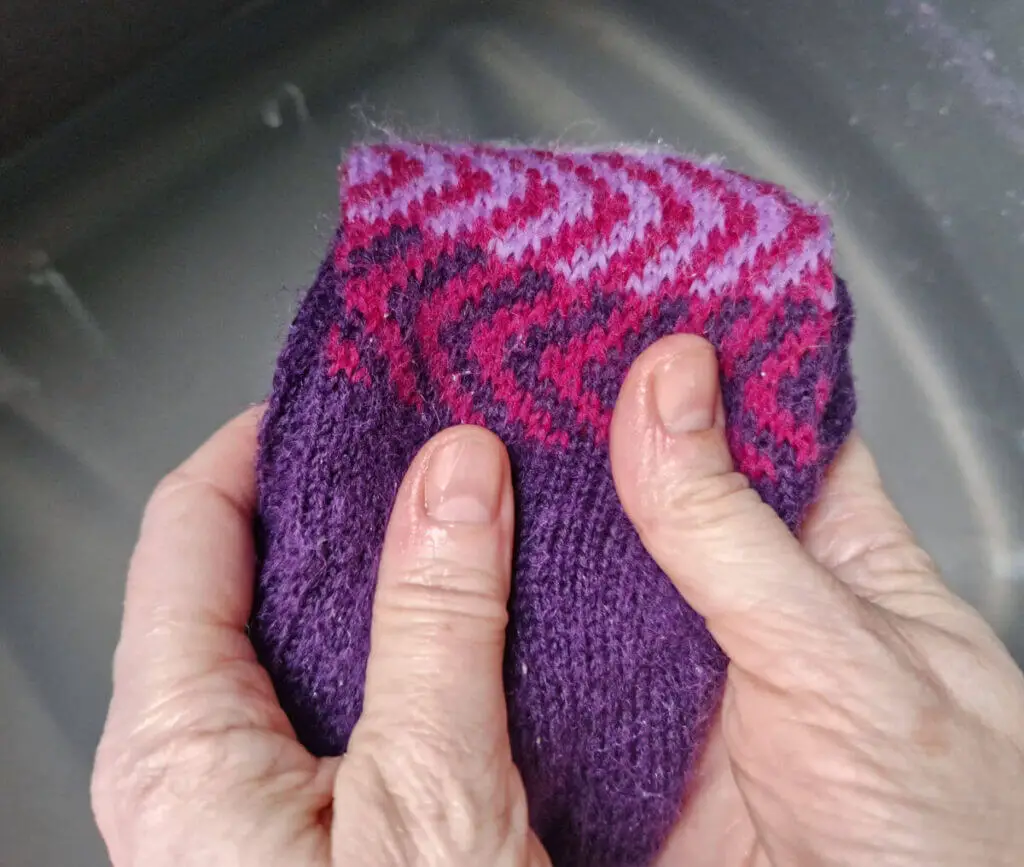
First things first, they’re going for a soak.
I soak my socks in a washing up bowl of warm water – not too hot, I don’t want to boil my socks or have my hands look like lobsters when I take them out of the water; if in doubt, go for cooler than you might usually use – with a small amount of Woolite or other gentle detergent suitable for woollens. About twenty minutes is a good length of time to make sure that all of the fibres are properly wet.
I push the socks right under the water so that all of them is getting wet and leave them for a while before rinsing them.
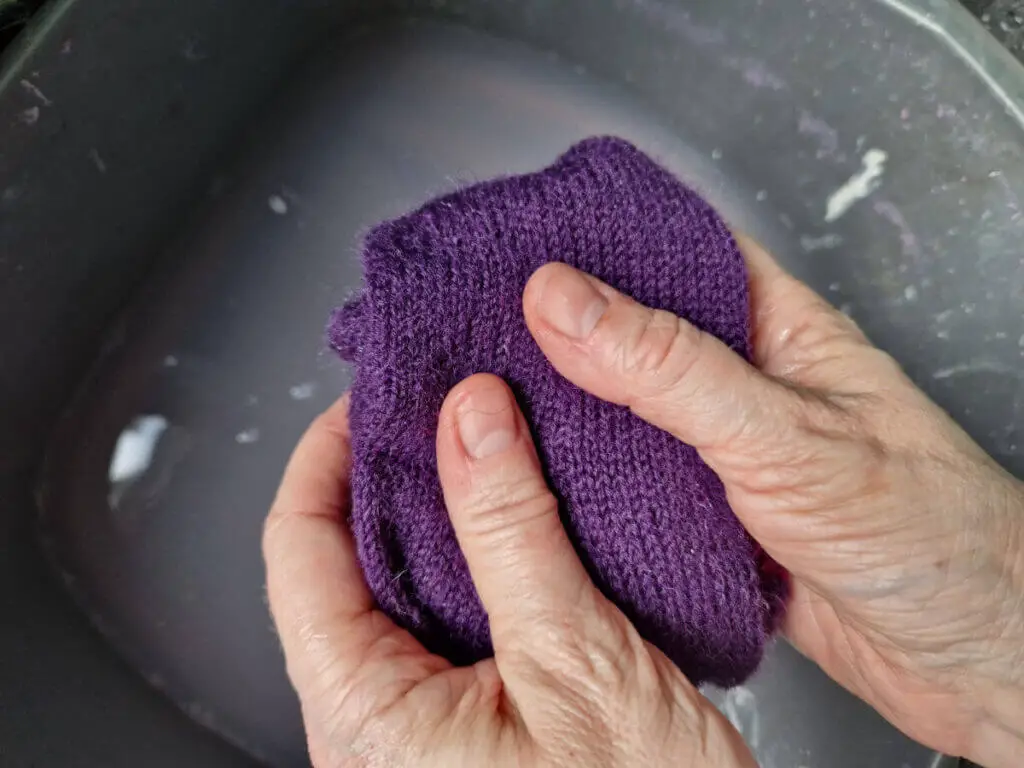
I squeeze the excess water out of my socks by folding them up – never wring them – and giving them a good squeeze …
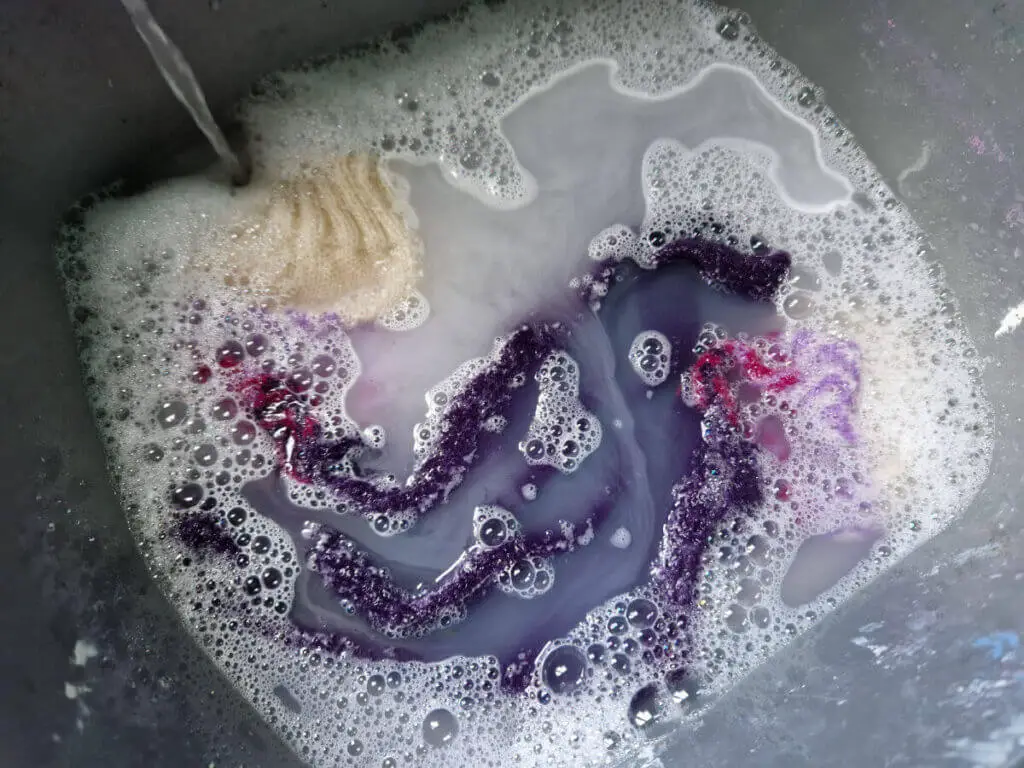
I don’t know if you can see very well in this photo but the water that the socks came out of is not as clear as it was when the socks went in! Any excess dye, dust, dirt, cat and dog hairs that your socks might have picked will be left behind and you’ll be wearing (or gifting) clean socks!
To rinse the socks, I swish them about in fresh, clean water to get all of the detergent out – again, not too hot, always go for cooler water if in doubt …

and then squeeze them again by folding them up to get as much water out of them as you can.
The socks will still be quite wet so the best way to get the rest of the water out of them now is to wrap them up in a towel. Lay the socks on the towel and roll it up from one end, rolling the socks up with it. I’ve got a furry helper here but it’s not obligatory (or actually very helpful!).

Once you’ve rolled the towel into a sausage, give it another good squeeze to soak up as much of the remaining water as you can.

And then it’s time to put the socks on the blockers to dry.
Because I’m using my adjustable ones, I choose the right size from the sizes marked on the foot and secure the end.
Next, it’s time to pull the sock carefully over the end of the blocker. You do have to take more time with adjustable blockers because of the two pieces and the sock can get stuck where there’s a gap, but it’s no more complicated than putting on a pair of sheer tights or stockings carefully over your own foot. If you’re using solid shape blockers, it’s still best to go slowly and take your time so that you don’t pull your sock out of shape.
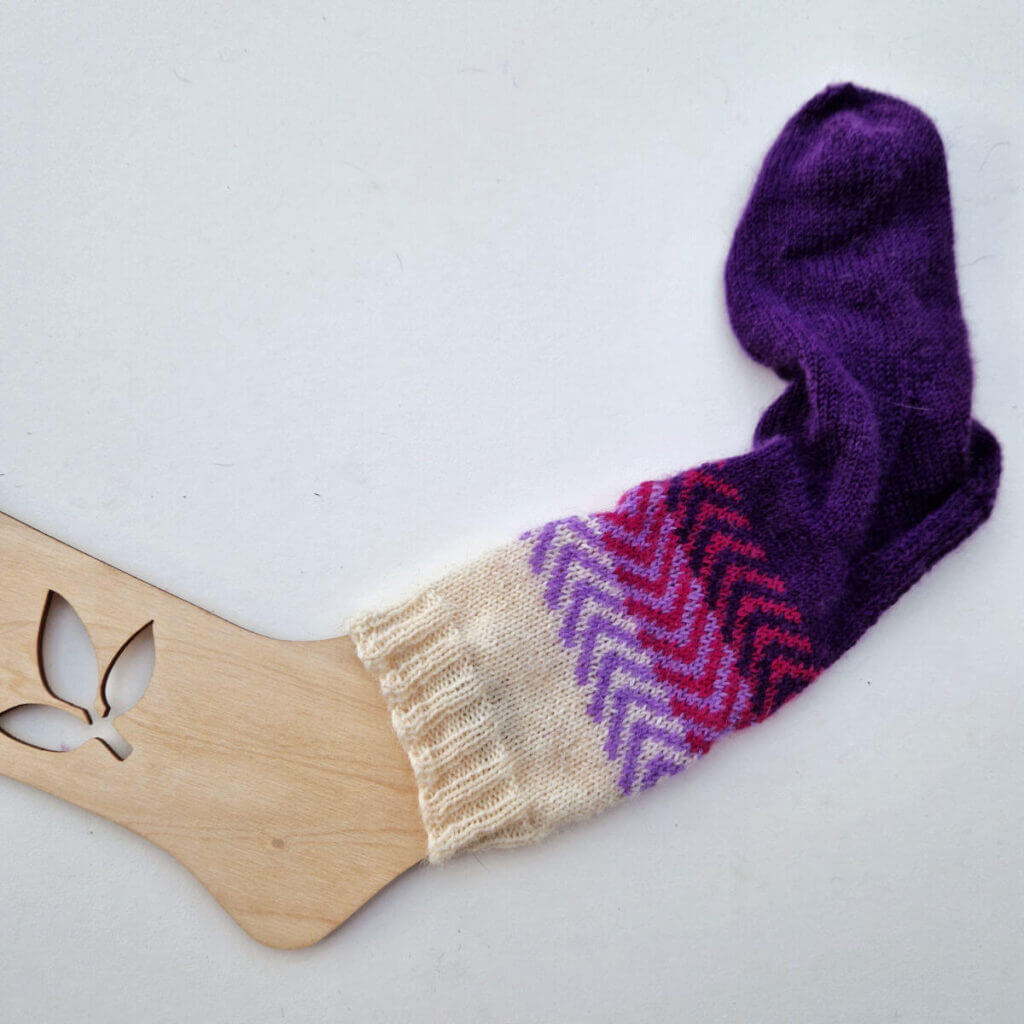
Because the sock is wet, it can feel a bit more difficult to pull it over the heel but again, take it slowly and carefully and you shouldn’t have a problem.

Once you’ve got the sock onto the blocker form, you can pull it into shape, move it around if the decreases aren’t quite in line and if you’re using an adjustable blocker, make sure that you pull the sock out of the gap between the two pieces so that the outline is smooth.
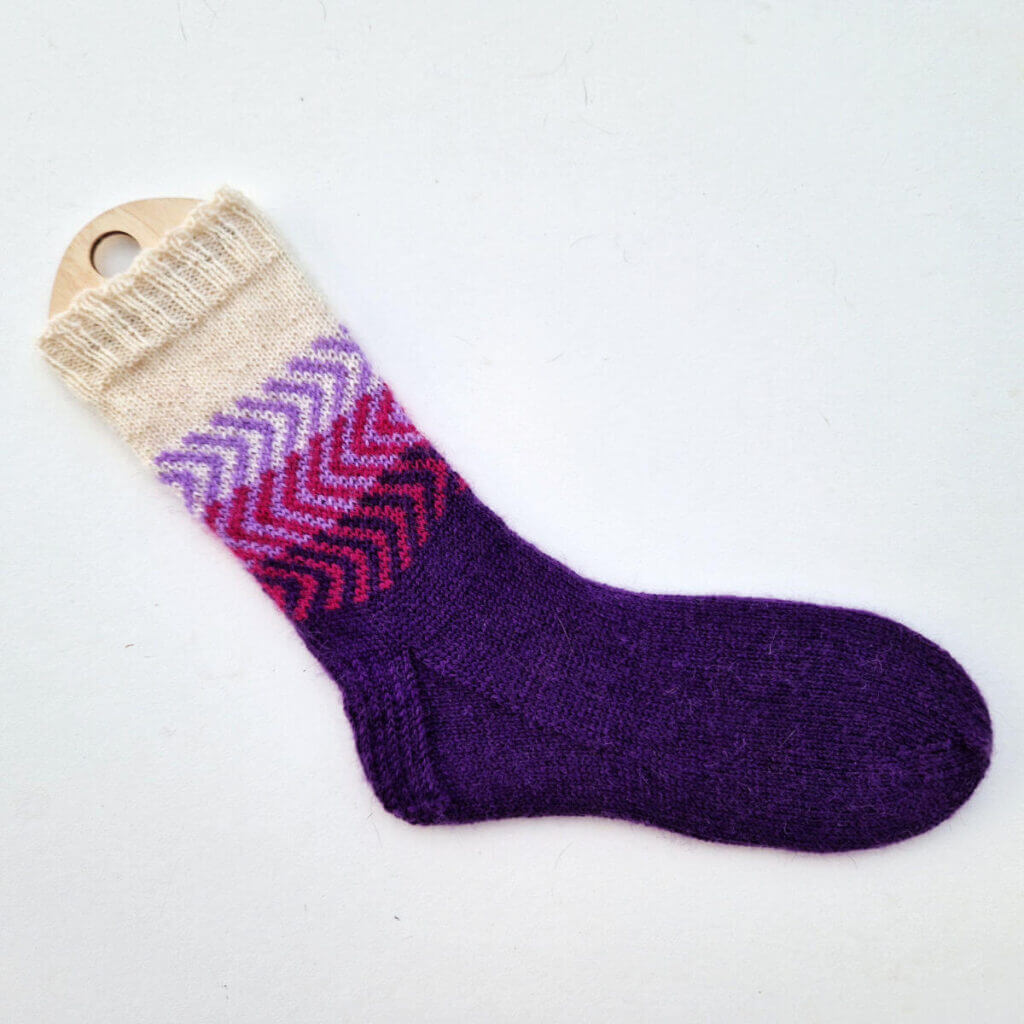
Repeat with the second sock and leave them to dry. There’s usually a hanging hole or hook at the top of the sock blockers so you can hang them up – outside is perfect if it’s a nice day, or somewhere where it’s nice and warm. I tend to dry mine flat and usually put them on the Aga lids but as long as you can find somewhere that’s not in direct heat and the socks will dry quickly enough not to smell musty, that should be fine.

Once the socks are done, you can take them off the blockers and they’re all ready for gifting or photographing or whatever you intend to do with them. You can see here that they keep the shape of the blockers and they will do that until the next wash when you can either block them again or just leave them to dry and roll them up in your sock drawer. As a side note, I never ball my hand knit socks up inside each other (as I would with bought socks) so that the cuff doesn’t stretch; I put mine one on top of the other and then fold them before putting them away.
And finally, just to remind you of the difference between blocked and unblocked socks, here are mine before they were washed and dried …
(and you can see why I shouldn’t really take photos on different days as the light changes significantly! 🙂 )
The pattern is called Zoom and you can find it in the West Yorkshire Spinners Happy Feet pattern book, and the blog post about this pattern and the others in the book is here.
If you’re gifting socks, I always think it’s worth taking the time to block them to show off your knitting. Too many people are upset that their knitting skills seem to be undervalued or taken for granted, but this is a good (and easy) way make your knitting look very professional and encourage people to see us for the sock knitting superstars that we know we are!
I hope this has been helpful! Do let me know what you think, and how you get on if you decide to try this method of blocking for yourself!
I’ve turned this blog post into a video and you can find it on YouTube – click the photo below!


Thanks for the info .
Those a such lovely socks – a shame about the pale lavender colour being discontinued – but so nice to have an unexpected spare pair of socks.
I always use sock blockers and must now see if I can find some nice adjustable ones – I have a small and a medium acrylic set – but adjustable would be great!
A very useful tutorial – thank you very much – I love your helper in the towel section.
Christine, not sure why but none of the pictures on your blog posts are ever visible. Have tried various browsers but it’s the same issue. Just a frame for a picture with a question mark in the centre.
Have you tried clearing your cache? It might be that your browser is picking up an older version of the blog pages – as far as I know, there’s no problem with the photos but obviously there’s a problem if you can’t see them!
Lovely post and clear instructions as usual, Christine. 🙂 I always block socks and other pieces because I love the way it makes them look. Your adjustable blockers are lovely. I made my own by drawing around a sock, making a neat template and then cutting it out from a cheap plastic placemat. Works a treat. Most of my socks are in the 5-6 range. I have found that the socks then actually return to the blocked shape after washing, if you smooth them out, which amazed me!
There are quite a lot of people in my Facebook groups who have made their own blockers using all kinds of things from foam mats to plastic sheets – I’ve not heard of them made from placemats before, though! 🙂 x
🙂 I was in the Supersocks group when on FB and I think that’s where I got the idea! The placemats are just bits of thin flexible plastic and about a quid each; easy to cut up.
That makes perfect sense – they are a group of enablers in every way! 🙂 xx
Would you ever use vinegar to set the color? I just finished a sock with bright red hearts with white as the background.
I’m ready to try your blocking method using a sock blocker.
I haven’t tried that – I just assume that it’s excess dye from the manufacturer and once it’s rinsed out then the socks will be fine in the future. I know it can be different with hand-dyed yarns so maybe that’s the answer! 🙂 xx
I’m having the same problem. but I don’t even have a frame, just a space.
I’m sorry, I don’t know why that is. Have you tried clearing your cache as well? It’s something that’s useful to do on a regular basis anyway to keep our computers running properly xx
Thankyou for that information Christine. I only started knitting socks seriously during lockdown and always have to have a pair on the needles now. LOVE LOVE knitting socks. Never knew how to block them though, so found this blog very useful.
Enjoy reading your blogs. Love to you and your little furry helper. xxx
Oh good, I’m glad you found it useful! Blocking is a nice-to-do but it’s also nice to know how to do it so you can choose to if you want to! 🙂 xx
Thank you for sharing this useful sock information 😄. I enjoy reading your newsletters from across the pond. I’ve downloaded your cowl, as like you, I spend more time than I would like trying to keep a shawl in its proper place on my shoulders. Your cowl is very cute and soon to be on my needles.
Also, I was wondering where you order your sock blockers from. I don’t think I’ve seen any at my LYS near me.
Thanks again for sharing your love of knitting and expertise. I wish I had leaned to knit at a young age. I feel I am trying to make up for lost time since I’ve discovered how much I enjoy the feel of the needles and the yarn becoming something beautiful.
Ah, I always believe that we only come things when we’re ready for them, and perhaps your time to knit is now. There’s always going to be more yarn and more patterns than we can ever hope to use so we just have to pick what suits us in the moment and enjoy the process! My wooden sock blockers are made by Vicky at D19EcoFriendlyLife. She lives in Ukraine but does post abroad; I guess it’s whether the postage would be prohibitive. There must be someone online who is closer to you who makes them – Etsy is a good place to start searching, but you should also be able to get single size ones from yarn shops that stock KnitPro (I know they make them). I hope that helps you get started! 🙂 xx
I am another keen sock blocker. I use a set of acrylic blockers. I decided against wooden ones which are far cheaper because I thought the wood would discolour and take a long time to dry. It doesn’t sound as though it’s a problem to you though so perhaps I will try a pair.
I’ve not had a problem with them, but if your acrylic ones work well then you should be fine with those! 🙂 xx