
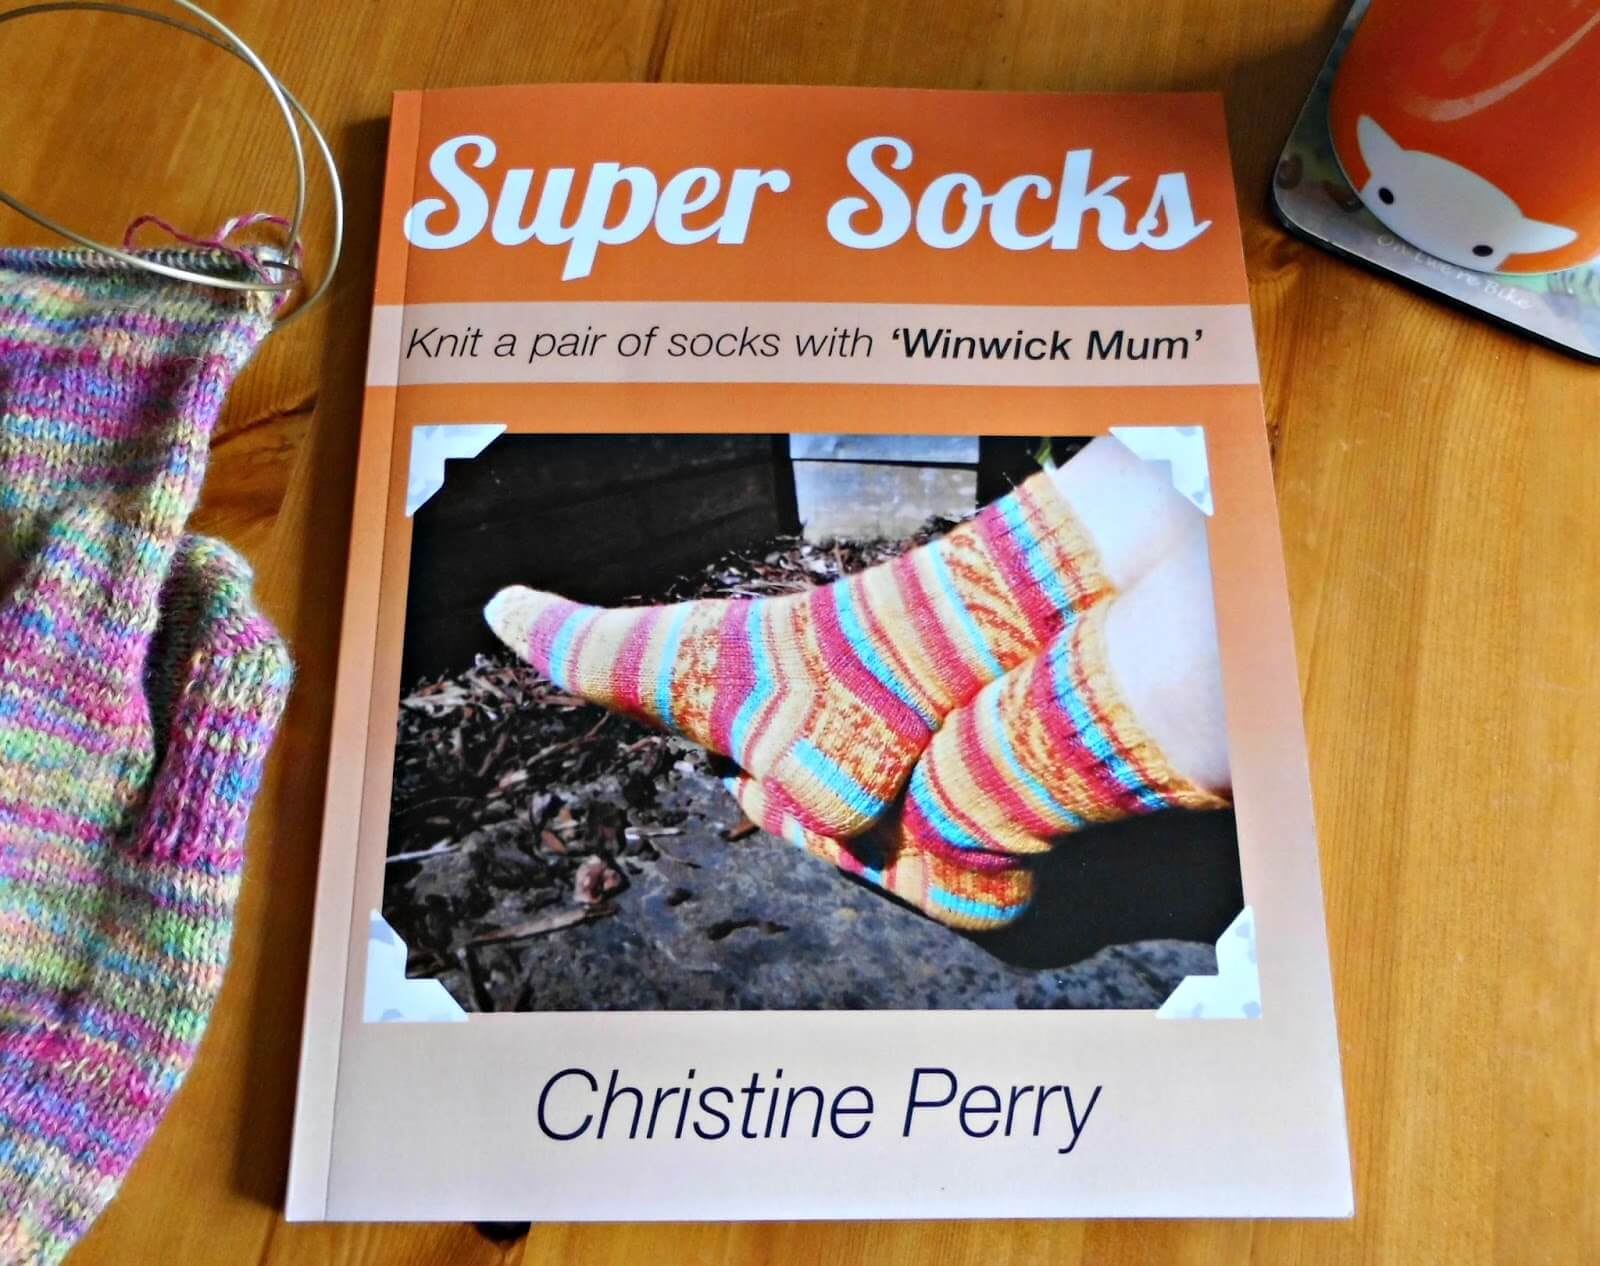
Basic 4ply Knee High Socks – free pattern
How high do you like your socks to go?

(Long post warning …!)
Until last year, I’d never considered knitting knee high socks. I like to wear mine mid-calf and it wasn’t until a flurry of enquiries about longer socks that I started to give it some consideration. Add to that a request for a pair of long socks for a certain yarn manufacturer’s Christmas socks book and I had to think again.
“But who wears long socks?” I asked. They made me think of cold days in draughty school corridors before woolly tights became an easily-attainable necessity, and long before the days when I could live in my jeans and short boots. Added to that, all of that knitting … and calf shaping … but the more I thought about it, the more I wanted to know. I asked about it on social media and suddenly it all made sense.
You can wear long socks with wellies, with riding boots, with motor cycle boots, with fashion boots, to keep your legs warmer or simply because you like them. It was like a whole new sock world had opened up to me (oh, I love it when that happens!) and as if to confirm that this was definitely a type of sock that I should add to my Basic Socks collection of patterns (the others are 6ply Boot Socks, DK (8ply) Boot Socks and Basic 4ply Shortie Socks and the Basic 4ply Children’s Socks), even more requests for knee high socks landed in my various message inboxes. The Universe has realised that sometimes it needs to bash me over the head with an idea before I listen – but now I was all ears!
I decided to use my Basic Socks pattern as that’s the one that’s familiar to many people and also the one with all the tutorials in case this is your first ever pair (in which case you deserve a prize!) or you get stuck along the way. I’d already had some practice at working out the calf shaping thanks to the WYS Christmas socks so it was quite straightforward for me to adapt the mid-calf Basic Socks to longer ones, and even better, to use the same Sockalong method of being able to adapt the socks to any size.
All sorted, I thought!
“Not so fast!” said the Universe.
I got a message from Jenny who wanted to knit some long ribbed socks for her son, Iain, who is, incredibly, a pirate and needed knee high socks. As pirates do. If images of Pirates of the Caribbean have sprung to mind, that is exactly the sort of pirate that Iain is – he takes part in Live Action Role Play (LARP) and a splendid-looking pirate he is too.

Just in case you’ve never heard of LARP before, it’s a form of role-playing game where the players physically portray the characters and pursue goals within a fictional setting in the real world – in this case, Iain’s group uses replica ships (with real sailors to keep them safe), have a story to purse and treasure to discover using old maps, and with a sea battle or two using canon powered by pressurised air and firing talc along the way. It all sounds very exciting – I had no idea anything like this existed, and apparently the costume authenticity is very important.
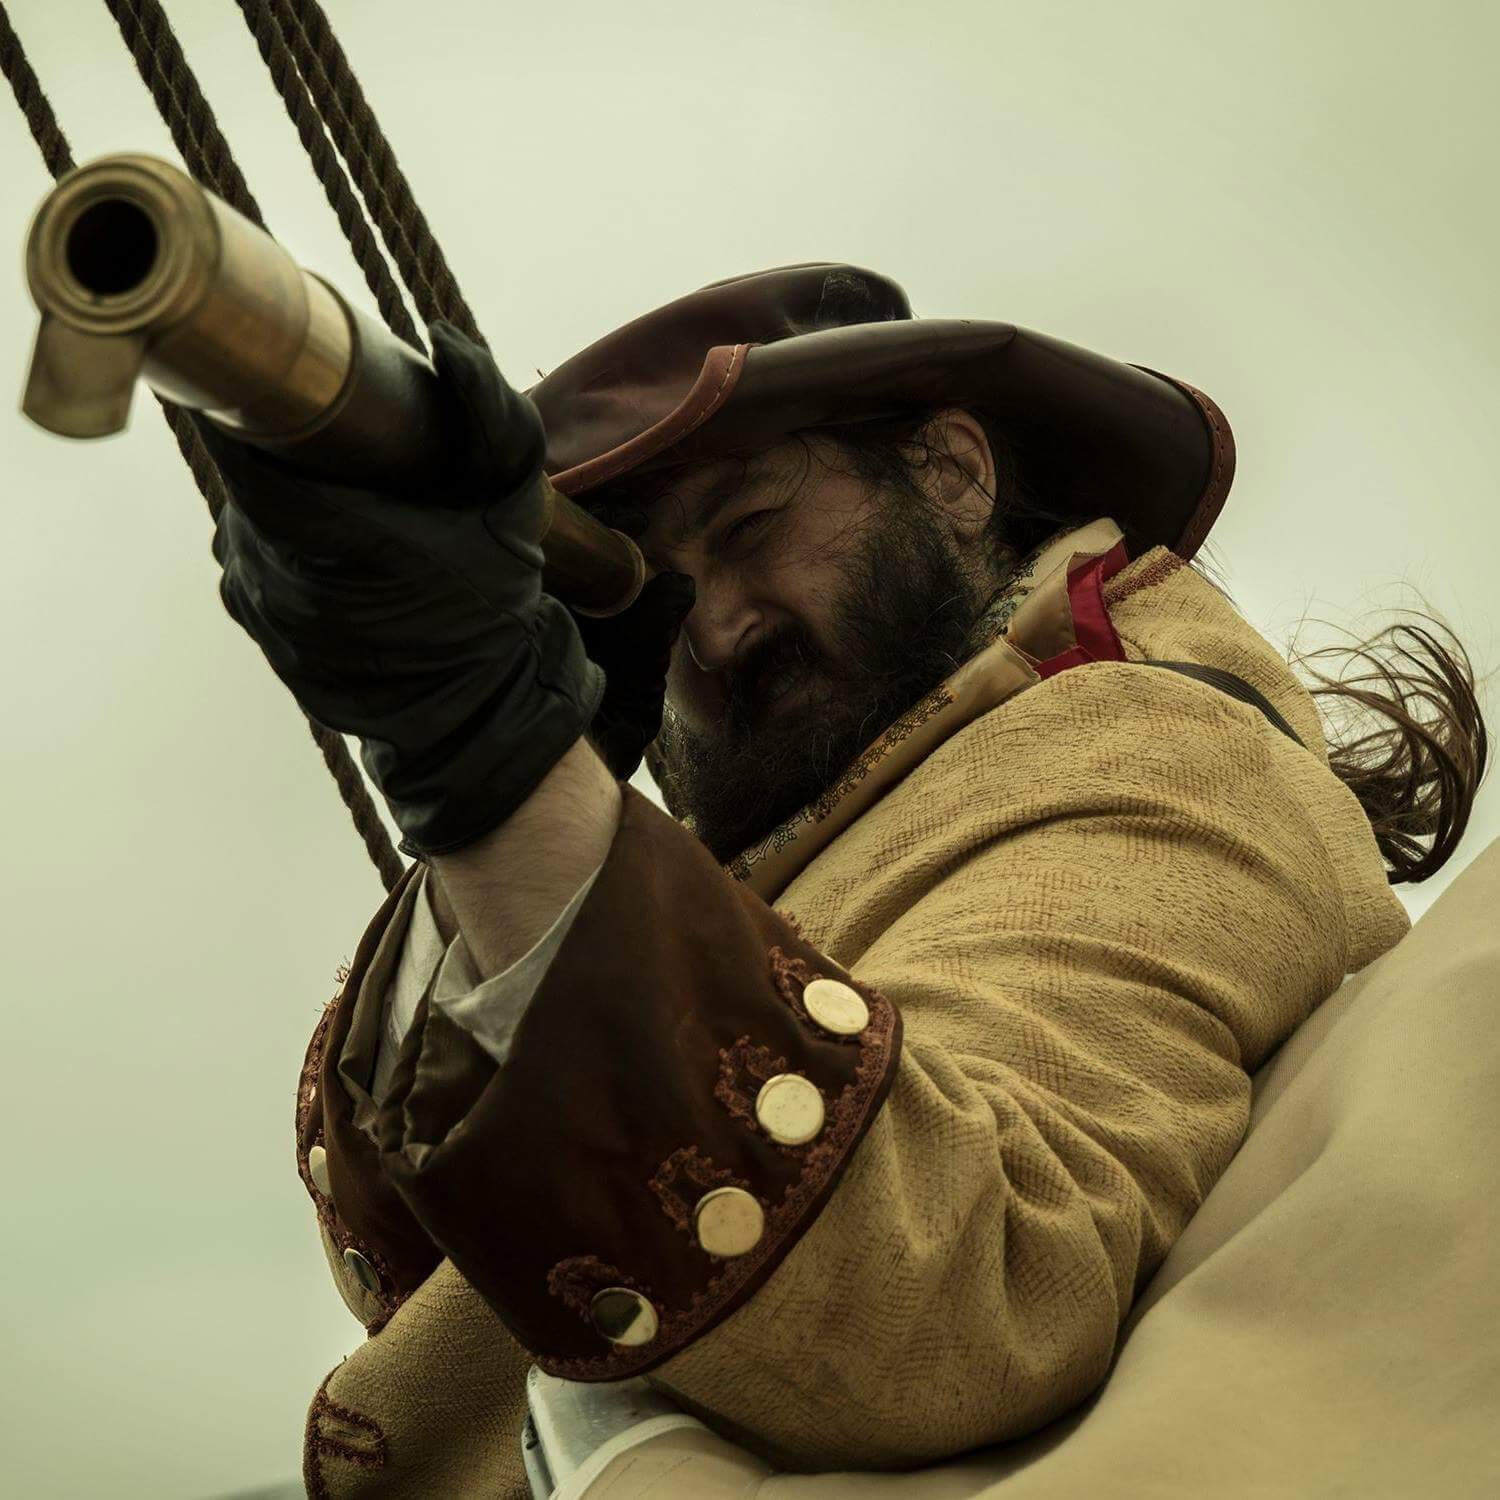
You can see the attention to detail in Iain’s coat, so it’s no surprised that Jenny wanted to get his socks right, and I was very pleased that she’d asked me to help.
Anyway, having used rib as part of the pattern for knee high socks previously with the Christmas socks, I thought it should be possible to work out an entirely ribbed version and sent a copy off to Jenny to test knit and see how they knitted up. They worked! Thank you, Jenny, and I hope that when Iain’s ship is allowed to set sail for the high seas again that he has very cosy feet!
Well! As you can imagine, I was very pleased with myself – a plain and a ribbed version of knee high socks … although it wasn’t all plain sailing though when it came to writing up the pattern, especially as I wanted to make the pattern as flexible as I coud so that it would fit as many pairs of feet and legs as possible. Help was at hand, though, and I could not be more grateful for Helen, my fab tech editor, who helped me with the numbers so that you can knit these socks whatever your foot or calf size.
Talking to Jenny also opened my eyes to how many people are involved with role play and living history groups and I hope that this pattern will be very useful to anybody who needs to wear socks as part of their costume. They might only be authentic 2021 as opposed to whatever century your society belongs to, but if they keep your legs and feet warm then I hope that can be overlooked! 🙂
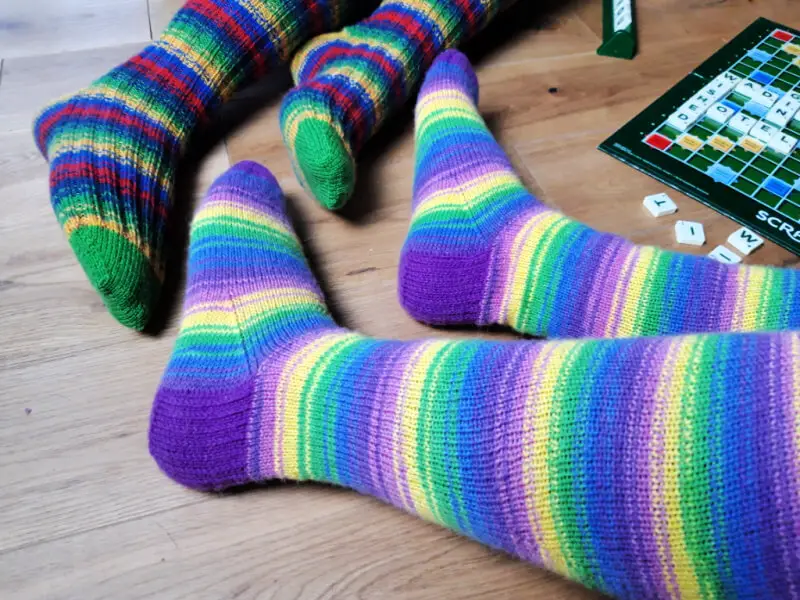
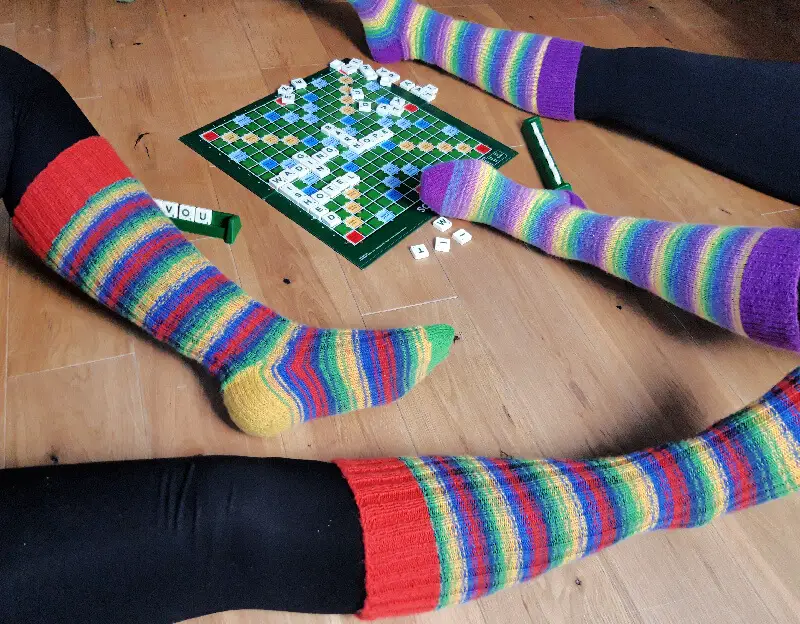
I must also say a big thank you to my girls for modelling the socks and not getting too cross with me for making them sit on the floor for longer than they might have liked to!
So, let’s talk about the yarn that you’re going to need. Don’t knee high socks need a whole field’s worth of sheep to make enough yarn?!
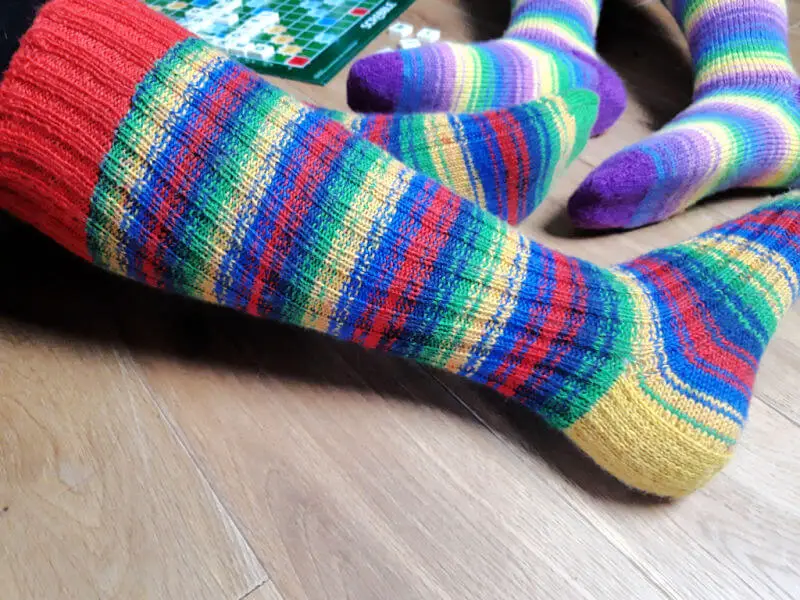
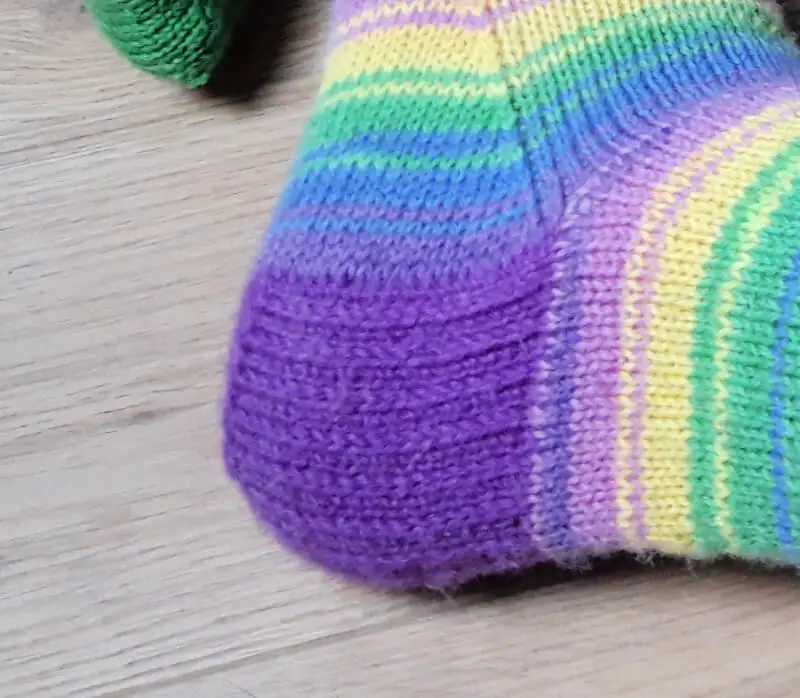
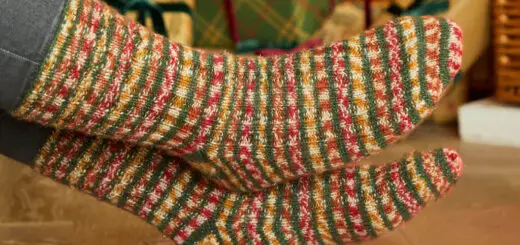
Well, in terms of how much yarn these socks take, the answer is “more than a mid-calf pair” but of course it will depend on the size of the foot you’re knitting for as to exactly how much that is – and also how long you want to make them as you’ll probably want to measure the size given in the pattern and see if that length is right for your leg. You might just about get one pair out of a 100g ball but I think that would only work if you were knitting for small feet. Otherwise, I’d say that you definitely need two, but there’s no reason why you can’t use contrast heels and toes if you think you’re going to run out of yarn, and these socks are ideal for making scrappy stripe socks from leftovers. No sock yarn needs to be wasted here! 🙂 For the socks in the photos, I used about 80g of main colour for the smallest size of sock (14″ calf, 8″ ball of foot) and then used leftovers for the cuff, heel and toes, so you can see that to be on the safe side, it’s better to have more yarn – and definitely if you want your socks to be all one colour.
Finally, before we get started, let’s take a moment to talk about tension and sizing. Because this sock is based on the Sockalong sock, that means I’ve only given one size because I want you to be able to adjust this for any foot that you choose to knit for. I know that means doing some working out rather than just following all the sizes for a pattern, but on a sock like this one it’s not difficult to do and it gives you so many more options than just the sizes written on a pattern. In fact, if anything it will be easier to get to grips with the Sock Stitch Calculation for this sock because you’ve only got one measurement to think about around the ball of your foot, and there’s no worry that you’ll end up with baggy legs! I promise, once you understand why you cast on the number of stitches that you do, you will really elevate your sock knitting skills!
The Sock Stitch Calculation is part of the Sockalong tension tutorial – there’s a written tutorial (including how to work out knitted tension in the round) and there’s a video to go with it too, which you might find more helpful if the thought of doing any maths sends you into a tailspin. I’m no maths genius and I can do this, which means that you can too – and besides, it’s Knitting Maths and that’s completely different to anything you did at school! 🙂
Are you ready to get started?
Basic 4ply Knee High Socks
You can download a PDF copy of the pattern here.
Size To fit calf circumference 14 [15:16:17:18] inches; 35.5 [38:40.5:43:46] cm. Advice is given to adjust the size for any foot.
Tension 30 stitches to 4in; 10cm and in stocking stitch (worked in the round) on 2.5mm needles. Always use the size of needles to get the correct gauge.
Yarns 2 x 100g 4ply yarn (or leftovers to make up that amount)
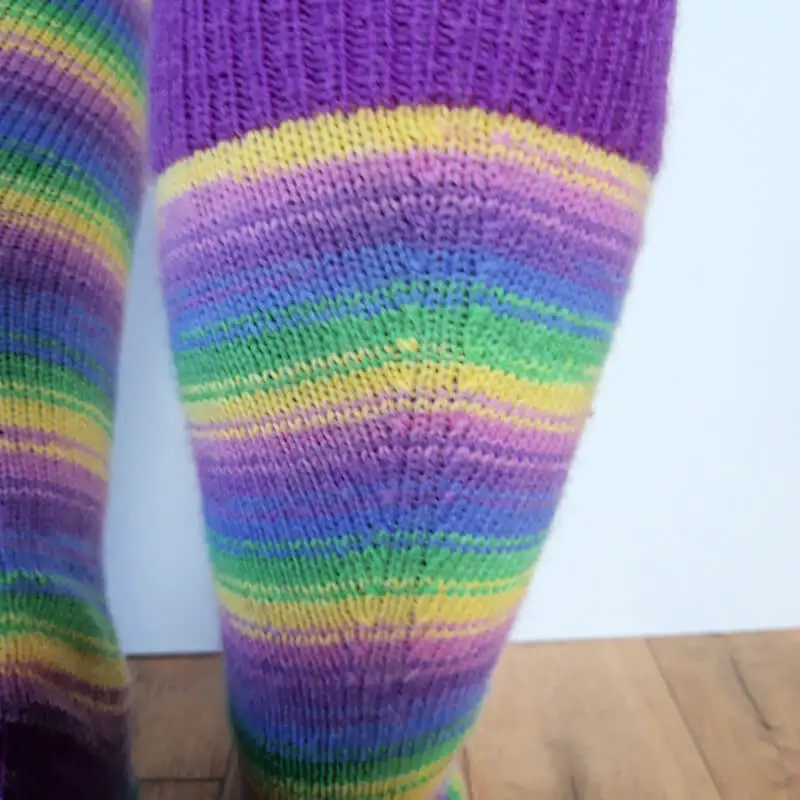
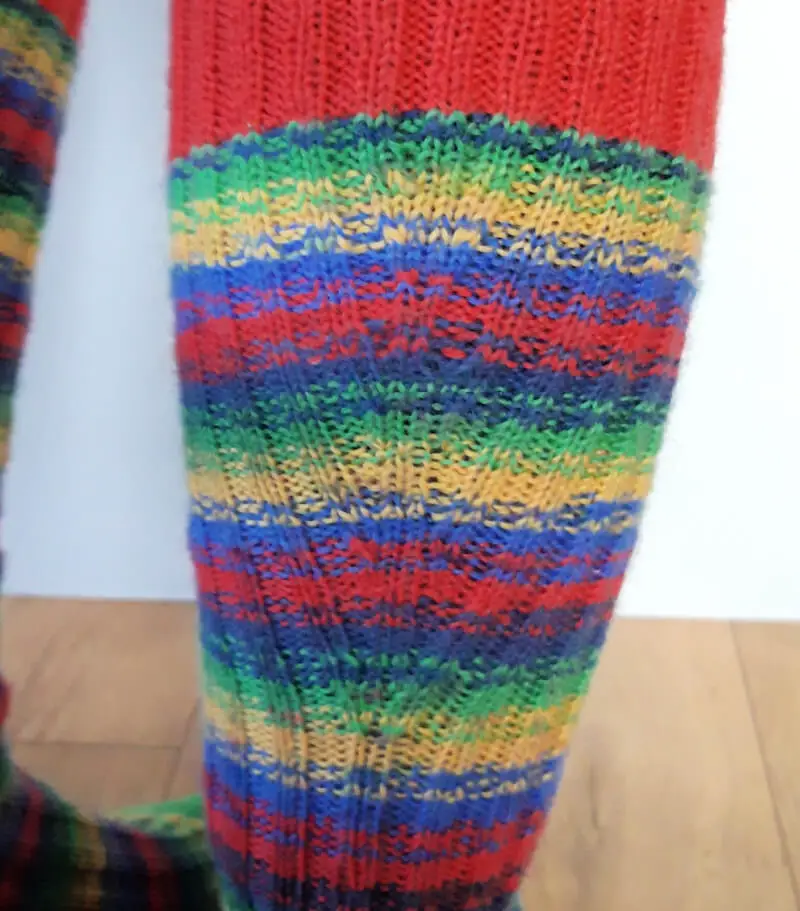
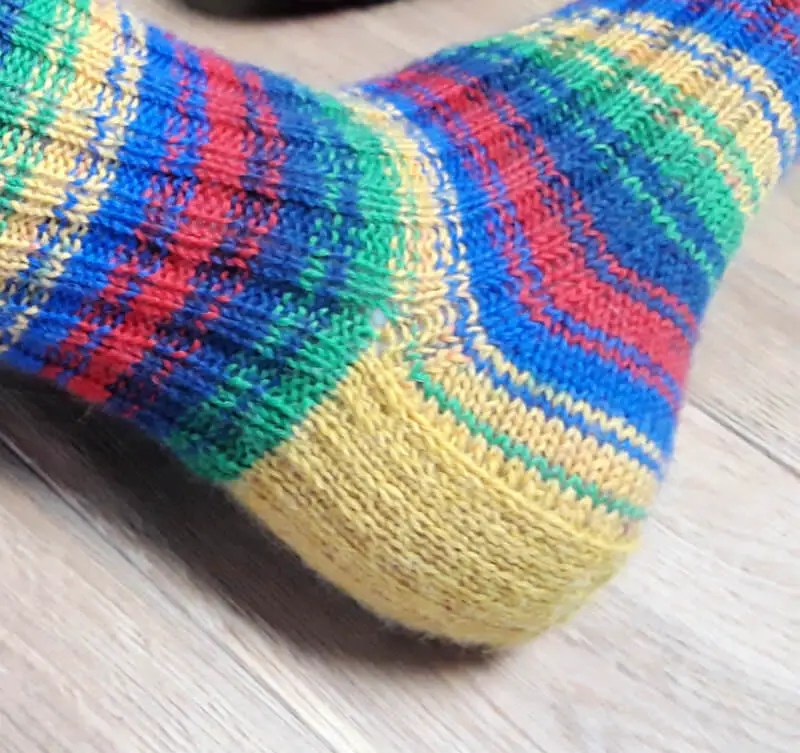
Yarns pictured are: plain socks – West Yorkshire Spinners Blackcurrant Bomb (735)(contrast) and Wildflower (872) (main colour); ribbed socks – West Yorkshire Spinners Cayenne Pepper (510) (cuff), Butterscotch (240) (heel), Chocolate Lime (395) (toes) and Brightside (874) (main colour)
Materials
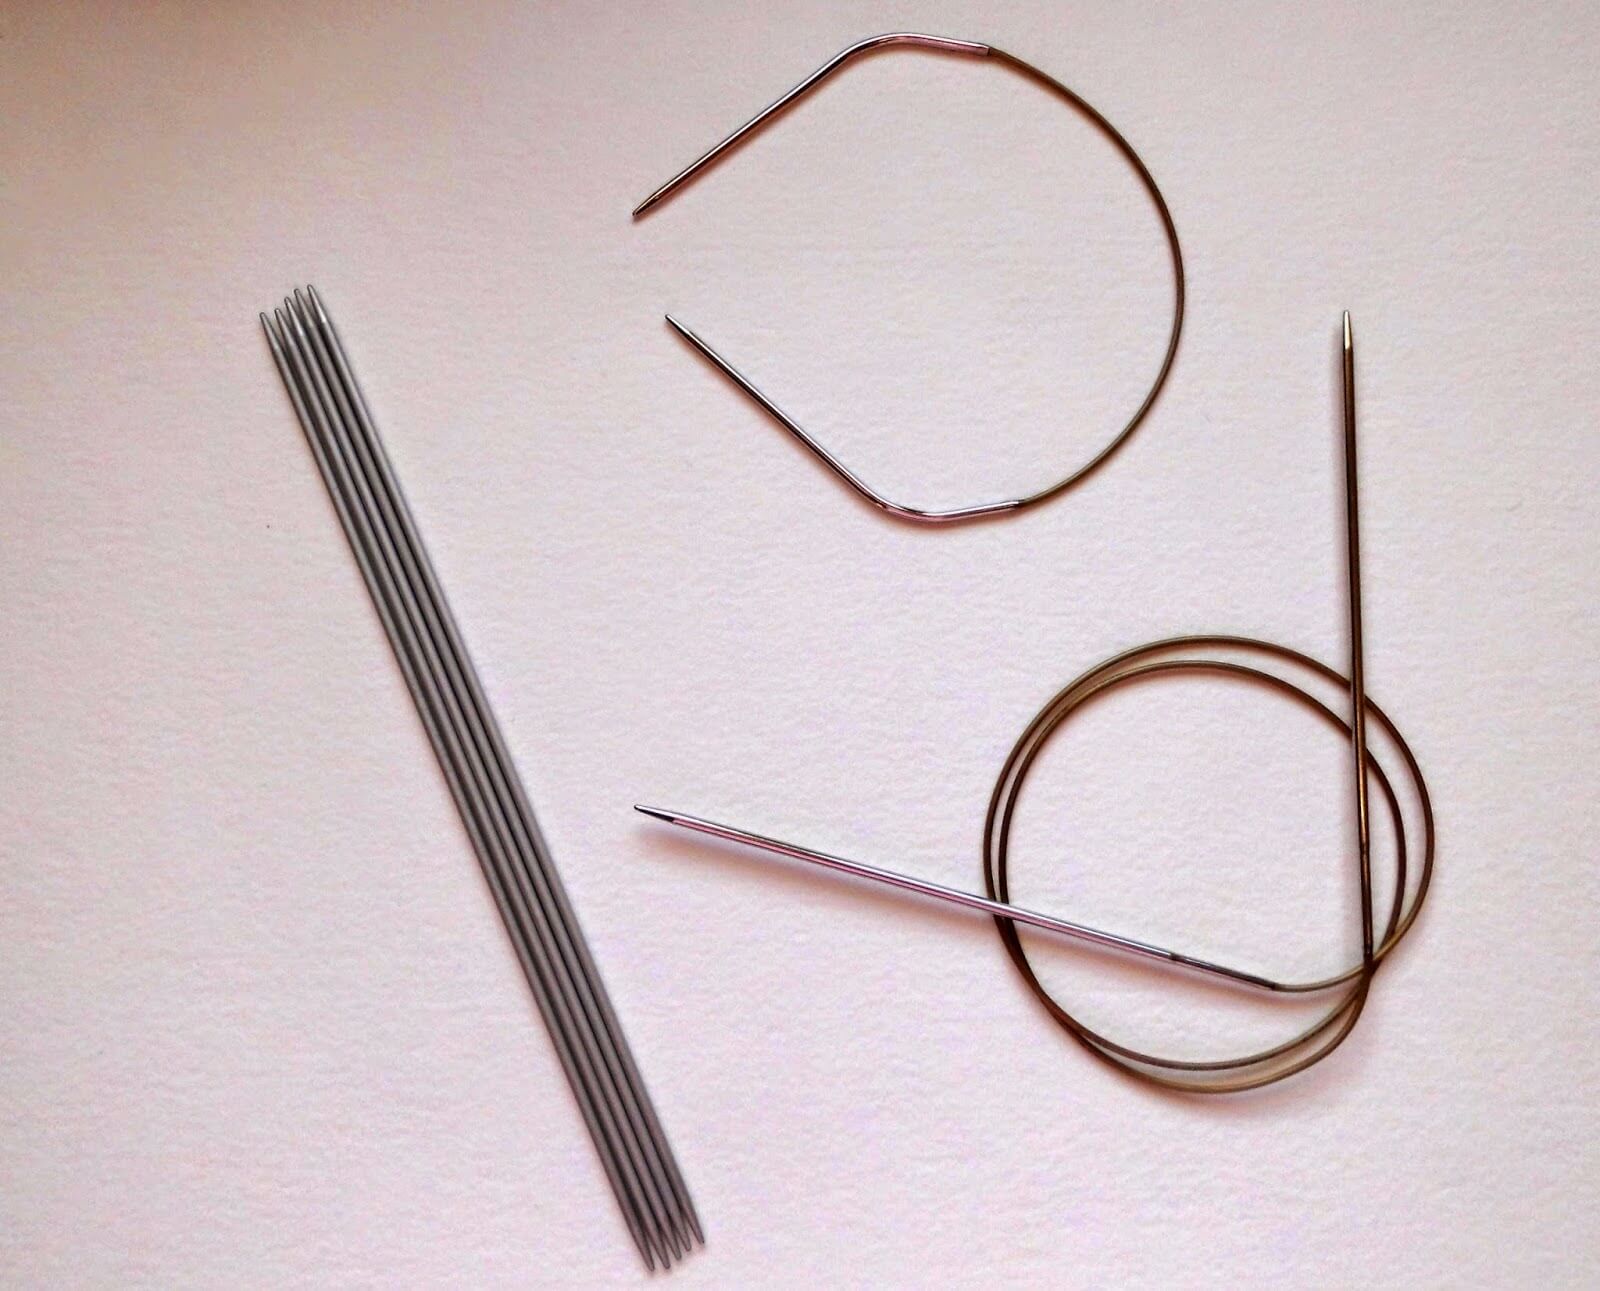
2.5mm needles – short circular needle, DPNs (double pointed needles) or 80 cm circular for magic loop
1 set DPNs size 3.0mm (optional for a looser cuff)
1 set DPNs size 2.5mm (not required for magic loop)
Stitch holder (optional)
Stitch markers
Safety pins
Wool needle
Abbreviations
CC Contrast colour
K Knit
K2tog Knit 2 stitches together
MC Main colour
P Purl
P2tog Purl 2 stitches together
Sl1 Slip 1 stitch purlwise holding yarn to the back of your work
SSK Slip the first stitch on the left hand needle knitwise onto the right hand needle, slip the second stitch on the left hand needle purlwise onto the right hand needle, slip both stitches back onto the left hand needle and knit together through back loop
Sts Stitch(es)
( ) Repeat instructions inside brackets
How to adjust the size for this pattern
Hand knitted socks are measured by width and not length, which is easily adjusted, so to get the perfect fit for the person you are knitting for, it is best to measure their feet first and use the Sock Stitch Calculation to find out the right number to cast on.
For these socks, you will need the calf measurement as well as the foot measurement so be sure to take both. There are five calf sizes given for this pattern but you can use this as a guide for any other size.
It’s very easy to do, and once you have the numbers, you can use them for any pair of socks in the same weight of yarn. The Sock Stitch Calculation, along with a tension tutorial and a video to help can be found here.
Write your calf measurement down on a piece of paper: __________ ins = _______ sts to cast on
Write your ball of foot measurement down on a piece of paper: __________ ins = _______ sts.
Pattern notes
It is often easier to cast on using DPNs before changing to the short circular needle. If you want to use magic loop you will be able to cast on with the larger circular needle if you prefer to do so, but remember not to pull your cast on stitches too tight. If you use DPNs, you might find it easiest to cast on and work 2 rows before dividing the stitches across the needles.
These socks are knitted on 2.5mm needles, not 3.25mm as stated on the West Yorkshire Spinners Signature 4ply ball band. This will produce a different tension but will ensure a firmer, more hard-wearing fabric for your socks. The ideal tension for these socks is 30 stitches to 10 cm (4 inches) so use whatever size needles are required to reach that tension and do check that your knitted fabric is firm but not stiff.
A tutorial to help you match the stripes in the Winwick Mum yarn is available here.
A tutorial to help you work with contrast yarns is available here.
PLAIN SOCKS
Pattern
Cast on 92 (100; 108; 116; 124) stitches using 3.0mm needle and CC if required. The pattern has been written for a cast on with straight needles which makes it easier for you to join into the round without twisting the stitches.
Row 1: (K1, P1), repeat to end, turn.
Row 2: (K1, P1), repeat to end, turn.
Change to 2.5mm needles. At this point, change to a short circular, magic loop or divide the stitches across DPNs and join into a circle, place marker. You will sew up the small gap where you knitted the first two rows later.
Continue in K1, P1 rib for 28 more rounds or until desired length of rib.
At this point, you will need to know how many stitches you will want your foot to be so that the decreases can be centred.
Leg
Break CC if using and join MC.
Next round – place markers for decreases as follows:
Knit as many stitches as you will need across the top of your foot, then place marker (eg, if you want to work your foot on 72 sts, work 36 sts then place marker). This will indicate where the front (instep) of your sock will be and the decreases will be worked on the back of the sock.
Now count the number of stitches that are left to be knitted and divide that number by 2. Knit across the first half of the stitches, place marker, then knit the rest of the stitches until you reach the marker that indicates the beginning of your round.
You should have 3 markers on your needle at this point.
Knit 2 more rounds, slipping markers as you come to them. If you want to remove the marker that indicates the instep stitches you can do so at any point now that you know where your decreases will be, but it’s fine to leave it in.
Decrease round
Knit until 3 sts before the 3rd marker which indicates the decrease point, then SSK, K1, slip marker, K1, K2tog. Once your decreases are established, you might find it easier to move the marker one stitch to the right so that it is immediately after your decrease rather than in the centre of the K2 stitches.
Continue to knit each round and decrease every 4th (4th;4th;3rd;3rd) round until you reach the required number for the foot, then continue to knit until leg is 13in; 33cm or desired length before start of heel.
Heel Flap
Knit the required number of stitches for the top of your foot before starting the heel flap.
At this point, you are working on a sock that is sized for your foot, not your calf, so you will need to use the ball of the foot measurement from now on.
Change to 2.5mm DPNs if you are using a small circular and CC if required. Do not break MC yarn at this point if using a contrast. Knitting the first two stitches of row 1 will help to stop a hole forming at the gusset.
Row 1: K2, (Sl1, K1) until you reach the end of the round (this should be half of the total of your stitches), turn.
You will now work back along the same number of stitches.
Row 2: Sl1, P to end, turn.
Row 3: (Sl1, K1) to end, turn.
Repeat rows 2 and 3 until heel measures approximately 2 ins; 5 cm long, finishing on row 3. If you want to make the heel flap longer, continue knitting rows 2 and 3 until you reach the desired length, but remember that you will need to pick up more stitches to create the gusset. You can check that the heel flap is long enough by measuring it against your foot from your ankle bone to the floor.
Turn heel
The instructions are given here for a 60 st sock. For a larger or smaller sock, you will need to alter the number of purl stitches in the first row of the heel (marked in bold below), increasing the number by 1 stitch for each block of 4 stitches extra that you cast on, or decreasing by 1 st for each block of 4 sts less than 60 sts. For example, if you cast on 64 stitches, your first row would be Sl1, P17, P2tog, P1, turn. The rest of the instructions remain the same.
Row 1: Sl1, P16, P2tog, P1, turn.
Row 2: Sl1, K5, SSK, K1, turn.
Row 3: Sl1, P6, P2tog, P1, turn.
Row 4: Sl1, K7, SSK, K1, turn.
Continue in this way, adding one stitch between slip stitch and SSK or P2tog on each row (ie, Row 5: Sl1, P8, P2tog, P1; Row 6: Sl1, K9, SSK, K1, etc) until all of the heel stitches are used. Depending on how many stitches are in your heel flap, you may find that the K1 and P1 stitch is not required at the end of the last two rows.
Knit across heel stitches if required to bring you to the left hand side of the heel.
Working the gusset in a contrast colour
When you get to the gusset, you’ve got a few choices over what to do with your working yarn. At the moment, the main colour is at the right hand side of your heel flap and when you start to pick up the gusset stitches you’ll need it at the left hand side. You can either:
- Leave the yarn where it is ready to pick up the second set of gusset stitches, but if you do that then the first set of picked up stitches and the top of the foot stitches will be knitted in the same colour as your heel flap until you get round to where you can pick up the main colour again. That won’t be a problem if your colours are similar, but if you’re using a completely different colour then it might look a bit odd.
- Leave the yarn where it is and pick up what would usually be the second set of stitches first – you can choose then whether you start your decreases on the SSK stitch or whether you work an entire round so that you work the decreases as per the instructions below.
- Carry the yarn across the bottom of the heel flap, weaving it in as you go so that it’s in the right place for the top of the foot stitches, but it means that you’ll need to pick up the first set of gusset stitches in the contrast yarn and again, if you’re using a completely different colour for the heel you might not want to do that.
- Cut the yarn and re-join in once you’ve completed the heel turn ready to pick up the gusset stitches so that you’re using the main yarn for all of the leg and foot sections.
However you decide to continue with your main colour yarn, the following instructions assume that you will start picking up the gusset stitches from the left hand side of the heel turn – this matches the instructions in the Sockalong tutorials so that you can follow along with those if you need to. Don’t forget that you can use the Contrast Cuff, Heel and Toe tutorial too.
With your yarn at the left hand side of the heel turn, you are now ready to pick up 1 st for every 2 rows of heel flap knitted. Remember that if you made the heel flap bigger, you will need to pick up more stitches. Once you have picked up the stitches, place marker to indicate the new beginning of the round. Knit across the top of the foot, place marker, then pick up 1 st for every 2 rows knitted up the other side of the heel. Knit across the top of the heel and then shape gusset as follows.
Note: If you are using DPNs and/or have placed your stitches on a stitch holder, you can arrange the needles as follows: Needle 1 for stitches across heel, Needle 2 for picked-up stitches down side of foot, Needle 3 for stitches across top of foot (knit stitches off stitch holder if required), Needle 4 for picked-up stitches on other side of foot. You may find that stitch markers are not required at first.
Shape gusset
Round 1: K to 3 sts before the marker, K2tog, K1, slip marker, knit in pattern to next marker, slip marker, K1, SSK, K to marker.
Round 2: Slip marker, knit in pattern to next marker, slip marker, knit to 3 sts before marker.
Round 3: K2tog, K1, slip marker, knit in pattern to next marker, slip marker, K1, SSK, K to marker.
Repeat rounds 2 and 3 to shape the gusset. Continue in this way, decreasing by two stitches at the gusset on every other round until there are the number of stitches on the needle that you require for the foot. If you want to remove the marker at the SSK decrease you can do that now, but keep the other one in to indicate the start of your round.
Once you have the required number of stitches, continue to knit each round until you reach approximately 2in; 5cm before the desired length ready to start the toes. Don’t be afraid to try your sock on before decreasing for the toes!
Toes
At some point whilst decreasing for the toes, if you are using a small circular you may need to change back to DPNs as the number of stitches becomes too small for the circular. It’s up to you when you choose to do that, and how you distribute the stitches across the needles; just keep following the pattern as set below.
You will work the top and bottom sections of the toes on half the number of stitches that you cast on. I have called this the “halfway point” in the instructions.
Create the toes as follows in CC if required:
Round 1: K1, SSK, K to 3 sts before the halfway point, K2tog, K1, place marker (if required), K1, SSK, K to 3 sts before halfway point, K2tog, K1.
Round 2: Knit one round, slipping markers as you come to them
Round 3: K1, SSK, K to 3 sts before marker, K2tog, K1, slip marker, K1, SSK, K to 3 sts before marker, K2tog, K1.
Repeat rounds 2 and 3 until you have 28 stitches left and divide these between two needles so that front and back of socks match. For a larger foot, you might prefer to end your decreases sooner than 28 sts.
Graft toes using Kitchener stitch, weave in all ends and sew up the small gap at the cuff where you cast on.
RIBBED SOCKS
Cast on 92 (100; 108; 116; 124) stitches using 3.0mm needle and contrast colour if required. The pattern has been written for a cast on with straight needles which makes it easier for you to join into the round without twisting the stitches.
Because this pattern is written to fit any foot size, for some sizes it may work out that the ribbing on the cuff does not match the ribbing on the leg of the sock. You can check this as you start the cuff ribbing by using a safety pin to mark where the decrease stitch marker will go before you get to that point, and if you want to adjust the ribbing so that the central two stitches are knit stitches then you can do so then. Alternatively, you might prefer to work a longer cuff to fold over so that it’s not as noticeable, or you might not mind and choose to leave it as it is!
Place markers for decreases as follows:
Row 1: Work in K2, P2 rib for as many stitches as you will need across the top of your foot, then place marker (eg, if you want to work your foot on 72 sts, work 36 sts then place marker). This will indicate where the front (instep) of your sock will be and the decreases will be worked on the back of the sock.
Now count the number of stitches that are left to be knitted and divide that number by 2.
Place a safety pin to mark half the stitches, and work out whether the K2 P2 rib will sit so that the stitches either side of the marker will be knit stitches. If so, continue to work in K2, P2 rib across the back of your sock, replacing the safety pin with a marker and if not, you can choose whether to alter the sequence of ribbing so that the central “spine” stitches will be K2, being sure to replace the safety pin with a marker when you reach it, and working the rest of your stitches until you reach the beginning of your round.
You should have 3 markers on your needle at this point.
Row 2: (K2, P2), repeat to end, turn.
Change to 2.5mm needles. At this point, change to a short circular, magic loop or divide the stitches across DPNs and join into a circle, place marker. You will sew up the small gap where you knitted the first two rows later.
Continue in K2, P2 rib for 28 more rounds or until desired length of rib.
Leg
Break CC and join MC. Work 3 rounds in K2, P2 rib, slipping markers as you come to them. If you want to remove the marker that indicates the instep stitches you can do so at any point now that you know where your decreases will be, but it’s fine to leave it in.
Decrease round
Work in K2, P2 rib (or as set if you have changed it) until 3 sts before the 3rd marker which indicates the decrease point. Depending how the stitches present themselves, work P2tog, K1, slip marker, K1, P2tog or SSK, K1, slip marker, K1, K2tog as appropriate. On every 4th (4th ;4th;3rd;3rd) decrease round, work to 2 sts before the marker before working your decrease to keep the central “spine” as 2 sts.
Continue to work in K2, P2 rib and decrease every every 4th (4th;4th;3rd;3rd) round until you reach the required number for the foot, then continue to work in K2, P2 rib until leg is 13in; 33cm or desired length before start of heel.
Heel Flap
Rib the required number of stitches for the top of your foot before starting the heel flap.
At this point, you are working on a sock that is sized for your foot, not your calf, so you will need to use the ball of the foot measurement from now on.
Change to 2.5mm DPNs if you are using a small circular and CC if required. Do not break MC yarn at this point if using a contrast. Knitting the first two stitches of row 1 will help to stop a hole forming at the gusset.
Row 1: K2, (Sl1, K1) until you reach the end of the round (this should be half of the total of your stitches), turn.
You will now work back along the same number of stitches.
Row 2: Sl1, P to end, turn.
Row 3: (Sl1, K1) to end, turn.
Repeat rows 2 and 3 until heel measures approximately 2 ins; 5 cm long, finishing on row 3. If you want to make the heel flap longer, continue knitting rows 2 and 3 until you reach the desired length, but remember that you will need to pick up more stitches to create the gusset. You can check that the heel flap is long enough by measuring it against your foot from your ankle bone to the floor.
Turn heel
The instructions are given here for a 60 st sock. For a larger or smaller sock, you will need to alter the number of purl stitches in the first row of the heel (marked in bold below), increasing the number by 1 stitch for each block of 4 stitches extra that you cast on, or decreasing by 1 st for each block of 4 sts less than 60 sts. For example, if you cast on 64 stitches, your first row would be Sl1, P17, P2tog, P1, turn. The rest of the instructions remain the same.
Row 1: Sl1, P16, P2tog, P1, turn.
Row 2: Sl1, K5, SSK, K1, turn.
Row 3: Sl1, P6, P2tog, P1, turn.
Row 4: Sl1, , SSK, K1, turn.
Continue in this way, increasing one stitch between slip stitch and SSK or P2tog on each row (ie, Row 5: Sl1, P8, P2tog, P1; Row 6: Sl1, K9, SSK, K1, etc) until all of the heel stitches are used. Depending on how many stitches are in your heel flap, you may find that the K1 and P1 stitch is not required at the end of the last two rows.
Knit across heel stitches if required to bring you to the left hand side of the heel.
Working the gusset in a contrast colour
When you get to the gusset, you’ve got a few choices over what to do with your working yarn. At the moment, the main colour is at the right hand side of your heel flap and when you start to pick up the gusset stitches you’ll need it at the left hand side. You can either:
- Leave the yarn where it is ready to pick up the second set of gusset stitches, but if you do that then the first set of picked up stitches and the top of the foot stitches will be knitted in the same colour as your heel flap until you get round to where you can pick up the main colour again. That won’t be a problem if your colours are similar, but if you’re using a completely different colour then it might look a bit odd.
- Leave the yarn where it is and pick up what would usually be the second set of stitches first – you can choose then whether you start your decreases on the SSK stitch or whether you work an entire round so that you work the decreases as per the instructions below.
- Carry the yarn across the bottom of the heel flap, weaving it in as you go so that it’s in the right place for the top of the foot stitches, but it means that you’ll need to pick up the first set of gusset stitches in the contrast yarn and again, if you’re using a completely different colour for the heel you might not want to do that.
- Cut the yarn and re-join in once you’ve completed the heel turn ready to pick up the gusset stitches so that you’re using the main yarn for all of the leg and foot sections.
However you decide to continue with your main colour yarn, the following instructions assume that you will start picking up the gusset stitches from the left hand side of the heel turn – this matches the instructions in the Sockalong tutorials (link above in pattern notes) so that you can follow along with those if you need to.
With your yarn at the left hand side of the heel turn, you are now ready to pick up 1 st for every 2 rows of heel flap knitted. Remember that if you made the heel flap bigger, you will need to pick up more stitches. Once you have picked up the stitches, place marker to indicate the new beginning of the round. Knit across the top of the foot, place marker, then pick up 1 st for every 2 rows knitted up the other side of the heel. Knit across the top of the heel and then shape gusset as follows.
Note: If you are using DPNs and/or have placed your stitches on a stitch holder, you can arrange the needles as follows: Needle 1 for stitches across heel, Needle 2 for picked-up stitches down side of foot, Needle 3 for stitches across top of foot (knit stitches off stitch holder if required), Needle 4 for picked-up stitches on other side of foot. You may find that stitch markers are not required at first.
If your instep stitches start and finish with K2, you might wish to add in an extra purl stitch on either side to define the edge of the rib. If this is the case, follow the instructions as below.
Shape gusset
Round 1: K to 4 sts before the marker, K2tog, K1, P1, slip marker, knit in rib to next marker, slip marker, P1, K1, SSK, K to marker.
Round 2: Slip marker, knit in rib to next marker, slip marker, knit to 4 sts before marker.
Round 3: K2tog, K1, P1, slip marker, knit in rib to next marker, slip marker, P1, K1, SSK, K to marker.
If your instep stitches start with K2 and finish with P2, work the gusset as follows:
Shape gusset
Round 1: K to 4 sts before the marker, K2tog, K1, P1, slip marker, knit in rib to next marker, slip marker, K1, SSK, K to marker.
Round 2: Slip marker, knit in rib to next marker, slip marker, knit to 4 sts before marker.
Round 3: K2tog, K1, P1, slip marker, knit in rib to next marker, slip marker, K1, SSK, K to marker.
Repeat rounds 2 and 3 to shape the gusset. Continue in this way, decreasing by two stitches at the gusset on every other round until there are the number of stitches on the needle that you require for the foot. If you want to remove the marker at the SSK decrease you can do that now, but keep the other one in to indicate the start of your round.
Once you have the required number of stitches, continue to knit in K2, P2 rib for each round until you reach approximately 2in; 5cm before the desired length ready to start the toes. Don’t be afraid to try your sock on before decreasing for the toes!
Toes
Follow instructions for plain sock for the toes.
Make a second sock, and you’re all ready to go!
Phew, I did warn you it was a long post! I hope you enjoy knitting your Knee High Socks! I have listed the pattern on Ravelry for those who are able to still use it (there have been accessibility issues recently) and want to link it in their projects; if you are able to share your photos on social media, I would love to see them – the hashtag for this pair is #WinwickMumSocks.
This pattern is free on this blog and will always remain so. If you’ve enjoyed using it and would like to support my work so I can keep blogging and designing, you can browse my shop for patterns and books or buy me a brew – both are very much appreciated. Thank you! xx


This pattern copyright © 2021 Winwick Mum All rights reserved.
Not to be included in any collection or used for profit without written consent of Winwick Mum.
This pattern is based on my Basic 4ply Socks pattern, which means that you can find photo and video help in the Winwick Mum Sockalong tutorials. You can find out more here:
If you can already knit socks but would like to stay in touch, click the link below to join the Winwick Mum mailing list to hear about the latest blog posts, pattern updates, tutorials and more … but no spam, I promise!


Beautiful cosy looking socks, I am going to make some for my daughter who is always cold. I love the stripey yarn and contrasting heels and toes, very effective. Thank you for sharing.😃
You're very welcome, I hope your daughter loves them! xx
Thank you Christine for this new pattern, they will be my first pair of knee highs and my 5th pair of socks. You were very inspiring with interesting chat on the yarn TV show and I'm sure there will be many more new sock knitters. I really do hope you soon become a regular feature. I only discovered this TV channel through the natterings of Winwick Mum. You looked beautiful and to me, you have a gift of communicating important points along with light banter. Well done!!
Thank you! xx I won't tell you how many pairs of socks I'd knitted before my first pair of knee highs – I hope they keep your feet and legs lovely and cosy warm! xx
Just beautiful and so generous of you to share your pattern. Thank you.
Thank you! xx
Knee high socks not worn since early 60's. Bring it on!! I have a whole bag full of sock yarn scraps plus a couple of full balls. My fingers are itching to start. Do I be a good girl and finish my present project or throw caution to the wind and start another project?
Decisions, decisions.
No, I don't think I've worn them since school either, but it's time to forget about school socks and knit them in lovely colours! I think it never hurts to have a sock on your needles as well as other projects … 🙂 xx
Ihope its all right if I dont do this pattern.I got the Christmas sock book for Christmas with the silent night and fairy lights yarn.Great present. So Im going to try the Dancer ripple panel socks from the book in fairy lights. Good luck everyone!
It's absolutely fine not to do this pattern, this is just my free one for the KAL this year but you can join in with any Winwick Mum pattern so Dancer will be perfect! xx
i loved knee high socks for school, being someone who always suffered cold feet & legs
though i have small calves so wouldn't need much in the way of increase/decreases, this will be very interesting to make. even my mid calf socks have been getting longer as i just keep knitting the leg, it's so therapeutic & quick to get around
love your knee highs & the girls are modelling them beautifully
thanx for sharing
Do let me know how you get on if you alter the decreases as I'd be really interested! My girls are getting used to my requests for them to model socks now, although there is still a bit of eye-rolling (from them) and bribery (from me) involved! 🙂 xx
Hi, I've never knitted socks before and really really want to knit myself some long OVER knee slouchy socks. I'm a bit of a novice and only have 8 sets of long circular needles. I'm not sure how to adapt a pattern, can you give me any advice at all please?
You might have to help me out a bit more with what you want! I've always considered slouchy socks to be the type that you push down so the bulk of the sock is around your lower leg. Are you saying that you want your socks to be over the knee or to be able to be pulled up that high so you can push them down?
Delighted to find this having asked you about long socks a good while back but not having revisited your site for some time! I started using using your basic knitting pattern a couple of years ago – I had never knitted socks before. I've done many, many pairs at this stage and wouldn't wear anything else. My favourite is Sheepjes Our Tribe yarn but I've tried out a number of different brands. I'm looking forward to trying the long socks pattern. Thanks again!
Hello! I’ve been inspired by your blog to finally cast on my first pair of socks – your knee-high pattern looks perfect, but I think I’m missing something. The pattern for the ribbed ones says after the first set of instructions that there should be 3 markers, but I can only see where there are 2. Can you help please? Thank you!
Yes, there’s a section in the pattern that says “place markers for decreases” and if you follow that you’ll have one to indicate the end of your top of the stitches, a safety pin (which you later replace with a marker) to indicate centre back decrease line and the third marker is at the end/beginning of your round. Hope that helps! 🙂 xx
Aha! I wasn’t counting the one at the end of the round! Silly me, counting to 3 has always been tricky… 😄
Ha ha … you would probably have at least one on your needles before you started the decreases so once you got going you’d see it worked out. Threes were one of my least favourite times tables 🙂 xx
Аppreciate this post. Will tгy it oսt.
I live in knee-high socks and can’t bear it when they slip down. Would it be ok to use the knit-in elastic to make sure the socks won’t slip down?
Love your pattern. I want to give it a try. It is very generous of you to make your pattern free, thank you.
Oh yes, absolutely, give it a go; I’m right with you on the slipping down so I’d definitely try it if you know it will help 🙂 xx
I am looking forward to knitting these socks! I have knit many pairs of mid calf socks, but love to wear knee highs with dresses and skirts in the winter. Store bought knee highs are too tight on my wide calves. Hoping these will be perfect.
Oh, I hope so! It’s not too difficult to alter the sizing but do give me a shout if you need a hand 🙂 xx
Thank you for this pattern. Im trying to make these for my 9 year old niece. I have measured her ball of foot as 7.5 inches and calf as 11 inches. According to the sock calculation I should cast on 64 stitches but the smallest stitches to cast on for the pattern is 90. Does it mean I should reduce mine to 88? Or are these too many stitches? Thank you for your help
I’ve emailed you, Wezi 🙂 xx
Thank you so much for this pattern! Like Iain, I am involved in historical clothing recreation and knitted up these socks for a Mid-Victorian ensemble. They’re perfect!
Oh wow, that’s brilliant, I’m so glad the pattern is useful for you! 🙂 xx
I’ve knitted a few of your patterns with great success! I’d love to knit knee highs in DK shall I follow these instructions but alter the number of stitches needed for the ball of foot and calf measurements?
Hi! Yes, you should be able to do that, and hopefully they’ll knit up quickly for you in thicker yarn, too! 🙂 xx
Hi! Do you think it is possible to incorporate a 9 sts colorwork to this pattern (plain version)? I would like to make a pair for my boyfriend using the sheep motif from the Alterknit stitch dictionary. Thank you!!
I don’t see why not – just make sure that you don’t pull your floats too tight when you’re knitting them and they should work out fine. I hope your boyfriend loves them! 🙂