
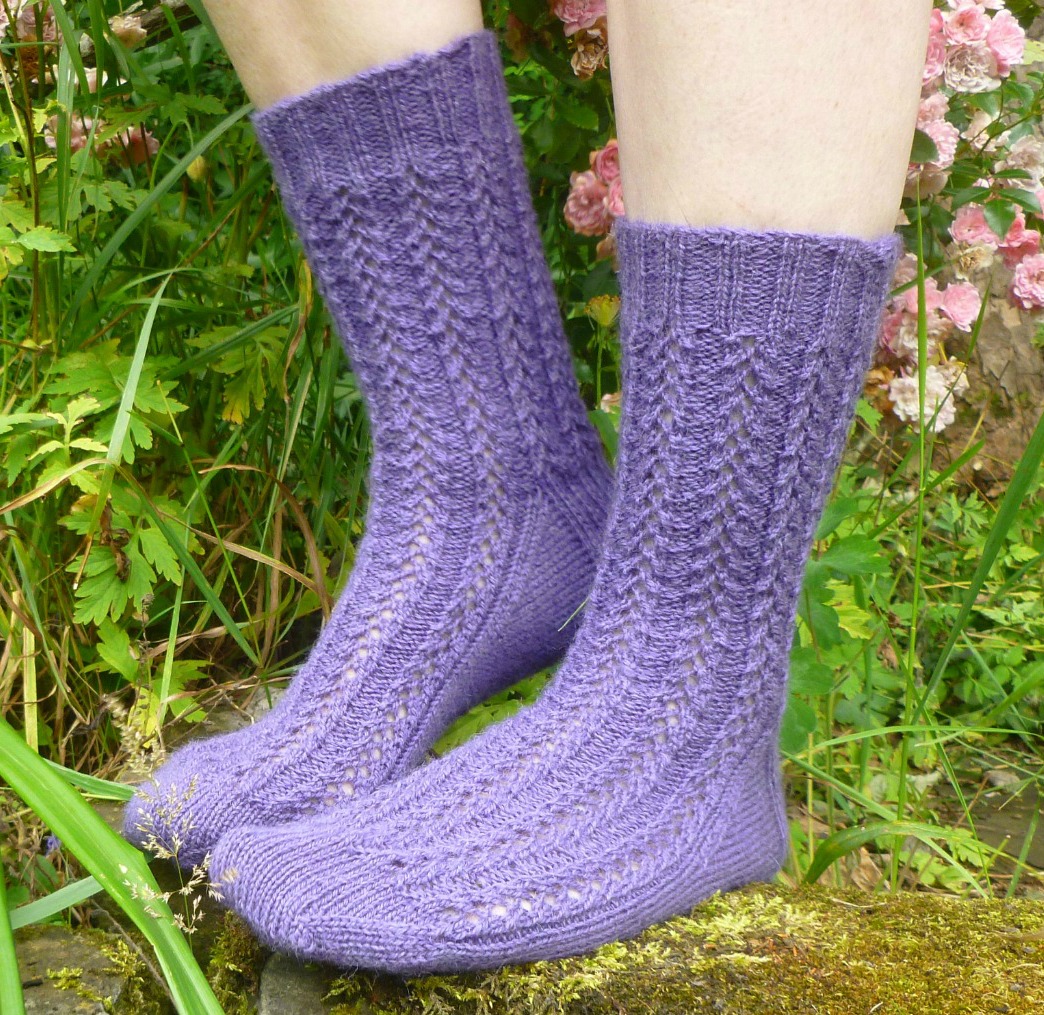
Easy Lace Socks – free pattern and tutorial
Hello again! It’s lovely to see you back again, I hope you’re all ready to start your Easy Lace Socks! Please note – this tutorial is picture-heavy!

This post follows on from yesterday’s where we talked about the basics of the Easy Lace Socks (if you missed it, you can catch up here) and I tried to answer some of the questions I thought you might have.
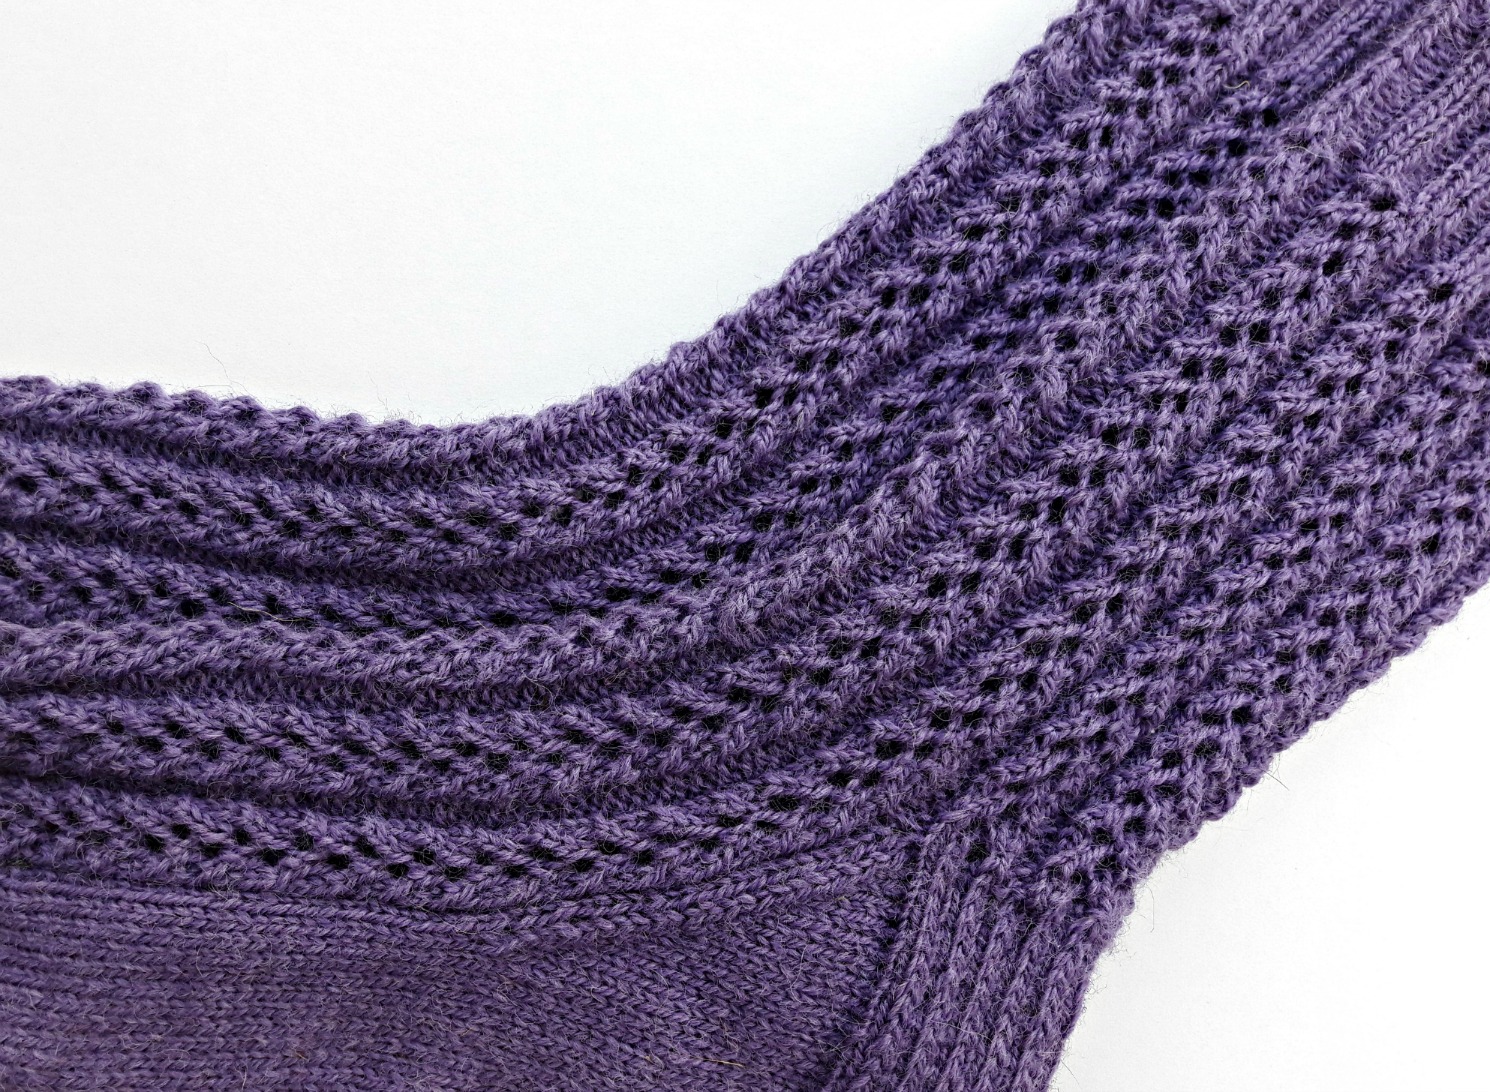
Although it looks quite complicated, this lace pattern is much easier than you might expect. It’s worked in blocks of six stitches over four rounds, and the six-stitch blocks are repeated around the sock. The lace pattern is created by knitting increases and decreases so no extra needles or special techniques are required – there’s nothing in here that you probably haven’t already done in other projects.
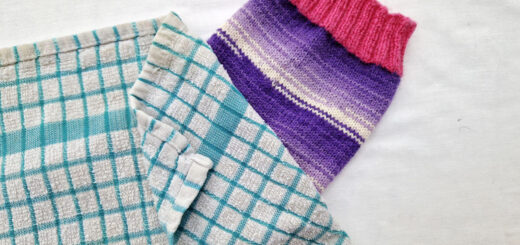
What I like about this pattern is that although it’s lacy, the lace sections form ribbed stripes which make it easy to see where you’re up to. They’re a bit more feminine than a plain sock but aren’t so floaty that you can lose your place (and your temper) when you’re knitting them.
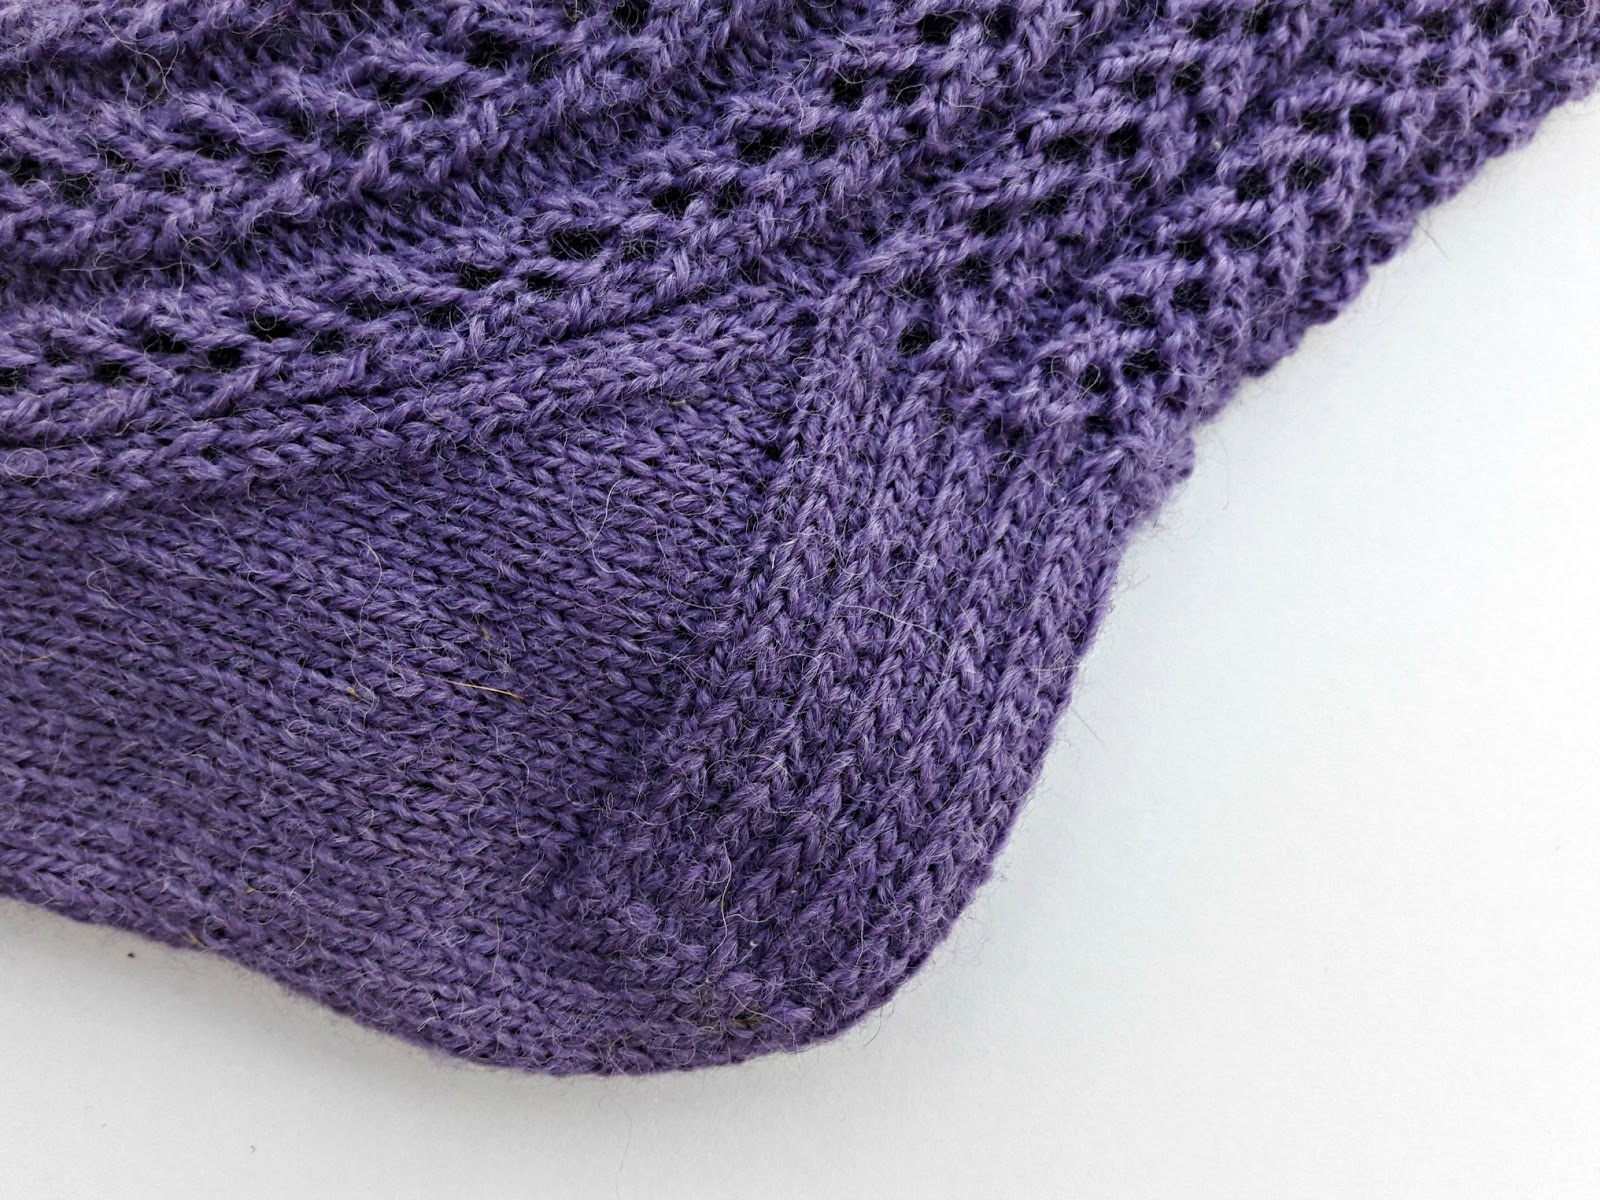
The heel is a heel flap and gusset-type heel knitted in heel stitch – just the same as the one on my Basic 4ply Socks pattern. I felt that there was enough going on with the rest of the sock to not want to create a “busy” heel as well.
This year’s tutorials are slightly different from the others I’ve done as there are short videos to go along with the written instructions and the photos and you’ll find those at the bottom of each section. I’ve made the assumption that you’ve already knitted a basic sock so you know about the construction but you can always take a quick look at the Sockalong tutorials if you get stuck.
Before we get started on knitting the sock, let’s take a look at the lace pattern. I’m going to give you written and charted instructions, and don’t worry if you’ve never read a chart before because I’ll show you how to do that. Think of it as a road map to give you directions so that you can visually see where you are as well as reading instructions.
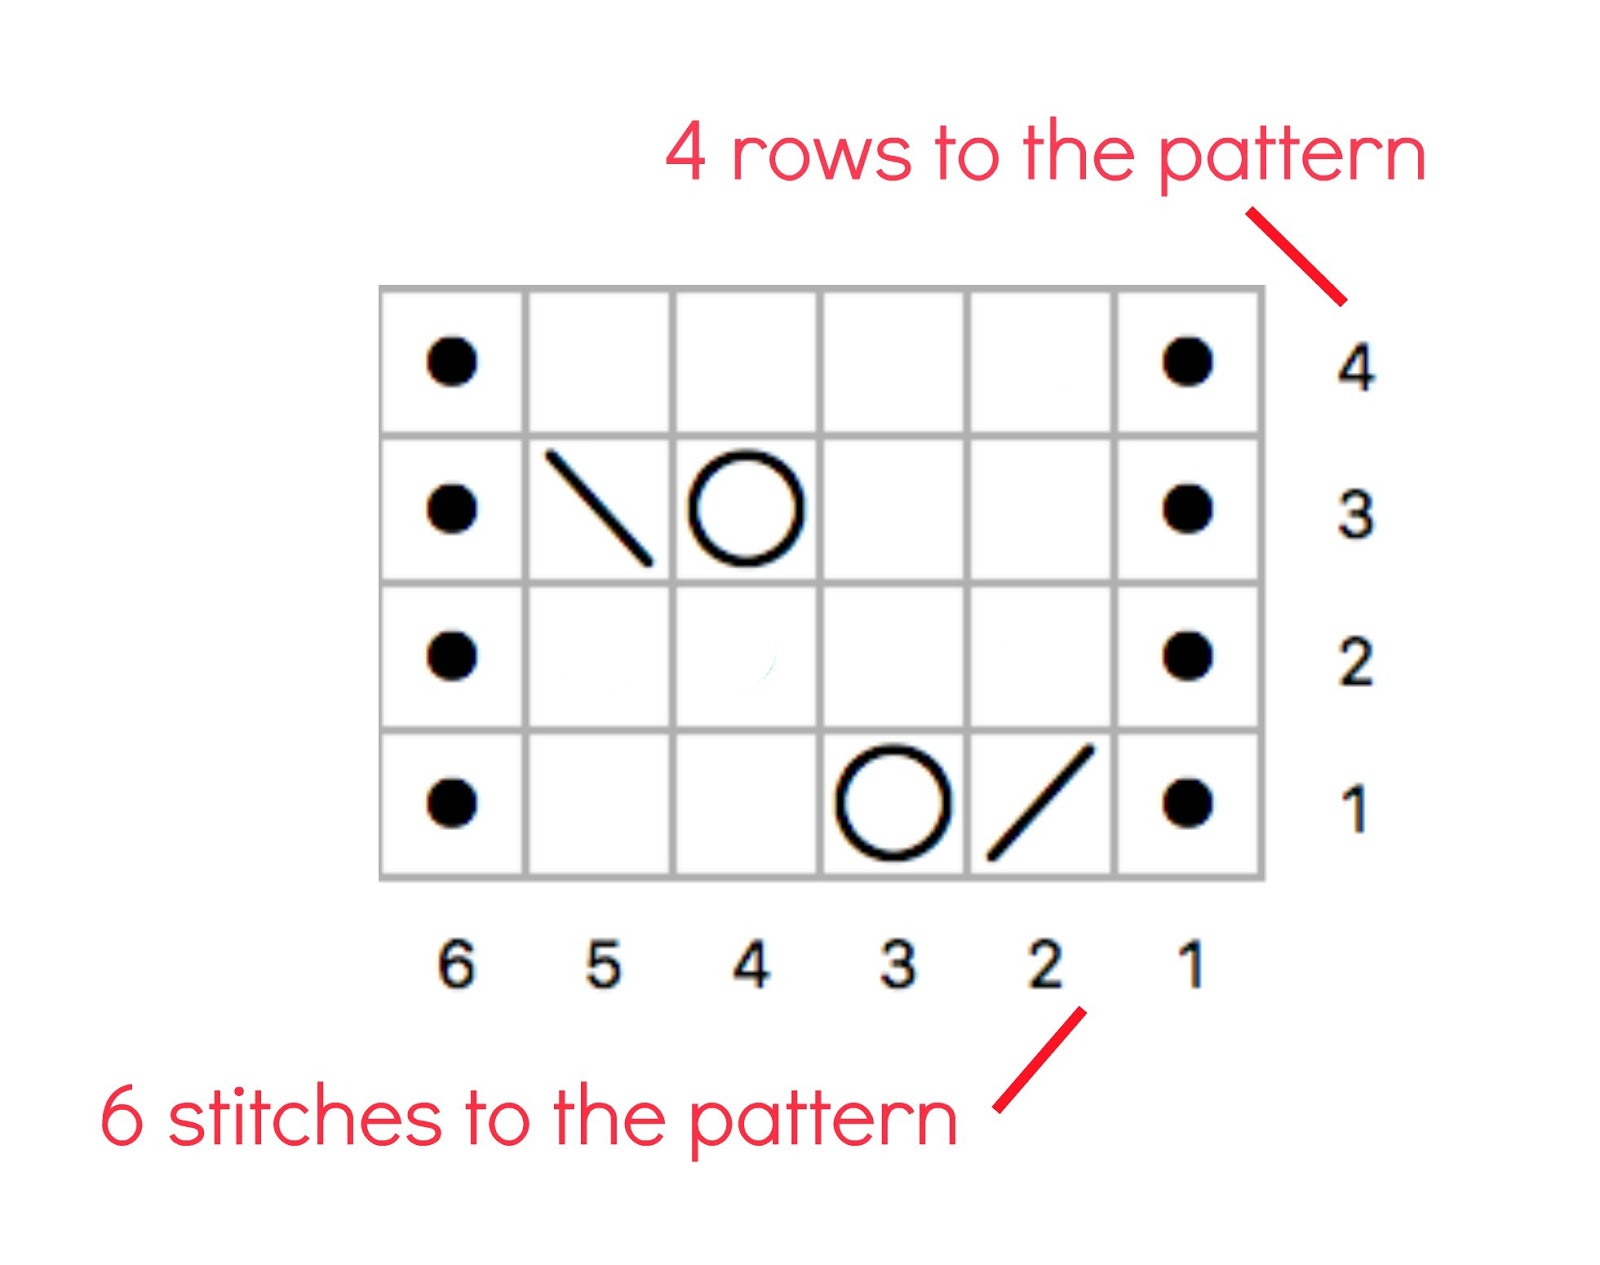
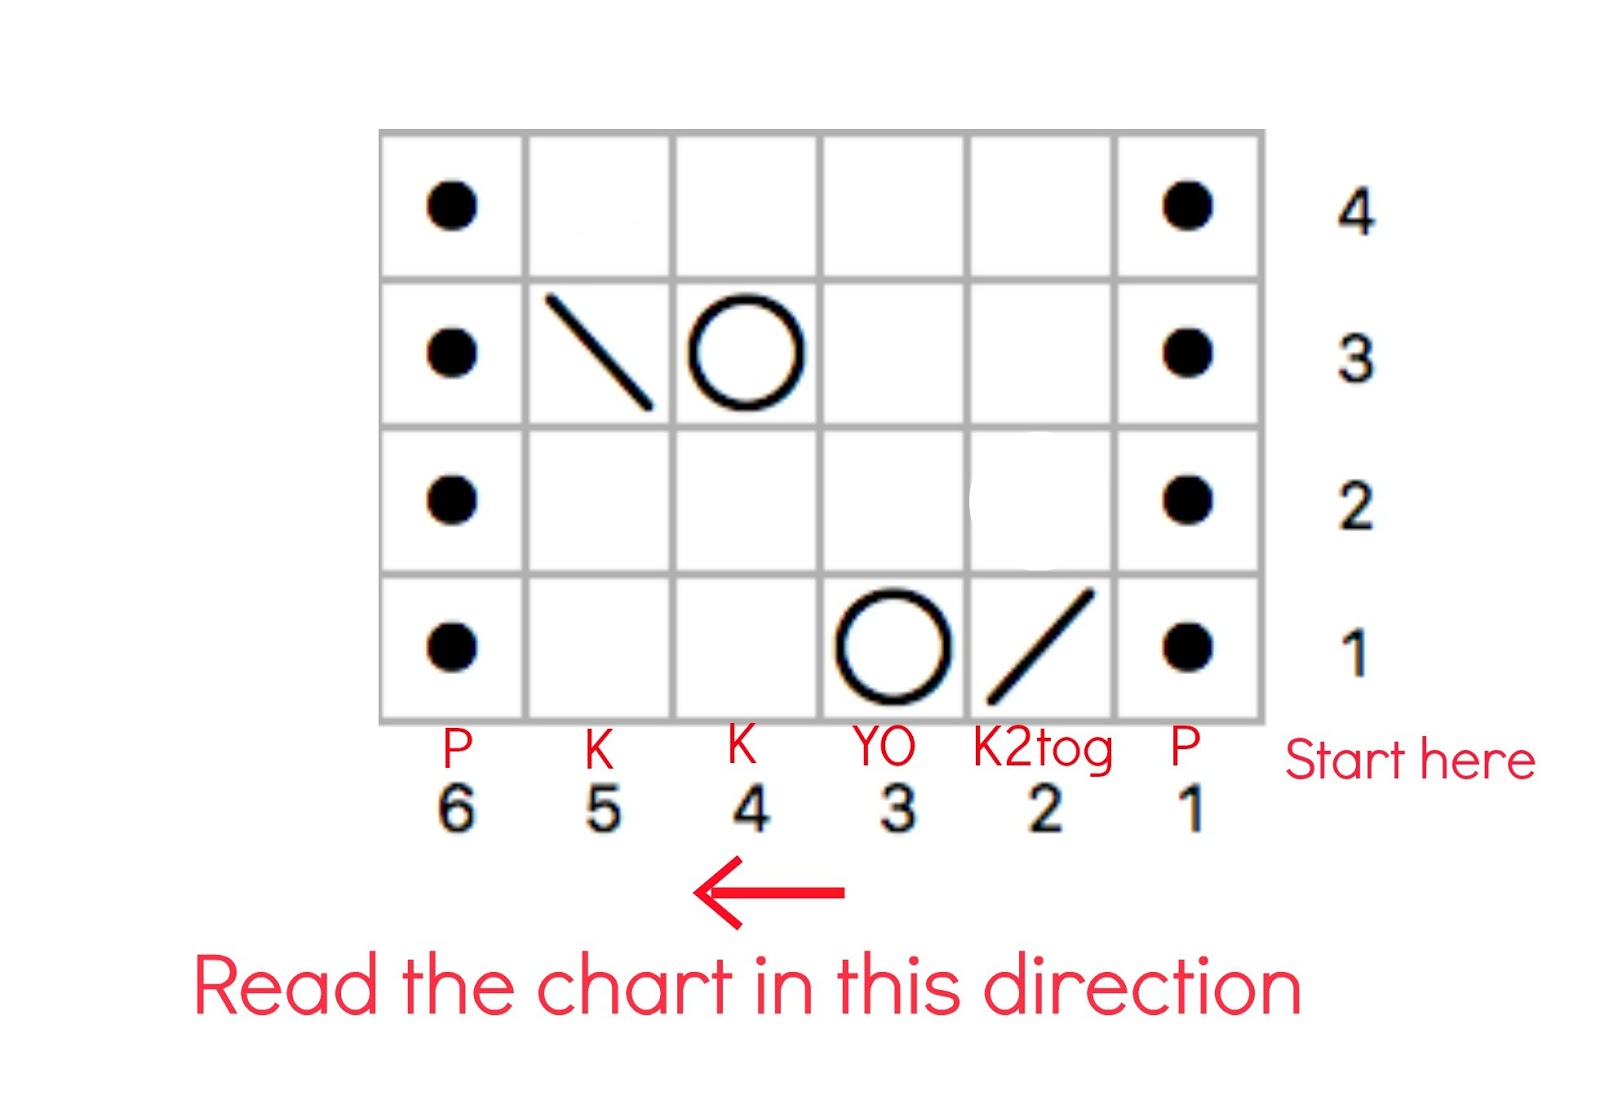
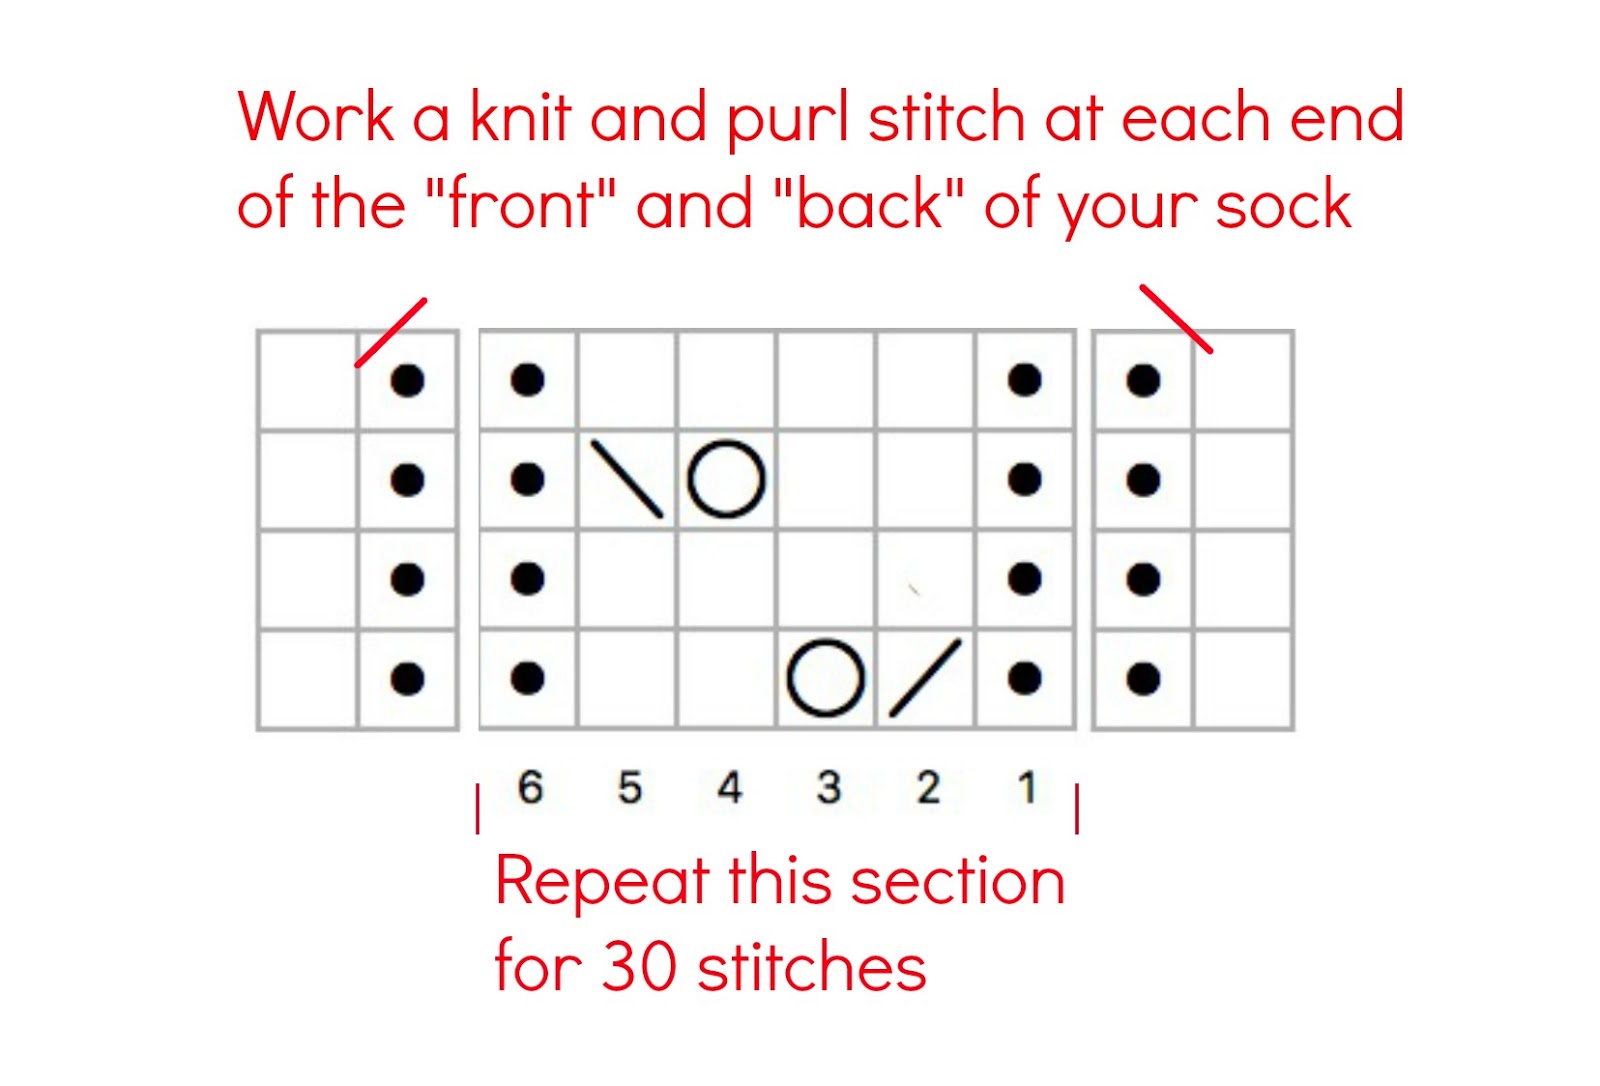
Here’s the chart for the lace pattern …

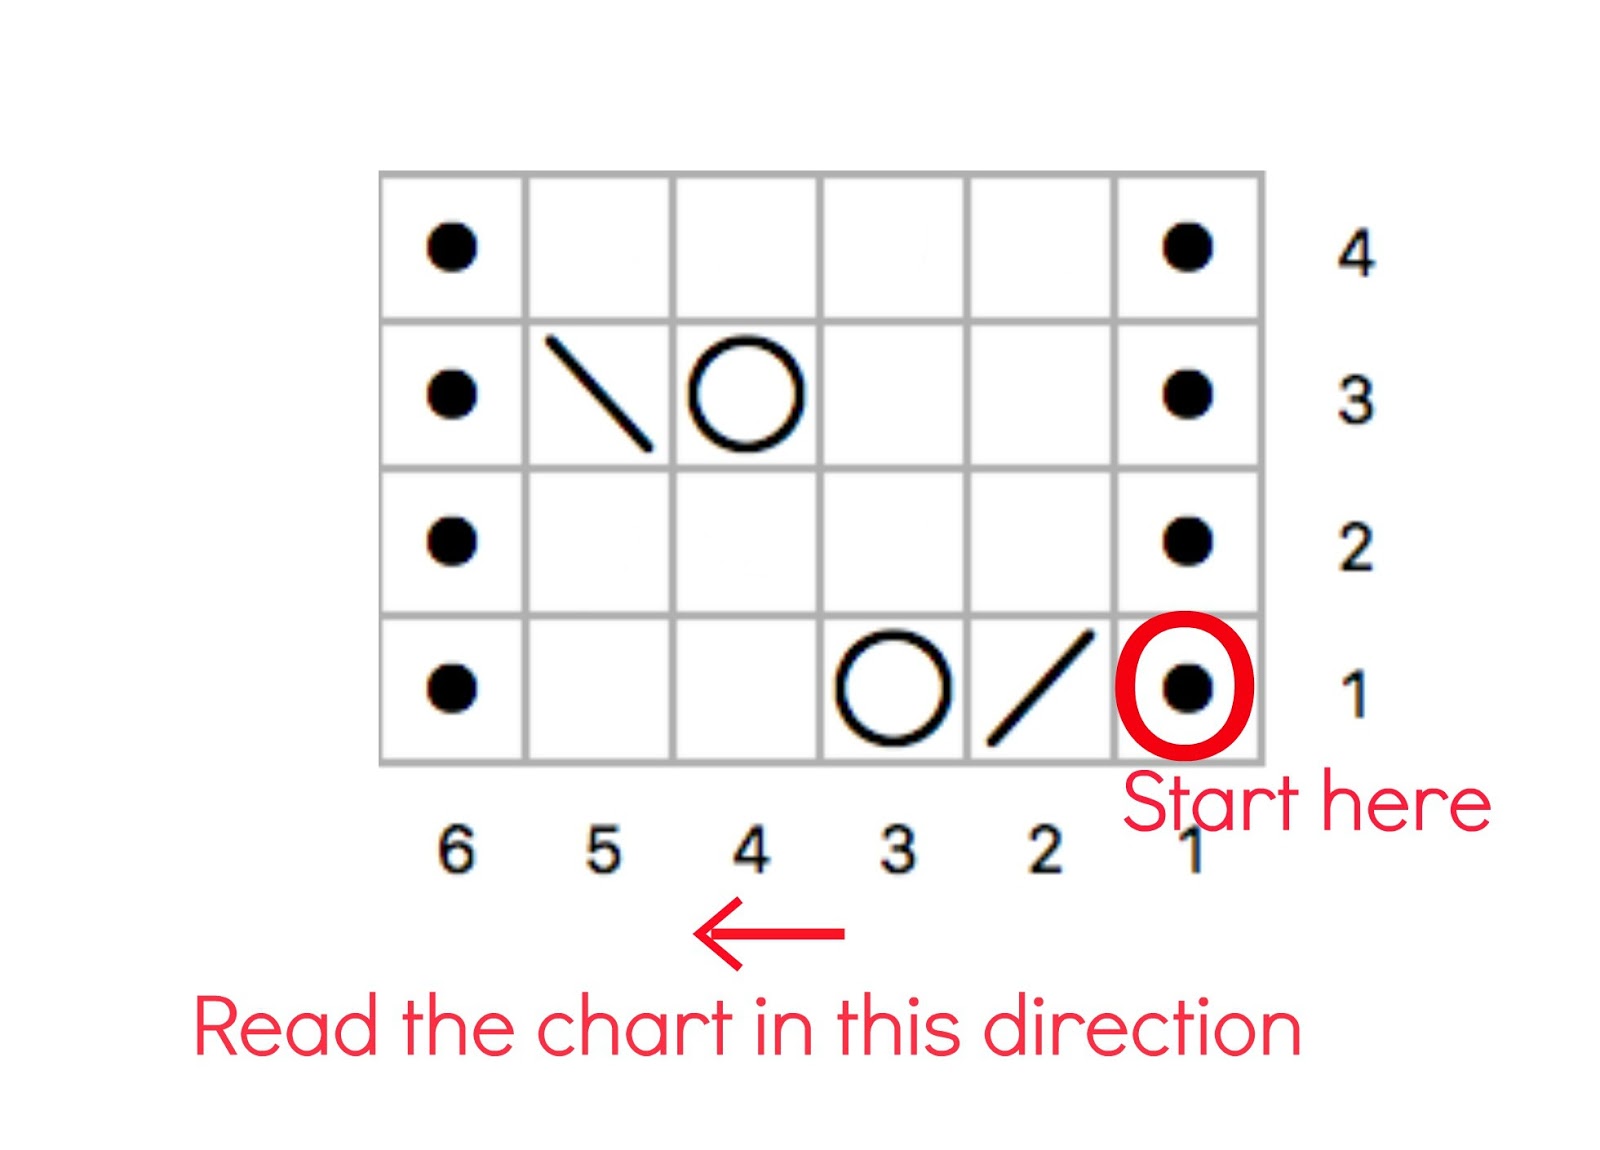
I know it looks like some kind of Battleships game but it’s really not that complicated when you understand how it works. Firstly, you can see that there are four rows (the numbers going up the right hand side) and six stitches (the numbers going along the bottom). The numbers go outwards from the first square on the bottom right hand side which is always the first stitch and that’s where you’ll start from, but we’ll talk about that in a minute.
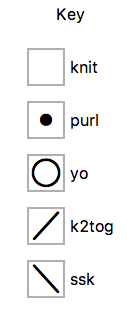
Every chart is created by showing a combination of symbols to represent each stitch. Once you can read a chart, you’ll see that it’s faster to do that than having to read written instructions all the time and just like using a road map when you’re out and about, you need a key to tell you what each of the symbols mean. There are some differences between symbols on patterns but for the most part they are a universal system and the pattern should always tell you what the symbols on the chart that is being used represent. Here’s the key for the Easy Lace Socks:

There will also usually be written instructions for how to complete each stitch if it’s not a knit or purl stitch so don’t worry if you don’t recognise a symbol, the designer should make everything clear!
Remember I said that you always start from the bottom right hand corner? You read the chart from right to left and upwards one row at a time.
For row 2, you’ll go back to the right hand side and read along the row 2 line, and the same for row 3 and so on. Some people like to mark off the rows as they go along so that they can see where they’re up to – you can use a ruler or write on the pattern. If you’re using a pattern with a chart (paid for or free) and don’t want to write on your original pattern, it’s OK to make a copy of the chart for your own personal use as long as you don’t share it with anyone else for copyright reasons.
Using the key above to tell you which stitches to knit, you’ll complete the first row of the chart like this:
You may be wondering how this 6 stitch pattern is going to work with our 60 stitch sock and that’s very simple too. If I was to write the pattern out for more than the six stitches it covers, it would look like this:
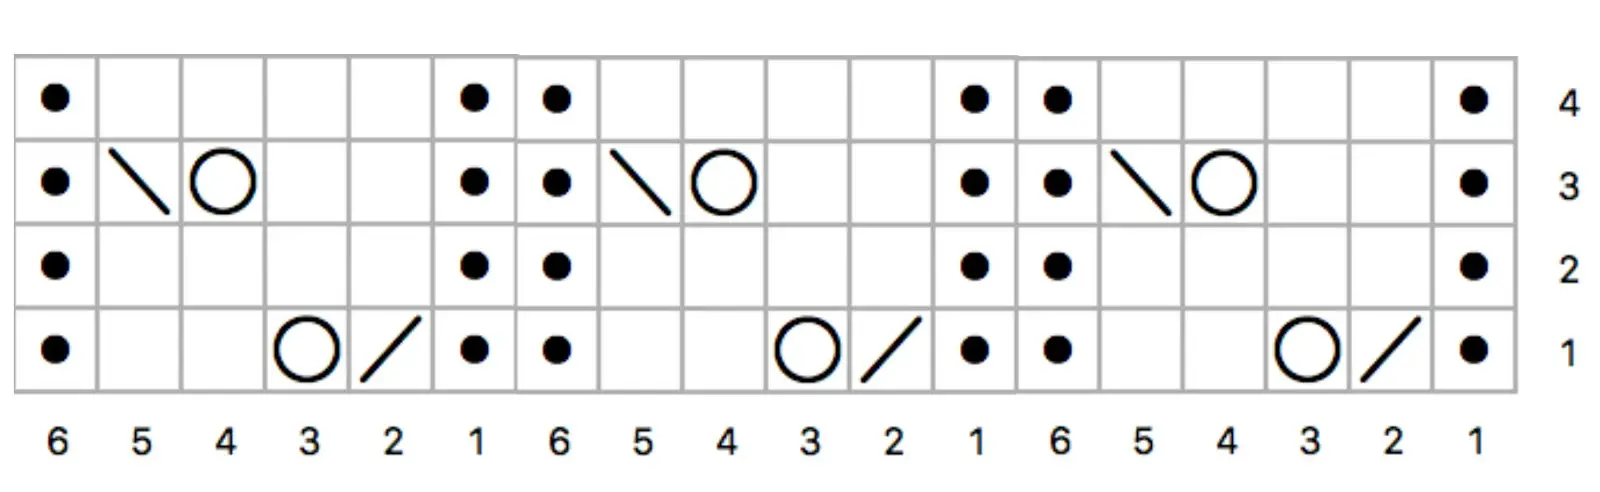
You simply repeat the pattern for the whole 60 stitches of the sock; it works in such a way that the pattern fits perfectly with 30 stitches for the front of the sock and 30 stitches for the back which makes it easy to fit in your heel flap. Can you see how it works with the basic lace pattern? Once you’ve worked the first six stitches, you just keep repeating it until you get to the end of the round. This is based on a 60 stitch cast on so if you cast on more or less there will need to be a change to make the stitches fit.

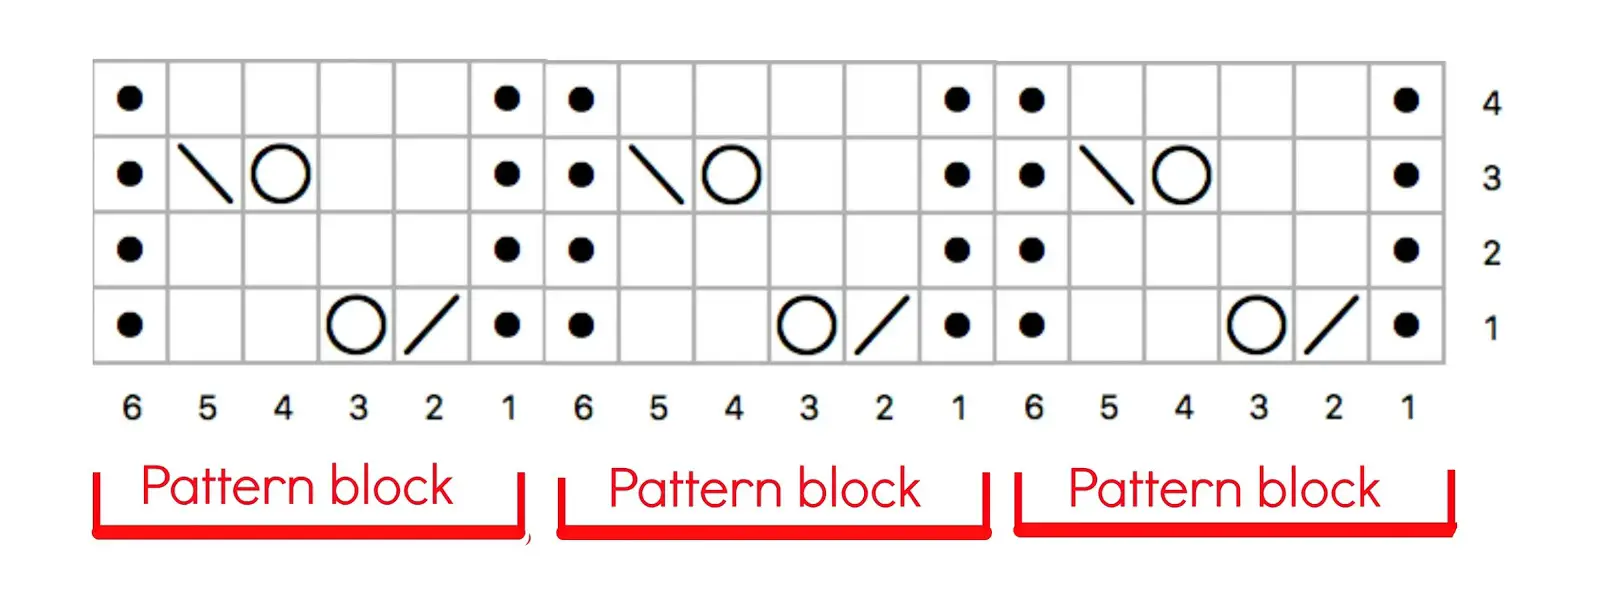
Have another look at the knitted pattern and you can see how the blocks fit together so that there’s a purl section between each lace section. You might even be able to see how the stitches relate to the chart now, but don’t worry if it all still seems like a game of Battleships, it should make sense when you start knitting.
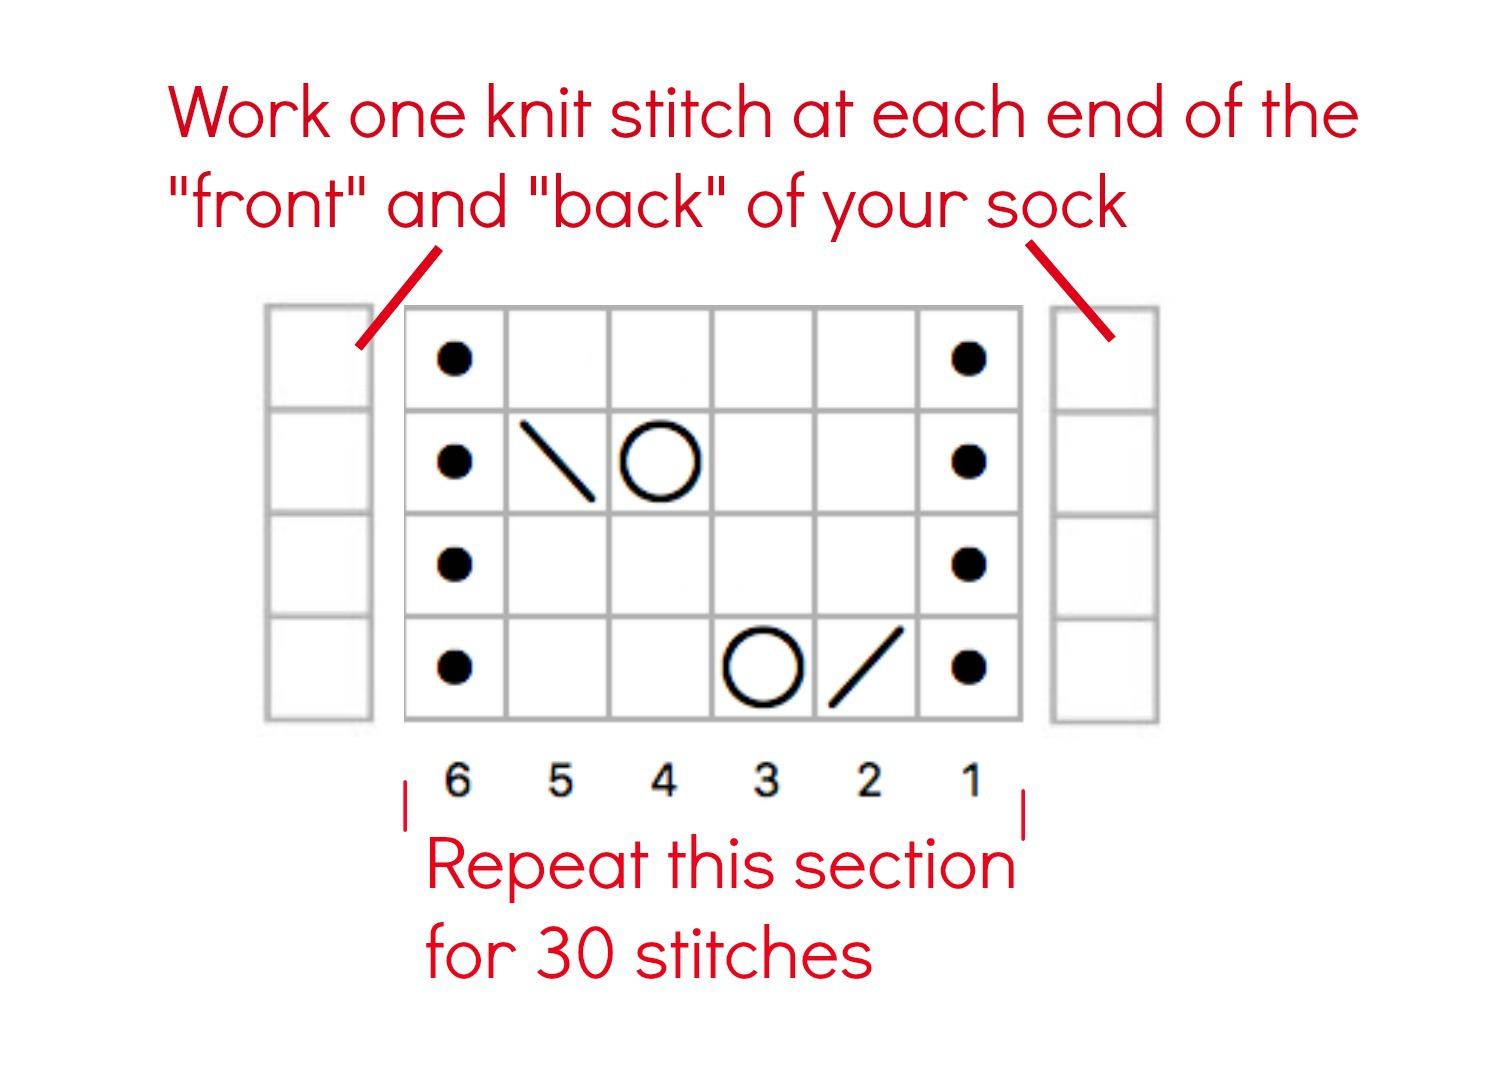
OK, let’s take a look at how we adjust the pattern for a bigger sized sock. Because the pattern is six stitches wide, you’ll find that if you increase (or decrease) the number of stitches in your sock then the pattern won’t fit evenly. This isn’t a problem – you can just knit or purl the extra stitches at the sides of your sock and they will look like they were always meant to be there. Let me show you:
Here’s the stitch pattern for 60 stitches:

This pattern will be repeated right across each half of the sock (the front half and the back half, both of which are 30 stitches). If you cast on 64 stitches then you’ll have 32 stitches across the front and back of the sock so that will be one extra stitch on each side of the front and one extra stitch on each side of the back (a total of 4 extra stitches = 64). You need to do something with the extra stitch at each end but you can’t fit a whole pattern block in so you just need something that is in keeping with the rest of the pattern. In this case, I’ve suggested that you knit the stitch so that you don’t get a big block of purl stitches:
It’s very similar for 68 stitches – this time I’ve added a knit and a purl stitch …
but when you get to 72 stitches, you have 6 extra stitches on each side which means that you can fit another lace pattern block in on each side so it goes back to the same pattern as the 60 stitch sock. If you want to make your sock smaller than 60 stitches you’ll need to do the same thing with the pattern but in reverse so that you take out a block of the lace pattern but still do something with the stitches.
OK, I think that’s everything before we get started – let the fun begin!
Easy Lace Socks
you can download a PDF copy of the pattern here.
These lace socks are constructed as top down socks with a heel flap and gusset heel. The heel is knitted in heel stitch, which creates a durable, cushioned heel. This pattern will create a medium-sized sock.
Materials
2.5mm needles – I use a 30cm circular needle but DPNs or an 80 cm circular for magic loop will also work
1 x 100g ball of 4ply sock yarn (or 2 x 50g depending on brand) I used 1 x 100g skein of Doulton Flock Border Leicester 4ply in shade Cringle Moor
1 set DPNs size 3.0mm (optional)
1 set DPNs size 2.5mm
stitch markers
wool needle
Tension
30 stitches to 4in; 10cm in stocking stitch (worked in the round) on 2.5mm needles. Always use the size of needles to get the correct gauge.
Abbreviations
K Knit
P Purl
Sl1 Slip 1 stitch purlwise
yo Wrap the yarn once anticlockwise around the needle
SSK Slip the first stitch on the left hand needle knitwise onto the right hand needle, slip the second stitch on the left hand needle purlwise onto the right hand needle, slip both stitches back onto the left hand needle and knit together through back loop.
K2tog Knit two stitches together
* Repeat everything written inside the asterisks
Note: It is often easier to cast on using DPNs before changing to the 30cm circular needle. If you want to use magic loop you will be able to cast on with the larger circular needle if you prefer to do so, but remember not to pull your cast on stitches too tight. If you use DPNs, you might find it easiest to cast on and work 2 rows before dividing the stitches across the needles.
Adjusting the size: To adjust the size for this sock, just add or remove stitches in blocks of 4 from the cast on total. You will need to make adjustments to the heel turn if you use extra stitches. The lace pattern is 6 stitches wide and will work with any weight of yarn and any number of stitches that you cast on; help is given on adjusting the lace pattern to accommodate extra stitches in the sock.
Pattern
Cast on 60 (64; 68; 72) stitches using 3.0mm needles.
Row 1: K2, P2, repeat to end, turn.
Row 2: K2, P2, repeat to end, turn.
Change to 2.5mm needles. At this point, change to a small circular, magic loop or divide the stitches across DPNs and join into a circle, place marker. Continue in K2, P2 rib for 14 more rounds or until desired length of rib (I knit 16 rounds of rib).
Here’s the video for the cable cast-on, transferring to a short circular and joining into the round:
Lace pattern
Start the lace pattern on the next round. I’m going to give you the chart instructions first and then show you how the lace is worked below. The lace pattern block is worked in sections of six stitches over four rounds:
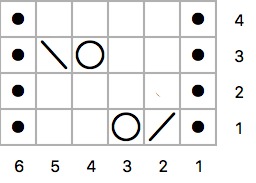

As you can see from the key above, there’s nothing more complicated here than a yarn over increase and decreases which you’ve already used on other pairs of socks. Here’s how to complete that first lace block, and then when it comes to your sock you’re going to pick the pattern section that fits with the size you’re making – I’ve put those after these photos.
Round (row) 1
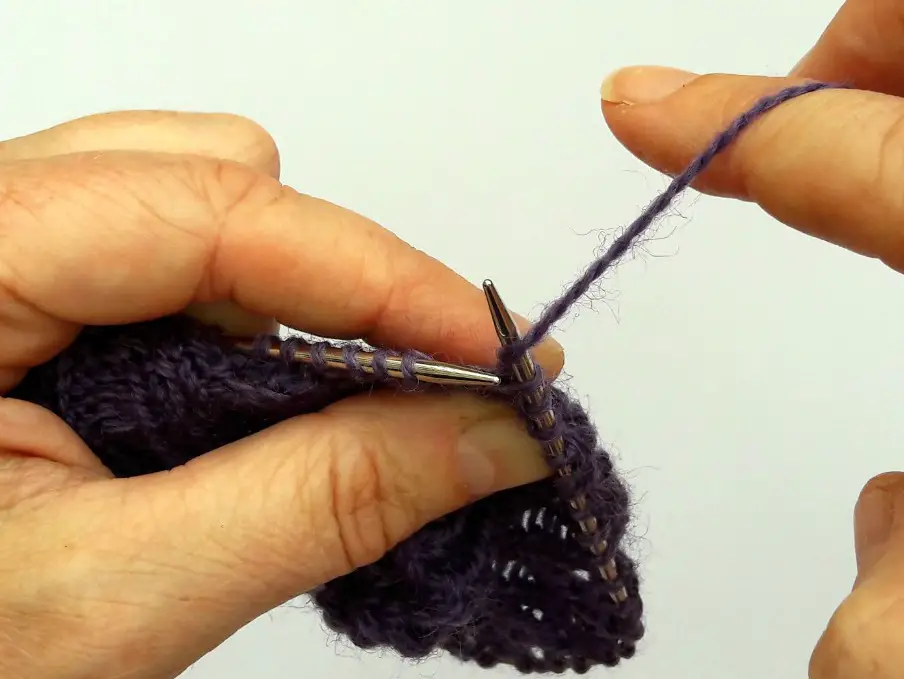
1 Purl the first stitch …
2 Knit two stitches together …
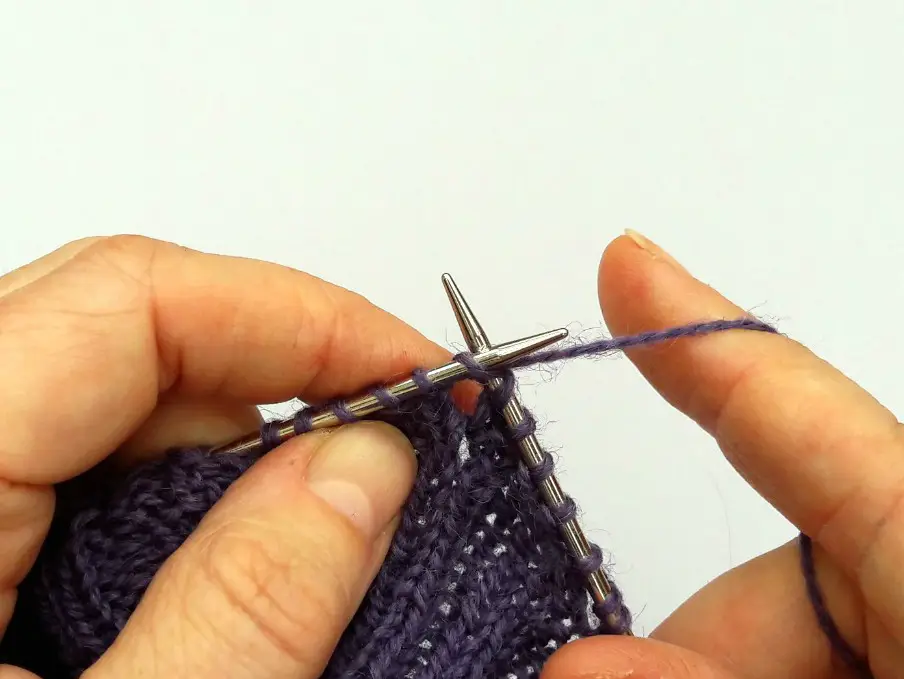
3 Wrap the yarn around the needle in an anti-clockwise direction, so that it’s back in the right place for you to knit the next stitch …
4 Knit two stitches …
5 Purl one stitch
Round (row) 2
Purl the purl stitches and knit the knit stitches
Round (row) 3
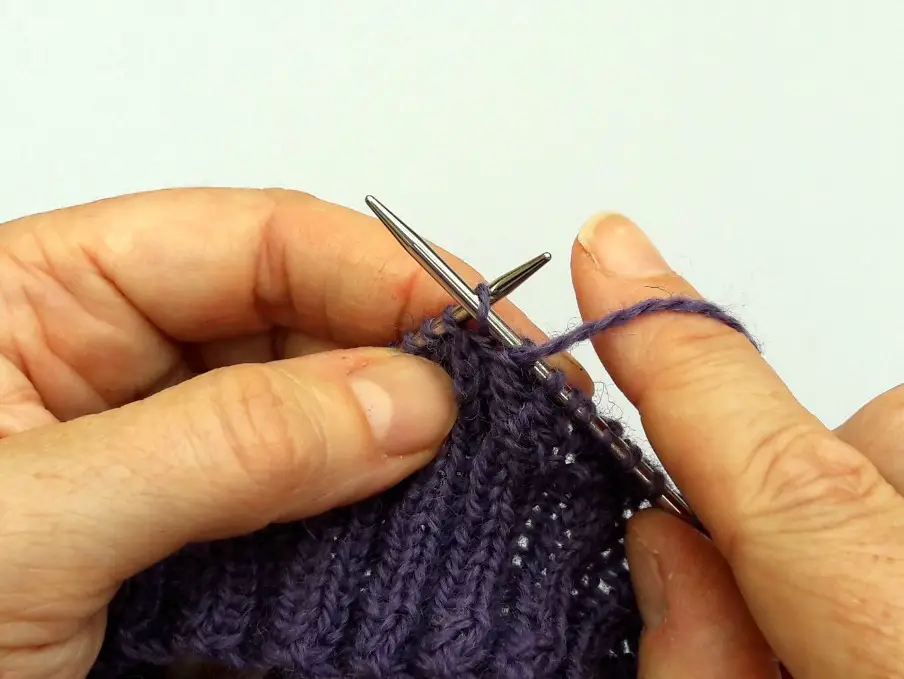
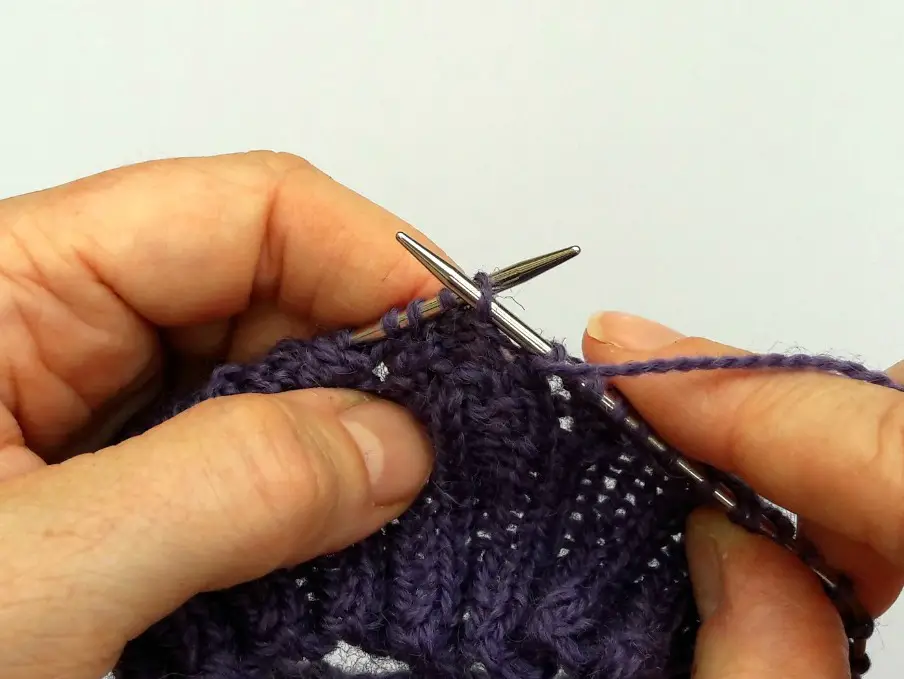
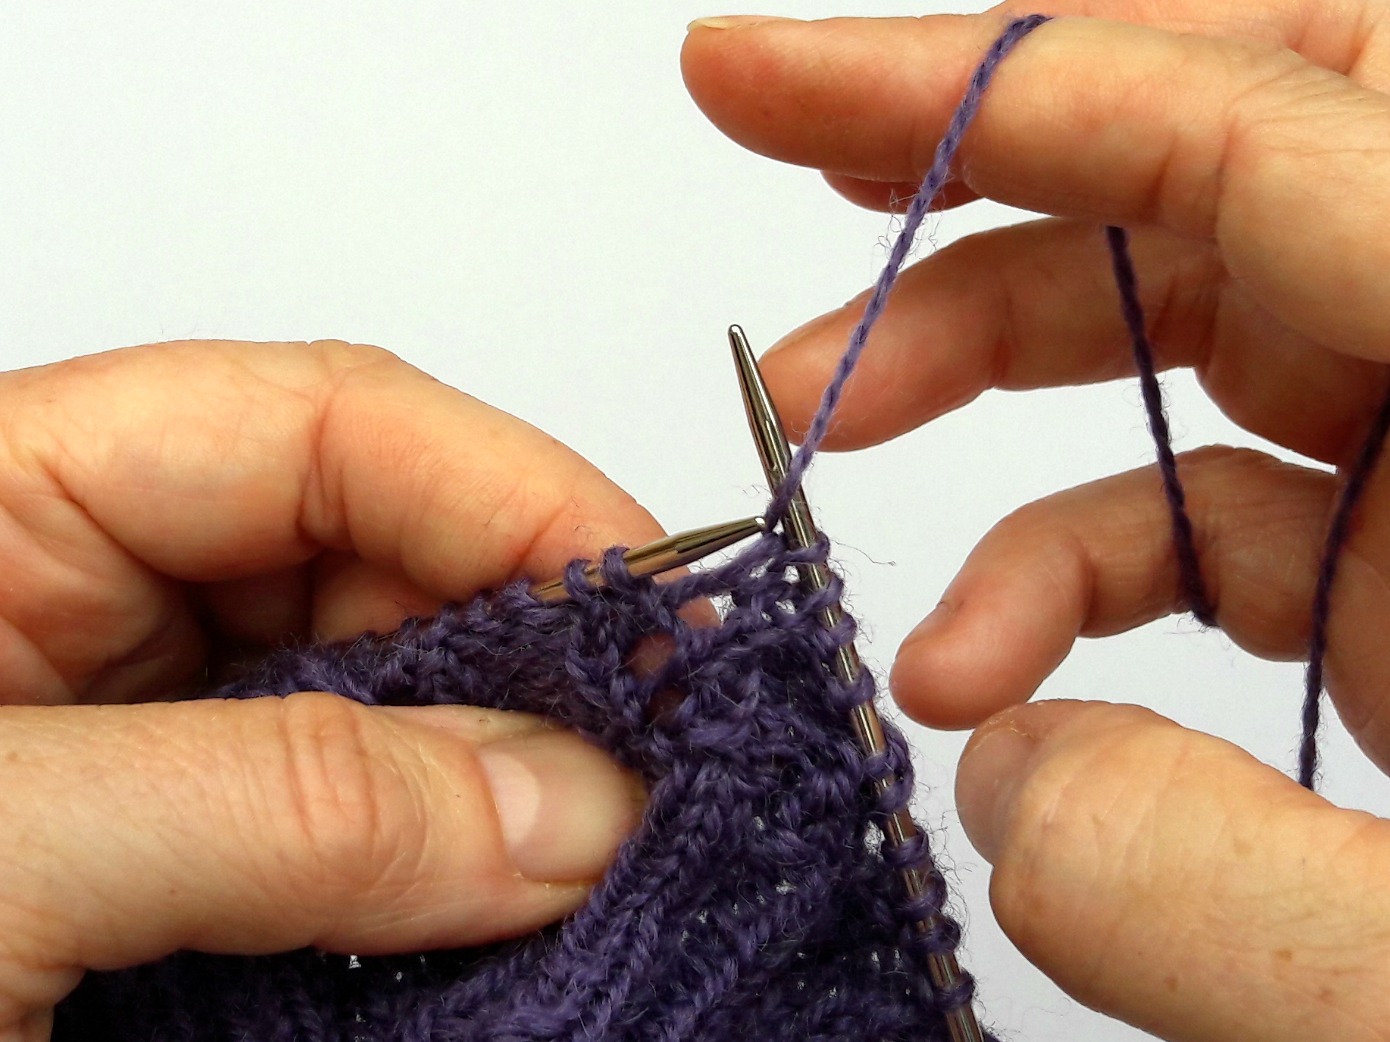
1 Purl the first stitch …

2 Knit the next two stitches …
3 Wrap the yarn around the needle in an anti-clockwise direction so that it returns to the back of your work ready to knit the next stitch …
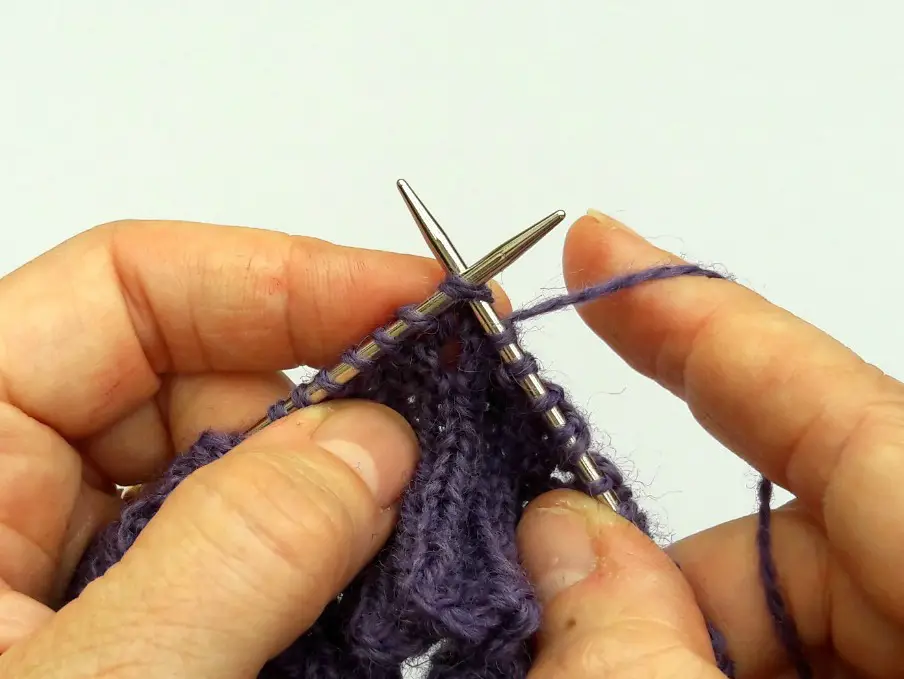
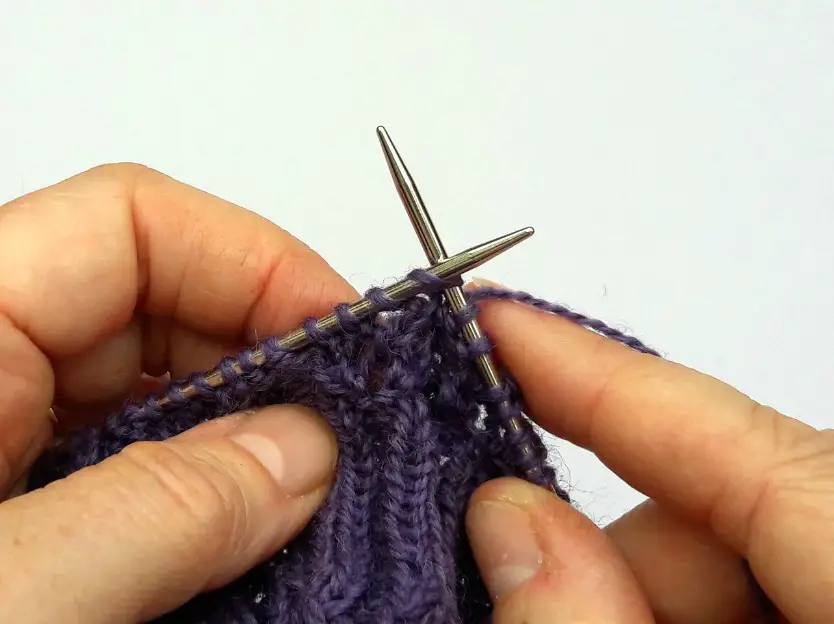
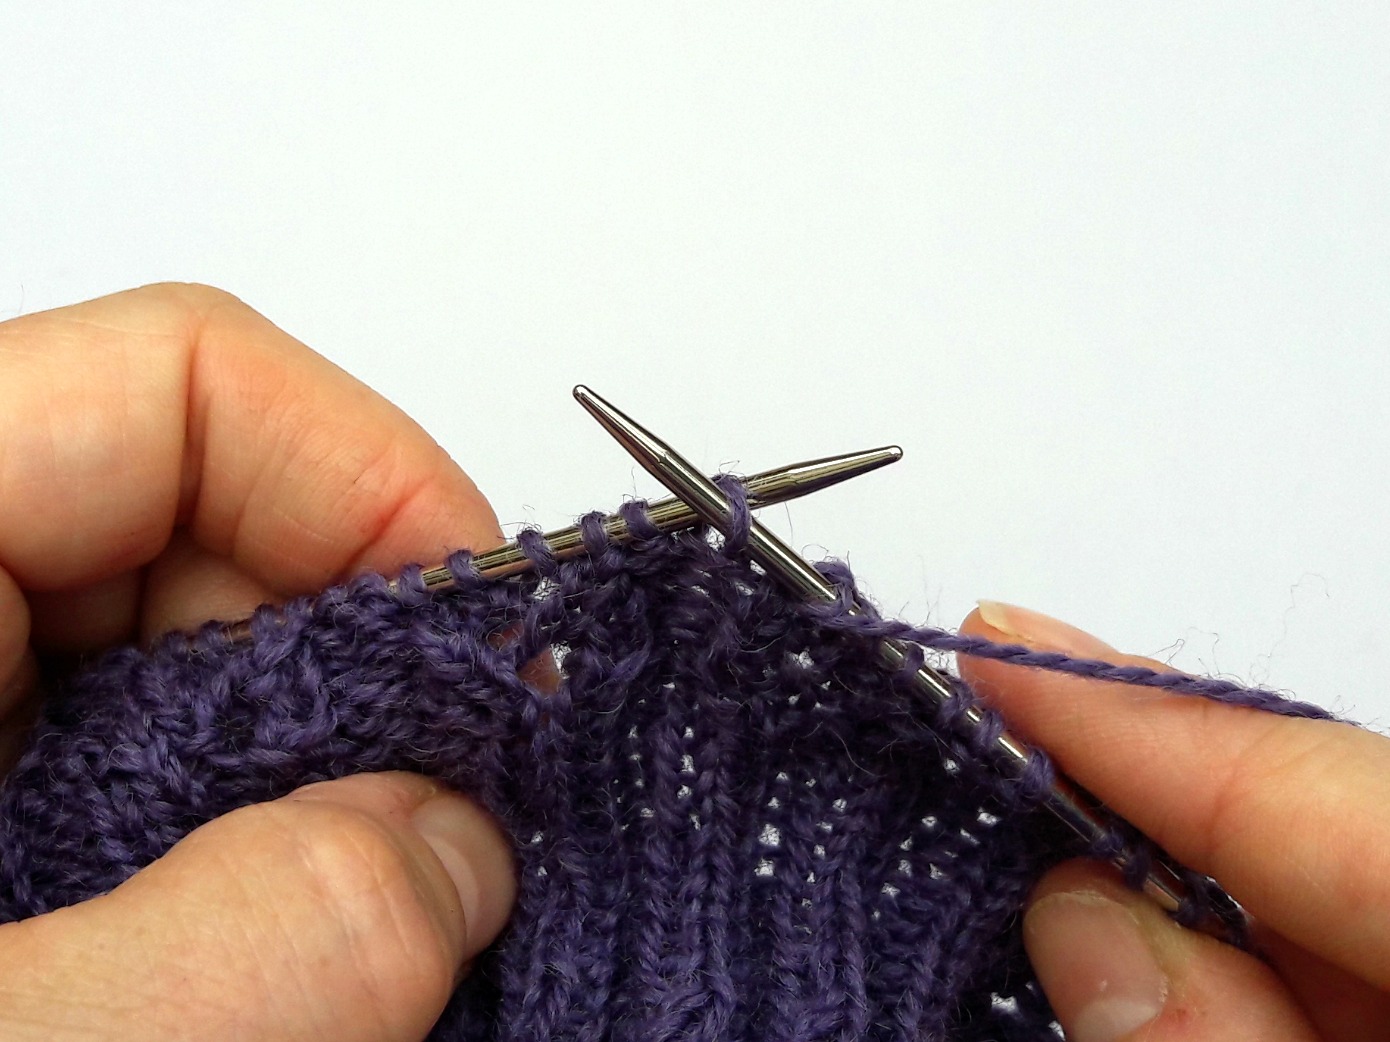
4 Now you’re going to do a SSK decrease so slip the first stitch knitwise from the left hand needle to the right hand needle …
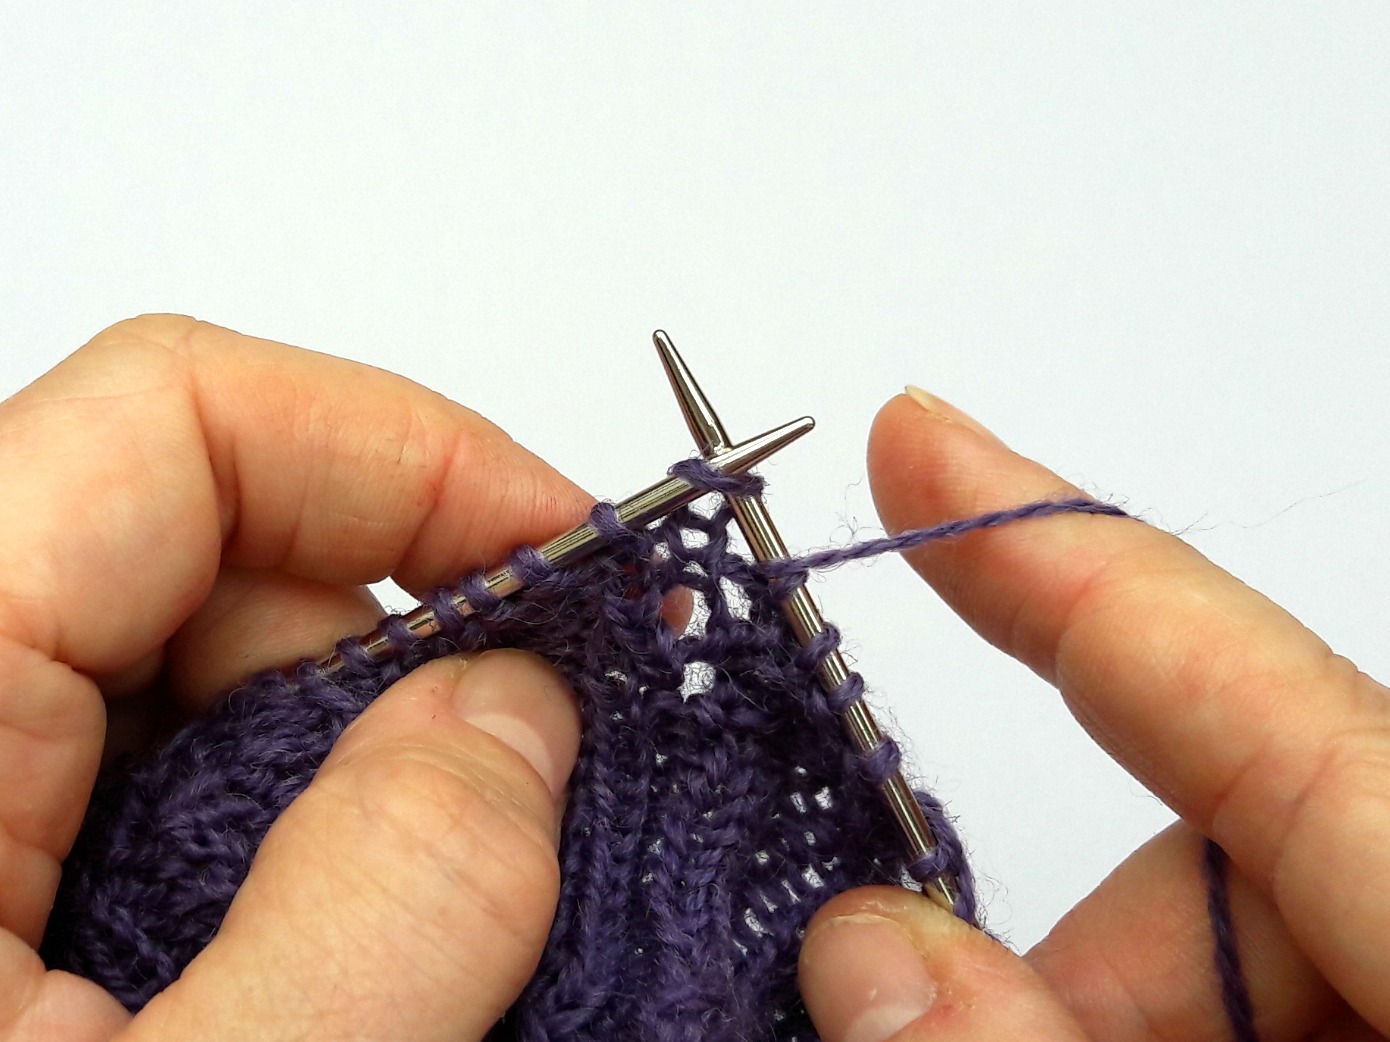
slip the next stitch purlwise from the left hand needle to the right hand needle …
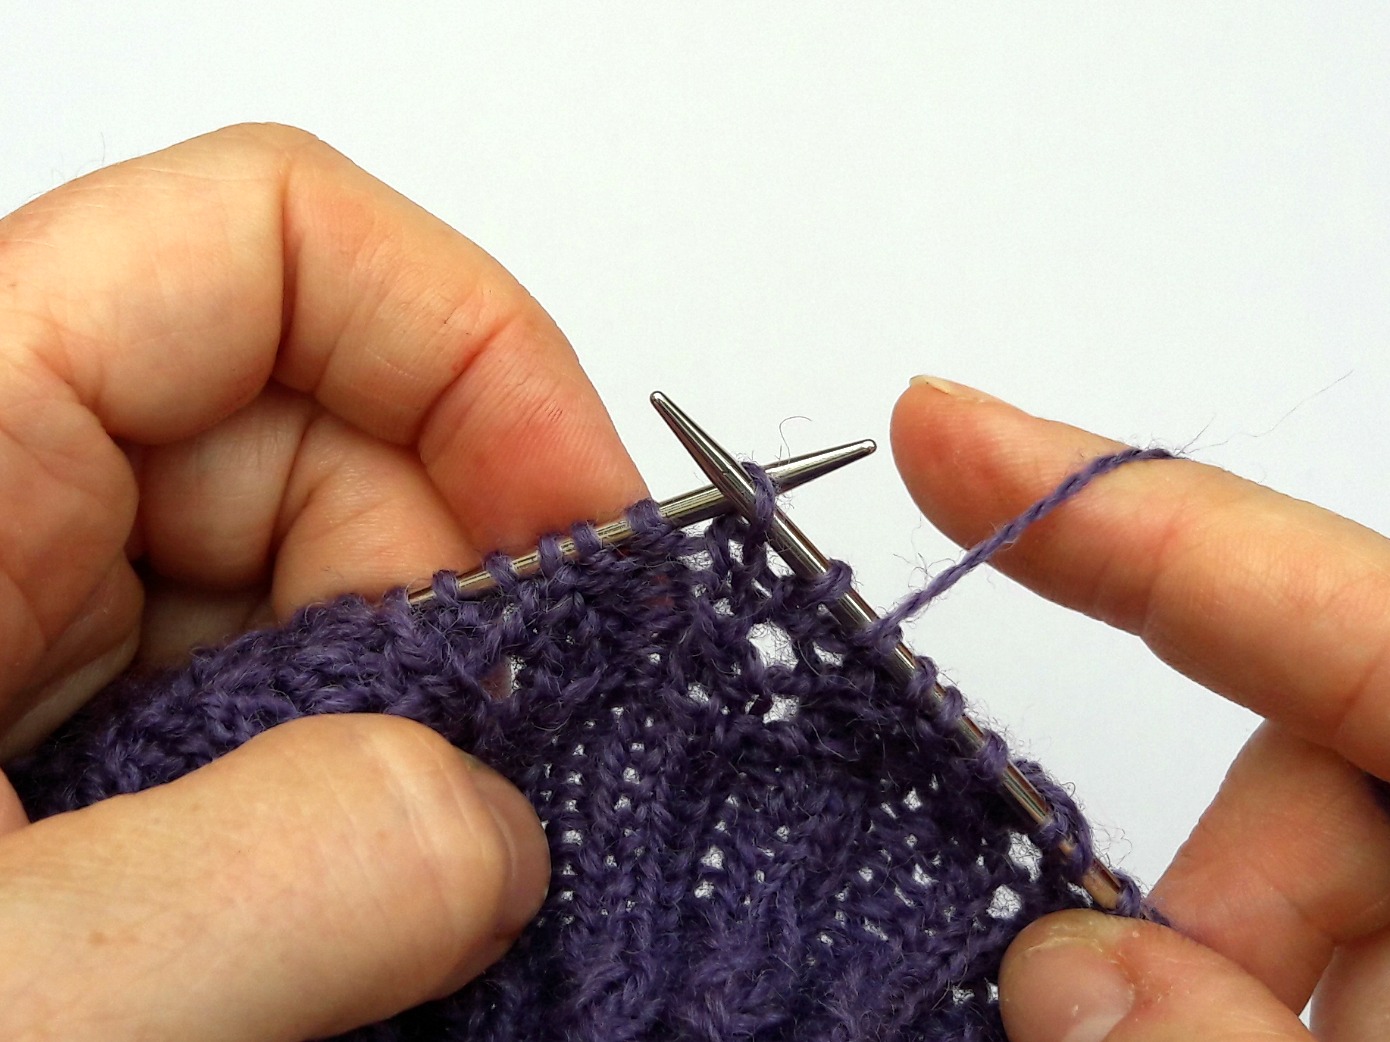
Now slip both stitches back onto the left hand needle and knit them through the back loop …
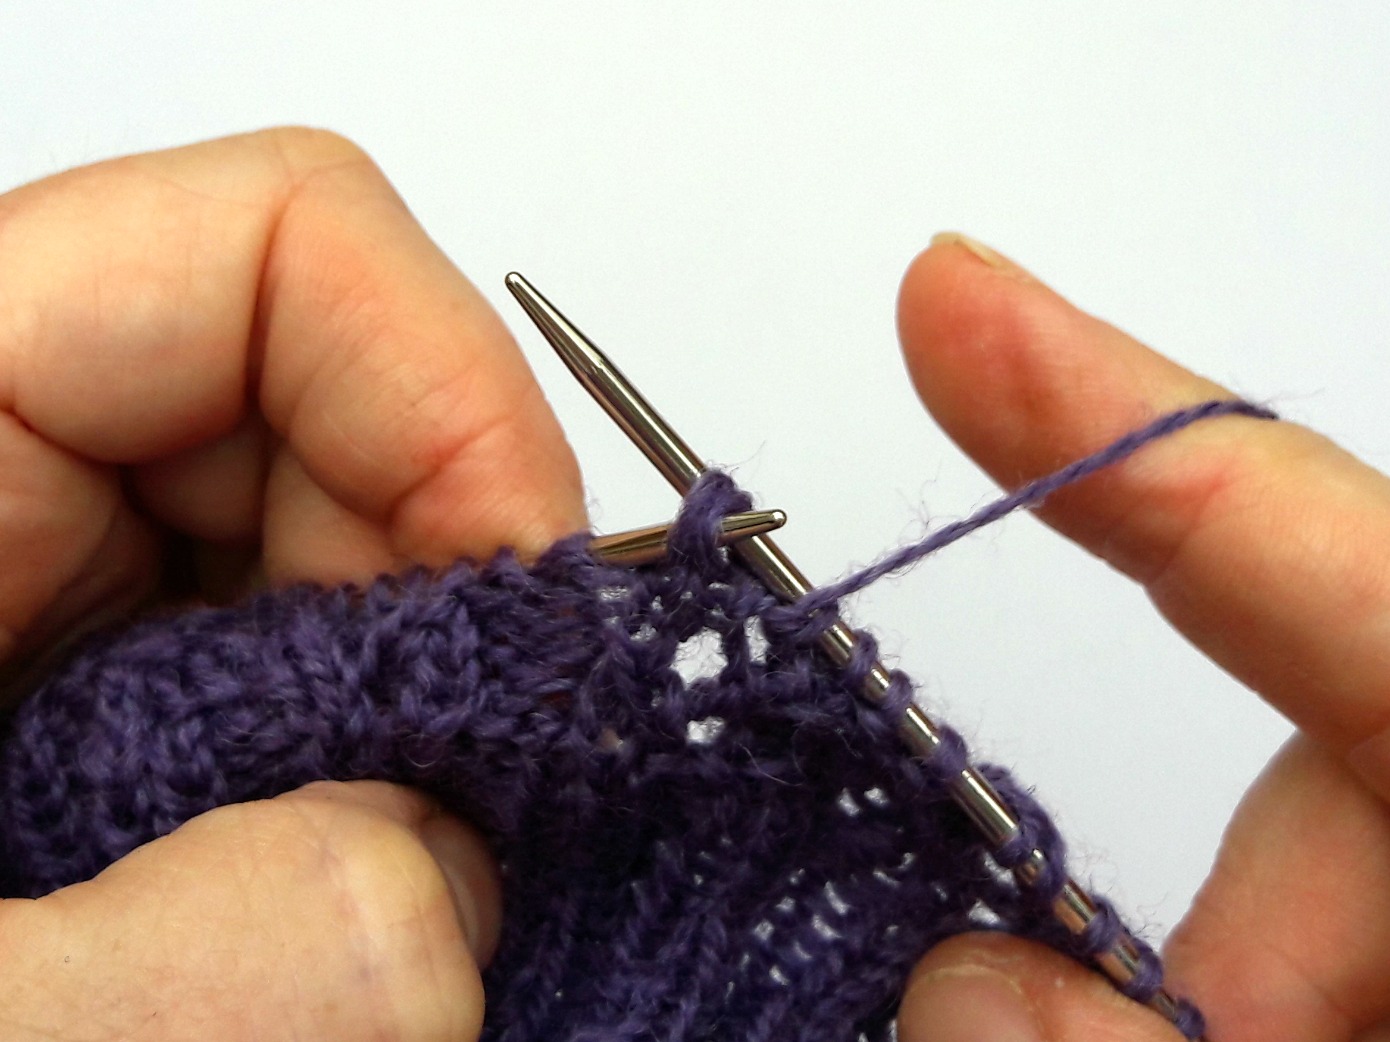
5 Purl the next stitch.
Round (row) 4
Purl the purl stitches and knit the knit stitches.
Here’s the video for working the lace section:
Here are the written instructions for the lace chart – choose the size that fits with the size of sock you’re making.
60 stitches
Round 1: *P1, K2tog, yo, K2, P1* repeat to marker
Round 2: *P1, K4, P1* repeat to marker
Round 3: *P1, K2, yo, SSK, P1* repeat to marker
Round 4: *P1, K4, P1* repeat to marker

64 stitches
Round 1: K1, *P1, K2tog, yo, K2, P1* 5 times, K2, *P1, K2tog, yo, K2, P1* 5 times, K1.
Round 2: K1 *P1, K4, P1* 5 times, K2, *P1, K4, P1* 5 times, K1.
Round 3: K1 *P1, K2, yo, SSK, P1* 5 times, K2 *P1, K2, yo, SSK, P1* 5 times, K1.
Round 4: K1 *P1, K4, P1* 5 times, K2, *P1, K4, P1* 5 times, K1.


68 stitches
Round 1: K1, P1 *P1, K2tog, yo, K2, P1* 5 times, P1, K2, P1, *P1, K2tog, yo, K2, P1* 5 times, P1, K1.
Round 2: K1 P1, *P1, K4, P1* 5 times, P1, K2, P1, *P1, K4, P1* 5 times, P1, K1.
Round 3: K1, P1, *P1, K2, yo, SSK, P1* 5 times, P1, K2, P1 *P1, K2, yo, SSK, P1* 5 times, P1, K1.
Round 4: K1 P1, *P1, K4, P1* 5 times, P1, K2, P1, *P1, K4, P1* 5 times, P1 K1

72 stitches
As for 60 stitches
Continue to knit each round in pattern until desired length before start of heel ending on round 4 of the pattern (for me, this is 14 repeats of the pattern giving 72 rounds in total including the rib). If you want to make the leg longer or shorter, you don’t have to finish on round 4 but do make a note of which round you finish on as you’ll start on the next round when you work on the gusset.
Lifelines
You may want to use a lifeline whilst you’re working your lace section to give yourself some added security in case you go wrong. Have you ever seen a rock climber securing themselves to the rock they’re climbing so that if they fall they will only go as far as the last place they attached themselves to? That’s exactly how a lifeline works and if you’ve never used a lifeline in your knitting before, you’re going to love them – they’re not just for socks, you can use them for any project.
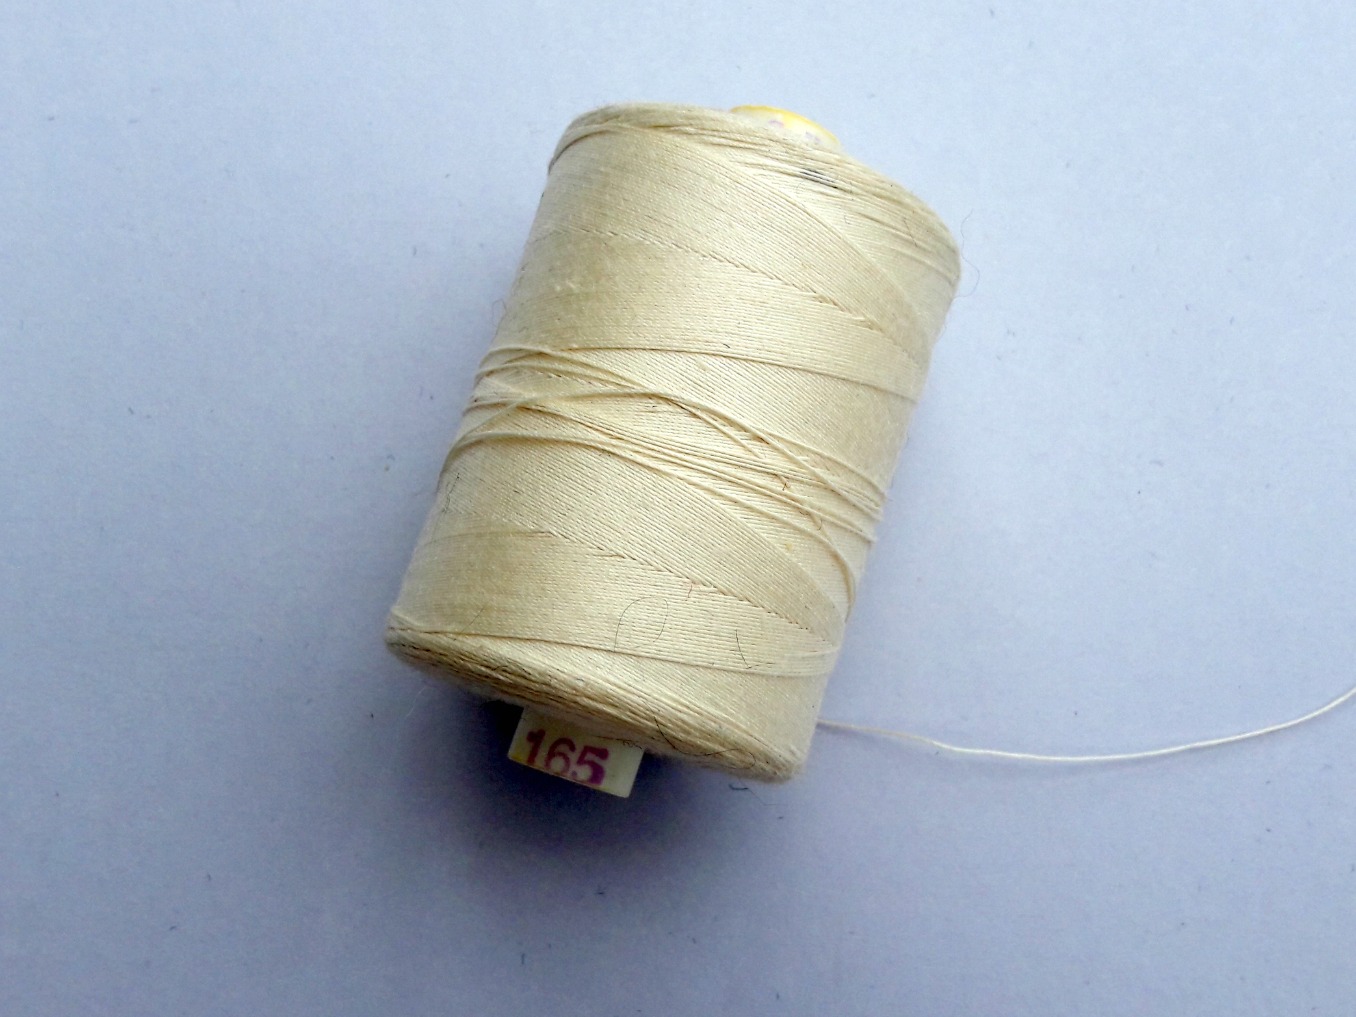
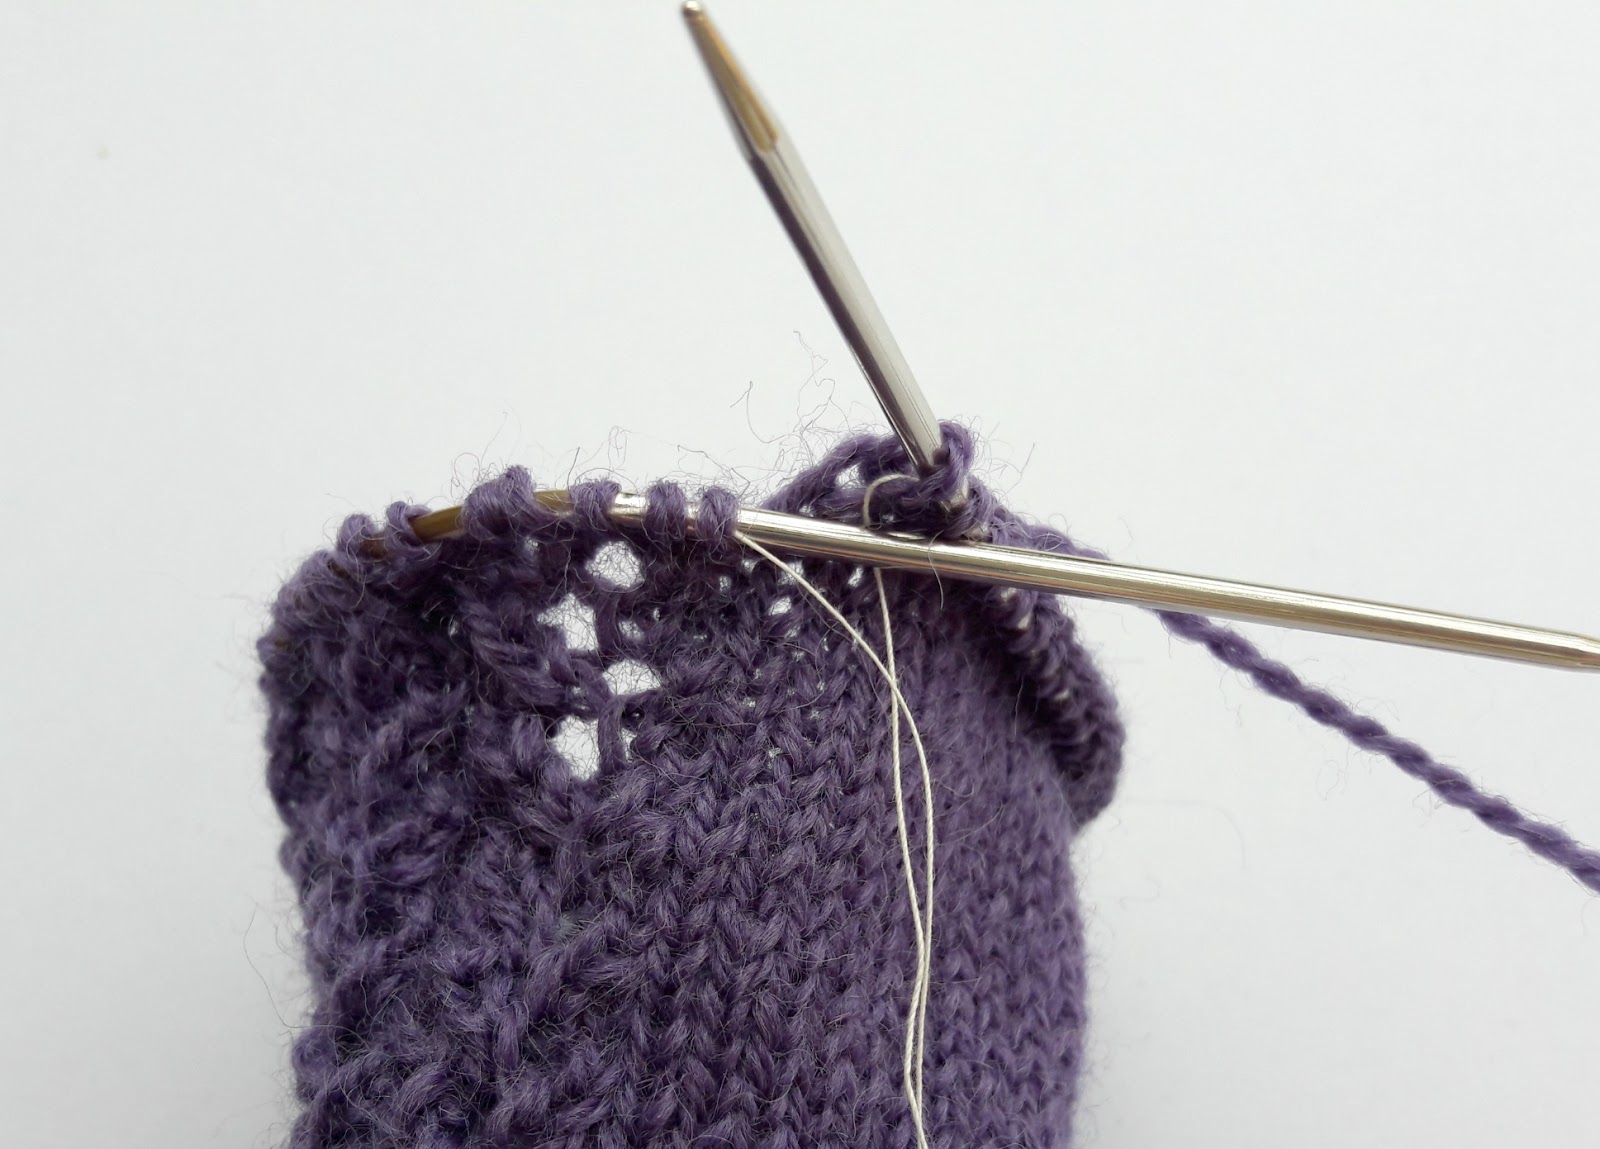
You’ll need a strong thread or thin yarn (some people like to use dental floss but if you choose to do this, don’t pick the waxed minty variety!) – I use quilting cotton because I happen to have a large reel of it – and a wool needle.
Thread your wool needle with a length of the cotton and thread it into the stitches on your needle. Try to go right through the stitch rather than catching the yarn, and take the thread right around your sock.
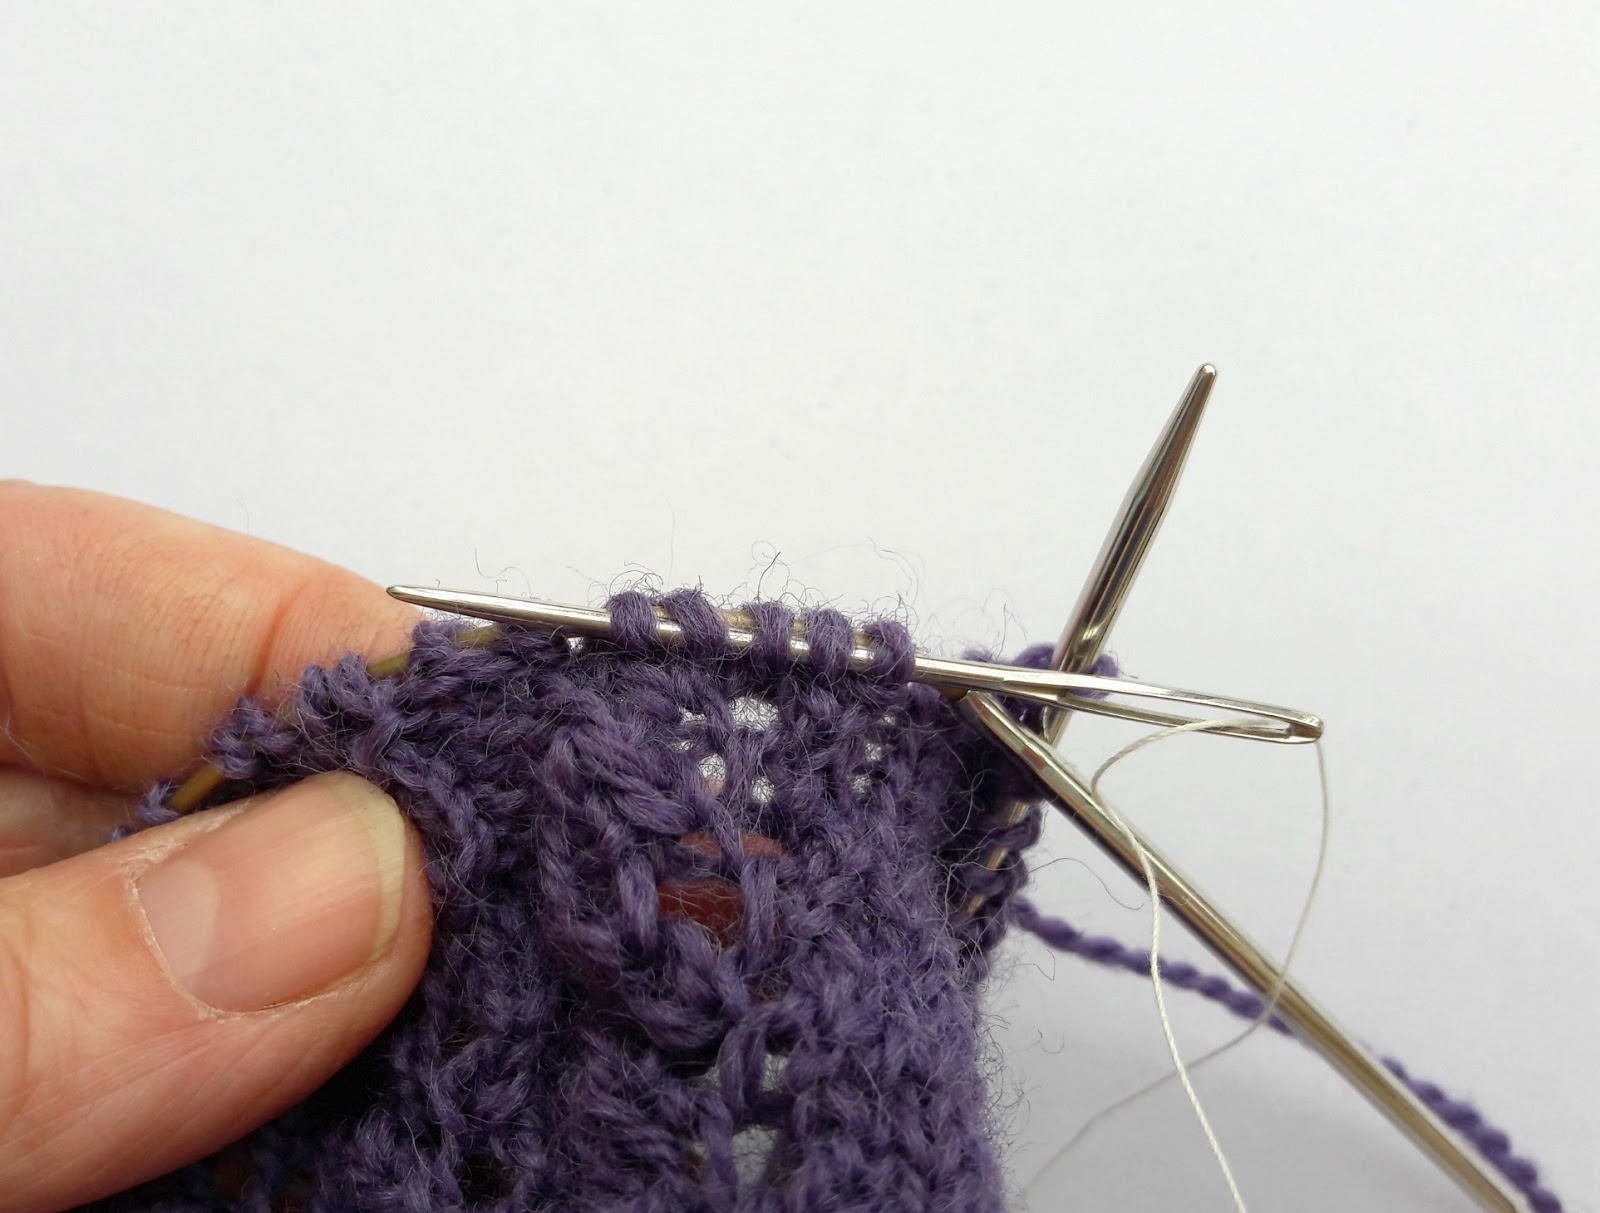
Once the cotton is threaded through all of the stitches, leave a long end so that it doesn’t come back through again. I usually knot the two ends of the cotton together if I’m using a lifeline in a sock – it’s not so easy to do that with a shawl!
There’s no limit to the number of lifelines you can have; just put them in wherever you feel comfortable. This sock is one that I’m working on with a ten row lace pattern and I’ve put a lifeline in at the end of each pattern block.
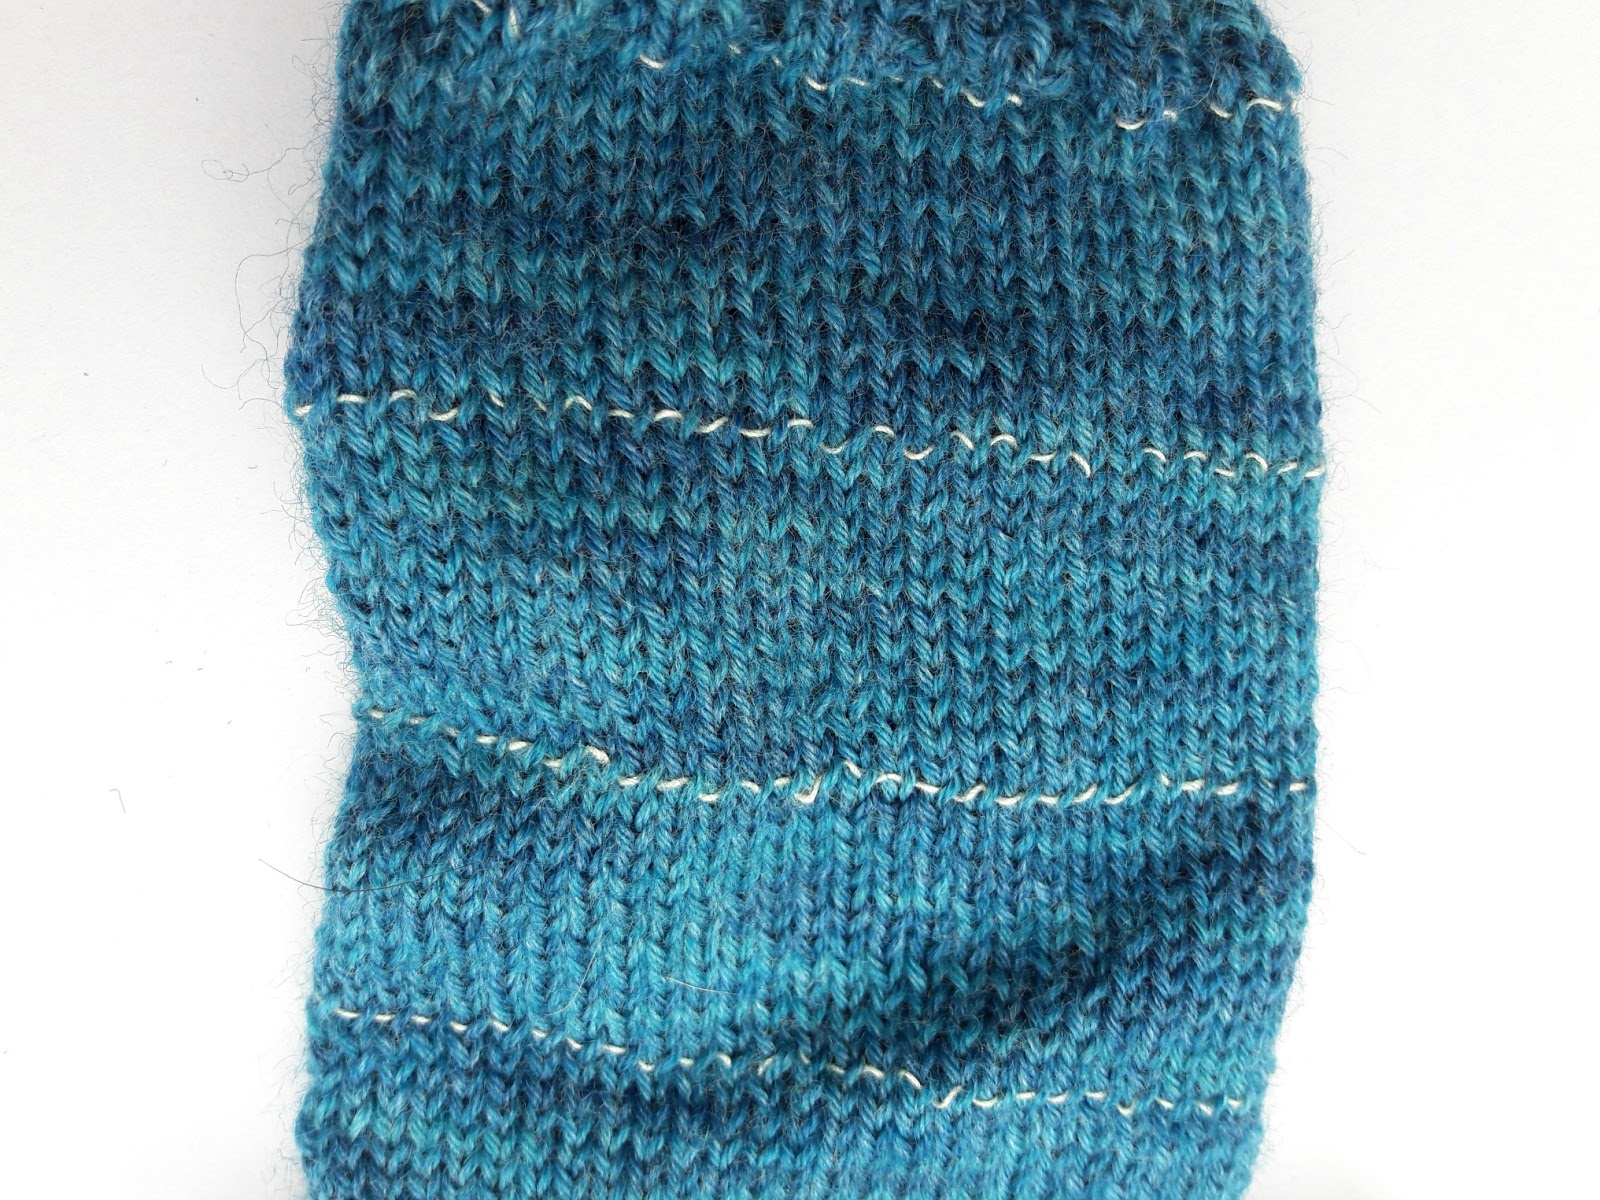
When you’ve finished with the lifeline, you just pull the cotton back through the stitches, and if you need to take your knitting out at any point you can safely take the needles out of your work and pull it back without needing to unpick it one stitch at a time. The yarn won’t go any further than the lifeline and you can pick the stitches up again and carry on as if nothing had gone wrong. Magic, eh? 🙂
Here’s the lifelines video:
Heel Flap
Change to 2.5mm DPNs if you are using a small circular. It is possible to knit the heel flap and gusset on the circular but it’s fiddly, especially if you’re using one of the really tiny circular needle sizes, so I usually swap to DPNs here. You are going to create the heel flap from half the number of stitches that you cast on, so if you have cast on more or less than 60 stitches, remember to adjust the number of stitches when you start the heel flap.
Row 1: K2, *Sl1, K1* until you have 30 stitches on your needle, turn.
Row 2: Sl1, P to end, turn.
Row 3: *Sl1, K1* to end, turn
Repeat rows 2 and 3 until heel measures approximately 2 inches, finishing on row 3 (approx 35 rows). If you want to make the heel flap longer, continuing knitting rows 2 and 3 until you reach the desired length, but remember that you will need to pick up more stitches to create the gusset.
Here’s the heel flap video:
Turn heel
Hooray! This is the bit where the sock starts to look like a sock. Some people worry about this bit but take it slowly and you’ll be fine. If you want to, put a lifeline in at the top of your heel flap so that you’ll know that you can take the stitches back easily if you need to.
*For a larger or smaller sock, you will need to alter the number of purl stitches in the first row of the heel (marked in bold below), increasing by 1 stitch for each block of 4 stitches extra that you cast on, or decreasing by 1 stitch for each block of 4 stitches less than 60 stitches. For example, if you cast on 64 stitches, your first row would be Sl1, P17, P2tog, P1, turn*
Row 1: Sl1, P16 (17; 18; 19), P2tog, P1, turn.
Row 2: Sl1, K5, SSK, K1, turn.
Row 3: Sl1, P6, P2tog, P1, turn.
Row 4: Sl1, K7, SSK, K1, turn.
Continue in this way, increasing one stitch between slip stitch and SSK or P2tog on each row until all of the heel stitches are used (ie, Row 5: Sl1, P8, P2tog, P1, turn; Row 6: Sl1, K9, SSK, K1, turn, etc).
Note: you’re not making any new stitches, you’re simply adding one stitch to the number in the centre every time you decrease. Knit across the heel stitches if required to bring you to the left hand side of the heel flap ready to pick up 1 stitch for every 2 rows knitted. Remember that if you made the heel flap bigger, you will need to pick up more stitches. Once you have picked up the stitches, place marker. Knit across the top of the foot stitches in pattern starting with round 1, place marker, then pick up 1 stitch for every 2 rows of heel flap knitted up the other side of the heel. Knit across the top of the heel and then shape gusset as below.
Note: If you are using DPNs and/or have placed your stitches on a stitch holder, you can arrange the needles as follows: Needle 1 for stitches across heel, Needle 2 for picked-up stitches down side of foot, Needle 3 for stitches across top of foot (knit stitches off stitch holder if required), Needle 4 for picked-up stitches on other side of foot. You may find that stitch markers are not required at first.
Shape gusset
Round 1: K to 3 sts before the marker, K2tog, K1, slip marker, knit in pattern to next marker, slip marker, K1, SSK, K to marker.
Round 2: Slip marker, knit in pattern to next marker, slip marker, knit to 3 sts before marker.
Round 3: K2tog, K1, slip marker, knit in pattern to next marker, slip marker, K1, SSK, K to marker.
Repeat rounds 2 and 3 to shape the gusset. Continue in this way, decreasing by two stitches at the gusset on every other row until there are 60 stitches on the needle.
You can see the line of the gusset very clearly in this picture:

Here’s the video for shaping the gusset:
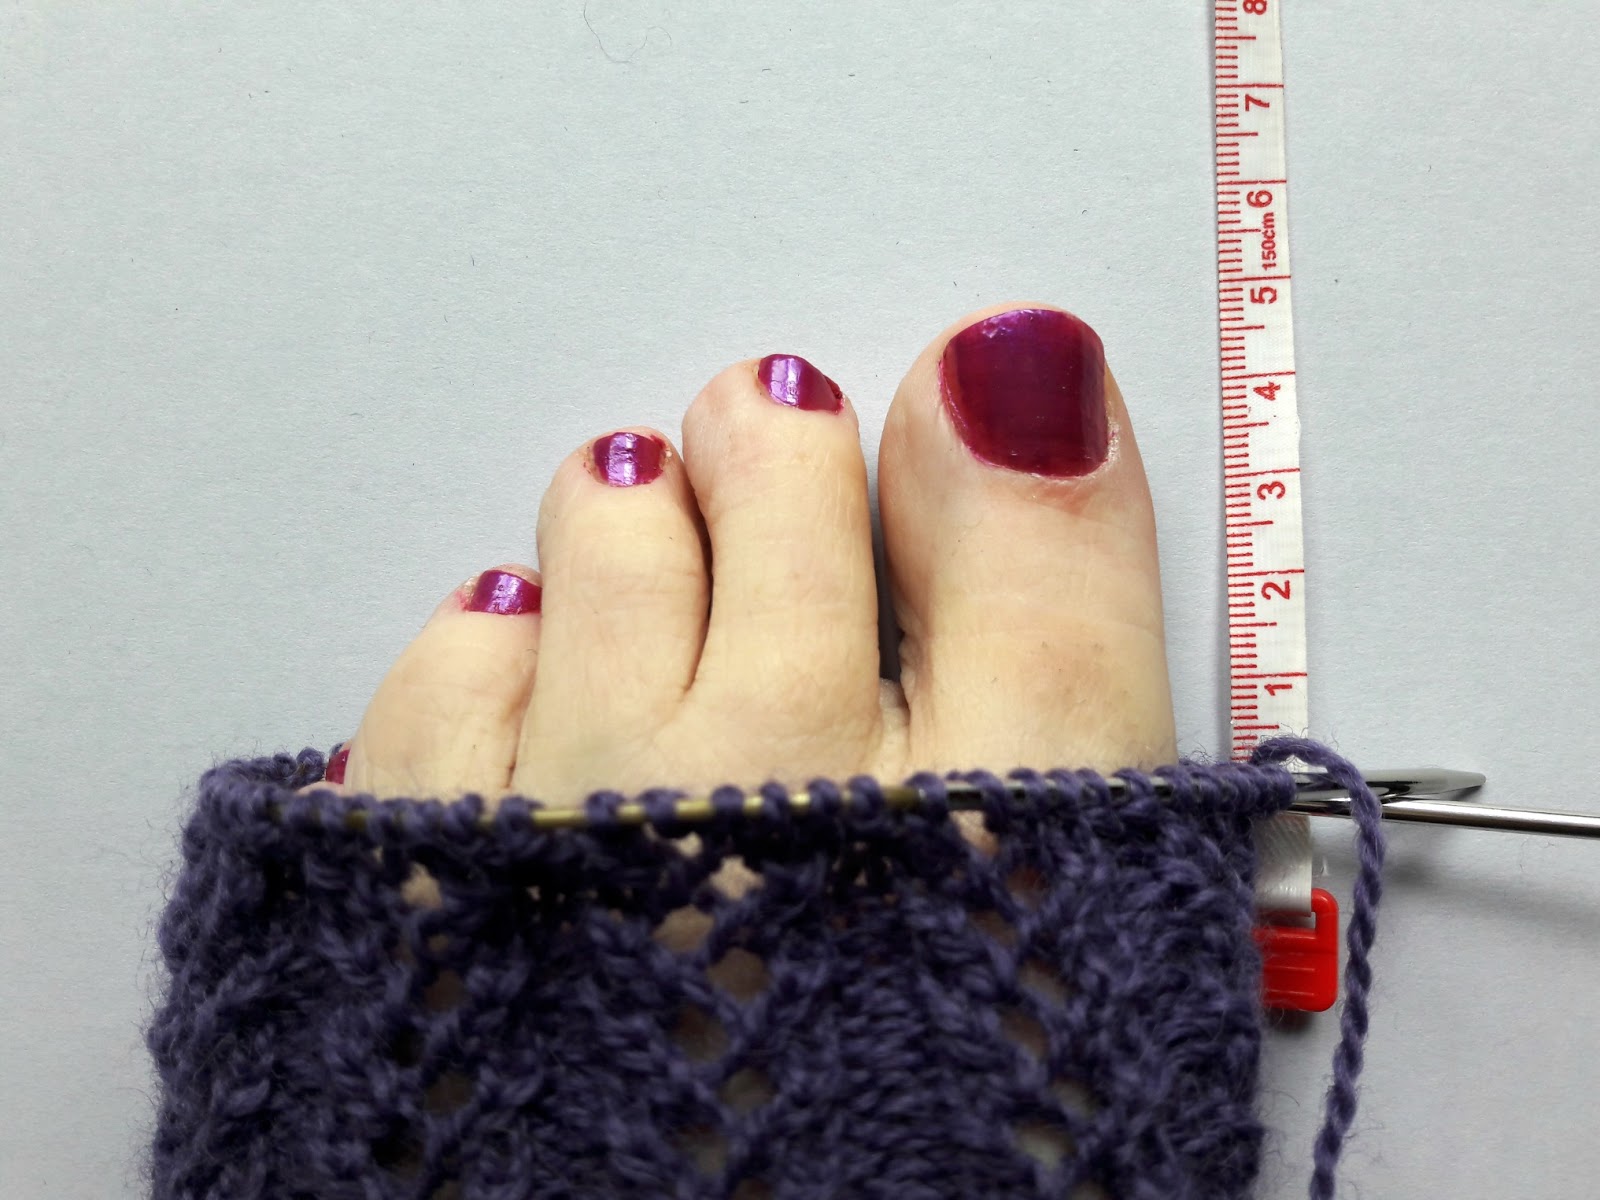
Once you have 60 stitches again, continue to knit each round until you reach approximately 5cm before the desired length ready to start the toes. For my size 5 feet, this is about 47 rounds. Don’t be afraid to try your sock on before decreasing for the toes, and make sure that you’re standing up when you measure your sock as you need your full weight on your foot. Sometimes you have to do more rounds than you think to get to where you need to be, but it’s always worth making sure that your sock is the right length otherwise it will pull against your toes and also pull the heel under your foot, neither of which are very comfortable!
Toes
I’ve chosen to knit the toes in plain knit but if you want to continue the pattern to the decreases you can do so. At some point whilst decreasing for the toes, if you are using a small circular you will need to change to DPNs or use magic loop as the number of stitches becomes too small for the circular. It’s up to you when you choose to do that, and how you distribute the stitches across the needles; just keep following the pattern as set below.
Create the toes as follows:
Round 1: K1, SSK, K24 (26; 28; 30) sts, K2tog, K1, place marker, K1, SSK, K24 (26; 28; 30) sts, K2tog, K1.
Round 2: Knit one round, slipping markers as you come to them.
Round 3: K1, SSK, K to 3 sts before marker, K2tog, K1, slip marker, K1, SSK, K to 3 sts before marker, K2tog, K1.
Repeat rounds 2 and 3 until you have 28 stitches left and divide these between two needles so that front and back of socks match (14 stitches on each needle).
The video for the toe decreases is here:
Finally, you’re going to graft the toes using Kitchener stitch. Again, this is another part of the sock that people worry about but as long as you take your time and try to pick a time when you won’t be disturbed then you’ll be fine. If you want to see photos of how the Kitchener stitch is completed you can find them in the Sockalong tutorial and the video of how to do it is below.
All you need to do now is to sew the seam together where you knitted your first two rows of rib on DPNs, tightening it up if you need to, and your first sock is done. Knit another one to match and you’ll soon be wearing your pair of Easy Lace Socks!
Don’t forget to link your socks on Ravelry so that others can admire them, and if you would like to share them on other social media platforms there’s a hashtag of #easylacesocks or #winwickmumsocks. I’m really looking forward to seeing how you get on!
This pattern is free on this blog and will always remain so. If you’ve enjoyed using it and would like to support my work so I can keep blogging and designing, you can browse my shop for patterns and books or buy me a brew – both are very much appreciated. Thank you! xx


You can also find this pattern and other tutorials and exclusive patterns in More Super Socks.
This pattern copyright © 2018 Winwick Mum All rights reserved.
Not to be included in any collection or used for profit without written consent of Winwick Mum.
This pattern is based on my Basic 4ply Socks pattern, which means that you can find photo and video help in the Winwick Mum Sockalong tutorials. You can find out more here:
If you can already knit socks but would like to stay in touch, click the link below to join the Winwick Mum mailing list to hear about the latest blog posts, pattern updates, tutorials and more … but no spam, I promise!


I love knitting lacy socks, these are right up my street! I'm bookmarking the page, thanks very much for the pattern.
That's great to hear, thank you! xx
Thank you so much for sharing your pattern. After not feeling like knitting for the last few months, I'm back in the swing of things now. Just finishing off a pair of the standard socks but will then be moving on to a lacy pair. Enjoy your week x
Sometimes the urge to knit does leave you for a while but not usually for long – I'm glad you're back into it again! xx
I found your nice blog with so many lovely patterns.
Today I start with these lacy socks.
Thank you for your workshop with foto's.
Greetings, Lia. I m from the Netherlands.
Hello Lia, thanks your for lovely message, I hope your socks turn out perfectly! xx
WOW Christine – this is an EPIC tutorial, what a huge amount of work has gone into it, no wonder it's been consuming your thoughts for so long!! Very well done you, it looks awesome xxxxxxxxxxxxxxxxxxxxxxxxxxxxx
Thank you! I did wonder if I would ever get it finished … the Forth Road Bridge of tutorials 🙂 xx
Looks like I might soon be knitting lacy socks!! Thanks very much for the pattern and for time and effort you took in completing the wonderfully clear instructions. ( I just need to complete the pair I am working on for Yarndale sock line first!!!).
Ooh, that's fantastic, thank you – Yarndale socks are always very much appreciated! xx
Amazingly detailed tutorial, Christine, what a lot of work. Thank you so much. Maybe they will be my Yarndale socks. Candy from Canada
I hope you enjoy knitting them, whatever you choose to do with them 🙂 xx
What fun…a new challenge! You do know that you are my "preventing dementia" method of choice?! All that stimulation of the "little grey cells" has got to be good. Pr number one are finished and just need the ends darned in. Lucy's Coast blanket is in progress ready for big son to take to uni. I think funky lace socks will be next, especially now you've explained about lifelines….brilliant! Pr 1 were unpicked back to the rib more than once. Hopefully lace pr will have more luck. Thanks for sharing this Christine.
Stimulation of those grey cells is always good and I've also heard that the more complicated a pattern is, the harder they work so this can be just the start 😉 You should find that with this pair you don't have to concentrate so hard on the construction as you've already made a pair so you know how it works xx
The socks look absolutely lovely; thank you for the detailed instructions. I'm sure they'll be fun to knit! Giselle from New Zealand
I hope so! Do let me know how you get on! xx
Such detail, thank you Christine, i'm sure i'll be able to manage a pair of these. What a nice Christmas pressie they would make for a family member.
xx
They knit up pretty quickly as well so they should be ideal for Christmas knitting! xx
Hello Christine, thank you for another great tutorial! I'm more into toe up socks, but I would love to knit some lace socks. Can I just use the lace pattern going up?
Hi Jill, yes you can just knit the lace pattern in the same way for toe-up socks and they'll work out fine. Don't forget to let me know how you get on! Xx
Thank you, I will certainly let you know about my progress, but first I need to finish my current pair. I have another question: is this pattern more stretchy than plain knit socks or can I just use my usual number of stitches?
what gorgeous socks! what a gorgeous colour! (my favourite! of course!)
wonder how it would look in a variegated yarn? i don't have any solid colours of sock yarn only the colours that i get from BWM.
love the tutorial! have saved it to the computer will print it out & put with your other patterns … one day i'll buy your book :))
i've shared it with the Homemakers too
thanx for sharing
Thank you, I'm glad you like it! I think the pattern would work well in a variegated yarn, but perhaps a more subtle one so that it doesn't get lost in the colours xx
Hi Christine, thank you so much for this pattern! I'm about to finish my second toe-up sock for my mum. I used a yarn with a slow colour change (red-orange-yellow) and I think she is going to love them. Thanks a lot!
You're very welcome, and I hope your Mum wears her socks with pride! xx
Just found your site. I'm going to try these on my very first 9" circular needle.
I usually use a 2, 80cm circular and toe-up two at a time.
Do you have a PDF of your Easy Lace Pattern. I have Bookmarked you site.
Amelia
Hi Amelia, it'll be something different knitting with a 9" circular! If you scroll down to where the pattern starts there's a link to the PDF there xx
I just finished the Easy Lace Socks. I love love this pattern! Thank you so much. I also just ordered your book.
Hi Barbara, I'm so pleased that you enjoyed knitting the pattern, and thanks for buying the book too! xx
This is a fabulous pattern! I'm really enjoying knitting these lace socks. It's much easier than I expected. Thank you for the excellent tutorial.
That's great to hear – that was always the plan when I wrote this pattern! 🙂 xx
Thank you so much for sharing this pattern. I started it yesterday for my friend who has really swollen legs and feet. I have cast on double the amount of stitches to get the fit, so the socks are going to take me a long time. I have been trying to find a lace pattern for extra large socks with no success, I wanted something pretty for her as all I could find were very masculine looking.
Oh that's lovely, they'll make great socks for your friend. The pattern is quite stretchy too because of the rib sections, so I am sure they will be a great fit xx
Thanks so much for this lovely pattern. I have made about 10 pairs of your other sock pattern and love it as well. Pattern looking lovely so far.
That's great to hear, I'm glad you like it! xx
Thank you!
Thank you for this real Nice latten, I'm going to try to make sockscbutcfirst heer to figure out how to adjust the latten to 56 stitches instead hahaha
Can I just confirm that in the written instructions for the lace pattern for 64 stitches there should be a K1 to start on Row 1.
Thank you
Hello – yes, you’re absolutely right! It’s the blog version that needed the K1, the pattern PDF is right so thank you for spotting that. I’ve fixed it now 🙂 xx
I have yarn I want to use, but it is very stretchy. Do I have to adjust anything?
I would check the ball band for the tension and as long as it is similar to other yarns of that weight (so for example for 4ply, it would usually be 30sts to 4 in/10cm), then you can knit with it as usual. The only thing you’ll need to do is make sure that you don’t stretch the yarn too tightly as you knit with it, but you should get used to it quite quickly 🙂 xx
Hi i have a query about the SSK decreases. Most descriptions I’ve seen say it should be slip each stitch knitwise then knit into back of stitches. Is there a reason it says slip stitch knit wise then next stitch purlwise in the patterns abbreviations and does it mke a difference to the pattern?
Thank you for your help
Hi! Yes, the reason for slipping purlwise first is that the stitch sits flatter than slipping both knitwise and looks more professional, but this is a sock gusset so it’s fine to use any way of creating a left-leaning decrease that works for you 🙂 xx
Thank you so much for such detailed tutorials and education in sock knitting. The best I can find out here on internet. I hope your website will continue to be here for long time so many more people could learn from your beautiful skills. Thank you so much for your great contribution to the knitting lovers society and Buddhas bless you and your loved ones 🙏💗🌹🍀
I’m so glad you found them useful, thank you! xx
Bless you for doing this. I’ve been struggling to find a simple lacy sock and this is it. Your instructions are clear and detailed. So helpful. Dianne from Florida
Oh brilliant, I’m so glad this is working out for you! 🙂 xx
Hi. Every year I make some socks for Woolly Hugs. This year I thought I’d use the Easy Lace pattern, but left it late to make them. Having cracked on, I’ve made one and a half I suddenly realised that I hadn’t checked whether Woolly hugs would be able to use them. I’m asking if I can still give them to them, although I do understand if youd rather i didn’t. If not I will give them to a charity shop
It’s absolutely fine with me if you want to give your Easy Lace Socks to Woolly Hugs – it’s a lovely thing for you to do! I am sure someone will be vey happy to receive them! 🙂 xx
Thank you so much 😊
Hi. I cast on 64 stitches and now at turn heel section. would like to clarify, for row 2 at turn heel, do I, S1, K5, SSK, K1 turn? or I need to adjust the K5 to K6?
Just keep the heel turn section the same (so Sl1, K5, SSK, K1) and it will fit in fine 🙂 xx
Beautiful lace socks. Just feminine enough to look nice, but definitely solid enough to hold up and offer some cushion and warmth.
I’m hoping you still receive notifications on comments on this thread.
I looked for gauge on the pattern, and the webpage, and didn’t find any. I don’t knit a lot of socks, so I’m not sure if there’s a “standard” gauge or not. I’m also not familiar with the yarn you used, so I’m assuming these are knit in “sock” or fingering weight?
Thanks.
Hi! Yes, these are knitted in 4ply so the gauge is 30sts to 4″ (10cm). However, you can still adjust the pattern if you want to use a different yarn or your own personal gauge is different – you can use the Sock Stitch Calculation in the Winwick Mum Sockalong tension tutorial if you need any advice about working out the numbers for your own knitting tension 🙂 xx
Sorry, I just noticed the link on the yarn listed, and it appears this may be worsted weight?
No, it is 4ply and will knit up to 4ply (fingering gauge) – sometimes the ball band gauges are different on yarns that have been independently spun and this is one of them. This pattern will work with any sock yarn, or you can adjust to another weight if you want to (see my reply above) 🙂 xx
Thank you so much for your response/s. I will check out the Winwick tutorial, especially the sock stitch calculation.
Can’t wait to work these. Just need to find time to get them on the needles, amongst a few other WIPs I currently have going on. 😉
Oh, we’ve all got far more WIPs than we think we should have – some would say it’s some kind of addiction! 🤣 xx
What?? An addiction?? Those people obviously don’t understand! We can stop at any time! 🤪😛
Oh, absolutely! 🤣 xx
This is a beautiful pattern and resulting sock, thank you so much! Robyne from South Australia x
I’m so glad you like it, thank you! 🙂 xx
I am going to attempt the lace socks !! Please excuse my ignorance, but after turning the heel and completing the gusset, do I knit in lace pattern for the whole of the rest of the foot , ie the sole as well ?
Hi! No, you just work the lace pattern on the top of the foot otherwise it wouldn’t be comfortable to wear. As you follow the pattern, you’ll see that the instructions for the gusset are to knit on the underside of the foot and work the pattern on the top so it’s all good 🙂 xx
How do I get the pattern for the easy lace sock?
You click the link halfway down the page where it says “You can download a copy of the pattern here” 🙂
finished my first pair of socks. yeah. Thank you for your youtube videos and excellent tutorials.
That’s wonderful to hear, I’m so glad I could help you! 🙂 xx
I am knitting a pair of your lacy socks, you have got me hooked with your fab tutorials. I chose drops Flora which is 65% wool 35% alpaca but have seen on another bloggers site that this is not really suitable for socks. Can I ask your opinion on this. thank you
Ideally, you need a yarn with a nylon percentage in it to make sure that your socks are going to be hard-wearing enough to last when you wear them, although there are certain fibres that can naturally take the place of nylon – silk, mohair, Tencel to name a few – although your socks generally won’t last quite as long as those with nylon in them. Alpaca is beautifully soft and warm and your Easy Lace Socks will feel fabulous on your feet – but the blend of wool and alpaca will probably wear through quite quickly, unfortunately. I’d suggest that you either keep your socks as sofa (TV watching) or bed socks, or if you haven’t got to the heel yet, use a sock yarn with nylon for contrast heels and toes with the alpaca blend in between and you should get a reasonable amount of time out of them, obviously dependent on where you might be likely to wear through your socks. I hope that helps! 🙂 xx
thank you for your help. I appreciate the amount of time you spend helping everyone with our projects.
Is this pattern suitable for a tubesock?
I don’t think it would be very comfortable as a tubesock – the lace rib sections wouldn’t feel very comfortable under your feet, I don’t think. If I’ve misunderstood what you’re asking about please let me know as I don’t knit tubesocks 🙂 xx
Such a lovely pattern and the instructions are amazing. I have a small foot (56 sts) and would like to try them. How can I modify the lace chart to 56 stitches? Thank you!! Sharon
Hi Sharon, I’m delighted you want to try out the Easy Lace Socks pattern! For 56sts, you’ll need to reduce the number of 6st pattern blocks. There are 10 pattern blocks in the 60sts socks (5 x 6 on the front and back of the sock) so you’ll need to knit 4 x 6 pattern blocks on the front and back to make it fit your lesser number of stitches. I would work K2, (6st pattern block) x 4, K2 and then repeat that for the back of the sock and that should fit. Let me know how you get on! 🙂 xx