
Beginner sock knitting: Sockalong – Week 3 – Foot, toe and grafting the toes
Well, we’ve made it! It’s the final tutorial of the beginner sock knitting Winwick Mum Sockalong, and I can’t tell you how delighted I am that so many new pairs of socks are nearly finished! Thank you so much to everyone who’s taken part, it’s been brilliant to see how many people want to learn how to knit socks and I’ve loved seeing your progress photos – and hope that you’ll post pictures of your finished socks on the Ravelry pattern page so that they can all be admired! I also hope that you’re not going to stop at one pair – there’s so much sock yarn and so many fabulous patterns around that it would be a shame to stop now!
Right, then. The home stretch this week – working the foot section, decreasing for the toes and then grafting with Kitchener stitch to make a nice seam-free toe. As usual, the tutorials are written for three types of needle: short circular, DPNs and long circular (magic loop). Shall we get started? Remember that this pattern is written for 60 stitches so if you’ve got more or less, you’ll need to make adjustments to accommodate that.
If you’ve just joined us and want to learn to knit basic top down socks, you can download the free Basic 4ply Socks pattern here and you’ll find the first tutorial in this series here. There are also getting started tutorials for choosing yarn and needles and adjusting the sock size here. If you’d like a copy of my free Kitchener Stitch guide to download and keep, you can get one by joining my mailing list here.
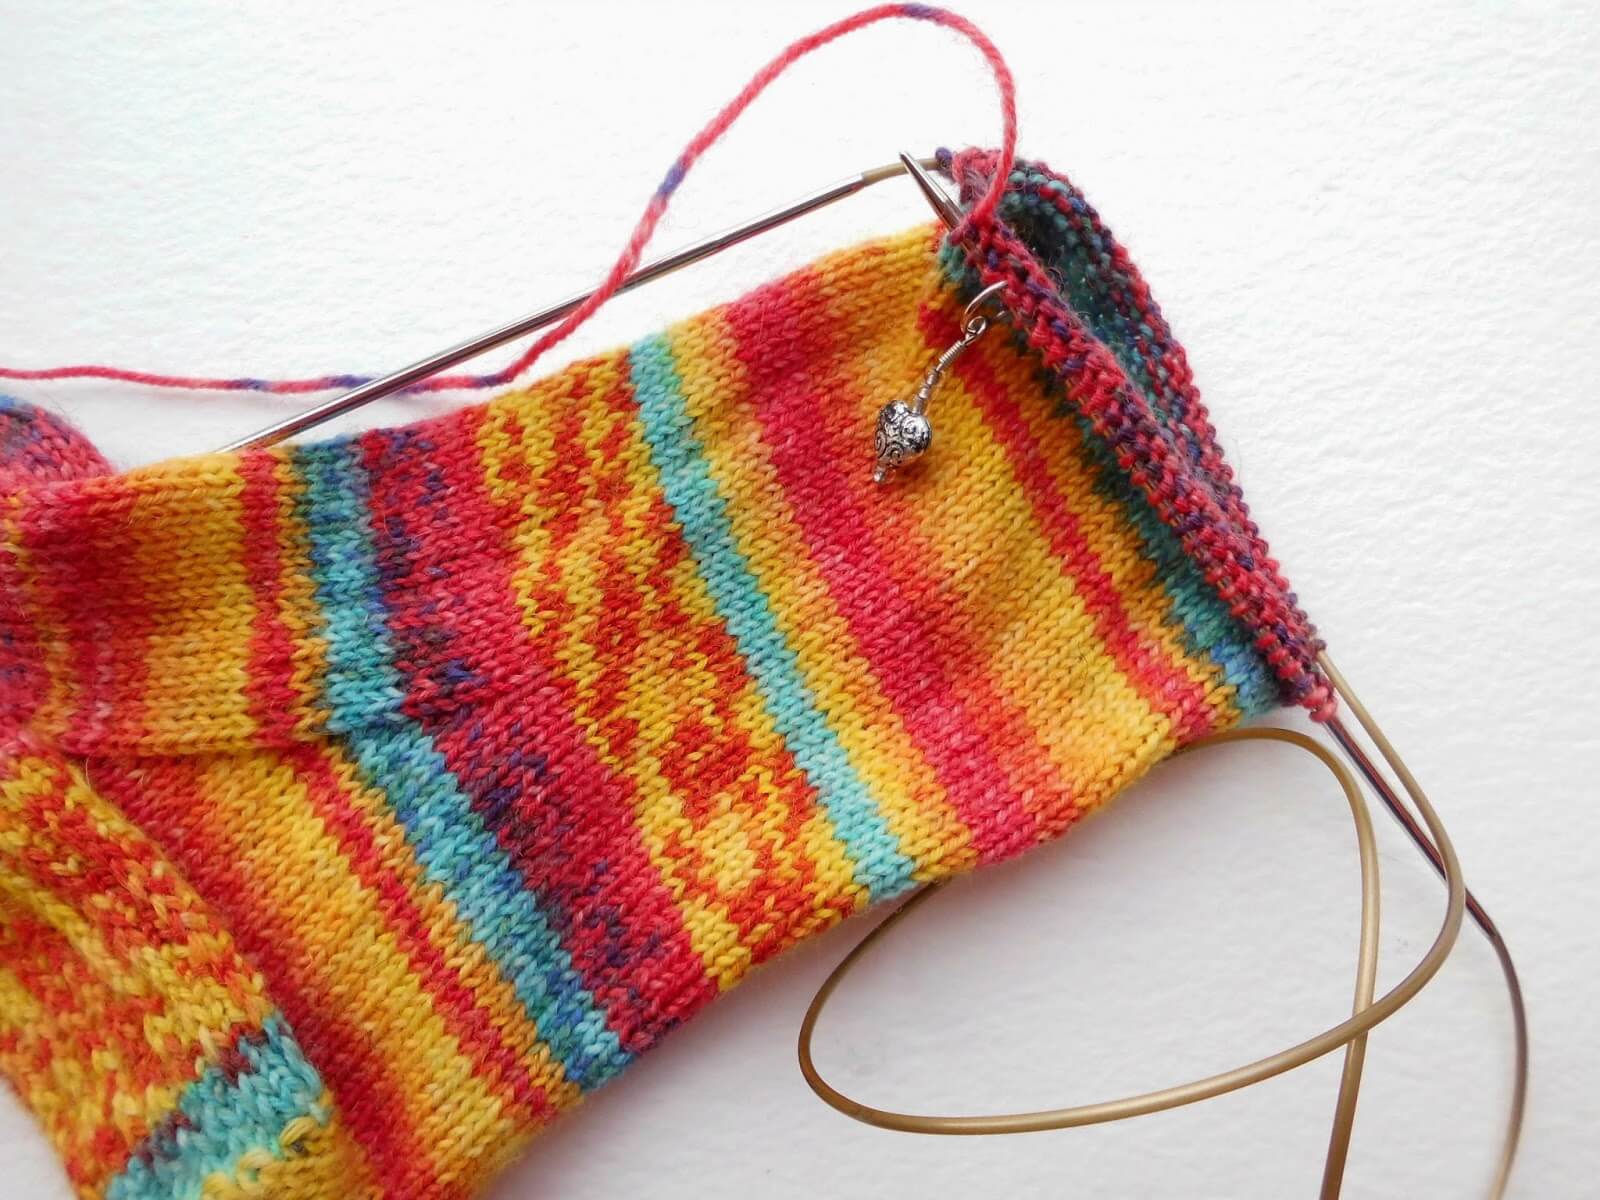
Foot – short circular needle
Once you have 60 stitches again after decreasing for your gusset, continue to knit each round until you reach approximately 5cm before the end of your big toe ready to start the toes. It’s best to measure your foot whilst you’re standing up so that your foot spreads to the size it will be when you’re walking. Just to give you an idea, for my size 5 feet, this is about 47 rounds. If you want to take one of the stitch markers off your sock so that you’ve only got one to slip across, then now is the time to do that and it’s best to keep the one that indicates the start of your round (that’s the side where you made your first decrease stitch for the gusset). Don’t be afraid to try your sock on again before decreasing for the toes!
Toes
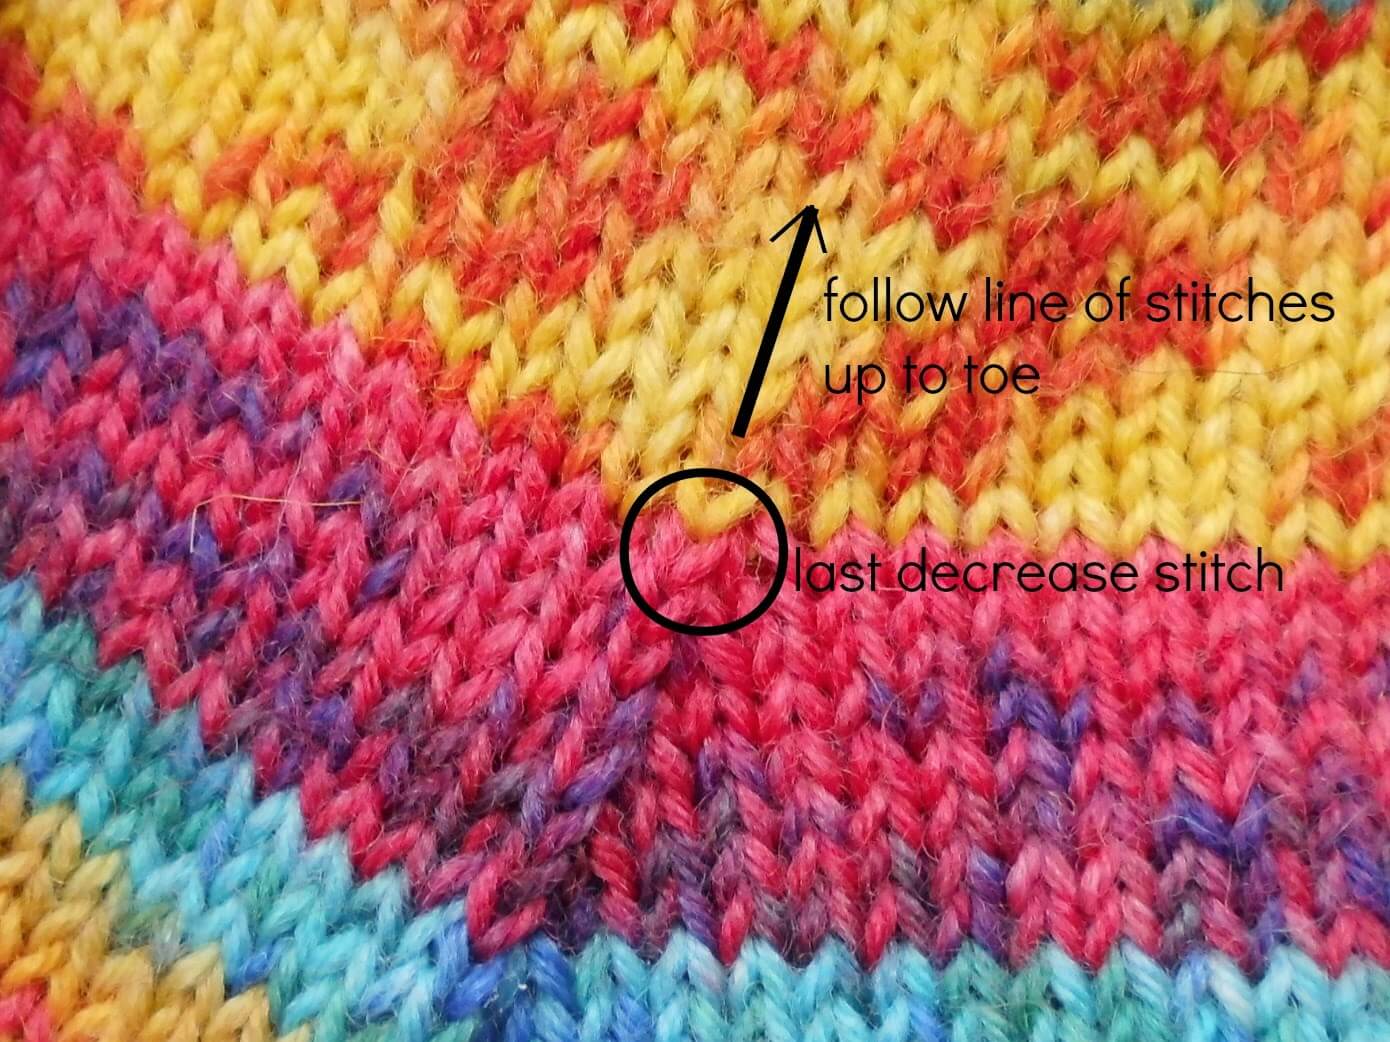
You might want to read this whole section before you start! You’ll need stitch markers in to help you set up the decrease rounds. Don’t worry if you’ve taken both of yours out, it’s not a big job to put them in again. Look at the foot section of your sock and find your last gusset decrease stitch. Then, follow the line of stitches straight up until you reach the top your sock and slip a marker onto your needle. Your next marker will be 30 stitches around your knitting, but you can add that marker during your first toe round. (If you have cast on more or less than 60 stitches, your next marker will be at the half-way point of whatever number you cast on.) If your gusset line isn’t as straight as you think it should be, the alternative is to put your sock on and put safety pins each side where think the markers should go, then follow the instructions as above to make sure there are an even number of stitches between the markers.

Create the toes as follows:
Round 1: K1, SSK, K24 sts, K2tog, K1, place marker, K1, SSK, K24 sts, K2tog, K1.
Round 2: Knit one round, slipping markers as you come to them.
Round 3: K1, SSK, K to 3 sts before marker, K2tog, K1, slip marker, K1, SSK, K to 3 sts before marker, K2tog, K1.
Repeat rounds 2 and 3 until you have 28 stitches left and divide these between two needles so that the front and back of the socks match. You can leave more or less stitches on your needle if you prefer, as long as you have an even number for grafting, but do make sure that you try your sock on before making this decision. If you need a reminder of how to do the SSK and K2tog stitches, you can find pictures on the heel tutorial.
If you cast on more or less than 60 stitches, you will need to adjust the number of stitches you are knitting between your decreases. As long as you decrease and K1 at each end, it doesn’t matter how many stitches you have between; just make sure you that you have the same number on both needles. You can try your sock on to make sure that it is comfortable and check that you want to decrease as far as 28 stitches – as long as your toes aren’t squashed you can stop at any point.
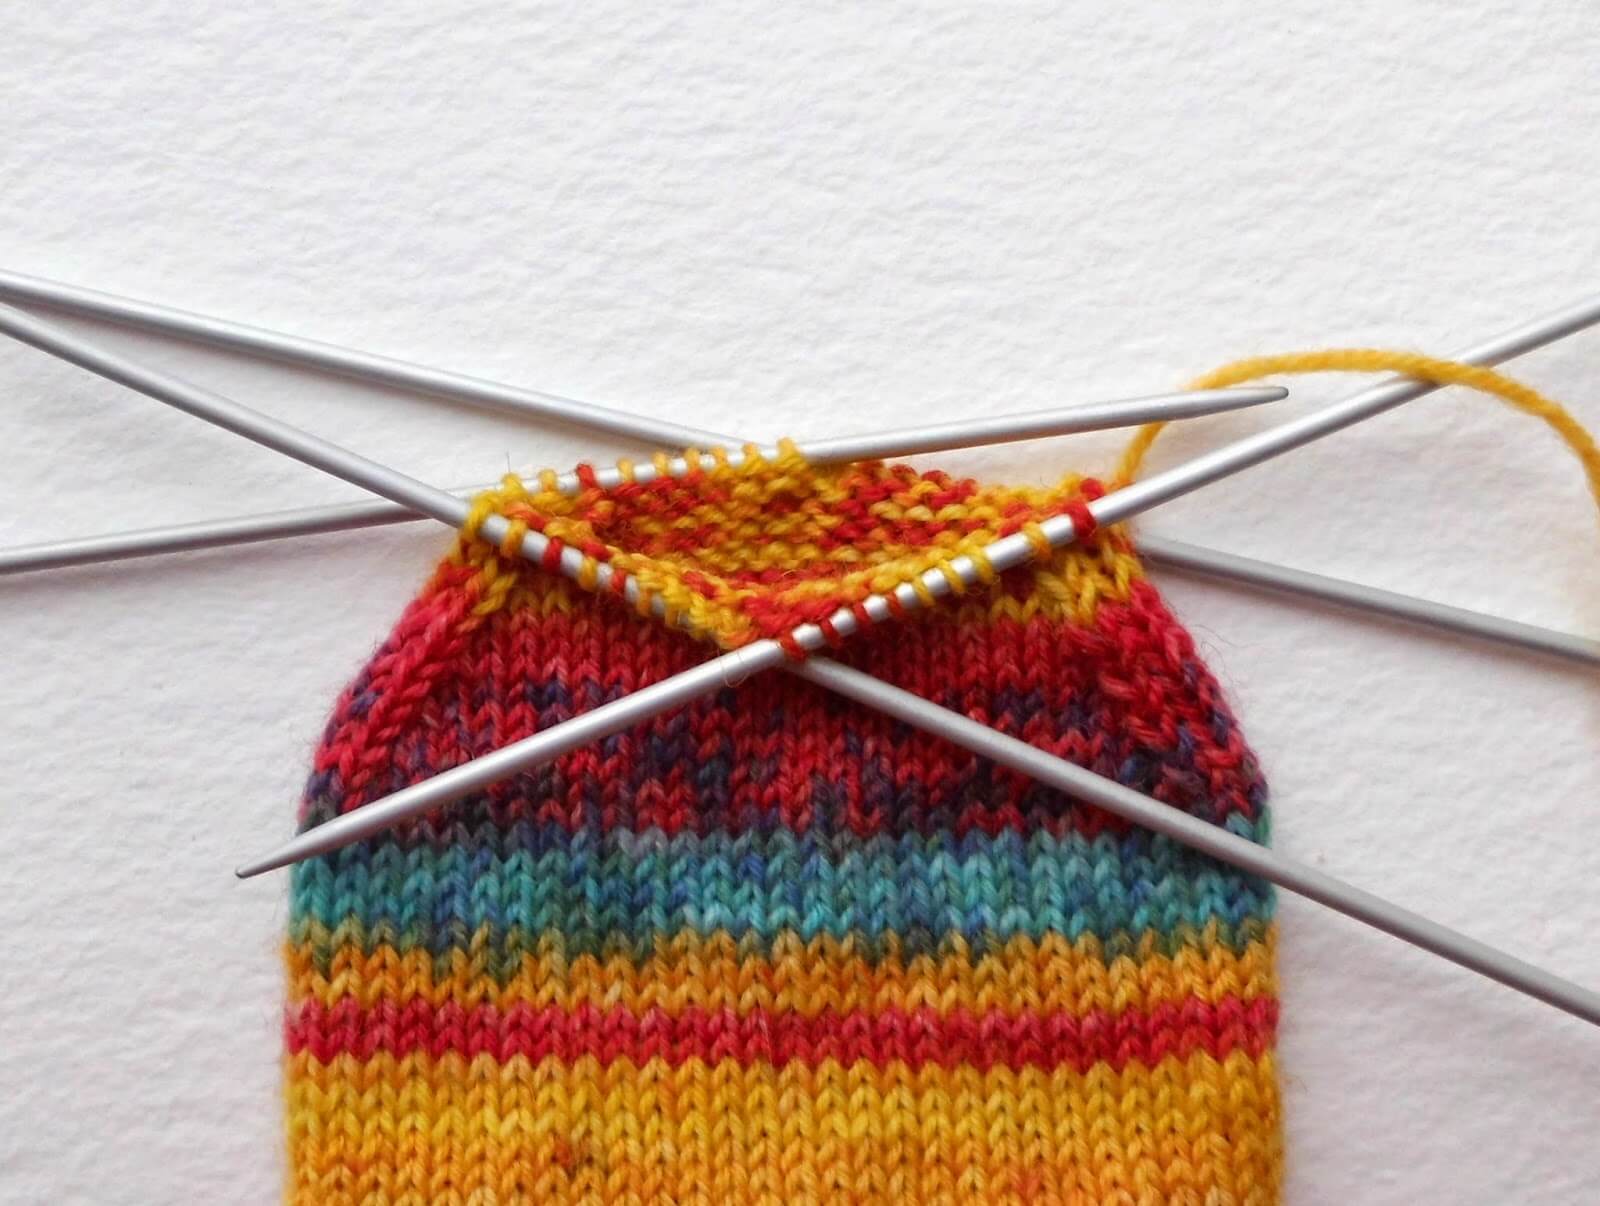
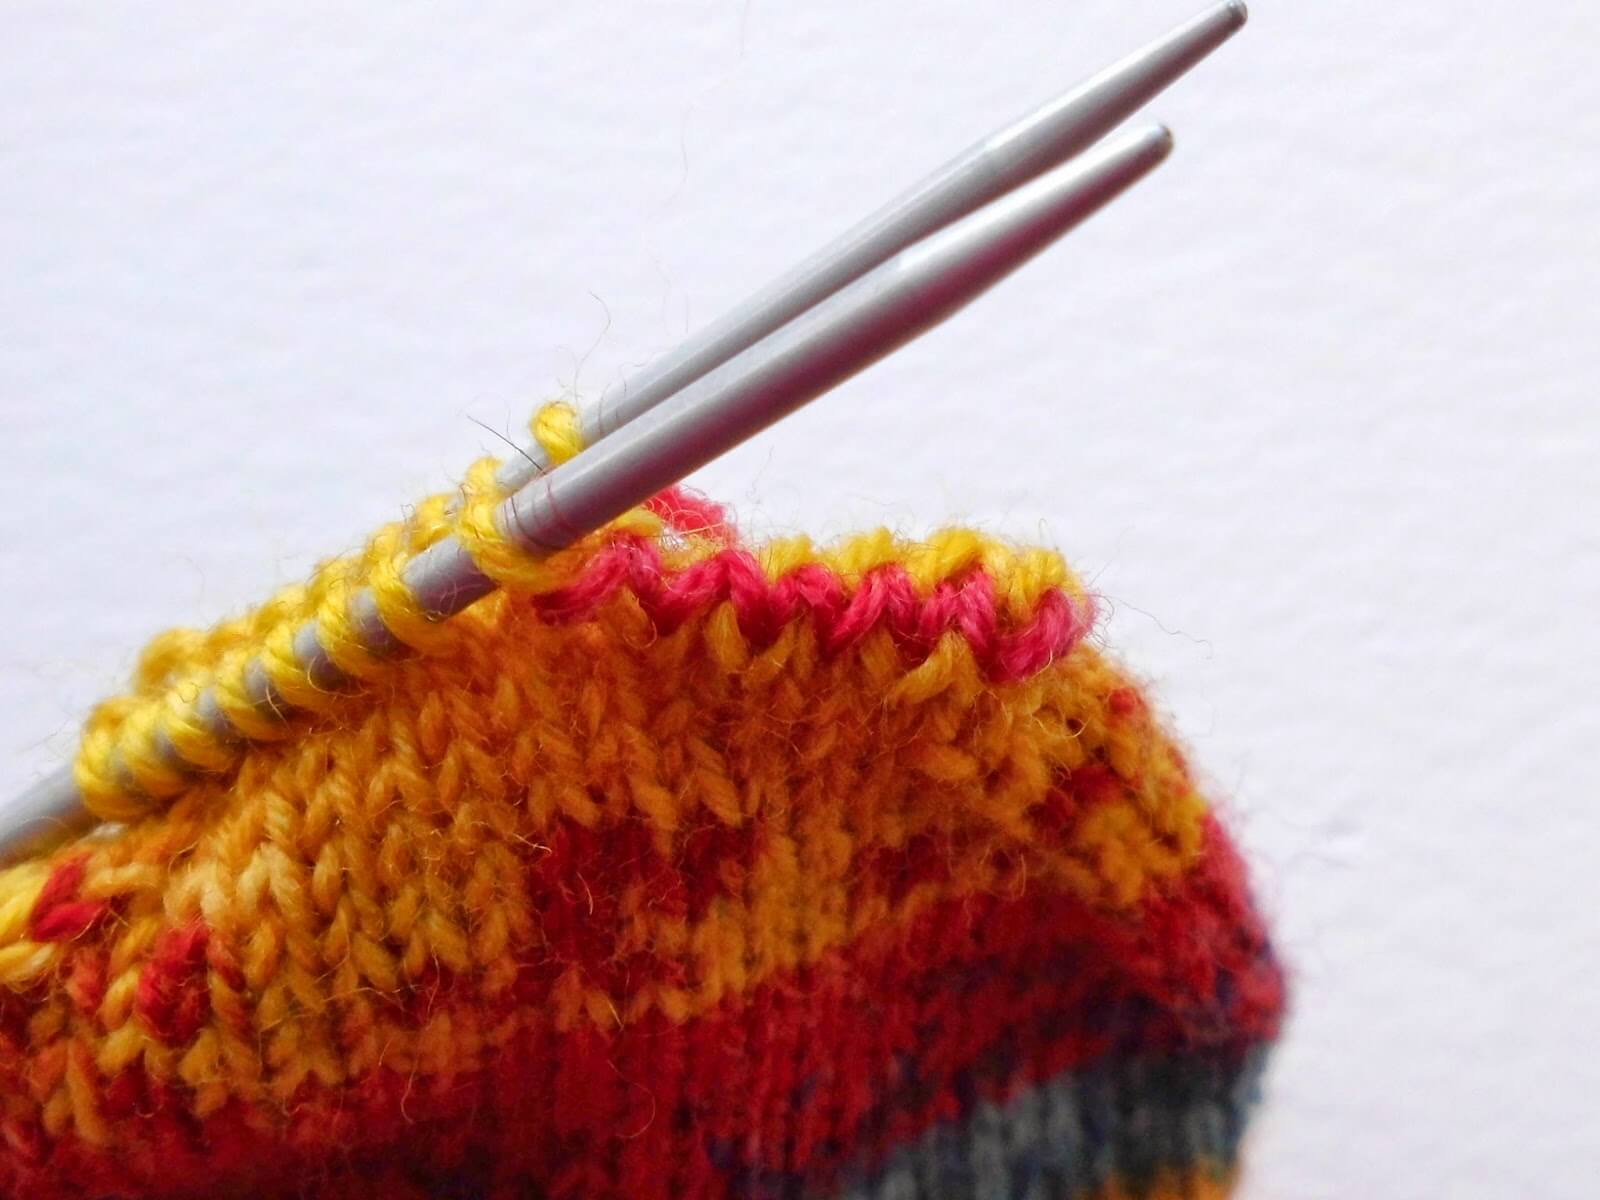
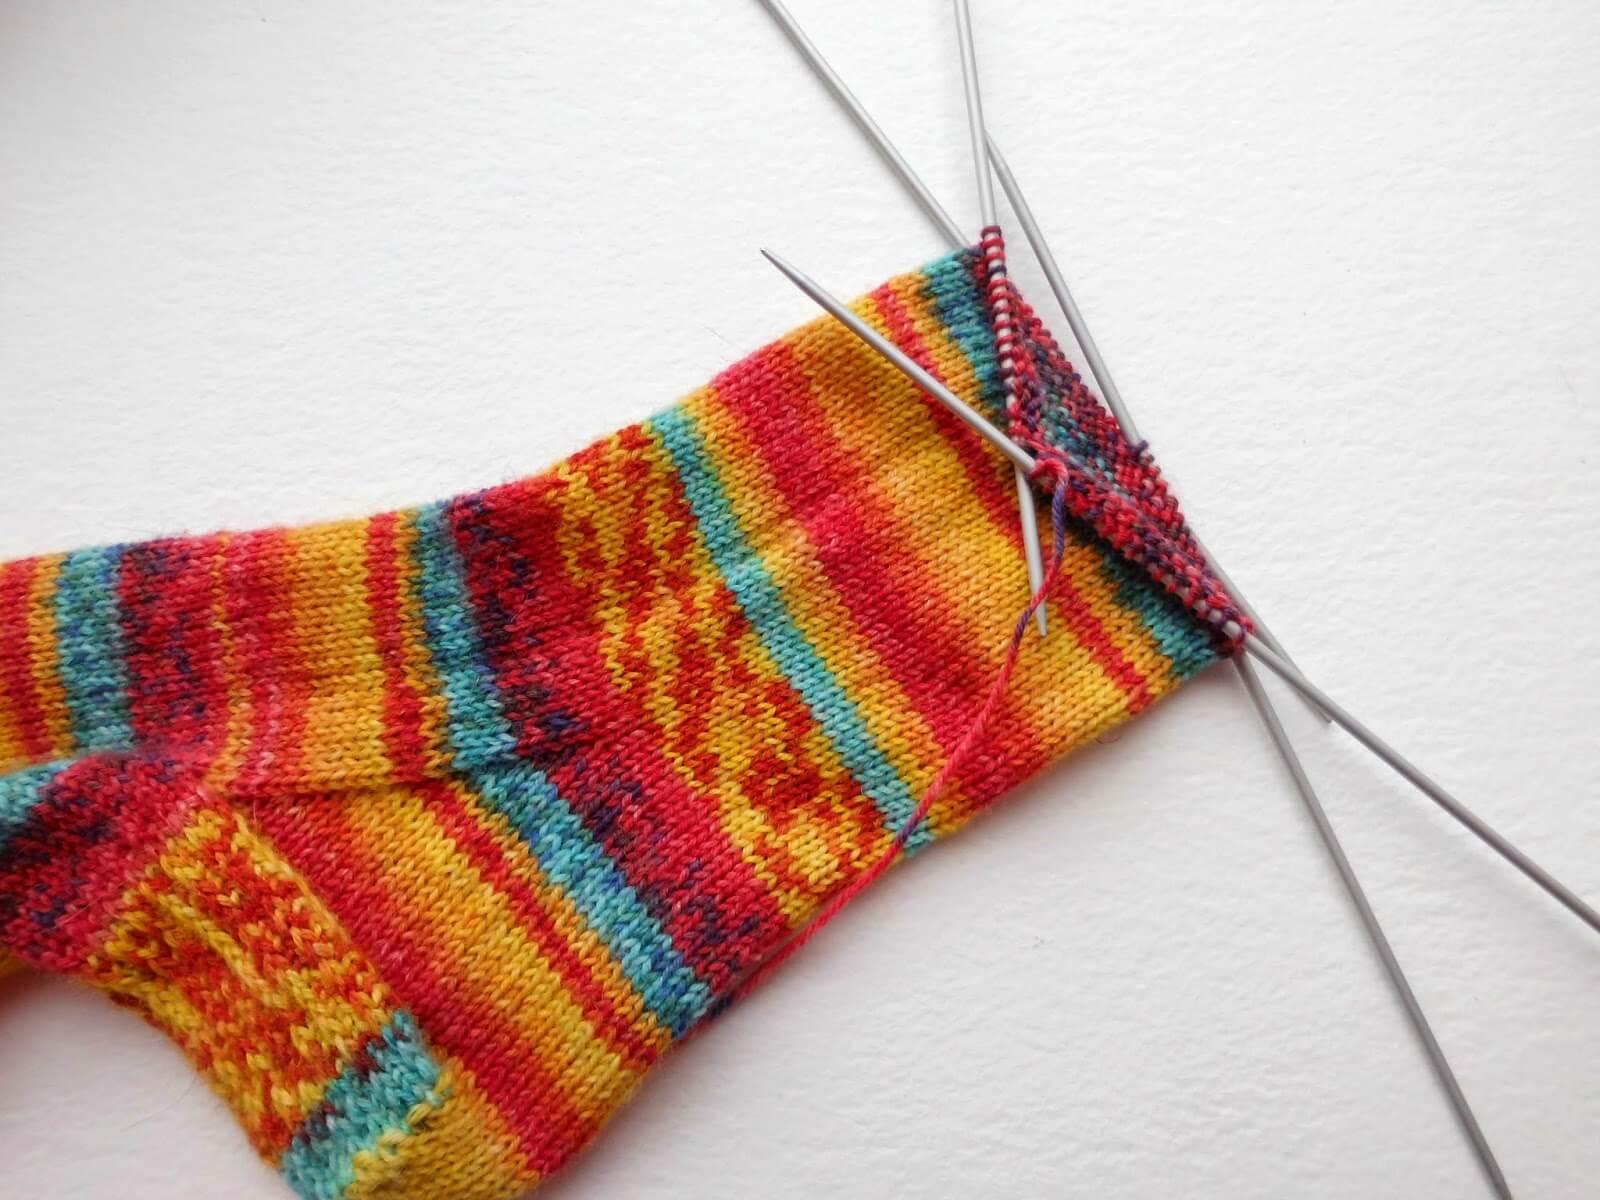
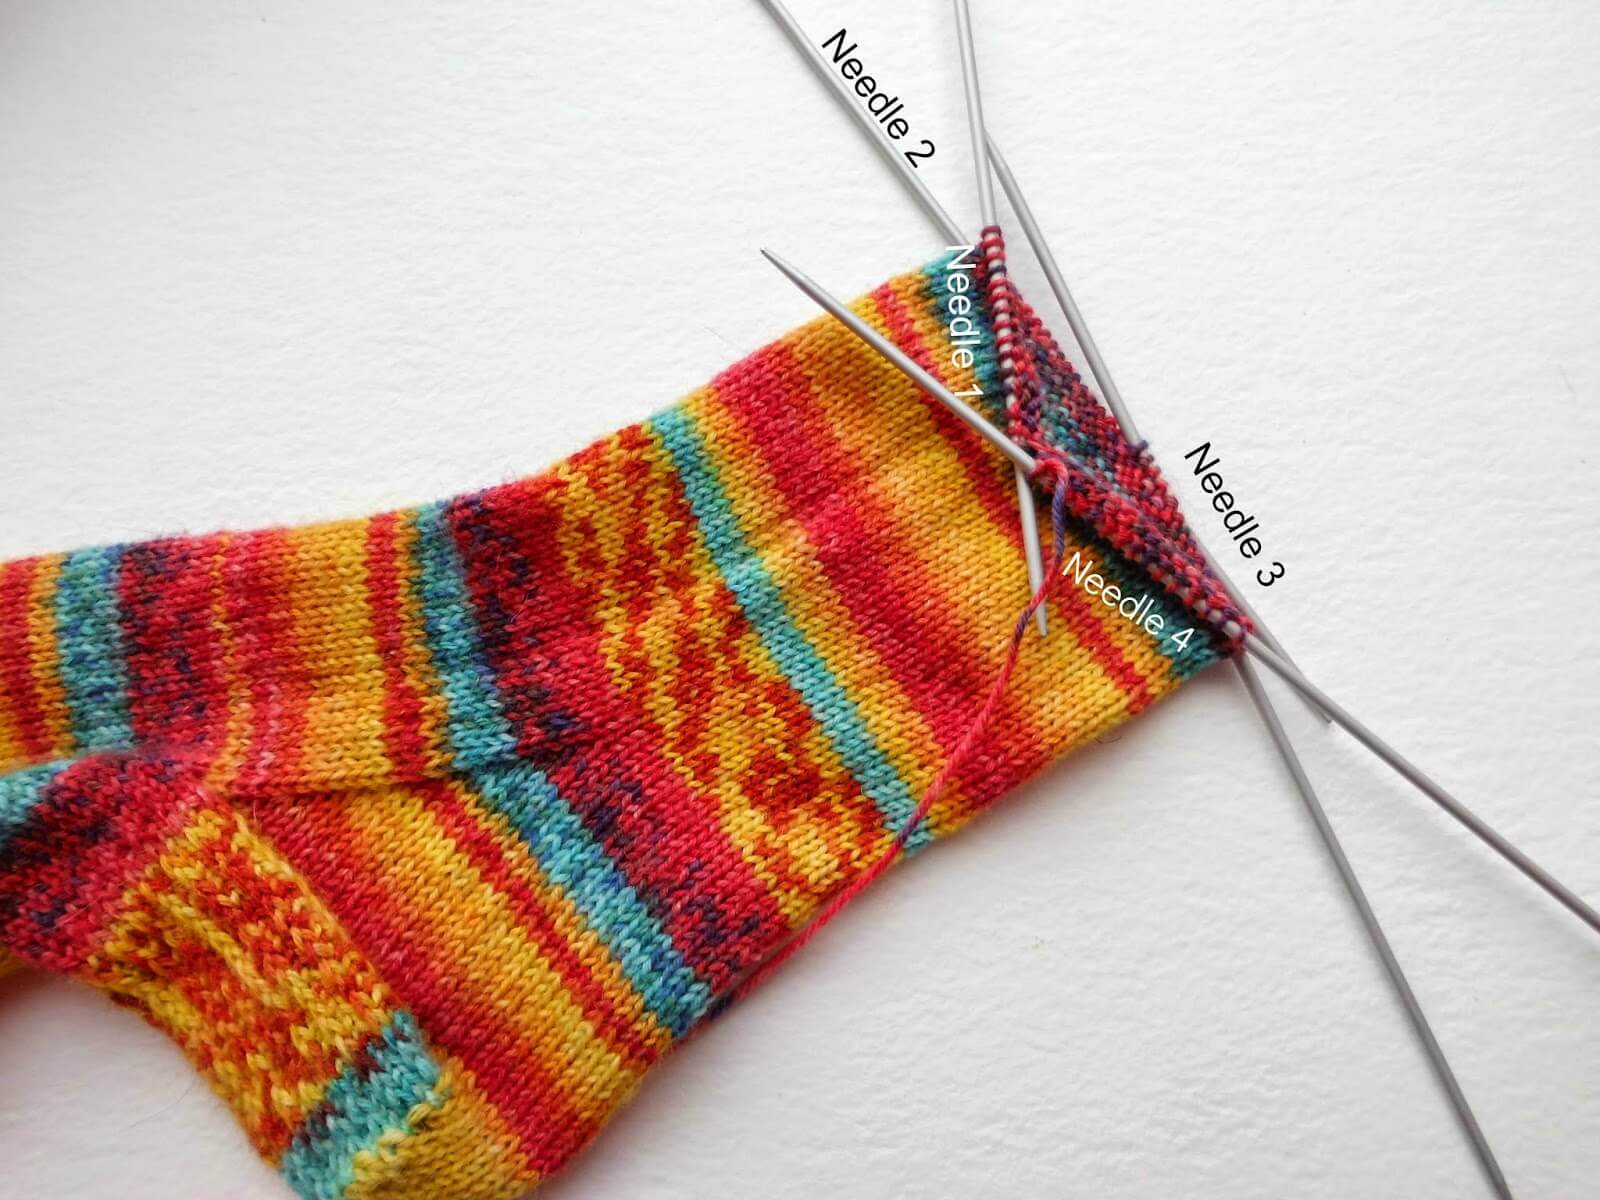
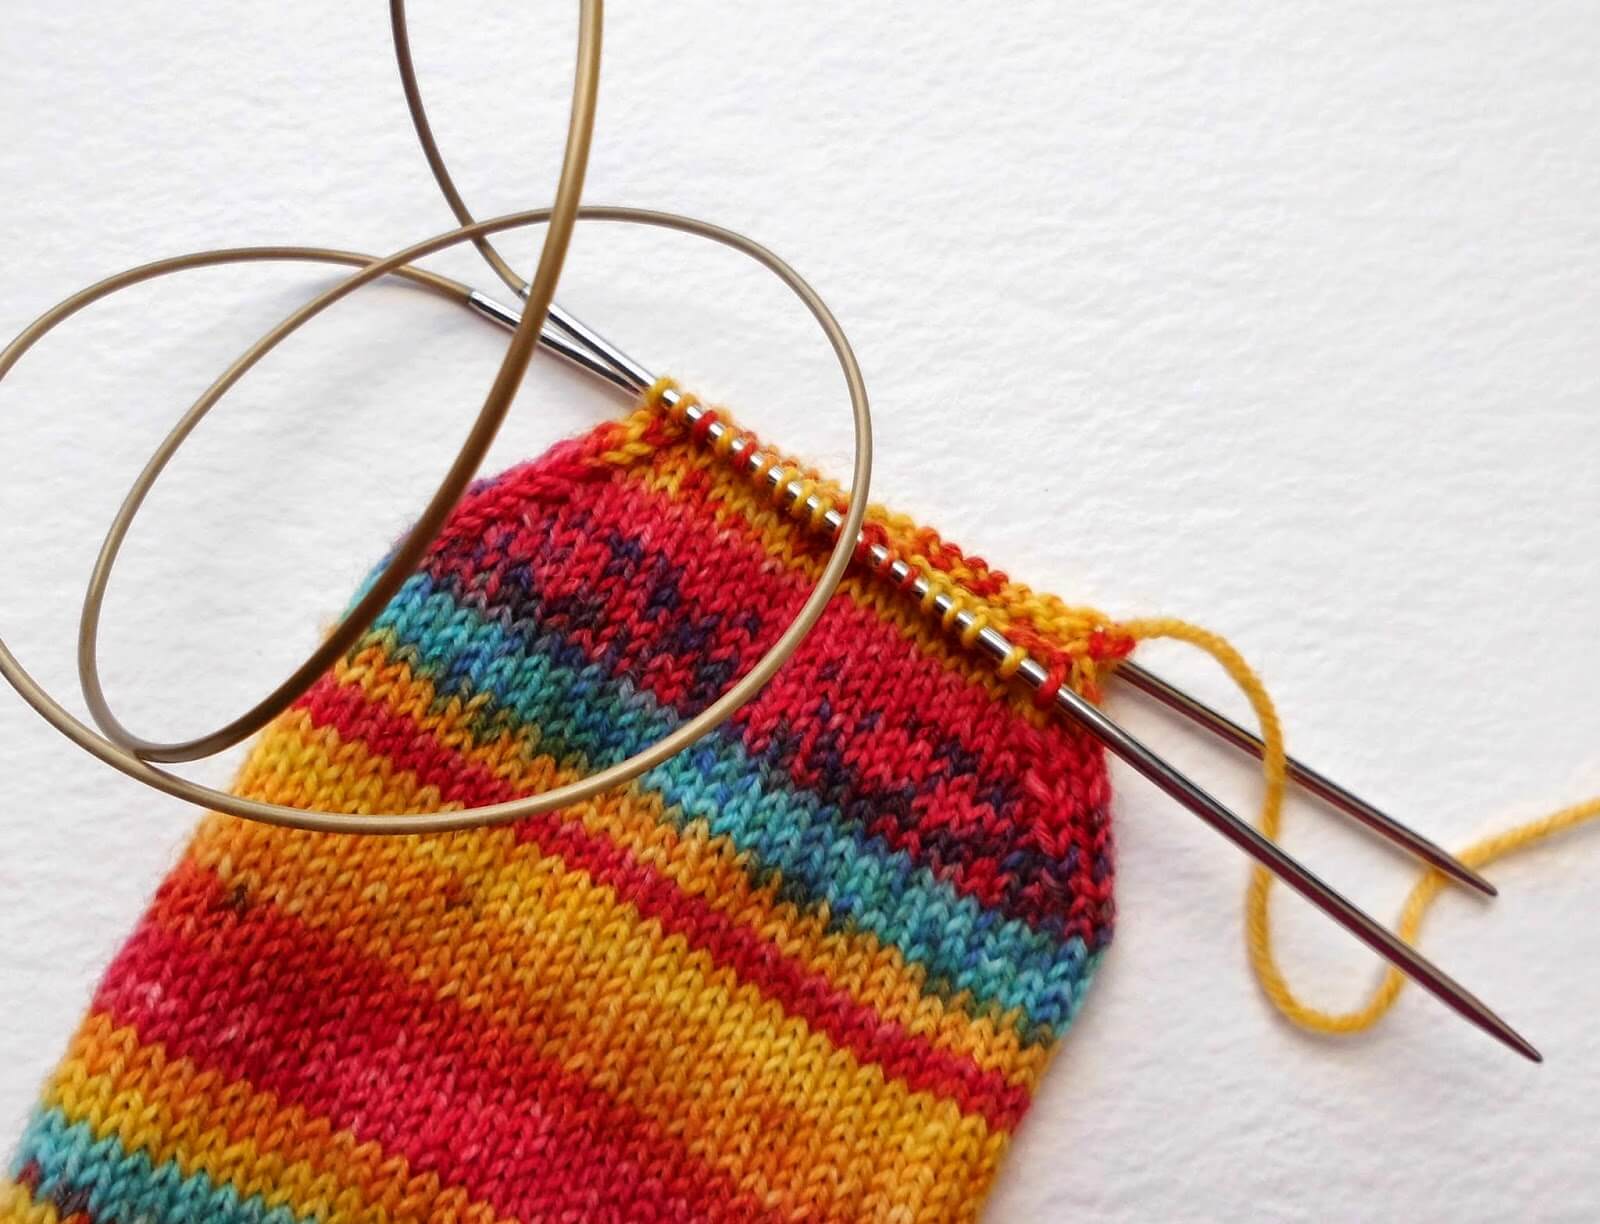
Unless you are using one of the tiniest circular needles, at some point whilst decreasing for the toes, if you are using a short circular you will need to change back to DPNs as the number of stitches becomes too small for the circular. You might find it easiest to do this at the start of a round, arranging your needles as in the picture, or alternatively you could use the magic loop method (see below).
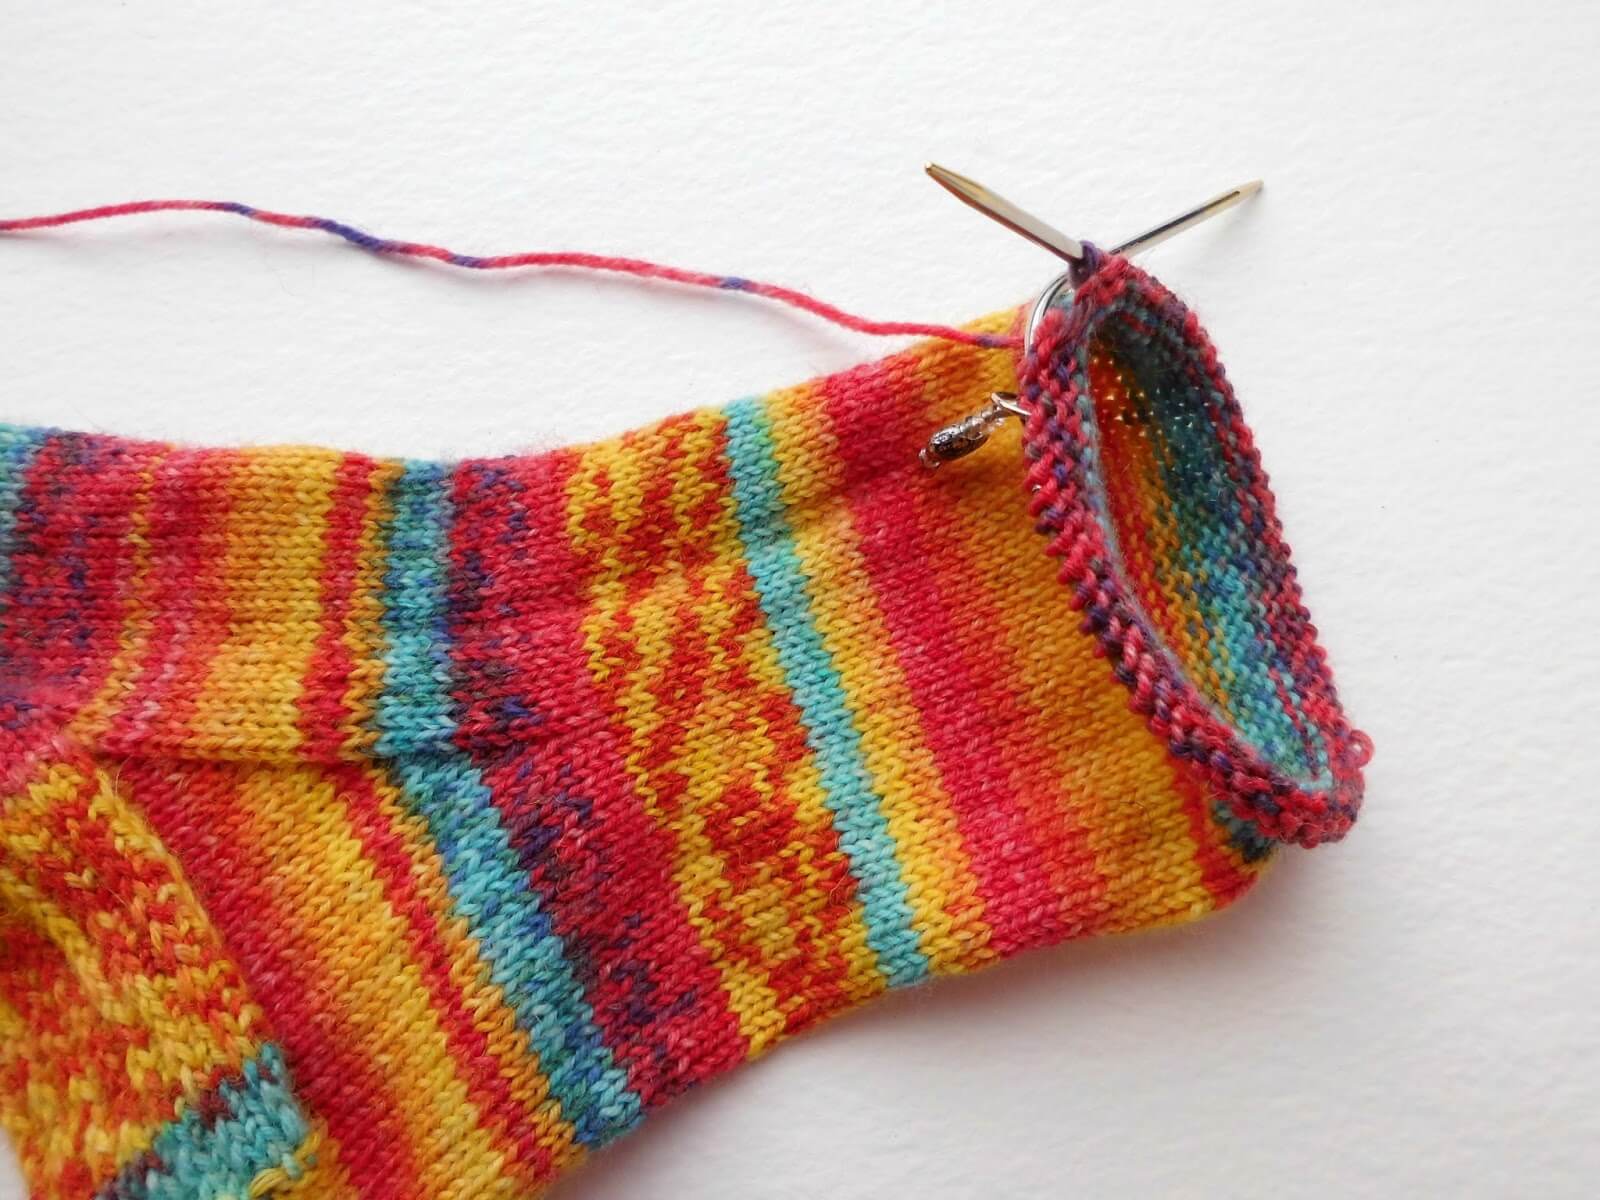
Now we’re going to graft the toes using Kitchener stitch. This is another part of the sock-creation that some people aren’t so keen on, but again, it’s not too bad if you take it slowly. The best thing about Kitchener stitch is that there is no seam across your toes – I’m like the Princess in the story of The Princess and the Pea and can feel the slightest bump in my socks so it’s always been very important to me that my socks are smooth! One thing that I would definitely recommend is that you find a time when you won’t be interrupted – you’ll need to concentrate and trying to pick it up again mid-row after a break is not easy.
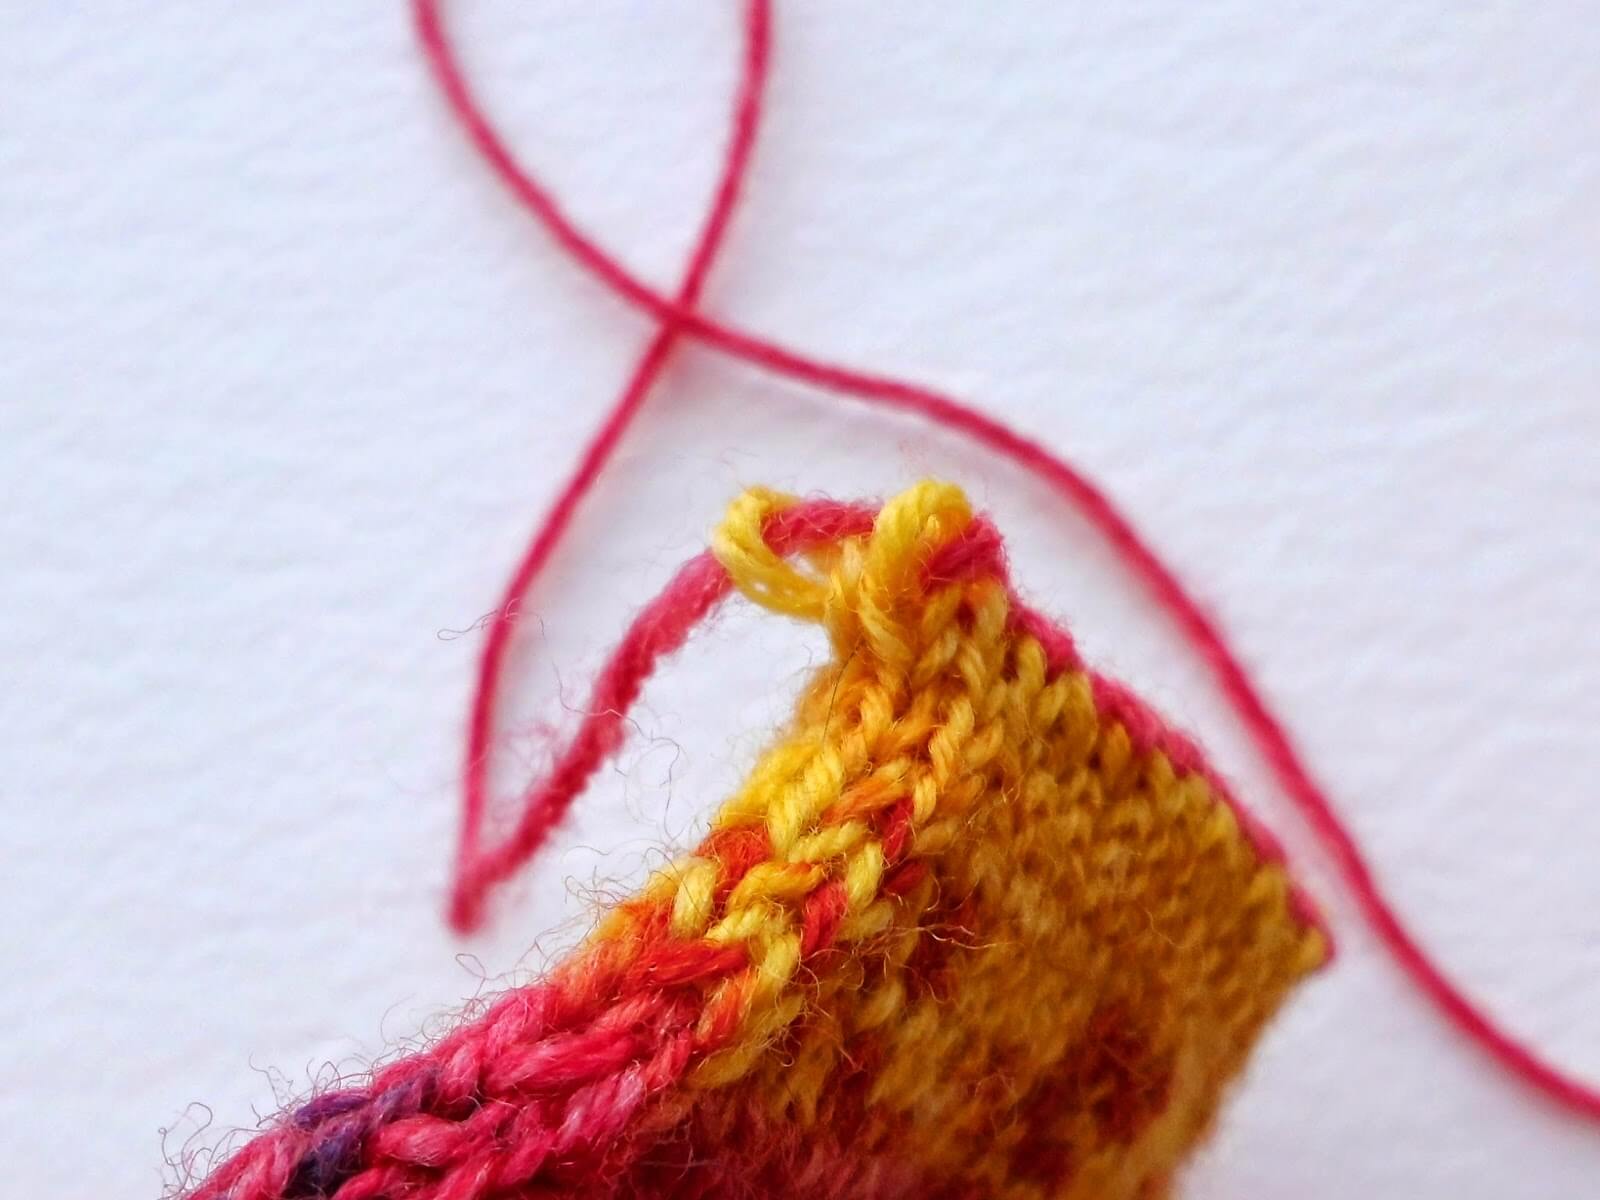
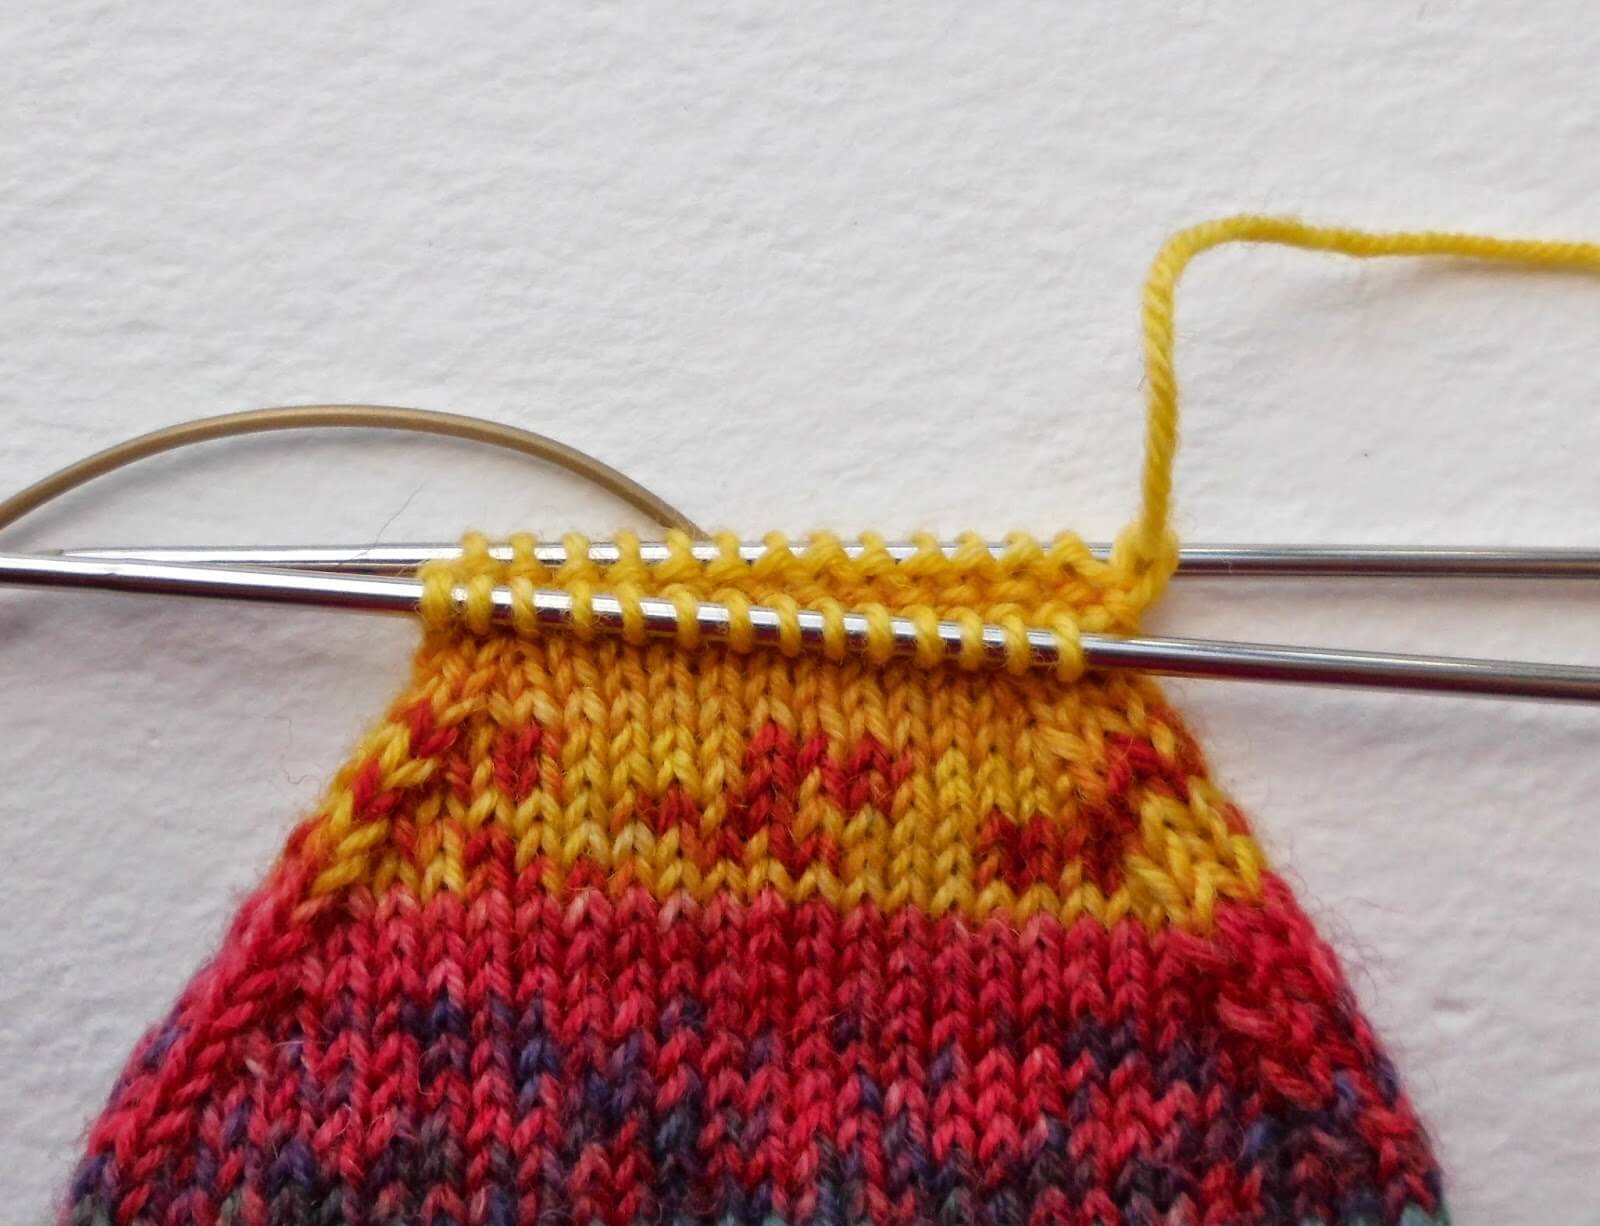
Start by leaving a long tail from the end of your knitting, then cut the yarn and thread the end onto a wool needle. I’m giving you right-handed instructions here, and I have used a different coloured yarn so that you can easily see how the Kitchener stitch works, but you will just keep using the yarn from your ball.
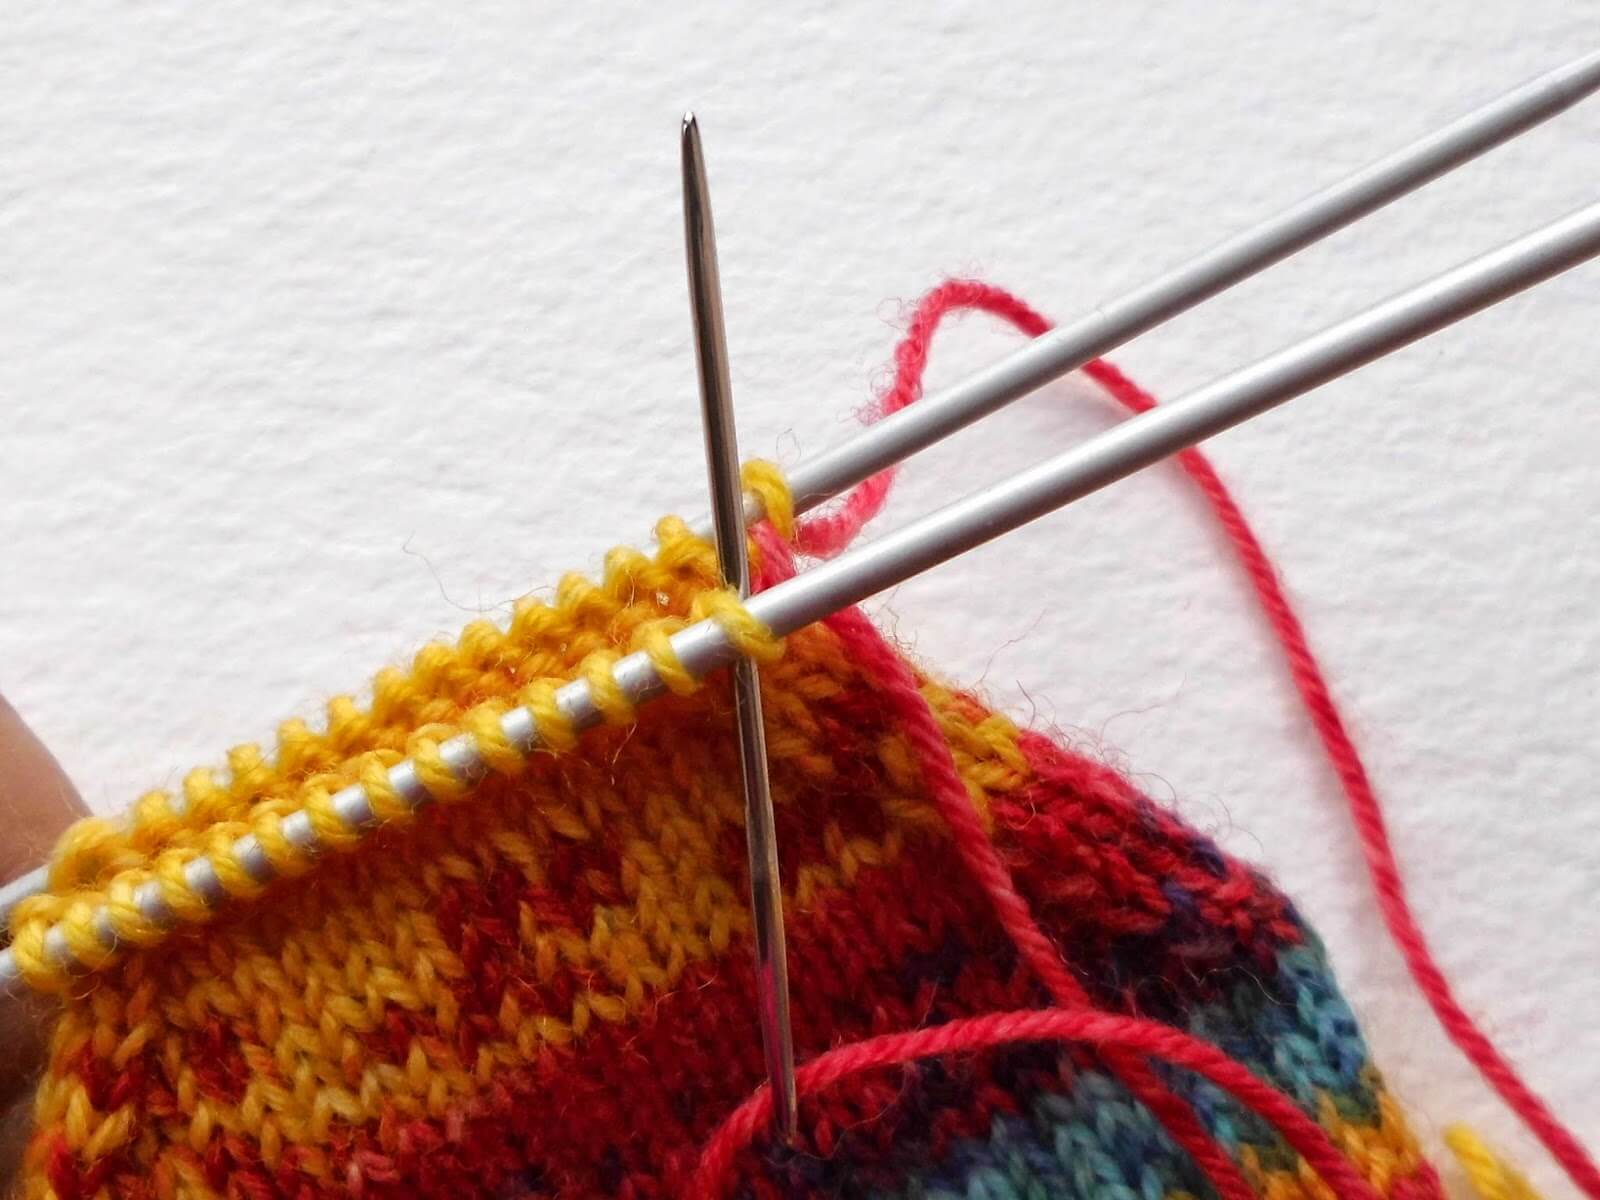
** The first two stitches are set up stitches and for some people, produce an “ear” on their sock. If you would prefer not to do the set up stitches, start at step 3 instead. **
1 Hold the two DPNs with your left hand. Insert the wool needle purl-wise into the first stitch on the front DPN and pull the yarn through. Don’t take the stitch off the DPN.

2 Next, insert the wool needle knit-wise into the first stitch on the back DPN. Don’t take the stitch off.
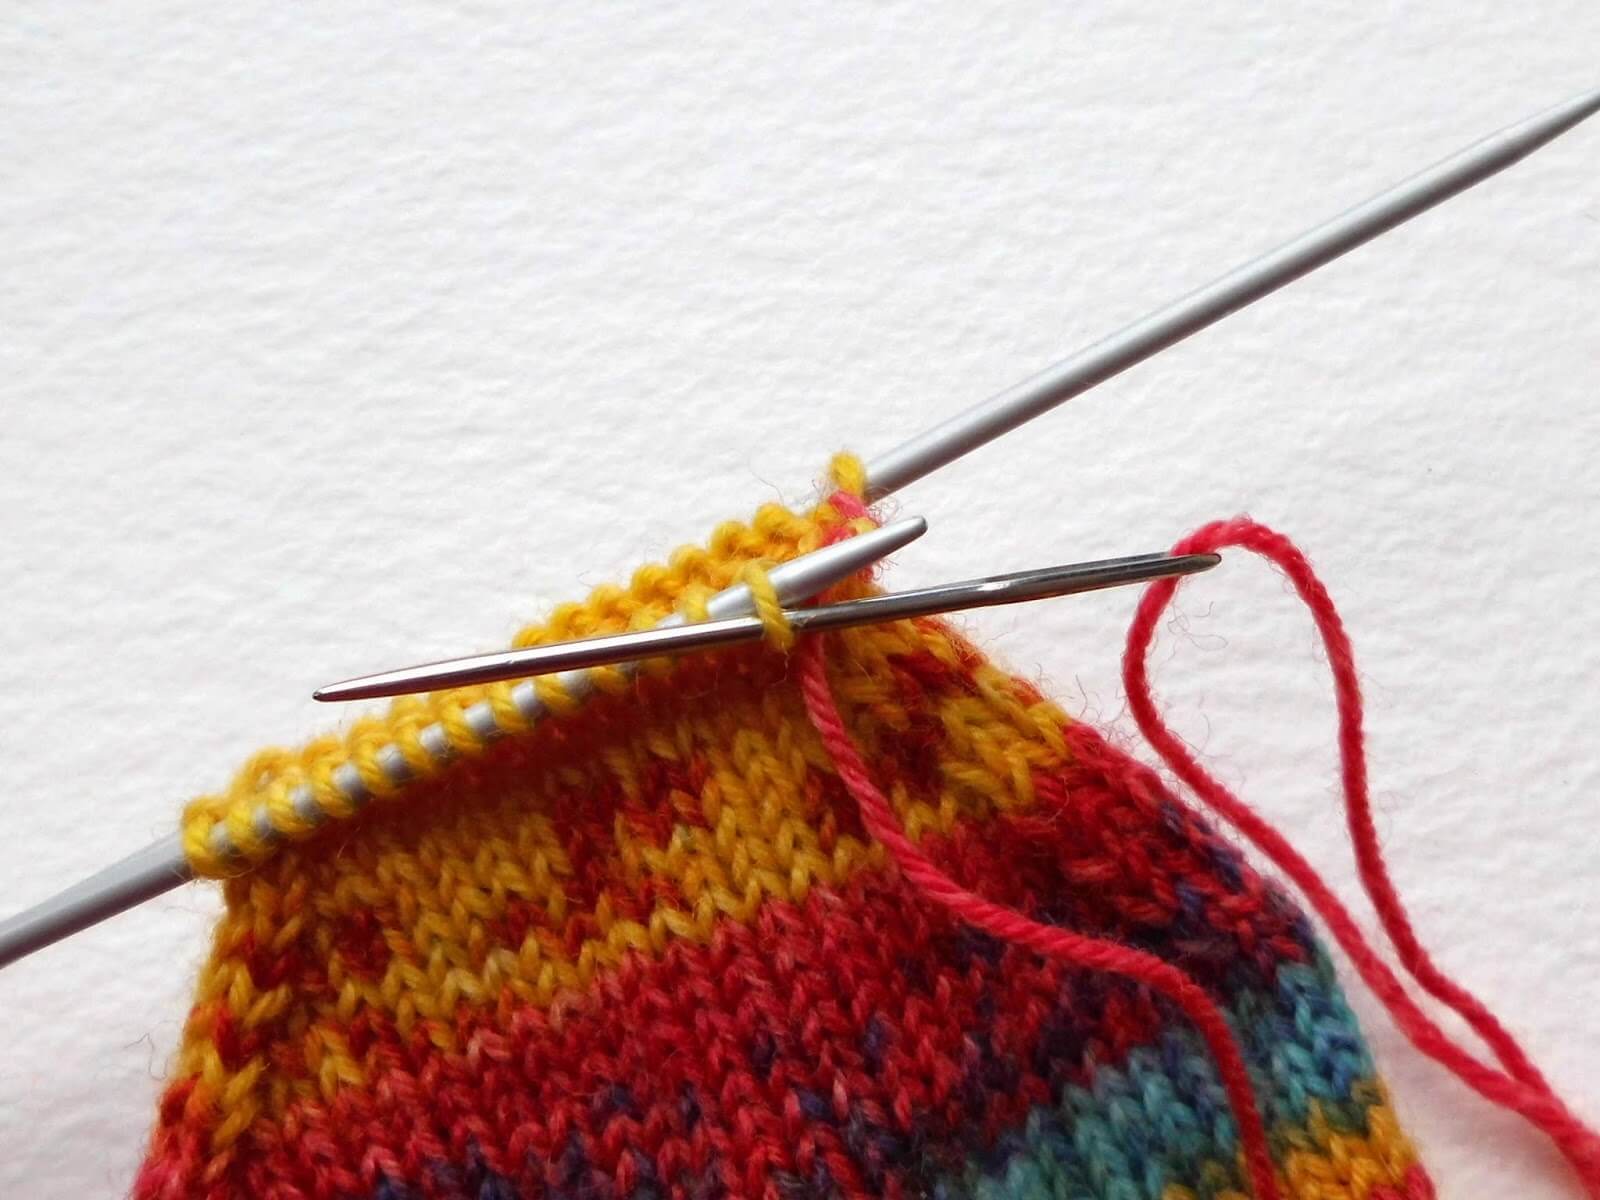
3 Insert the wool needle knit-wise into the first stitch on the front DPN and slip it off.
4 Insert the wool needle purl-wise into the second stitch on the front DPN and don’t slip it off.
5 Insert the wool needle purl-wise into the first stitch on the back DPN and slip it off.
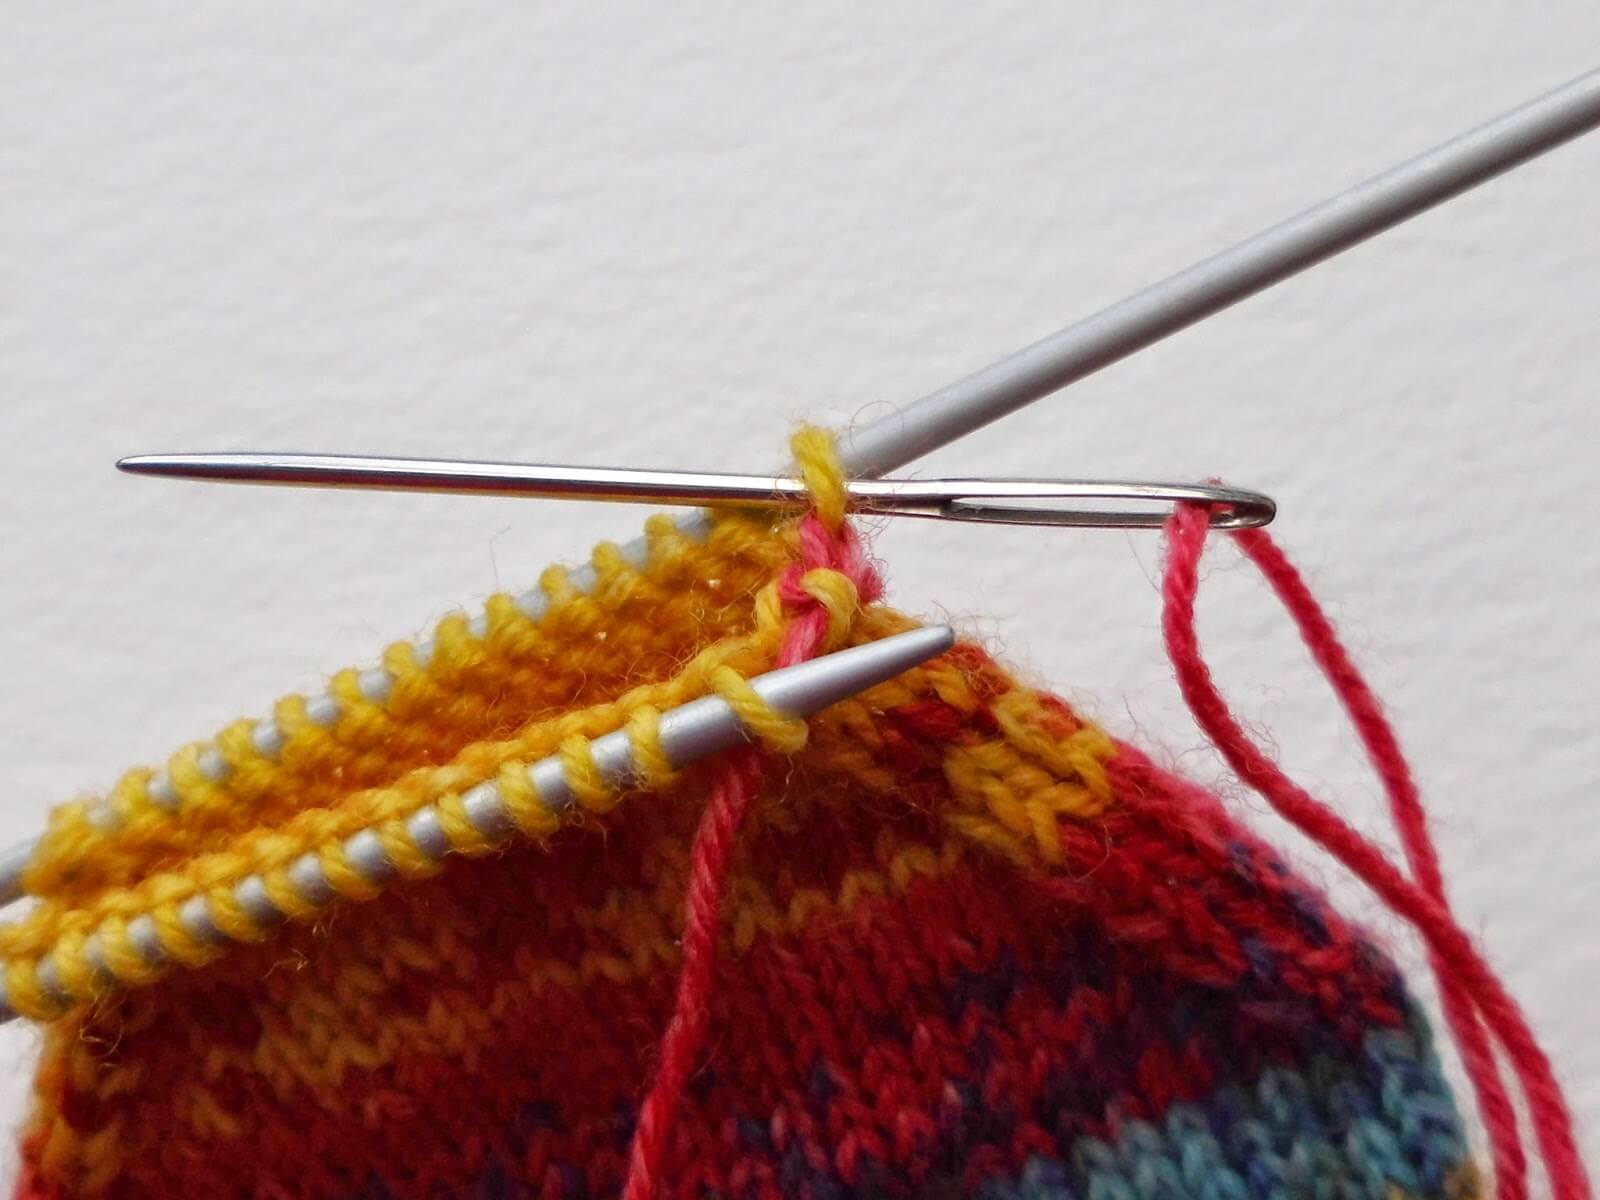
6 Insert the wool needle knit-wise into the second stitch on the back DPN and don’t slip it off.
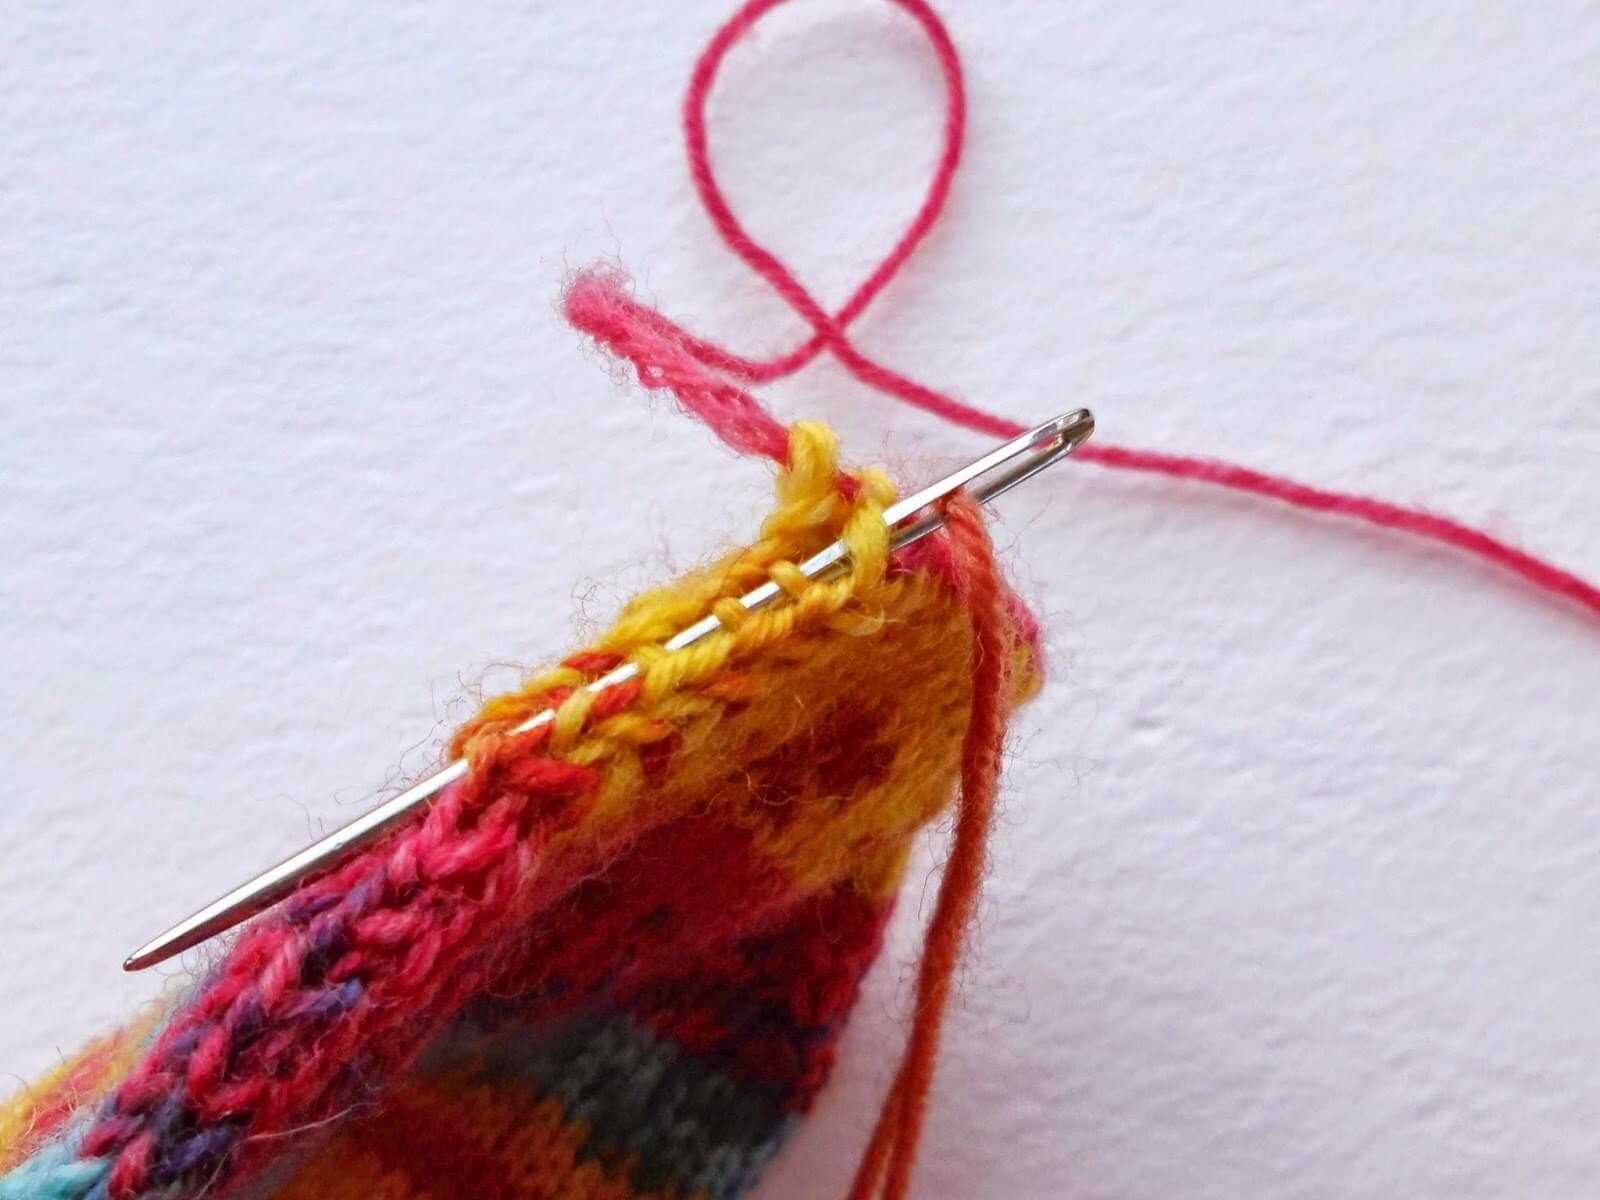
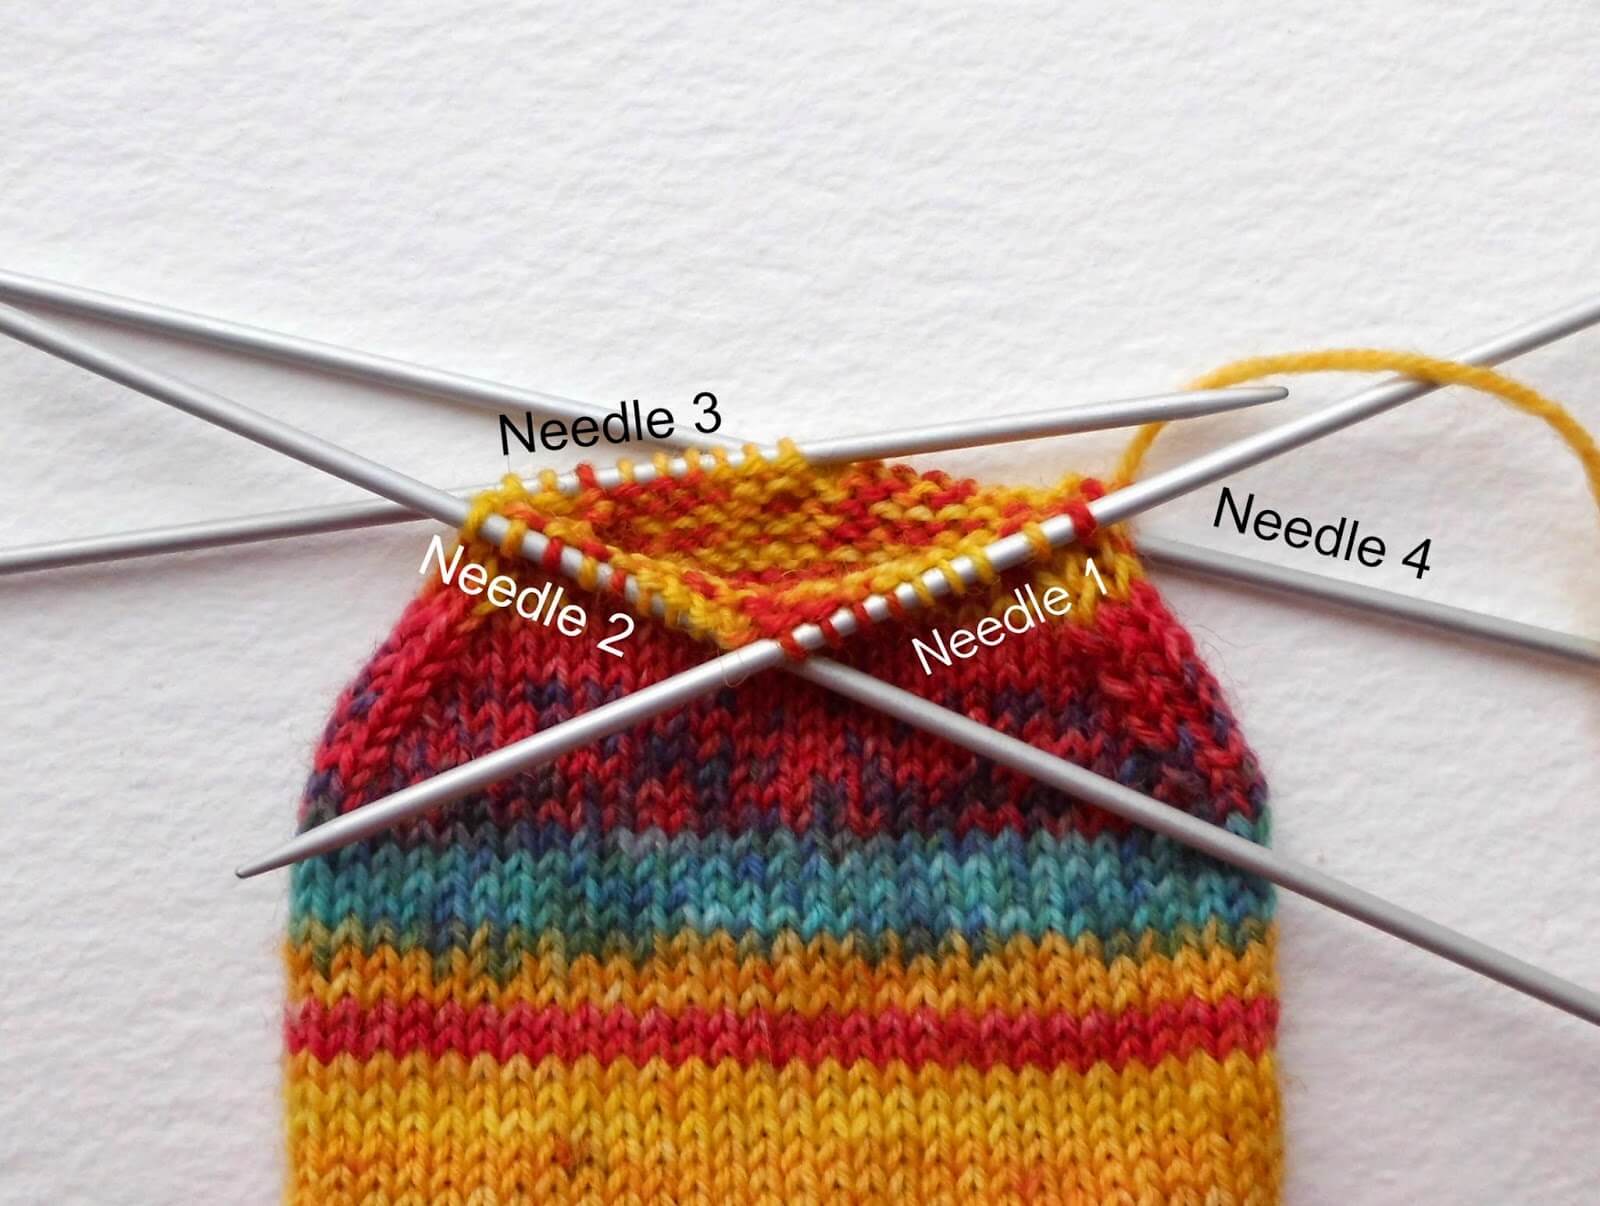
You can see how this process creates a new row of stitches which bind the two edges of the sock together.
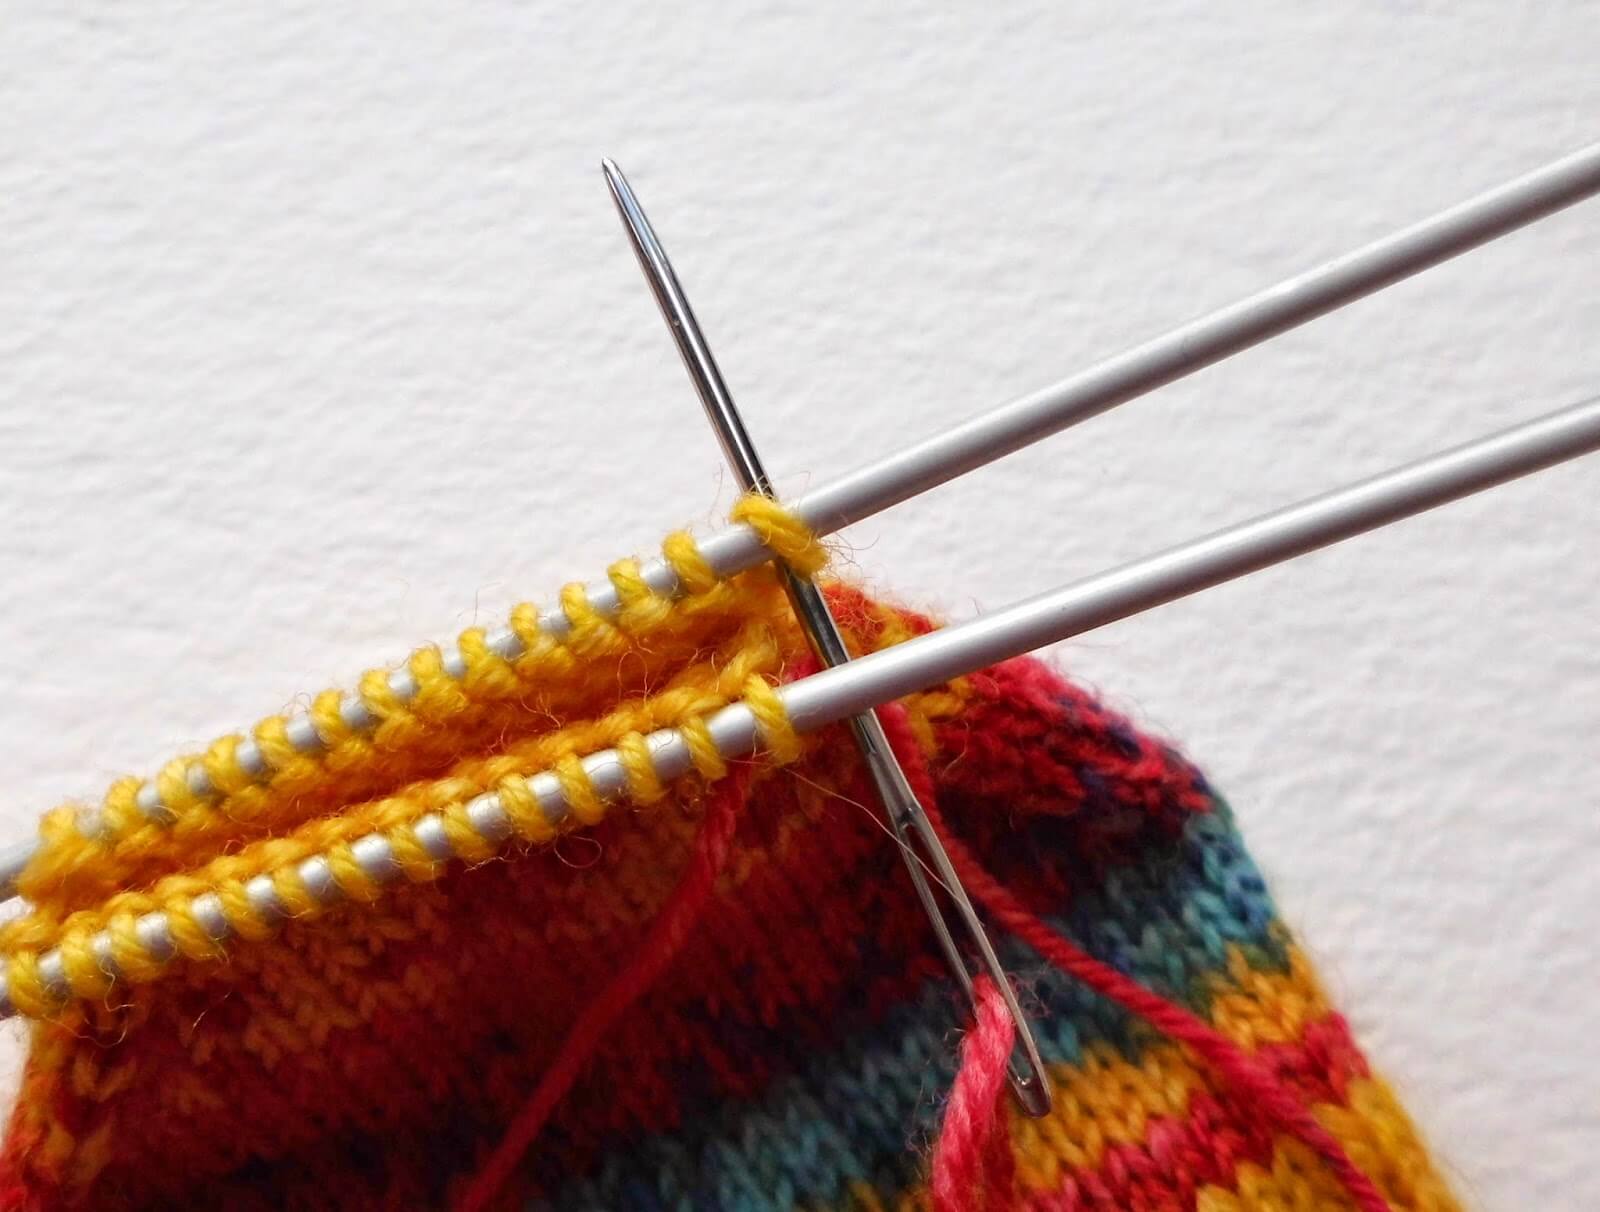
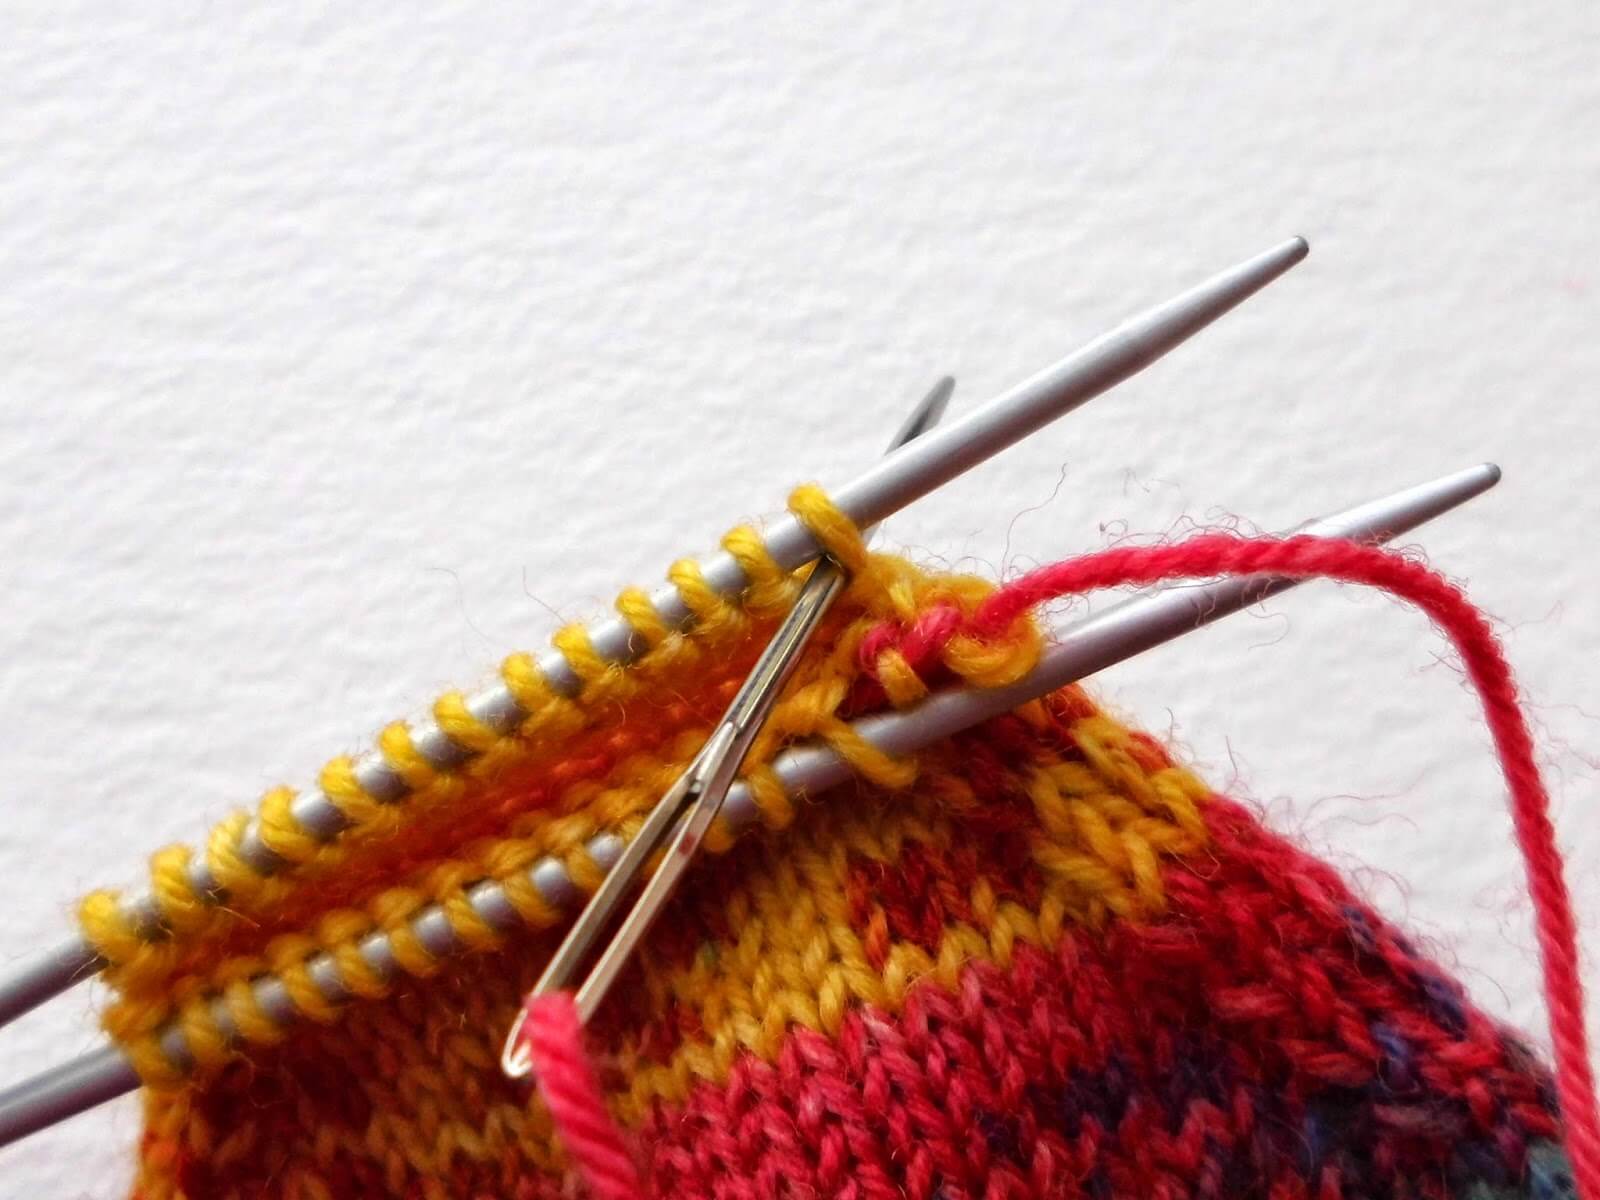
Repeat steps 3 to 6 until you get to the last two stitches on the DPNs. You will already have taken the yarn through the front stitch so after you have taken the yarn through the back stitch, you can slip both stitches off the DPN. The single yarn thread through the first stitch will be strong enough to hold it and it will sit flatter when you weave the end back into your sock.
Weave the end securely into the sock and cut the yarn.
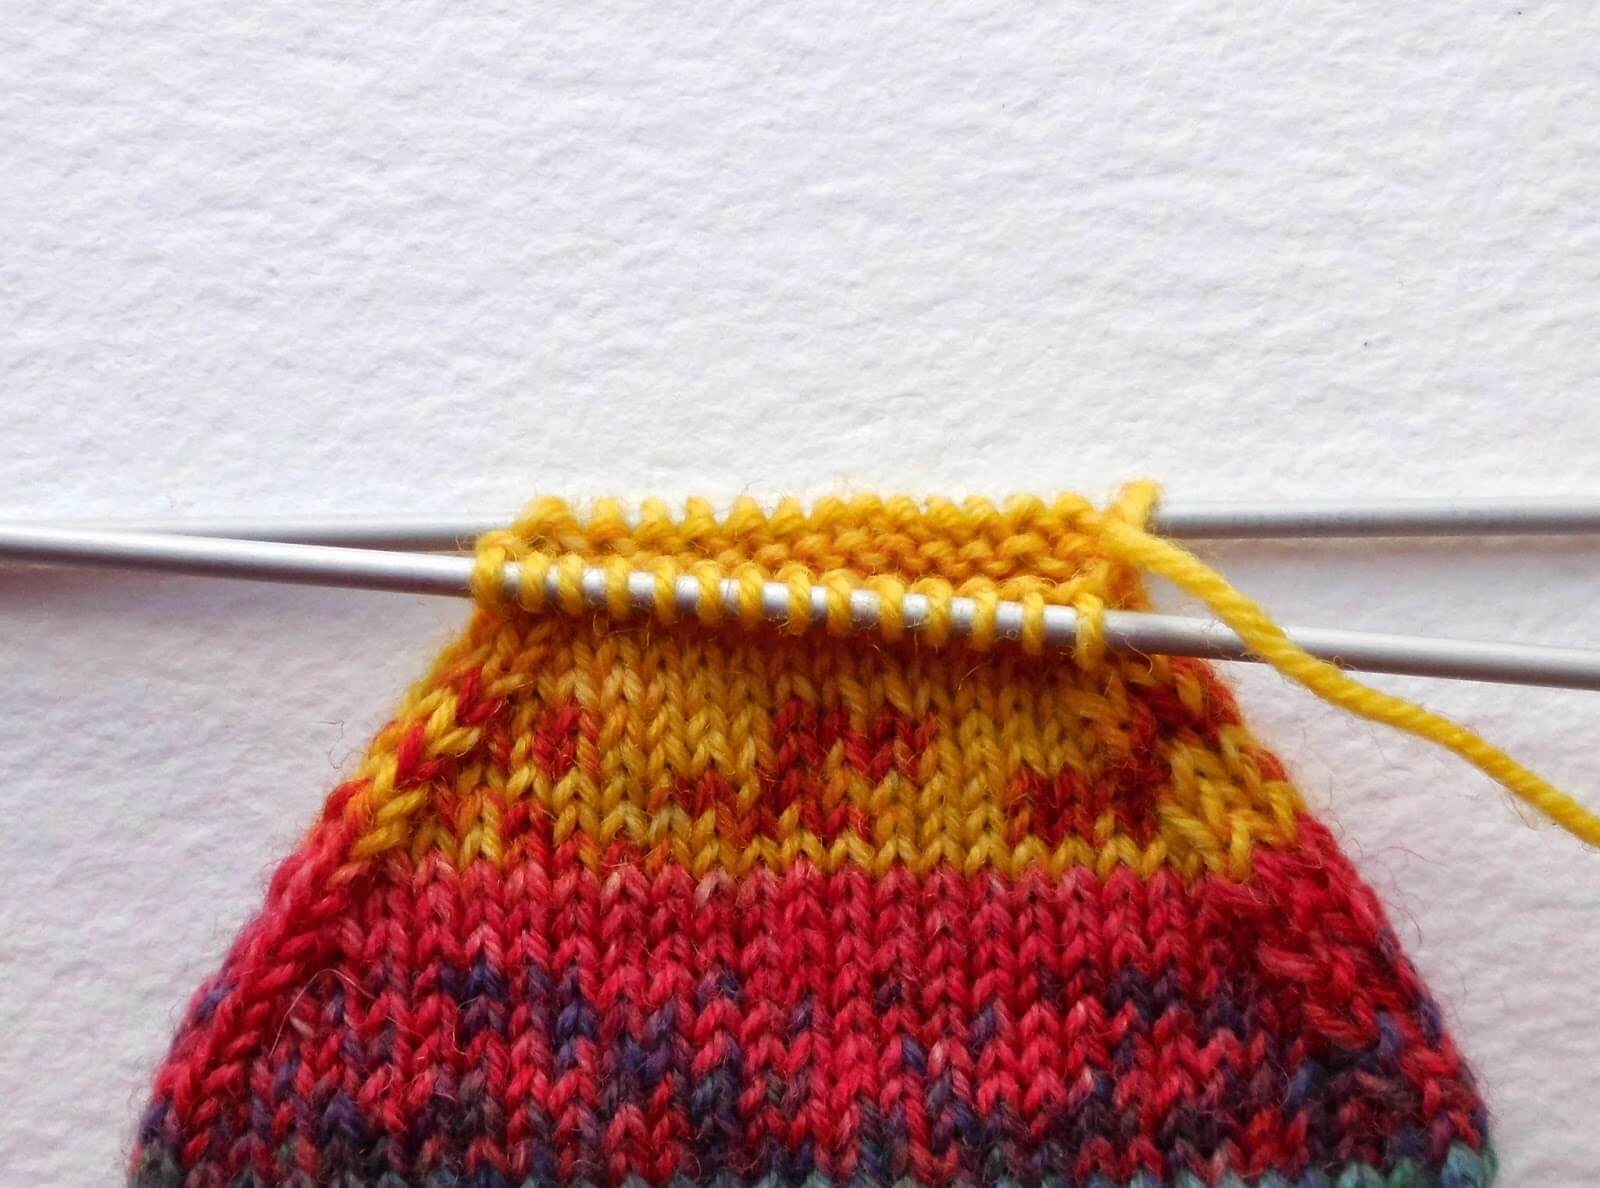
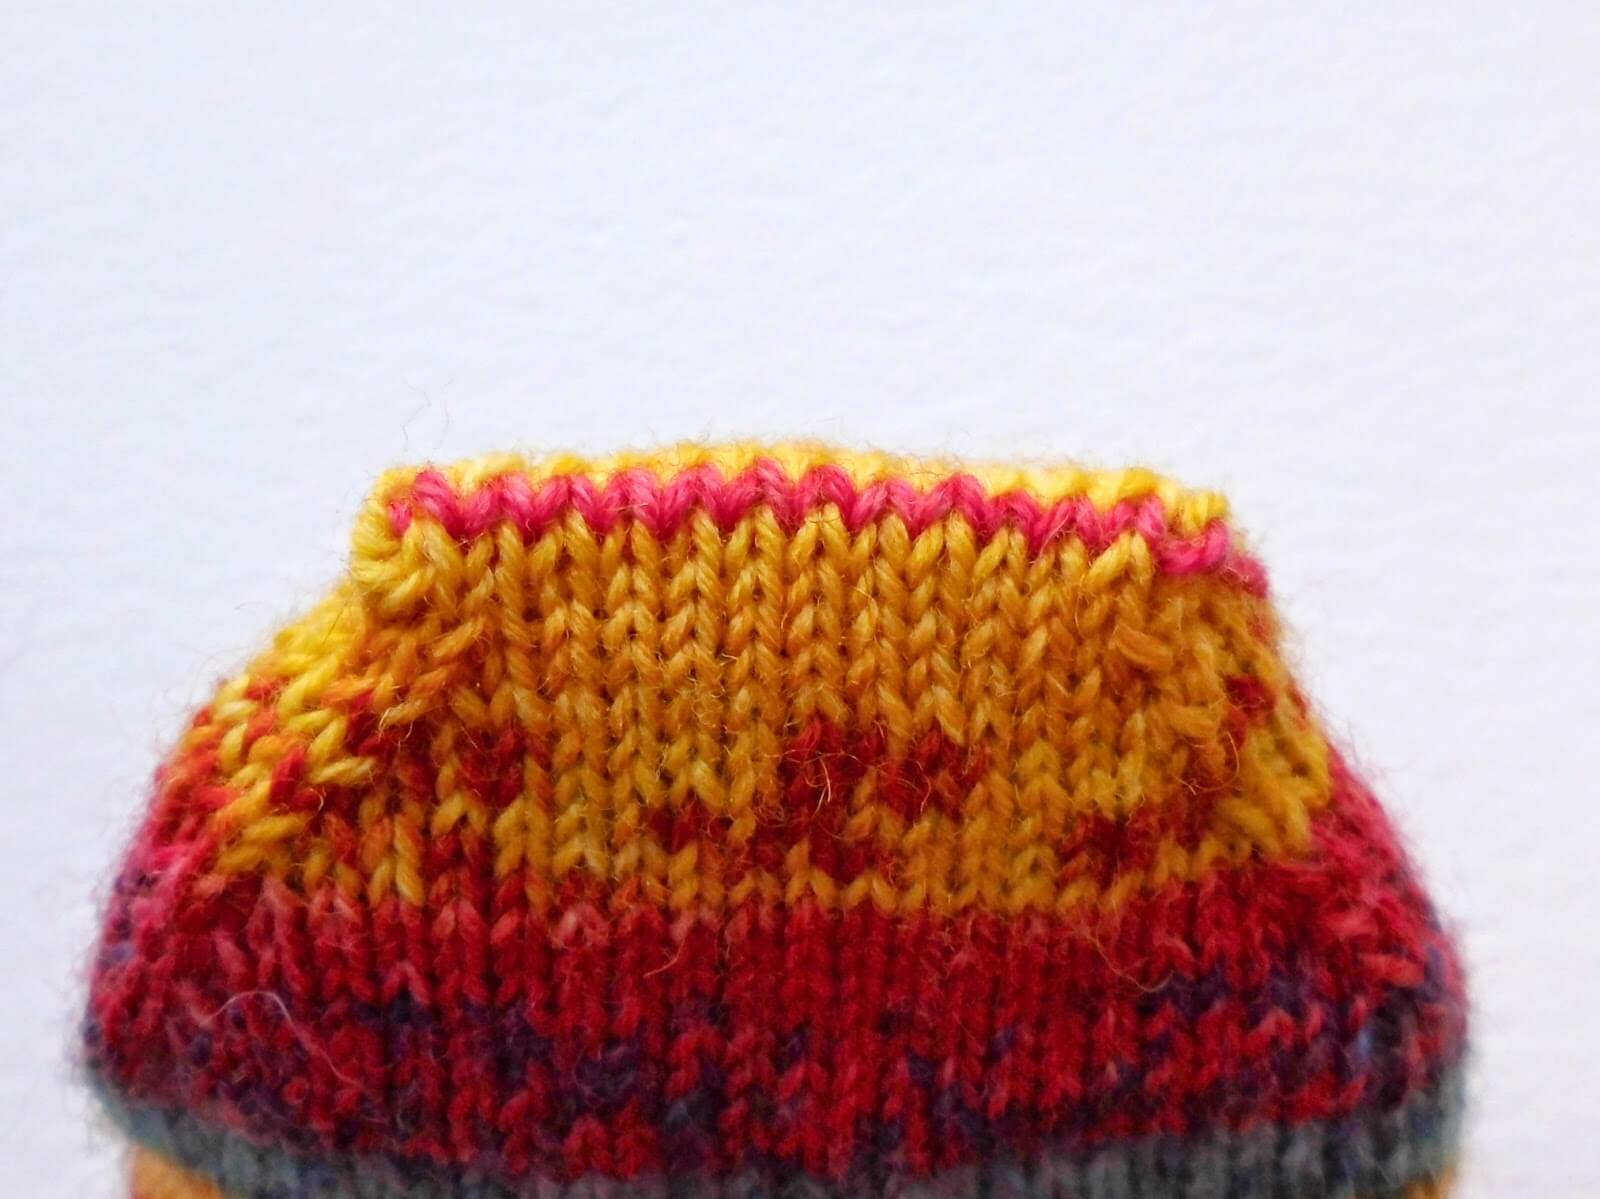
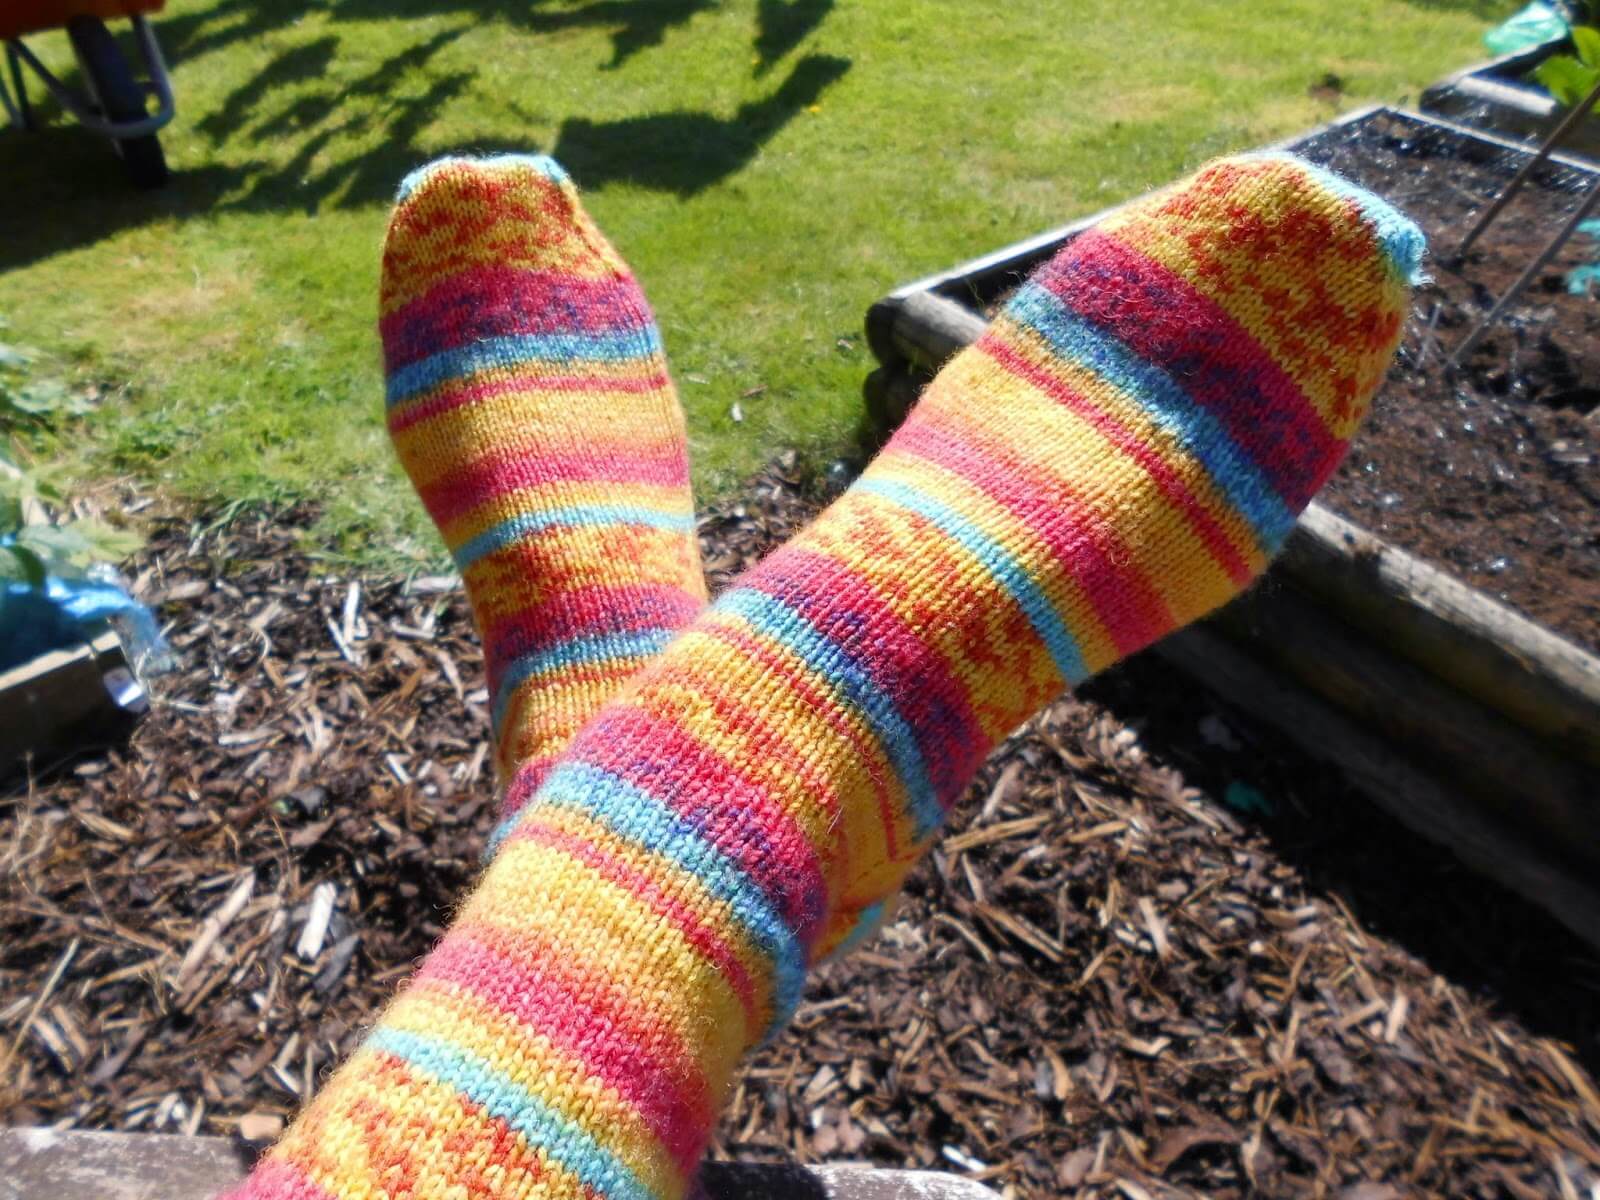
This is how the end of your sock should look once you have completed the grafting process. You can see that the end of the sock is neat and straight, and there is no seam to rub against your toes.
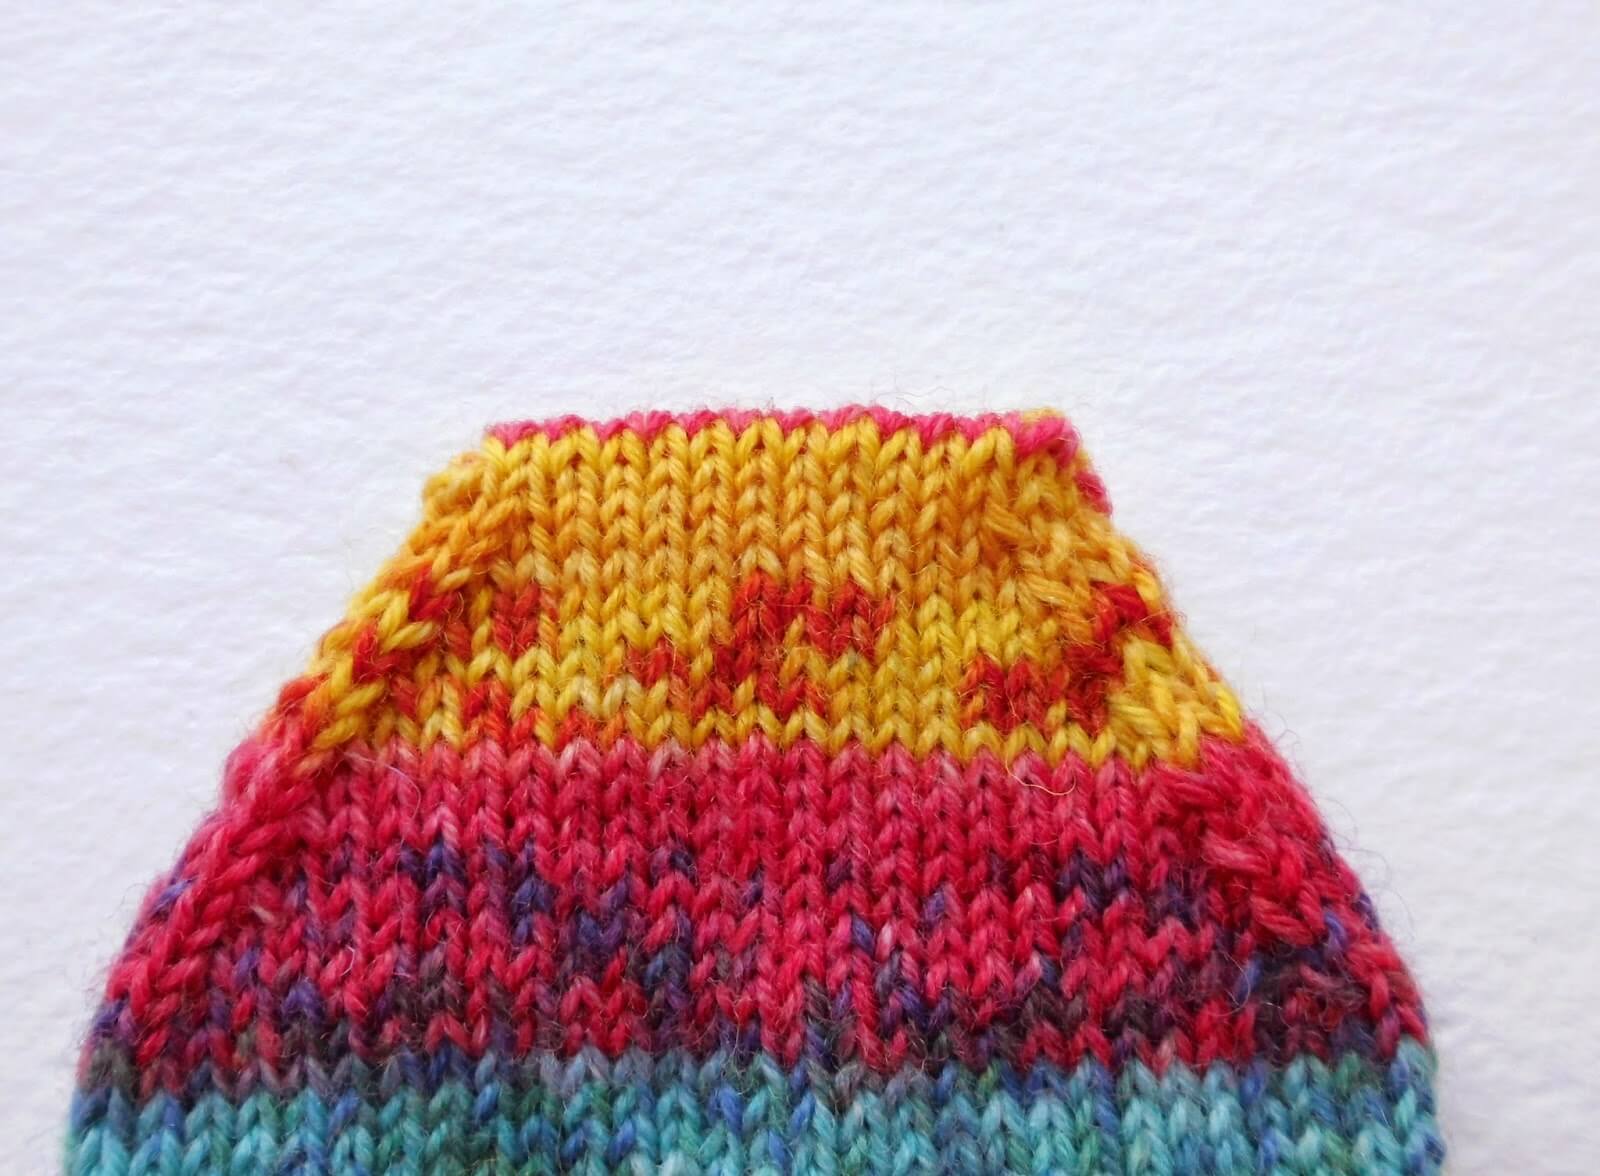
It is worth remembering that the grafted row adds an extra row of stitches to your finished length. You can see here quite clearly how the stitches blend into the original knitting.
Finally, sew the seam together at the cuff of the sock where you knitted your first two rib rows on DPNs, tightening it up if you need to, and your sock is finished. You’ve done it! Huge congratulations on a job well done! Now all you need to do is make a second sock and you’re ready to wear your first pair! Jump down to the end of the page to see my finished pair!
Foot – DPNs
Once you have 60 stitches again after decreasing for your gusset, continue to knit each round until you reach approximately 5cm before the end of your big toe ready to start the toes. It’s best to measure your foot whilst you’re standing up so that your foot spreads to the size it will be when you’re walking. Just to give you an idea, for my size 5 feet, this is about 47 rounds. Don’t be afraid to try your sock on again before decreasing for the toes!
Toes
Once your sock foot is the right length, it’s time to start decreasing for the toes. Your DPNs will already be in the right place, although you will find that as you decrease the stitches you may wish to go down to four needles. It really doesn’t matter whether you do or not as long as you decrease in the same place every time. If you’re already on four needles, make sure that either you finish a DPN row where you need to decrease or you place stitch markers in your rows to help you keep your toes straight.
If you need to put stitch markers in, it’s not a big job to work out where they should go. Look at the foot section of your sock and find your last gusset decrease stitch. Then, follow the line of stitches straight up until you reach the top your sock and slip a marker onto your needle. Your next marker will be 30 stitches around your knitting, but you can add that marker during your first toe round. (If you have cast on more or less than 60 stitches, your next marker will be at the half-way point of whatever number you cast on.)
Create the toes as follows, starting with needle 1 and assuming that you have 15 stitches (60 in total) on each needle:
Round 1: (Needle 1) K1, SSK, K12 sts, (Needle 2) K12, K2tog, K1, (Needle 3) K1, SSK, K12 sts, (Needle 4) K12, K2tog, K1.
Round 2: Knit one round.
Round 3: (Needle 1) K1, SSK, K to end of needle, (Needle 2) K to 3 sts before end of needle,K2tog, K1, (Needle 3) K1, SSK, K to end of needle, (Needle 4) K to 3 sts before end of needle, K2tog, K1.
If you have more than 60 stitches on your needle, make sure that the number of stitches is evenly divided across your four needles and work the decreases as above, knitting the extra stitches at the start and end of the needle as you come to them.
If you are working on four needles, you need to make sure that it’s easy for you to see where your decreases need to be, so use a stitch marker if necessary, or position your needles so that the row always ends at a decrease.
Repeat rounds 2 and 3 until you have 28 stitches left and divide these between two needles so that front and back of socks match. You can leave more or less stitches on your needle if you prefer, as long as you have an even number for grafting, but do make sure that you try your sock on before making this decision. If you need a reminder of how to do the SSK and K2tog stitches, you can find pictures on the heel tutorial.
If you cast on more or less than 60 stitches, you will need to adjust the number of stitches you are knitting between your decreases. As long as you decrease and K1 at each end, it doesn’t matter how many stitches you have between; just make sure you that you have the same number on both needles. You can try your sock on to make sure that it is comfortable and check that you want to decrease as far as 28 stitches – as long as your toes aren’t squashed you can stop at any point.
Now we’re going to graft the toes using Kitchener stitch. This is another part of the sock-creation that some people aren’t so keen on, but again, it’s not too bad if you take it slowly. The best thing about Kitchener stitch is that there is no seam across your toes – I’m like the Princess in the story of The Princess and the Pea and can feel the slightest bump in my socks so it’s always been very important to me that my socks are smooth! One thing that I would definitely recommend is that you find a time when you won’t be interrupted – you’ll need to concentrate and trying to pick it up again mid-row after a break is not easy.
Start by leaving a long tail from the end of your knitting, then cut the yarn and thread the end onto a wool needle. I’m giving you right-handed instructions here, and I have used a different coloured yarn so that you can easily see how the Kitchener stitch works, but you will just keep using the yarn from your ball.
** The first two stitches are set up stitches and for some people, produce an “ear” on their sock. If you would prefer not to do the set up stitches, start at step 3 instead. **
1 Hold the two DPNs with your left hand. Insert the wool needle purl-wise into the first stitch on the front DPN and pull the yarn through. Don’t take the stitch off the DPN.
2 Next, insert the wool needle knit-wise into the first stitch on the back DPN. Don’t take the stitch off.
3 Insert the wool needle knit-wise into the first stitch on the front DPN and slip it off.
4 Insert the wool needle purl-wise into the second stitch on the front DPN and don’t slip it off.
5 Insert the wool needle purl-wise into the first stitch on the back DPN and slip it off.
6 Insert the wool needle knit-wise into the second stitch on the back DPN and don’t slip it off.
You can see how this process creates a new row of stitches which bind the two edges of the sock together.
Repeat steps 3 to 6 until you get to the last two stitches on the DPNs. You will already have taken the yarn through the front stitch so after you have taken the yarn through the back stitch, you can slip both stitches off the DPN. The single yarn thread through the first stitch will be strong enough to hold it and it will sit flatter when you weave the end back into your sock.
Weave the end securely into the sock and cut the yarn.
This is how the end of your sock should look once you have completed the grafting process. You can see that the end of the sock is neat and straight, and there is no seam to rub against your toes.
It is worth remembering that the grafted row adds an extra row of stitches to your finished length. You can see here quite clearly how the stitches blend into the original knitting.
Finally, sew the seam together at the cuff of the sock where you knitted your first two rib rows on DPNs, tightening it up if you need to, and your sock is finished. You’ve done it! Huge congratulations on a job well done! Now all you need to do is make a second sock and you’re ready to wear your first pair! Jump down to the end of the page to see my finished socks!
Foot – long circular (magic loop)
Once you have 60 stitches again after decreasing for your gusset, continue to knit each round until you reach approximately 5cm before the end of your big toe ready to start the toes. It’s best to measure your foot whilst you’re standing up so that your foot spreads to the size it will be when you’re walking. Just to give you an idea, for my size 5 feet, this is about 45 rounds. If you’ve been using stitch markers and want to take one of them off your sock so that you’ve only got one to slip across, then now is the time to do that and it’s best to keep the one that indicates the start of your round. Alternatively, you can line your needles up so that they’re at the point where you need to start decreasing for your socks. Don’t be afraid to try your sock on again before decreasing for the toes!
Toes
You might want to read this whole section before you start! It’s very easy to create the toes using your long circular needle; you just carry on knitting as you would do normally but decrease at each side.
If you have moved your needles around, you might need to find the point where your decreases start. Luckily, it’s not a big job to work out where they should go. Look at the foot section of your sock and find your last gusset decrease stitch. Then, follow the line of stitches straight up until you reach the top your sock and slip a marker onto your needle. Your next marker will be 30 stitches around your knitting, but you can add that marker during your first toe round. (If you have cast on more or less than 60 stitches, your next marker will be at the half-way point of whatever number you cast on.)
If your gusset line isn’t as straight as you think it should be, the alternative is to put your sock on and put safety pins each side where think the markers should go, then follow the instructions as above to make sure there are an even number of stitches between the markers.
Create the toes as follows:
Round 1: K1, SSK, K24 sts, K2tog, K1, K1, SSK, K24 sts, K2tog, K1.
Round 2: Knit one round.
Round 3: K1, SSK, K to 3 sts before end of needle, K2tog, K1, K1, SSK, K to 3 sts before end of needle, K2tog, K1.
Repeat rounds 2 and 3 until you have 28 stitches left and divide these between your two needles so that the front and back of your socks match. You can leave more or less stitches on your needle if you prefer, as long as you have an even number for grafting, but do make sure that you try your sock on before making this decision. If you need a reminder of how to do the SSK and K2tog stitches, you can find pictures on the heel tutorial.
If you cast on more or less than 60 stitches, you will need to adjust the number of stitches you are knitting between your decreases. As long as you decrease and K1 at each end, it doesn’t matter how many stitches you have between; just make sure you that you have the same number on both needles. You can try your sock on to make sure that it is comfortable and check that you want to decrease as far as 28 stitches – as long as your toes aren’t squashed you can stop at any point.
Now we’re going to graft the toes using Kitchener stitch. This is another part of the sock-creation process that some people aren’t so keen on, but again, it’s not too bad if you take it slowly. The best thing about Kitchener stitch is that there is no seam across your toes – I’m like the Princess in the story of The Princess and the Pea and can feel the slightest bump in my socks so it’s always been very important to me that my socks are smooth! One thing that I would definitely recommend is that you find a time when you won’t be interrupted – you’ll need to concentrate and trying to pick it up again mid-row after a break is not easy.
Start by leaving a long tail from the end of your knitting, then cut the yarn and thread the end onto a wool needle. I’m giving you right-handed instructions here, and I have used a different coloured yarn so that you can easily see how the Kitchener stitch works, but you will just keep using the yarn from your ball.
** The first two stitches are set up stitches and for some people, produce an “ear” on their sock. If you would prefer not to do the set up stitches, start at step 3 instead. **
1 Hold the two DPNs with your left hand. Insert the wool needle purl-wise into the first stitch on the front DPN and pull the yarn through. Don’t take the stitch off the DPN.
2 Next, insert the wool needle knit-wise into the first stitch on the back DPN. Don’t take the stitch off.
3 Insert the wool needle knit-wise into the first stitch on the front DPN and slip it off.
4 Insert the wool needle purl-wise into the second stitch on the front DPN and don’t slip it off.
5 Insert the wool needle purl-wise into the first stitch on the back DPN and slip it off.
6 Insert the wool needle knit-wise into the second stitch on the back DPN and don’t slip it off.
You can see how this process creates a new row of stitches which bind the two edges of the sock together.
Repeat steps 3 to 6 until you get to the last two stitches on the DPNs. You will already have taken the yarn through the front stitch so after you have taken the yarn through the back stitch, you can slip both stitches off the DPN. The single yarn thread through the first stitch will be strong enough to hold it and it will sit flatter when you weave the end back into your sock.
Weave the end securely into the sock and cut the yarn.
This is how the end of your sock should look once you have completed the grafting process. You can see that the end of the sock is neat and straight, and there is no seam to rub against your toes.
It is worth remembering that the grafted row adds an extra row of stitches to your finished length. You can see here quite clearly how the stitches blend into the original knitting.
Finally, sew the seam together at the cuff of the sock where you knitted your first two rib rows on DPNs, tightening it up if you need to, and your sock is finished. You’ve done it! Huge congratulations on a job well done! Now all you need to do is make a second sock and you’re ready to wear your first pair!
Wow! That’s it! Apart from knitting your second sock, you’re all done. I hope you’re very proud of your socks, and I’ve love to see your photos. As always, you can ask any questions either here, on Facebook or on Ravelry.
Don’t forget that we have a Flickr gallery to show them off – it’s wonderful to see more pictures appearing every day! As well as the Facebook group for the beginners’ Sockalong, we now also have the Winwick Mum Knit n Natter group – an online knit n natter for people to talk about other things than knitting a basic sock! There’s no need to leave the original Sockalong group as it’s fabulous to have so many people share their knitting experiences and helping other people to work their way through their socks; but there are so many friendships being developed that I just know there are going to be lots more conversations going on! Anyone can join in, whether you’ve finished your socks or not and you can find the new group here.
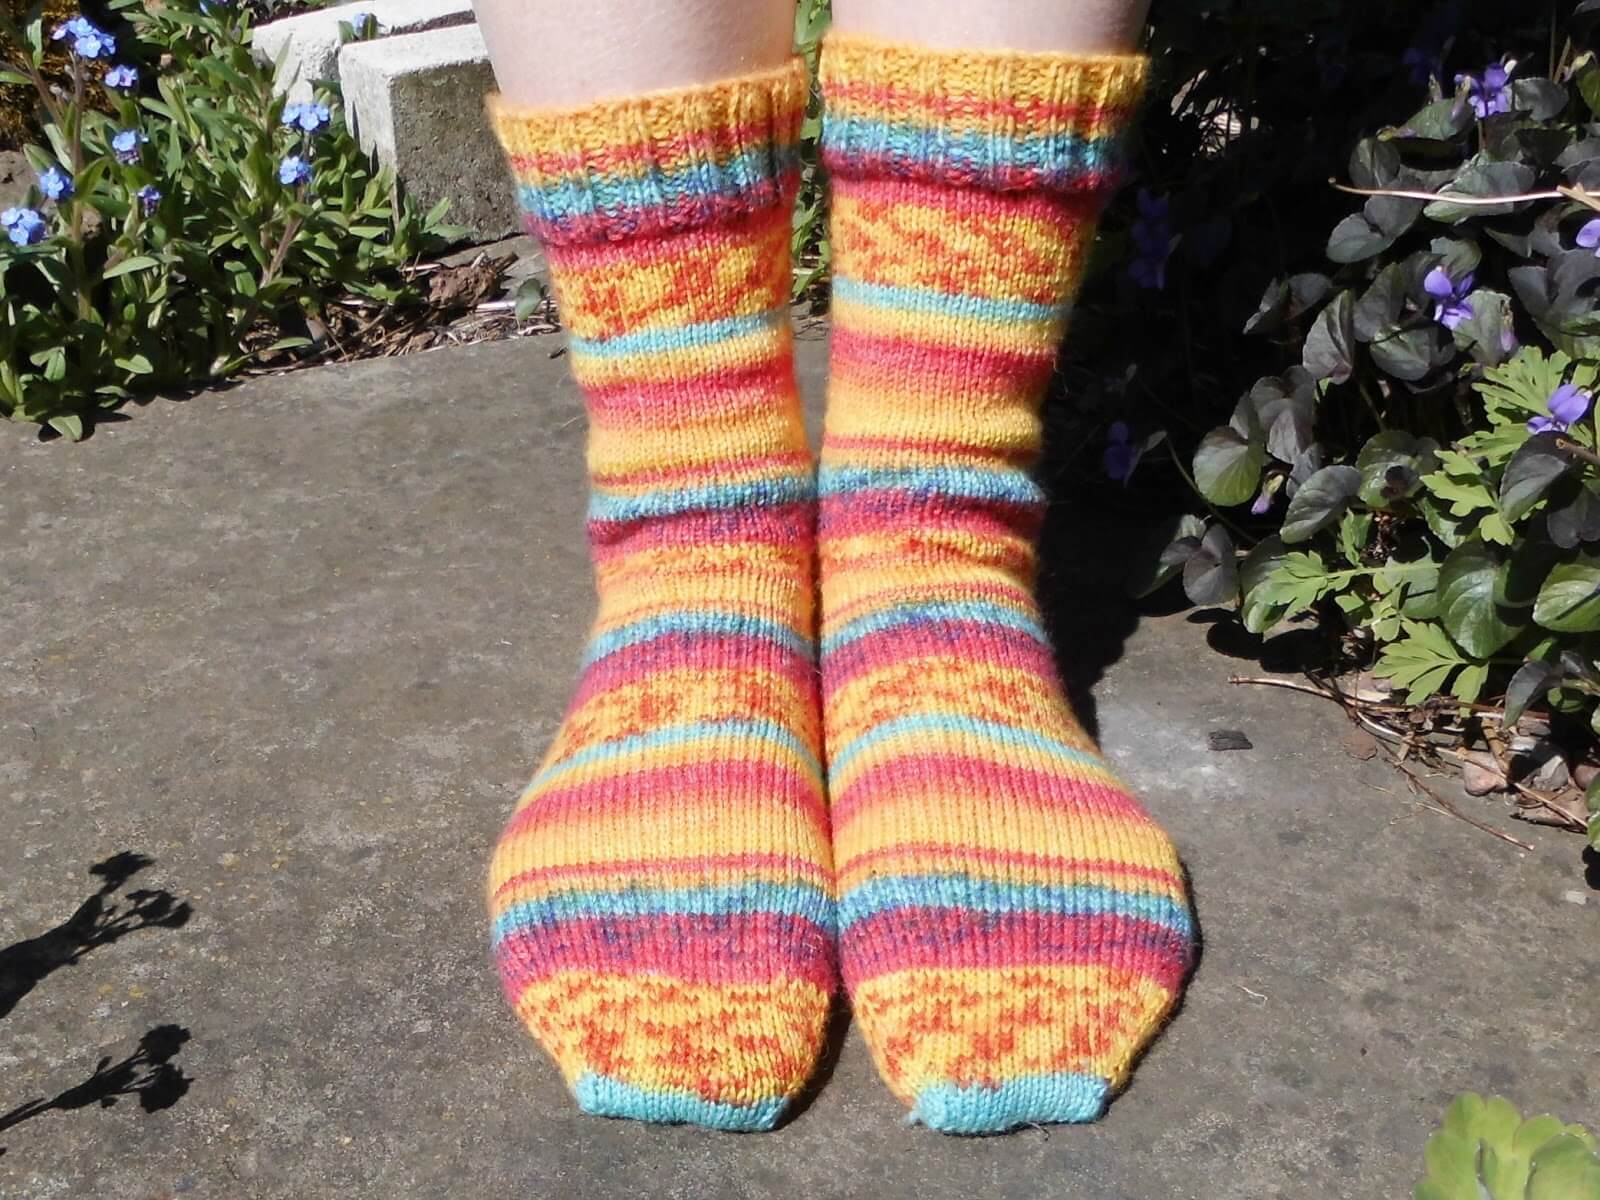
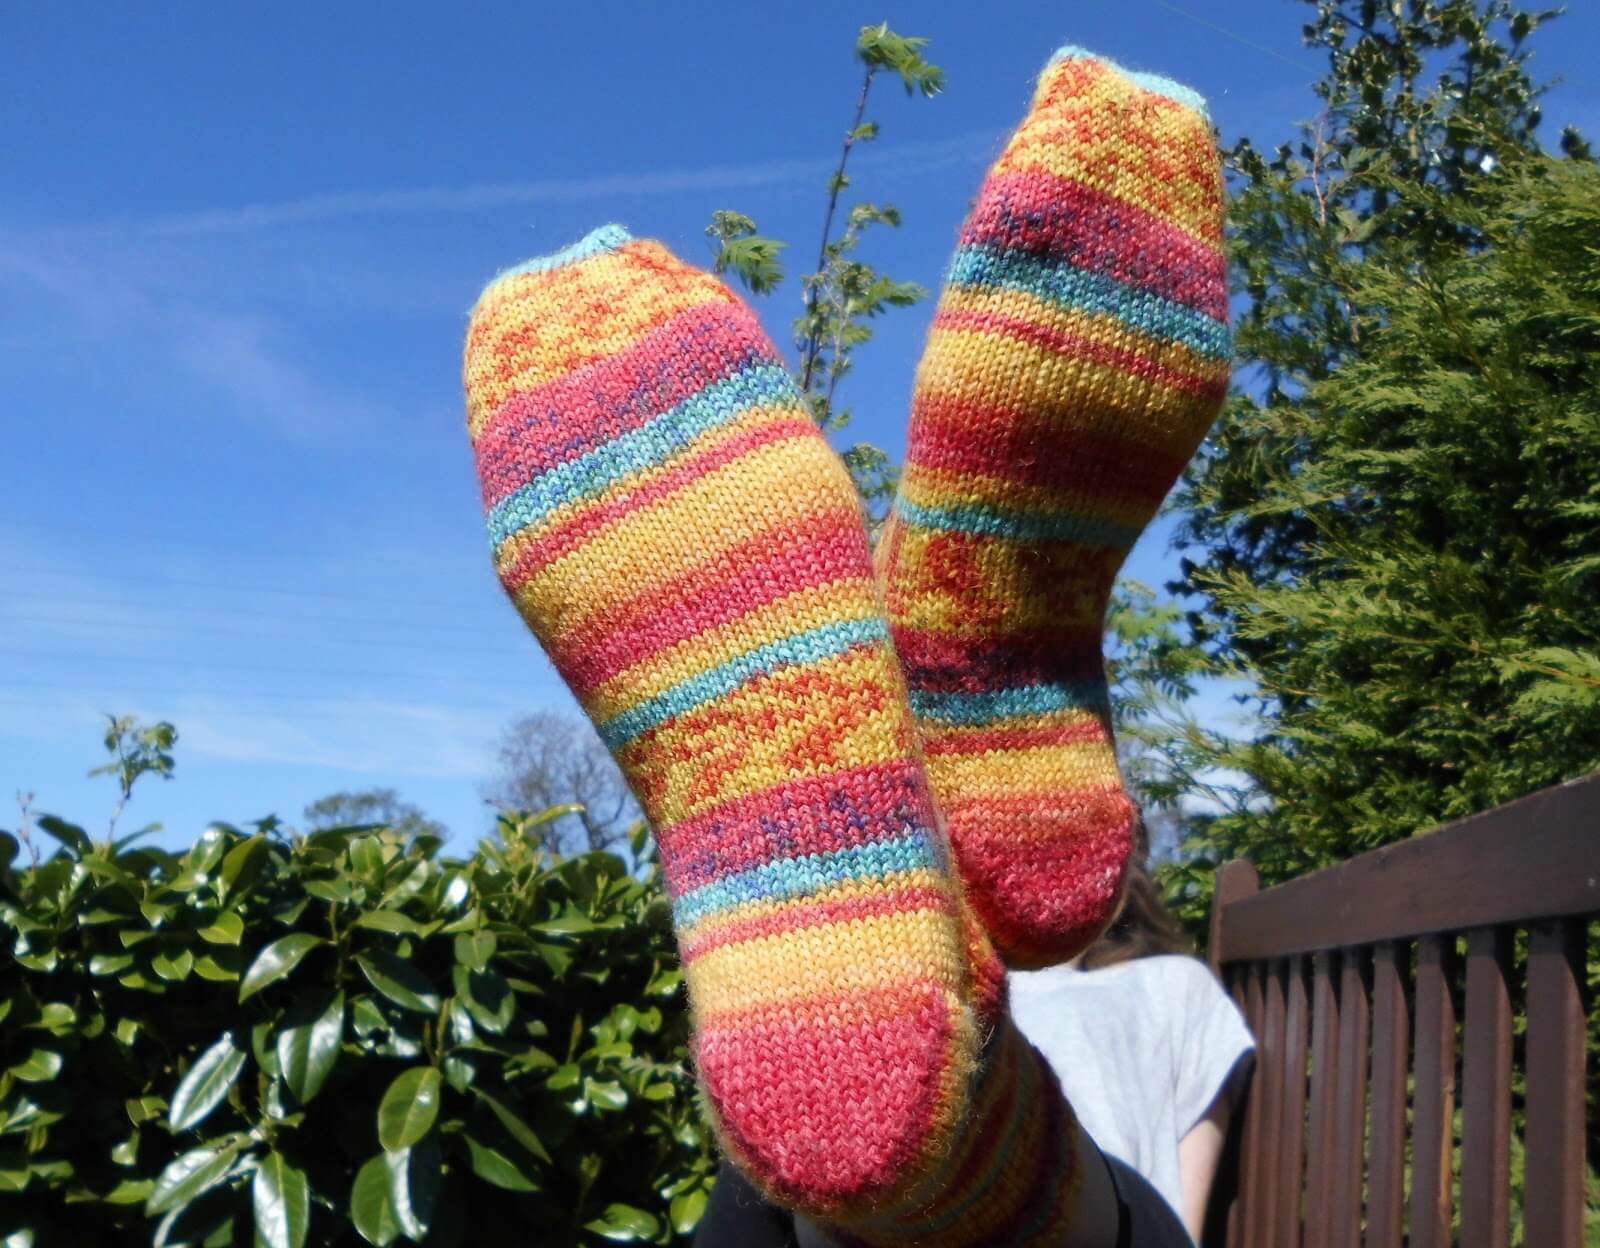
Finally, I thought you might like to see my pair of socks in their finished state rather than just bits of them for the photos! Here they are! They’re actually for big daughter who probably would have liked her socks earlier in the year when it was cold enough to be wearing them, but had to wait because I thought the yarn would be good for the Sockalong 😀.
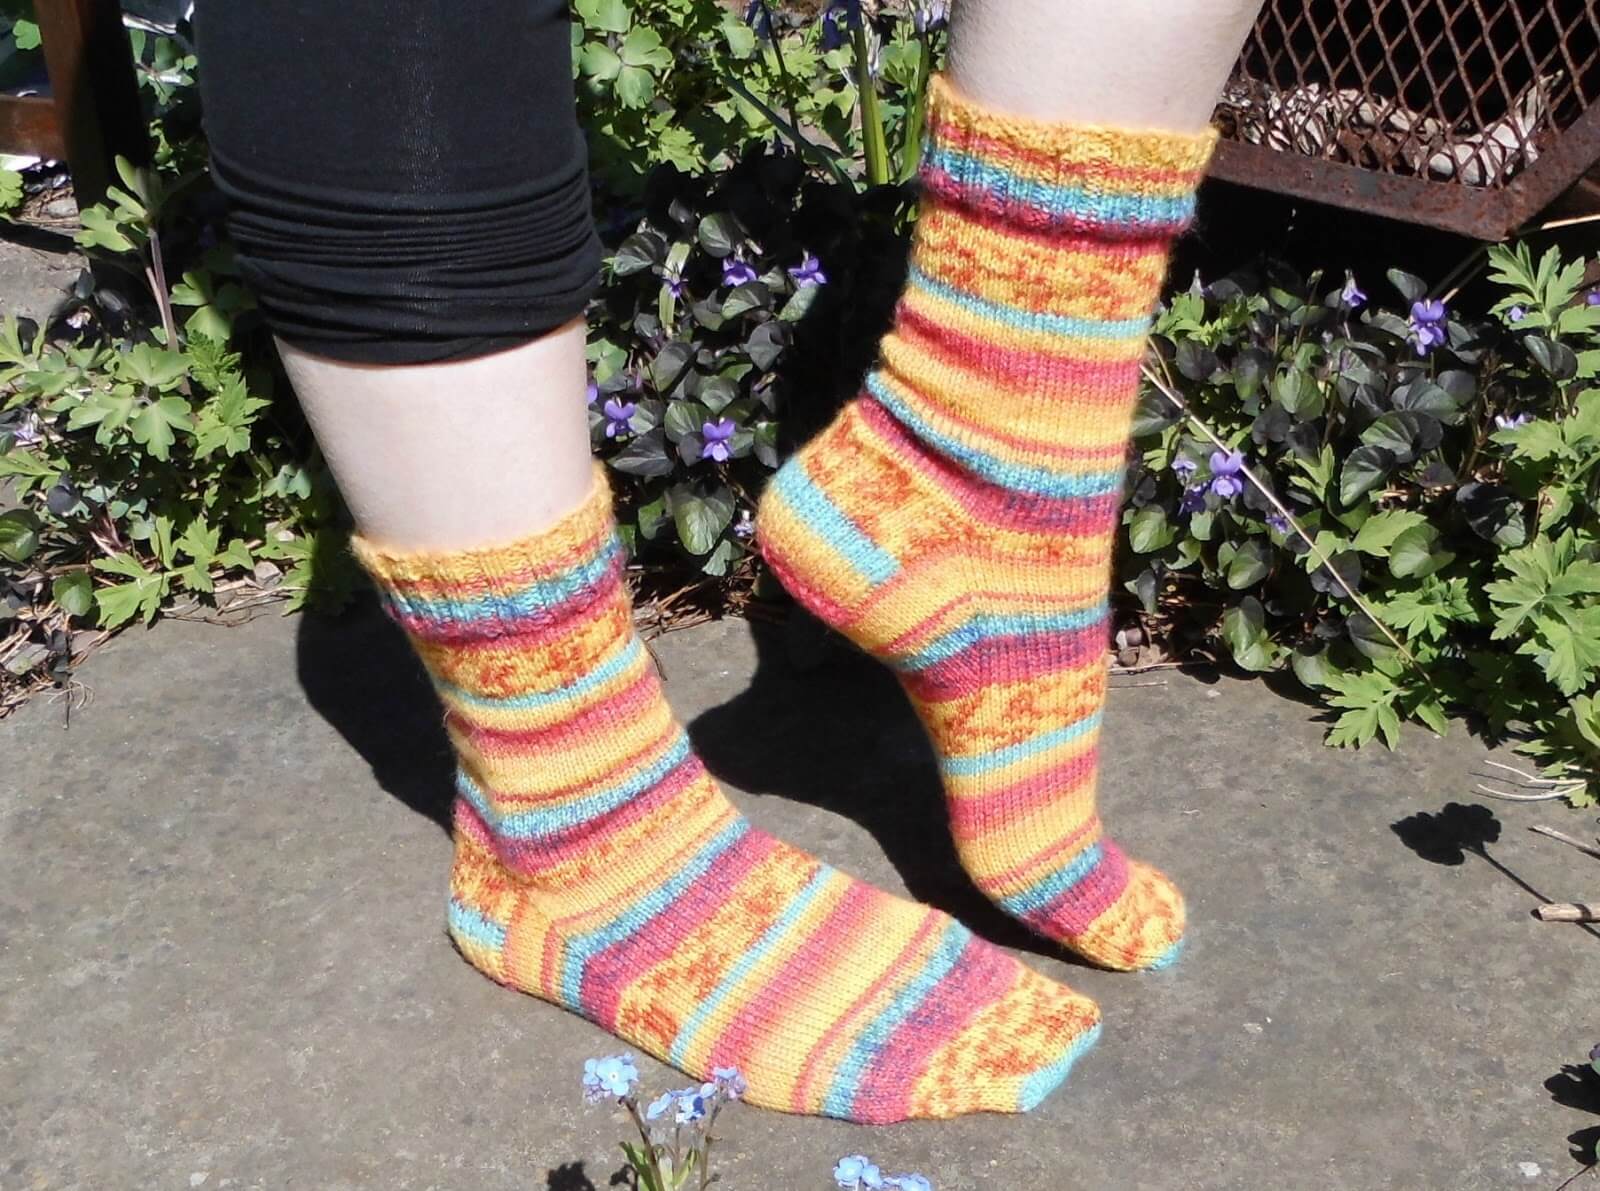
Matching stripes – I couldn’t do otherwise!
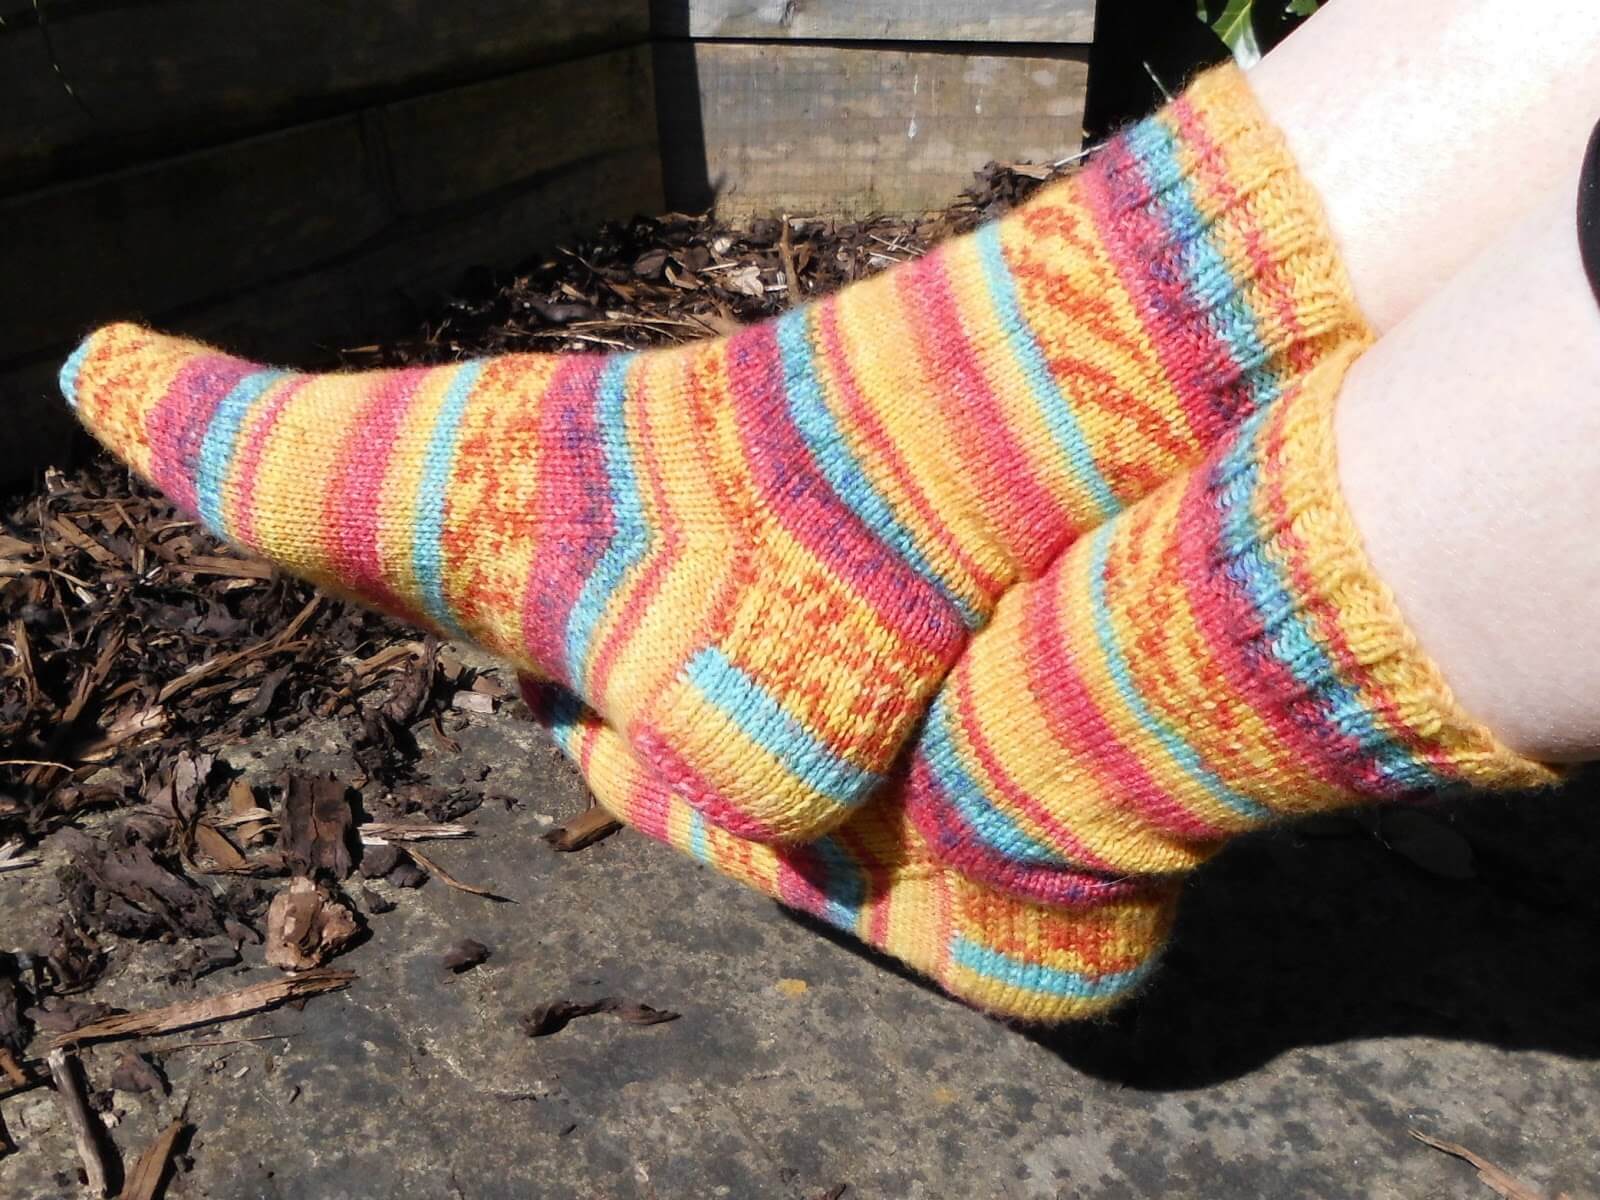
You can see the V of the heel here very clearly …
and the way the heel joins seamlessly to the gusset.
Big daughter was very pleased to finally get her pair of socks!
It’s been wonderful to do the Sockalong with so many of you, I’ve absolutely loved it and I’ve been very grateful for all the questions as we’ve gone along as that’s helped me to really think about how best to help you! Thank you again for joining in.
I hope that this is just the start of your sock knitting adventures – you really can never have too many pairs of socks!
This Sockalong tutorial is free on this blog and will always remain so. If you’ve enjoyed using it and would like to support my work so I can keep blogging and designing, you can browse my shop for patterns and books or buy me a brew – both are very much appreciated. Thank you! xx


Basic 4ply Socks pattern copyright © 2014 Winwick Mum All rights reserved.
Sockalong tutorials copyright © 2015 Winwick Mum All rights reserved.
More Sockalong posts:
Sockalong – tension squares, casting on and stitch calculations
Sockalong – accessories and matching yarn
Sockalong – Week 1 – Cast on, cuff and leg
Sockalong – Week 2 – Heel flap, heel turn and gusset
Sockalong Basic 4ply Socks pattern
Facebook Sockalong group for help, advice and encouragement


Thank you again Christine. This has been a fun sockalong.
Thanks for joining in Selma, and your socks are looking great! xx
This is just too exciting. I started this not knowing whether or not I would manage to do it and I'm about to start shaping the toes! I tried it on before and it's fab. An actual sock! (Almost). Thank you so very very much Christine. I could never have done this without your wonderful tutorial. X
Thank you! It's so lovely to know that you've managed to knit a sock – not long to go now and you'll have a pair! Thanks for joining in! 🙂 xx
Love the yarn and great instructions, I admire your patience!
Caz xx
Thanks, Caz! It's a good job I like socks 🙂 xx
I've done it! I've made a pair of socks! Thank you for your brilliant instructions – now I just need to get to grips with technology and post a photo 😀
Wow, that's fantastic, Elaine, well done! Yes, I'd love to see them so if you can post a picture that would be great. Feel free to put it in the Flickr gallery – we're getting a nice collection of socks in there now! ( flickr.com/groups/winwickmumsockalong)
Thank you so much for the great instructions.I am just on the toes of my second sock and feel that the addiction has grabbed me already.my children are fed up at my excitement as the stripes appear! Already ordered wool for the second pair!
That's great, I'm so glad the tutorials have helped! I think self-striping yarn is what makes socks so addictive – because the rounds are so short the colours change very quickly and you're always waiting to see what happens next! 🙂 xx
Thank you ever so much for this pattern I have successfully knitted my first pair of socks on the small circular needles clear instructions and love the pictures as well
That's brilliant, thanks for letting me know. I hope you're super-proud of your new socks! xx
Crikey – one sock complete, but of all the stages to completely and utterly muck up, I didn't think it would be the kitchener stitch! Not the ecstatic end high I was anticipating, considering all the previous nifty manoeuvres I managed!
Oh well, on to the Frankenstein monster-toed next sock!
Oh dear! The Kitchener stitch does take a bit of practice but luckily you've got another sock to improve your technique 😉 xx
Me too, fell at the last hurdle!! However, son so excited to be getting home made socks he'll not mind, and I'll practice on sock two! Thanks so much for your instructions. So helpful. X
Just finished my first sock, hooray! I was wondering whether this pattern would work for a baby/child sock or if it would mess up the shaping to make it so small?
Hello Kirsty, well done on finishing your sock! No, it doesn't mess up the shaping at all to create this as a child's sock – you will need to cast on less stitches, of course (use your stitch calculation to work out how many you need), and so your set-up heel row will be different, but other than that everything else is the same. Take a view as to how many stitches you want to decrease to on the toes and you're away 🙂 xx
Thank you sooooooo much for your instructions, I have just finished my first sock and about to start the second. I noticed your stripes match up across your pair of socks. How do I make sure the same happens with my socks. I am using a similar self striping wool. Hilary
That's great to hear, Hilary! If you look at the list of tutorials on the Join The Sockalong page you'll one called "accessories and matching yarn" and you'll find instructions for matching stripes in there. As you've already made one sock, it should be quite easy to match the second – keep pulling the yarn from the ball until you find an obvious stripe which you can match up against your first sock and then work backwards from there until you find the point where you can cast on. I hope that helps! xx
That will teach me to jump in and start knitting before I've read all the instructions. I'll have a go at matching but if it doesn't work I'm fairly relaxed about having mismatched socks ! Thanks again for all your help.
No problem … I'm impressed that you read the instructions at all, my husband never does 😉 xx
Hi thanks for the tutorial, it was great for a novice like me!I've finished my first sock and it looks sockish but it's a bit wavy and bumpy, do I need to block them , if so , how can I do it without the block inserts , thanks
Hi! I think you'll find that the waves and bumps disappear when you put the sock on and certainly when you wash them. Blocking will only last until you wash the socks anyway, so I'd just wear them. If my socks are to be gifts, I often press them under a damp cloth instead of using blockers, but be careful not to press so hard that you crush the yarn xx
Hi. I would like to thank you for your fantastic tutorial. It is so easy to understand and follow. I have finished my first sock and love it. Thanks again.
That's brilliant to hear, thanks for letting me know Vicki! xx
Hi Christine. I have just finished my 3rd sock and as I said above, your tutorial is so easy to understand. Just wondering if you think that the socks stretch at all. I am using a good quality sock yarn. They are quite firm but am afraid that if I make them a little longer, they may stretch. Thanks for your time.
Hi Vicki, I've never had a problem with my socks stretching, but I have found that after about five years or so (!), they tend to shrink just a little so I tend to add a round or two to compensate for that 🙂 xx
Hi Christine. I have finished two more pairs of socks since last I posted. I now feel very comfortable with this pattern. Thankyou. One pair was in Nako Boho and are not as soft as I would have liked. The second pair are Patons Patonyle Merino and are lovely and soft. Being in Aust I can't get most of the wools I see on your blog. I'm hoping that the Nako one washes up a bit softer.
Wow – two more pairs? You're on a roll! I've seen that quite a lot of people in the Sockalong Facebook groups who are in Australia shop at Bendigo Mills and Spotlight (you may know of these already) and it's also worth having a look at UK online yarn companies as often their postage to Australia isn't as much as you think. The other thing to do is find a friend who wants yarn at the same time and combine the order 🙂 xx
So I was moving my needles about a lot in an effort not to get ladders. It worked!! Trying to line up the start of my round for the toe now. Should I be placing my marker to the left or right of the heel decrease row you suggest to use?
To the left, Gemma, so you'd slip your marker and then knit the first stitch and then decrease 🙂 xx
Hi I met you on Yarn Shop day at City Knits in Birmingham and bought your book. I've finally started my first pair of socks and have just finished the gusset. I am about to start knitting the foot and the stitches are on my needles as follows – needle 1 – 7 stitches, needle 2 – 32 stitches, needle 3 – 7 stitches and needle 4 -18 stitches (total 64 , agrees with cast on). My query is – do I move stitches around needles so there are 16 stitches on each or do I continue as they are? Thanks for any help you can give me.
Hi! Well done on getting to this point! Yes, move your stitches around your needles so that it's more comfortable to knit with them, but I'd suggest that you arrange your stitches so that you change needles where your gusset decreases finish so that it's easy to see where the decreases start for the toes xx
First sock finished, ready to start second. Thanks for your help
Brilliant! That's great news! xx
Thank-you so much for this tutorial. I made a New Years resolution to knit a pair of socks this year and have just finished my first ever pair with a few days to spare! Your instructions were so clear and I felt comfortable being walked through it. I've already bought the wool for my next pair 🙂
That's brilliant – well done, you should be super-proud of those socks! I have a feeling there may be quite a few pairs in your future 😉 xx
Hello, thank you very much for the excellent tutorial! I've happily got as far as my toe decreases without incident, but now I'm a bit stuck. I am working 60 stitches on 5 DPNs and have moved them around a bit so that I have 15 stitches on each needle. I am now ready to start my toe decreases, but I'm a bit confused about where they should go. I understand I could move my needles around so there is a change of DPN in line with the gusset decrease. Then, if I count 30 along, that is where I should place my stitch marker for the other toe decrease. But this half way point is not at all in line with my gusset decreases on the other side. Should it be? Thanks for any guidance you're able to give!
Hi Annie, thanks for your message. If you've got 60 stitches on your needles but counting 30 on from where your last decrease was doesn't make the decreases fit properly, then it sounds like you need to put your sock on (you might need to shuffle your stitches around on the needles so that you can do that) so that you can see where the decreases should be. Sometimes they don't line up with the gusset decrease so the only way to get them right is to put your foot flat on the floor and put markers on either side and then count to make sure you've got the same number on the top and bottom of your foot. Hope that helps! xx
Thank you! I think I was overthinking it. I eyeballed the first one, then was more careful with positioning my stitches on the second one. Think the first one came out better! Thanks again for great tutorial, very proud of my first pair.
That's brilliant, you should always be super-proud of your hand-knit socks! 🙂 xx
Hi Christine, just a quick thank you from a fellow Christine for the tutorials. I’ve knitted since I was little but not very much really. I picked it up again this year as a distraction. I’ve stuck to scarves, at least they always fit! But thought I’d try a sock. I’m well on my way down the foot section of my first ever sock thanks to your instructions. I’ve got a twisted stitch or two here and there where I had to unpick, and I lost my bearings through the first row or two of the gusset section so I have an extra k2tog in the top section which cocked up my numbers slightly, but I’ve compensated and it’ll all be fine, nobody will notice! I’m making these for my daughter who’s home on a flying visit tomorrow so am hoping to get to 45 or so rows then have a fitting while she’s here! Using West Yorkshire Spinners Signature 4 ply (not too expensive as per your suggestion) so these socks will be reared, sheared, spun and knitted in Yorkshire. Many thanks again, Chris
That's brilliant to hear, and I'm sure your daughter is going to absolutely love her new socks. And I suspect they won't be the last pair you knit either – here's to plenty more! xx
I can't thank you enough Christine – I'm late to the party, but I've just knitted my first ever sock! I could probably possibly just about been able to muddle through a pattern myself, but thanks to you and your super clear instructions it's been an absolute joy. I'm so grateful for your hand hold through the process – now onto the second!
Hope you're all well and safe, and thanks again! d/x
Oh you're never late to the party – this Sockalong goes on and on! I'm so pleased that the tutorials helped you, here's to a drawerful of the best socks you can wear! 🙂 xx
Thanks so much Christine! I also just knitted my first pair – took about 5 weeks but I reckon I've found a new hobby. Your tutorials are really really great, especially the way you've included pictures and different kinds of needles etc. Thanks again!
Hiya Christine, thanks for helping make the snowy winter lockdown productive and bearable:). I went into our new local yarn shop in December (Wiseheart and Wild in New Mills) looking for something to keep me occupied as a very novice knitter. I came out with some beautiful wool, needles and your tutorial address neatly printed on a bit of paper. It's taken me 5 weeks so far and the end of sock 2 is in sight! I've found knitting helps me focus on the here and now and forget everything else that's going on. Thanks for the time and effort you put into this x
Hello from Australia!
Thank you so much for not just the very clear and beginner-friendly instructions (first time sock knitter here) but also for the numerous pictures which really helped me immensely. I’m about to start decreasing the toes of my first sock and plan to move immediately onto the other – and they will be a gift for my Sister In Law. I’m also quite hooked now and already planning my next pair to follow shortly after I’m done with this one. Thank you so much for keeping this site active – I am deeply appreciative!
Cheers, Elizabeth
Hello to you, it’s lovely to see you! I’m really glad that the Sockalong tutorials helped you and I’m sure your Sister in Law will love her new socks! Here’s to many more pairs! 🙂 xx
Hi, wonderful instructions – my first cuff down pair and very impressed. Thank you for your sockalong
You’re very welcome, I’m really glad the tutorials are helping you! 🙂 xx
Hello! I am attempting my first ever pair of socks and enjoying the challenge! Thank you for the clear instructions. I think I’ve now completed the heel flap and gusset but what I’m wondering is, should there be any of the stitches picked up along the edges of the heel flap left once you are back to the original number of stitches cast on? I seem to have some left.
Hi! I’m glad you’re enjoying knitting your socks! No, you usually pick up all the stitches – there should be one for every 2 rows of heel flap worked so there shouldn’t be any left over or you’ll get a gap. You’ll have more stitches than you originally cast on when you start the gusset and then you decrease to the number that you cast on as you work the gusset section. Does that make sense? xx
DONE! I always come back to your kitchener tutorial – THE BEST! Pair number 4 (in as many years!) finished and ready to post in the last post for Christmas tomorrow. A gift for hubby’s aunt who tried mine on and loved them.
Might branch out and try and make a DK sock….haven’t yet braved a pattern. Apart from being rubbish at patterns, I do love this plain sock, shows off the fabulous yarn to best adventage. Thanks so much for this…and for teching the world to knit socks x
Oh well done – you’re just in time! That’s always a good feeling, isn’t it? DK socks are much quicker to knit as the yarn is thicker so I’m sure you’d have no trouble with them. There’s a pattern here that you can use with the Sockalong tutorials if you need to remind yourself as you go along (you just need to adjust the numbers) – they make brilliant boot and welly socks! I can recommend Novita yarn for DK socks – there’s a (paid) link on the right for Snufflebean Yarn and you can get 10% off with the code WINWICKMUM. Browsing costs nothing! 🙂 Have a lovely Christmas! xx
Hello, Christine!
I just finished the first sock of the pair! It looks like a bona fide sock and also fits really well. I am so delighted! Thank you so much for these tutorials, and also for answering all my questions along the way. I appreciate both your enthusiasm and your generosity!
Now it’s on to the second sock, before second sock syndrome sets in! And then the sock world is my oyster 🙂
Thanks again for all the help!
Jaya
Woohoo! That’s brilliant, I’m so pleased! You should find that the second sock is much easier and quicker as you’ve done all of your learning on the first sock, so the sock world will be your oyster before you know it 🙂 xx
I finished the second sock yesterday! A very nice sense of accomplishment, that! They both fit very well, and came out looking like real socks 🙂 I need to get better at picking up stitches, though. Your instructions and photos are super-clear, and I looked at some videos, too, but then actually doing it, I can’t always see clearly where is the right, or best place, to insert the needle, as the stitches are so small (even though I slipped them, as you said to do). I think it’s just practice that’s needed (or maybe younger eyes and better eyesight!). I did manage to avoid a gap where the heel flap joins the top of the foot, by picking up an extra stitch or two in the gap, and was very happy that worked out so nicely! Thanks again for all your wonderful tutorials and being willing to answer questions! I’m looking forward to more sock-knitting in my future!
Hooray! That’s fantastic, I’m so pleased that you’ve finished your socks and I hope you are super-proud of them! Picking up stitches gets easier with practice so you’ll just have to cast on another pair … 🙂 xx
Thank you so much for this fabulous sock tutorial! I have previously started knitting socks using other patterns and found it such a horrible experience that I couldn’t face doing a 2nd one (I have one pink sock for me and one blue sock for my partner langusing at the bottom of my wool bag :-/ ) but using your fab instructions I’ve managed to compete a pair for him and have just finished my first sock for me – three whole socks, woohoo! Thank you x
Oh wow, that’s brilliant! Well done you – I hope you’re super-proud of your socks! I’m so glad I could help you 🙂 xx
Just finished my first ever sock. Thank you for the excellent instructions. On to sock number 2!
Ooh that’s fabulous, well done! The second sock is always easier and faster to knit – do let me know how you get on! 🙂 xx
Hi Christine, I’m new to knitting socks and started the first one last weekend. Thank you for your brilliant instructions! I do have a question – in order to get nearer the yarn tension I am using 2.75 mm needles; would it have been better to stick with 2.5s and just cast on more stitches, as explained in your stitch calculator? Either way, I’m so glad I found your website 😊
Hi Helen, thanks for your message! I think the answer to your question is based on the fabric that you’re producing with your needles. Have you tried knitting with both 2.75 and 2.5mm? And if so, which one do you prefer? There are people who like the fabric that they get with, say, 2.0mm needles but that means they need to cast on more stitches, but they’re happy to do that as they like the fabric of their socks. I would say that this is a matter of personal preference for you – as long as your fabric is firm but not stiff, then go with whichever size you’re most comfortable using and adjust the stitch count if you need to. I hope that helps! 🙂 xx
Thank you Christine, I did try with 2.5 needles but my tension was way out according to the yarn band (Drops Fabel). When I started following your instructions I forgot I could simply increase the stitch count.. I’ve finished the first sock today; the fabric is a little soft but I’m happy with it. I’ll use 2.5 needles for the next pair! 😊
Brilliant – it sounds like you’re all sorted! 🙂 xx
I am loving the instructions as I am new to sock knitting! One thing I wonder about – I am feeling the width of my sock should be narrower after the gusset compared to the body (leg) part of the short, as my foot is considerably narrower than my leg. So I am wondering if I should have less than 60 stitches after shaping the gusset. Just wondering if it will all work out?
Hi! Yes, you can reduce to whatever number works for you – I’ve just finished a pair of socks that started at 84sts and reduced to 76sts to suit the wearer. The great thing about hand knits is that you can do this to suit the shape of your own feet. I’d recommend trying your sock on first before you decide, though – make sure you’re standing up so that your foot is pushed out to its fullest extent and if you still feel that you need to go narrower, then you can reduce by 4sts until you get to the number you need – your total number of stitches needs to be divisible by 4 to make the toe decreases equal, so you’d choose 56sts, 52sts etc. I hope that helps! 🙂 xx
Thanks so much! Very helpful.
Thank you! 🙂 xx
Promised myself when I turned 50 that I’d learn to knit socks – and I did! Took me a month, but I got there. Now casting on to knit a pair for my 9yo. Thank you, the instructions were amazing!
Oh wow, that’s fabulous! I’m really glad I was able to help you and I hope that you’re super-proud of your new socks … they’re obviously fantastic if your 9yo wants a pair too! 🙂 xx
Hi! I’m finally knitting my first pair of socks (thank you for the amazingly detailed instructions btw)! I am past the gusset and knitting the foot portion, but I was wondering if you start the toe decrease 5cm from the base of your toe (connects to foot) or the very end of the toe (toe nail end)?
Hi Marcella, you need to start the decreases 5cm from the very end of your big toe as the decrease section is about 5cm so you want to make sure that covers your toes. If you stand up in your sock, you’ll probably find that if your foot section is at about the length of your little toe then that should be about right, but do measure it to make sure! 🙂 xx
Thank you!
I’m glad it helped! 🙂 xx
Loved knitting my first pair of socks. Thanks so much for your tutorials. They were amazing!
You are very welcome, I’m so glad they helped you! 🙂 xx
Still knitting my socks and experimenting with tiny circulars. I have a query re the toe decrease. I left my markers in, but when I follow the decrease line my marker is out by one stitch (which makes sense to me as we did the decrease 3 stitches before the marker). So now I am confused about whether to go by my marker or follow the gusset decrease line. Does this matter?
By the way, was unable to purchase the Ebook. Long story, and I gave up in the end. However found one of your Sock Pattern collection books from the West Yorkshire Spinners at one of our local shops…beautiful patterns in there and also got a mix and match section in the back. If others are reading this…highly recommended! Will keep me knitting for a long time.
I think that being out by one stitch isn’t going to make any difference to your toes decreases, but if you want to be sure then try your sock on and see where the marker is compared to the side of your foot – you can always adjust it then if you think you need to. Thanks for buying the pattern book – I think that’s the first Winwick Mum collection one if you’ve got the mix’n’match heels in there 🙂 xx
Thanks…I will just run with it I think as my distribution of stitches is ok (have a rib pattern over the top of the foot. Left my markers in as I was getting very confused with that little circular, but wanted to try that out. Think I will stick to the DPNs as the circular is uncomfortable for the hands after a while.
I’m so grateful to you for getting me started on my knitting and sock journey. I had just started knitting purely for the purpose of knitting socks and was told it was very complex and would take a lot of time getting proficient at knitting first. After knitting 2 beanies for practice I was on to socks with your wonderful site guiding me!
I have one query – with the toes in the 4 ply sock – I measured 5cm from the end of my toes and found when I had completed the toes they were well short (did it on both socks) so had to unpick all the toe rounds and knit more foot rounds to gain more length. I had to guesstimate how many rounds. My first socks were the 8 ply boot sock and I did not have this problem at all – the instructions were a perfect fit. Please can you advise.
It may be that you have longer toes than me, Michele, but usually leaving 5cm is a close fit with 4ply. A couple of questions: did you try your sock on before starting the toe decreases to make sure that you were starting in the right place? And also, did you definitely work a knit round in between the decrease rounds because not doing that would make the toes decrease faster? The good thing about being able to try your socks on is that you can see where 5cm would be on your foot and it may be that you needed more rounds than you thought. Standing up in your sock pushes your foot out to its fullest extent and gives you the right measurement for when you’re going to be wearing it. I hope this helps for future pairs! 🙂 xx
I have the same question about the toes. My gauge is about 11 rows per inch. According to the decrease for a children’s sock with 48 stitches that should take me 11 rows. I will be well shy of the 5 cm for the toe. It is also interesting that adult sock and mud socks use that same measurement. Would love any suggestion. And I second all the praise. Your sock patterns are my go to.
For a 48st children’s sock, your toe decreases will be more like 4cm rather than 5cm – have you seen the Basic 4ply Children’s Socks pattern? There’s more information on the sizing for children’s socks on that post which you might find helpful 🙂 xx
Being this was my first attempt at knitting socks, and the first time using DPNS, and the first attempting a knitting project more complex than rectangle, I thought I would quit halfway through from frustration. But the language of this tutorial is so easy to follow !!! My sock was still an abomination (did not test my gauge, my tension changed a bunch, and my needles were 2.75mm) but it is a sock !!! I am very proud of it. Thank you for teaching me the basics of knitting socks.
I’m really glad the tutorial helped you – and I am sure your sock wasn’t an abomination at all, but the perfect way to practice – and your next pair will be fabulous! 🙂 xx
Hi, I was hoping you might be able to tell me how many balls of wool I would need to knit a pair of size 10 socks?
It’s difficult to say precisely because you should really measure the feet that you want to knit for (hand knit sock size is based foot circumference, not shoe size), but I can tell you that I have had a pair of size 14 socks for wide calf and slightly slimmer feet out of one ball 🙂 xx
Hello. Is there a tutorial on how to sew the gap at the cuff? I can’t see instructions on how to do this? Thank you.
No, I don’t have a specific tutorial for that at the moment, but perhaps I need to write one! I usually put my wool needle into the stitch next to the one that has the tail end and then take the needle down the inside of the stitches so that the yarn holds them all tightly together 🙂 xx
Thank you so much for these tutorials!!
I’m brand new to knitting (long time crocheter who wanted to learn to knit specifically to make hand-knit socks) and recently finished my first pair of socks by following the Sockalong!
Now I’m working on a pair of your easy lace socks, and loving that pattern too.
I will always happily recommend your patterns and tutorials to anyone who asks what I’m knitting!
Thanks a billion for not only writing such detailed and beginner friendly tutorials, but also for keeping them free to use.
Best wishes, and happy knitting,
-Millie