
Beginner sock knitting: Sockalong – Week 1 – Cast on, cuff and leg
Hooray! The day has finally arrived when we’re going to start our socks! Hello and thank you to everyone who’s joining in with this beginner sock knitting adventure – it’s amazing to see so many of you on the blog and in the Facebook group. Just thinking of how many pairs of socks we’re going to produce is making my mind boggle more than just a little! 🙂
Right, a quick recap before we get started on learning how to knit socks. If you need to remind yourself of any of the preparations we’ve talked about up until now – yarn, needles, tension squares, accessories, matching self-striping yarn and the anatomy of a sock, then you can find all of the posts here.
The materials you’re going to need for these socks are:
Your choice of needles
1 x 100g ball of 4ply sock yarn (or 2 x 50g depending on brand)
stitch markers
wool needle
scissors
You’ll also need a copy of my Basic 4ply Socks pattern, a basic top down socks pattern that you can find for free here, so that you can follow along.
Now, I’m going to show you how to make these socks with each of the sets of needles that I’ve talked about the earlier blogs posts – short circular, DPNs and long circular (magic loop) – but you only need to pick one set to work with. There’s going to be a lot to get through and LOTS of pictures so I’ll keep it all as simple as I can. It will be easiest to see what I’m doing if I keep all of the information for each type of needle together, so scroll through until you find your preferred one. I’ll be giving you exactly the same information for each type of needle so don’t worry that you’re missing something if you’re using one and not another.
Got everything? Great! Here we go … drum roll please … Week 1 of the Winwick Mum Sockalong!
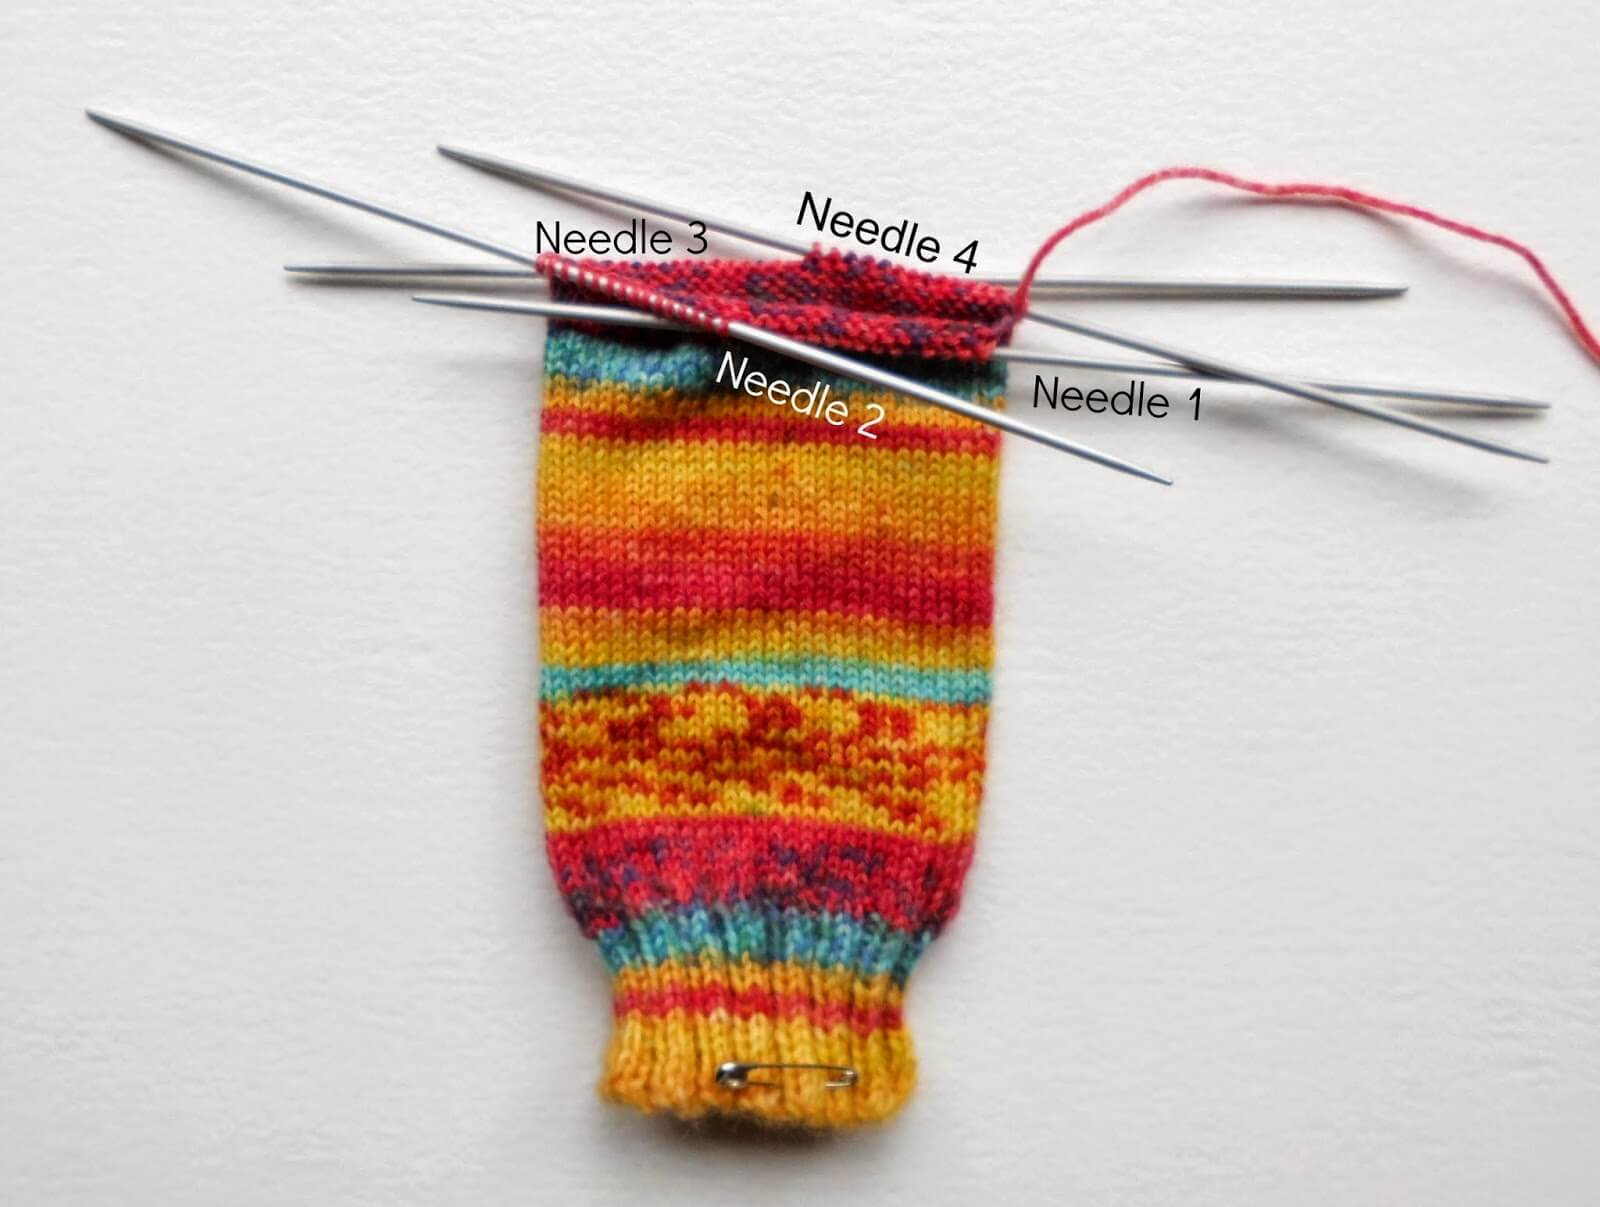
Basic 4ply Socks – short circular needle
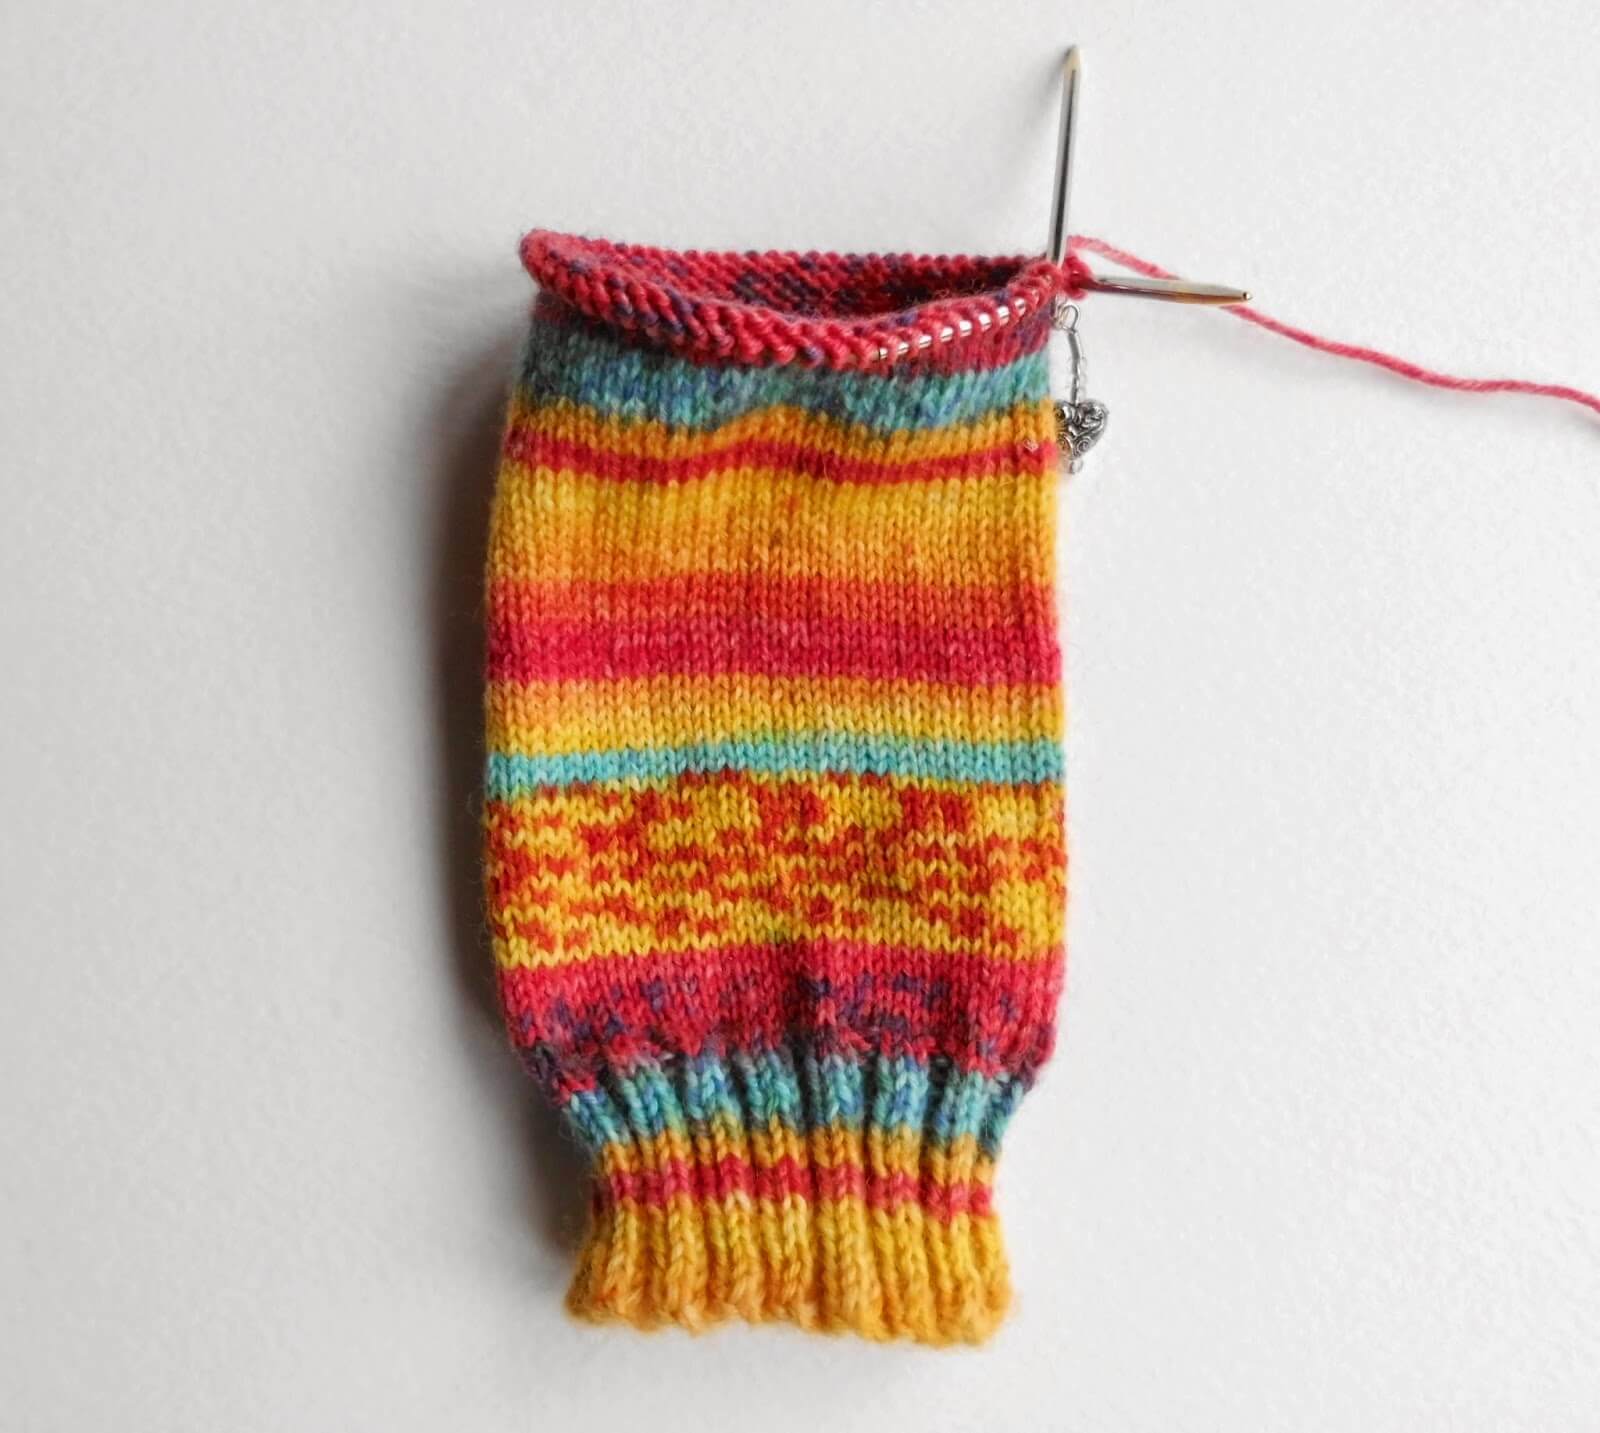
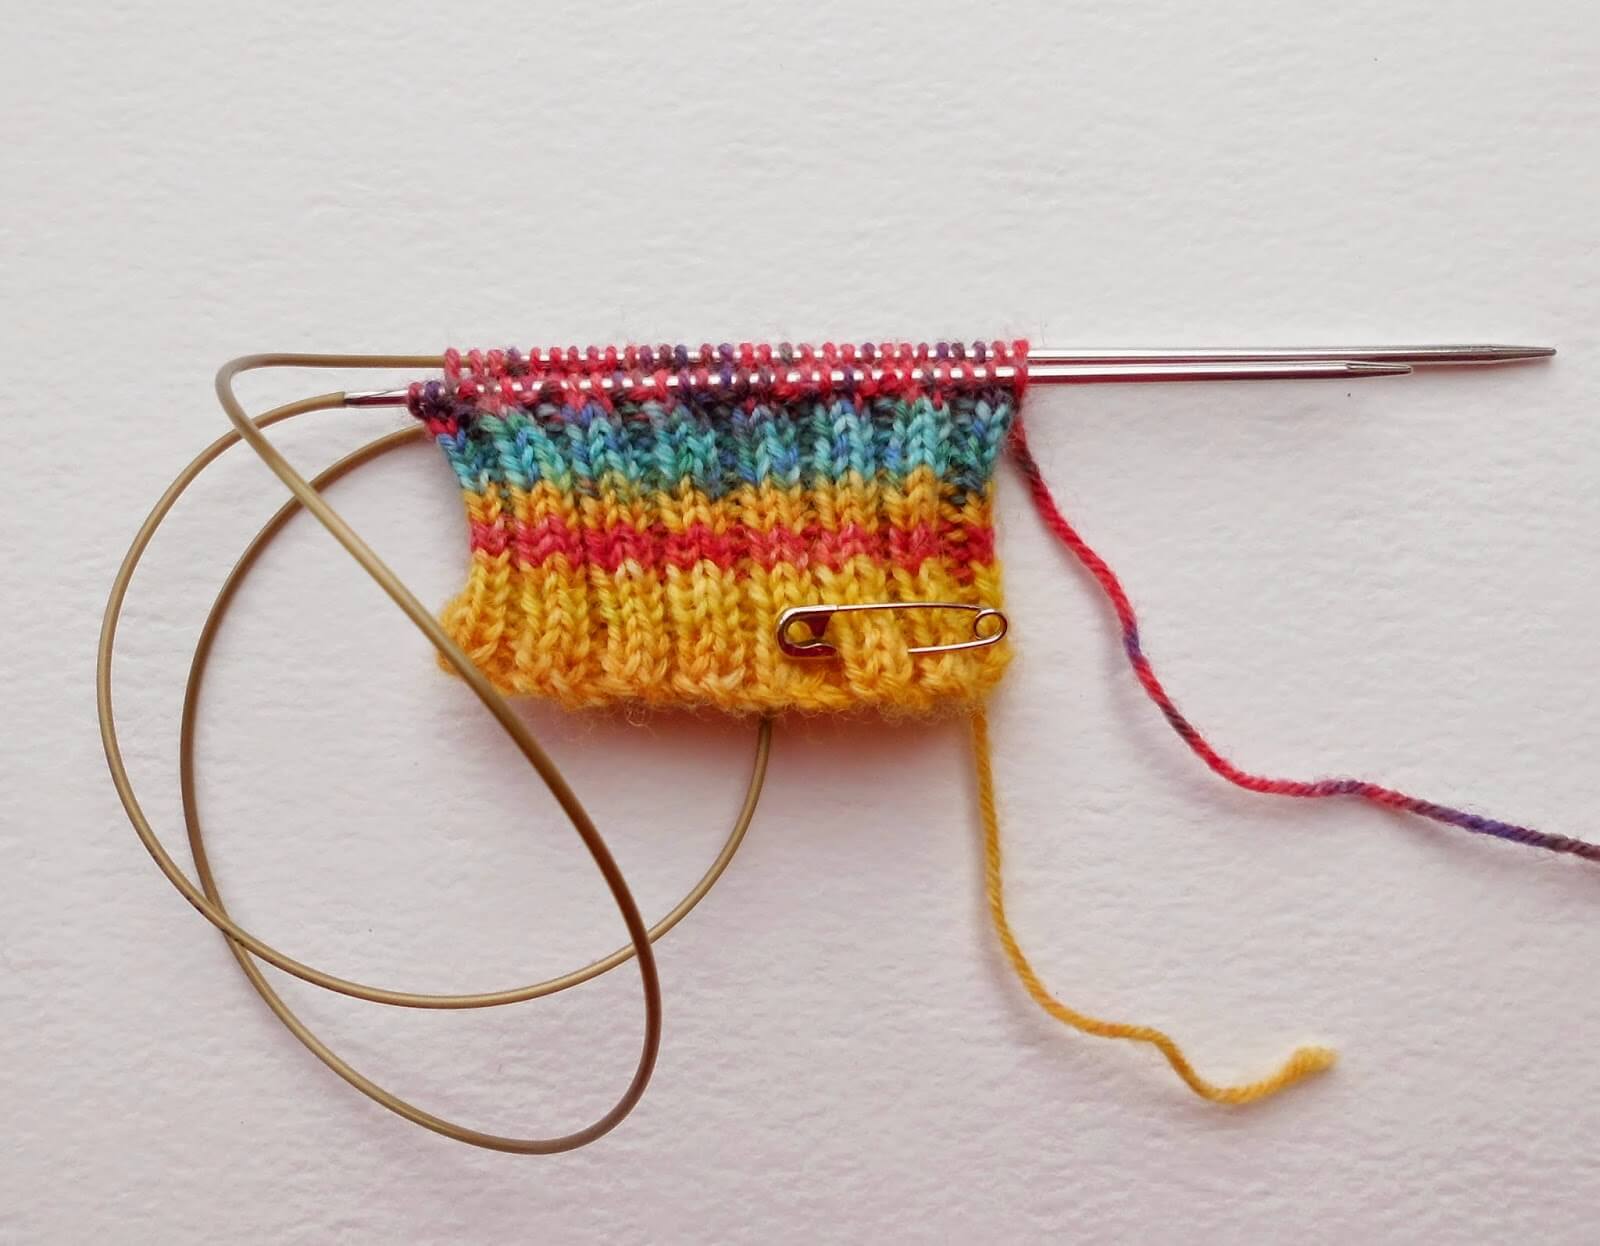
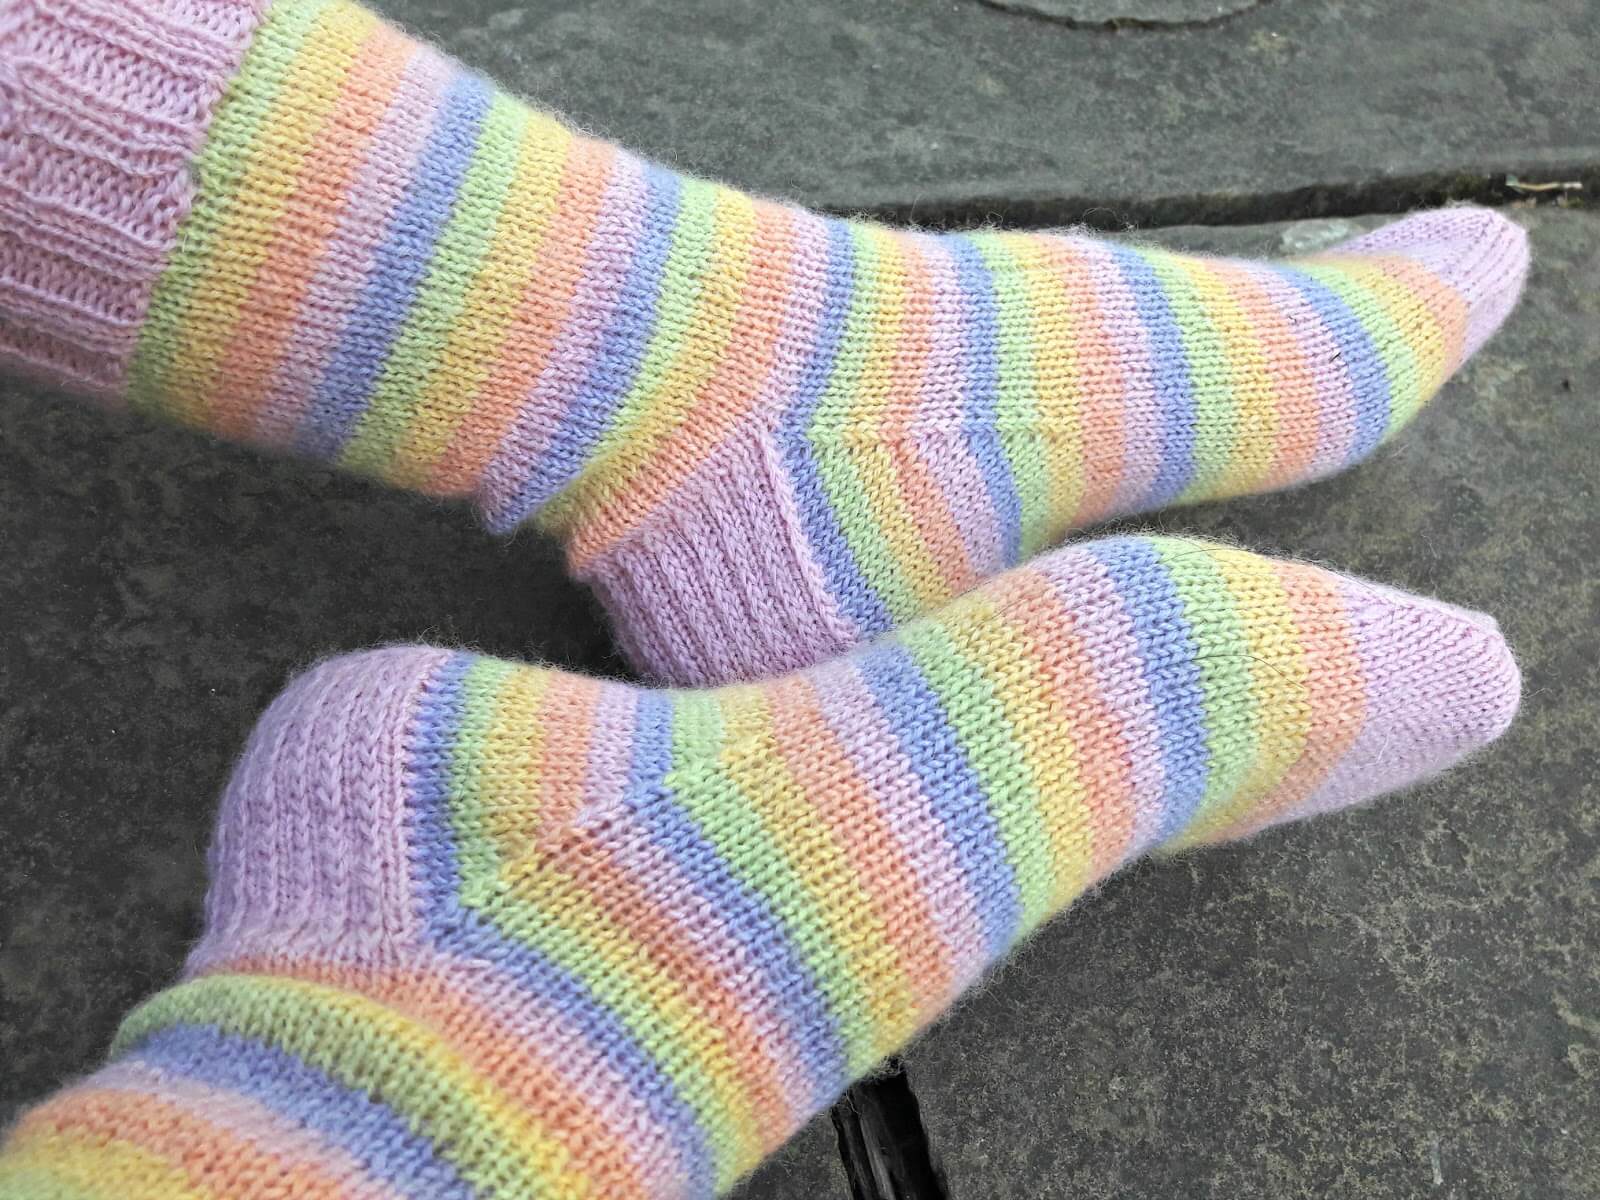
Cuff
I’ve based this sock pattern on 60 stitches. Because I know you will have completed your tension square and worked out the right gauge for your sock and used the Sock Stitch Calculation to check your size, you will know if 60 stitches is the right number for you, or whether you need to add more stitches or take some away. If you need a bigger sock, simply add stitches in blocks of 4, so cast on 64, 68, 72 stitches etc, and if you need a smaller sock, remove stitches in blocks of 4 so cast on 56, 52, 48 etc.
Cast on 60 stitches using 3.0mm DPNs. This is optional; you can use 2.5mm needles but I find that using a larger needle size gives me a slightly looser cable edge, which in turn makes it easier to put your socks on. I use the cable cast-on method which I showed you in the tension squares post, but you can use any method as long as it’s a nice stretchy cast-on.
The reason that I use DPNs to cast on before changing to my short circular is that I find it much easier to transfer the knitting to the circular after I’ve completed the first two rows – there’s more knitting to get hold of and the stitches are less likely to twist.
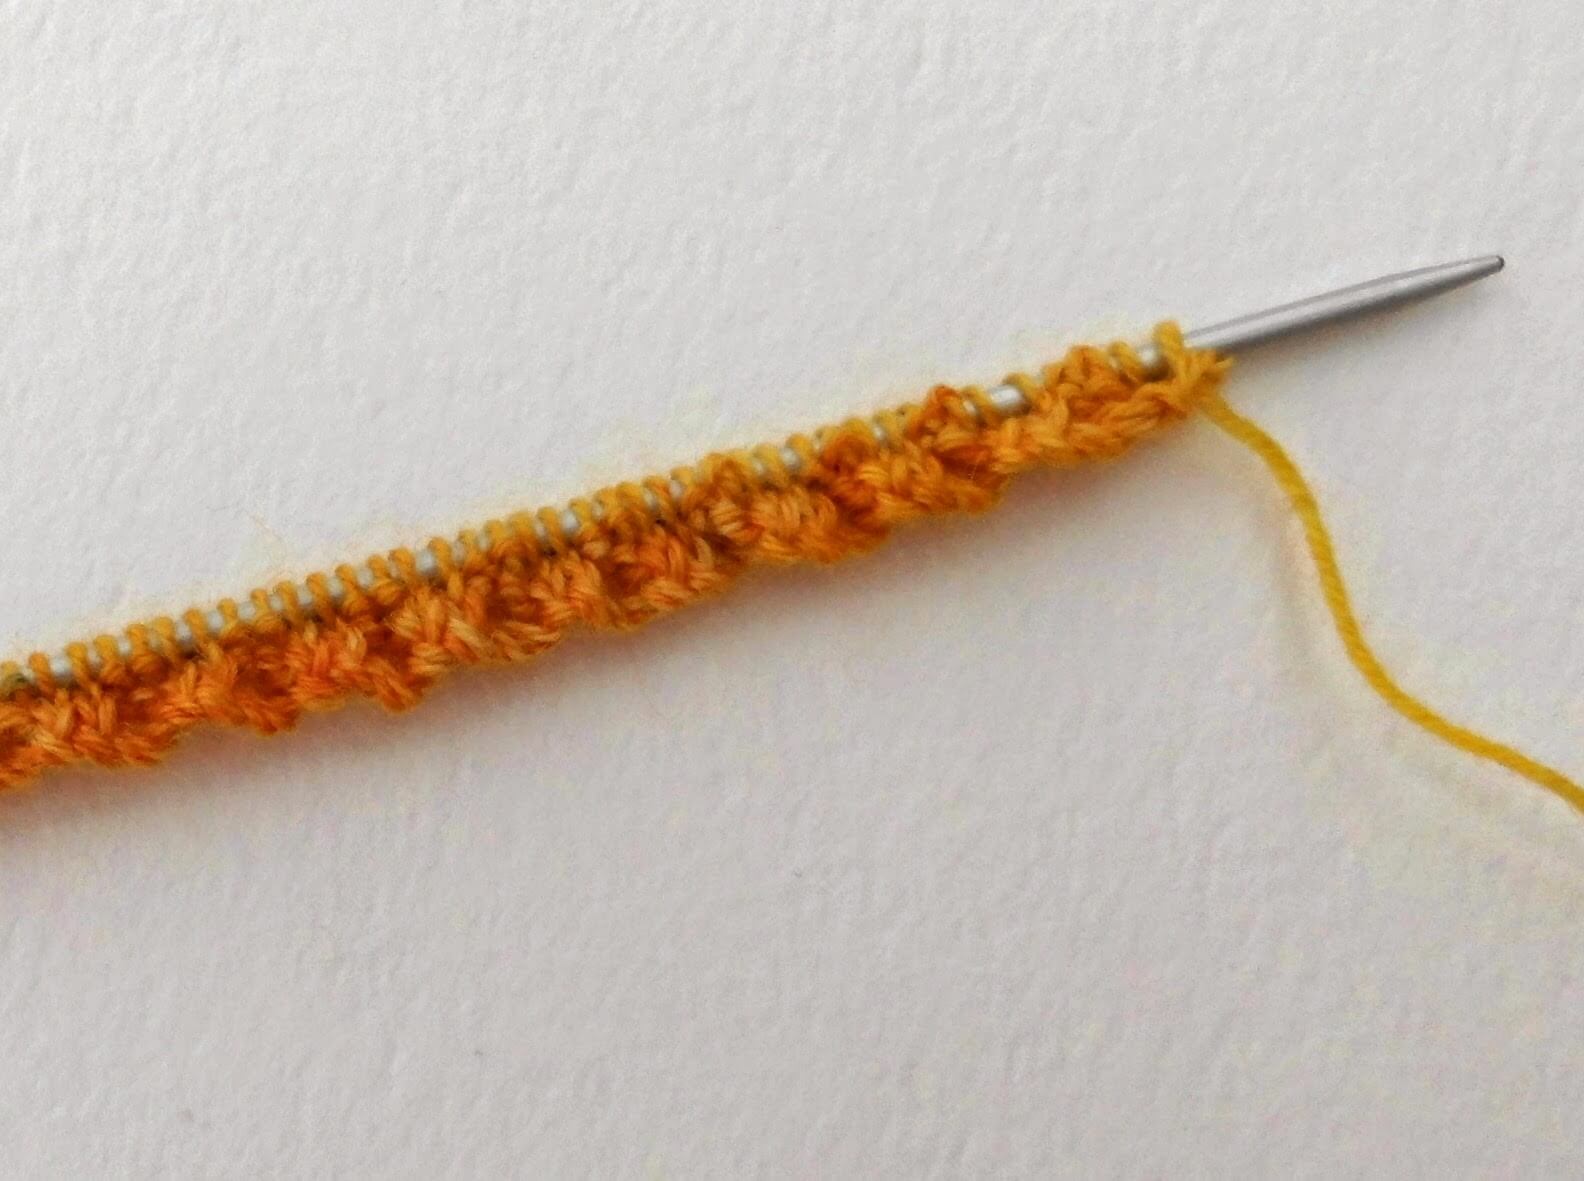
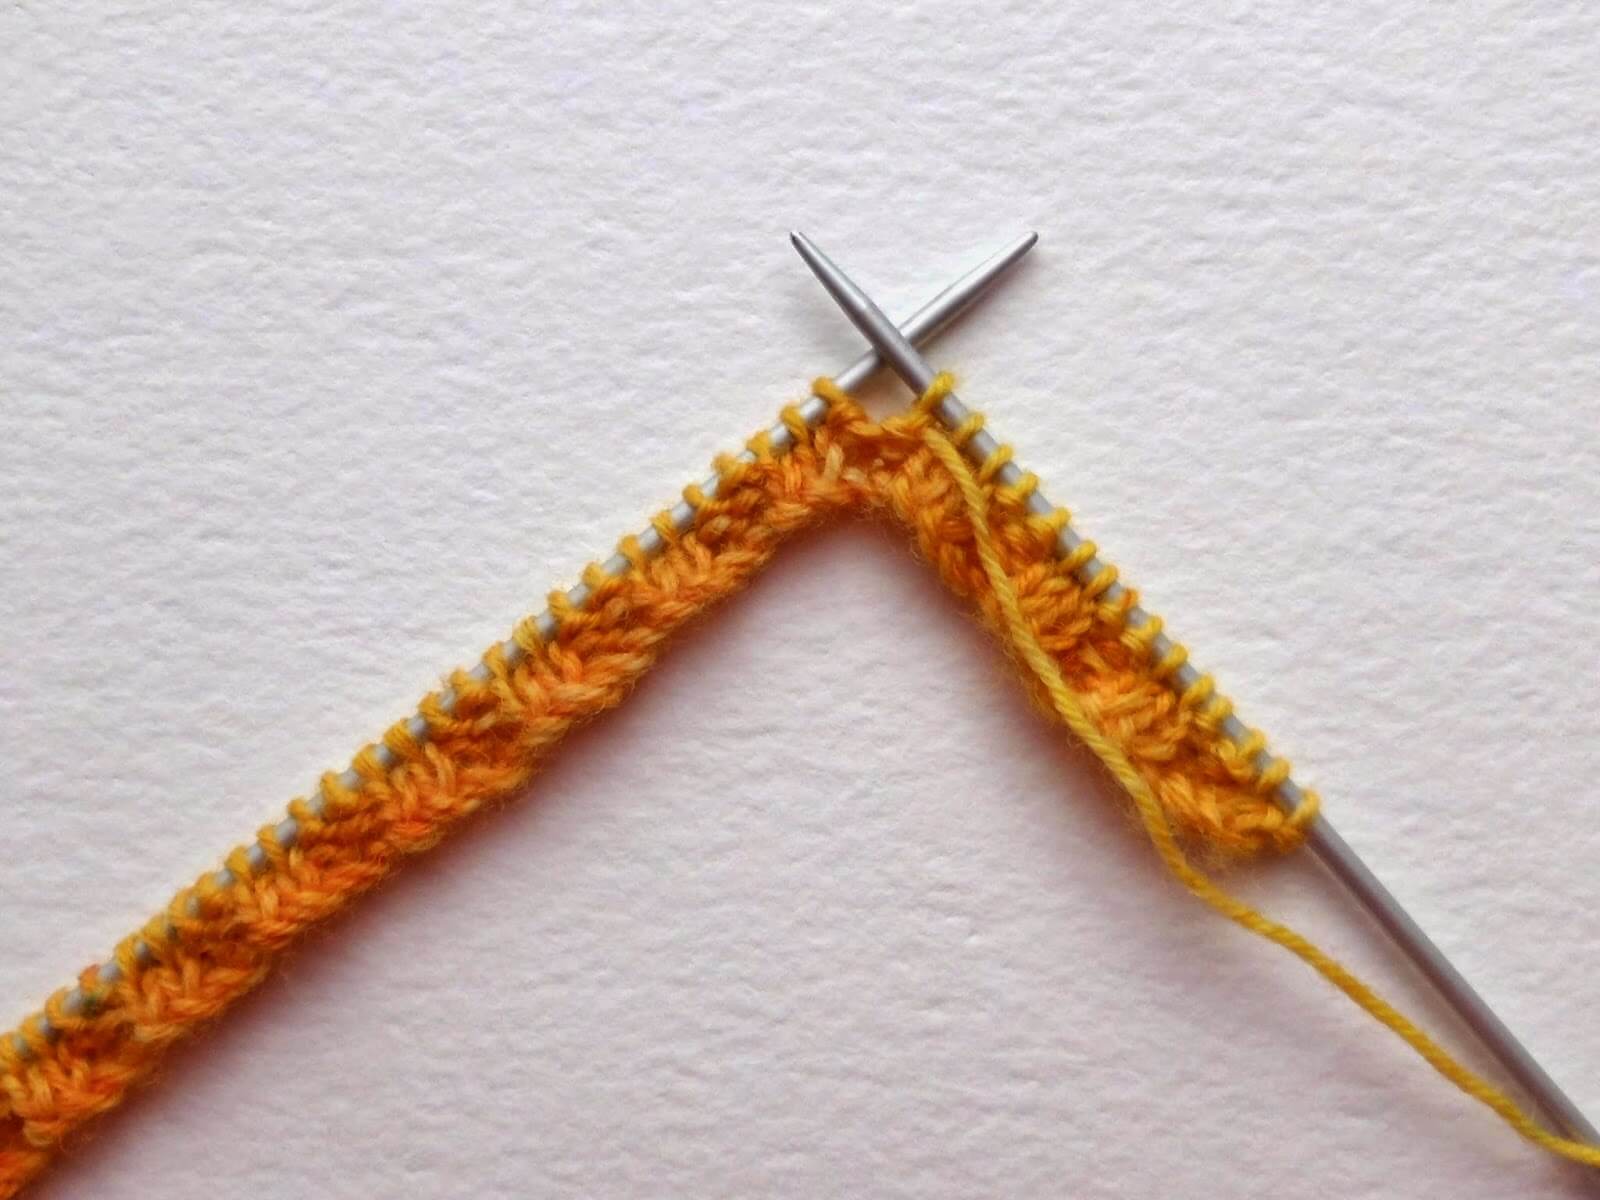
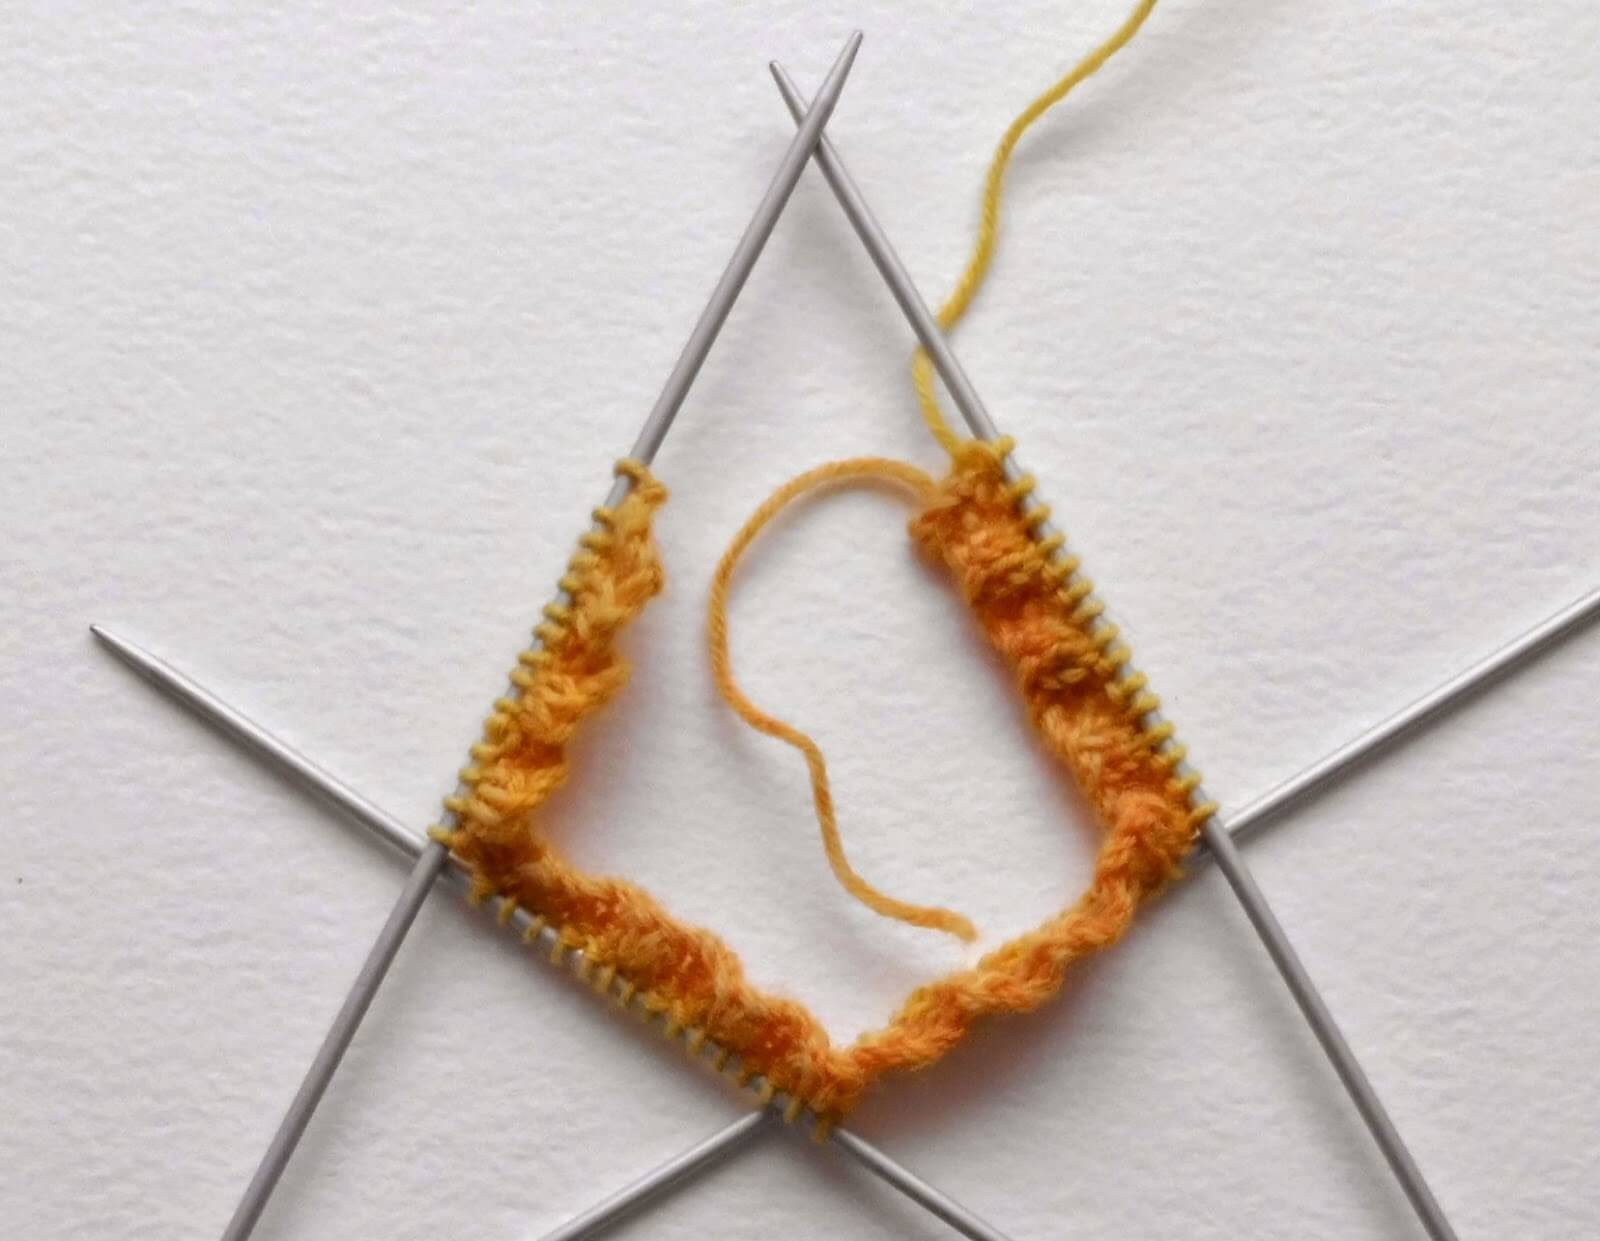
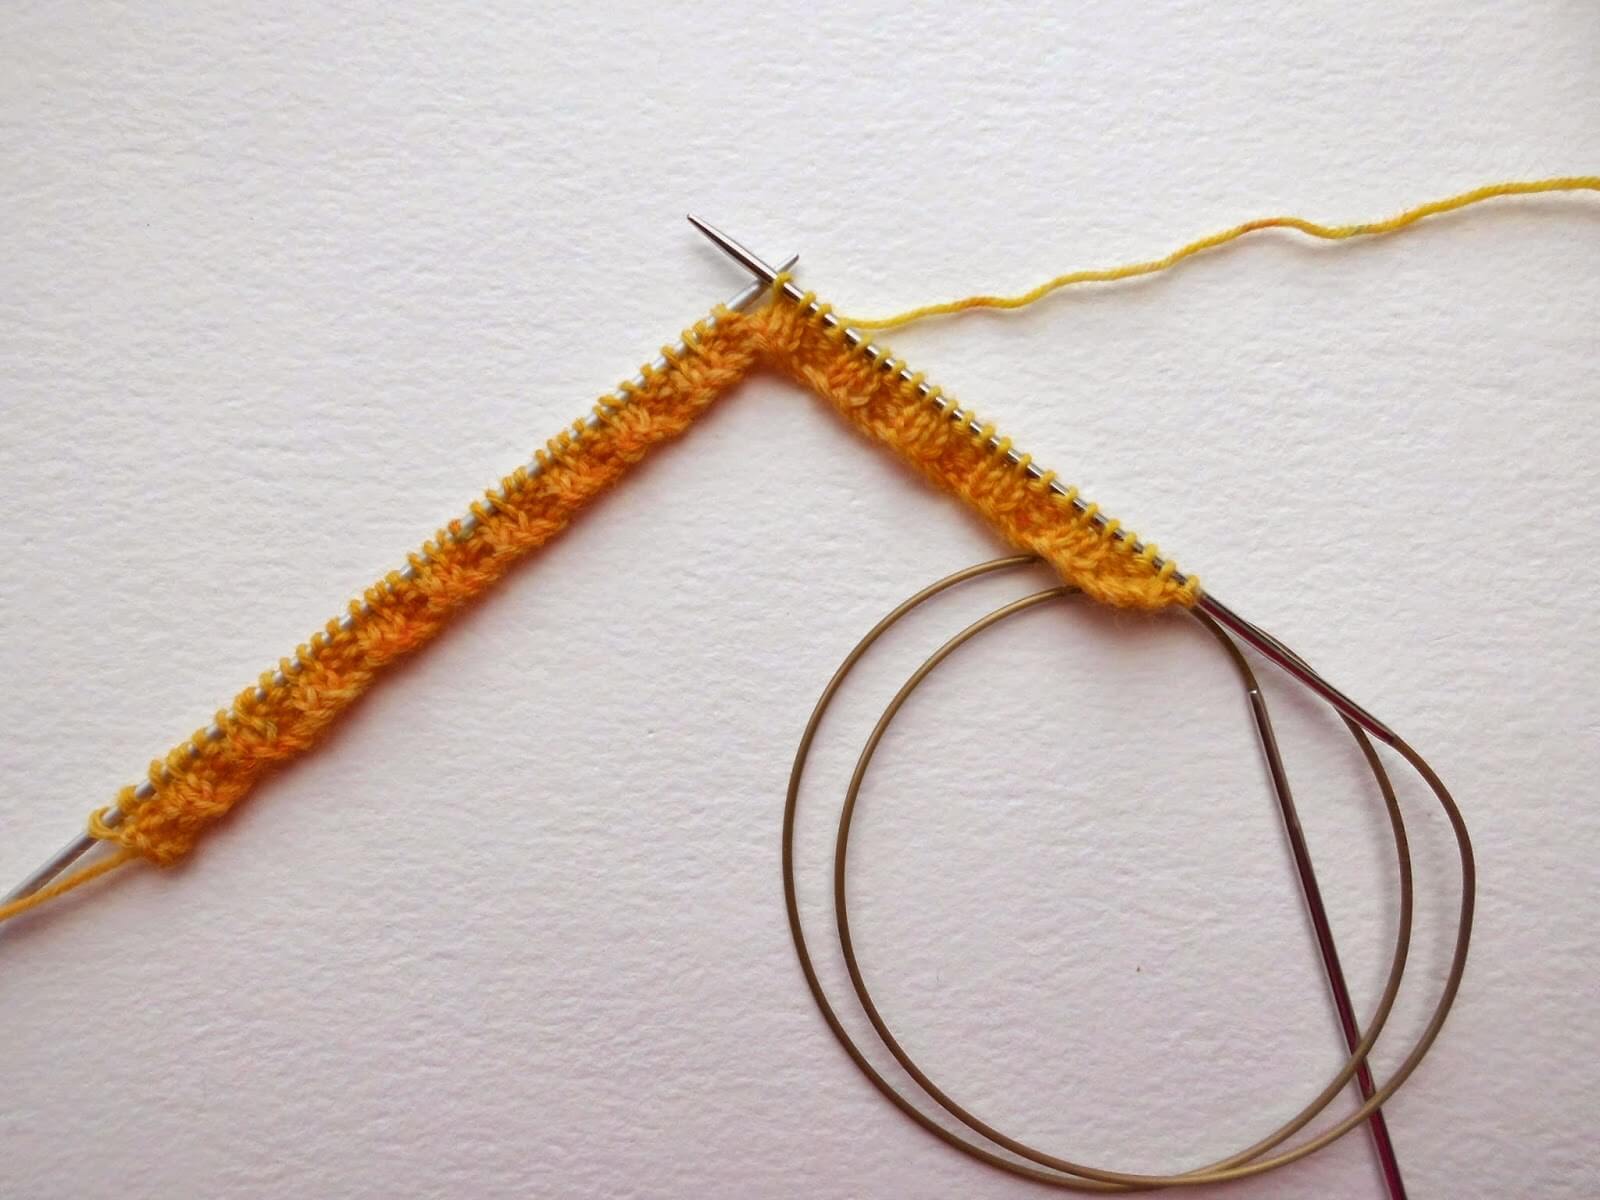
Row 1: K2, P2, repeat to end, turn.
Row 2: K2, P2, repeat to end, turn.
Your first two rows will look like this:
Now we are going to change to our 2.5mm circular needle. All you have to do is to knit the stitches from the DPN onto your circular needle for the next round, continuing to knit in K2, P2 rib.
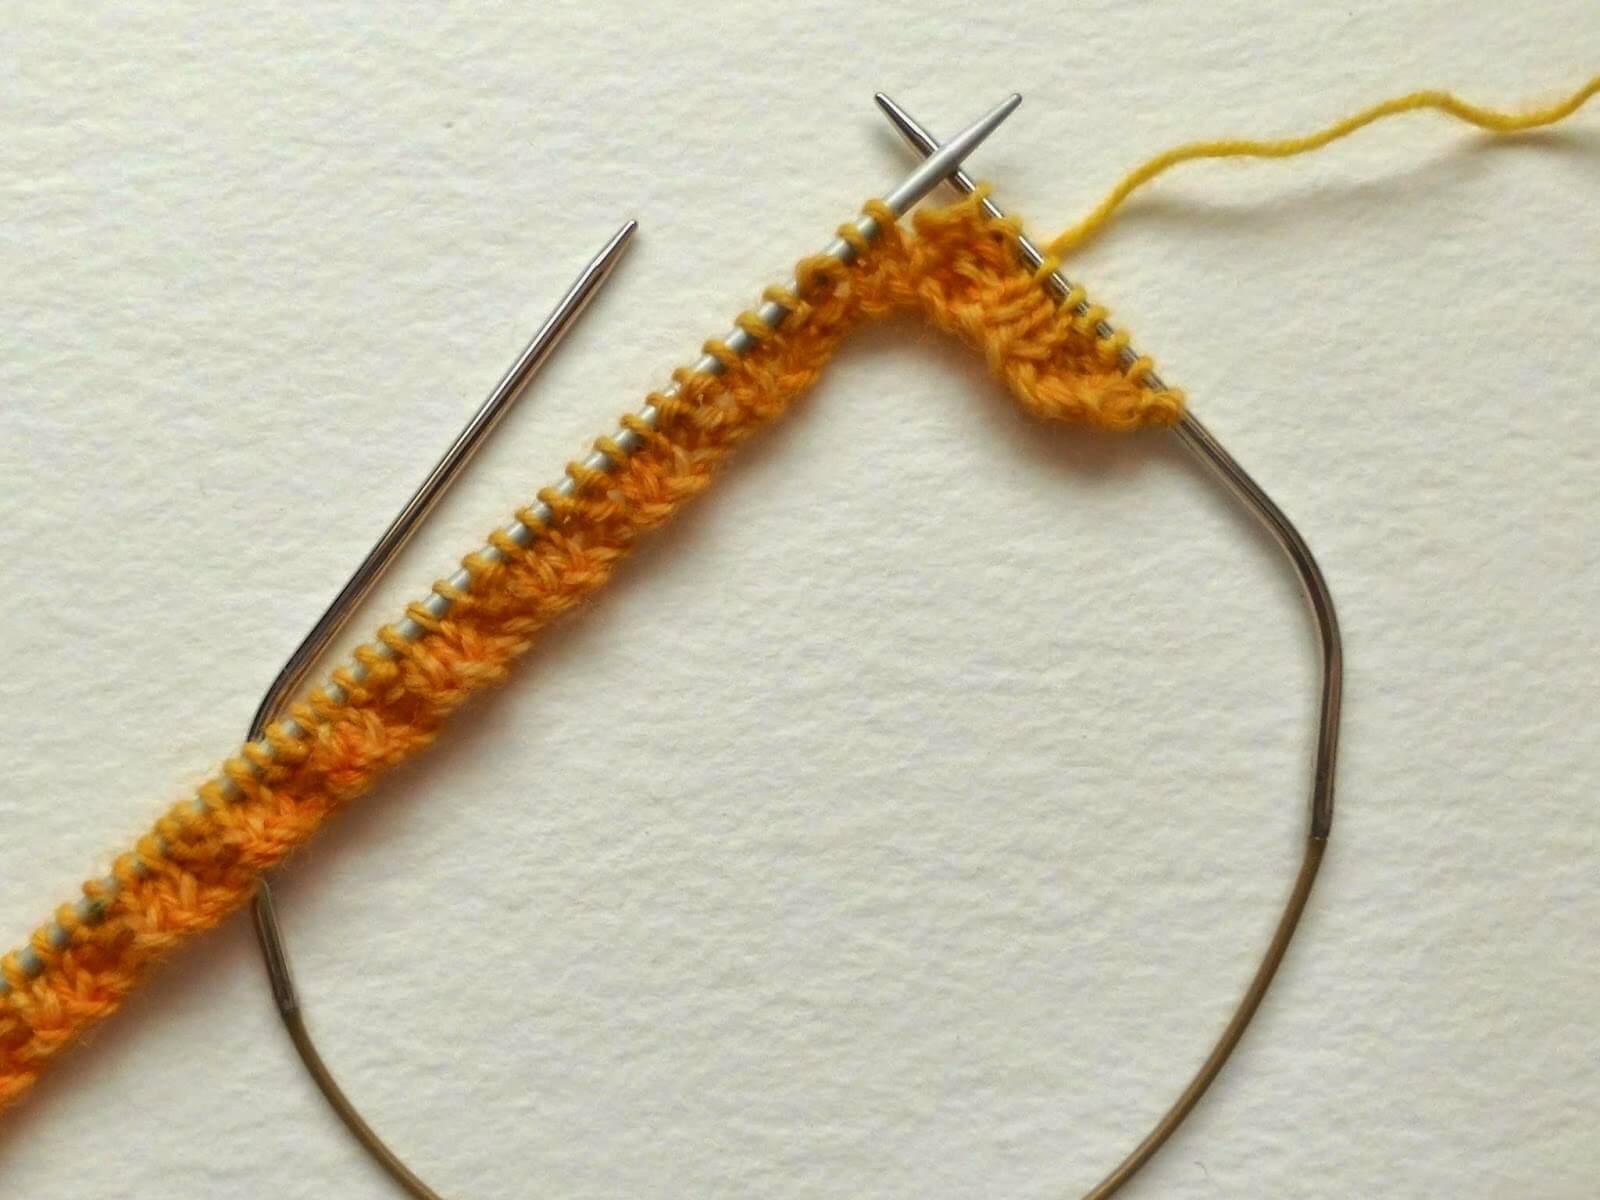
When you get to the end of the stitches, place a stitch marker over the end of the circular needle you are holding in your right hand, and then start the next round. Take care not to twist the knitting as you make the join, although you should be less likely to do that as you’ve knitted the two rows of rib first. You will be able to sew up the small gap where you knitted the first two rows on the DPNs later with your tail end.
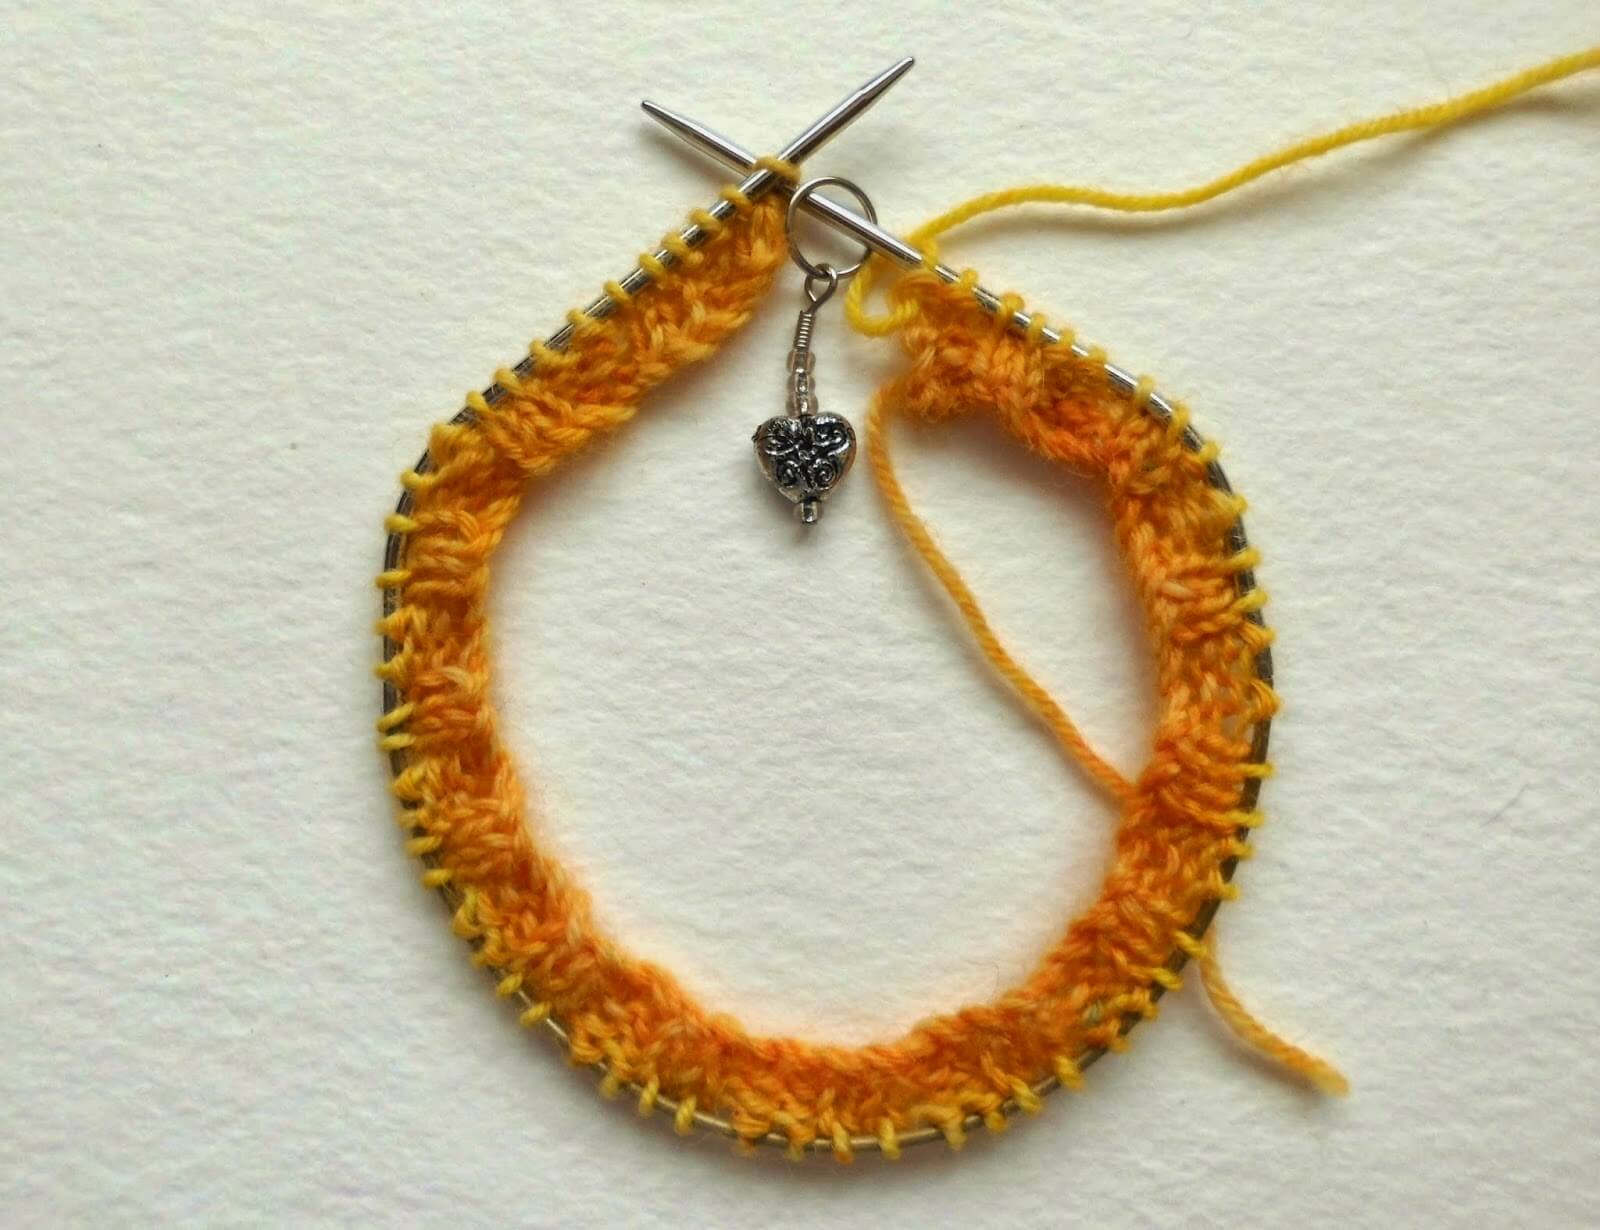
Continue in K2, P2 rib for 14 more rounds or until desired length of rib. (I knit 16 rounds of rib.) It might feel as if the stitches are pulling tightly on your needle as you knit and that your sock is rather an awkward shape, but this will rectify itself as you get further down the sock leg.
I find that K2, P2 rib makes a nice solid rib which will hold your sock up. If you want to experiment with K3, P1 rib or even K1, P1 rib then feel free to do so. What I wouldn’t recommend is skipping the rib altogether unless you really can’t bear tight things around your ankles and even then a few rows are a good idea – your socks will fall down if you don’t have any rib at all!
If you find that your knitting is turning inside out, don’t worry. It’s very easy to fix – just put your hand inside your knitting and pull it the right way out! We’ve all done it, it’s one of those fun beginner things! 🙂
Everything OK so far? It’s onto the leg part now and this is very easy – all you’re going to do is knit each round, remembering to slip the marker across from one needle to the other when you reach it. If you haven’t done so already, it’s a good idea at this point to start keeping count of how many rows you are knitting so that you can make sure that your second sock matches. Once you get to the leg, you’ll see why socks are such great projects to travel with – they occupy your hands and mind but not a great deal of space!
Leg
To create the leg part of your sock, you simply knit each round. If you haven’t done so already, it’s a good idea at this point to start keeping count of how many rows you are knitting so that you can make sure that your second sock matches.
Continue to knit each round until you reach your desired length before the start of the heel (for me, this is 75 rounds in total including the rib). The heel flap I create is 2” long so you can measure from the base of your foot if you’re not sure how long to make your leg section. You can always make your heel flap longer if you want to (you may want to do this if you have a high instep as it will the sock easier to put on). This is a very flexible sock! If you want to try your sock on at any point you can do so, but be careful that you don’t slide any stitches off the needle. You can slip your knitting onto a spare piece of yarn or use stitches holders if you need to.
That’s this week’s part finished. Easy, eh? 🙂 You’re done for this week now, so jump down to the end of the page where I’ll be telling you what we’re going to be doing next.
Basic 4ply Socks – double pointed needles (DPNs)
Before we start – all of the pictures in this post are based on using five DPNs. If you only have four, DO NOT PANIC, your sock will still work out just fine. Instead of spreading your stitches across four needles and using one to knit with, you’re going to spread them across three needles and use the fourth to knit with. I’ll tell you how to do this when we get to this point.
Cuff
I’ve based this sock pattern on 60 stitches. Because I know you will have completed your tension square and worked out the right gauge for your sock and used the Sock Stitch Calculation to check your size, you will know if 60 stitches is the right number for you, or whether you need to add more stitches or take some away. If you need a bigger sock, simply add stitches in blocks of 4, so cast on 64, 68, 72 stitches etc, and if you need a smaller sock, remove stitches in blocks of 4 so cast on 56, 52, 48 etc.
Cast on 60 stitches using 3.0mm DPNs. This is optional; you can use 2.5mm needles but I find that using a larger needle size gives me a slightly looser cable edge, which in turn makes it easier to put your socks on. I use the cable cast-on method which I showed you in the tension squares post, but you can use any method as long as it’s a nice stretchy cast-on.
I always cast on with just two needles rather than trying to cast on across four needles straight away – I find it just too fiddly.
Row 1: K2, P2, repeat to end, turn.
Row 2: K2, P2, repeat to end, turn.
Your first two rows will look like this:

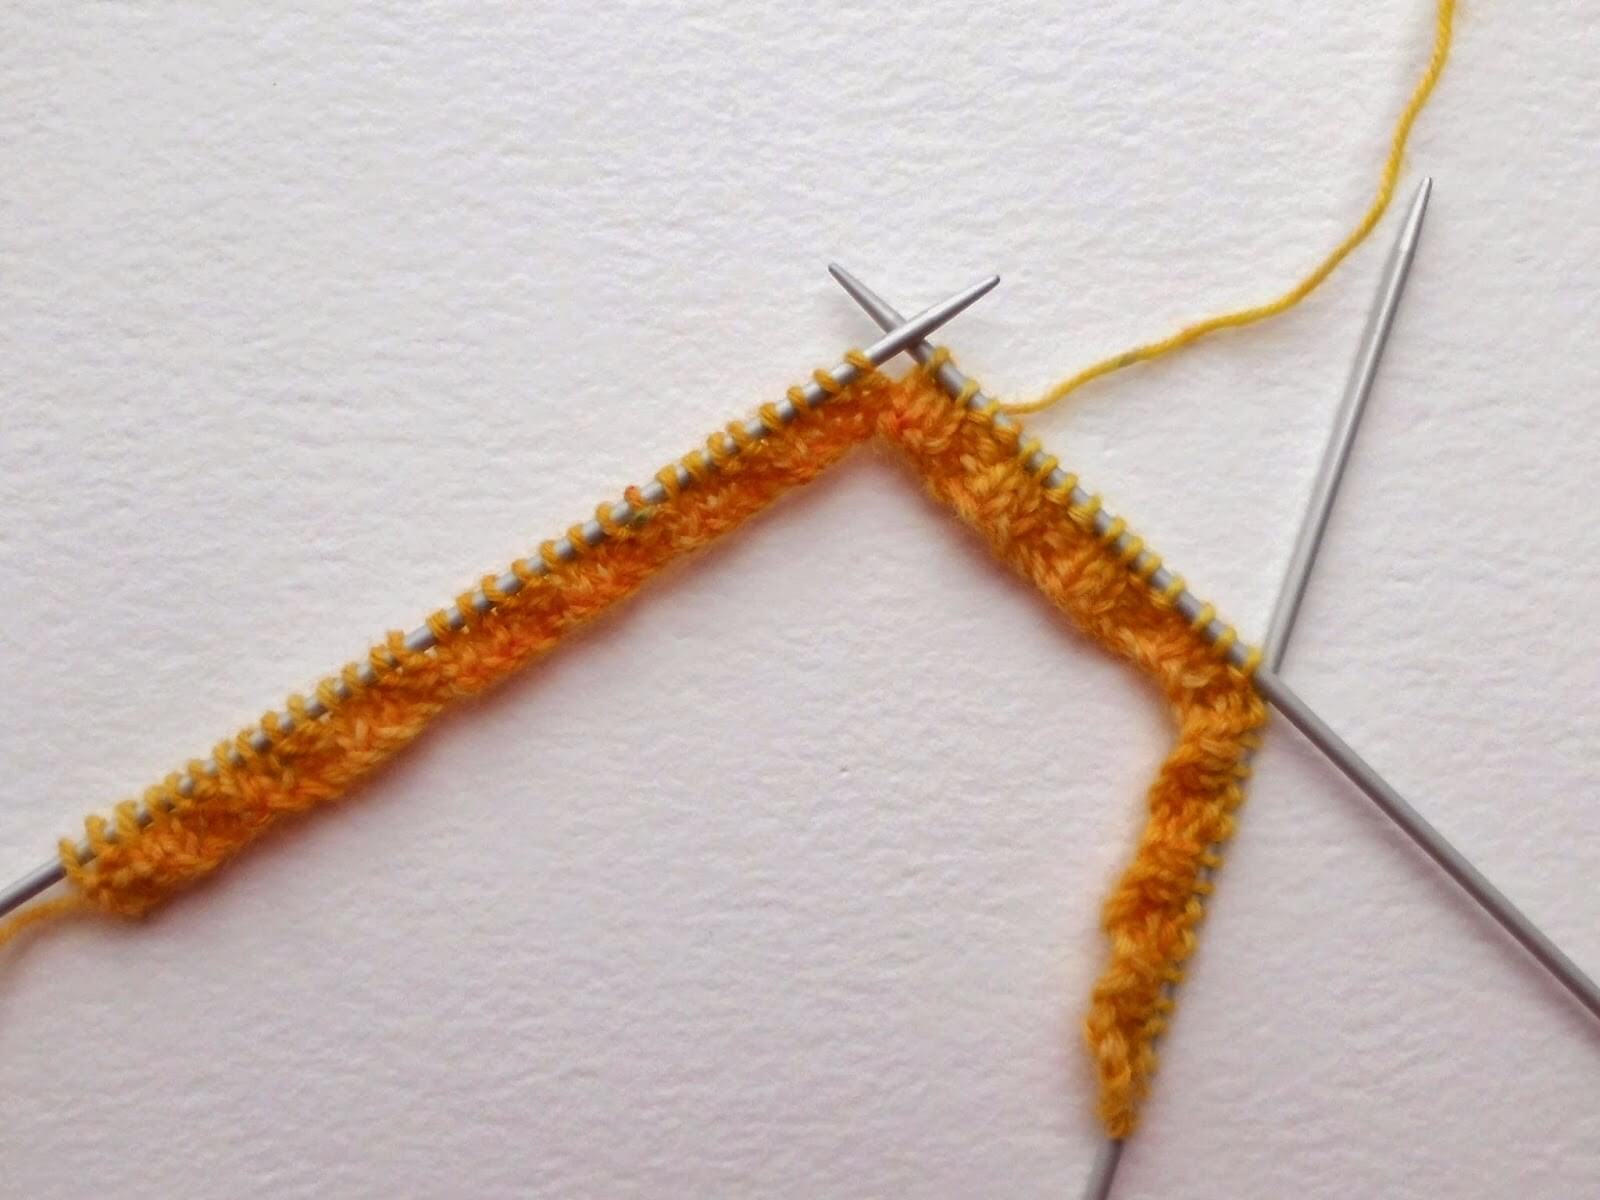
Now we are going to bring in the rest of the DPNs, but at this point you’re going to change down to 2.5mm needles for the rest of the rib. Because you have knitted the first two rows, you’ll find it much easier to incorporate more needles without twisting your stitches, although care still needs to be taken. This is the point where it really might feel as if you’re wrestling with a hedgehog, but take it slowly and it will be fine!
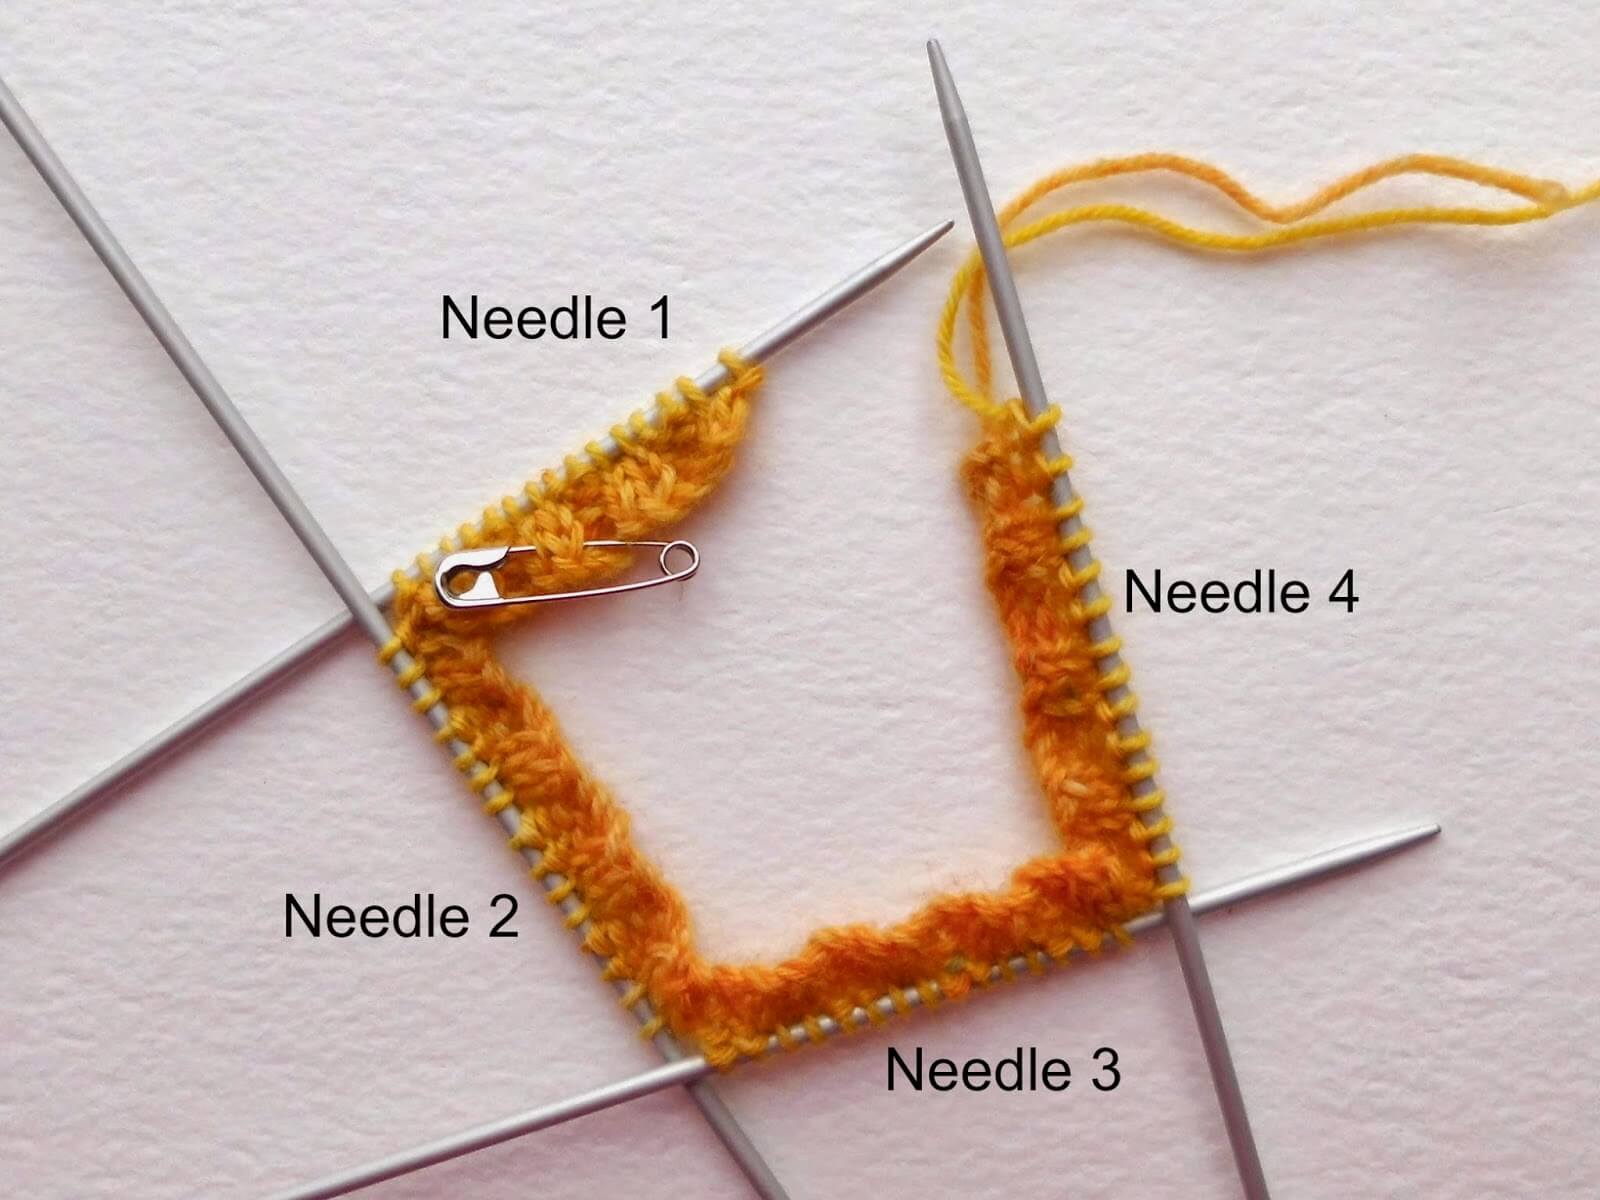
My preference is to knit on five DPNs and this is what I’m going to show you here. If you want to use four, that’s absolutely fine. Your sock will still work out just as well.
All you need to do is divide the 60 stitches by 4, which will give you 15 stitches for each needle. However, that will mean you splitting your K2 or P2 rib stitches across the needles so you’ll find that it’s easiest to have an even number of stitches on each needle so we’re going to split them 16, 14, 14, 16. It doesn’t matter that you have one more or less on each needle as long as your total number of stitches stays the same. If you have cast on more or less than 60 stitches, just divide the total number by 4 and that will give you the number of stitches for each needle, but again make sure that you have an even number on each needle.
If you’re knitting on four DPNs, then just divide the total number of stitches by three. You’ll split them across your needles in exactly the same way as in the following pictures but won’t use the fourth needle as you’ll need that to knit with.
Assuming that you’re working with 60 stitches, knit the first 16 stitches onto your first needle, continuing in K2 P2 rib.
Now knit the next 14 stitches onto your second needle. This can feel very fiddly if you’ve not done it before, but it will get easier as you join your knitting into the round. It doesn’t matter whether you needles are on top of each other or underneath – and they’ll probably swing about a bit as well whilst you’re adding new needles. Just take it slowly.
Simply repeat the process for needle three …
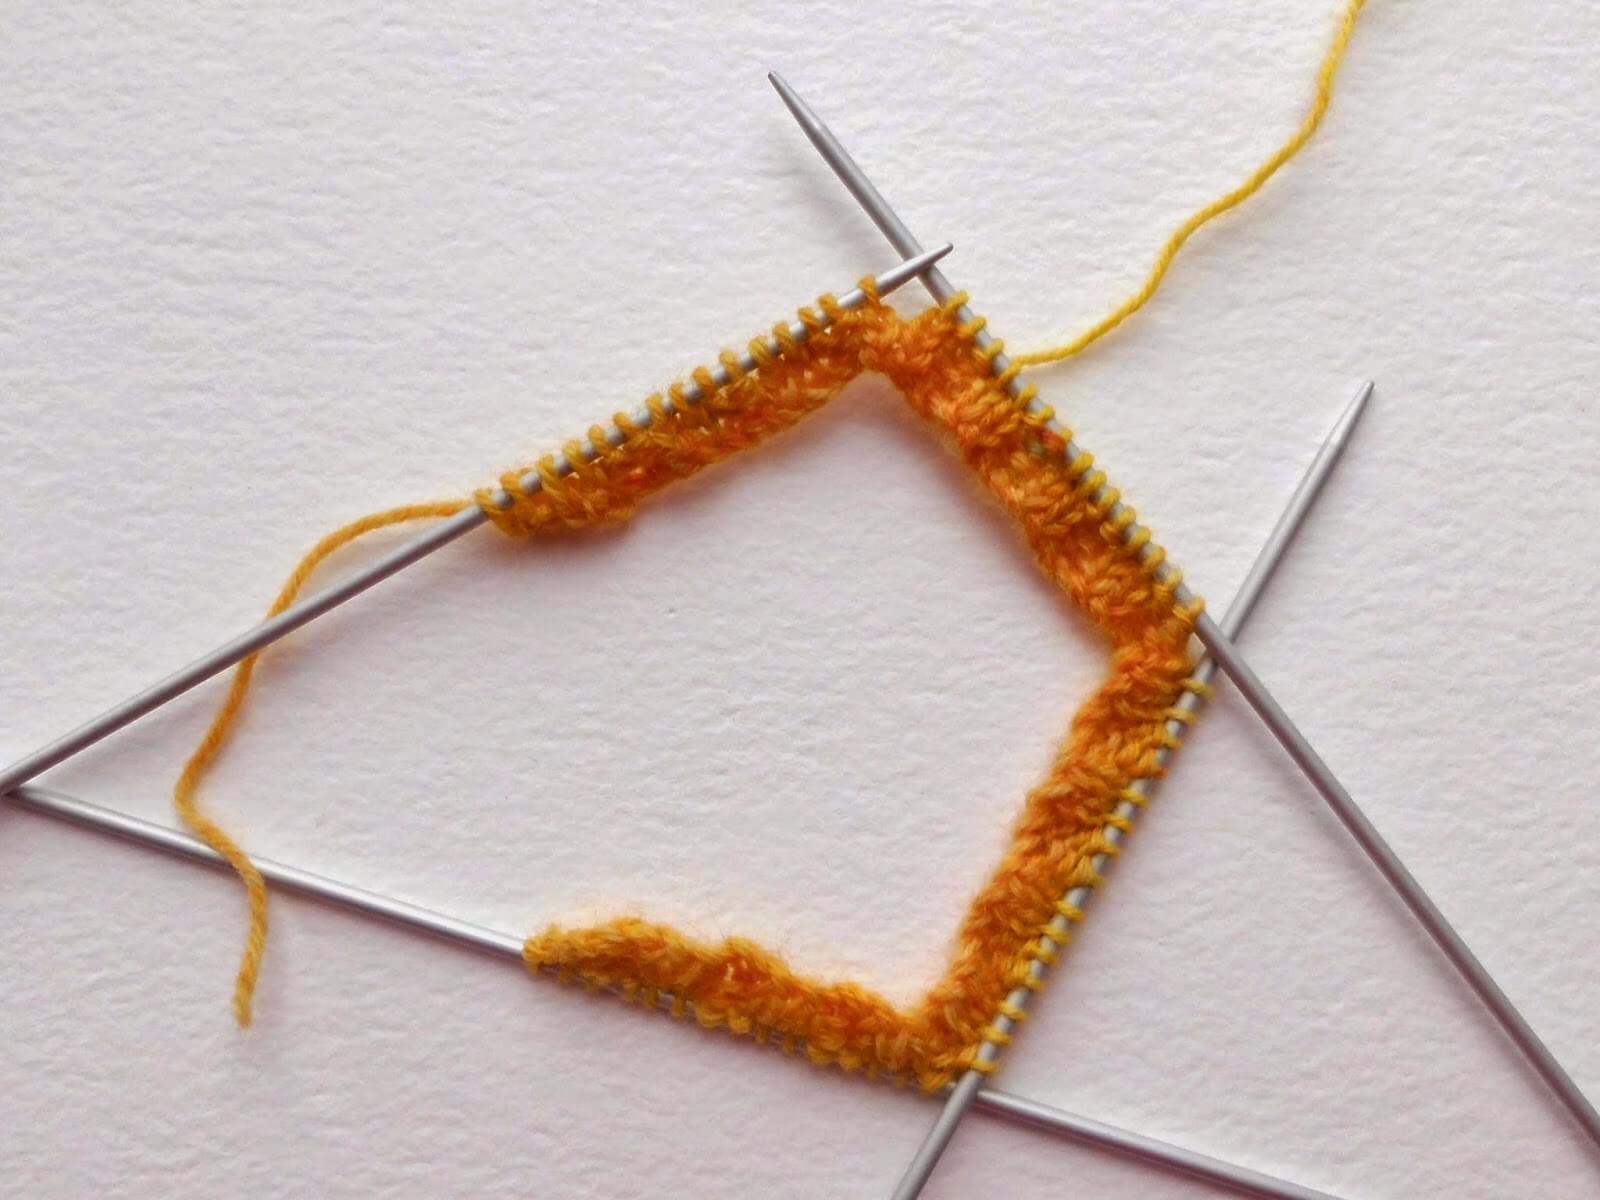
and knit the last 16 stitches onto needle four …
It’s not really necessary to use a stitch marker to indicate the end of your round when using DPNs, although I find it useful to mark needle one. I use a safety pin, which I pin into the knitting on needle one – although more attractive markers are available!
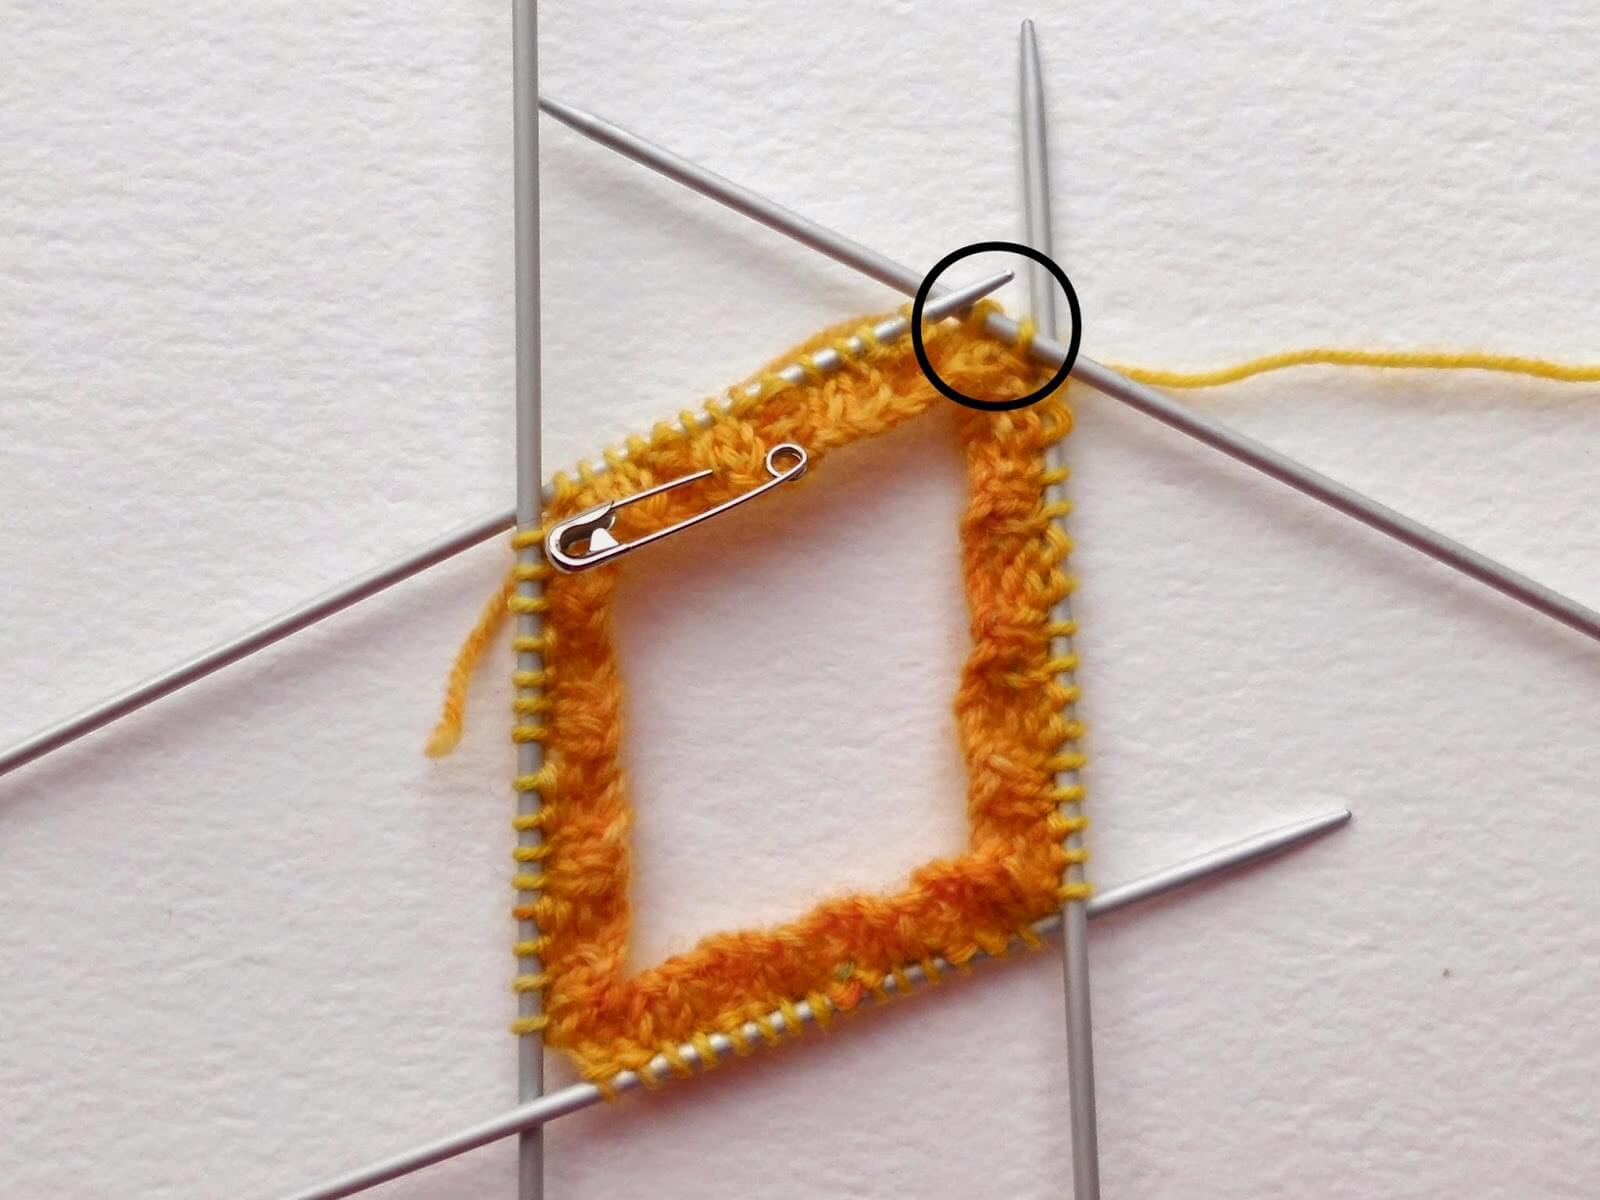
To join into the round, simply knit the first stitch of needle one onto needle five, pulling the yarn tightly for the first two stitches (circled in the picture). This helps to reduce ladders and should be done every time you change needles. You will be able to sew up the small gap where you knitted the first two rows on the DPNs later with your tail end.
Continue in K2, P2 rib for 14 more rounds or until desired length of rib (I knit 16 rounds of rib).
I find that K2, P2 rib makes a nice solid rib which will hold your sock up. If you want to experiment with K3, P1 rib or even K1, P1 rib then feel free to do so. What I wouldn’t recommend is skipping the rib altogether unless you really can’t bear tight things around your ankles and even then a few rows are a good idea – your socks will fall down if you don’t have any rib at all!
If you find that your knitting is turning inside out, don’t worry. It’s very easy to fix – just put your hand inside your knitting and pull it the right way out! We’ve all done it, it’s one of those fun beginner things! 🙂
Everything OK so far? It’s onto the leg part now and this is very easy – all you’re going to do is knit each round, remembering to keep the yarn tight at the needle changes to stop ladders. If you haven’t done so already, it’s a good idea at this point to start keeping count of how many rows you are knitting so that you can make sure that your second sock matches. Once you get to the leg, you’ll see why socks are such great projects to travel with – they occupy your hands and mind but not a great deal of space!
Leg
To create the leg part of your sock, you simply knit each round. If you haven’t done so already, it’s a good idea at this point to start keeping count of how many rows you are knitting so that you can make sure that your second sock matches.
Continue to knit each round until you reach your desired length before the start of the heel (for me, this is 75 rounds in total including the rib). The heel flap I create is 2” long so you can measure from the base of your foot if you’re not sure how long to make your leg section. You can always make your heel flap longer if you want to (you may want to do this if you have a high instep as it will make the sock easier to put on). This is a very flexible sock! If you want to try your sock on at any point you can do so, but be careful that you don’t slide any stitches off the needle. You can slip your knitting onto a spare piece of yarn or use stitches holders if you need to.
That’s this week’s part finished. Easy, eh? 🙂 You’re done for this week now, so jump down to the end of the page where I’ll be telling you what we’re going to be doing next.
Basic 4ply Socks – Long circular (magic loop)
Cuff
I’ve based this sock pattern on 60 stitches. Because I know you will have completed your tension square and worked out the right gauge for your sock and used the Sock Stitch Calculation to check your size, you will know if 60 stitches is the right number for you, or whether you need to add more stitches or take some away. If you need a bigger sock, simply add stitches in blocks of 4, so cast on 64, 68, 72 stitches etc, and if you need a smaller sock, remove stitches in blocks of 4 so cast on 56, 52, 48 etc.
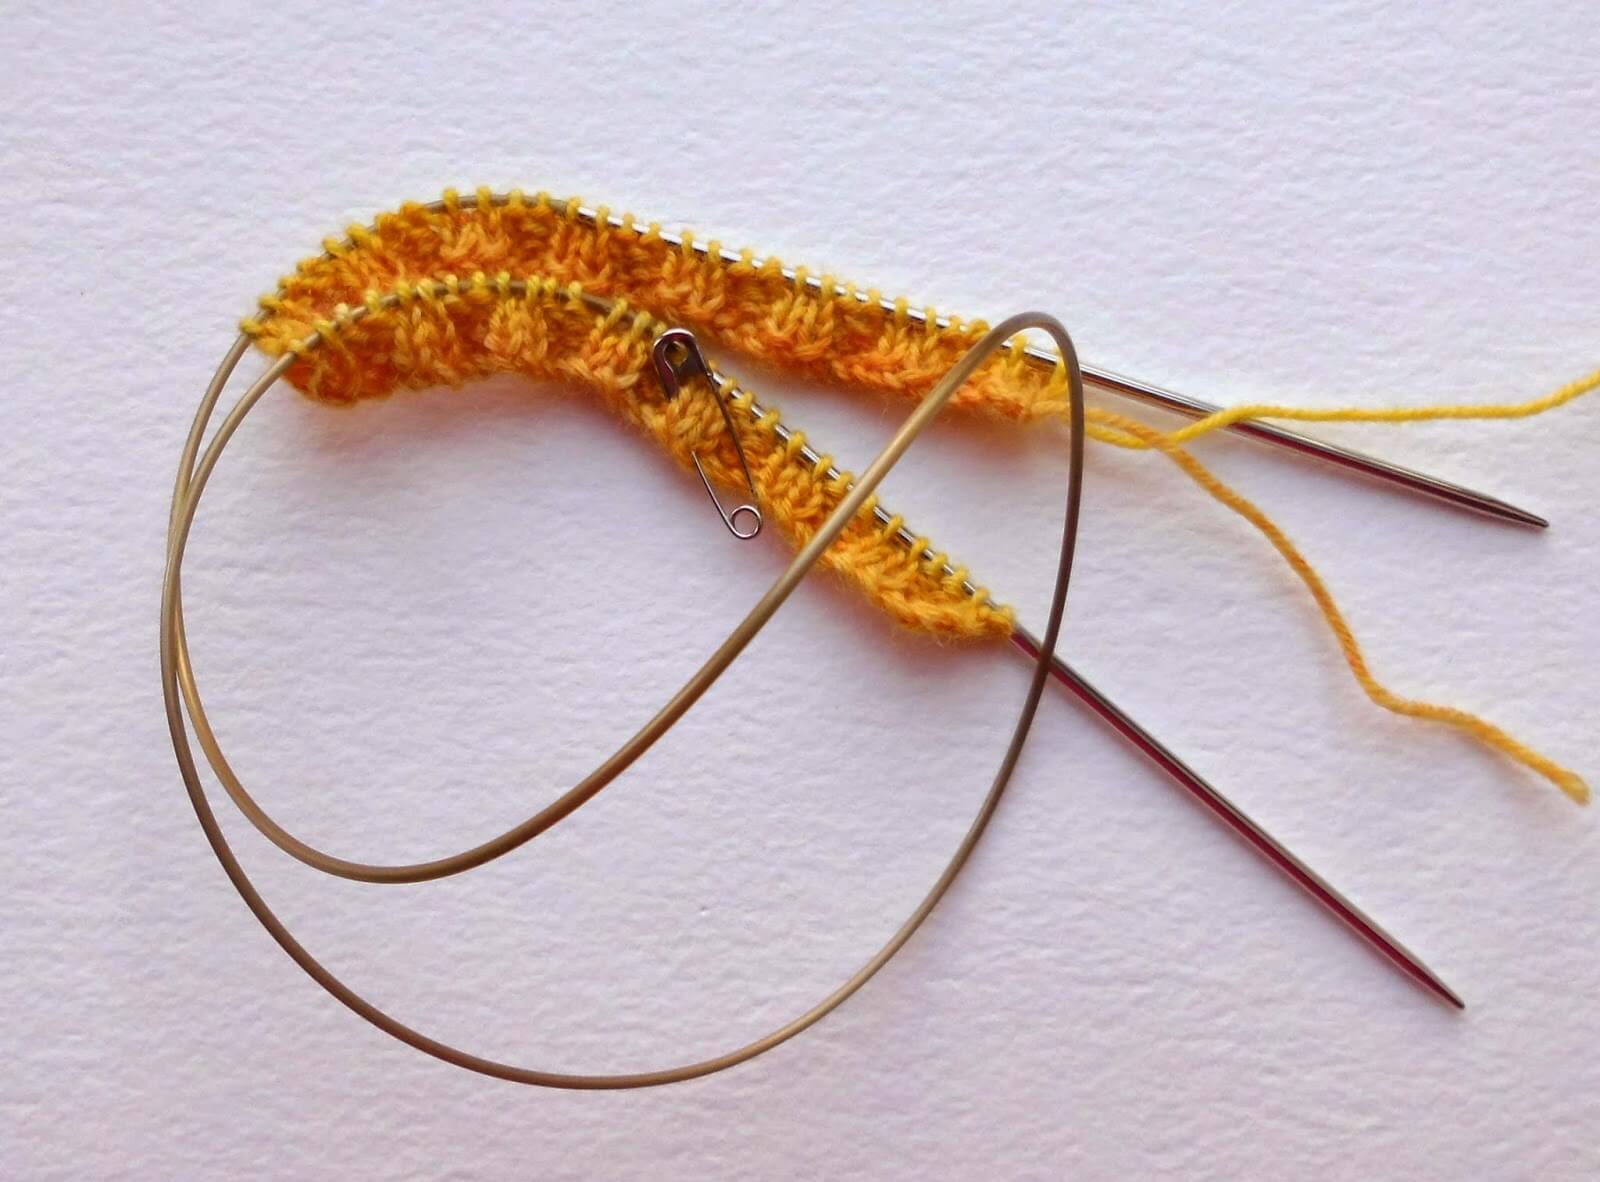
Cast on 60 stitches using 3.0mm DPNs or your circular needle. The needle that you use to cast on is entirely your choice – it really doesn’t matter whether you use DPNs or your circular needle for the cast on and first two rows as you’re not going to join your knitting into the round straight away. You can use 2.5mm needles but I find that using a larger needle size gives me a slightly looser cable edge, which in turn makes it easier to put your socks on. I use the cable cast-on method which I showed you in the tension squares post, but you can use any method as long as it’s a nice stretchy cast-on.
Row 1: K2, P2, repeat to end, turn.
Row 2: K2, P2, repeat to end, turn.
Your first two rows will look like this:

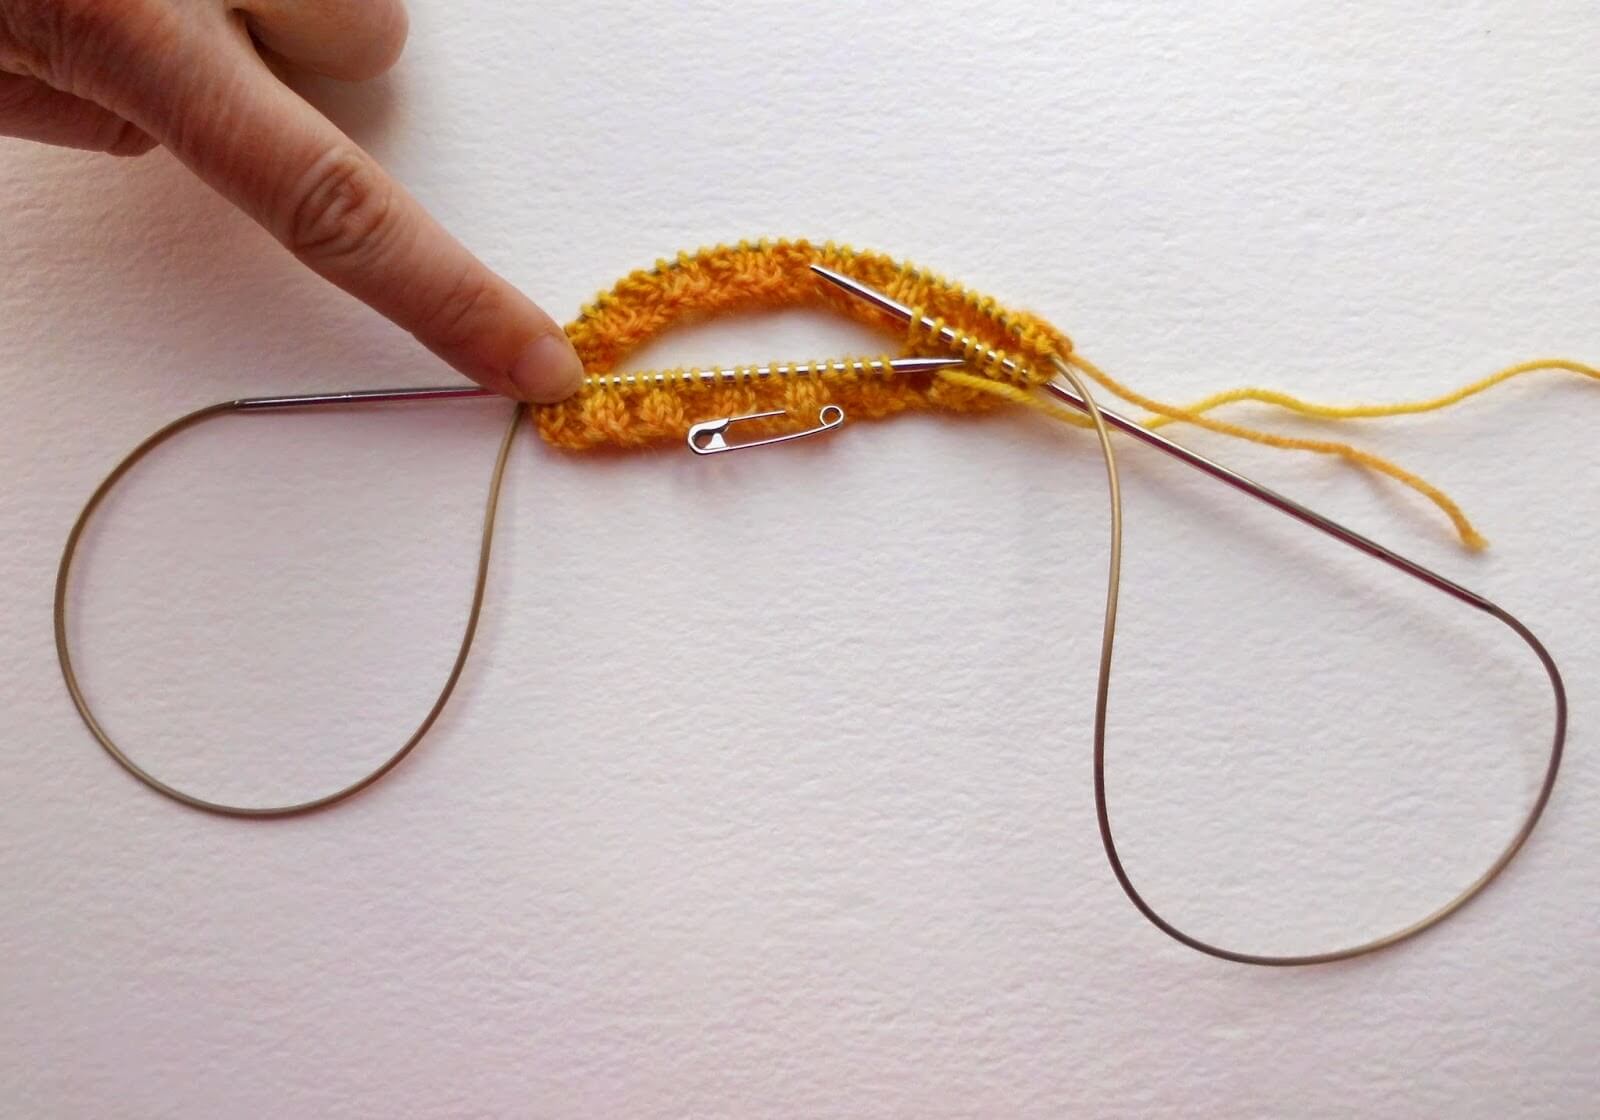
If you chose to cast on with DPNs, this is the point where you are going to change to your 2.5mm circular needle – all you have to do is to knit the stitches from the DPN onto your circular needle. If you’ve cast on with your circular, just work across your needle as before but follow the instructions below for creating the magic loop, continuing to knit in K2 P2 rib.
When you have knitted half of the stitches, pull the cable through the stitches (being careful not to slide them off the end) and leave a loop of cable before knitting the rest of the stitches onto the needle. This is what gives you the “magic loop”. (I think it looks like a large prawn! 🙂
When you are ready to start the next round, pull the back needle towards you, lengthening the amount of cable you have to knit with in your right hand and shortening the loop on the left hand side (but don’t let it disappear altogether) and then knit into the front stitches, leaving another loop. Take care not to twist your stitches and remember to pull the yarn tight for the first two stitches you knit to avoid a ladder. You’ll see that you’ve created a sort of figure of eight with your needle. You will be able to sew up the small gap where you knitted the first two rows before joining into the round later with your tail end.
If you want to use a stitch marker, then when you get to the end of the stitches, place it over the end of the circular needle you are holding in your right hand, and then start the next round. If you use a stitch marker, you’ll need to knit the first stitch on the next needle onto your right hand needle to stop the stitch marker sliding off. If you don’t want to use a stitch marker, you will still need some way of identifying the beginning and end of your knitting. You can see in the above picture that I’ve placed a safety pin in the “front” section of my sock so that if I get distracted in the middle of a round, I always know where I’m up to. Take care not to twist the knitting as you make the join, although by knitting two rows before transferring to your circular needle, it’s much easier to see that the stitches don’t twist.
Continue knitting in K2, P2 rib for 14 more rounds or until desired length of rib (I knit 16 rounds of rib). I find that K2, P2 rib makes a nice solid rib which will hold your sock up. If you want to experiment with K3, P1 rib or even K1, P1 rib then feel free to do so. What I wouldn’t recommend is skipping the rib altogether unless you really can’t bear tight things around your ankles and even then a few rows are a good idea – your socks will fall down if you don’t have any rib at all!
If you find that your knitting is turning inside out, don’t worry. It’s very easy to fix – just put your hand inside your knitting and pull it the right way out! We’ve all done it, it’s one of those fun beginner things! 🙂
Everything OK so far? It’s onto the leg part now and this is very easy – all you’re going to do is knit each round. If you haven’t done so already, it’s a good idea at this point to start keeping count of how many rows you are knitting so that you can make sure that your second sock matches. Once you get to the leg, you’ll see why socks are such great projects to travel with – they occupy your hands and mind but not a great deal of space!
Leg
To create the leg part of your sock, you simply knit each round, remembering to slip the marker across from one needle to the other when you reach it if you’re using one. If you haven’t done so already, it’s a good idea at this point to start keeping count of how many rows you are knitting so that you can make sure that your second sock matches.
Continue to knit each round until you reach your desired length before the start of the heel (for me, this is 75 rounds in total including the rib). The heel flap I create is 2” long so you can measure from the base of your foot if you’re not sure how long to make your leg section. You can always make your heel flap longer if you want to (you may want to do this if you have a high instep as it will make the sock easier to put on). This is a very flexible sock! If you want to try your sock on at any point you can do so – it’s much easier to do with a large circular needle than the other needles as the cable safely hold all the stitches.

That’s this week’s part finished. Easy, eh? 🙂
Phew! Everyone still with me? Don’t worry about the length of time it might take you – there’s no rush. The posts will always be available on the blog and you can find them here. Feel free to ask questions, and of course there are the groups on Facebook and Ravelry too for help and support – Facebook is also a good place to show off pictures of your progress so don’t be shy! We also have knit n natter group on Facebook (Winwick Mum Knit & Natter) which you can find here to join in with the conversations. There’s even a Flickr group so that we can share photos of our finished socks. Yes, I know that this is just the first post and it’s all about taking it at the pace to suit you – but I also know that there are a few people who can’t resist knitting the rest of their socks straight away and I think it will be wonderful to see how many pairs of socks the Sockalong generates!
The other thing that I would say that is REALLY IMPORTANT for beginners is don’t worry too much about any small mistakes. Mistakes are what help us learn and make our socks unique! If it’s a really big mistake you might need to unpick and re-do that part, but if you’ve got the right number of stitches and your sock is looking good, then “mistakes” like ladders and uneven stitches are the sorts of things that will often right themselves in the wash.
Next Sunday we’re going to work on the heel flap, the heel turn and the gusset. If you’re not up to that point by then, it’s absolutely fine as you’ll catch up, and if you’re steaming ahead then by all means put your first sock on a stitch holder and cast on for your second! We’ll be talking about Second Sock Syndrome and ways to avoid it as we get closer to finishing our first sock, so if you’ve got any good methods then do share! Happy knitting, everyone!
This Sockalong tutorial is free on this blog and will always remain so. If you’ve enjoyed using it and would like to support my work so I can keep blogging and designing, you can browse my shop for patterns and books or buy me a brew – both are very much appreciated. Thank you! xx


This pattern copyright © 2014 Winwick Mum
Sockalong tutorials copyright © 2015 Winwick Mum
More Sockalong posts:
Sockalong – tension squares, casting on and stitch calculations
Sockalong – accessories and matching yarn
Sockalong – Week 2 – Heel flap, heel turn and gusset
Sockalong – Week 3 – Foot, toe and grafting the toes
Sockalong Basic 4ply Socks pattern
Facebook Sockalong group for help, advice and encouragement


So clear. Cannot wait to start tonight.
Thank you! Glad you found it easy to read! 🙂 xx
8 rows of rib so far! It's raining here in Suffolk so hope to get lot more done today x
That's a great start, Elaine! xx
Rainy here so a great day to start my sock knitting. Rib done, now onto the leg. Am loving this short circular needle, so much less of a fiddle than dpn's or magic loop. xx
It's good, isn't it? I love my short circular 🙂 xx
Thank you for the clear explicit instructions I can't wait to start but still waiting for yarn I've ordered a short circular too. 🙂 x
Hi Linda, glad you found the instructions clear to read. You'll soon catch up, and I'm looking forward to seeing your finished socks! xx
I'm using dpns again but I'd like to have a go with a short circular needle, I shall have to buy one so that I can give it a go. Not sure about magic loop, it's always looked a bit complicated but you make it sound easy so I might give that a go too, I suppose the benefit of this is that you get two socks done in one go.
Jo, you'll only get two socks done in one go if you buy a longer circular (100cm) and do two-at-a-time socks. I'm only showing one sock at a time on magic loop on an 80cm circular, and it is easy so I'm sure you'd have no problems. Given your sock expertise anyway, you might want to try two-at-a-time for the challenge! 🙂 xx
Thank you so much for your clear tutorial. I think I'm doing it right, although, after ten rows of the cuff I'm exhausted from concentrating so hard. My face must be a picture. I'm think I'm slowly winning the battle with the DPN's. X
Good for you! Don't forget that it's a new skill and nobody expected you to get on a bike and ride it, or get in a car and drive without learning first. I'm so pleased that you've stuck with it, well done you xx
Yeay everyone! Go for it. Much respect for all those socking along, from a non-sock-maker.
You know you want to 😉 xx
I just found your blog through a link at Through the Keyhole's blog. I am an avid sock knitter and have some in progress right now, so won't be joining your KAL, but I look forward to seeing how everyone does. It's so nice to have discovered you!
It's lovely to see you – and great to meet another sock knitter (though I'm hoping there'll be a fair few more of those at the end of this Sockalong!) 🙂 xx
Arghhh! My short circular is 40cm! I thought it was 30cm! I either need to order a smaller one or master dpns / magic loop. There I was all excited and casting on then I measured my needle 🙁
I've seen someone using a 40cm circular today and she says it's working fine with her socks. You can give it a go or even try to magic loop it – you're not going to lose anything by trying it out! xx
I will try & cast on tonight, an extended family meal put paid to my knitting plans yesterday. Your instructions do seem very clear though so thank you x
You're very welcome! Extended family meals are often good fun, but don't do anything for your sock-knitting concentration! xx
Morning,thanks for these fantastic instructions!😊I'm starting today! Have a great day! x
Morning! Looking forward to seeing your finished socks! xx
Hello Christine! This is such a great start to your sock tutorial. I loved the photos and seeing the difference between the circular and DPNs. Sending you my best wishes, hugs from me, Pat
Thanks, Pat! I really appreciate your comments! xx
Hi Christine, I am up and running on the rib! In the end I worked out that little daughter's foot size would need me to cast on 48 stitches so I decided it might be too small for a first attempt at sock knitting. So I'm making some for me instead!
That's great, Alison! Once you've mastered your own pair, you'll have your daughter's finished in no time – that's the joy of little feet! 🙂 xx
Hi Christine
I'm loving the sockalong. Having tried to knit socks before and failed I have two legs done and waiting for the heel pattern. In the meantime I have started a second pair 🙂
A great idea – thank tou
Love Joy xx
Wow! That's praise indeed, thank you! You're going to have very well-dressed feet 🙂 xx
Thanks for taking the time to do this. Love the yarn you're using! And you have a wonderful blog.
mitchellsc.blogspot.com/
Thank you! I've just been to visit yours and seen your amazing fluorescent socks – wonderful! xx
Thank you for your time! My question is.. when knitting in round I find it very difficult to knit from the front of the stitch. It takes me forever…. if I were to knit from behind the stitch, would the sock not come out right? Do you know? Thanks so much!
Hello! Without seeing what it is that you're doing, it's quite difficult for me to answer the question. You create a purl stitch by putting the needle in from behind so although your sock would look different, there wouldn't be anything wrong in that; socks can be created in all sorts of different patterns.. If you're not very far down your sock then that might be why you're finding it difficult but as you get further down it should get easier. I'm not sure that I've really answered your question but I hope that helps!
I've just started my very first sock (first time using a circular needle!) and I love it! 🙂 Thanks so much for the excellent tutorial. So far, so good xxx
Hello Sarah, it's lovely to see you, and I'm glad you're finding the tutorial useful. Looking forward to seeing your finished socks! xx
Am very excited to be halfway down the leg of my first ever sock! Just discovered the sock along, and am finding your instructions really clear and easy to follow. I've never used DPNs before either- congratulations on a super blog!
Wow, that's brilliant Marella, well done! I'm glad you're enjoying the tutorials and the blog too, thank you! xx
glad I stumbled across your blog. going to try my luck at this. guess it will be a knit along; but alone. thanks for posting.
Hello Pat, it's lovely to see you! You're never alone in the Sockalong – although it started in May it's still going strong and we've got over 2,100 members in our Facebook group now, as well as many people around the world joining in without being members of the Facebook group! Do shout out if you need any help 🙂 xx
Just started my first sock ever. Wondering how i go about matching stripes when i start my second sock.
I've written a tutorial on matching stripes which you'll find here on the blog. All the tutorials links are on the Join the Sockalong page which you can find at the top of this page xx
LOve this sockalong. Your pattern is the FIRST sock pattern that FITS me perfectly. It is going to become my regular pattern from now on. Oh, I have knitted socks before but never matching stripes or having them fit me. Thanks for a wonderful pattern
That's great to hear, thank you! I like that this pattern is so easy to make your own – whatever shape your foot is, you can alter it in some way so that the sock fits you in all the right places 🙂 xx
I've "really" started knitting 2 months ago and just love it (by "really" I mean I'm more of a seamstress-and-corchet-type of girl and I know some knitting basics)! I'm about to finish my first sock thanks to your Sock-a-long and I'm so pleaaaased with it (apart from some rookie mistakes, but hey, who will look into my boots?!?). 2nd sock will be awesome, I'm sure!
That's amazing, well done! Your second second will be so much easier and are unlikely to repeat the mistakes you made on the first one – you'll soon be doing the happy dance in your new socks! xx
Im trying my first steps with 5 dpns,and I stuck in the very begining.
Can,t figure out how do you go to the round step.
If you follow the pictures for the DPNs they show you how to join into the round. It's quite easy as long as you take your time and make sure that you don't twist your stitches xx
I've never attempted socks before although I've knitted for over 50 years so I thought it was about time! I was referred to your SAL through facebook and I'm so glad I found you. I am guilty though of not doing a tension square so I'm just hoping they'll fit my daughter! 🙁
I'm using DPN's for the first time and I'm finding 3 easier than 4, but that might change as I get into the shaping. I'm still doing the cuff and counting the rows with a little app I put into my phone, much easier than paper and pen, lol.
Thanks for your easy to understand instructions, I'm doing OK so far 🙂
It sounds like you have it all sorted, Lynette, and you can use the sock as your tension square so if it does turn out too small you'll be able to work out the stitch calculation for the next pair so that they fit you! xx
I'm a bit stuck on the toe shaping now, when I have to SSK (Is this 2 slip stitches?)
Yes, it's the same decrease that you do for the gusset, Lynette, so you can look back a the heel tutorial if you need a reminder of how to do it. By using the SSK decrease the stitches will lie flatter across your toes xx
Hi Christine! First of all, thank you so much for sharing this tutorial! I discovered it a month ago and I already managed to knit three beautiful pairs od socks – it's great! 🙂
A question: usually I like to wear stockings which arrive just below the knee. Do you think it would be possible to modify this pattern that way?
Wow! Three pairs is great, I'm glad the tutorials helped! Yes, you can knit longer socks but you will need to make some adjustments for the calf so you'd need to cast on and then reduce the number of stitches. There are patterns on Ravelry which are designed as longer socks which you could look up – there's no reason why you couldn't adapt one of those using the Sockalong pattern if you're comfortable with that one 🙂 xx
Hi Christine, i am new to this and excited my circular needle is arriving this Friday. after reading through the tutorials i am not very clear of how to join the rows and knit in rounds using the circular needles. Also wouldnt there be a split from the first three rows when we start the join from the fourth row. I hope you understand my issue. Thanks.
Hello! Yes, there will be a split from the first rows knitted before you join into the round, but you can easily sew this up at the end with your tail end which you would be sewing in anyway. I find it easier to start the socks like this then there's less chance of them twisting. You don't say whether you've bought a short or long circular, but the process is the same for joining into the round – just bring your needle tips round so that you knit in a clockwise direction, starting at what would be the end of the round. It will probably make more sense when you actually come to do it rather than reading about it first. Do shout if you need more help, and don't forget that we've got our lovely Facebook group too, where it's easy to post pictures and ask for help at any time. Looking forward to seeing your socks! xx
So pleased to find your wonderful tutorials while I have 1 lower leg in plaster and can't do my usual active activities! You have already answered so many of my questions. You are a natural teacher x
That's such a lovely thing to say, thank you! I hope that knitting socks will make the time go faster until you are up and about again xx
Thank you for great tutorial….I'm still not understanding how to join the round with 5 DPN . If I go into the first stitch on needle 1 then what and how I connect needle 4? I'm sorry but photo do not show how it is done, or I can not understand….Could you kindly point how I do join round…Thank you so much
Hi! Once you have divided your stitches across 4 DPNs as in the photo above, then you simply take needle 5 and knit the stitches on needle 1, using the working yarn which is attached to the stitches on needle 4. You always have your stitches on 4 needles with one spare to knit with. As you knit the first stitch, you'll pull the needles into a square which joins them into the round; you can't help but do this as the yarn is attached to the stitches on needle 4. The photo shows the square after the first two stitches have been knitted and this is what your sock will look like too – the easiest thing to do is try it, it will make more sense when you have your needles in your hand! xx
Hi Christine,
It took me few days to respond and there is reason why. First I couldn't understand join the round, because my needles was on opposite sites of working yarn LOL. Of course once you explain that part I got my AHA moment….After making my 2 rows on stitches K P, still my work end up curled, twisted, and my working yarn was still all over the places, under my work , over- simply mess. I could not understand why …LOL…So, I went searching youtube for videos that shows circular knitting ribbing, and then another AHA moment came in- of course I had to move my working yarn back and forth- well did not think so when I was trying to fight with 5 needles…Lmao….Anyway after 2 days of trying I gave up, and said to myself; This tutorial is not for me no matter how simple it is, since everything came all twisted ha ha ha…I took my sock loom and start knitting the sock, and of course love it, simple pulling the yarn, etc…Long story short, deep down in my heart I badly want it to knit the socks for years, and I can get off my mind to buy that small miracle circular needles. I searched in my city over here, and I call one of the stores and ask for Chiagoo 30 cm, – no luck. Searched online found them, but I want them today, so no luck there either.. This morning I call one of the yarn stores that going out of business and ask for circular needle 2.5 30 cm – you got the point….She said no I don't have Chiagoo, but I have addi turbo . AHA new moment, and I want to know is it curved, and is it 30 cm, and is it 2.5. All my question get answered yes . Hoooray, I was on my way to get that small magic circular needles to start making my socks. I'm so determined.
I got my needle today, and guess what I have no problem with working yarn to move back and forth LMAO ( still laughing at myself how on the Earth I did not notice why my work does not look like yours on the first 2 rows….Ha ha ha
Anyway I'm proudly knitting my first cuff on Addi Turbo 2.5 30 cm, and going around. Absolutely amazing. I'm sure that I will at some point go to my DPN without any issues and problems. I hope to finish the sock with your tutorial. I'm so lucky to found you, and I'm sure I will be in contact again. Thank you so much .
That's wonderful! You'll be zooming along with your new needle and you'll have a sock knitted in no time. I look forward to hearing about it! 🙂 xx
Thank you so much Christine. You have demystified the sock! So easy to follow on short circulars…now to read your dpn instructions so I can try other patterns.
I'm so glad it all helped! You can knit any sock on short circulars (pretty much) even if the pattern is written for DPNs or magic loop – you just have to make sure that you read the pattern carefully so that you get any particular instructions in the right place. Here's to lots more socks! xx
Happened upon this post when searching for easy sock instructions and used it to knit my first pair- they turned out pretty well if I say so myself. 🙂 Thanks so much!
I’d love to make a pair for my 8-year-old niece but unfortunately she doesn’t live nearby so I can’t have her try them on during the process as I did with myself. Any recommendations for child/tween sizing?
You should still be able to work to her measurements and it never hurts for children's socks to work out a little bigger! If you can get her ball of the foot measurement you can work out how many to cast on, and if you can get the length of her foot measurement (rather than her standard shoe size) then you'll know how long to make them and be able to take a view about whether to make them a little bigger. Hope that helps! 🙂 xx
Hello, Christine. I have really benefitted from your excellent instructions and tutorials. Thank-you! I have been using Techknitter's 3-in-1 tech join for hats and I now use it for top down socks. In her her instructions, she suggests knitting the first 3 rounds in plain knitting, which I do for hats, but for socks, I only knit one round in plain before beginning the K2, P2 ribbing (it gives the top a nicer look). I have also switched to a purl-wise longtail cast on. This technique means there is no "jog" to tidy up, the end is knitted into the top edge, and the stitches stay "sunnyside" up when starting the first round. You and she have helped me improve my self-taught knitting self many times over the years, so I thought I would share it. Thank-you again.
techknitting.blogspot.com/2007/01/circular-knitting-3-in-1-techjoin_26.html
Thanks for sharing! It's always good to find a technique that works for you and the best thing about knitting is that there are so many, there's always going to be one that suits you perfectly! 🙂 xx
Hi. I recently discovered your sock along and started last night. However, instead of hanging down the knitting wants to come up through the needles. If I pull in back down through I find I have reverse side on the outside and stocking stitch inside. Can I rectify this? Thought of just turning the whole lot the other way up, but then I will be knitting round in the wrong direction which may have other untoward consequences. Advice would be much appreciated. Thank you.
Cancel my last message! It seems fine now I've gone a bit further. I think I'm just not used to using a tiny circular needle!
Am I missing something? Is the gauge for this pattern written anywhere in the pattern? I looked at the post you have on swatching, and you talk about gauge, but is the gauge for this pattern 30 stitches per 4 inches?
Yes it is … the reason I've not given a specific gauge is that this pattern is about people using their own gauge and being able to work it out to suit their own feet 😀
I've started my sock journey today, so far this is my 3rd try Part thats confusing me is heel turn
You might find it helpful to have a look at one of my heel turn videos – they're different patterns but based on the same Basic Sock – try this one
Thank you so much for the magic loop instructions and particularly the tip about knitting the first couple of rows on flat needles first, as that's when it finally clicked with me. I'd reached the stage of throwing the whole lot across the room in desperation after wtching other videos! I actually did the whole cuff (of a sleeve) on flat needles and then joined in the circular needle and started magic loop and suddenly all was clear. I've left a long tail after casting on so hopefully sewing the cuff seam up won't be an issue!
Many thanks again – I'm not a sock knitter, but I enjoy your blog, especially as it takes me back home (born in Warrington, spent my teenage years in Lymm, now leaving in the South-East, but Cheshire still feels like home whenever I come back up :-))
I'm so glad that helped you! You'll probably never sew up a jumper sleeve again! 🙂 Ah, Lymm isn't so far away from us, and you're in a nice part of the world now but yes, I can imagine that oop north still feels like home 🙂
No, not far at all – I used to work for NatWest Bank in the dim and distant past and was occasionally sent out to the sub-branch in Winwick Hospital. I wonder if they still offer that service with all the bank closures? Probably not….
I had no idea there was a sub-branch of NatWest at Winwick Hospital! Would that have been in the old building before they knocked it down? There's still a hospital here but it's called Hollins Park and is tucked away at the back – much more modern-looking and hopefully a much happier place to be!
Thanks so much for your pattern. What a huge amount of work you've put into the clear instructions.
You're very welcome – I just want people to be able to knit socks! 😀
Hello
Thank you so much for your excellent clear instructions and encouraging tone. I'm very much a beginner knitter – I can only just knit and purl. I have the same problem as the person in 2019 9th December. My right side is on the inside of my circular needles and I can't seem to put my hand in and pull it the right way. It just doesn't seem to work. It just spins round.I'm worried I won't be able to do the heel with it like this. I've read started once because of this. I'm really puzzled. Any advice appreciated.
Hi Cat, don't worry, we'll get to the bottom of this! I think it should be easily solved, but can I ask you to take a quick look at this video and see if you are holding your needles in the same way as me? If you can come back and let me know what you think, I can try to help you get this fixed. We will get those socks on your feet! ��
Hello
I am determined to master sock knitting and was really excited to find your sockalong. I have done the tension square, got my needles and knitted the cuff. I am merrily knitting the leg but suddenly realised that I have the flat stocking stitch on the inside and the bumpy side on the outside. I can only get it to look like yours if I have the sock coming up the middle, not going down. I am holding my needles and knitting in the same way I would if I were knitting on straight needles. What is going on??? Can you help please?
Hello! It’s really common for beginners to find their socks inside out so don’t worry, you’re in good company! Usually you can just put your hand inside your sock and pull it the right way through, and holding your needles so that that the tips are right in front of you (instead of at the other side of the socks – imagine 6 o’clock on a clock rather than 12 o’clock!). However, if you find that you would be knitting backwards after doing this, it’s likely that you’ll have turned your knitting around at some point … don’t worry about it for now, just keep on going and then you can change it when you get to the heel flap and you should be able to work your sock the right way round from then on. I hope that helps! 🙂 xx
Hello, Winwick Mum!
I started the first sock of the pair last week by casting on 60 sts and knitting with US size 1 or 1.5 needles, I can’t remember now. I was getting 7 sts/inch. Once I had the cuff and about half of the leg done, I slipped the work onto some spare yarn and tried it on. It seemed a bit too big for me, and the fabric was also coming out a little looser than I wanted, so I ripped it out. Yesterday I started over, again casting on 60 sts, but this time with US size 0 needles, and I like the fabric I’m getting much better. The tension with the size 0 needles is 7.5 sts/inch. Yesterday I knit the cuff and about half the leg. Today I slipped the work off onto spare yarn and tried it on, and they seem to fit really nicely now. Yay! So, all is going well, and looks like I’m ready to keep moving along with it! 🙂
Brilliant! It sounds like you’re doing really well! 🙂 xx
Hello! Week 1 went very well! Cuff and leg are complete and look nice. On to the next step! I know Week 2 will be more challenging, but I’m looking forward to learning with your excellent tutorials. Thank you for keeping them all up on the blog!
Oh brilliant, you’re up to the really exciting part now! You’re going to be absolutely fine with the heel, it’s just the same yarn and the same stitches so take your time and I know you’ll be amazed when you see your sock start to look like a sock! 🙂 xx
Found your blog series…brilliant! Am knitting my second pair and trying to work through some of the differences I see from other patterns and trying to understand that. Made a mistake with my heel flap, I.e. carrying the thread across the front rather than the back. Looks ok so I am leaving that.
I think I will buy your book. As a fellow pattern writer (quilts) I just know how work intensive it is to put something like this together, particularly with the detail you have provided. So, big thank you…really appreciated
Hello Karin, thanks for your message and your lovely words – and for buying the book! I really appreciate it all! It’s quite common for people to carry their yarn across the front of the heel flap at first, but it gives a nice effect, doesn’t it? A unique design feature already! 🙂 I hope the rest of your sock goes really well 🙂 xx
Thanks…at the toes now, fine tuning my measurements. Yes, my heel effect is looking nice. I will do it right with the next pair of socks…had some major confusion with the slip stitch in general as it has been some years since I knitted, but it’s slowly coming back to me. Might try your Lace socks next time. Very addictive!
Ah, we can get a bit hung up on “right” and “wrong” so don’t worry about your heel flap as long as it works! I’m glad it’s all coming back, and I hope you enjoy the Easy Lace Socks too if you try them! 🙂 xx
Hello! I’m about to mbark on my second pair of socks following your tutorials! Thank you!! I want to make a pair for my dad’s birthday and was wondering if anyone knew of a guide for shoe size to rough stitch number/guidance for socks… or if anyone has experience making socks for men’s size UK 10, US 11, EU 45… or any advice on this at all!!
Hello! The number of stitches that you cast on will depend on the size of your Dad’s feet. If the socks aren’t going to be a surprise, you can ask him to measure around the ball of his foot and then use the Sock Stitch Calculation to work out the number, and if they are going to be a surprise, that’s a little more difficult but not impossible … can you work out how wide his feet might be in relation to yours? I cast on 68sts for my husband’s socks (he’s a UK size 8) but my friend casts on 64sts for her husband (also a UK size 8) – there are only 4 stitches in it so you’re probably not going to be far wrong if you pick one of those, but if he’s got wider feet then maybe consider 72sts. As for the shoe size length, have a look online a shoe store website like this one which will tell you the total length to work from the heel and remember to take about 5cm off for the toe decreases. Finally, don’t forget that there’s an IOU sheet on the blog here in case you find yourself running out of time – I have never yet met anybody who wasn’t delighted to know that they were having socks made for them even if they weren’t quite finished 🙂 Good luck! xx
Hallo Christine, I’m a latecomer to the sock party & need a little clarification. I’ve jumped into the long sock pattern but have a problem with the division of stitches & placing of markers after the ribbing. In the example I don’t get the bit “if you want to work your foot on 72sts, work 36 then place a marker.” Where are the other 36sts then?
Sorry to sound so stupid but I love the look of these socks & would REALLY like to get it right. Sincerely, Sureen
Hi Sureen, the other stitches stay on your needles, all you are doing is putting a marker to show where your top of the foot stitches are going to be. If you imagine that you’ve got 100sts on your needle when you start, you’re not going to need nearly that many when you get to the foot – a mid-calf sock knitted using my Basic 4ply Socks pattern will use 64sts, say, for an 8 1/2″ circumference foot – so you’ve got to “lose” the other 36sts before you get to the foot. That’s where the decreases come in on the long sock, but you only want the decreases down the back of the leg so you mark out where your top of the foot stitches are going to be so that you can place the decreases in the centre of the remaining stitches and work from there. It might be a good idea to print out a copy of the Basic 4ply Socks as well so that you can use that and the Sockalong tutorials to help you with your socks. The Basic 4ply Knee High Socks are based on the same pattern shape so you can use the tutorials to help you – it’s just the decrease bit that’s different. Do let me know how you get on! 🙂 xx
Thank you so much for being patient with an old timer & explaining what’s what. It just sounded odd to knit only half of the sts that you need for the foot. Will most certainly have a look at the Basic 4ply Sock pattern as well. Fingers crossed that I get it right. ;-0
I’ve written the pattern this way so that you can adjust it for any size of foot rather than giving specific numbers – if you can follow it as it’s written, it will work out, I promise! 🙂 xx