
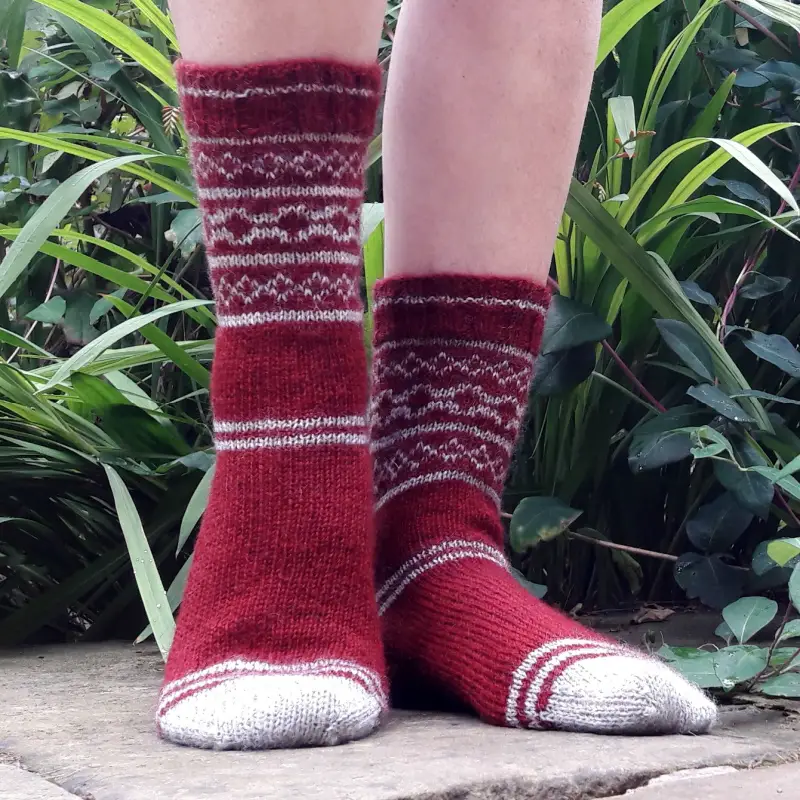
Easy Colourwork Socks – free pattern and tutorial
Hi there! I’m really glad to see that I didn’t scare you off yesterday with all this talk of colourwork knitting, so let’s get started with this new pair of socks. Before we start, I need to warn you that there are lots of photos in this tutorial, plus video links!
This post follows on from yesterday’s getting started post (which you can find here if you missed it) where I talked about the socks and tried to answer some of the questions you might have.
I created this pattern with the intention of helping you to get started with colourwork so I’ve kept it very simple: just two colours and easy geometric shapes which will have you whizzing along in no time. We’re going to tackle the pattern one row at a time and you’ll see that it’s easier than you think to create beautiful socks with more than just one colour of yarn.
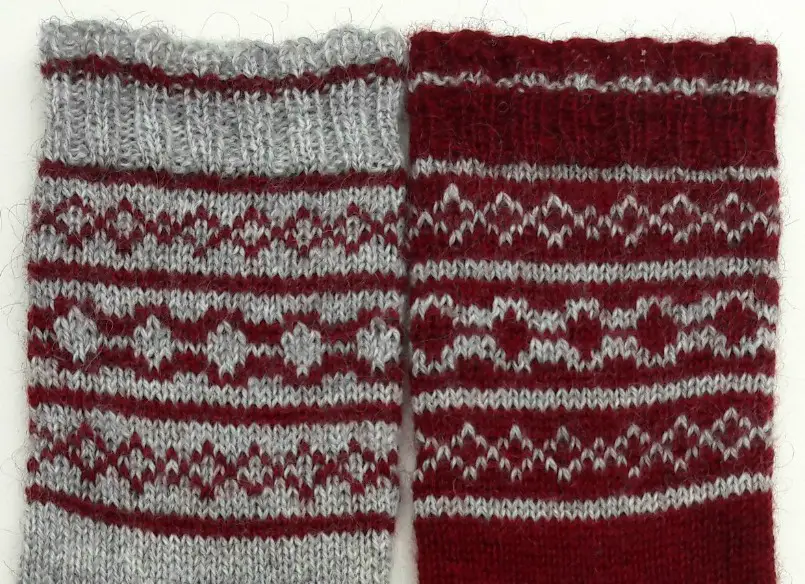
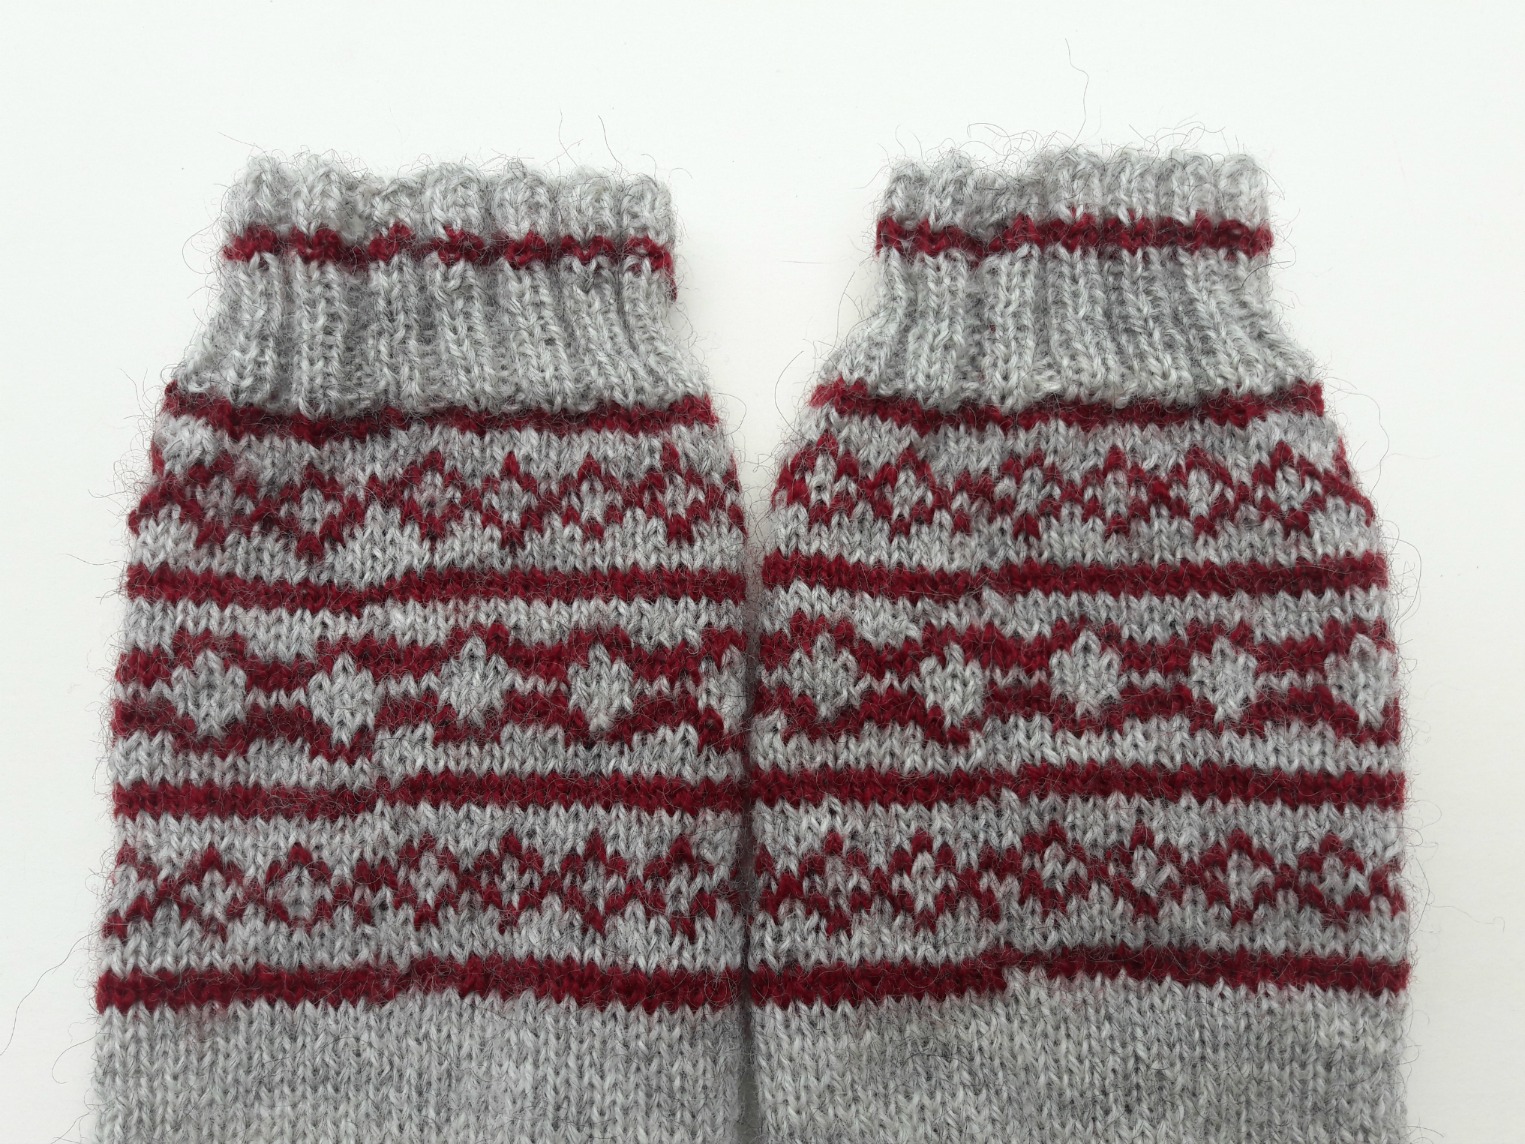
I’ve been able to get two pairs of socks out of the yarn that I’ve used and it’s been interesting to see how the pattern looks different when you change the contrast.
The heel is a heel flap and gusset heel using heel stitch which you’ll be familiar with from the other patterns that I’ve written. If you want to swap it for the slightly stretchier Ribbed Heel Stitch heel flap, have a look at the tutorial for the Patchwork Socks as you’ll find the instructions there. It doesn’t use any more stitches than this heel flap so you can easily swap it without needing to make any other changes.
With each of these new tutorials, I’ve made the assumption that you have knitted a basic sock so that you know about the construction, but if not you can always take a look at the Sockalong tutorials if you get stuck. You can also look at the Contrast Cuff, Heel and Toe Socks tutorial for help with changing colours for the heels and toes.
There are a couple of techniques with colourwork knitting that I want to show you, but I think the easiest way to do that is as we work our way through the pattern, so we’ll just get started.
Easy Colourwork Socks
you can download a PDF of the pattern here
It’s always a joy to see patterns that use more than one colour of yarn, and it’s not as hard as you think to get the effect.
These socks are constructed as top down socks with a heel flap and gusset. The heel is knitted in heel stitch, which creates a durable, cushioned heel.
Size To fit ball of foot circumference 8 [8.5:9:9.5] inches; 20 [22:23:24] cm
Tension 30 stitches to 4 inches (10 cm) in stocking stitch (worked in the round) on 2.5mm needles
Materials
2.5mm needles – short circular needle, DPNs (Double Pointed Needles) or an 80 cm circular needle for magic loop
100g of 4ply sock yarn in two colours (leftovers are perfect as a contrast!) – I used 2 x 100g skeins of Freehold Yarn Co Autumn 4ply yarn in shades Maple (main colour – MC) and Cloud (contrast colour – CC) (2021 edit – now discontinued)
1 set DPNs size 3.0mm (optional)
1 set DPNs size 2.5mm (not needed for magic loop)
stitch markers
wool needle
Abbreviations
K Knit
P Purl
Slip 1 Slip 1 stitch purlwise
K2tog Knit two stitches together
SSK Slip the first stitch on the left hand needle knitwise onto the right hand needle, slip the second stitch on the left hand needle purlwise onto the right hand needle, slip both stitches back onto the left hand needle and knit together through back loop
St(s) Stitch(es)
( ) Repeat the instructions inside the brackets
Pattern notes
- It is often easier to cast on using DPNs before changing to the 30cm circular needle. If you want to use magic loop you will be able to cast on with the larger circular needle if you prefer to do so, but remember not to pull your cast on stitches too tight. If you use DPNs, you might find it easier to cast on and work 2 rows before dividing the stitches across the needles.
- Use lifelines in your work as often as you feel you need to (video and photo tutorial in the Easy Lace Socks tutorial) – there’s no limit to the number of them that you can use in one sock!
- Mark each row on your pattern as you work it – it’s easier to work out where you’re up to if you have to put your knitting down for a while.
- If you have to take your work back, unravel one round at a time and don’t forget to amend your chart so that you know where you’re up to.
Pattern
Using MC, cast on 60 [64:68:72] stitches using 3.0mm double pointed needles.
1st row: (K2, P2), repeat to end, turn.
2nd row: (K2, P2), repeat to end, turn.
Change to 2.5mm needles. At this point, change to a short circular needle, magic loop or divide the stitches evenly across DPNs and join into a circle; place marker. Work two more rounds of K2, P2 rib.
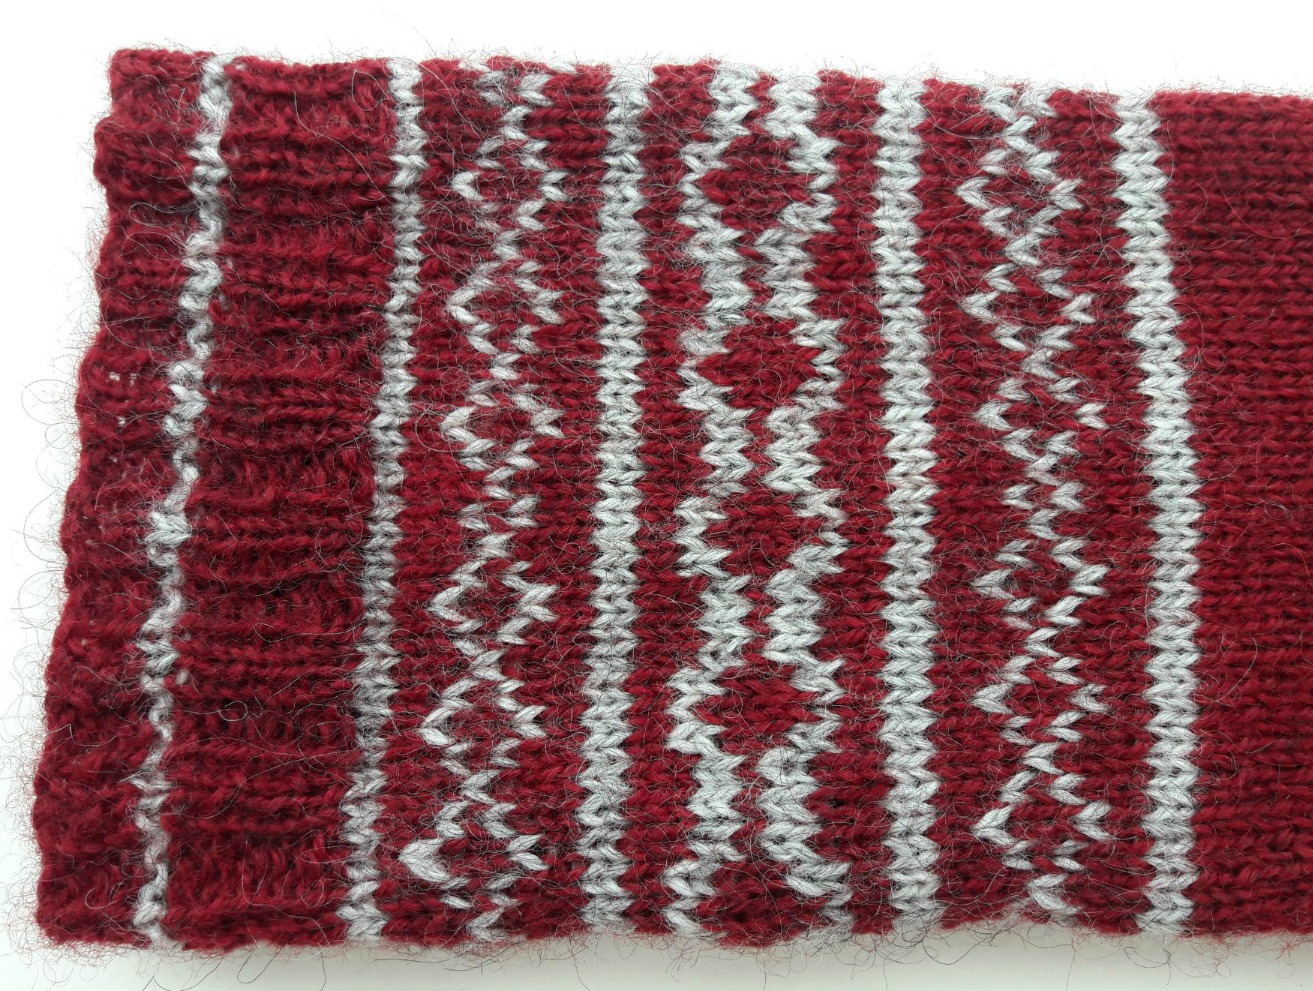
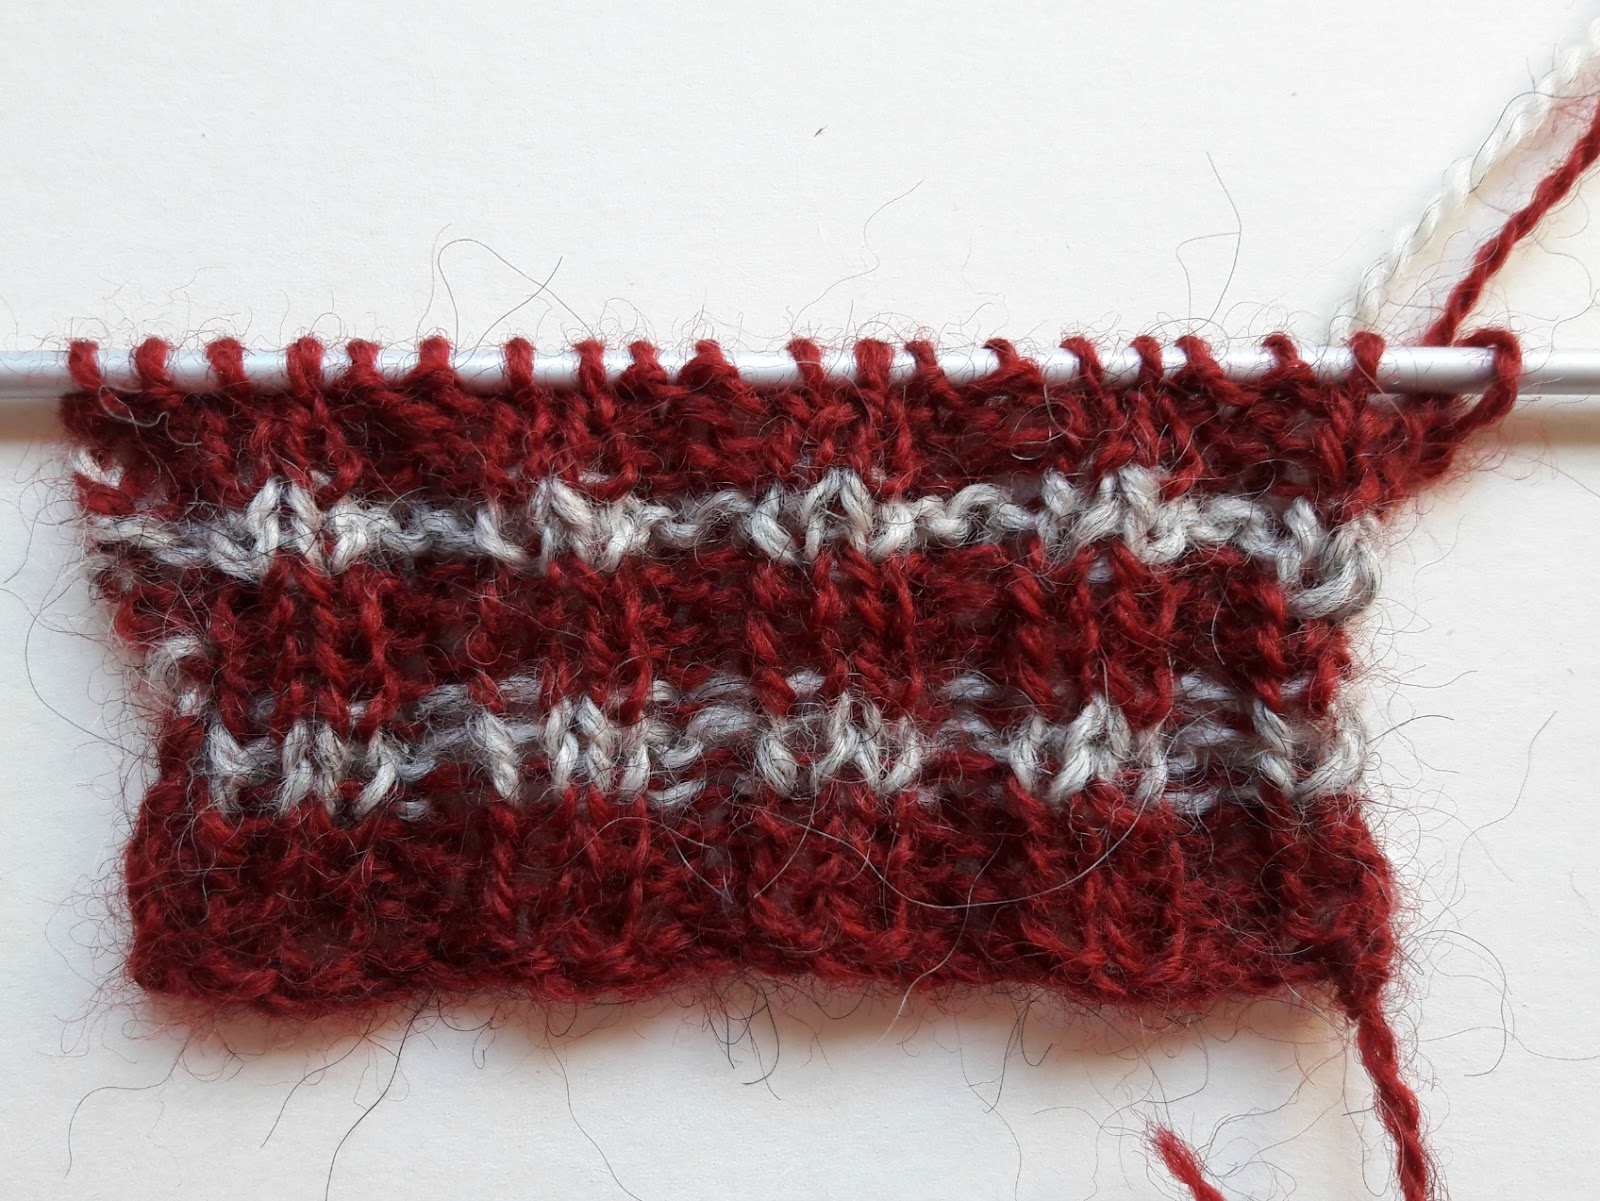
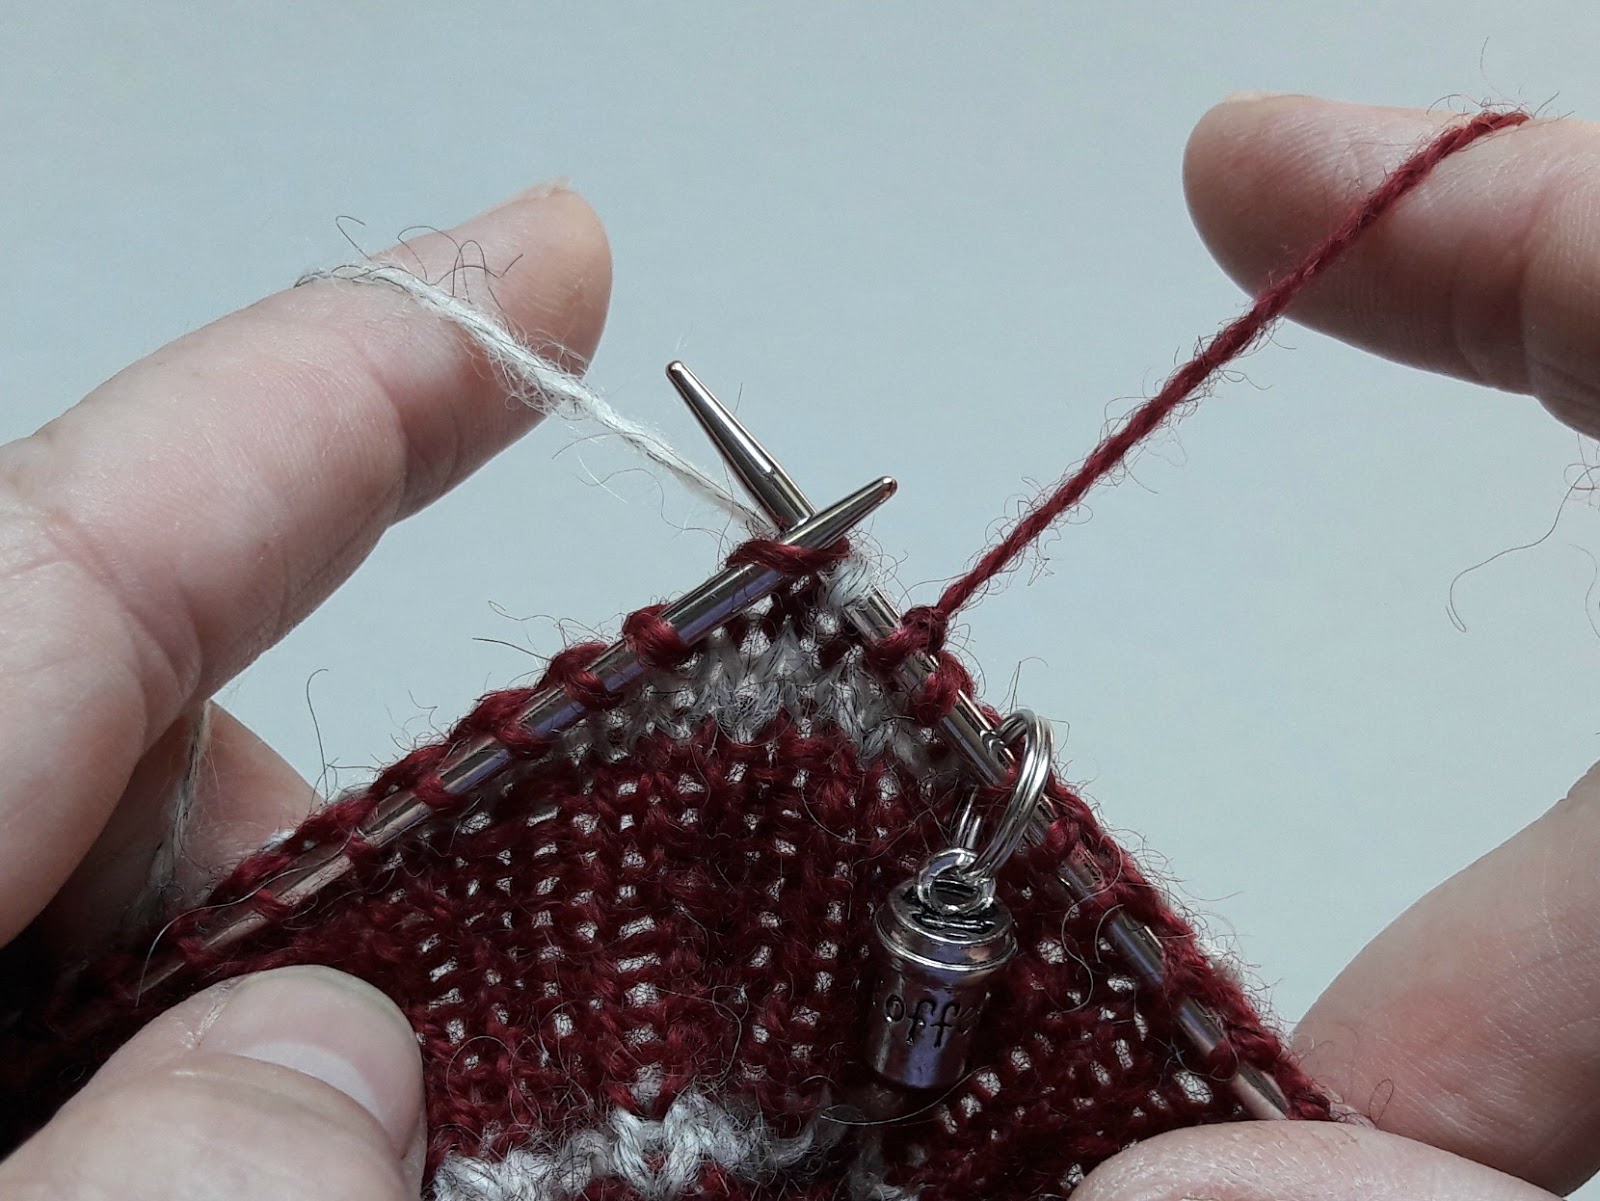
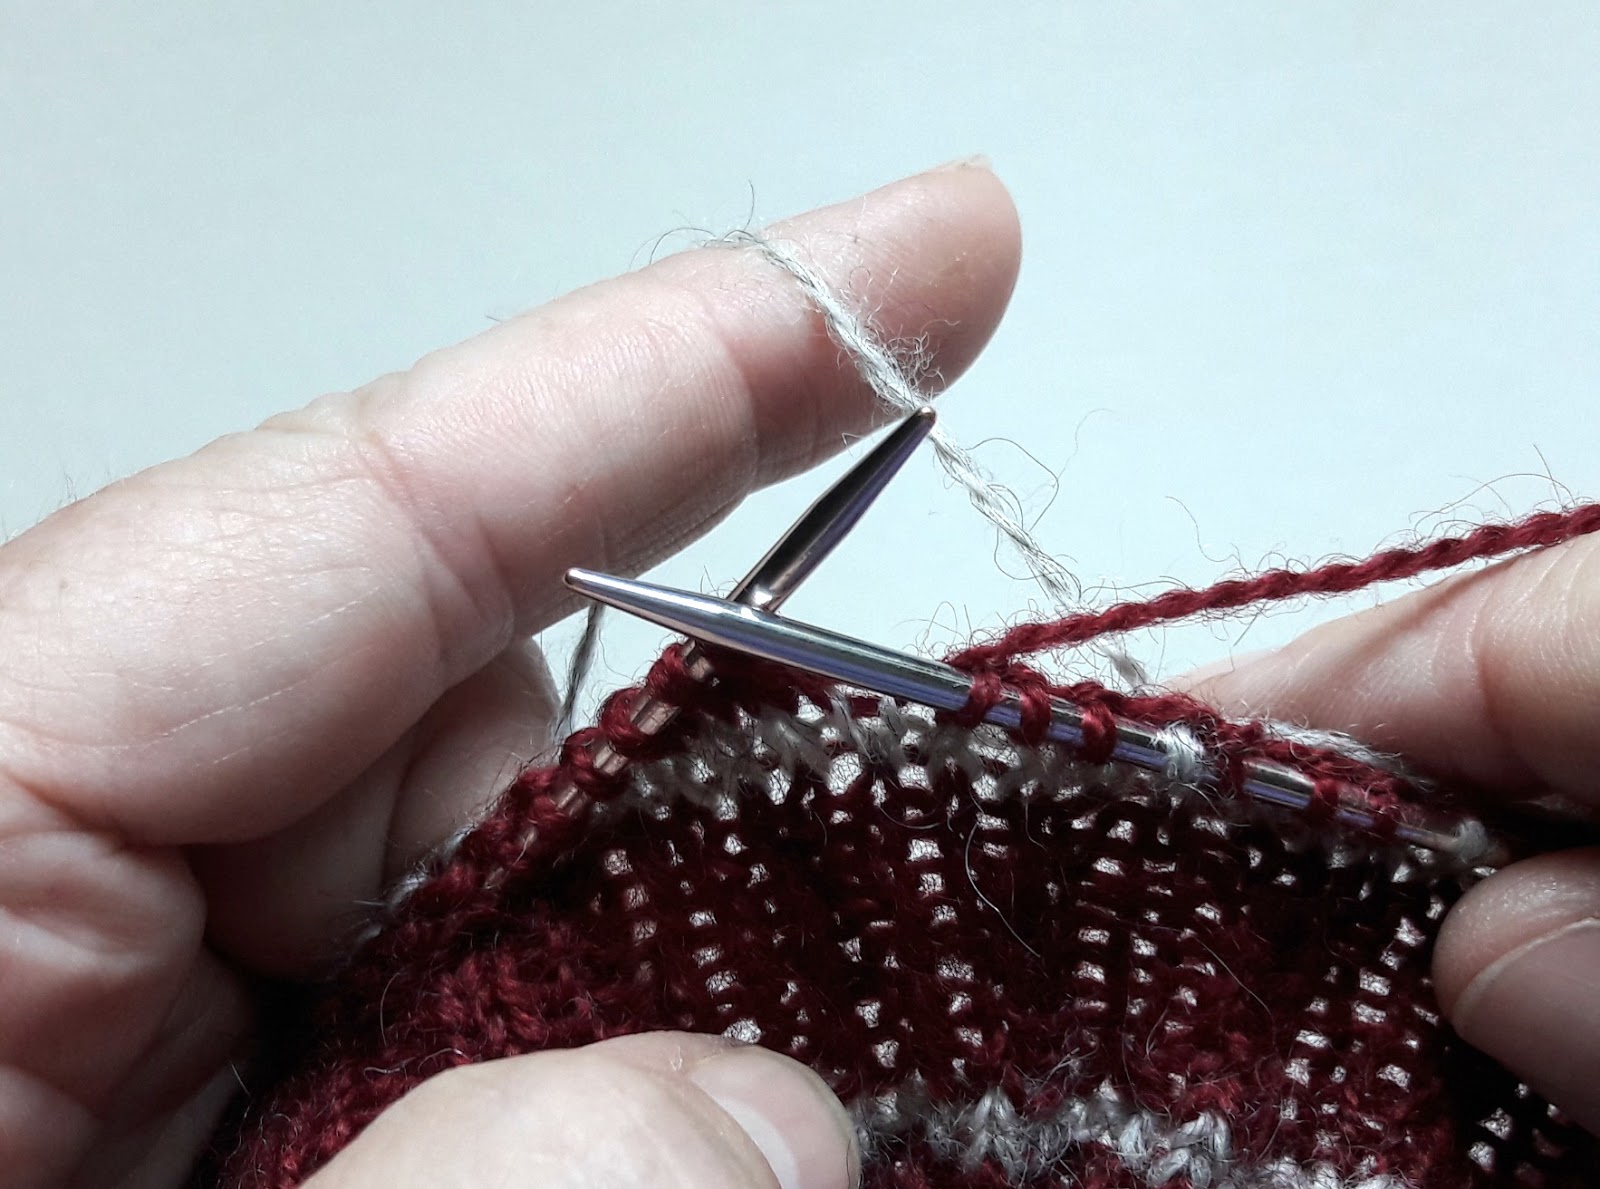
We’re now going to do something called a Bipless rib, but feel free to knit the rib in your usual style if you prefer. When you knit a rib section with more than one colour, you can see the colour change from the other side when you knit the purl stitches, but there’s a way of stopping that. In this next photo, you can see that the bottom stripe is knitted in the usual way with K2, P2 stitches on every round, but the top stripe doesn’t have those “bips” in between the ribs.
 This is how you do it:
Round 5: Change to CC and knit one round.
Round 6: (K2, P2), repeat to end.
Round 7: Change to MC and knit one round.
Round 8: (K2, P2) repeat to end.
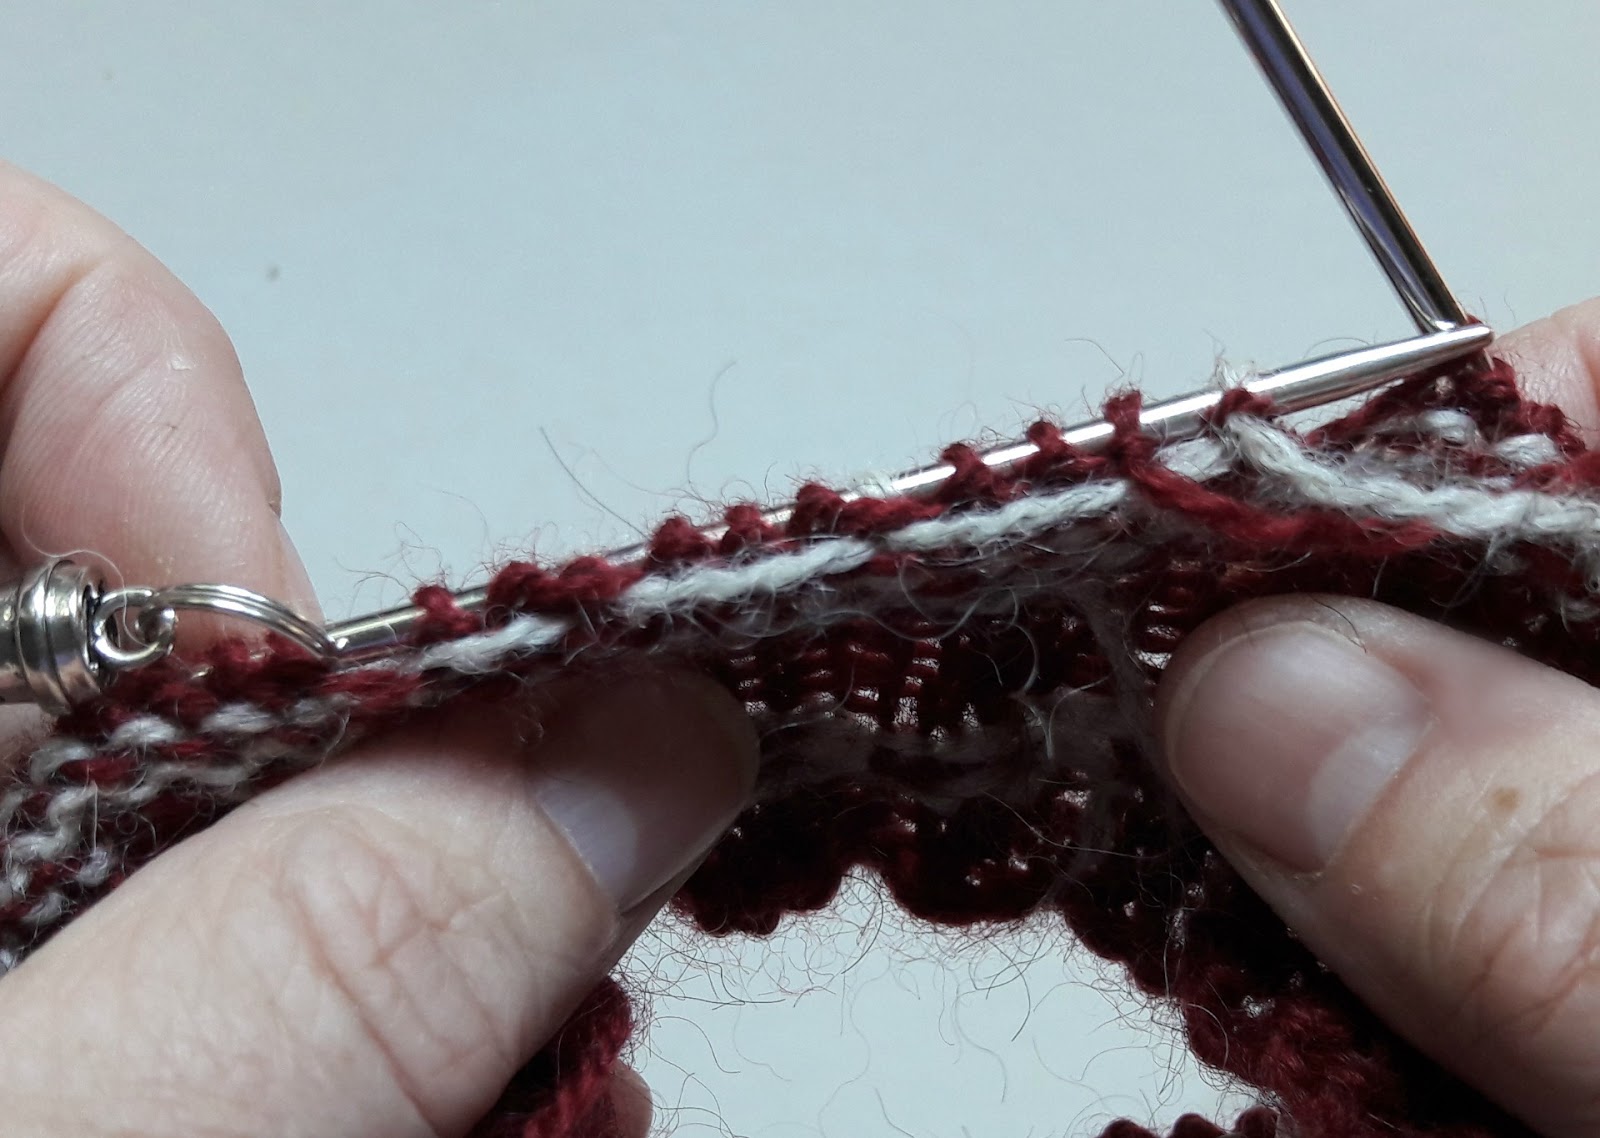
The way to stop the bips is to knit all the stitches of the first colour change round, then go back to K2, P2 rib for the second round. If you look closely, you can see that the top band looks slightly narrower than the bottom one, but now you have a choice between that and the bips appearing in the wider band.
Continue in K2, P2 rib for 8 more rounds or until desired length of rib (I knit 16 rounds of rib).
The video for working the cast on, joining into the round, bipless rib and jogless stripe (see below) is here:
Leg – both the same
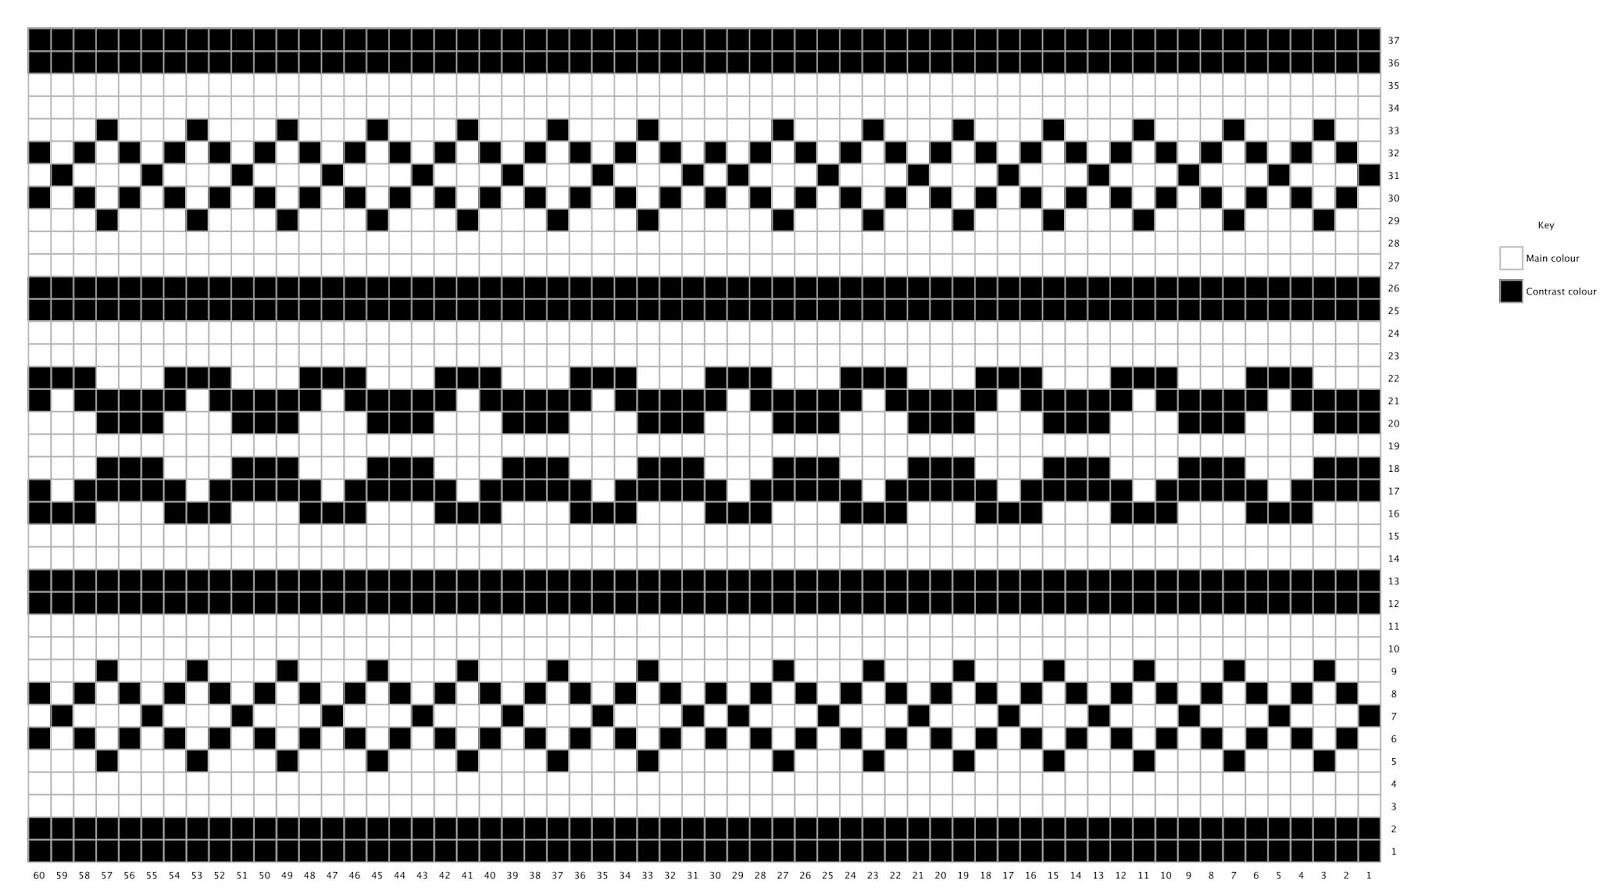
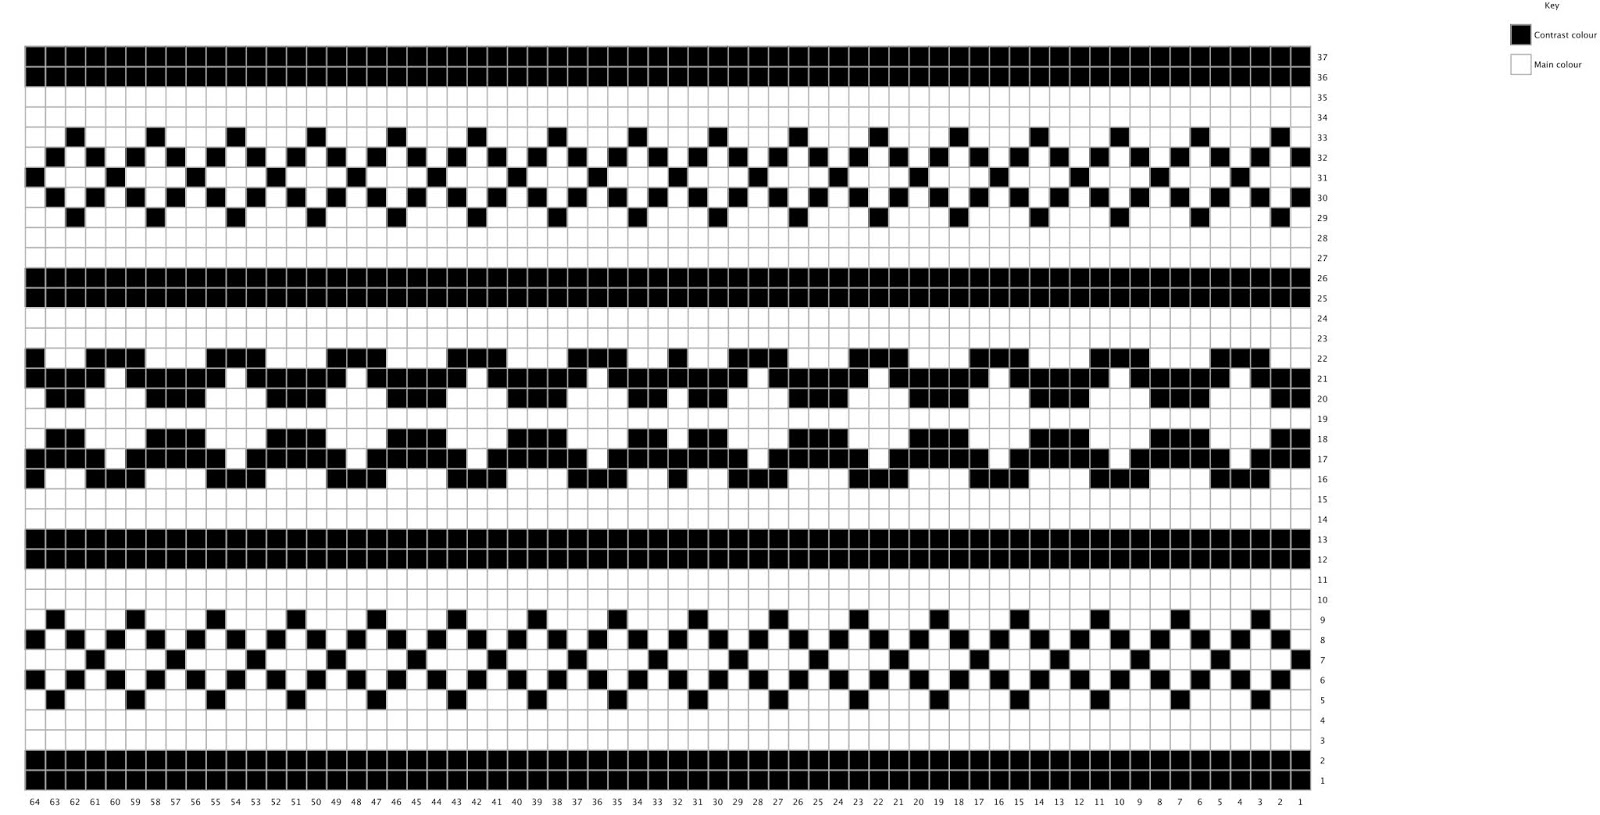
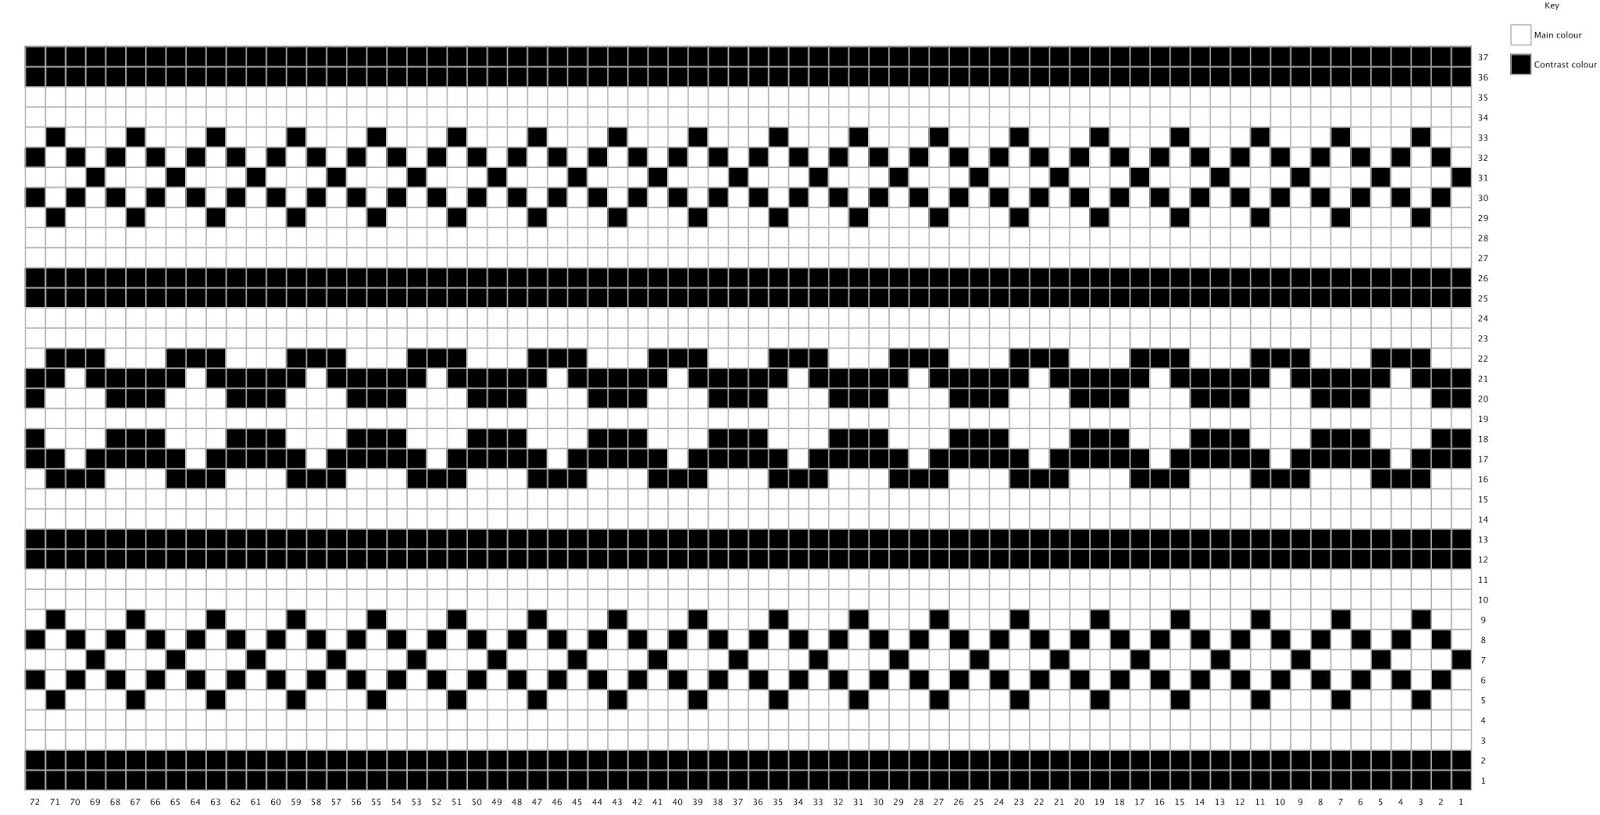
Using MC and the correct chart for your size, read the chart from right to left and knit rounds 1-37 changing colours where directed, then knit each round until you reach the desired length before start of heel (for me, this is usually around 72 rounds in total including the rib). If you need a reminder of how to read a chart, you can find one in the Easy Cable Socks tutorial.
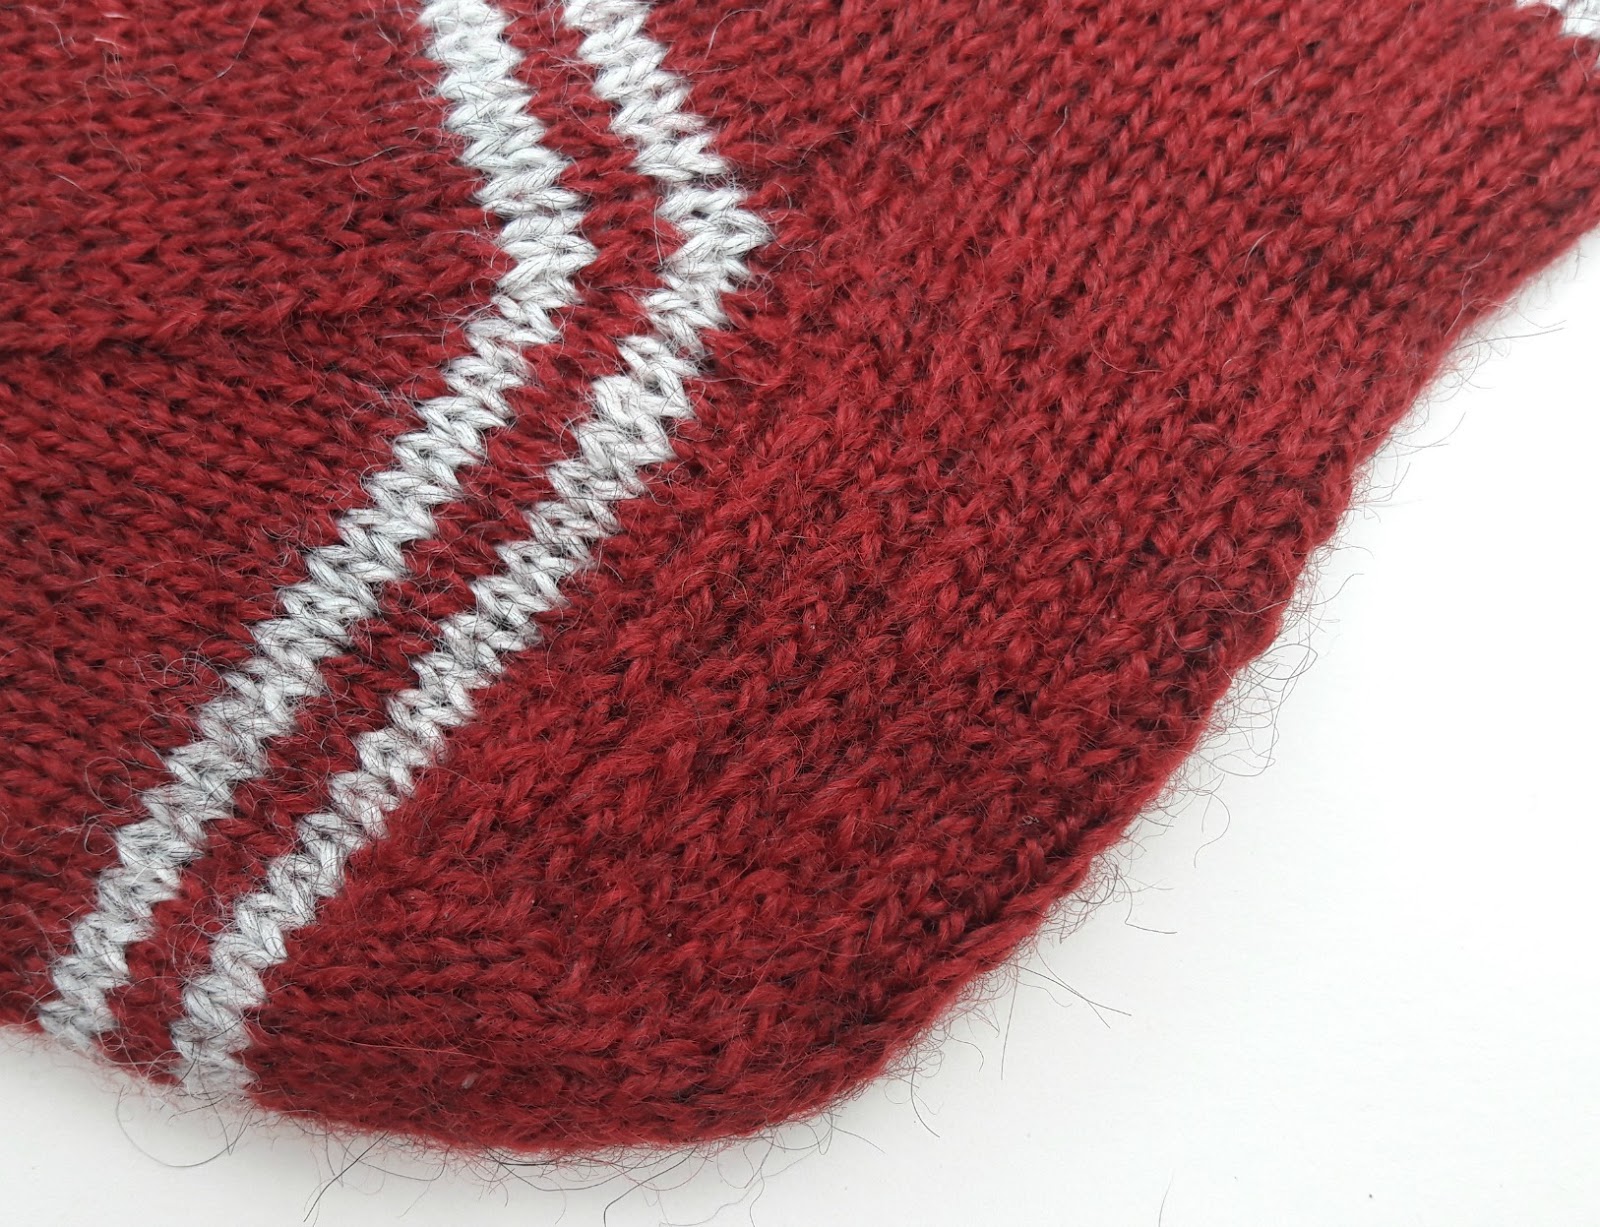
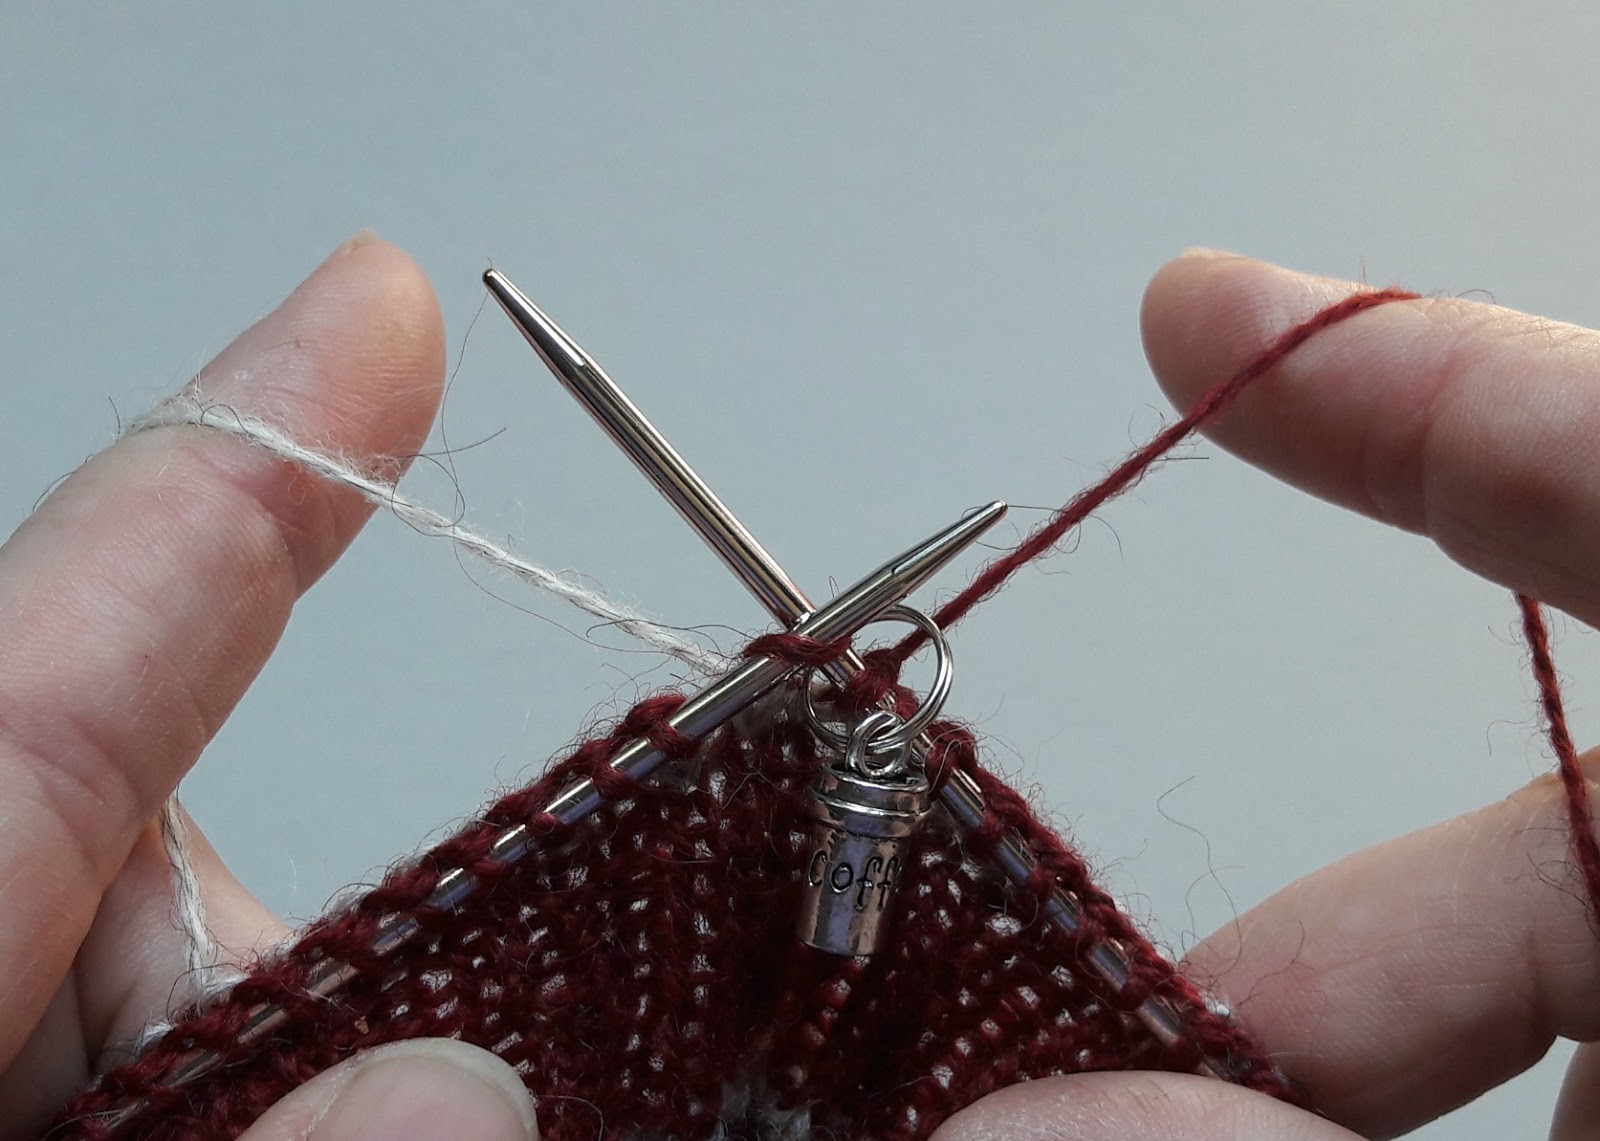
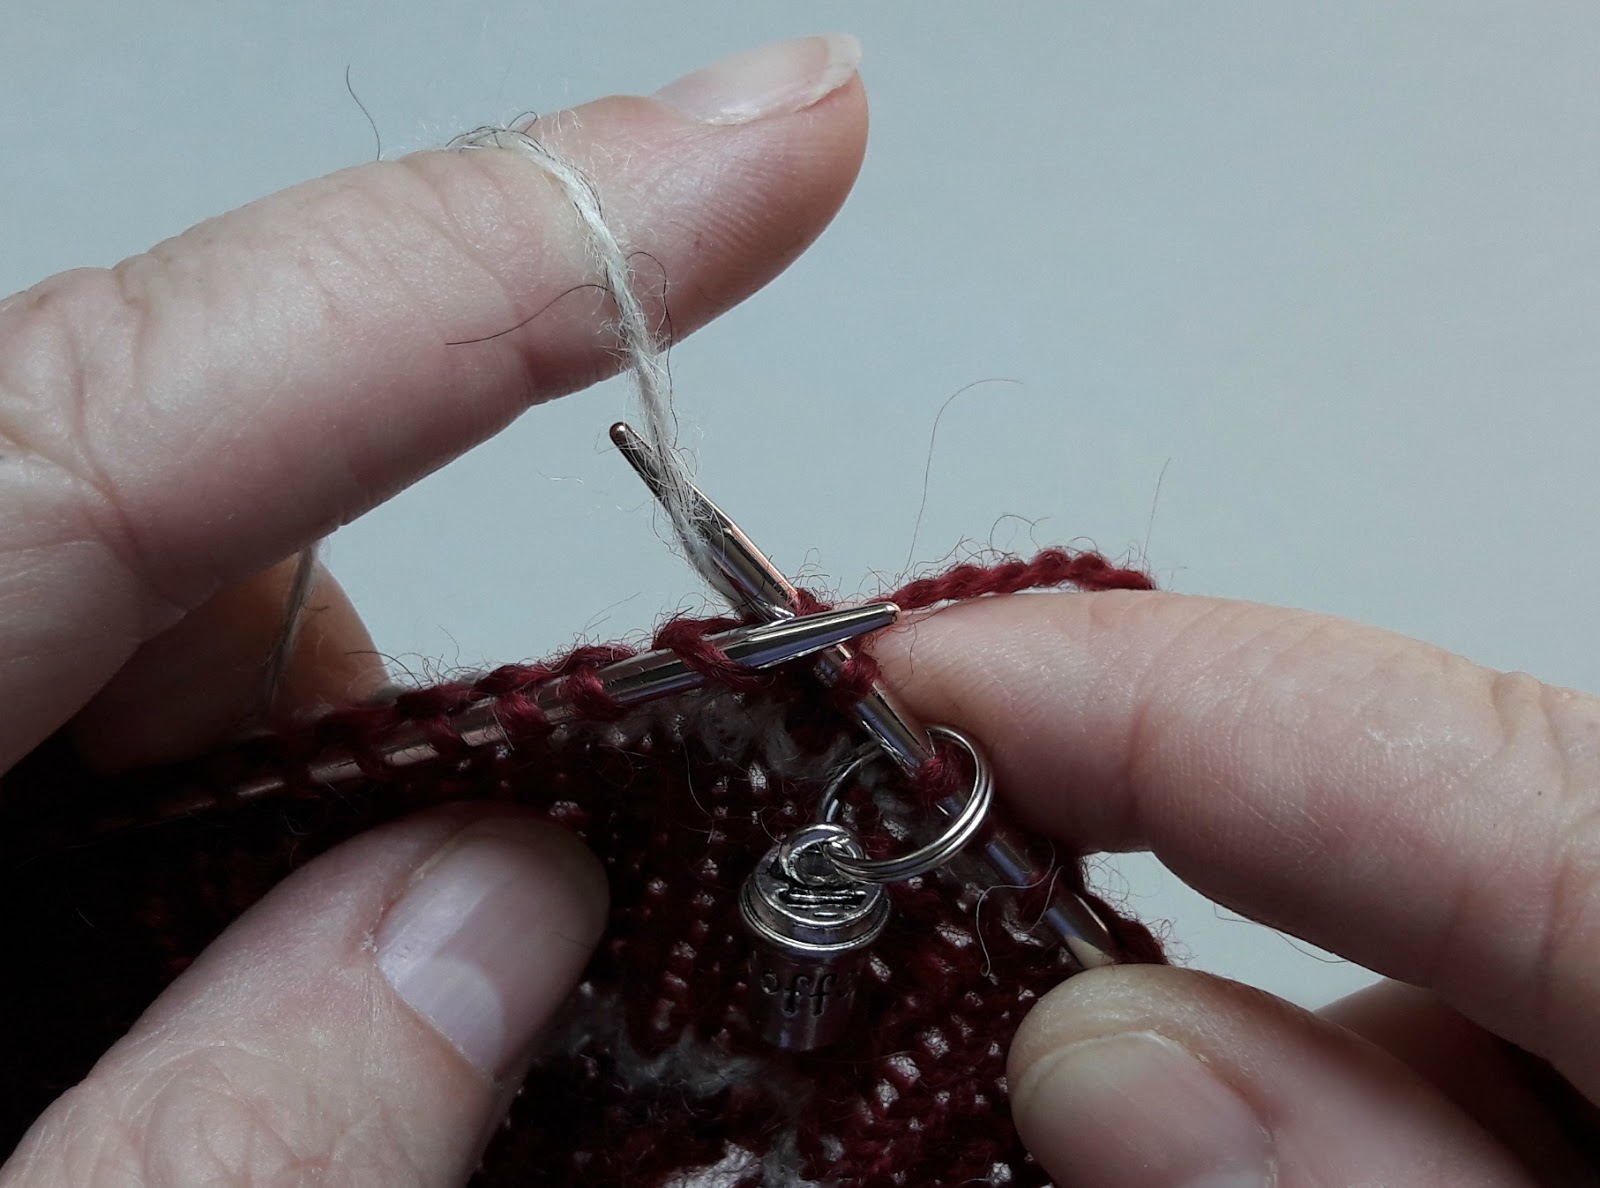
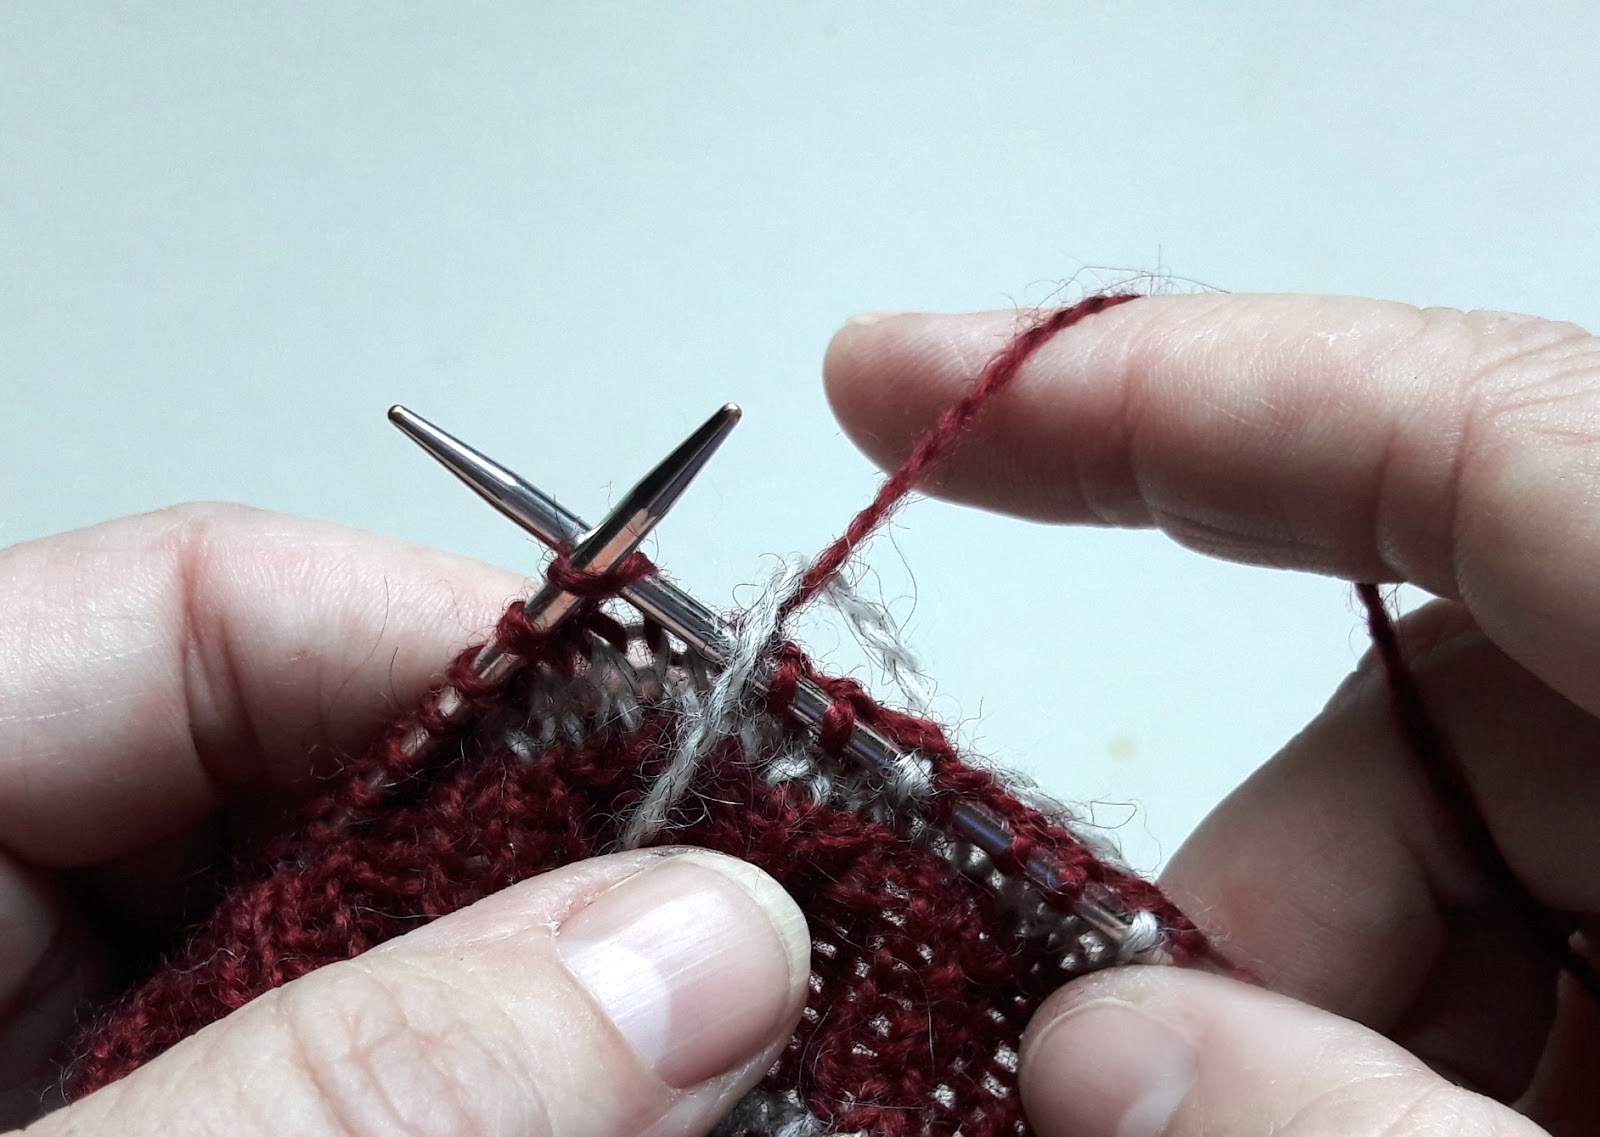
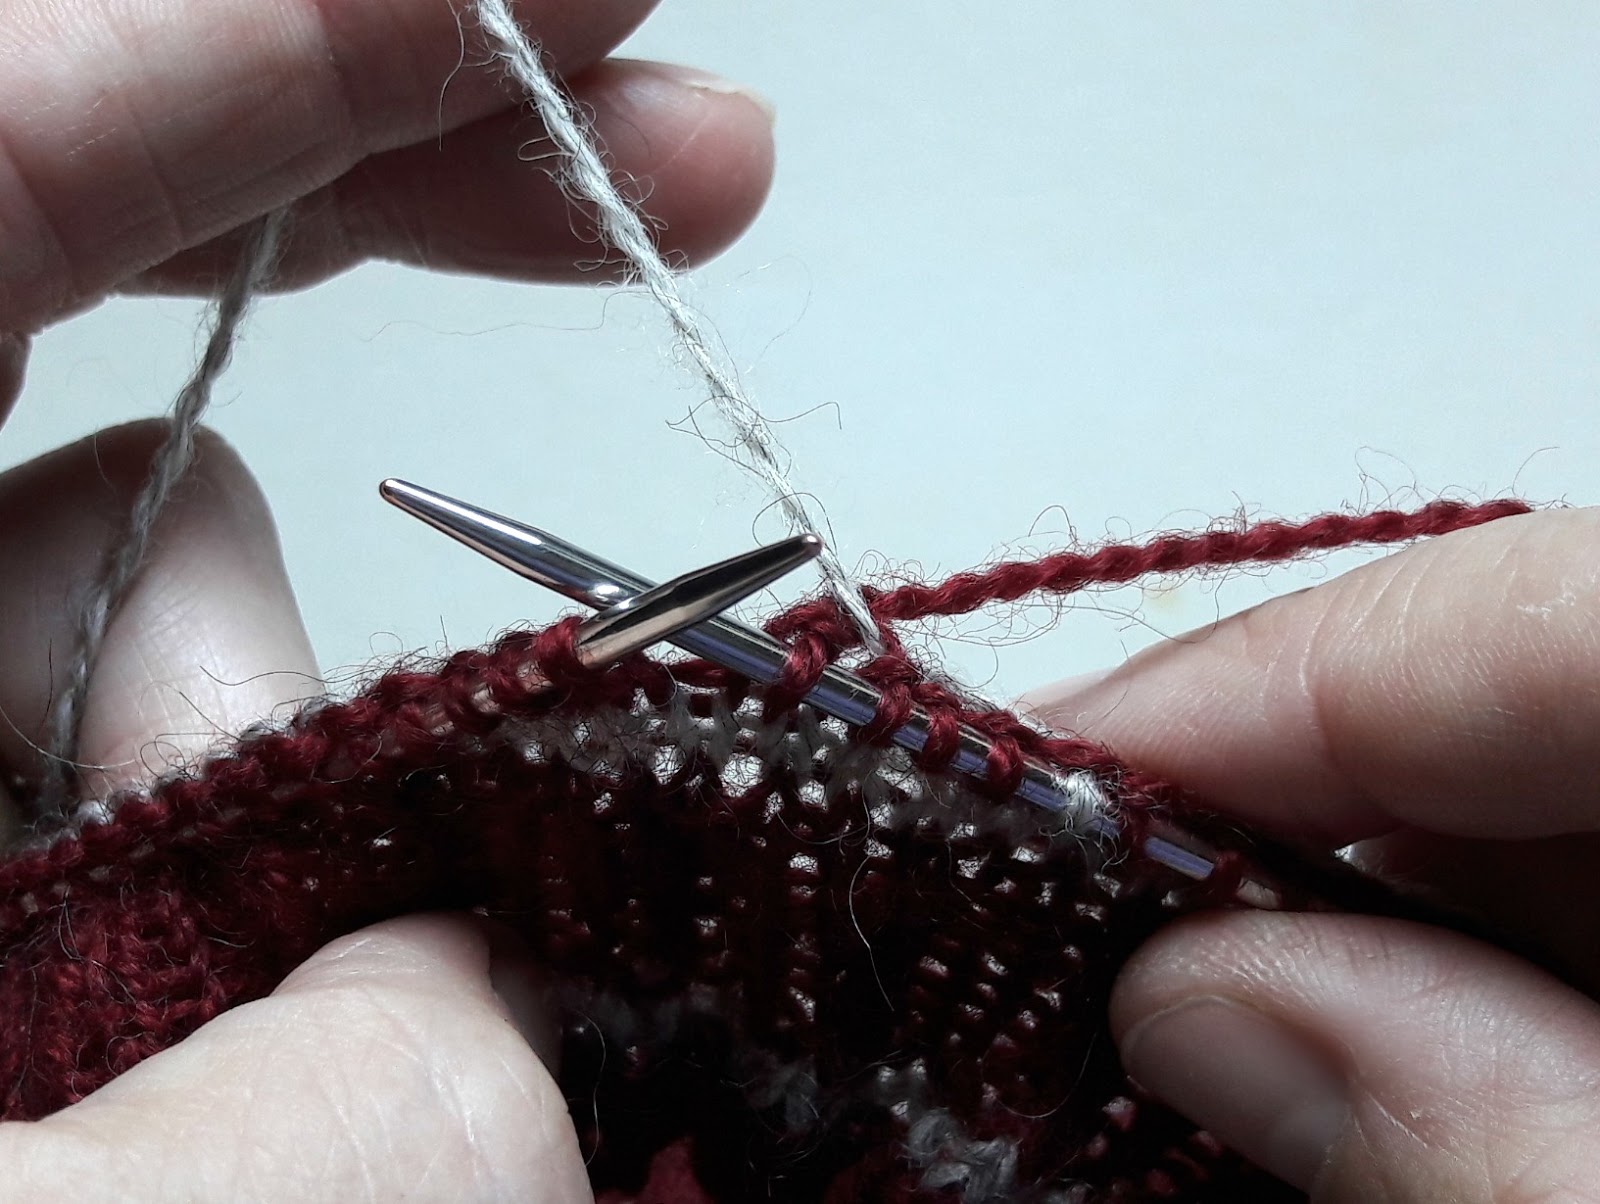
One of the idiosyncrasies of knitting colourwork in the round is that you get a “jog” when you change colours. They happen because each round is stacked on top of the previous one, but there are methods you can use to try to lessen the impact of the stripes. The one that I use is to knit the first round of the new colour, then pick up the first stitch of the previous colour …
put it onto the left hand needle and knit it together with the first stitch of the new colour round.
What happens there is that you get a big stitch of the contrast colour which makes the join less obvious.
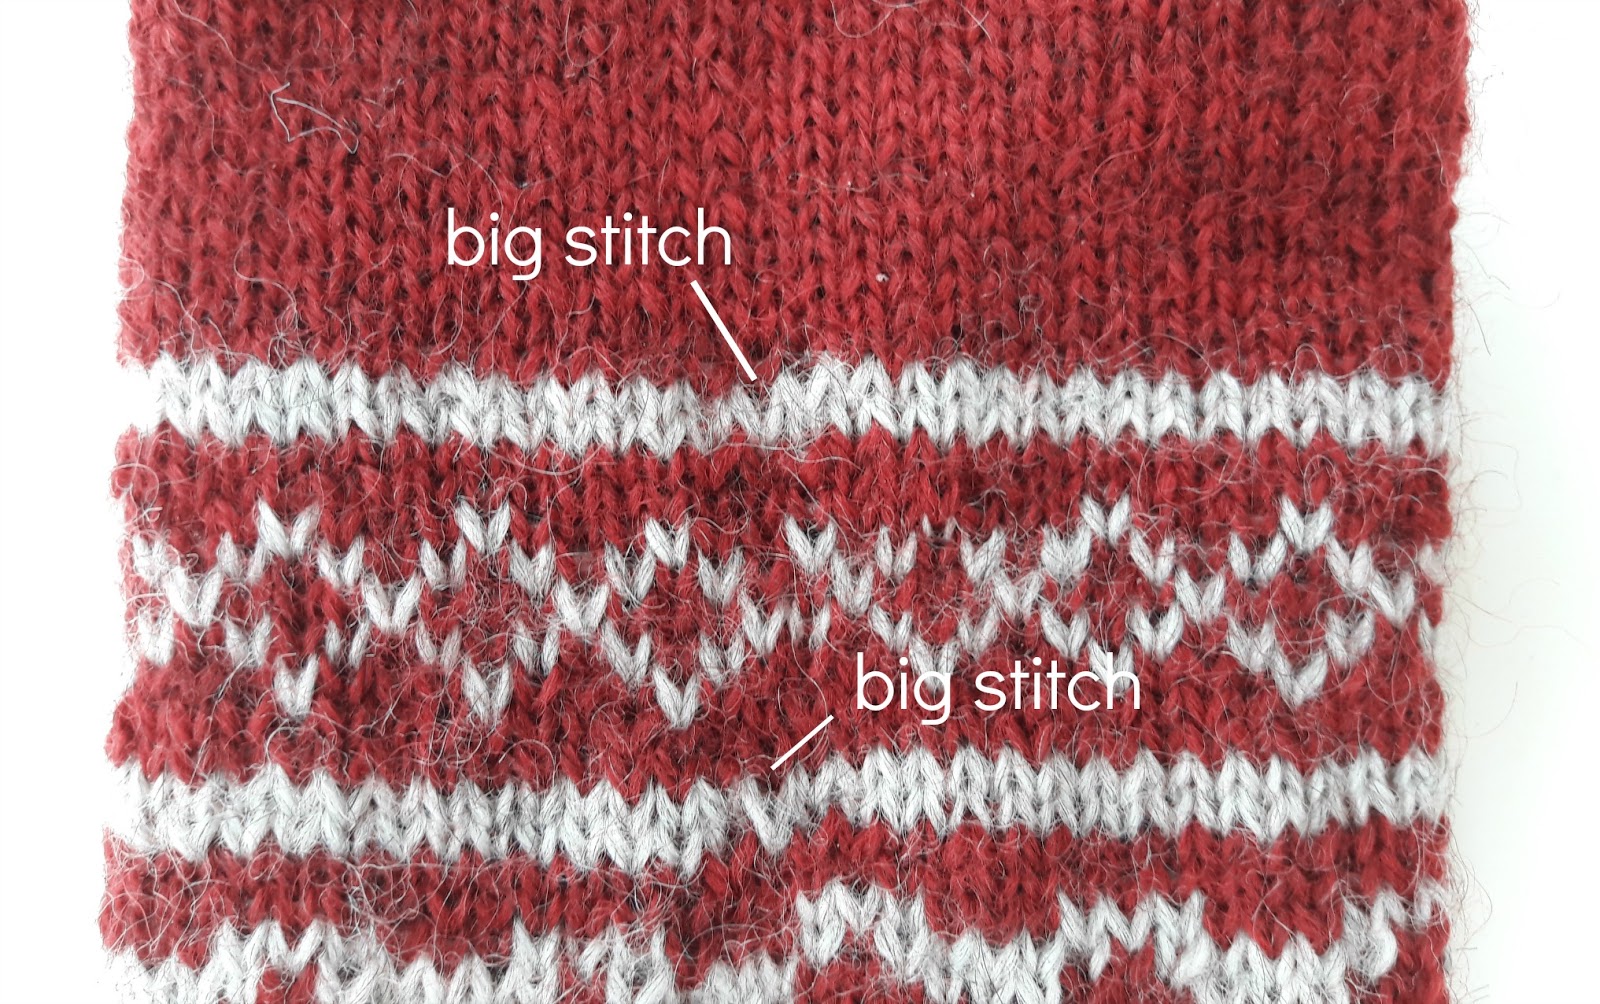
If you look at this photo, you can see that I forgot to lift the stitch on the right hand sock on the bottom stripe – there’s quite a difference so it’s worth the effort!
Let’s also have a look at how you’re going to work your two colours at once. There’s absolutely nothing wrong with picking each colour up individually whenever you need to use it, but there are other ways to hold your yarn too which do make it faster to knit colourwork. I used to knit lots of colourwork jumper samples for my local yarn shop when I was much younger and I wish I’d thought to knit like this then!
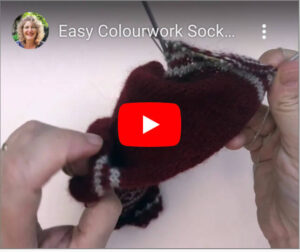
I’m an English-style knitter so I hold my working yarn in my right hand. Here, I’ve got my contrast colour in my left hand held in continental style. I’ve chosen to do this so that I can remember which is the dominant colour of the two that I’m working with, but more of that in a minute.
Whenever I need to knit with the contrast colour, I scoop the yarn from my left hand …
and then when I need to knit the main colour, I knit as usual with my right hand. It takes a bit of practice but it’s so much faster than dropping the yarns each time.
This is what the yarns look like on the wrong side. Because I’m only knitting with the contrast colour every few stitches, I get long threads called “floats” which are carried along the back of the work. It’s really important not to pull the floats tight when you’re working or you’ll lose the stretch in your knitting and won’t be able to get your sock (jumper, cardigan) on later.
I mentioned dominant colour and you’ll be pleased to know that’s a really easy concept to get your head around. When you knit with more than one colour, you’ll find that you have one yarn that is on the top and the other will come from underneath. It’s something that you need to pay attention to because basically, the yarn that you want to stand out in your knitting – that is, the contrast yarn – is the dominant colour and you need to make sure that the yarn is always coming from underneath the main colour. This is because it uses slightly more yarn which produces a bigger stitch and therefore makes that colour stand out more. Easy, eh? This is what your sock will look like on the inside.

That pattern would look different if the red was the dominant colour, so turning your work inside out on a regular basis to check that your pattern remains the same is a good way to make sure that you haven’t swapped the dominant colour by mistake.
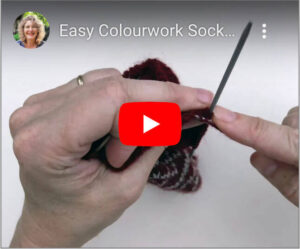
Finally, let’s talk about what happens to those floats if they get too long. I don’t recommend that you carry your floats over any more than 4 stitches with a sock or you might risk getting your toes stuck in them when you put them on. Here, you can see that I need to carry the contrast yarn along and is how I do it. Start by lifting the contrast yarn over the main colour working yarn …
then knit the next stitch with the main colour …
then take the contrast yarn back down over the main colour working yarn again as you knit the next stitch. This will ensure that your contrast yarn remains in the right place to come up from underneath the main colour and maintain the dominance.
I hope that didn’t seem too complicated! I’m sure you’ll find it all quite easy once you get going!
The video tutorial for working the colourwork section is here:
Charts
60 stitches
64 stitches
68 stitches
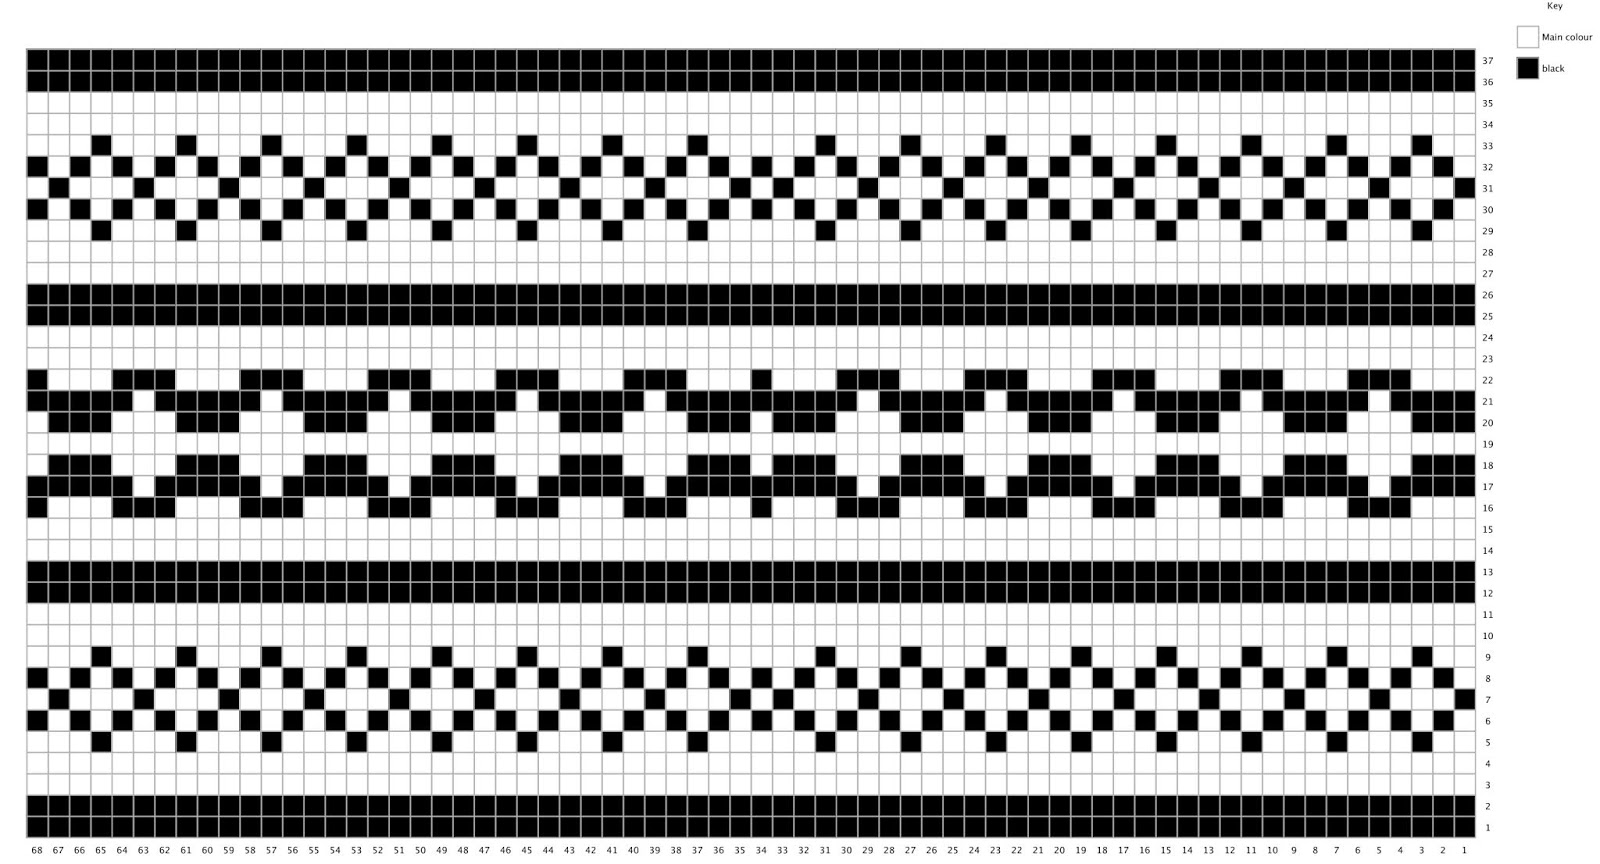
72 stitches
Heel Flap
Change to 2.5mm DPNs if you are using a short circular needle. There is no need to use DPNs if you are using magic loop. You may prefer to place the spare stitches from the top of the foot onto a stitch holder if you are using a short circular or DPNs whilst you work the heel.
Row 1: K2, (Slip 1, K1) until you have 30 [32:34:36] stitches on your needle, turn.
Row 2: Slip 1, P to end, turn.
Row 3: (Slip 1, K1) to end, turn.
Repeat rows 2 and 3 until heel flap measures approximately 2 inches (5 cm), finishing on row 3 (for me this is approx 35 rows). If you want to make the heel flap longer, continue knitting rows 2 and 3 until you reach the desired length, but remember that you will need to pick up more stitches to create the gusset.
Here’s the video for the heel flap:

Heel turn
Row 1: Slip 1, P16[17:18:19], P2tog, P1, turn.
Row 2: Slip 1, K5, SSK, K1, turn.
Row 3: Slip 1, P6, P2tog, P1, turn.
Row 4: Slip 1, K7, SSK, K1, turn.
Continue in this way, adding one stitch between slip stitch and SSK or P2tog on each row (ie, Row 5: Slip 1, P8, P2tog, P1; Row 6: Slip 1, K9, SSK, K1, etc) until all of the heel stitches are used.
Here’s the video for the heel turn:
Gusset
Knit across heel stitches if required to bring you to the left hand side of the heel flap (with the outside of the flap facing you) ready to pick up 1 stitch for every 2 rows knitted. Remember that if you made the heel flap bigger, you will need to pick up more stitches. Once you have picked up the stitches, place marker. Knit across the top of the foot stitches, place marker, then pick up 1 stitch for every 2 rows of heel flap knitted up the other side of the heel. Knit across the top of the heel and then shape gusset as below.
Note: If you are using DPNs and/or have placed your stitches on a stitch holder, you can arrange the needles as follows: Needle 1 for stitches across heel, Needle 2 for picked-up stitches down side of foot, Needle 3 for stitches across top of foot (knit stitches off stitch holder if required), Needle 4 for picked-up stitches on other side of foot. You may find that stitch markers are not required at first.
If you would prefer to omit the contrast stripe, use MC throughout the gusset. You are going to knit two rounds of CC, starting part-way through round 1 and finishing part-way through round 3. I have chosen to join the yarn at this point to make the join less visible, but you can join the yarn elsewhere if you choose.
Round 1: K to 3 sts before the marker, K2tog, K1, slip marker, knit to next marker, slip marker, K1, SSK, K to start of first set of picked up stitches and join CC. Knit to marker.
Round 2: Slip marker, knit to next next marker, slip marker, knit to 3 sts before marker.
Round 3: K2tog, K1, slip marker, knit to next marker, slip marker, K1, SSK, K start of CC round and rejoin MC. Knit to marker.
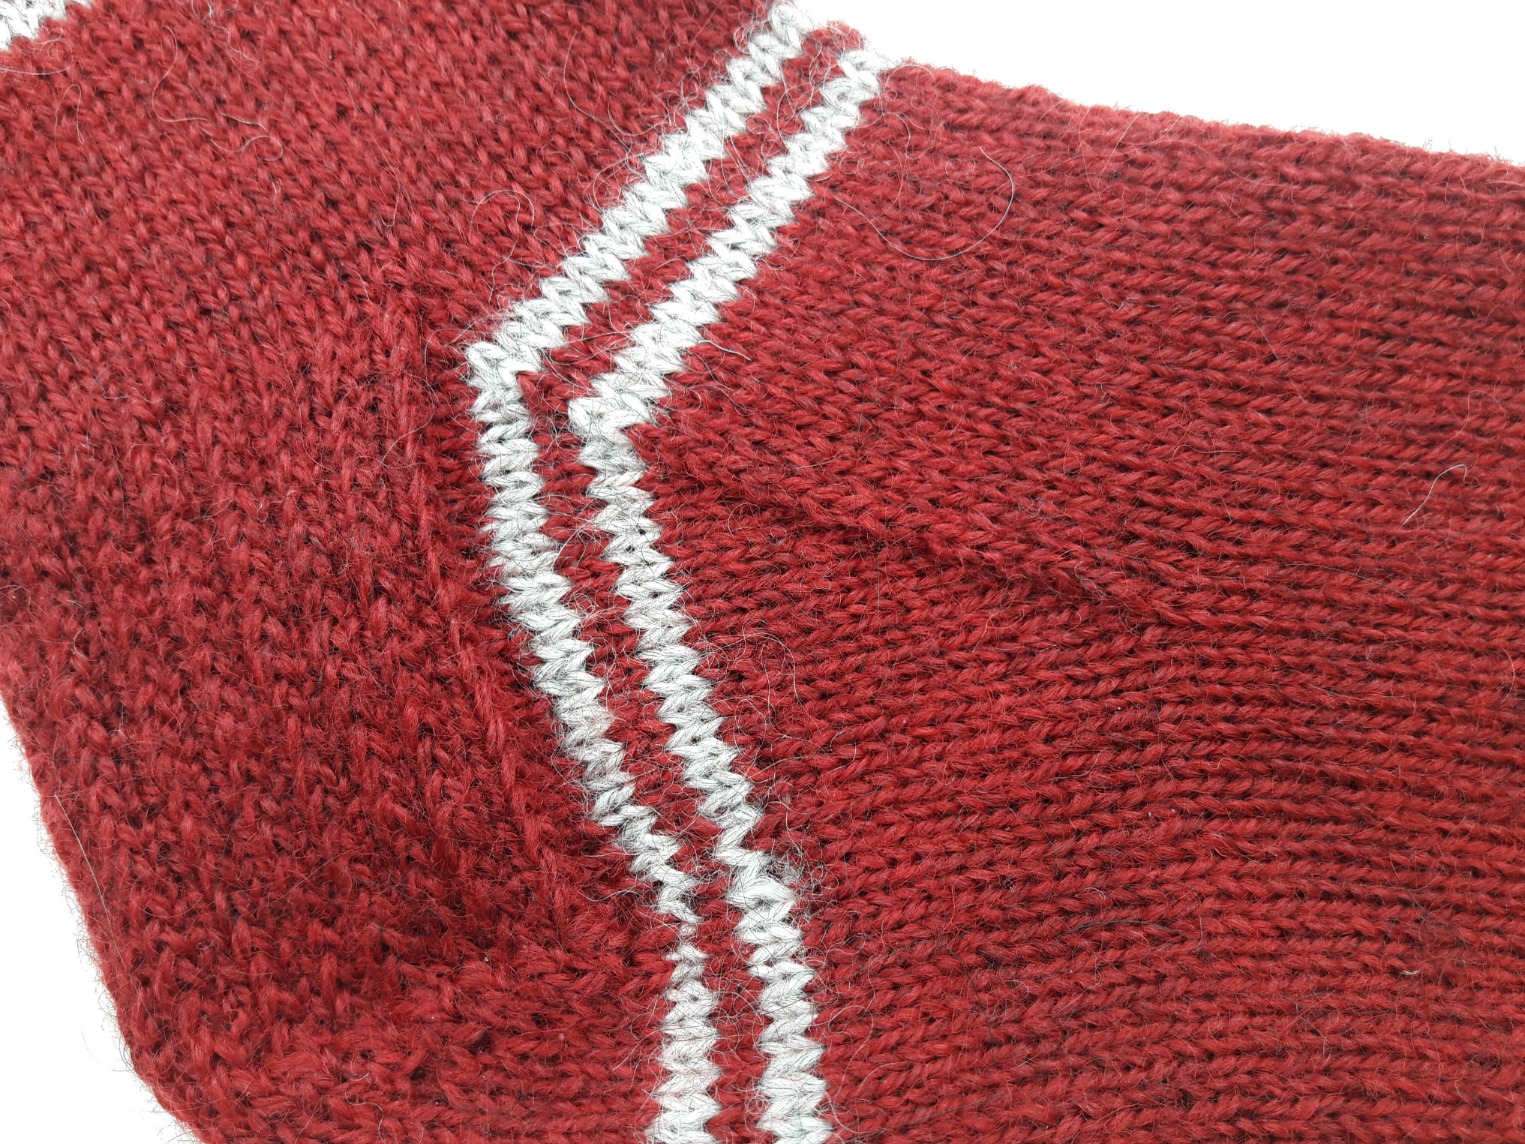
Using MC only, repeat rounds 2 and 3 to shape the gusset. Continue in this way, decreasing by two stitches at the gusset on every other round until there are 60 [64:68:72] stitches on the needle. You can see the line of the gusset very clearly in this picture:
Here’s the video for the gusset:
If you wish to add the next set of stripes, join in CC at approximately 2.75 inches (7 cm) before the desired length of your sock and knit 2 rounds CC, 2 rounds MC, 2 rounds CC and 2 rounds MC. Continue to knit each round in MC until you reach approximately 2 inches (5 cm) before the desired length ready to start the toes. For my size 5 feet, this is about 47 rounds. Don’t be afraid to try your sock on before decreasing for the toes and make sure that you’re standing up as you need your full weight on your foot. Sometimes you have to work more rounds than you think to get to where you need to be, but it’s always worth doing that so that sock is the right length – otherwise it will pull against your toes and under your heel which isn’t very comfortable!

Toes
At some point whilst decreasing for the toes, if you are using a short circular you may need to change to DPNs or use magic loop as the number of stitches becomes too small for the circular. It’s up to you when you choose to do that, and how you distribute the stitches across the needles; just keep following the pattern as set below. Join CC and create the toes as follows:
Round 1: K1, SSK, K24 [26:28:30] sts, K2tog, K1, place marker, K1, SSK, K24 [26:28:30] sts, K2tog, K1. (60 [64:68:72] sts)
Round 2: Knit one round, slipping markers as you come to them.
Round 3: K1, SSK, K to 3 sts before marker, K2tog, K1, slip marker, K1, SSK, K to 3 sts before marker, K2tog, K1. (56 [60:64:68] sts)
Repeat rounds 2 and 3 until you have 28 stitches left and divide these between two needles so that front and back of socks match.
The video for the toe decreases is here:
Finally, you’re going to graft the toes using Kitchener stitch so that you don’t get a seam. This is part of the sock that does worry some people, but as long as you take your time and you choose to do it when you won’t be disturbed, you’ll be absolutely fine. If you want to see photos of how to complete the Kitchener stitch, you can find them in the Sockalong tutorial, and there’s a video here:
You’re all done! You’ve just got to sew up the gap between the first two rows when you cast on, tidy up any loose ends inside your sock and then you can admire it – but not for too long as you’ve got a second one to cast on!
Don’t forget to link your socks on Ravelry so that others can admire them, and if you would like to share them on other social media platforms, there are hashtags of #easycolourworksocks and #winwickmumsocks. I’m really looking forward to seeing how your colourwork turns out!

This pattern is free on this blog and will always remain so. If you’ve enjoyed using it and would like to support my work so I can keep blogging and designing, you can browse my shop for patterns and books or buy me a brew – both are very much appreciated. Thank you! xx


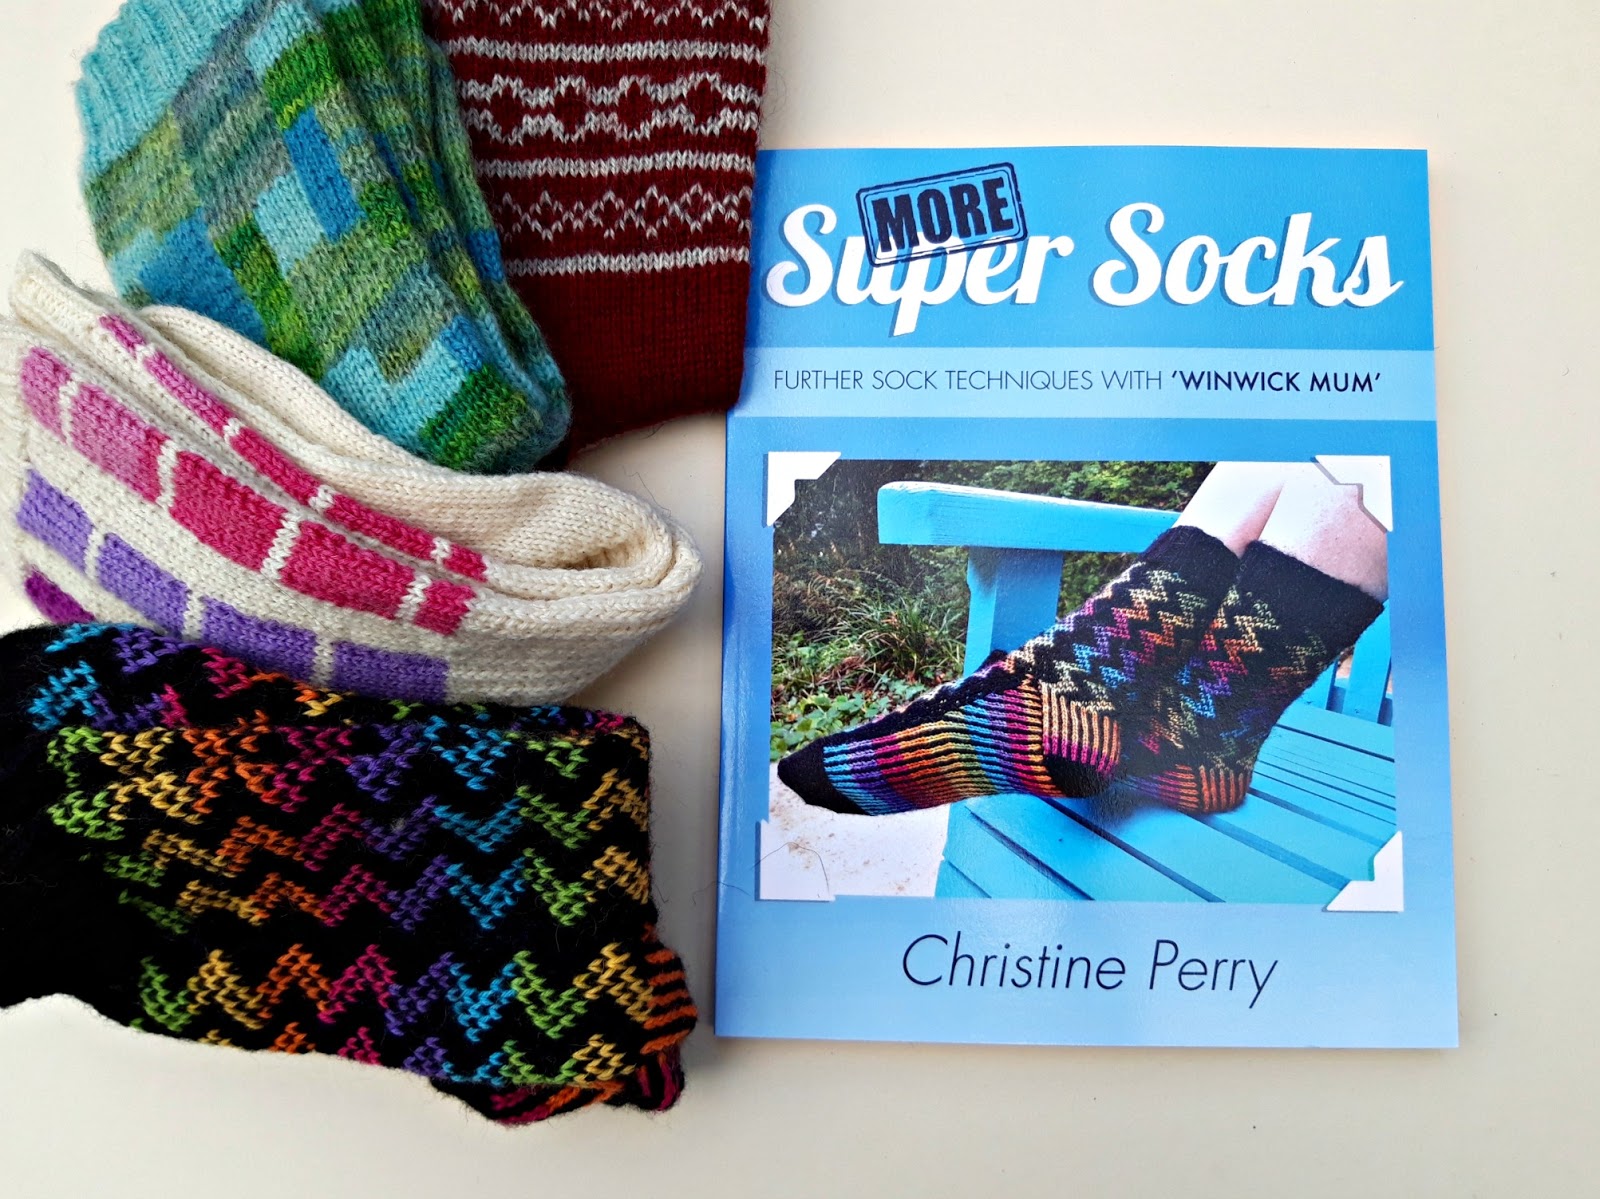
You can also find this pattern and other tutorials and exclusive patterns in More Super Socks.
This pattern copyright © 2018 Winwick Mum All rights reserved.
Not to be included in any collection or used for profit without written consent of Winwick Mum.
This pattern is based on my Basic 4ply Socks pattern, which means that you can find photo and video help in the Winwick Mum Sockalong tutorials. You can find out more here:
If you can already knit socks but would like to stay in touch, click the link below to join the Winwick Mum mailing list to hear about the latest blog posts, pattern updates, tutorials and more … but no spam, I promise!


I'm looking so forward to trying your new pattern, Christine. It is extremely kind and generous of you to create these wonderfully clear tutorials. I know that these would take a huge amount of time and effort on your part. So many people all around the world will be benefiting from being introduced by you to the fabulous craft of sock knitting!
I do hope so – I think the world can only be a better place if we're all knitting! Thank you for your lovely words 🙂 xx
beautiful socks! love the simple pattern you have chosen
will be a little while before i get to these, do have a pair on the needles atm, first time using a circular & find it a tad too small!
thanx for sharing
Your tension might well be different if you're using a different needle – there are different sizes of short circular which might be worth investigating, but I also find that it helps to angle your wrists out slightly. Good luck! xx
I work on 56 stitches – which chart should I use?
If you take 6 stitches off each end of the 68 stitch pattern then it will work with 56 stitches. Hope that helps! xx
Beautiful yarn, pattern and knitting!!!
Thank you! 🙂 xx
I love your clever pattern; easy but sooo impressive! thank you so much Christine 💓
I’m so glad – thank you! I always try to design for easy but impressive 🤣 xx