
Twinkle Star socks – free pattern and tutorial
“Twinkle, twinkle, little star …”
The Twinkle Star Socks are here at last, and thanks to everyone for your comments on the blog and Facebook about what to do about the outline!
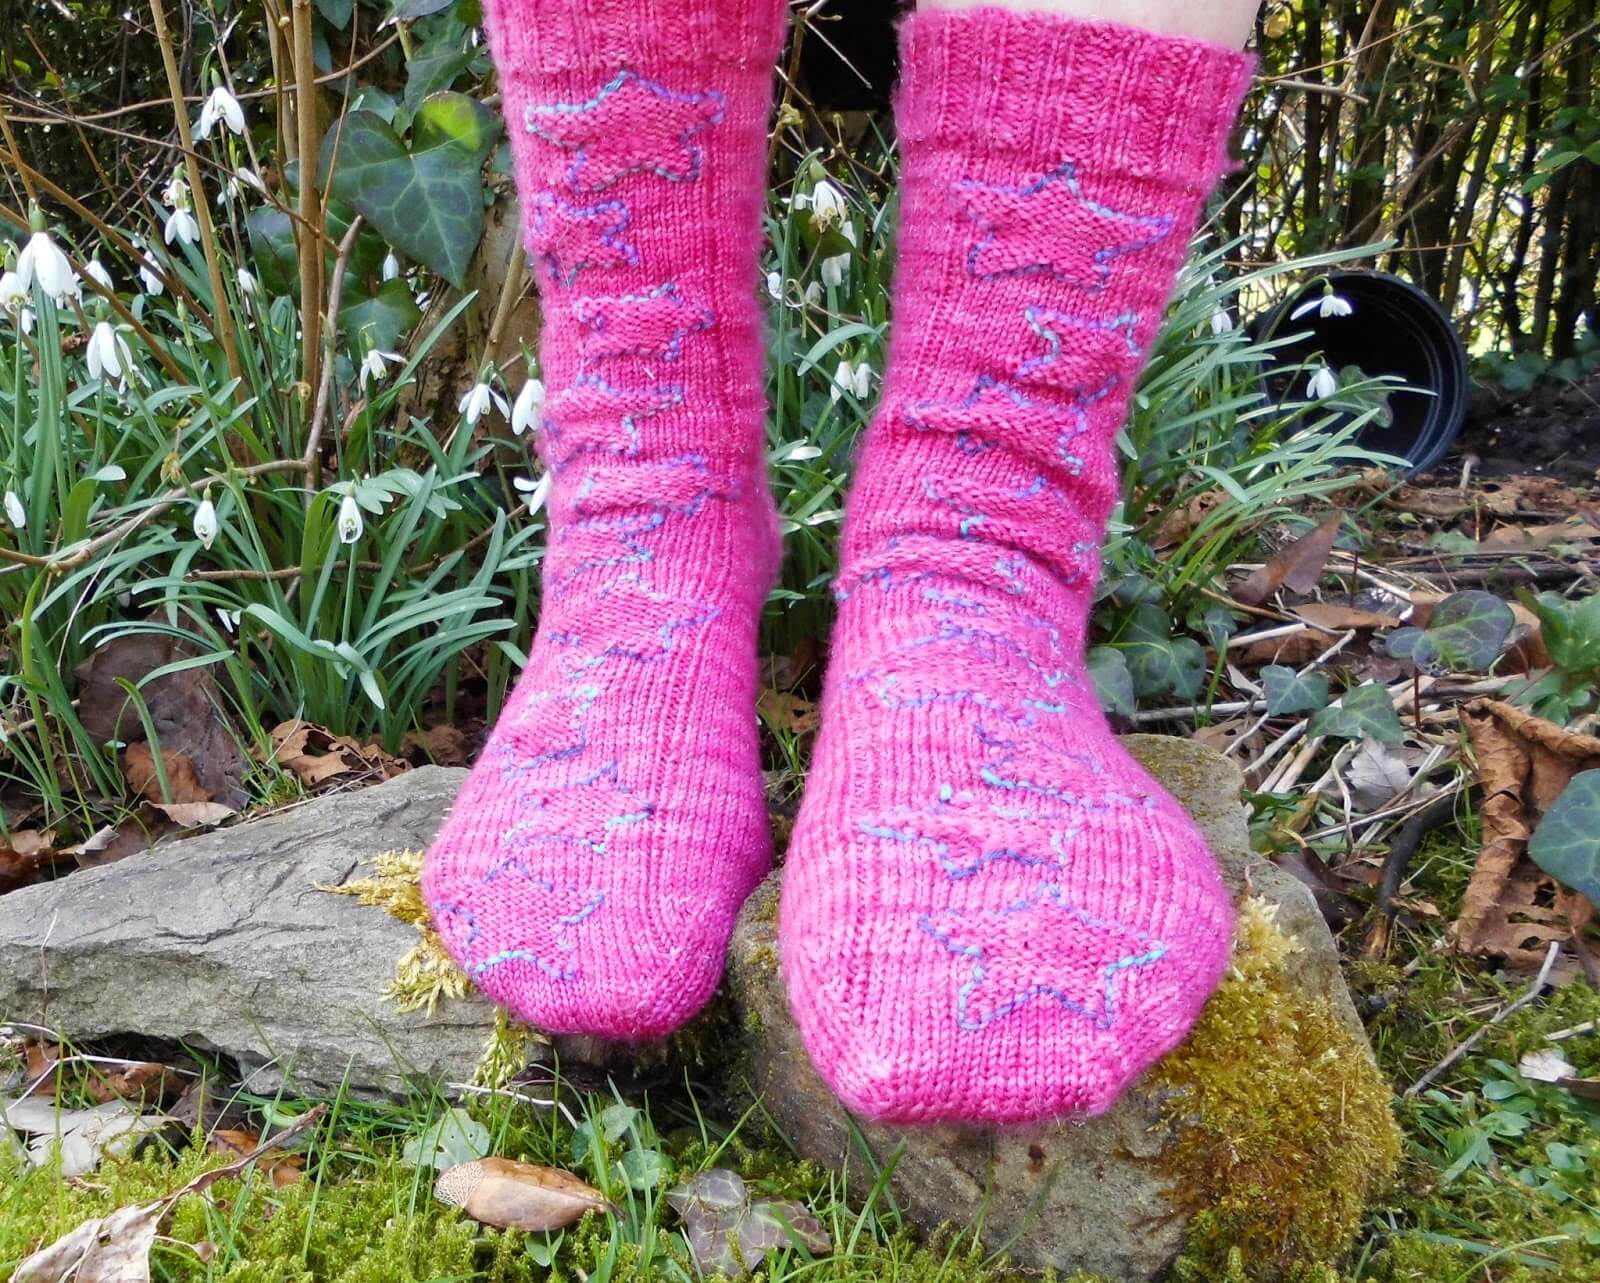
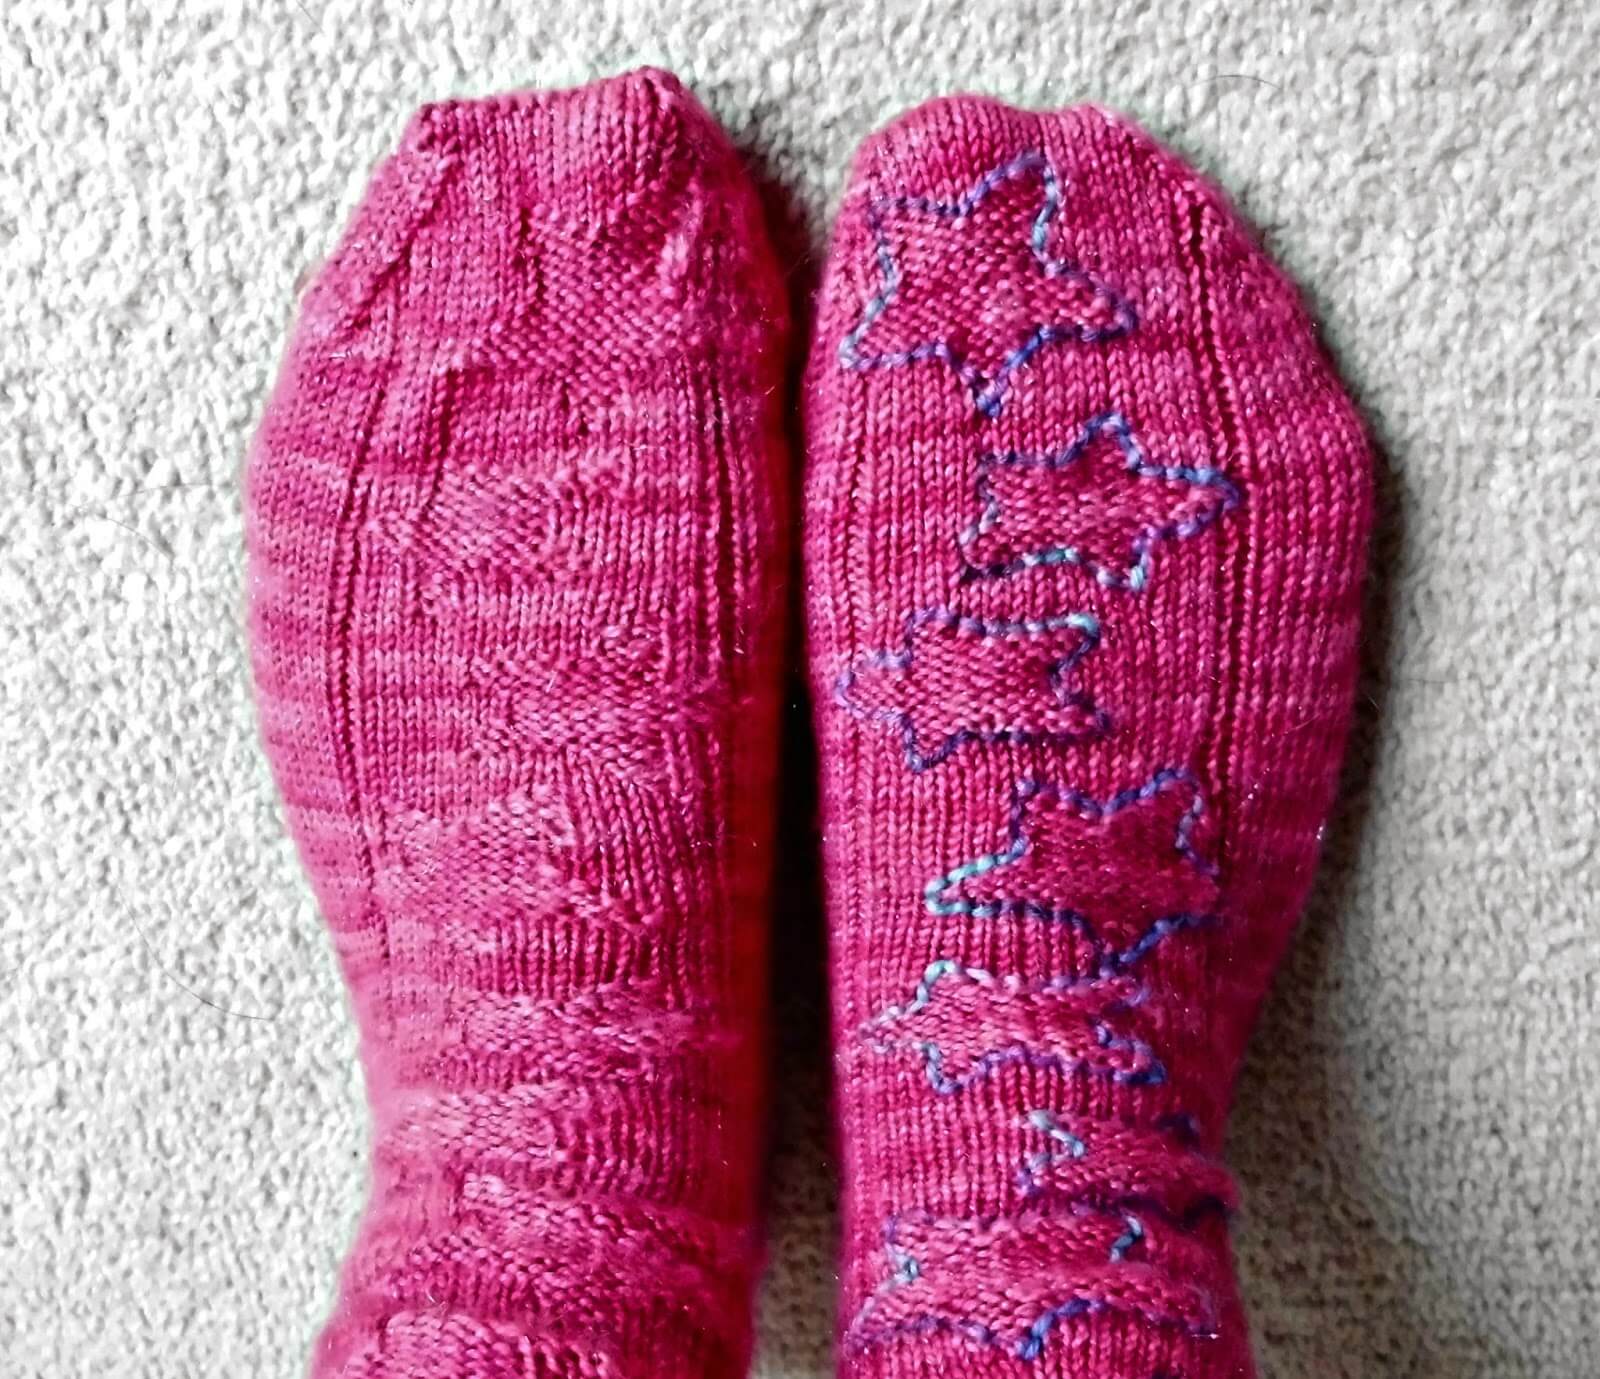
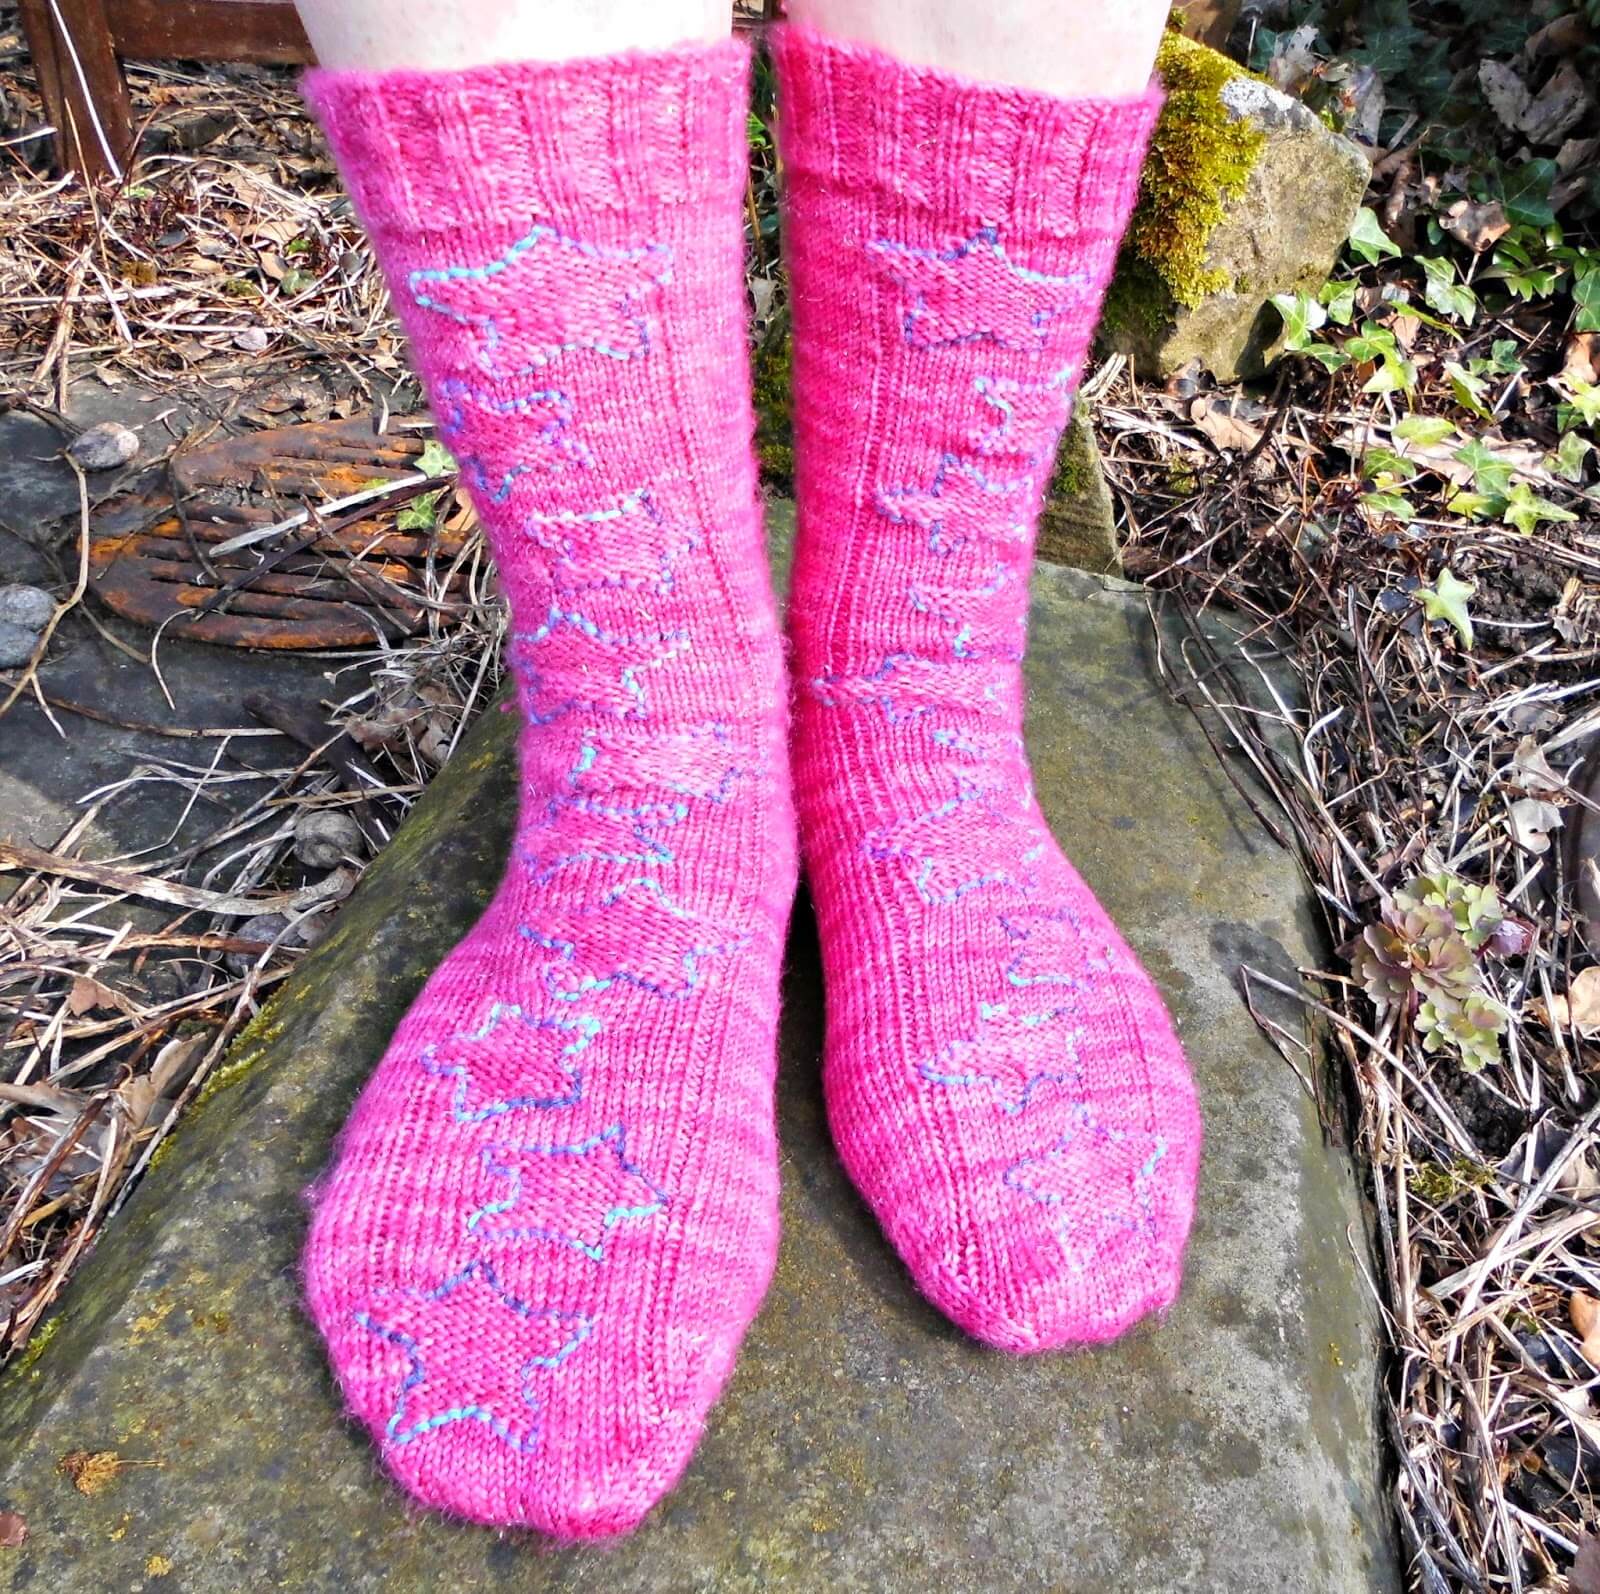
As you can see, I’ve decided that my pair of socks will have outlined stars. I like to be able to see them and I like the contrast of the colours. However, your socks can be made with whatever style of stars you would like! I’ve had lots of suggestions and I’ll mention some of them as we go along. First of all, though, I just want to show off my socks!


I just love the sparkly yarn and I’m very happy with my outlined stars. The yarn is super-soft and I’m hoping that it wears well as I can see me wearing these socks a LOT!
I used Sparkleduck Galaxy 4ply in the colour Rosebud to make the socks. It is 75% superwash merino wool, 20% nylon and 5% Stellina (the sparkly bits). I used some oddments of sock yarn that I had left over from another pair of socks to create the outlines. You can use any sock yarn to make these socks for yourself. Even variegated yarn would work if you made the outlines bold enough against the variegated colours.
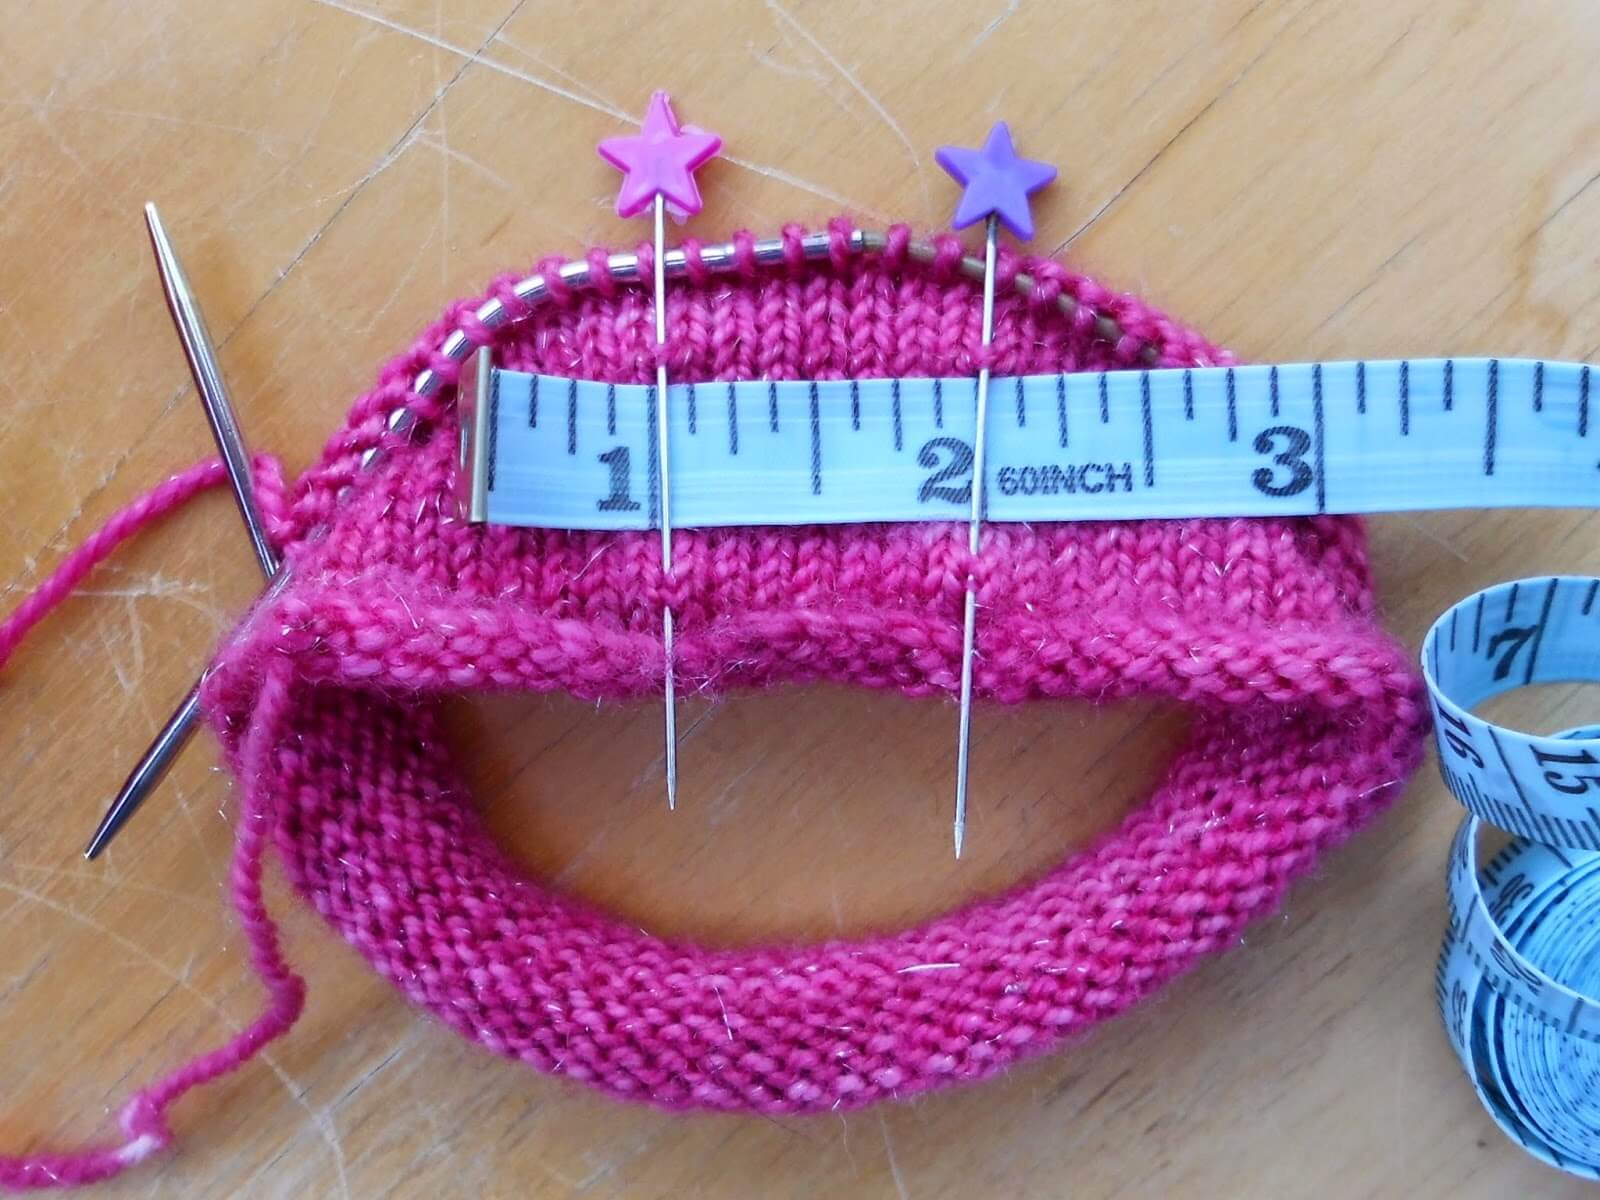
There isn’t any tension information given on the label for the yarn, so for once I had to check my gauge. I’m usually far too impatient to bother with it, but as this is yarn I haven’t knitted with before, it seemed like a sensible idea! My tension sample worked out at 32 stitches and 52 rows to 10 cm on 2.5mm needles. (Ignore the scratched table – can you see the sparkles now? J) This is the usual gauge that I knit with so I would expect that this yarn would knit up to your usual gauge too, although it might be best to do a tension square just to check. You should always check your gauge in the way that you are knitting, so in this case it’s in the round. I’ve chosen to cast on as if I’m knitting the whole sock here, but you can cheat a little and just knit the front of the sock and then carry the yarn across the back to represent knitting and then start again at the front side of your test piece if you want to. It’s a bit faster, but I wanted to see how the yarn was going to knit up for the whole sock which is why I chose to do it this way. (I think the test piece looks a bit like a frog’s face – can you see it too?)
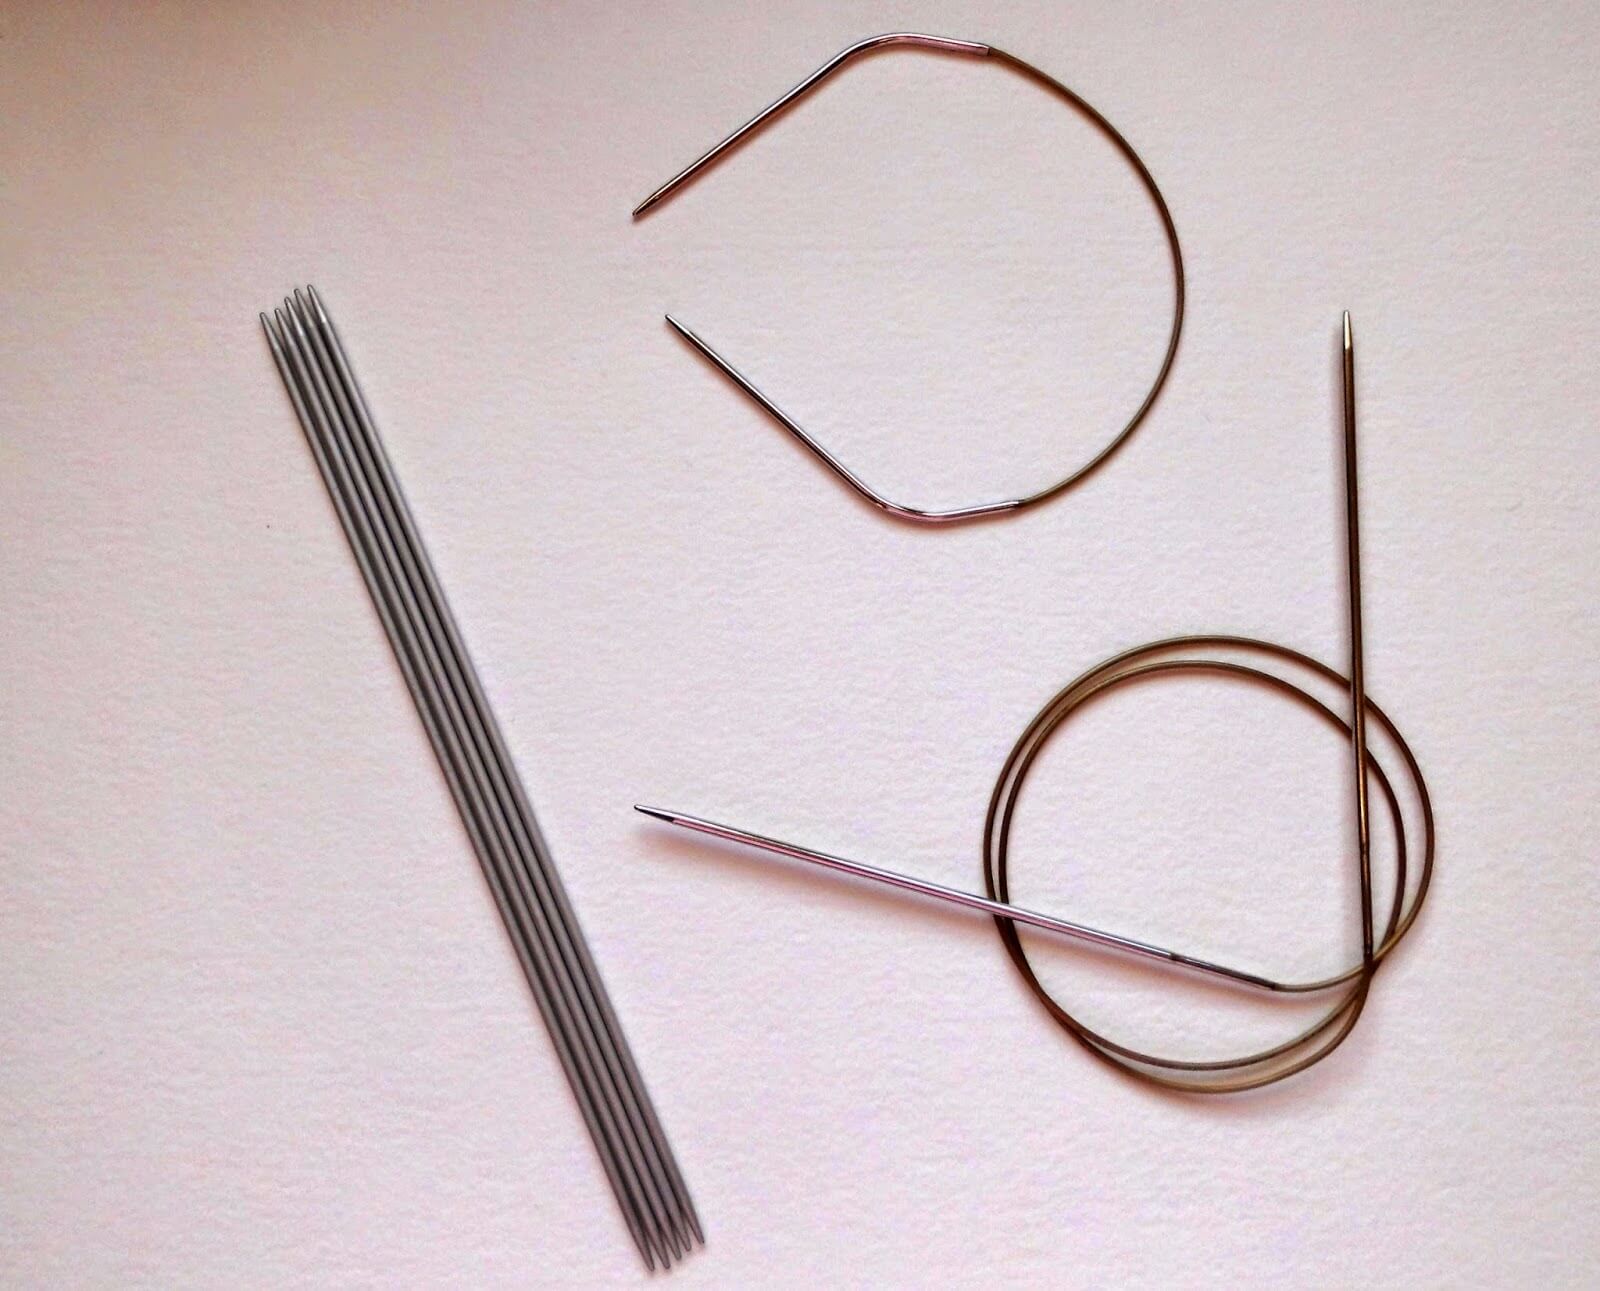
I’m back on my 30cm circular again for these socks, but they can easily be knitted on DPNs or magic loop. They’re also easy to re-size as you can simply add or take away stitches in blocks of four to make bigger or smaller socks.
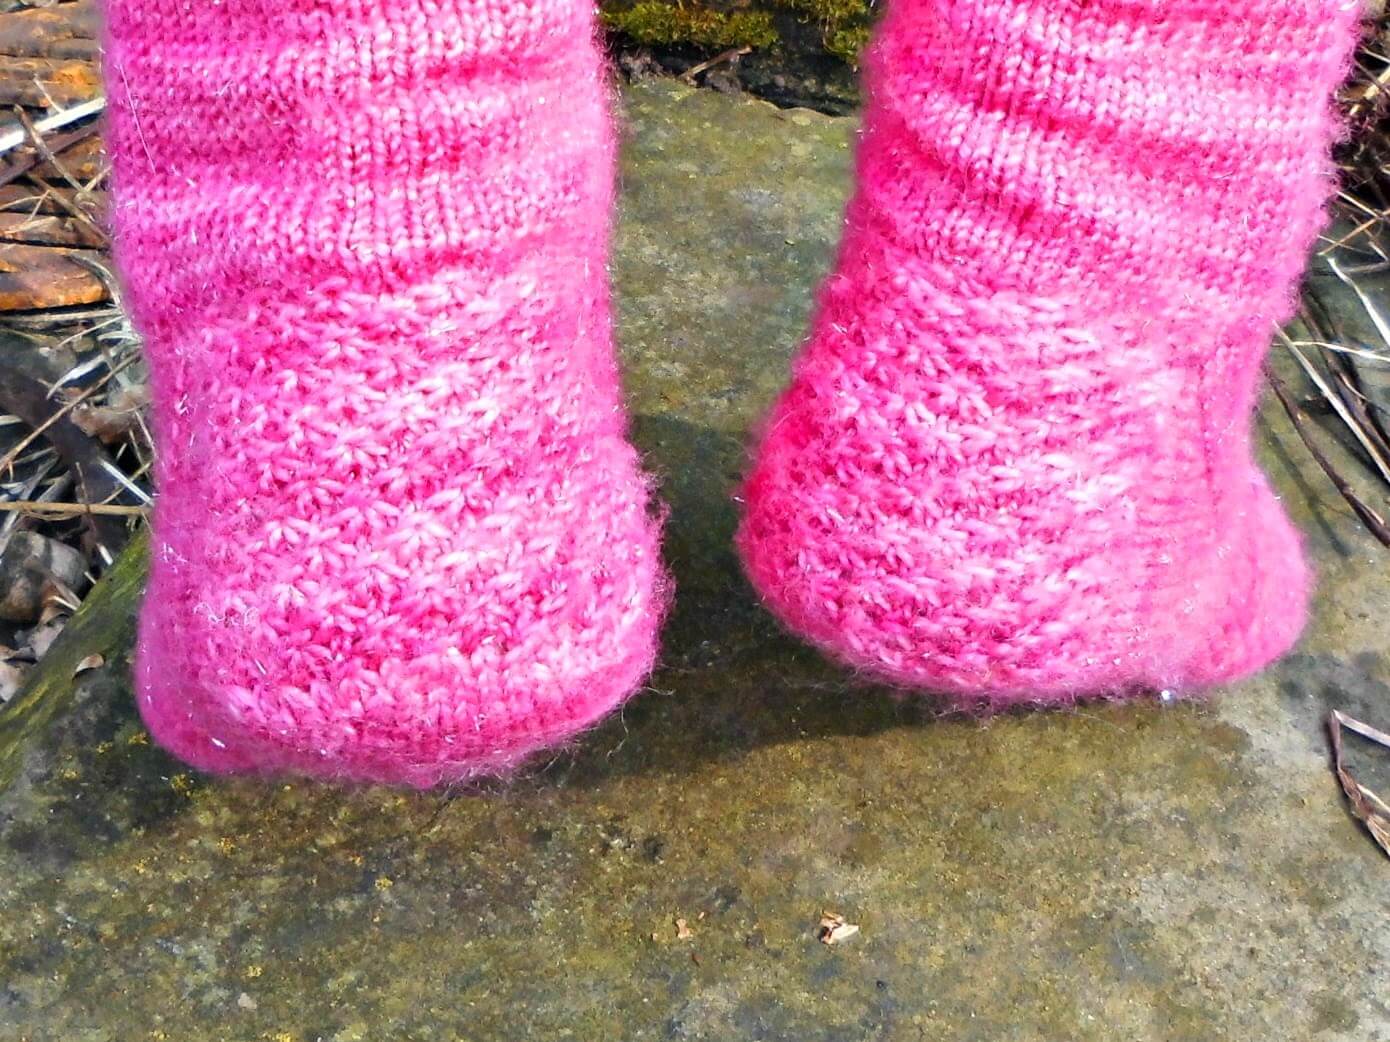
Before we get onto the pattern itself, let me show you the heels. I’m very pleased with the heels. They’ve worked out just how I wanted them too. I have wondered if I need to expand my horizons away from heel flaps, but I like them. I like that they’re cushioned and hard-wearing, and I like that I can change the stitch to make them look a little bit different from time to time.
Star stitch is very easy; the pattern tells you to “make star” and this is how you do it.
1 Put your right hand needle through the first three stitches on your left hand needle as if to purl.
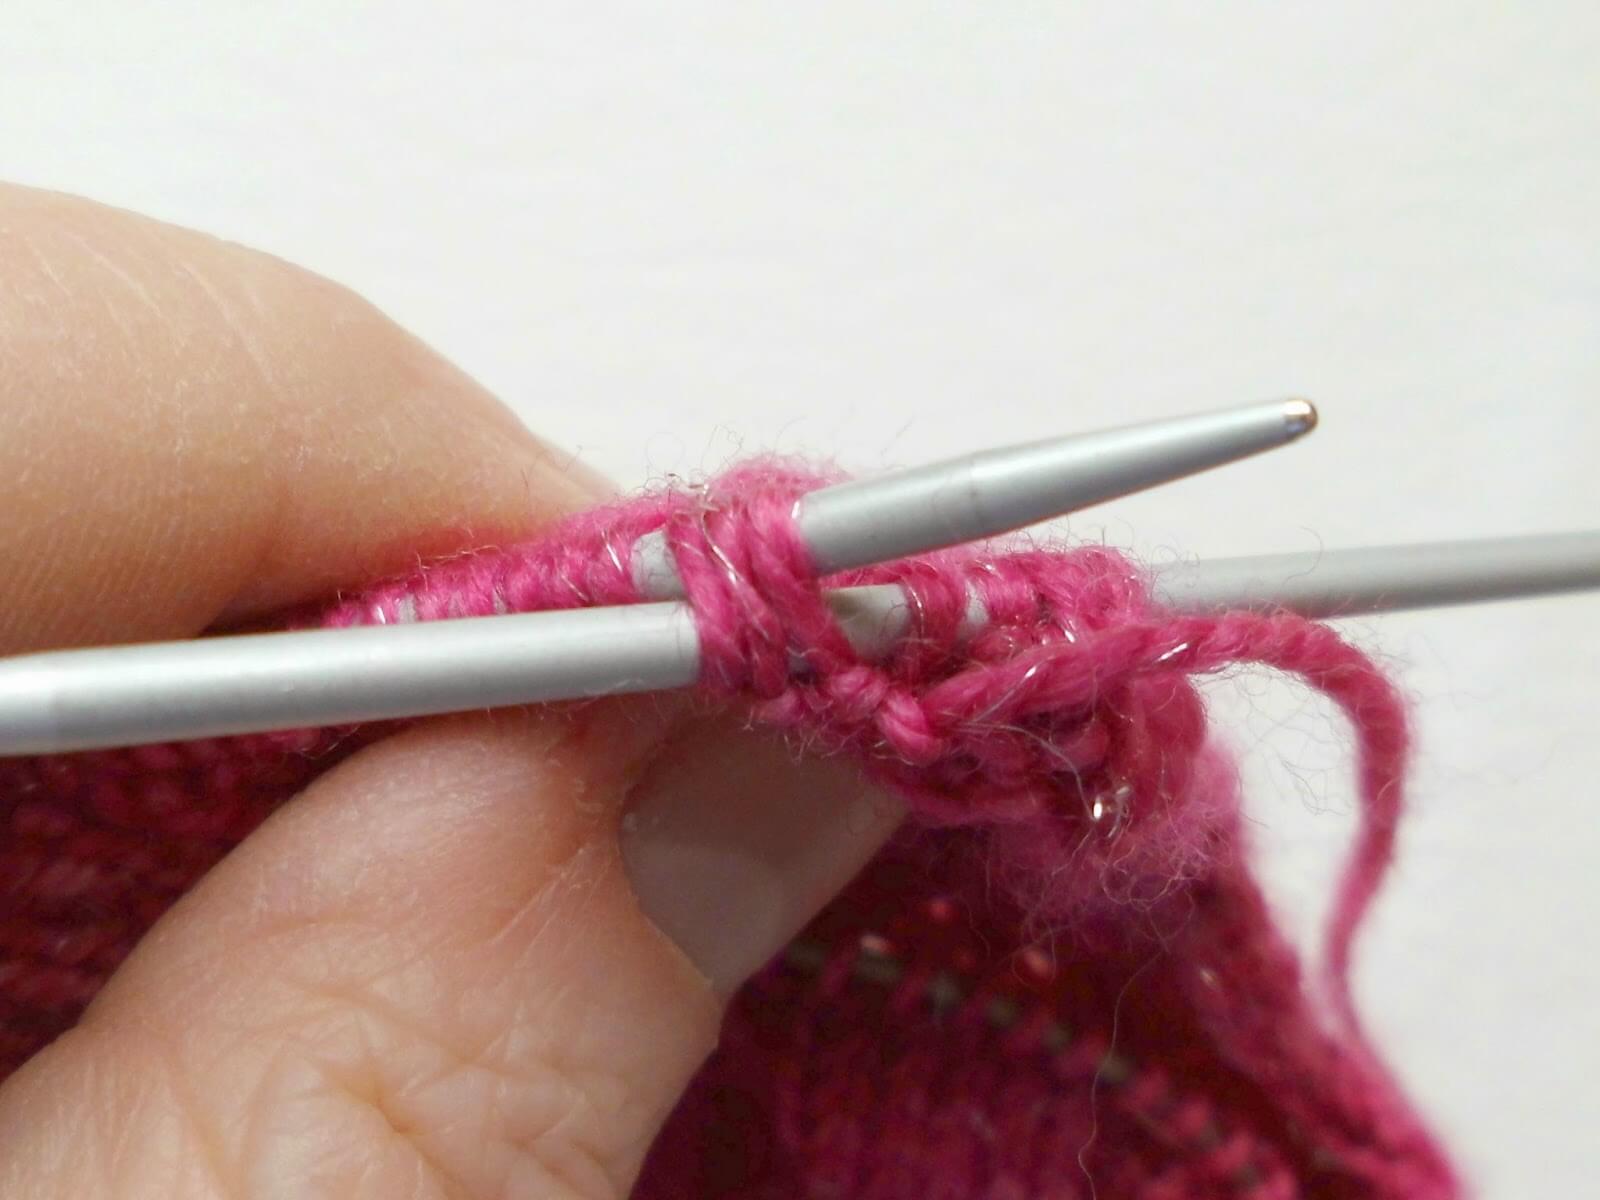
2 Pull the yarn through the stitches onto the right hand needle but don’t slide the stitches off the left hand needle.
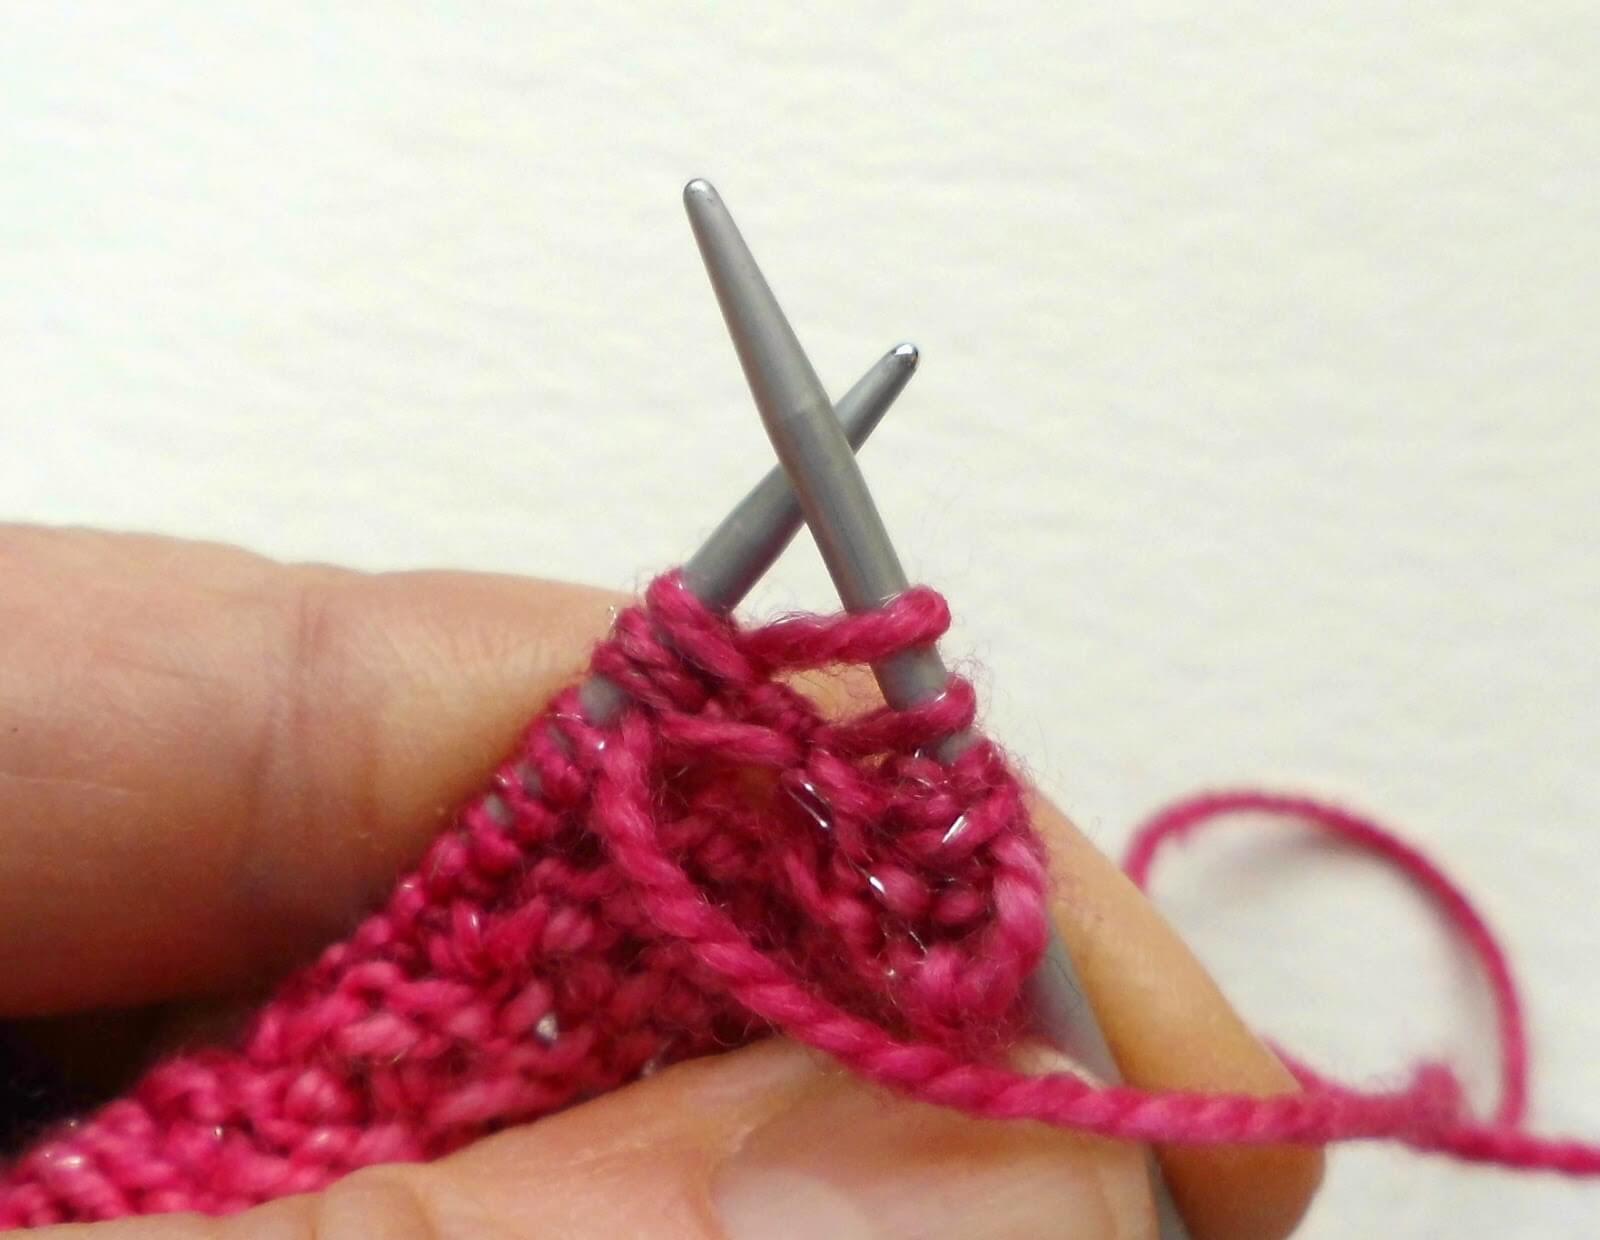
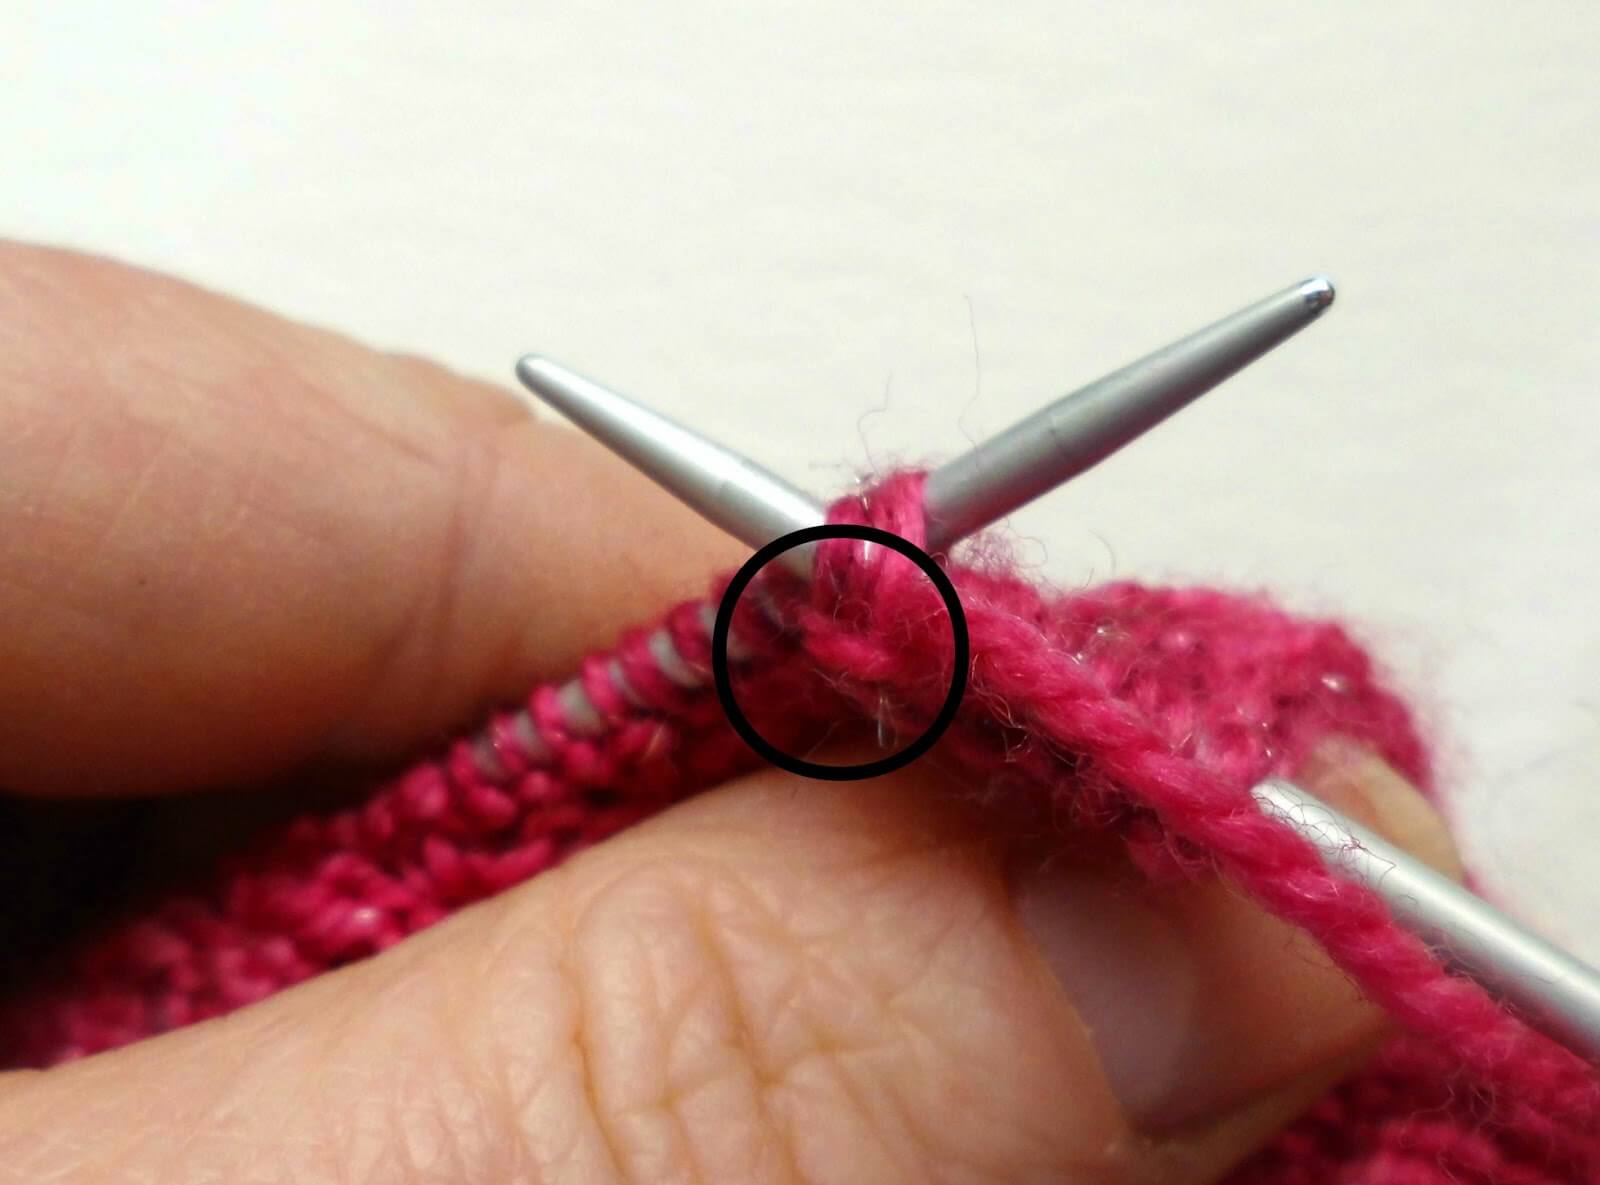
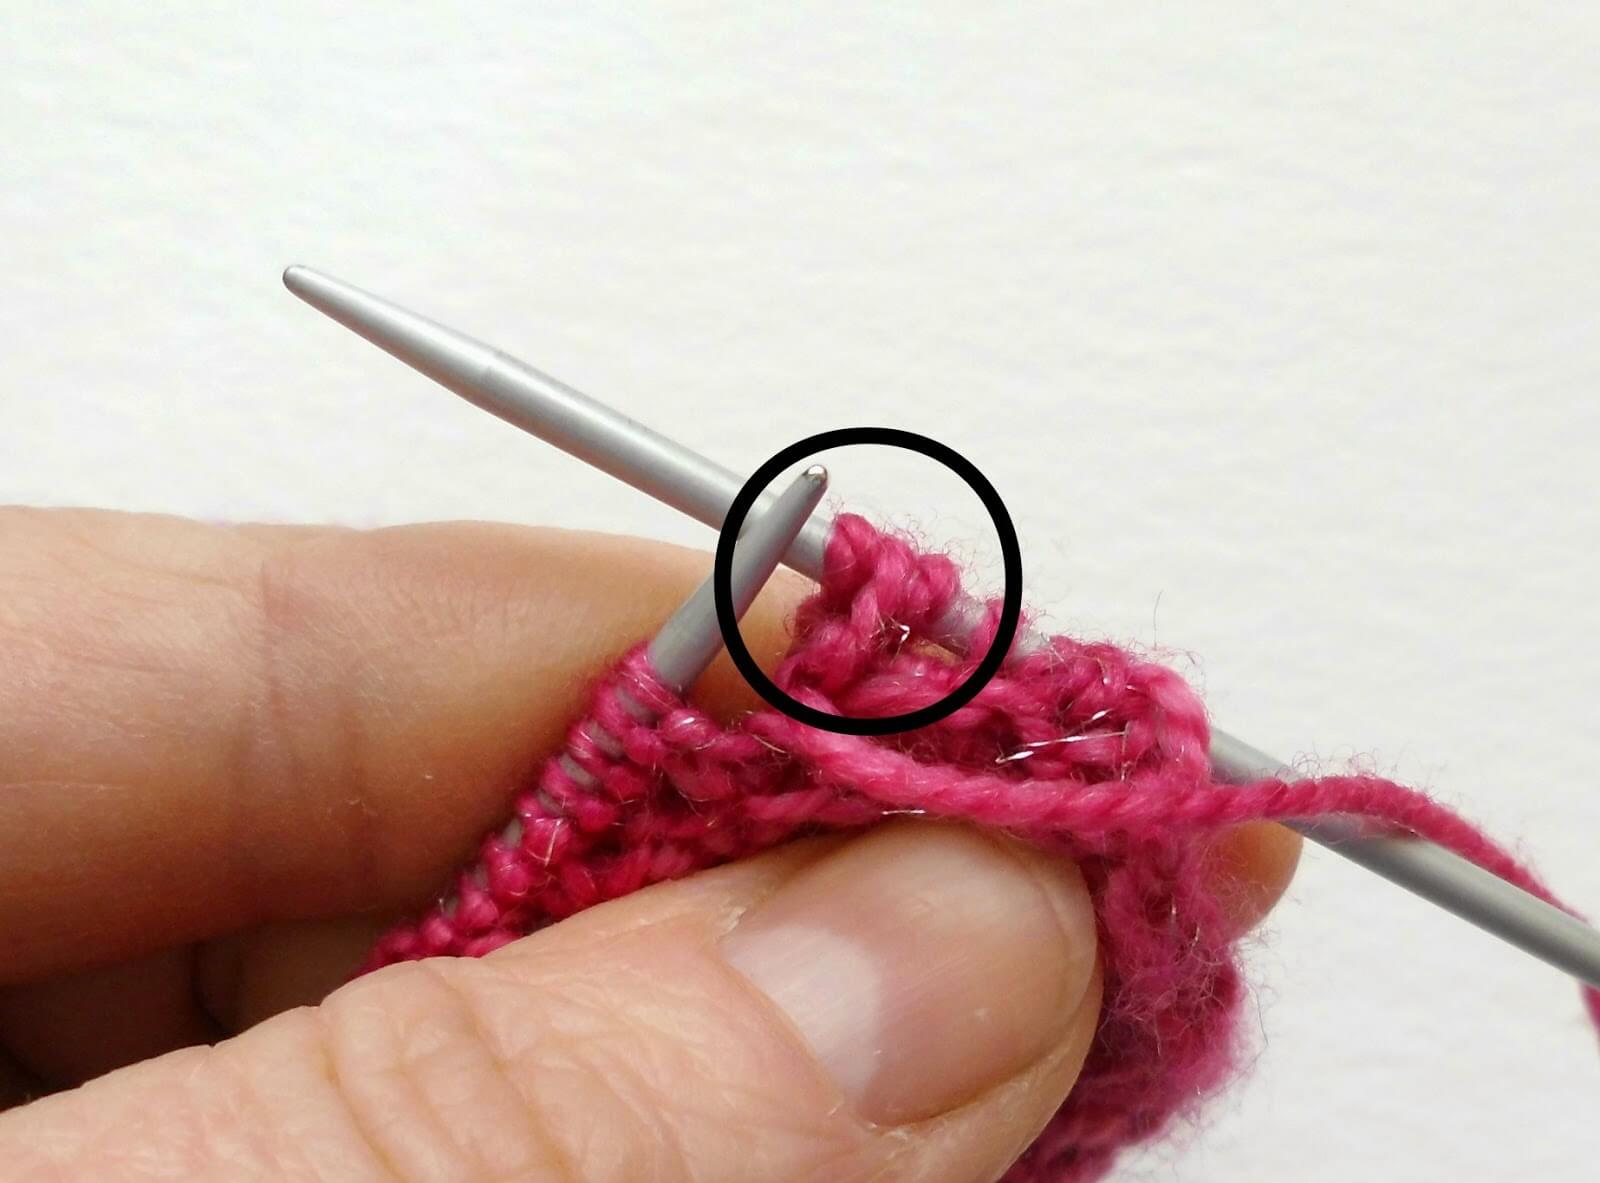
3 Wrap the yarn around the right hand needle from front to back, then put your right hand needle back through the first three stitches on the left hand needle as if to purl. You can see the wrap stitch circled in this picture …
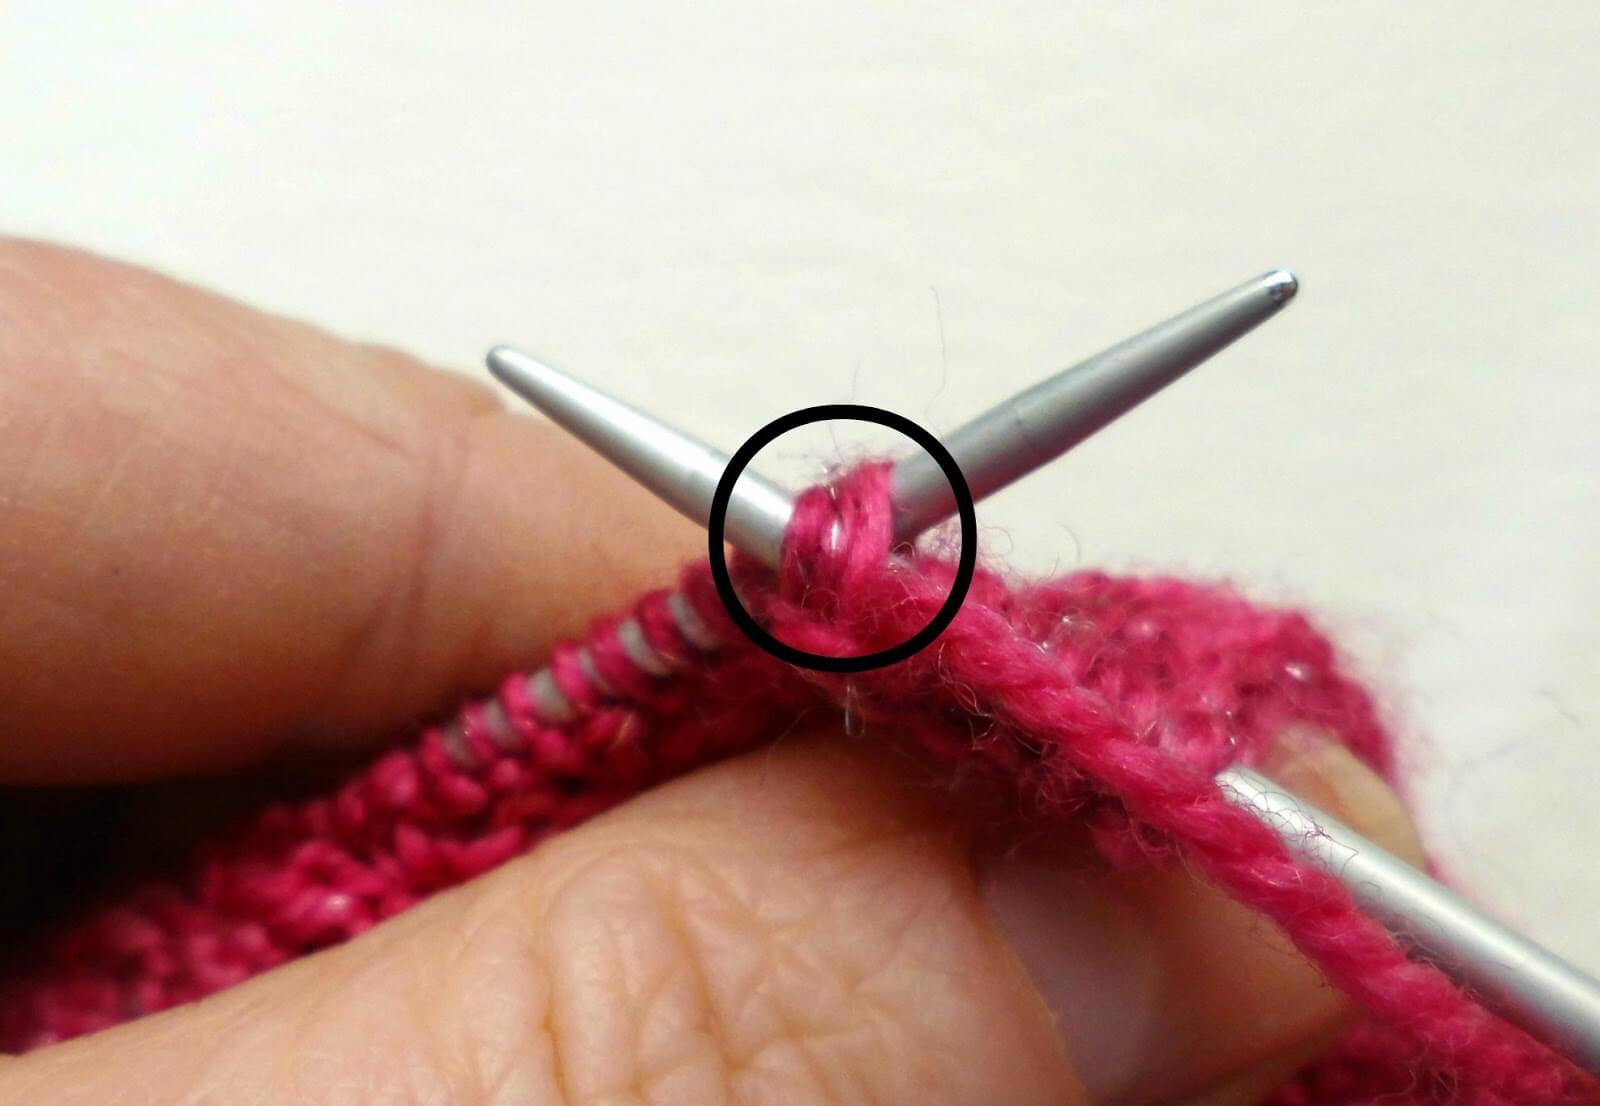
… and the three purl stitches circled in this picture.
4 Slide the stitches off the left hand needle. You still have three stitches, although you have created them as new stitches with the purl/wrap/purl that you have just done. The star will appear on the other side of your knitting.
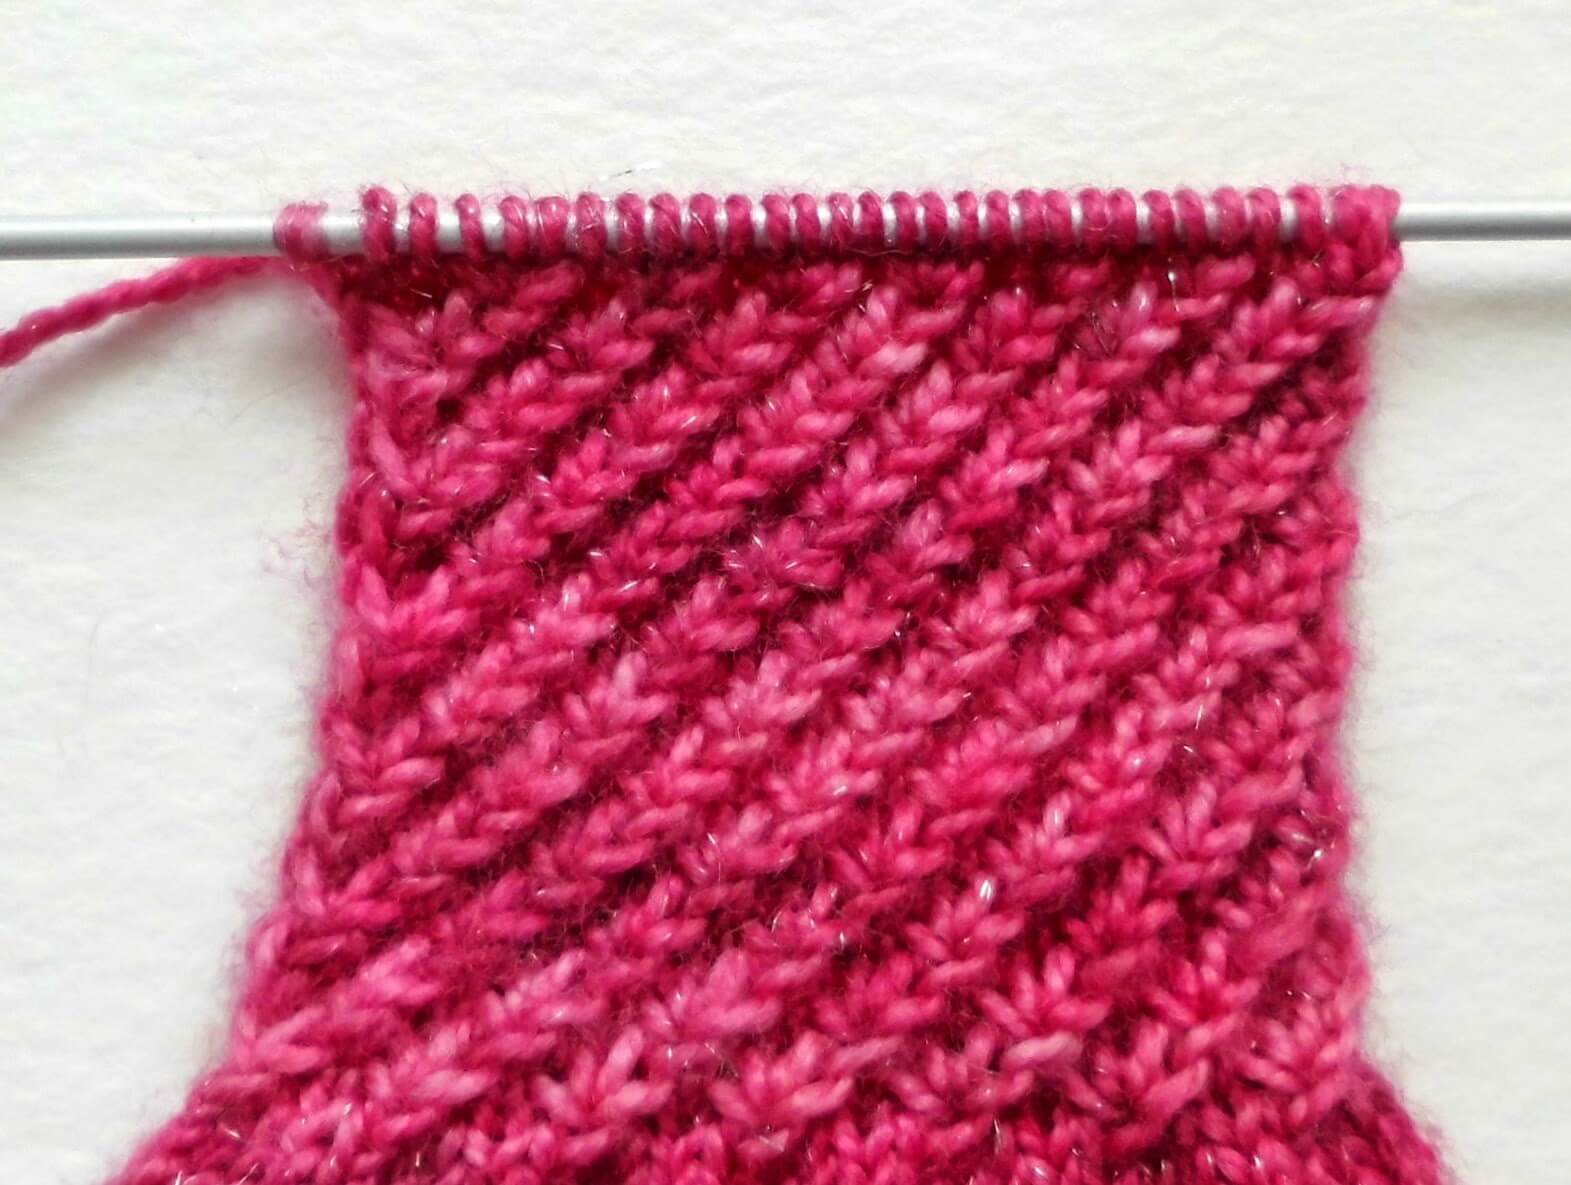
This is what the heel flap looks like with the diagonal rows of stars.
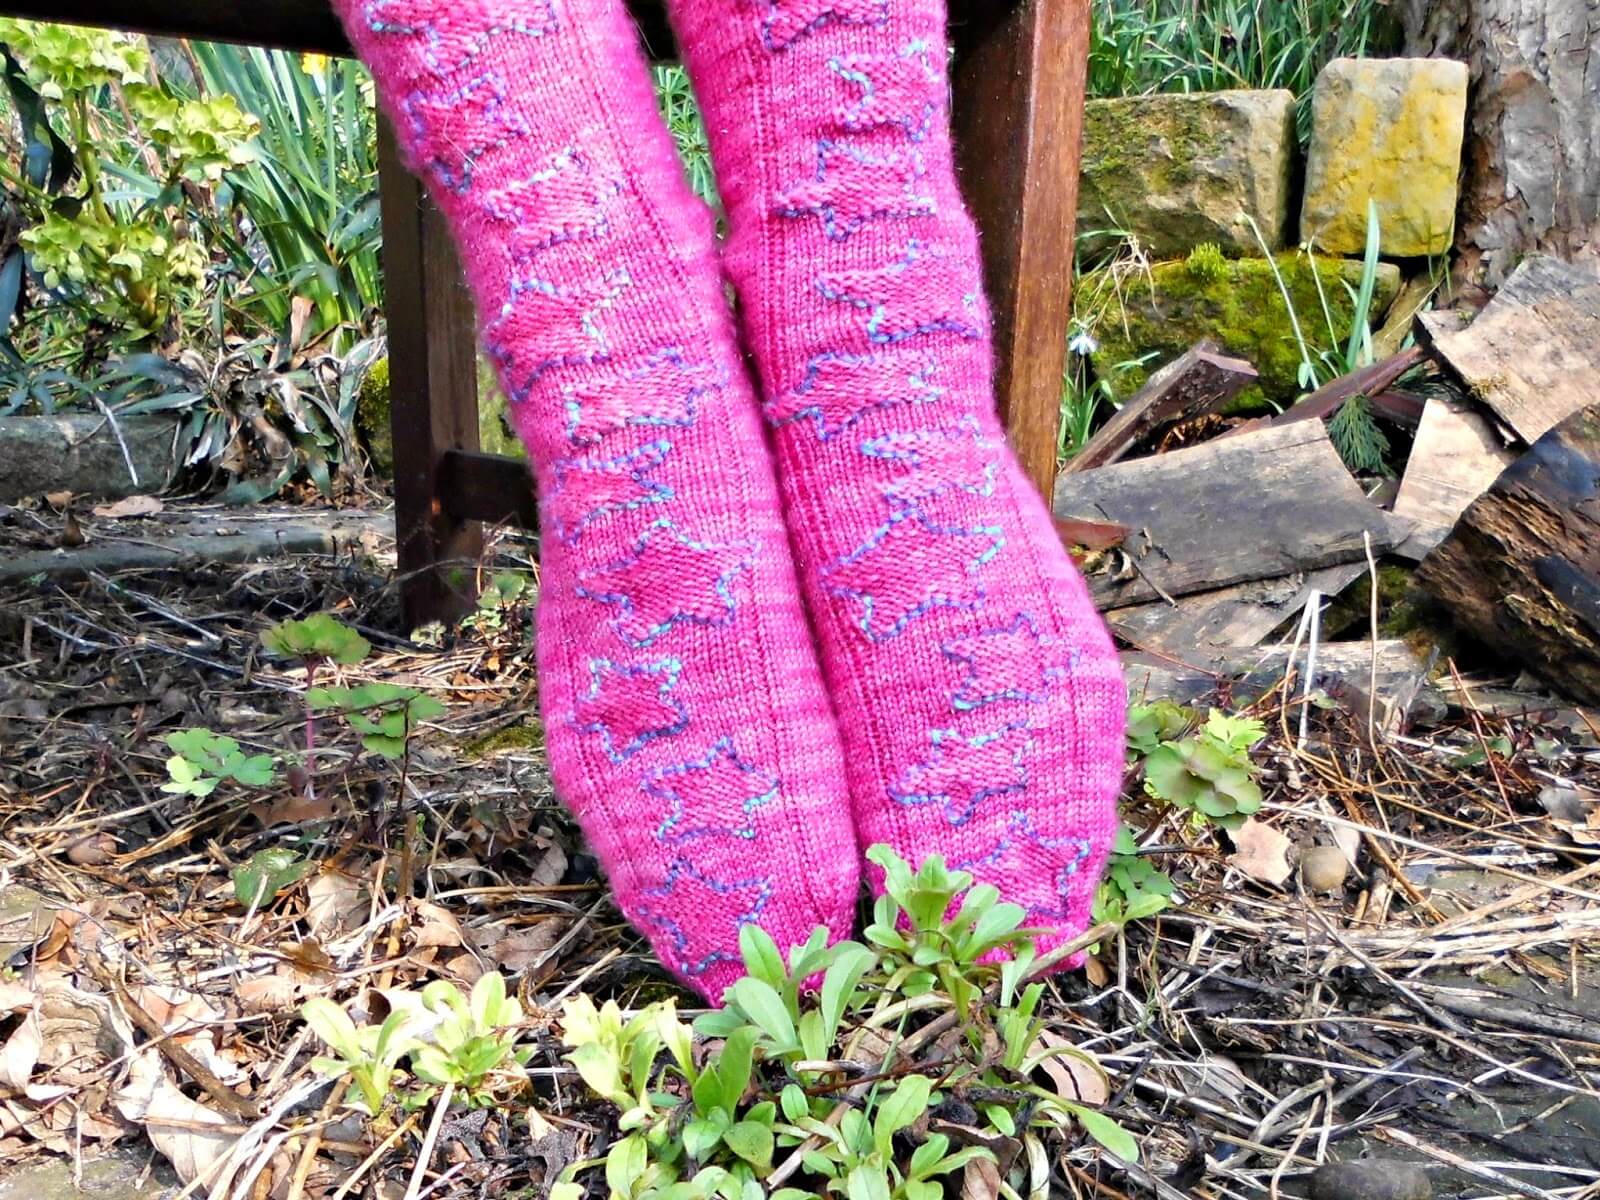
Finally, before we get to the pattern itself, I want to talk to you about the stars on the main foot of the sock. They are knitted from a chart which is always followed from right to left. If you’ve never used a chart before you might find it easiest to print out a couple of copies so that you can mark the row that you’re on – some people use a ruler to show where they’re up to but I prefer to draw on a copy of my pattern so that if my pattern gets knocked (very easy to do with cats, dogs and children marauding about the house!) then I always know where I’m up to.
Now, these stars can be created however you would like. You can leave them plain or you can outline them like my socks.
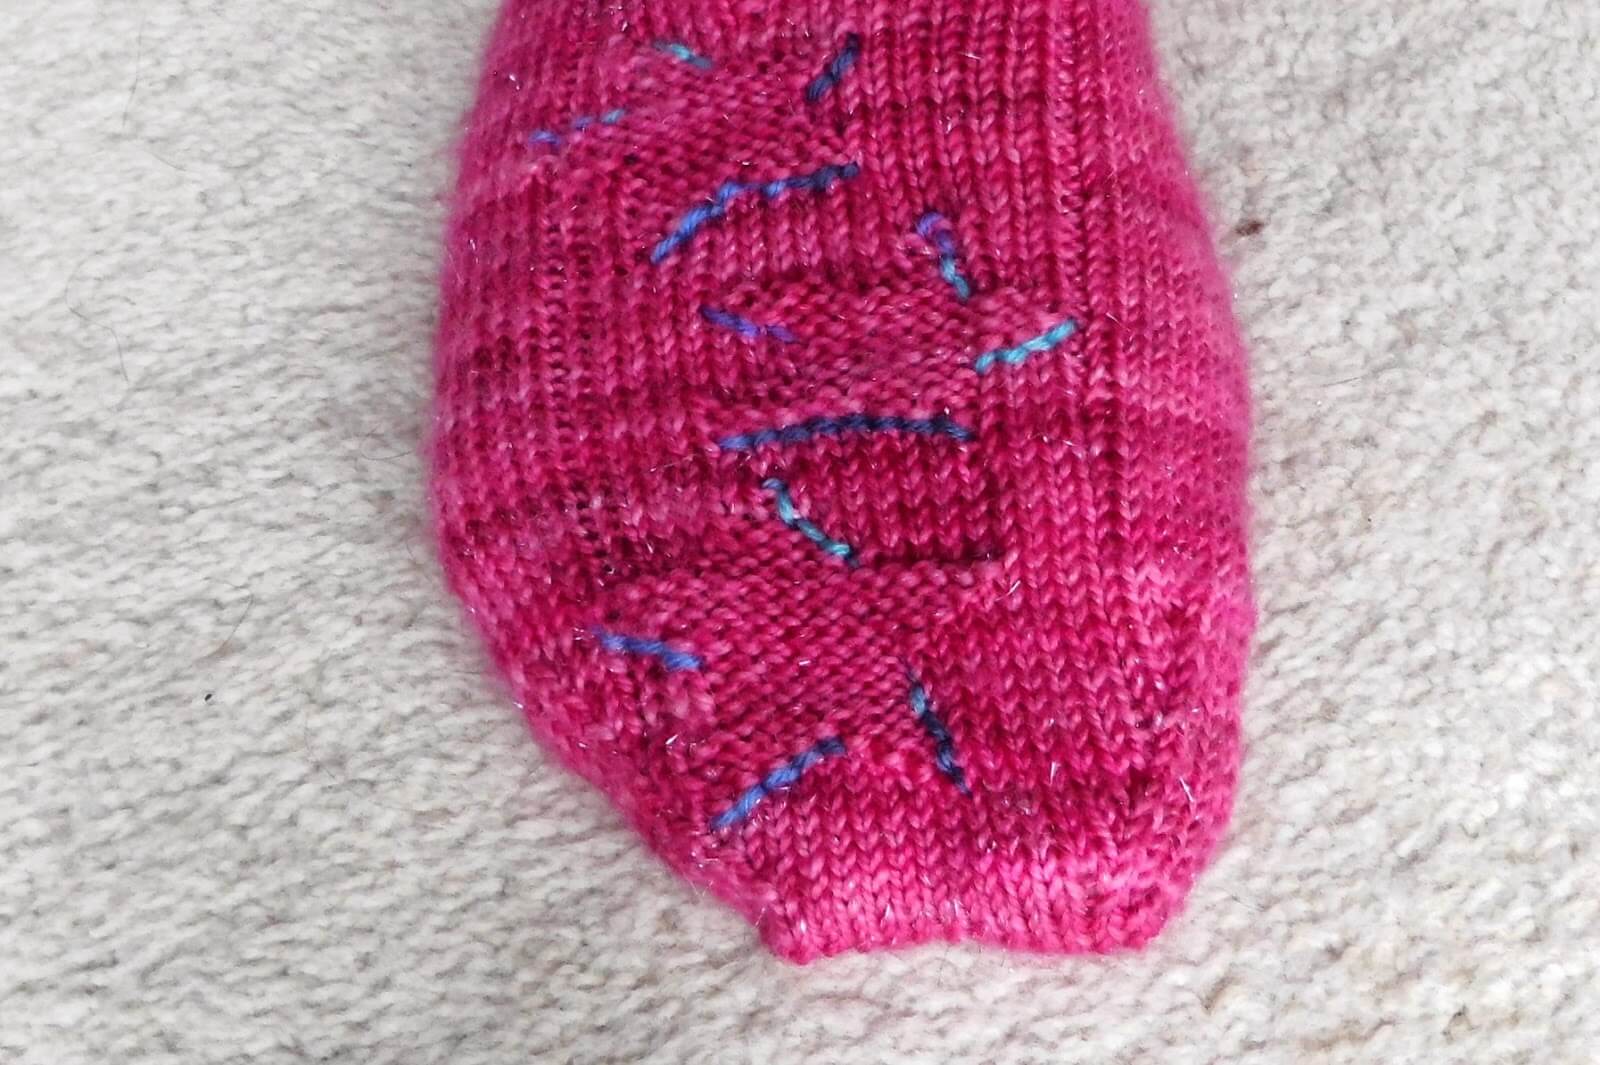
Other suggestions that I have had are to partially outline them to highlight the shadows, making the stars look three-dimensional …
… to knit the outline into the pattern or to knit the stars using the intarsia method so that the whole star is a different colour.
I love that there are so many different options to creating this sock! There are so many things that you could do to change the pattern slightly to make the socks uniquely yours. Want a broader channel to define the star area? Put one in! Want to make these as toe-up rather than top-down socks? Just turn the star pattern around!
Want to make a pair of your very own? Let’s go for it!
Twinkle Star socks
(you can download a PDF of the pattern here. There is a chart for the stars which isn’t given here in the blog instructions so you will need a downloaded copy of the pattern.)
These socks are constructed as top down socks with a gusset heel. The heel is knitted in star stitch, which creates a durable, cushioned heel. This pattern will create a sock that fits an 8-8.5″ foot circumference. If you want to make the pattern bigger or smaller, simply increase or decrease the number of cast-on stitches by 4, but remember that you will need to make adjustments when you turn the heel.
Materials
2.5mm needles – I use a 30cm circular needle but DPNs or 80cm long circular for magic loop will also work
1 x 100g ball of 4ply sock yarn (or 2 x 50g depending on brand)
1 set DPNs size 3.0mm
1 set DPNs size 2.5mm
Stitch markers
Wool needle
Spare yarn to outline stars (optional)
Gauge 30 sts and 52 rows to 10 cm on 2.5mm needles
I cast on using DPNs then change to my small circular needle – it’s not easy to cast on using the circular as it’s too small. If you want to use magic loop you will be able to cast on with the larger circular needle. If you use DPNs, you might find it easiest to cast on and work 2 rows before dividing the stitches across the needles.
To adjust the size for this sock, just add or remove stitches in blocks of 4 from the cast on total. Remember that you will need to make adjustments when turning the heel if you use extra stitches. If you need extra help with sizing your socks, take a look at this tutorial here.
Abbreviations
K Knit
P Purl
Sl Slip stitch
SSK Slip the first stitch on the left hand needle as if to knit, slip the second stitch on the left hand needle as if to purl, transfer them both back to the left hand needle and knit into the back of both stitches together
P2tog Purl two stitches together
Make star Purl first three stitches on left hand needle but do not slide stitches off needle. Wrap yarn around right hand needle and purl first three stitches onleft hand needle again. This time, slide the stitches off the needle. This creates the star on the right side of the knitting.
Pattern
Cast on 60 stitches using 3.0mm needle.
Row 1: K2, P2, repeat to end, turn.
Row 2: K2, P2, repeat to end, turn.
Change to 2.5mm needles. At this point, change to a short circular, large circular for magic loop or divide the stitches across DPNs and join into a circle, place marker.
Continue in K2, P2 rib for 14 more rounds or until desired length of rib (I knit 16 rounds of rib).
Star pattern
Knit one round.
Set up round for pattern: K36, P1, work 16 sts of pattern (working from right to left from chart), P1, K6, slip marker.
This sets the pattern so that the star pattern sits at the front of your sock.
Following the chart, work pattern rounds until desired length before start of heel. It doesn’t matter which line of the pattern you finish on as long as you make a note of it so that you can continue in pattern after picking up the gusset stitches.
Heel Flap
Change to 2.5mm DPNs if you are using a small circular. You are going to create the heel flap from half the number of stitches that you cast on, so if you have cast on more or less than 60 stitches, remember to adjust the number of stitches when you start the heel flap.
Row 1: (RS) K1, knit to end, turn. (30sts)
Row 2: (WS) Sl1, *make star, P1 *, repeat to last 2 sts, P2, turn.
Row 3: Sl1, knit to end, turn.
Row 4: Sl1, P2, *make star, P1*, repeat to last 3 sts, make star, turn.
Row 5: Sl1, knit to end, turn.
Repeat rows 2 to 5 until heel measures approximately 2 1/2 inches, finishing on row 3 or 5. If you want to make the heel flap longer, continuing knitting rows 2 to 5 until you reach the desired length and finishing on row 3 or 5, but remember that you will need to pick up more stitches to create the gusset.
Turn heel
*For a larger or smaller sock, you will need to alter the number of purl stitches in the first row of the heel (marked in bold below), increasing by 1 stitch for each block of 4 stitches extra that you cast on, or decreasing by 1 stitch for each block of 4 stitches less than 60 stitches. For example, if you cast on 64 stitches, your first row would be Sl1, P17, P2tog, P1, turn*
Row 1: Sl1, P16, P2tog, P1, turn.
Row 2: Sl1, K5, SSK, K1, turn
Row 3: Sl1, P6, P2tog, P1, turn
Row 4: Sl1, K7, SSK, K1, turn
Continue in this way, increasing one stitch between slip stitch and SSK or P2tog on each row until all of the heel stitches are used.
Knit across heel stitches if required to bring you to the left hand side of the heel ready to pick up 17 stitches. Remember that if you made the heel flap bigger, you will need to pick up more stitches. Once you have picked up the stitches, place marker. Knit across the top of the foot in pattern (I usually knit back onto my circular needle at this point), place marker, then pick up 17 stitches (or more if required) up the other side of the heel. Knit across the top of the heel and then shape gusset as below.
Note: If you are using DPNs and/or have placed your stitches on a stitch holder, you can arrange the needles as follows: Needle 1 for stitches across heel, Needle 2 for picked-up stitches down side of foot, Needle 3 for stitches across top of foot (knit stitches off stitch holder if required), Needle 4 for picked-up stitches on other side of foot. You may find that stitch markers are not required at first.
Shape gusset
Round 1: K to 3 sts before the marker, K2tog, K1, slip marker, knit to next marker keeping star pattern correct, slip marker, SSK, K to marker.
Round 2: Slip marker, knit to next next marker keeping pattern correct, slip marker, knit to 3 sts before marker.
Round 3: K2tog, K1, slip marker, knit to next marker keeping star pattern correct, slip marker, SSK, K to marker.
Continue in this way, decreasing by two stitches at the gusset on every other row until there are 60 stitches on the needle.
Once you have 60 stitches again, continue to knit each round until you reach approximately 5cm before the desired length ready to start the toes. You will probably need to repeat the chart more than once; when you get to the top of the chart simply start again at the bottom. Don’t be afraid to try your sock on before decreasing for the toes!
Toes
At some point whilst decreasing for the toes, if you are using a small circular you may need to change back to DPNs as the number of stitches becomes too small for the circular. You might even find it easier to do that even on a large circular. It’s up to you when you choose to do that, and how you distribute the stitches across the needles; just keep following the pattern as set below. Create the toes as follows:
Round 1: K1, SSK, K24 sts (keeping pattern correct), K2tog, K1, place marker, K1, SSK, K24 sts, K2tog, K1.
Round 2: Knit one round, slipping markers as you come to them.
Round 3: K1, SSK, K to 3 sts before marker (keeping pattern correct), K2tog, K1, slip marker, K1, SSK, K to 3 sts before marker, K2tog, K1.
Repeat rounds 2 and 3 until you have 28 stitches left and divide these between two needles so that front and back of socks match.
Graft toes using Kitchener stitch.
If you want to outline your stars, simply embroider around the edges taking care not to pull the yarn too tight. I used a back stitch but you can use any stitch that you like the look of.
If you’d like a free Kitchener Stitch guide to download and keep in your project bag, you can get one by signing up to my newsletter list here!
You can also find this pattern on Ravelry so do show me your pictures if you decide to make starry socks for yourself – I’d love to see them!
This pattern is free on this blog and will always remain so. If you’ve enjoyed using it and would like to support my work so I can keep blogging and designing, you can browse my shop for patterns and books or buy me a brew – both are very much appreciated. Thank you! xx


This pattern copyright © 2015 Winwick Mum All rights reserved.
Not to be included in any collection or used for profit without written consent of Winwick Mum.
This pattern is based on my Basic 4ply Socks pattern, which means that you can find photo and video help in the Winwick Mum Sockalong tutorials. You can find out more here:
If you can already knit socks but would like to stay in touch, click the link below to join the Winwick Mum mailing list to hear about the latest blog posts, pattern updates, tutorials and more … but no spam, I promise!


I thought I posted, I guess not! Again, thank you so much for posting the pattern. My niece has "Peter Max" style stars tattooed across her chest (yeah, I know……). These will make her smile.
That sounds like an interesting combination – stars on chest and feet … Thanks for your comment, hope you enjoy the socks! xx
the pattern is as fun as it looked on facebbook. thank you
Thank you! Hope you enjoy making them! xx
My goodness, I am in total awe and terror! I cannot even begin to imagine how one might start to do something like this and find it very scary indeed, but I am incredibly impressed that you can do it and make such wonderful socks!! xx
I think if you can make beautiful daffodil wreaths you could easily manage a pair of socks. I will get you knitting socks one day! 🙂 xx
I just love them ……. and pink has always been my favourite colour.
All the best Jan
Thanks! I just love this pink yarn too! xx
These are super colourful and look very comfy. I wouldn't know where to start on knitting socks, but one day I'll have a go 🙂
My plan is to get everyone knitting socks so I'll hold you to that! xx
If I was a knitter I would be practising that star stitch right away. At best I can just about cast on 🙂 I'll keep going though and one day… in many moons… I'll be able to create a star! I love the colour, they look so snuggly xx
If you can cast on, you can do the rest. I'll expect your socks by the end of the week 😉 xx
The socks are amazing, Christine. Love the colour! :o)
Thank you! It is a lovely colour, and fabulous yarn to knit with – very soft! xx
Now I am wishing I could knit socks; alas, they are a talent too far for me!
Now I feel like you've set me up with a challenge! 🙂 xx
These are so beautiful! And, thank you for sharing such a detailed pattern. I love the "star" heel flap. It looks like a fun stitch to knit. Congrats for creating such great socks. I'm sure you will enjoy wearing them.
I love star stitch, Pat, it's my new favourite stitch. I've got all kinds of star stitch ideas buzzing about in my head, but I think it's time to do something else at the moment! xx
Your completed socks are stunning and thank you for sharing the pattern. xx
Thank you! Hope your socks are coming along well xx
They're fabulous, you must be so pleased with them. I do like the stars outlined as you've done, it just adds something to the whole design, but it's great that you can do exactly what takes your fancy and make them totally individual.
Thank you, I am very pleased with them! I do like the idea of anybody being about to create their own look too, so I'm hoping that I get to see lots of starry versions! xx
Thanks for the cool pattern! It will be refreshing to follow a sock pattern rather than making my own for once. I'll wait for autumn before starting any new socks, I am in full spring sewing mode just now. I noticed that your needles are curved, how fantastic is that, especially for small circulars.
The tiny circular is great for knitting socks, and the curved tips definitely help. My sock patterns aren't in any way as complicated as yours, and I like yours very much – I've got my eye on a couple for when I find just the right yarn! xx
Your socks look great Christine, outlining the stars was definitely the way to go. And thank you so much for the pattern – what patience you have writing that up!
Caz xx
Thank you! I'm really glad I went with the outline now. And I like to share my patterns, so it's worth the effort 🙂 xx
Hi! I'm working on the star heel, I'm doing total of 56 stitches for my daughter so heel flap is 28. The second row I can't seem to work out though, I'm at the end of the row with 3 stitches left? Where have I gone wrong?!
Hi! I don't think you've done anything wrong – I think it's because you've reduced the number of stitches in the heel flap and the star stitch uses 3 stitches per star so it works out right for 30 stitches, but 28 stitches isn't divisible by 3. What you could do is adjust the pattern slightly so that it all moves over so that you don't get a big plain gap on one side – so row 2 could be Sl1, P1 *make star, P1* etc, and row 4 could be sl1, P3, *make star* etc and that would shift your stars over slightly. Does that make sense? It's probably worth a try to see how it fits 🙂
Ok, I'll have a play with it, thanks! Think I was getting confused as the repeat is "star, P1" making a 4st repeat, I wasn't sure it would work for 30 sts either! 😂 But sometimes my math skills aren't up to scratch!! X
You are right and I've forgotten how to count 🙂 I was looking at the number of stitches in the star stitch itself rather than the whole repeat; 7 x 4 is 28 so you could work it if you did the repeat across the whole width of the sock but then you'd be picking up on the edge of a star stitch rather than having a slip stitch to work with – it's do-able but it might pull your star out of shape. It would probably be better work on 6 repeats (24 sts) and then you've got 4 stitches left so you should be able to work in one or two stitches before the star on both the rows. Does that make more sense? 🙂
Yes thank you! I'll give that a try!
I have worked from a chart before but after the set-up row, I am not sure if you just continue on the the twenty-four stitches in the chart AFTER 36 +1 stitch every round?
Hi Judith, thanks for your message! This was a really early pattern of mine and I really need to go back and update it as my charting skills have improved significantly! 🙂
The way that I’ve written the set up round is that you work 30sts of the back of the sock, then 6 sts from the front (that gives you the 36sts mentioned), P1 and then the 14 charts stitches, P1, K6. The chart itself shows the front of the sock so that’s K6, P1, 14 sts of start chart, P1, K6 but I agree that it’s not very clear.
I hope that makes sense, and thank you for pointing that out to me, I’ll up a pattern update on the list! 🙂 xx
Thanks so much for explaining the 30 stitches are for the back. (In fact I am adding4 stitches two at begining and two at the end of the round) I could see the pattern is on the front but normally at the heel I would knit a quarter of flap stitches onto the needle purl back and add another quarter. I will be careful to follow your instructions for the heel flap as my normal method would have the stars to one side. Thanks again. Looking forward to it now. JH
I hope it works out for you! As I said, it was quite an early patten and I can see now that I still had plenty to learn about writing them! I hope your heel flap works out OK with the extra stitches – if it looks like you don’t have enough for a complete star, you can always add extra knit stitches to give a small band down the side and that will still look good. Good luck, do let me know how you get on! 🙂 xx