
Avoiding colour pooling and flashing on sock gussets
There’s something very exciting about knitting with a variegated yarn and seeing how the colours turn out – often it’s not at all how you’d expect!
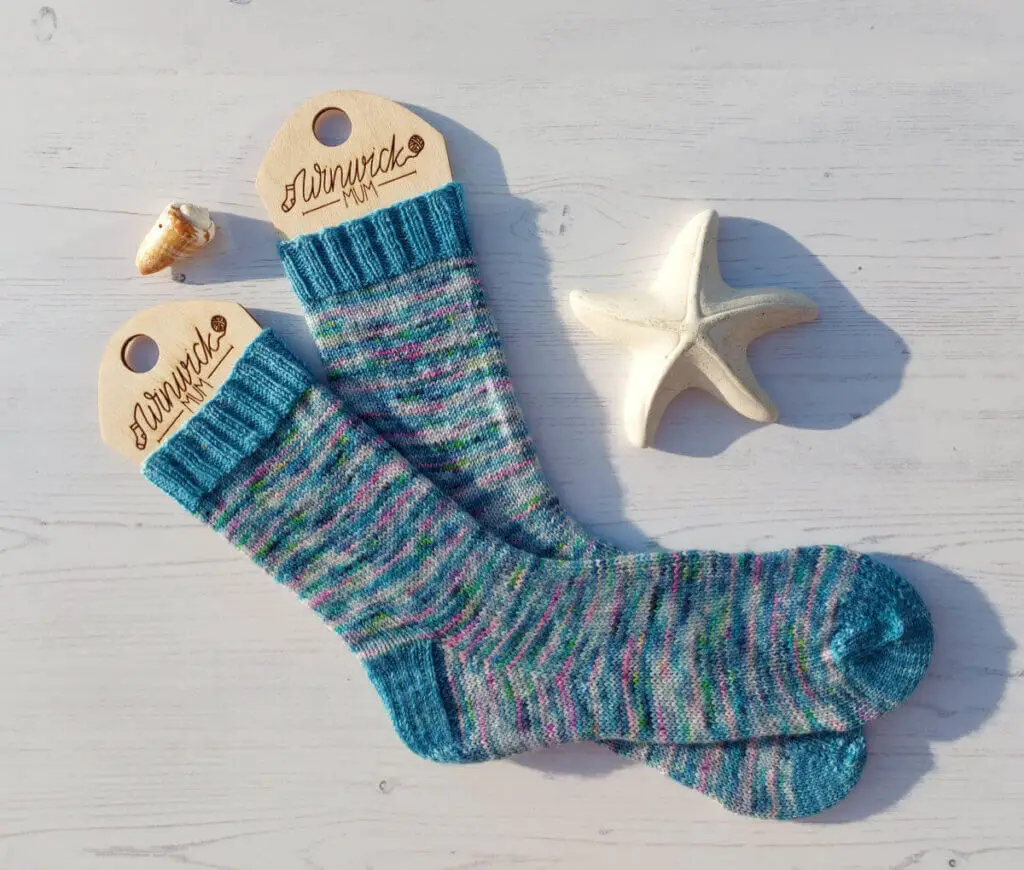
Take a look at the pair of Mermaid’s Tail socks that I knitted earlier this year …

You can see that the yarn hasn’t knitted up into regular stripes but in a variegated pattern that is different on both socks but actually matches because of the way the colours work.
Very often though, and especially across the gusset of a heel-flap type sock where the stitch count changes, variegated yarn knits up with a flashing effect – this is where the colours create a flash across the fabric like this …
This is a hand-dyed yarn from Hey Jay yarns and you can see that the yarn is striped until the gusset when it creates the large flashes. They’re the same on both socks, but in slightly different places. Years ago, I’d have made sure they were in exactly the same place on both socks (seriously, not having my socks match exactly bothered me that much!) but I’m OK to wear them like this now 🙂
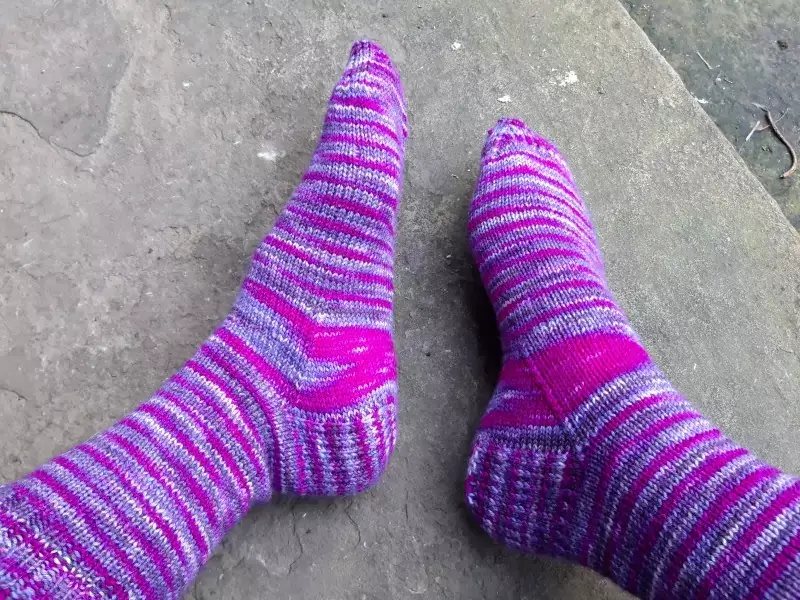
Variegated yarn also does something called pooling – this is where the yarn colours create a puddle or pool of colour instead of being spread across the fabric. These socks knitted in West Yorkshire Spinners Florist yarn (the shade is Foxglove) and you can see that there’s flashing and pooling going on here!

Both flashing and pooling can be a feature of variegated yarns, both commercial and hand-dyed. It can add an attractive and unique quality to your socks but it’s not to everyone’s taste and it can be a bit of a nuisance sometimes when you only get the effect across the gusset.
When I knitted my Mermaid’s Tail socks, I had a feeling that the yarn was going to change across the gusset and I wanted to try something different.
This photo shows how the yarn was knitting up without me doing anything differently to my usual style of knitting the yarn from the ball as it came out.

If you look closely you can see that there’s a larger band of pink which has developed across the gusset. It started around the back of the sock and was becoming more and more obvious the further down the gusset I was getting. I could see that the foot of my sock was going to look different to the leg so I decided to try something new!
Now, I can’t promise that this will work every time – sometimes you might even find that the pooling or flashing is even more pronounced – but if the colour change is something that bugs you then it might be worth a go.
This is the same gusset section once I’d tried a different method of knitting the yarn and look, the pooling has gone! That big section of pink that you could see in the photo above had extended right round the sock and I knew it would annoy me if I didn’t do something about it.

What do you think? Worth a try?
You’ll be pleased to know that it’s not too fiddly to do this, although you do have to think about what you’re doing as you’re going to be using both ends of the ball at the same time. For a totally variegated yarn like this one, it really doesn’t matter which way out of the ball you pull the yarn, but obviously if you have one where it really will make a difference then this technique may not be for you.
Anyway, let me show you what I did and then you can see if you think it’s something you might want to have a go at 🙂
First of all, I worked my heel flap. I chose to work a contrast heel and you can see that my working yarn is over on what would normally be the wrong side of the sock for picking up the stitches as I’d usually pick up from where I finished the heel flap (that would be the bottom right hand side of the photo). There’s a separate tutorial on the blog on working contrast cuffs, heels and toes and what to do with the working yarn if you want to take a look at that one too!

Having experimented with my first sock, what I found worked best for me was to pick up the stitches from where my working yarn was attached. If you have worked your heel in the same colour as the rest of your sock, you can pick up the gusset stitches in the usual way from the heel turn, but whichever way you choose, don’t pick up all the stitches on the left hand side of the heel flap (the bottom side of the flap in this photo) but instead stop about 4 or 5 stitches before the end of the heel flap.

Here, you can see that I’ve used my circular needle to pick up the stitches on the right hand side of the heel flap where my yarn was attached, worked across the heel and then picked up stitches down the left hand side of the heel flap before stopping. If I had worked my heel in a plain colour, I would have started at the heel turn where my working yarn was, picked up the stitches down the left hand side of the heel flap and stopped in the same place.

Next, take the other end of the ball of yarn and use that to pick up the last few stitches on the heel flap. I’ve put my top of the foot stitches on a DPN so that you can see where I’m up to more easily.

I’ve got two working yarns now …

and what I’m going to do is use the blue yarn on the left to work across the top of the foot stitches so that all of my stitches are back on my short circular. If you’re using magic loop, keep your top of the foot stitches on one needle tip as you would usually do, and if you’re using DPNs then keep the top of the foot stitches on Needle 3 as you would do with any other sock.
This photo gives you an overview of what’s happening here. You can see the top of the foot stitches safely on the DPN, all of the gusset stitches have been picked up and there are two working yarns on the left hand side of the heel flap.

Place your marker at this point for the first decrease at this point if you’re using a short circular needle and then knit across the top of the foot stitches. It’s up to you whether you start your decreases at the SSK side or whether you work all the way around so that your first decrease will be K2tog as usual – it really doesn’t matter if you have an extra round on the SSK side before you start your decreases!
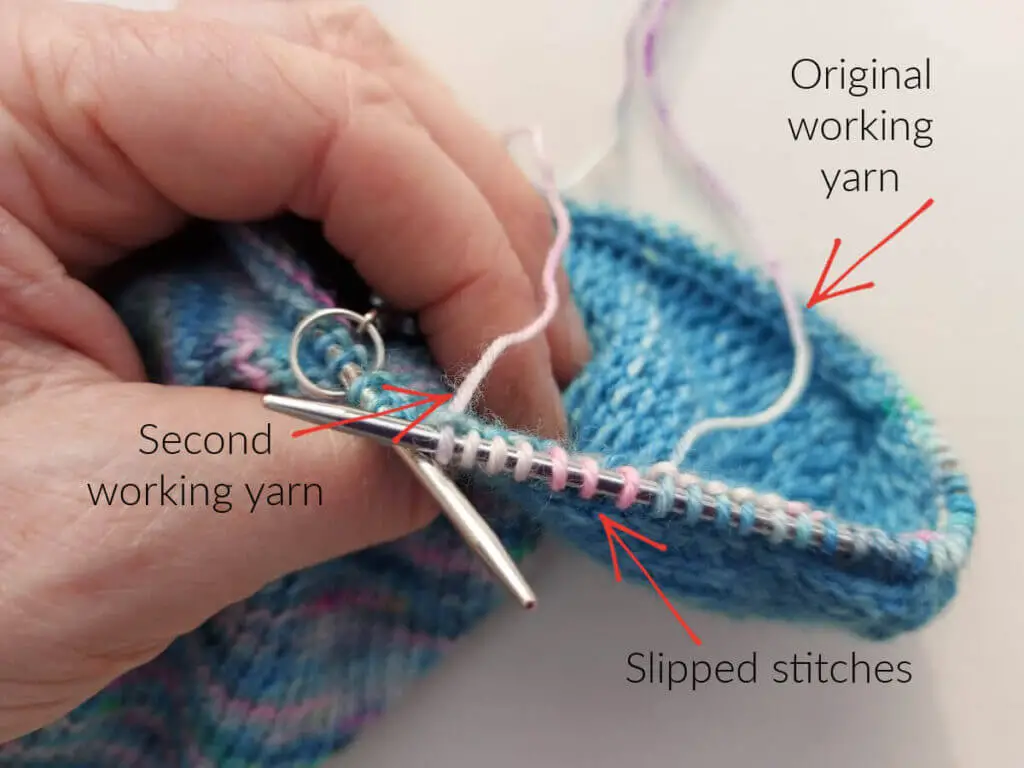
Once you get back round to the left hand side of your heel flap, this is where you’re going to swap the yarns over and this will help to stop the colour pooling. Basically, we’re using the helical knitting technique and you can find lots of help with this online if you want to look into the technique itself – I’m only using it for the gusset section here. Knit until you are 3 stitches before the second working yarn and then stop. You can see that the three stitches before the second working yarn are pink in my photo which will hopefully help you see what I’m doing next!

Next, I’ve slipped those three pink stitches from the left hand needle to the right without knitting them …

and I’m going to work my round using the second working yarn. Don’t worry about those slipped stitches, they will get knitted so you won’t have loose stitches in your sock.
When I get to the K2tog decrease, I’m going to work that as I usually would do, and the same for the SSK decrease on the other side. The only time that anything changes is when I get back round to the other working yarn and I’m going to repeat the steps above, so that’s stopping 3 stitches before the new working yarn, slipping the stitches and then using the new working yarn until I get back round to the other side again (and as part of this, I’ll knit the slipped stitches from the round before so they’re not forgotten). Easy peasy!
What you will find is that the point where you change the working yarns over moves backwards by 3 stitches on every round, and that’s why I started so close to the first K2tog decrease as it means that I don’t have to worry about slipping the stitches over the decrease until I’ve got the hang of how it works 🙂
Now, there will come a time where you will need to consider what happens at the SSK decrease. In this photo, you can see that one of my working yarns is on one side of the decrease and the other one is on the other (I’ve taken the stitch marker out to try to make everything easier to see). It looks like I’ll need to slip 3 stitches including the decrease stitch (which this time round is a knit stitch) and that means I won’t knit it on this round – and that’s exactly what I did. Instead, I knitted it on the next round and when I came to work the decrease, there was no issue with needing to slip stitches or change working yarn. No, don’t worry, it all works out OK! However, it does help here to remember which side of your sock you are knitting or decreasing on, though, as they will be out of sync for a couple of rounds and then they’ll sort themselves out again.

You can mark this down on a piece of paper, but this is an ideal opportunity check that you can “read” your decreases which is an invaluable skill for any knitting project, so let’s take a quick look at that before we move on. If you look closely at the two stitches that I’ve got the arrows pointing to, you can see that the one on the right is a single stitch and the one on the left has a second stitch tucked behind as that’s the SSK decrease where two stitches have been knitted together to make a single one.

Once you’ve passed this point, it’s plain sailing. You can continue working with the two yarns for as long as you want to – I continued until I was back to my original cast on number – and then once you’ve decided that you only need one yarn again, you just knit across the 3 stitches that you’d been slipping on previous rounds, cut the working yarn attached to those stitches and weave in the end as you go to save having to remember to go back and do it later.

And that’s all there is to it!
You might wonder why I didn’t use the helical knitting method for the whole sock and the answer is that I wanted to see how the yarn knitted up as it was dyed. Helical knitting is a great technique but it does change how the yarn looks as you’re either using two different yarns (the more usual method of working this technique) or in the case of a skein like this one, you’re using both ends at once so the colours will potentially run in opposite directions. It was fine for the gusset section as I wanted to make sure that the colours were mixed up, but I didn’t want to do that for the whole sock.
I’m looking forward to using this idea on more socks – not because I don’t like the flashing and pooling, because I think that sometimes it can give wonderful effects that would be lost otherwise – but because I like to try out new things!
Do let me know how you get on if you decide to to try this out too!
This tutorial is free and will always remain so, but if you have enjoyed using it and would like to buy me a brew, it will be much appreciated! You can find the donation button on the sidebar on the left hand side. Thank you! xx


Sounds brilliant! Will be trying this next time!! Thank you. Have a good weekend.
Thank you – I hope you have a lovely weekend too! xx
Aarrgghh! My brain hurts just reading this. You are SO CLEVER! always completely in awe of people like you who can fathom these things out. My biggest problem at the moment is deciding which wip to work on! and I have just received the lovely Christmas yarn from WYS complete with pattern! What a stash I have😂🙈
I think it always sounds more complicated to read it than to actually do it, I’m sure you’d be fine! I hope you enjoy knitting the Vintage Tinsel yarn! xx
I agree with Mary about how clever you are but I love the contrasting cuff, heels and toes so I’ll be giving this a try on my next pair. Thank you so much for your clear instructions and photos (for me much better than videos) and your interesting musings.
I’m so glad you think it’s useful, thank you! Do let me know how you get on if you try it out 🙂 xx
Thanks so much for this. I’ve just finish a sock with stripes that pooled around the gusset and though I’ll make a second to match I’ll try this for next pair. Do u have a video? I’m a visual learner
Thanks!
Gayle
No, I didn’t make a video as there are already lots of videos available on helical knitting, I just took photos of what I did at the time. It’s really not hard to do and I’m sure that you’ll make sense of it in no time 🙂 xx
I have to agree with Gayle that a video would be great because I’m a visual learner. I will try to figure this out from the instructions because I really don’t like pooling or flashing in the socks. Thanks for at least addressing that issue and showing how it’s done. Most knitters with blogs or whatever will just tell you to use two skeins and don’t show how you do it around the gusset. I bought semi solid yarn for the heel, toes and ribbing as well. I like the contrast.
I didn’t create a video because this is just a section of helical knitting and I actually think that it’s easier to see from flat, annotated photos where the yarn should be rather than in a video. If you’ve never tried helical knitting before, have a look at this excellent tutorial which will show you the basics of it. All I’ve done is shown you where to add your yarn to make it easiest so work the decreases. You’ll have this in no time, I’m sure, and your contrast socks will look fabulous! 🙂 xx
Thanks for your positivity, it helps my insecurity. I will check out the video.