
Abacus Socks – free pattern
I’ve been in our attic a lot over the last year. It might not sound particularly glamorous and to be honest, it wasn’t (our attic is very cobwebby with an old wasp nest that looks like the Death Star from Star Wars) but it’s been refreshing to do some decluttering up there – and I also found inspiration for a pair of socks!
In amongst the boxes of stuff was an abacus that has been passed down the generations in our family – I can remember playing with it, I remember my brother having it too, and my girls loved being able to move the beads from one side of the bar to the other. Such a simple thing, but excellent for a baby’s hand-eye co-ordination!
It was those beads that caught my eye and the pattern for this pair of socks formed in my mind even as I stood in the attic with the abacus in my hands.
Abacus Socks
They’re simple socks, and knitting them will be excellent for your hand-eye co-ordination as well … the benefits of the wooden abacus are not confined to our family!
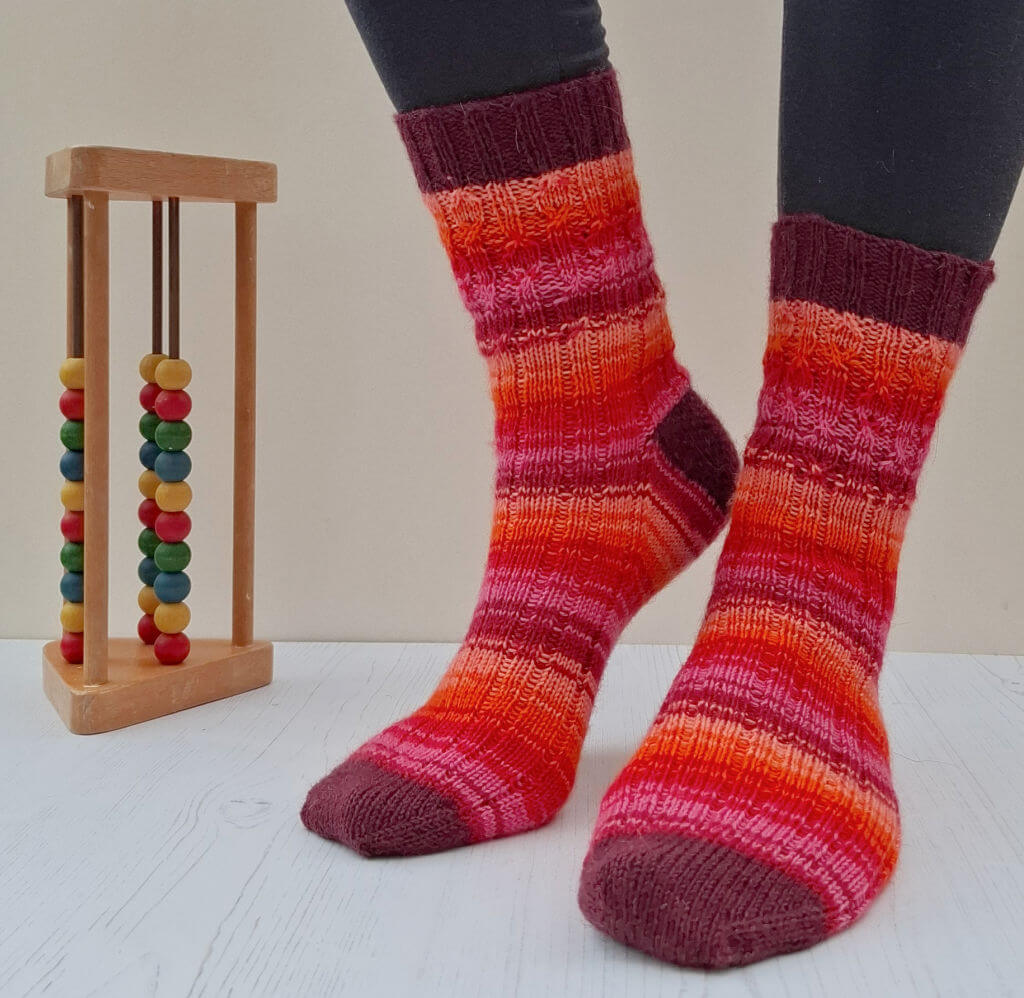
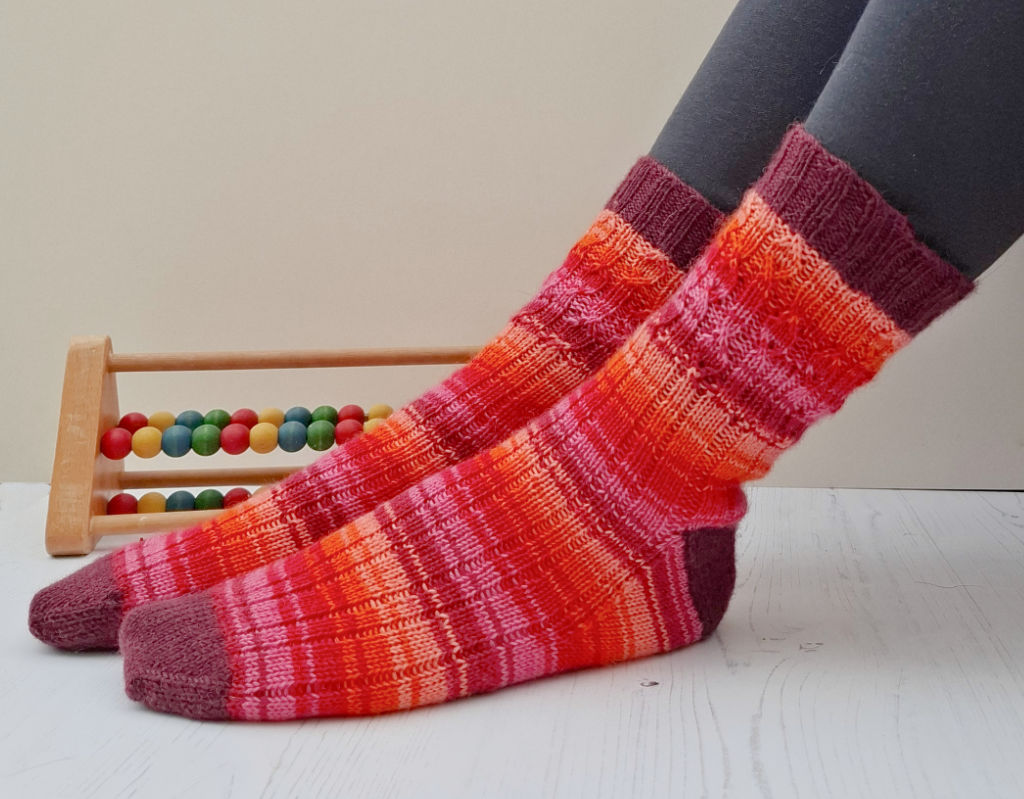
This pattern is one of the ones that I like best when I’m designing – easy enough for someone new to socks, yet it looks complicated to anyone who doesn’t understand the magic of the pointy sticks. I love making us look like sock knitting superstars! The “beads” are created with twisted stitches; two-stitch cables that don’t require a cable needle, and because the pattern section is at the top with the rest of the sock in a comfortable wide rib, you’ll sail through these socks in no time!
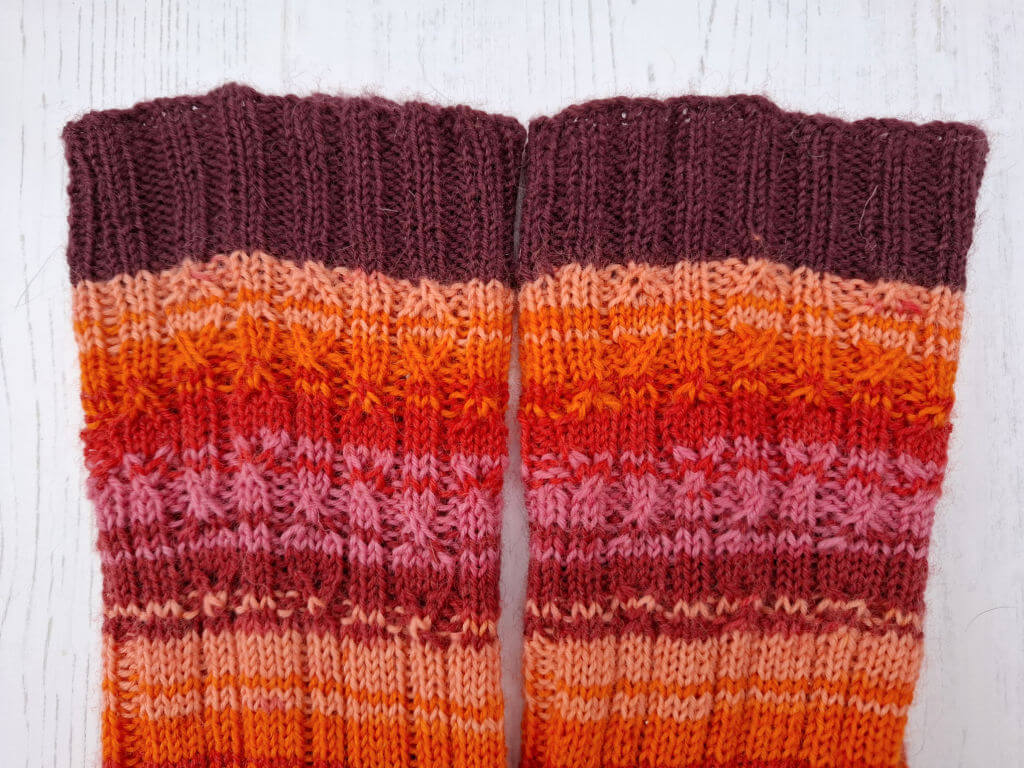
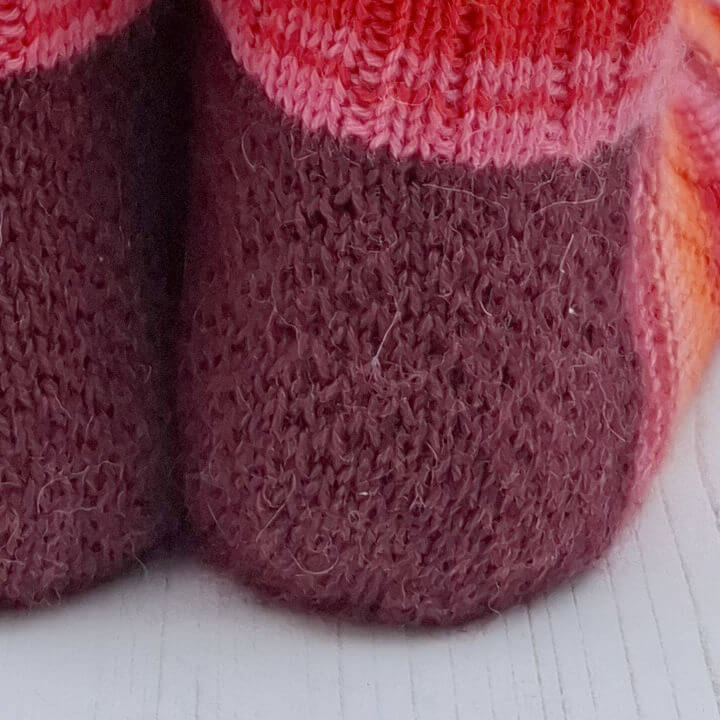
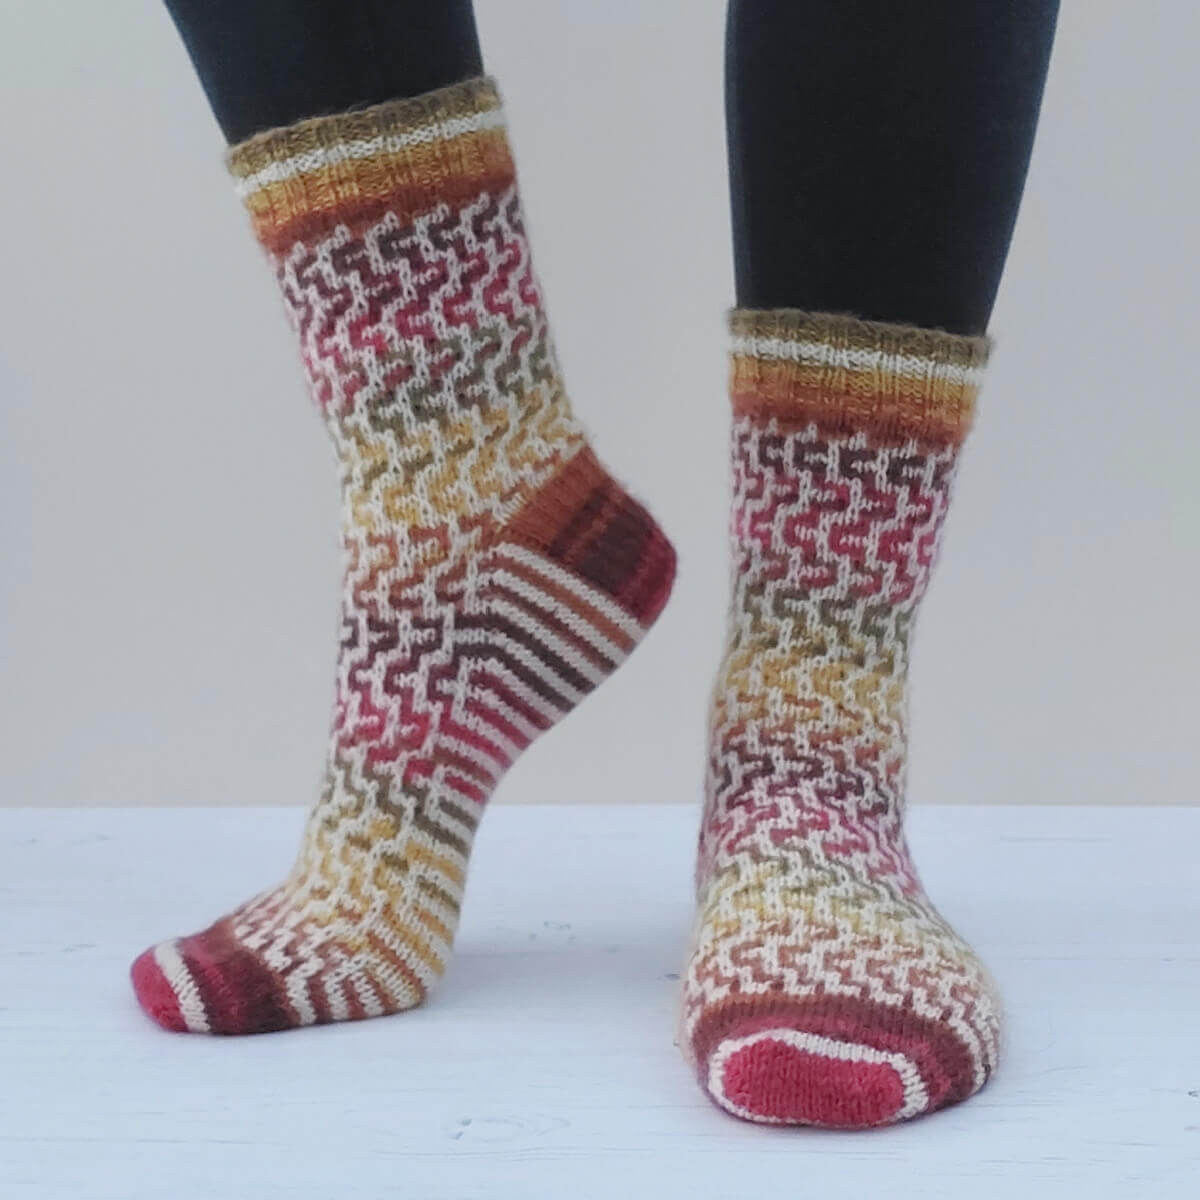
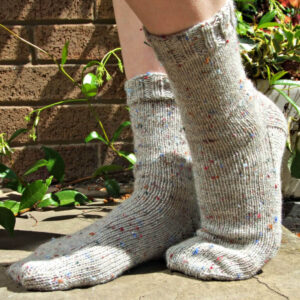
I’ve chosen to use a contrast yarn with my pair. The main colour is West Yorkshire Spinners Signature 4ply in Summer Sunset, one of the Winwick Mum colourways, and the contrast is West Yorkshire Spinners Signature 4ply in Mulberry. This was a new colour brought out last year to go with the Christmas colourway of Mulled Wine, but as soon as I saw it, I thought it would look wonderful with Summer Sunset! I showed the WYS Marketing Manager my in-progress socks and she said that the two colours together made her think of late summer when you get a last burst of sunshine, and I like that image very much.

The heel is a heel flap and gusset-type heel which you’ll be really familiar with if you’ve knitted any of my sock patterns before. On this sock, I’ve used the Eye of Partridge stitch to give some textured contrast, and it fits better with the wide rib than the more traditional heel stitch too.
I like this heel type, I think it fits well and I think it’s a good one for beginners too, although you might find that you need to write down the rows of the heel flap otherwise it’s easy to get the rows mixed up (ask me how I know that!). Other people might recommend other types of heel as being the easier as this one involves picking up stitches, but I think that going to all the effort of knitting a heel (especially for the first time) requires a heel that fits properly and I haven’t found one that I like to wear better than this one so far.
That brings me neatly to telling you that if you’re a beginner and you love these socks – go for it! The pattern is based on my Basic 4ply Socks pattern and you can get help with knitting it through the Winwick Mum Sockalong tutorials. All I’ve done is added in an extra pattern on the front and back of the sock, and as I’m all about creating fearless sock knitters, don’t let that put you off!
If you’ve knitted basic socks before and are looking for a next step pattern – this one is perfect (she says, modestly 😉 )! You’ll already be familiar with the sock anatomy and shape so you’re just moving the stitches about in a different way and I know that if you can already knit a pair of socks then you can do this. If you’re an experienced sock knitter, you’ll take to this pattern like a duck to water – take it from someone who knitted two pairs in quick succession because she couldn’t decide on the colours! 🤣
Are we ready to start? I’ve written out the pattern below for you and you’ll find the photo tutorial on the increases below. No over-thinking allowed, just follow the pattern and it will all make sense! If you’re brand new to charts, try following it whilst you read the written instructions so that you can see how it works, and perhaps have a quick look at my Easy Lace Socks tutorial as there’s information on chart reading for beginners there.
If you would like a PDF copy of the pattern to work from, you can download that HERE.
** 27.01.26 – This pattern has been amended to alter round 31 in both the written instructions and charts. If you have version 01 of the pattern, please check the Errata for the update. The current version of the PDF is Abacus Socks 02 **
Abacus Socks
Size
To fit foot circumference 8 [8½:9:9½] inches; 20 [22:23:24] cm
Yarn
1 x 100g West Yorkshire Spinners Signature 4ply in Summer Sunset (MC)
1 x 100g West Yorkshire Spinners Signature 4ply in Mulberry (CC)
Materials
2.5mm needles – short circular needle, DPNs (double pointed needles) or 80 cm circular for magic loop
1 set DPNs size 3.0mm (optional for a looser cuff)
1 set DPNs size 2.5mm (not required for magic loop)
Stitch holder (optional)
Stitch markers
Wool needle
Tension
30 sts to 4 ins (10 cm) in stocking stitch (worked in the round) on 2.5mm needles.
Always use the size of needles to get the correct tension. It is essential to work to the stated tension to ensure success.
Abbreviations
cm Centimetres
DPNs Double pointed needles
in(s) Inch(es)
K Knit
K2tog Knit two stitches together
LT Left Twist – Taking your right hand needle behind your work, insert your right hand needle into the back loop of the second stitch on your left hand needle, knit the stitch and leave it on the needle. Now knit into the first stitch on the left hand needle in the usual way and slide both stitches off the needle.
P Purl
P2tog Purl two stitches together
RT Right Twist – Keeping your needles at the front of your work, insert your right hand needle into the second stitch on the left hand needle knitwise and knit the stitch, but don’t take the stitch off the needle. Now knit into the first stitch on the left hand needle in the usual way and slide both stitches off your needle.
Sl1 Slip 1 stitch purlwise holding yarn to the back of your work
SSK Slip the first stitch on the left hand needle knitwise onto the right hand needle, slip the second stitch on the left hand needle purlwise onto the right hand needle, slip both stitches back onto the left hand needle and knit together through back loop
St(s) Stitch(es)
( ) Repeat instructions inside brackets for a short repeat
[ ] Repeat instructions within brackets for a longer/more complex repeat
Pattern Notes:
- These socks are knitted on 2.5mm needles, not 3.25mm as stated on the ball band. This will produce a different tension but will ensure a firmer, more hard-wearing fabric for your socks. The ideal tension for these socks is 30 stitches to 10 cm (4 inches) so use whatever size needles are required to reach that tension and do check that your knitted fabric is firm but not stiff.
- When working from a chart you will read all rounds from right to left.
- If you’re brand new to socks, you can use the Winwick Mum Sockalong tutorials to help with the basics.
Pattern
Cuff
Using Mulberry (CC), cast on 60 [64:68:72] sts using 3.0mm double pointed needles. The pattern has been written for a cast on with straight needles; if you wish to join into the round straight away, work row 1 twice and omit row 2.
60 sts
Row 1: K1, P1, (K2, P2) 6 times, (K2, P1) twice, (K2, P2) 6 times, K2, P1, K1, turn.
Row 2: Work all knit and purl stitches as they present themselves, turn.
64 sts
Row 1: K1, (P2, K2) 15 times, P2, K1, turn.
Row 2: Work all knit and purl stitches as they present themselves, turn.
68 sts
Row 1: P1, K1, (P2, K2) 7 times, P1, K2, P2, K1, (P2, K2) 7 times, P2, K1, P1, turn.
Row 2: Work all knit and purl stitches as they present themselves, turn.
72 sts
Row 1: P1, (K2, P2) 17 times, K2, P1, turn.
Row 2: Work all knit and purl stitches as they present themselves, turn.
Change to a 2.5mm short circular needle, magic loop or divide the stitches across DPNs and join into a circle, place marker. You will sew up the small gap where you knitted the first two rows later.
Continue in rib as set for row 1 for 14 more rounds.
Leg
Break CC yarn and join in Summer Sunset (MC) yarn. Knit one round. (This prevents contrast colour blips.)
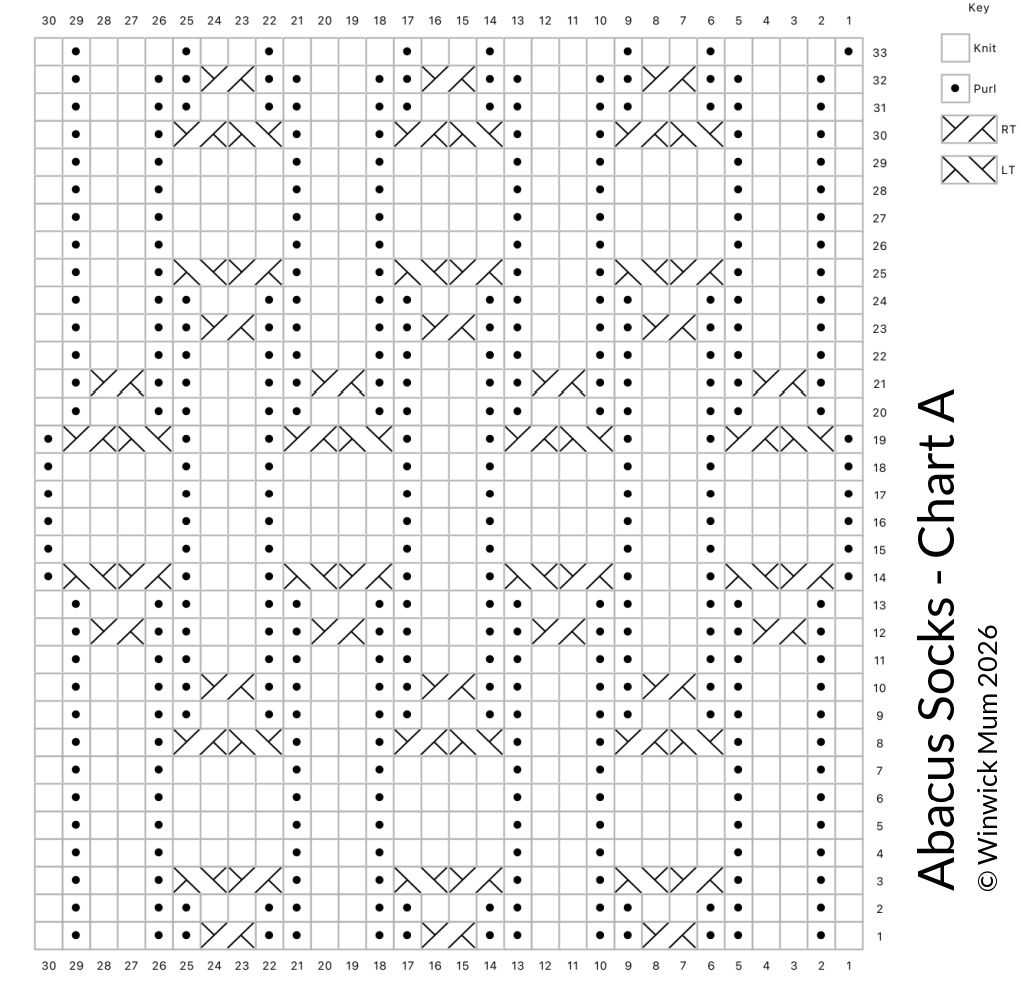
Using the instructions for your size, continue to work the leg as follows from round 1, inserting the pattern panel where instructed. You can find the written and charted instructions for the pattern panel below the size instructions.
60sts
Round 1: Work 30sts of pattern panel A then 30sts of pattern panel B starting at Round 1.
Rounds 2-33: Work 30sts of pattern panel A then 30 sts of pattern panel B from Round 2 onwards.
Repeat round 33 until leg measures desired length from cast on edge.
64 sts
Round 1: K1, work 30sts of pattern panel A starting at Round 1, K2, work 30sts of pattern panel B starting at Round 1, K1.
Rounds 2-33: K1, work 30sts of pattern panel A from Round 2 onwards, K2, work 30sts of pattern panel B from round 2 onwards, K1.
Repeat round 33 until leg measures desired length from cast on edge.
68 sts
Round 1: K2, work 30sts of pattern panel A starting at Round 1, K4, work 30sts of pattern panel B starting at Round 1, K2.
Rounds 2-33: K2, work 30sts of pattern panel A from Round 2 onwards, K4, work 30sts of pattern panel B from round 2 onwards, K2.
Repeat round 33 until leg measures desired length from cast on edge.
72 sts
Round 1: K3, work 30sts of pattern panel A starting at Round 1, K6, work 30sts of pattern panel B starting at Round 1, K3.
Rounds 2-33: K3, work 30sts of pattern panel A from Round 2 onwards, K6, work 30sts of pattern panel B from round 2 onwards, K3.
Repeat round 33 until leg measures desired length from cast on edge.
Written instructions
Pattern panel A
Round 1: K1, P1, (K2, P2, RT, P2) 3 times, K2, P1, K1. (30 sts)
Round 2: K1, P1, (K2, P2) 6 times, K2, P1, K1.
Round 3: K1, (P1, K2, P1, RT, LT) 3 times, P1, K2, P1, K1.
Rounds 4-7: K1, (P1, K2, P1, K4) 3 times, P1, K2, P1, K1.
Round 8: K1, (P1, K2, P1, LT, RT) 3 times, P1, K2, P1, K1.
Round 9: Repeat round 2.
Round 10: Repeat Round 1.
Round 11: Repeat round 2.
Round 12: K1, P1, (RT, P2, K2, P2) 3 times, RT, P1, K1.
Round 13: Repeat round 2.
Round 14: (P1, RT, LT, P1, K2) 3 times, P1, RT, LT, P1.
Rounds 15-18: (P1, K4, P1, K2) 3 times, P1, K4, P1.
Round 19: (P1, LT, RT, P1, K2) 3 times, P1, LT, RT, P1.
Round 20: Repeat round 2.
Round 21: Repeat round 12.
Round 22: Repeat round 2.
Round 23: Repeat round 1.
Round 24: Repeat round 2.
Round 25: Repeat round 3.
Rounds 26-29: K1, (P1, K2, P1, K4) 3 times, P1, K2, P1, K1.
Round 30: Repeat round 8.
Round 31: Repeat round 2.
Round 32: Repeat round 1.
Round 33: (P1, K4, P1, K2) 3 times, P1, K4, P1.
Repeat round 33 until desired length of leg.
Pattern panel B
Round 1: K1, P1, (K2, P2, LT, P2) 3 times, K2, P1, K1. (30 sts)
Round 2: K1, P1, (K2, P2) 6 times, K2, P1, K1.
Round 3: K1, (P1, K2, P1, RT, LT) 3 times, P1, K2, P1, K1.
Rounds 4-7: K1, (P1, K2, P1, K4) 3 times, P1, K2, P1, K1.
Round 8: K1, (P1, K2, P1, LT, RT) 3 times, P1, K2, P1, K1.
Round 9: Repeat round 2.
Round 10: Repeat round 1.
Round 11: Repeat round 2.
Round 12: K1, P1, (LT, P2, K2, P2) 3 times, LT, P1, K1.
Round 13: Repeat round 2.
Round 14: (P1, RT, LT, P1, K2) 3 times, P1, RT, LT, P1.
Rounds 15-18: (P1, K4, P1, K2) 3 times, P1, K4, P1.
Round 19: (P1, LT, RT, P1, K2) 3 times, P1, LT, RT, P1.
Round 20: Repeat round 2.
Round 21: Repeat round 12.
Round 22: Repeat round 2.
Round 23: Repeat round 1.
Round 24: Repeat round 2.
Round 25: Repeat round 3.
Rounds 26-29: K1, (P1, K2, P1, K4) 3 times, P1, K2, P1, K1.
Round 30: Repeat round 8.
Round 31: Repeat round 2.
Round 32: Repeat round 1.
Round 33: (P1, K4, P1, K2) 3 times, P1, K4, P1.
Repeat Round 33 until desired length of leg.
Charts
Starting at Round 1, work each round of the chart as per instructions for your size, then repeat Round 33 until desired length of leg.
Round 1: K0 (1:2:3), work 30sts of pattern panel A starting at Round 1, K0 (2:4:6), work 30sts of pattern panel B starting at Round 1, K0 (1:2:3). 60 [64:68:72] sts
Rounds 2-33: K0 (1:2:3), work 30sts of pattern panel A from Round 2 onwards, K0 (2:4:6), work 30sts of pattern panel B from round 2 onwards, K0 (1:2:3).
Repeat round 33 until leg measures desired length from cast on edge.
Heel Flap
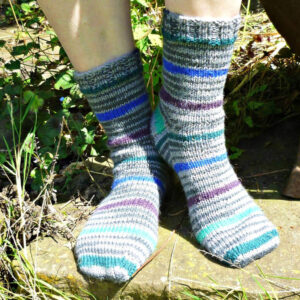
The pattern twists go in two different directions for the front and back of these socks. You can choose to knit the heel flaps in the same place so that the twists go in the same direction on both socks, but if you would prefer to have them going in opposite directions (as on my socks in the above photo), work the next round as follows for the left sock only, before following the heel flap instructions.
Next round: Work 30 (32:34:36) sts of round 33 of foot instructions before starting heel flap.
Drop MC and join CC.
Change to 2.5mm DPNs if you are using a short circular needle. There is no need to use DPNs if you are using magic loop. You may prefer to place the spare stitches from the top of the foot onto a stitch holder if you are using a short circular or DPNs whilst you work the heel.
Row 1: K2, (Sl1, K1) until you have 30 [32:34:36] sts on your needle, turn.
Row 2: Sl1, P to end, turn.
Row 3: Sl1, (Sl1, K1) to last st, K1, turn.
Row 4: Sl1, P to end, turn.
Row 5: (Sl1, K1) to end, turn.
Repeat rows 2 to 5 until heel flap measures 2 [2:2½:3] ins; 5 [5:6.5:7.5] cm or desired length, finishing on row 3 or 5.
Turn heel
Row 1: Sl1, P16 [17:18:19], P2tog, P1, turn.
Row 2: Sl1, K5, SSK, K1, turn.
Row 3: Sl1, P6, P2tog, P1, turn.
Row 4: Sl1, K7, SSK, K1, turn.
Continue in this way, adding one stitch between slip stitch and SSK or P2tog on each row (ie, Row 5: Sl1, P8, P2tog, P1, turn; Row 6: Sl1, K9, SSK, K1, turn; etc) until all of the heel sts are used. Depending on how many stitches are in your heel flap, you may find that the K1 and P1 stitch is not required at the end of the last two rows.
READ THIS SECTION BEFORE CONTINUING AS YOU’VE GOT CHOICES!
Picking up for the gusset with a contrast colour heel flap
Usually, when you’re knitting a sock in a single colour, your yarn is at the left hand side of the heel flap ready to pick up the gusset stitches. Your MC yarn which you need for this next section is where you left it at the start of the heel flap, so you now have three choices:
A Work the gusset decrease stitches from where you left the MC yarn – this will mean that you work the gusset the other way around from the Basic 4ply Socks pattern and your round will start with SSK;
Or
B Pick up the gusset stitches from where you left the MC yarn but work an extra round of the gusset so that you can start your round at K2tog in the usual place. If you are comfortable knitting your socks that way round, you’re not going to be doing anything different;
Or
C Cut the MC yarn where you left it and rejoin it on the left hand side of heel flap ready to pick up the stitches just as you would for the Basic 4ply Socks pattern.
Choose your preferred method and follow the instructions below.
Note: If you are using DPNs and/or have placed your stitches on a stitch holder, you can arrange the needles as follows: Needle 1 for stitches across heel, Needle 2 for picked-up stitches down side of foot, Needle 3 for stitches across top of foot (knit stitches off stitch holder if required), Needle 4 for picked-up stitches on other side of foot. You may find that stitch markers are not required at first.
Option A:
Pick up and knit 1 st for every 2 rows of heel flap knitted. Remember that if you made the heel flap bigger, you will need to pick up more stitches. Knit across heel sts to bring you to the left hand side of the heel flap ready to pick up 1 st for every 2 rows of heel flap knitted, place marker, then knit across the top of the foot stitches in pattern. Place marker to indicate new beginning of round, then work gusset as given below for starting the round at SSK decrease.
Option B:
Pick up and knit 1 st for every 2 rows of heel flap knitted. Remember that if you made the heel flap bigger, you will need to pick up more stitches. Knit across heel sts to bring you to the left hand side of the heel flap ready to pick up 1 st for every 2 rows of heel flap knitted, then place marker to indicate new beginning of round.
Next round: Slip marker, work across top of foot stitches in pattern as set, place marker, knit to 3 sts before marker.
Work gusset as given below for starting the round at K2tog decrease.
Option C:
Break MC yarn and rejoin to left hand side of heel flap (with the outside of the heel flap facing you) ready to pick up and knit 1 st for every 2 rows of heel flap knitted. Remember that if you made the heel flap bigger, you will need to pick up more stitches. Once you have picked up the stitches, place marker to indicate new beginning of round. Knit across the top of the foot in pattern as set, place marker, then pick up 1 st for every 2 rows knitted up the other side of the heel. Knit across the top of the heel then work gusset as given below for starting the round at K2tog decrease.
Shape gusset
To start your round at the SSK decrease, shape gusset as follows.
Round 1: K1, SSK, K to 3 sts before the next marker, K2tog, K1, slip marker, knit in pattern to next marker.
Round 2: Slip marker, K1, K to next marker, slip marker, knit in pattern to next marker.
Round 3: K1, SSK, K to 3 sts before next marker, K2tog, K1, slip marker, knit in pattern to next marker.
To start your round at the K2tog decrease, shape gusset as follows.
Round 1: K to 3 sts before the marker, K2tog, K1, slip marker, work to next marker in pattern as set, slip marker, K1, SSK, K to marker.
Round 2: Slip marker, work to next marker in pattern as set, slip marker, knit to 3 sts before marker.
Round 3: K2tog, K1, slip marker, work to next marker in pattern as set, slip marker, K1, SSK, K to marker.
For all versions
Repeat rounds 2 and 3 to shape the gusset. Continue in this way, decreasing by two stitches at the gusset on every other round until there are 60 [64:68:72] stitches on the needle.
It’s up to you at this point which side of your sock you choose to keep as the start of your round – you’ll have two stitch markers so you can remove the marker at the SSK or K2tog decrease as you prefer but keep the other one in to indicate the start of your round. The toe decreases will work as written whichever side you have the start of your round.
Once you have reached the required number of stitches, continue to knit each round in pattern as set until you reach 2 ins; 5 cm before the desired length ready to start the toes. Don’t be afraid to try your sock on before decreasing for the toes!
Toes
Note: At some point whilst decreasing for the toes, if you are using a short circular needle you may need to change back to DPNs or use the magic loop method as the number of stitches becomes too small for the circular. It’s up to you when you choose to do that, and how you distribute the stitches across the needles; just keep following the pattern as set below.
Break MC and rejoin CC. Create the toes as follows:
Round 1: K1, SSK, K24 [26:28:30] sts, K2tog, K1, place marker (if required), K1, SSK, K24 [26:28:30] sts, K2tog, K1. 56 [60:64:68] sts.
Round 2: Knit one round, slipping markers as you come to them.
Round 3: K1, SSK, K to 3 sts before marker, K2tog, K1, slip marker, K1, SSK, K to 3 sts before marker, K2tog, K1. 52 [56:60:64] sts.
Repeat rounds 2 and 3 until you have 28 [28:32:32] sts left and divide these between two needles so that front and back of socks match.
Graft toes using Kitchener stitch, weave in all ends and sew up the small gap at the cuff where you cast on.
If you can use Ravelry and you’d like to, you can link your socks to the project page so that others can admire them, and if you would like to share them other social media platforms you can use the hashtags #WinwickMumSocks and #WinterHavenKAL.
I’m really looking forward to seeing how your Abacus Socks turn out!
This pattern is free on this blog and will always remain so. If you’ve enjoyed using it and would like to support my work so I can keep blogging and designing, you can browse my shop for patterns and books or buy me a brew – both are very much appreciated. Thank you! xx


This pattern copyright © 2026 Winwick Mum. All rights reserved.
Not to be included in any collection or used for profit without written consent of Winwick Mum.
This pattern is based on my Basic 4ply Socks pattern, which means that you can find photo and video help in the Winwick Mum Sockalong tutorials. You can find out more here:
If you can already knit socks but would like to stay in touch, click the link below to join the Winwick Mum mailing list to hear about the latest blog posts, pattern updates, tutorials and more … but no spam, I promise!


Hi Christine
I tried to download the pdf and at the checkout I bought you a coffee – however whilst the coffee purchase went through I didn’t get the download and several attempts later I still can’t get it. Is it me or have we dropped a stitch somewhere?
This design looks fab Christine, thanks for sharing it with us and I can’t wait to cast on!
Lovely design; thank you Christine. I tried to download this from Ravelry, but your abacus socks aren’t there (yet?) The link on your blog threw me out!
That looks like a greaat pattern – thank you. Enjoy your coffee. xx
I cannot download the pattern either. I keep getting thrown out of the shopping cart.
Thank you for the Abacus sock pattern Christine, looks fabulous and loving the colours and Mulberry is of course my colour, I have not done much knitting for a while, bad case of Trigeminal Neuralgia for 4 months on top of torn cartilage in both knees! As you can imagine it hasn’t been a lot of fun, and a lot of resting and sleeping has been involved, knees still bad and waiting on results of an MRI scan, which should be some time later this month, January…..or maybe next…??? Who knows with the NHS these days! But cannot knock them, I’m sure they are doing their best under very trying circumstances.
Love reading your blogs, we have recently had our loft boarded out and a new more easily accessible loft hatch with a wooden fold down ladder…..but just haven’t been able to make use of it yet, we even had a light put up there so we can see what we …will be doing, when we get up there! Ha ha! Keep warm and cosy xx
Hi Christine
I tried to download the pdf and the page tells me I’ve timed out before I can even fill in all the info requested and then it tells me I cannot get the pattern? Help! It looks fab and I would love to knit them,
Just wanted to add that I too tried to fill in the form and it threw me out and then won’t let me try again -says I must uses Payhip or Ravelry and I can’t find Abacus on either.
I am sure it’s just an unfortunate blip
It’s a super pattern and just what I didn’t know I was looking for with my ball of WYS ready for the knitting
Hi Christine, for some reason, when trying to add the Abacus Sock Pattern to the cart, it keeps getting removed with the message that it’s no longer available for sale. I do wish to knit the socks, so is there any way I cam able to receive the pattern, please?
Such a beautiful pattern, enjoy your brew!
Ah now I can’t decide! I intended to knit the easy lace socks but I do love this pattern. Decisions!